ION430 - Air purifier Ionmax - Free user manual and instructions
Find the device manual for free ION430 Ionmax in PDF.

User questions about ION430 Ionmax
0 question about this device. Answer the ones you know or ask your own.
Ask a new question about this device
Download the instructions for your Air purifier in PDF format for free! Find your manual ION430 - Ionmax and take your electronic device back in hand. On this page are published all the documents necessary for the use of your device. ION430 by Ionmax.
USER MANUAL ION430 Ionmax
natural_image
White industrial air purifier with digital display and 'lonmbox' branding (no visible text or symbols on device body)USER MANUAL
Version 1.2 Updated March 2021
DEAR CUSTOMER
Thank you for purchasing the Ionmax ION430 UV HEPA Air Purifier. The Ionmax
ION430 can help to improve the indoor quality in your home or office.
Please read this manual carefully before use to ensure proper usage and save
these instructions for future reference.
The package includes:
• ION430 air purifier
- User manual
Note: Remove plastic bags from filters before first use
CONTENTS
SAFETY INSTRUCTIONS 3
PRODUCT DIAGRAM 4
SPECIFICATIONS
FILTER REPLACEMENT 9
TROUBLESHOOTING GUIDE
WARRANTY DETAILS
WARRANTY REGISTRATION
SAFETY INSTRUCTIONS

PLEASE READ ALL THE TIPS AND WARNINGS BELOW BEFORE USING THE AIR PURIFIER.
- Use only as directed in the User Manual.
- Do not allow children or persons with reduced physical, sensory, or mental capabilities to operate the unit without adult supervision.
- Only designed for use in a 220-240V, 50Hz outlet.
- Use indoors only.
- Only operate the unit when it is fully assembled.
- Never touch the unit with wet hands or allow it to come into contact with water.
- Turn off all controls before unplugging the power supply.
- Always disconnect the unit from the power supply before moving or cleaning the unit, and when the unit is not in use.
- When removing the power plug, always hold the plug and never pull the cord.
- This air purifier is not a substitute for proper ventilation, regular vacuum cleaning or an extractor hood or fan while cooking.
- Leave at least 20cm of space behind and on both sides of the unit and leave at least 30cm space above the unit.
- When the unit is in operation, please place it at least 2m away from equipment that emits electric waves such as televisions, radios and clocks, to prevent electrical interference from occurring.
- Do not use the unit in bathrooms, kitchens, humid areas, near fireplaces, or place it in proximity to flammable or combustible products, as electric shock and a fire hazard may result.
- Do not clean the unit with water or any other liquid including flammable products.
- Never operate the unit if the plug or cord appears damaged. Contact the authorised distributor or qualified personnel immediately for examination and repair.
- Do not insert fingers or foreign objects into the air intake or air outlet, or block them by placing items on the air outlet or in front of the air intake.
- Do not place anything on top of the unit and do not sit on the unit.
- Do not place the unit directly below an air conditioner as condensation may drip into the unit.
- Do not operate this unit when using indoor insect repellents (aerosols) or in places with oily residues, burning incense or chemical fumes.
- Do not use the unit in a room with major temperature changes, as this may cause condensation inside the unit.
PRODUCT DIAGRAM
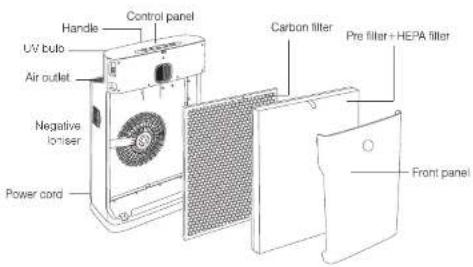
text_image
Handle Control panel UV bulb Air outlet Negative lonser Power cord Carbon filter Pre filter+HEPA filter Front panelSPECIFICATIONS
| Model Ionmax ION430 | |
| Voltage 220-240V, 50Hz | |
| Power Rating 90W | |
| Coverage Area Up to 40sqm | |
| Noise Level 60dBA (max) | |
| CADR 340m3/h | |
| Negative ions Output 5 million Voc | |
| Filter Life 2.000 hours | |
| Weight 7.0 KG | |
| Dimensions 380 (W) x 210 (D) x 590 (H) mm | |
PURIFICATION SYSTEM

flowchart
graph LR
    A["Polluted Air"] --> B["Particle Dispersion"]
    B --> C["Particle Distribution"]
    C --> D["Clean Air"]
1. Cleanable Pre-Filter
Traps large particles such as human hair, pet dander and dust particles.
Helps to extend the life of the HEPA and Activated Carbon filters.
2. True HEPA Filter
Traps up to 99.97% of allergens and airborne contaminants down to 0.3 microns in size. These allergens include lung damaging dust, mould spores, plant spores, pet dander and pollen.
3. Activated Carbon Filter
Neutralises odours and Volatile Organic Compounds (VOC's) such as formaldehyde and benzene, as well as other harmful fumes emitted by household products.
4. UV-C Light (254nm)
Inactivates microbes such as germs, viruses, fungi and bacteria.
5. Negative Ions
Improve indoor air quality by combining with dust or reacting with odour molecules and removing them from the air we breathe.
AIR QUALITY INDICATOR
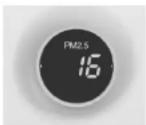
Fine Particulate Matter (PM _20 )

Relative Air Humidity in % Temperature in °C
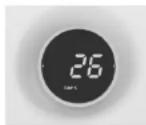
The digital display on the front of the air purifier indicates the current air quality by measuring the level of fine particulate matter ( PM_25 ), indoor relative humidity, and indoor temperature.
Fine Particulate Matter (PM _2.5 )
PM1.5 refers to atmospheric particulate matter (PM) that have a diameter of less than 2.5 micrometers, which is about 3% the diameter of a human hair. These particulate matter can come from various sources indoors, from chemicals in cleaning supplies, building products, furniture and carpeting, to mould, bacteria, dust mites and even from cooking. Studies have shown that inhaling too much fine particulate matter can cause health issues and trigger or worsen chronic disease such as asthma, heart attack, bronchitis and other respiratory problems.
Due to the many adverse effects fine particles can inflict on a large number of people, PM25 is one of the major pollutants closely monitored by health authorities around the world. The table below provides a rough indication of what levels of PM_25 are harmful:
| μg/m3 | Indoor air quality |
| <75 Good | |
| 76-150 Average | |
| >151 Bad |
Indoor Relative Humidity
Indoor humidity levels also provide a good indication of healthy indoor air quality. In general, a relative humidity level of 45 to 60% is optimum indoors. A humidity level of 50% is recommended to inhibit dust mites, mould, and bacteria growth. In colder climates, a lower humidity level of 30 to 40% may be preferred to prevent condensation on windows and other surfaces.
CONTROL PANEL
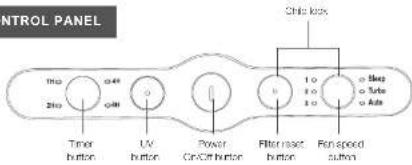
text_image
INTROL PANEL Timer button UV button Power CNCButton Button Filter reset button Fan speed button Chip lock 10 10 10 10 10 10 10 10 10 10 10 10 10 10 10 10 10 10 10 10 10 10 10 10 10 10 10 10 10 10 10 10 10 10TIMER BUTTON
The air purifier can be timed to operate for intervals of 1, 2, 4, or 8 hours, stopping automatically when the selected operating time has elapsed.
Press this button repeatedly until the desired timer setting is selected (the LED will light up).
To select the continuous operating mode, press the button repeatedly until all the timer lights are off.
UV BUTTON
Press this button to turn the UV-C light function on or off.
POWER BUTTON
Press this button to turn the air purifier on or off.
Note: The negative ion generator turns on and off with the unit and cannot be controlled separately.
FILTER RESET BUTTON
This light flashes after 2,000 hours of use to indicate that the filters need replacement. Press this button to reset this after the filters have been replaced.
FAN SPEED BUTTON
The air purifier has three fan speeds and three modes (sleep, turbo, auto). Press this button repeatedly until the desired fan speed setting is selected (the LED will light up).
CHILD LOCK FUNCTION
Press and hold the Filter Reset and Fan Speed buttons for 3 seconds to turn on the Child Lock function.
The power button light will flash (0.5 seconds on and 0.5 seconds off) to indicate that Child Lock function is activated. When Child Lock is activated, pressing the control panel buttons will not have any effect.
To deactivate the Child Lock function, press and hold the Filter Reset and Fan Speed buttons for 3 seconds. All control panel buttons will return to normal function.
OPERATING INSTRUCTIONS
Note: Remove plastic bags from filters before first use.
- Plug the appliance into a suitable electrical outlet.
- Press the power button to turn the appliance on.
- Change the timer, fan speed or UV settings if desired (refer to Control Panel description).
- Press the power button to turn the appliance off.
When the unit is not in use, switch it off and unplug it from the electrical outlet.
CLEANING AND MAINTENANCE
CLEANING THE UNIT
• Always unplug the power supply before cleaning the unit.
- Do not put the unit into water or use water to wash it directly.
- Do not use alcohol, oil, benzene, or any corrosive or flammable detergent to clean the unit.
- Use a soft cloth with mild detergent to clean the unit, and make sure the unit is completely dry after cleaning.
- Regularly clean the inside and outer surface to prevent dust from gathering
- To maintain or replace filters, see Filter Replacement instructions.
STORAGE INSTRUCTIONS
If the unit will not be in use for a long time, please pack and store it properly away from moisture and direct sunlight:
- Unplug the power supply of the unit.
- Clean the pre-filter
- Use a soft cloth to clean the air intake and air outlet.
CAUTION
Proper use and regular maintenance can ensure efficient operation and extend the life of the unit. Do not attempt to repair or adjust any electrical or mechanical functions on this unit. All servicing should be performed by qualified personnel only.
FILTER REPLACEMENT
FILTER REPLACEMENT INDICATOR
After 2,000 hours of use, the "Filter Reset" button light will flash during operation. This indicates that the filters in the air purifier need to be replaced.
Replace the fillers according to the instructions below. Then, press the Filter Reset button to reset the built-in filter replacement timer.
FILTER REPLACEMENT INSTRUCTIONS
The ION430 comes with the filters fitted inside, but you will need to remove the plastic packaging from the filters before using the air purifier for the first time.
When replacing with new filters, remove all packaging and place filters into the unit as described below.
Tip: Place the appliance against a wall for more stability when you remove or insert filters.
Note: Make sure you insert the filters in the correct order and position.

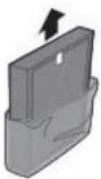
Step 1.
Hold the top of the front panel and pull it forward to remove it from the air purifier.
Step 2.
Remove all packaging materials from the Pre+HEPA filter and the Carbon filter.
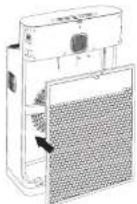
Step 3.
Place the Carbon filter into the air purifier with the tag pointing out towards you.

Step 4.
Place the pre+HEPA filter into the air purifier with the tag pointing out towards you.
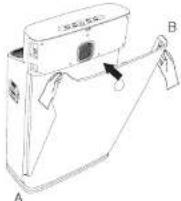
Step 5.
Reattach the front panel by mounting the panel onto the bottom of the air purifier first (A). Then, gently push the top of the panel against the body of the air purifier (B) to secure it into place.
PRE-FILTER MAINTENANCE
- Clean the pre-filter regularly to maintain air purifier performance.
- The pre-filter can be gently vacuumed using hand tool attachments (no
rotating brushes). - Do not use any solutions, brushes or sharp objects to clean the pre-filter, as
this can damage the filter.
HEPA / ACTIVATED CARBON FILTER MAINTENANCE
• The HEPA / Activated Carbon filter is not washable.
- A vacuum cleaner may be used to gently clean the HEPA filter periodically.
- Replace with new filters when the filter replacement light comes on.
TROUBLESHOOTING GUIDE
| Problem Probable Cause Solution | ||
| Unit not operating | Power cable not plugged in Plug in power cable | |
| Power cable not plugged in properly | Plug in power cable correctly | |
| Front cover not attached properly | Reattach the front cover | |
| Loud noise | Filters not unpacked Unpack the filter packaging (see Filter Replacement Instructions) | |
| Too much dust on pre-filter Clean the pre-filter | ||
| HEPA and Activated Carbon filters dirty | Replace HEPA and Activated Carbon filters | |
| Abnormal noise | Loose parts inside the unit Contact customer service centre | |
| Motor broken | ||
| Indicator lights not switched on | Product circuit control failure Contact customer service centre | |
| UV-C indicator light is off | UV-C is switched off Press the UV-C button | |
| UV-C light broken or needs replacement | Contact customer service centre | |
| Reduced airflow | Filters are dirty Replace filters | |
| Filters not unpacked Unpack filters | ||

andatech
WARRANTY DETAILS
Congratulations on your purchase! It is our aim to provide you with quality products that you can trust. Our goods come with guarantees that cannot be excluded under the Australian Consumer Law. You are entitled to a replacement or refund for a major failure and compensation for any other reasonably foreseeable loss or damage.
You are also entitled to have the goods repaired or replaced if the goods fail to be of acceptable quality and the failure does not amount to a major failure.
The Guarantee
The product is guaranteed to be free from defects in workmanship and parts for a period of 24 months from date of purchase. Defects that occur within this warranty period, under normal use and care, will be repaired, replaced or refunded at our discretion, solely at our option with no charge for parts and labour. The benefits conferred by this warranty are in addition to all rights and remedies in respect of the product that the consumer has under the Trade Practices Act and similar state laws.
Proof of Purchase
This warranty is valid for the original purchase and is not transferable. Please keep your purchase docket or receipt as proof of purchase and es proof of date on which the purchase was made. The purchase docket (or a copy) or receipt must be presented with the warranty when making a claim under this warranty.
Service during the Warranty Period
To claim for warranty, contact us on 1300 800 200 or support@encatech.com.au to get an RA# (Return Authorization Number) or submit a support ticket on my andatech.com.au. Ensure that the RA# is clearly stated on the outside of the packaging and that the product is properly packaged so that no damage occurs to the product during transit. Shipping of the product back to us for warranty will be at your cost. A product return without the RA# will not be accepted.
Extent of Warranty
This warranty is limited to defects in workmanship or parts. All defective products or parts will be repaired or replaced. This warranty does not cover manuals and packaging.
Normal Wear and Tear
This warranty does not cover normal wear and tear to the product or parts.
Exclusions
This warranty does not cover:
- Any defect caused by an accident, misuse, abuse, improper operation, lack of reasonable care, unauthorised modification, loss of parts, tampering or attempted repair by a person not authorised by the distributor.
- Any product that has been damaged by a lightning strike either directly or indirectly or a main power surge or liquid ingress.
- The product if it is located outside of Australia.
- Any damage caused by improper power input or improper cable connection.
Andatech Pty. Ltd.
PO Box 3039, Nunawading VIC 3131, Australia
Phone: 1300 800 200 Fax: 1300 883 802 Email: support@andatech.com.au

WARRANTY REGISTRATION
Register your lonmax ION430 online at my.andatech.com.au or fill out this form and forward to the address below with a copy of your proof of purchase. Contact us on 1300 800 200 or visit andatechdistribution.com.au for options to extend your warranty.
Andatech Pty Ltd
PO Box 3038, Nunawading VIC 3131, Australia.
| Product : Ionmax ION430 |
| Date of Purchase : |
| Place of Purchase : |
| Serial No. : |
| Surname : |
| Given Name : |
| Address : |
| Suburb : |
| Postcode : |
| State : |
| Contact No. : |
| Email : |

andatech
distribution
ionmax
ENERGISED FOR LIFE

andatech
distribution
andatechdistribution.com.au
1300 800 200