
A1561.07BFFKOSW - Lighting JUNG - Free user manual and instructions
Find the device manual for free A1561.07BFFKOSW JUNG in PDF.


| Product Type | Radio-control pushbutton with pilot lamp |
| Brand | JUNG |
| Model | A1561.07BFFKOSW |
| Application | Remote and manual control of lighting (on/off, dimming) |
| Compatible Inserts | Universal touch dimmer 1254 UDE, Standard touch dimmer 1225 SDE, Relay insert single-channel 1201 URE, Relay insert two-channel 1202 URE, Tronic switching insert 1254 TSE, LV triac switching insert 1244 NVSE, Touch control unit 1240 STE, Relay insert with potential-free contact 1201-1 URE |
| Power Supply | From flush-mounting insert (e.g., 230 V AC) |
| Receive Frequency | 433.42 MHz, ASK modulation |
| Number of Radio Channels | 30 |
| Temperature Range | 0 °C to +55 °C |
| Dimensions (approx.) | 81 x 81 x 30 mm (with frame) |
| Weight (approx.) | 50 g |
| Memory Function | Stores last brightness level; recall on power on |
| Lightscape Support | Up to 5 lightscapes, each storing brightness for a group of lights |
| All-ON / All-OFF | Simultaneous switching of all connected loads via transmitter |
| Control Range | Up to 5 m during programming, depends on building materials |
| Mounting | Flush-mounted, plugs onto insert with frame |
| Protection Class | IP20 (indoor use) |
| Maintenance | Clean with dry cloth; avoid solvents and water |
| Safety Notes | Installation only by skilled electrician; keep 0.5 m from electronic appliances, 1 m from transmitters to avoid saturation |
| Spare Parts / Repairability | Not user-serviceable; return to service center for repairs |
| Certifications | CE (R&TTE Directive 1999/5/EC) |
Frequently Asked Questions - A1561.07BFFKOSW JUNG
User questions about A1561.07BFFKOSW JUNG
0 question about this device. Answer the ones you know or ask your own.
Ask a new question about this device
Download the instructions for your Lighting in PDF format for free! Find your manual A1561.07BFFKOSW - JUNG and take your electronic device back in hand. On this page are published all the documents necessary for the use of your device. A1561.07BFFKOSW by JUNG.
USER MANUAL A1561.07BFFKOSW JUNG
Operating Instructions Radio-control pushbutton and pilot lamp
natural_image
Simple horizontal orange line on white background (no text or symbols)1. Function
The radio-contol pushbutton permits radio-controlled or manual switching and dimming of lamps. The starting brightness can be stored in the device as memory brightness. The pushbutton with radio-control receiver is plugged onto one of the following inserts:
■ Universal touch dimmer 1254 UDE
- Standard touch dimmer 1225 SDE
■ Relay insert single-channel 1201 URE
- Relay insert two-channel 1202 URE
- Tronic switching insert 1254 TSE
■ LV triac switching insert 1244 NVSE
- Touch control unit 1240 STE
Relay insert with potential-free contact 1201-1 URE After reception of a data telegram from a programmed radio-control detector and corresponding darkness, the radio-contol pushbutton is switched on for about 1 minute with the preset memory brightness. The radio-contol pushbutton can be programmed to identify up to 30 radio channels.
Lightscapes
The radio-contol pushbutton can be included in up to five lightscapes which are activated with the corresponding radio-control transmitters (e.g. hand-held transmitter 'Komfort') and stored. The desired lightscape key must be programmed beforehand into the radio-contol pushbutton.
All-ON / All-OFF
The programming of a radio channel (e.g. hand-held transmitter 'Komfort') always includes the simultaneous and automatic storage of the functions of the All-ON or All-OFF key. The All-ON or All-OFF key of a radio-control transmitter switches the load connected to the switching actuator on or off.
Light control
In combination with a programmed radio-control presence detector, the radio-contol pushbutton can be used for lighting control functions. For more information, refer to the operating instructions of the radio presence detector.
Light Management Radio-control pushbutton and pilot lamp
Ref.-no.:
Important
The present instructions describe the functions of the radio-control pushbutton without lighting control. More information on light control with a presence detector is set out in the operating instructions for these devices.
WARNING!
Caution: The installation and assembly of electrical equipment may only be performed by a skilled electrician.
2. Fitting
The radio-control pushbutton can only be operated in conjunction with the inserts listed under 'Functions'. Connection and fitting are described in the operating instructions of the insert.
Procedure
- Install the selected insert (1) in a flush-mounting box (deep model recommended), the connecting terminals of the insert pointing downwards.
- Plug the radio-control pushbutton (2) together with frame (3) onto the insert while the mains voltage is disconnected.

① The distance from electrical appliances (e.g. microwave oven, hi-fi and TV sets) must be at least 0.5 m.
① To prevent saturation of the radio receiver (actuator), the radiocontrol pushbutton must be at least 1 m away from the nearest transmitter.
Learning a Radio Transmitter
During programming of a transmitter, the sensitivity of a radiocontrol receiver is reduced to a range of approx. 5 m. The distance between the radio-control pushbutton and the transmitter to be programmed should be between 0.5 m and 5 m.
Procedure
- Switch off the load connected to the radio-control pushbutton by a brief depression (< 0,4 s) of any of the two pushbutton rockers.
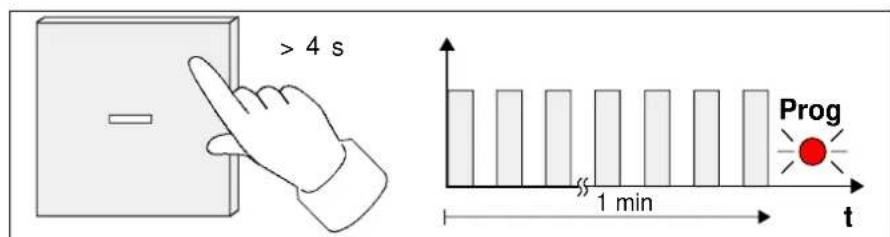
- Depress both rockers of the radio-control pushbutton at the same time for abt. 4 seconds (fig. B: double-sided operation) to switch over to the programming mode. The LED blinks for abt. 1 min (Fig. C). The radio pushbutton is then in the programming mode.
Light Management Radio-control pushbutton and pilot lamp
Ref.-no.:
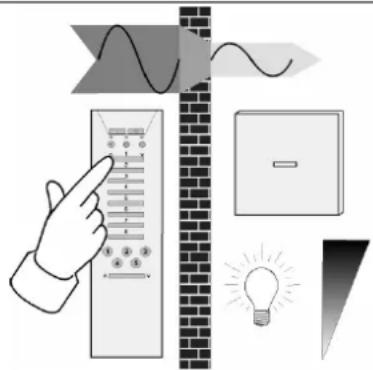
- Send a radio telegram from the selected transmitter (fig. D); see "Radio-control transmitter" operating instructions:

natural_image
Illustration of a hand pointing at a rectangular screen with icons (no text or symbols)Programming a channel
Depress the channel key for more than 1 second.
Programming a lightscape key
Depress the lightscape key for more than 3 seconds.
Programming a detector
Remove the battery for about 2 minutes from the detector. Put the the battery back in place and make a movement inside the detection range of the detector within the next 10 minutes.
Programming a presence detector
Remove the battery(ies) for about 2 minutes from the transmitter. After putting the battery back in place, the device starts transmitting programming telegrams for about 30 s.
① It is not possible to program a combination consisting of presence-control detector and detector.
- The radio pushbutton confirms the storage by switching on the LED permanently

- The programming mode ends automatically after about 1 minute or can be terminated by a short depression of the programming key. The radio-control pushbutton is then again in the normal operating mode.
① When all 30 memories are occupied, it is necessary to delete an already stored transmitter before a new one can be programmed.
Light Management Radio-control pushbutton and pilot lamp
Ref.-no.:
① The programming of a radio channel (e.g. hand-held transmitter 'Komfort') always includes the simultaneous and automatic storage of the functions of the All-ON or All-OFF key.
Deleting a radio-control transmitter
A radio-control-transmitter in the pushbutton's memory is deleted when the same transmitter is programmed again into the memory (see above). All channels and lightscape keys must be deleted one by one. Successful deletion is indicated by the LED blinking fast (fig. F).

Deleting all radio-control transmitters
It is possible to delete all transmitters in the radio pushbutton. In this case, the radio pushbutton is reset to the state as delivered.
- Depress both faces of the radio pushbutton at the same time for about. 20 s (Fig.. G: full-faced operation). After abt. 4 s, the LED starts blinking (cf. Fig. C). After 20 s the LED emits brief flashes of light for abt. 6 s.
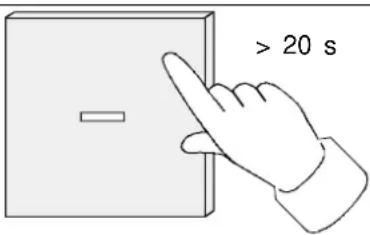
- Release the radio pushbutton briefly during these 6 s and press once again both sides for about 1 s to start the deleting procedure.
- During the deletion, the LED is illuminated. Successful deletion of all radio transmitters is then indicated by a fast blinking LED (cf. Fig. F). The LED is extinguished after abt. 1 min or after a brief press on the button.
3. Operation
The radio-control pushbutton has an upper and a lower rocker. The operation distinguishes between a short and a long depression of the pushbutton rocker:
Light Management Radio-control pushbutton and pilot lamp
Ref.-no.:

natural_image
Illustration of a hand pointing at a light bulb above a door panel, with a gradient screen on the right (no text or symbols)Short depression of pushbutton (< 0,4 s)
The lights are switched on (on with memory brightness) or off. When the lights are on, the LED is illuminated.
Short depression of pushbutton (> or = 0,4 s)
When the radio-control pushbutton is attached to an insert permitting the dimming function, the brightness of the lamps connected can be increased (upper rocker) and decreased (lower rocker) by a long depression of the pushbutton rockers.
① To switch on the lamps at minimum brightness, depress the lower rocker for more than 0.4 seconds when the lamps are off.
3.1. Memory-function
The selected brightness level can be stored as memory value in the radio-control pushbutton. A brief depression of the pushbutton recalls the memory brightness level as the starting brightness of the lamp.
Storing the memory value
- Select the desired brightness level for the lamps.
- Depress both rockers at the same time for at least 4 seconds (fig.l). This is confirmed by a soft-start, i.e. the lighting is shut off briefly and then increased in brightness up to the stored memory value.
① In as-delivered condition, the memory value is set to maximum brightness.
① A saved memory value is not lost after a mains failure.
3.2. Lightscape
Before storing or recalling a lightscape, the lightscape key of the radio-control transmitter must be programmed into the radio-control pushbutton (see „Programming of a radio transmitter“). The data pertaining to a lightscape (brightness of lamp) can then be stored in the radio-control pushbutton. A lightscape can be changed at any time by storing it again.
Storing a lightscape
- Select the desired brightness of the lamp.
- Depress the lightscape key of the radio transmitter for at least 3 seconds. The old lightscape will at first be recalled (keep key depressed). The new lightscape will activated and stored only after about 3 seconds.
4. Radio Transmission
Radio transmission takes place on a non-exclusive path. Therefore, interference cannot be excluded. This type of radio transmission is not suitable for safety applications such as emergency stops or emergency calls. The range of a radio-control system depends on transmitter power, receiver characteristics, air humidity, fitting height and building conditions. Fig. I illustrates the penetration of building materials by radio waves:
natural_image
Illustration of a hand pointing at a control panel, next to a brick wall with abstract wave patterns and a lightbulb icon (no text or symbols)Dry material
Permeability
Timber, gypsum, gypsum-plasterboards approx. 90 %
Brickwork, particle boards
approx. 70
Reinforced concrete approx. 30 %
Metal, metal grating, aluminium lamination approx. 10%
Rain, snow
approx.
0 - 40
Radio operation
- The inter-connection of this radio system with other communication networks must comply with national legislation.
- This radio system must not be used for communication beyond property boundaries.
- If utilized in conformity with its designated use, this unit fulfills the requirements of the R&TTE Directive (1999/5/EC). The complete declaration of conformity can be found in the Internet under: www.jung.de/ce
The radio-control pushbutton may be operated in all countries of the EU and the EFTA.
5. Specifications
Power supply : from flush-mounting insert
Receive frequency : 433,42 MHz, ASK
Number of radio channels : 30
Temperature range : approx. 0 °C ... +55 °C
Technical specifications subject to change.
6. Guarantee
Our products are under guarantee within the scope of the statutory provisions.
Please return the unit postage paid to our central service department giving a brief description of the fault:
ALBRECHT JUNG GMBH & CO. KG
Service-Center
Kupferstr. 17-19
D-44532 Lünen
Service-Line: +(49) 23 55 . 80 65 51
Telefax: +(49) 23 55.80 61 65
CE The CE-Sign is a free trade sign addressed exclusively to the authorities and does not include any warranty of any properties.
- Operating Instructions Radio-control pushbutton and pilot lamp
- Function
- Lightscapes
- All-ON / All-OFF
- Light control
- Light Management Radio-control pushbutton and pilot lamp
- Ref.-no.:
- Important
- WARNING!
- Fitting
- Procedure
- Learning a Radio Transmitter
- Programming a channel
- Programming a lightscape key
- Programming a detector
- Programming a presence detector
- Deleting a radio-control transmitter
- Deleting all radio-control transmitters
- Operation
- Short depression of pushbutton (< 0,4 s)
- Short depression of pushbutton (> or = 0,4 s)
- Memory-function
- Storing the memory value
- Lightscape
- Storing a lightscape
- Radio Transmission
- Dry material
- Permeability
- Radio operation
- Specifications
- Guarantee
- Please return the unit postage paid to our central service department giving a brief description of the fault:
Brand : JUNG
Model : A1561.07BFFKOSW
Category : Lighting