
CBT-8 - Unspecified Kopul - Free user manual and instructions
Find the device manual for free CBT-8 Kopul in PDF.

| Product Type | Professional cable tester |
| Brand | Kopul |
| Model | CBT-8 |
| Dimensions (H × W × L) | 1.4 × 3.5 × 5.5 in (3.5 × 8.9 × 14 cm) |
| Weight | 1.4 lb (0.6 kg) |
| Material | All-metal construction |
| Power Source | One 9V battery (not included) |
| Battery Check | Rotary knob to Battery Check position; bright green LED indicates full charge |
| Connectors Supported | Speakon (4-pin), XLR M/F, RCA, DIN (3/5-pin), TS/TRS, 3.5 mm mini plug, Banana plugs |
| Testing Method | Six-position selector knob for pin-by-pin continuity testing |
| Indicators | Yellow and green LEDs per pin; Ground LED for short detection |
| Additional Leads | Two removable banana plug leads for manual testing and custom cables |
| Audio Tone | Yes, for manual testing (tone indicates continuity) |
| Application | Home, project, and professional studio use |
| Construction | Rugged all-metal case, road-ready |
| Cleaning | Use a soft dry cloth |
| Safety | Keep away from water and flammable gases/liquids; do not disassemble |
| Warranty | One-year limited warranty |
| Manufacturer | Gradus Group |
| Brand | Kopul (registered trademark) |
Frequently Asked Questions - CBT-8 Kopul
User questions about CBT-8 Kopul
0 question about this device. Answer the ones you know or ask your own.
Ask a new question about this device
Download the instructions for your Unspecified in PDF format for free! Find your manual CBT-8 - Kopul and take your electronic device back in hand. On this page are published all the documents necessary for the use of your device. CBT-8 by Kopul.
USER MANUAL CBT-8 Kopul
natural_image
Abstract red and white geometric shape with curved and angular forms (no text or symbols)Thank you for choosing Kopul.
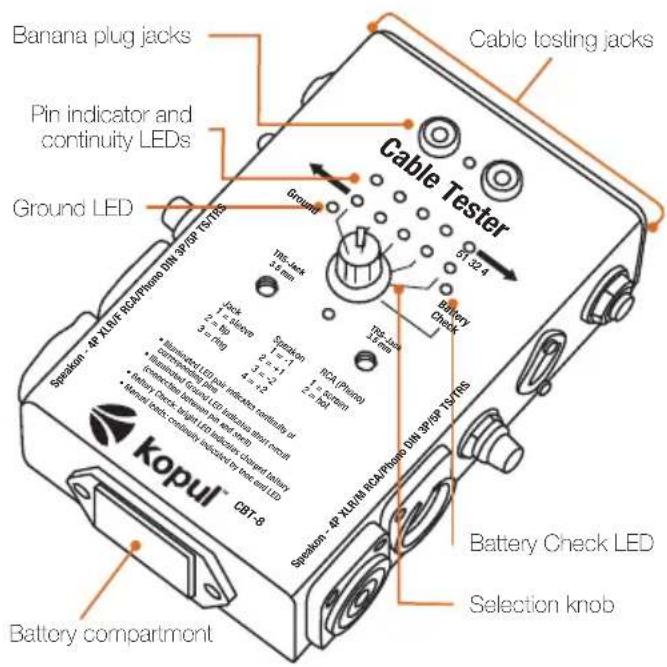
The Kopul CBT-8 is a professional-quality cable tester that allows users to test the continuity of a wide variety of cables with a single device. It quickly identifies connectivity and ground problems in some of the most frequently-used cables, and makes troubleshooting audio and studio setups fast and effortless.
A six-way selection knob provides easy selection of the pins to be tested. LED indicators illuminate to show that each pin on the cable is properly connected. The CBT-8 can test cables with any combination of Speakon, XLR, RCA, 3-pin and 5-pin DIN, TRS, and 3.5 mm mini plugs. Two removable leads are included for testing any kind of wire or cable with jacks that are not included on this model. They also allow for testing connections when building or repairing cables.
The CBT-8 is ideal for home, project, and professional studio use. Constructed with a rugged all-metal case, the CBT-8 is a road-ready addition to the gig bag of musicians, engineers, and mobile DJs alike.
Precautions
- Please read and follow these instructions, and keep this manual in a safe place.
- Make sure that this product is intact and that there are no missing parts.
- Keep this unit away from water and any flammable gases or liquids.
- Remove the battery during long periods of non-use.
- Do not attempt to disassemble or repair the equipment—doing so will void the warranty, and Kopul will not be responsible for any damage.
- Clean the unit with a soft dry cloth.
- Use only parts provided by the manufacturer.
- All photos are for illustrative purposes only.
Overview
Installing the battery
- Lift the cover of the battery compartment in the direction of the arrow. A click indicates that it is unlocked.
- Slide the battery compartment out of the cable tester.
- Insert a 9-volt battery into the compartment with the orientation indicated by the diagram on the inside of the compartment.
- Slide the battery compartment back into the cable tester. Push it in firmly and press down until it clicks, locking it into place.
It is recommended to check the battery prior to testing cables. To test the battery, do the following:
- Turn the selection knob all the way to the right to Battery Check
- The LED should glow a bright green indicating that the battery is fully charged.
Note: a dim LED indicates that the battery is not fully changed. Recharge the battery or replace a disposable battery with a fresh one.
Operating the cable tester
Testing cables:
- Plug the connectors of the cable into the corresponding jacks on either side or the top of the cable tester.
- Switch the selection knob to "1."
- Turn the knob one click at a time to test each pin on the cable (see table on pages 5-6).
Reading the LED indicators
- Yellow and green LEDs light up: There is good continuity on that pin.
- Yellow, green or both LEDs do not light up: There is a faulty connection or possibly a broken or damaged wire.
- Ground LED lights up: There is a short circuit in the cable caused by a connection between the pin and the shell.
Use the tables on pages 5-6 to verify proper pin connections
Manually testing cables
- Plug the banana plugs of the leads into the corresponding red and black jacks on the front panel of the cable tester.
- Touch each lead to the corresponding pin on either end of the cable.
- A lit LED accompanied by a tone indicates good connectivity and continuity.
Jack
| 1 = sleeve | 1 = -1 | 1 = screen | 1 Sleeve | 1 Sleeve, 3 Ring |
| 2 = tip | 2 = +1 | 2 = hot | 2 Tip | 2 Tip |
| 3 = ring | 3 = -2 | 3 Ring | 1 Sleeve, 3 Ring (shorted with sleeve) | |
| 4 = +2 |
1/4" TS Mono to 1/4" Mono
| 1 Sleeve | 1 Sleeve, 3 Ring |
| 2 Tip | 2 Tip |
| 3 Ring | 1 Sleeve, 3 Ring (shorted with sleeve) |
1/4" TRS to 1/4" TRS
| 1 Sleeve | 1 Sleeve, 3 Ring |
| 2 Tip | 2 Tip |
| 3 Ring | 3 Ring |
XLR balanced to XLR balanced
Pin 1 Pin 1
Pin 2 Pin 2
Pin 3 Pin 3
XLR unbalanced to XLR balanced
Pin 1 Pin 1, Pin 3
Pin 2 Pin 2
Pin 3 Pin 1, Pin 3
1/4" TS Mono to XLR unbalanced
1 Sleeve Pin 1, Pin 3
2 Tip Pin 2
3 Ring Pin 1, Pin 3 (shorted with sleeve)
1/4" TRS to XLR balanced
1 Sleeve Pin 1
2 Tip Pin 2
3 Ring Pin 3
Specifications
Dimensions (H × W × L) 1.4" × 3.5" × 5.5"
(3.5 × 8.9 × 14 cm)
Weight 1.4 lb. (0.6 kg)
Material All-metal construction
Connectors Speakon - 4 pin
XLR M/F
RCA (Phono)
DIN - 3 pin/5 pin
TS/TRS
3.5 mm mini plug
Banana plugs
Power One 9-volt battery
(not included)
One-Year Limited Warranty
This KOPUL product is warranted to the original purchaser to be free from defects in materials and workmanship under normal consumer use for a period of one (1) year from the original purchase date or thirty (30) days after replacement, whichever occurs later. The warranty provider's responsibility with respect to this limited warranty shall be limited solely to repair or replacement, at the provider's discretion, of any product that fails during normal use of this product in its intended manner and in its intended environment. Inoperability of the product or part(s) shall be determined by the warranty provider. If the product has been discontinued, the warranty provider reserves the right to replace it with a model of equivalent quality and function.
This warranty does not cover damage or defect caused by misuse, neglect, accident, alteration, abuse, improper installation or maintenance. EXCEPT AS PROVIDED HEREIN, THE WARRANTY PROVIDER MAKES NEITHER ANY EXPRESS WARRANTIES NOR ANY IMPLIED WARRANTIES, INCLUDING BUT NOT LIMITED TO ANY IMPLIED WARRANTY OF MERCHANTABILITY OR FITNESS FOR A PARTICULAR PURPOSE. This warranty provides you with specific legal rights, and you may also have additional rights that vary from state to state.
To obtain warranty coverage, contact the Kopul Customer Service Department to obtain a return merchandise authorization ("RMA") number, and return the defective product to Kopul along with the RMA number and proof of purchase. Shipment of the defective product is at the purchaser's own risk and expense.
For more information or to arrange service, visit www.kopulcables.com or call Customer Service at 212-594-2353.
Product warranty provided by the Gradus Group.
www.gradusgroup.com
KOPUL is a registered trademark of the Gradus Group. © 2016 Gradus Group LLC. All Rights Reserved.

KOPUL® A Gradus Group Brand
- Thank you for choosing Kopul.
- Precautions
- Overview
- Installing the battery
- Operating the cable tester
- Testing cables:
- Reading the LED indicators
- Manually testing cables
- XLR balanced to XLR balanced
- XLR unbalanced to XLR balanced
- 1/4" TS Mono to XLR unbalanced
- 1/4" TRS to XLR balanced
- Specifications
- One-Year Limited Warranty
Brand : Kopul
Model : CBT-8
Category : Unspecified