VTC-TNT30R3V - IP Camera Vitek - Free user manual and instructions
Find the device manual for free VTC-TNT30R3V Vitek in PDF.

User questions about VTC-TNT30R3V Vitek
0 question about this device. Answer the ones you know or ask your own.
Ask a new question about this device
Download the instructions for your IP Camera in PDF format for free! Find your manual VTC-TNT30R3V - Vitek and take your electronic device back in hand. On this page are published all the documents necessary for the use of your device. VTC-TNT30R3V by Vitek.
USER MANUAL VTC-TNT30R3V Vitek
natural_image
Exterior view of multiple surveillance cameras with visible lens and camera modules (no text or symbols)FEATURES
• 1/3" 3.0 Megapixel Progressive Scan CMOS image sensor
- Up to 30fps live view @ 1920x1080 (2MP) / 15fps live view @ 2048x1536 (3MP)
• Fixed Iris Lens & Varifocal Lens Options
- Up to 150' IR Range
- Wide Dynamic Range (WDR)
• True Mechanical Day/Night function by ICR
• 3D-DNR Noise Reduction
- Remote Viewing via CMS, Internet Explorer, and iOS & Android Apps
- Minimal Latency with up to 10 simultaneous user connections
• On Board Motion Detection
• H.264/MJPEG Dual Streaming
- Onvif Compliance
• IP66 Weather Resistance
• 12VDC & PoE (Power over Ethernet) Operation
Please read this manual carefully for correct use of the product.
Notes
■ Please use the specified power supply to connect.
■ Do not attempt to disassemble the camera; in order to prevent electric shock, do not remove screws or covers.
There are no user-serviceable parts inside. Please contact the nearest service center as soon as possible if there is any failure.
■ Avoid incorrect operation, shock vibration, heavy loads which can cause damage to the camera.
■ Do not use corrosive detergent to clean body of the camera. If necessary, please use soft dry cloth to wipe dirt; for hard contamination, use neutral detergent. Any cleanser for high grade furniture is applicable.
■ Avoid aiming the camera directly towards extremely bright objects, such as the sun, this may damage the image sensor.
■ Please follow the instructions to install the camera.
■ Do not operate it incase temperature; humidity and power supply are beyond the limited stipulations.
- Keep away from heat sources such as radiators, heat registers, stove, etc.
■ Do not expose the product to the direct airflow from an air conditioner.
We may reserve the rights to amend typographical errors, inconsistencies with the latest version, software upgrades and product improvements, interpretation and modification. These changes will be published in the latest version without special notification.
The pictures and screenshots in this manual are only used to explain the usage of our product. The ownerships of trademarks, logos and other intellectual properties related to Microsoft, Apple and Google belong to the above-mentioned companies.
This manual is suitable for IR weather-proof network camera. All pictures and examples used in the manual are for reference only.
Table of Contents
1 IE Remote Access .... 3
1.1 LAN 3
1.1.1 Access through IP-Tool 3
1.1.2 Directly Access through IE 4
1.2 WAN 5
2 Remote Preview 6
2.1 The Remote Preview Interface....6
2.2 Record Playback 7
2.3 Snap Pictures....8
3 Remote Configuration 9
3.1 System Configuration.... 10
3.1.1 Basic Information....10
3.1.2 Date & Time Configuration 10
3.2 Video Configuration....10
3.2.1 Camera Configuration 11
3.2.2 Video Stream....11
3.2.3 OSD Configuration 12
3.2.4 Video Mask....12
3.2.5 ROI Configuration....13
3.3 Alarm Configuration....14
3.3.1 Motion Detection Area 14
3.3.2 Motion Detection Trigger 15
3.3.3 Motion Detection Schedule....16
3.4 Network Configuration....16
3.4.1 Port 16
3.4.2 IP Address 17
3.4.3 Server Configuration....17
3.4.4 IP Notify 18
3.4.5 DDNS Configuration....18
3.4.6 RTSP 19
3.4.7 UPnP 20
3.4.8 Mail Setting....20
3.4.9 FTP 21
3.5 Advanced Configuration....21
3.5.1 User Configuration....21
3.5.2 Security Configuration 23
3.5.3 Configure Backup & Restore 23
3.5.4 Reboot Device 24
3.5.5 Upgrade....24
4 Q & A 25
1 IE Remote Access
IP-CAM can be connected through LAN or WAN. Take IE browser (6.0) for example. The details are as follows:
1.1 LAN
In LAN, there are two ways to access IP-CAM: 1. Access through IP-Tool; 2. directly access through IE browser.
1.1.1 Access through IP-Tool
① Make sure the PC and IP-CAM are connected to the LAN and the IP-Tool is installed in the PC
② Double click the IP-Tool icon on the desktop to run this software as shown below:

text_image
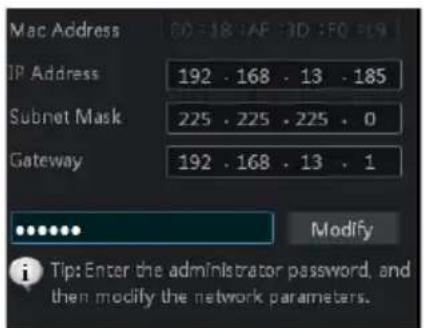
Device Network Search Immediate Refresh Device Name Device Type Product Mode IP Address Http Port Date Port Subnet Modify Network Parameter name IPC TD unknown 192.168.226.201 80 9008 255.255. EDVR CYR 192.168.13.100 80 6016 255.255. Max Address 192.168 - AF-SD IP2 119 IP Address 192 - 168 - 226 - 201 Subnet Mask 255 - 255 - 255 - 0 Gateway 192 - 168 - 226 - 1 Modify Top:Enter the administrator password, and then modify the network parameters. Restore IPC Default Configuration Total Device 2 LocalIP Address: 192.168.13.4 Subnet Mask: 255.255.255.0 Gates: 192.168.13.1 DNS-210.21.786.6③ Modify the IP address. The default IP address of this camera is 192.168.226.201. Click the information of the camera listed in the above table to show the network information on the right hand. Modify the IP address and gateway of the camera and make sure its network address is in the same local network segment as the computers. Modify the IP address of your device according to the practical situation.
text_image
Mac Address 0D=18:AF:3D:FQ=19 IP Address 192 . 168 . 13 . 185 Subnet Mask 225 . 225 . 225 . 0 Gateway 192 . 168 . 13 . 1 Modify Tip: Enter the administrator password, and then modify the network parameters.For example, the IP address of your computer is 192.168.13.4. So the IP address of the camera shall be changed to 192.168.13.X. After modification, please input the password of the administrator and click "Modify" button to modify the setting.

The default password of the administrator is "123456".
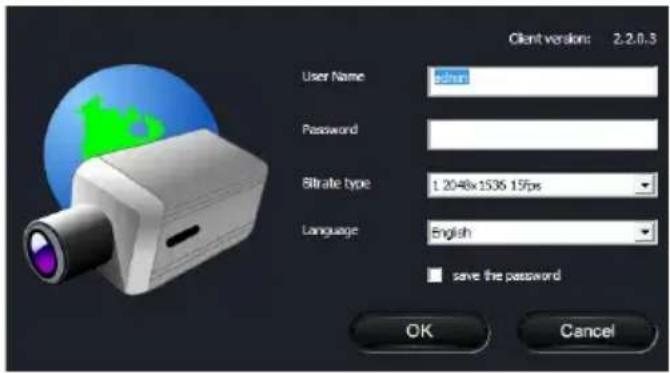
④ Double click the IP address and then the system will pop up IE browser to connect IP-CAM. IE browser will automatically download the Active X control. After downloading, a login window will pop up as shown below.
text_image
Client version: 2.2.0.3 User Name: 65mn Password: Bitrate type: £ 2048x1536 15fps Language: English save the password OK CancelInput the username and password to log in.

The default username is "admin"; the default password is "123456".
1.1.2 Directly Access through IE
The default network settings are as shown below:
IP address: 192.168.226.201
Subnet Mask: 255.255.255.0
Gateway: 192.168.226.1
HTTP: 80
Data port: 9008
You may use the above default settings when you log in the camera for the first time.
① Manually set the IP address of the PC, the network segment should be the same as the default settings of the IP camera. Open the network and share center. Click “Local Area Connection” to pop up the following window.

text_image
Local Area Connection Status General Connection IPv4 Connectivity: Internet IPv6 Connectivity: No Internet access Media State: Enabled Duration: 00:01:27 Speed: 100.0 Mbps Details... Activity Sent — Received Bytes: 27,480 | 778,065 Properties Diseble Diagnose CloseSelect "Property" and then select internet protocol according to the actual situation (for example: IPV4). Next, click "Property" button to set the network of the PC.

text_image
Internet Protocol Version 4 (TCP/IPu4) Properties General You can get IP settings assigned automatically if your network supports this capability. Otherwise, you need to ask your network administrator for the appropriate IP settings. Obtain on IP address automatically Use the following IP address: IP address: 192 . 168 . 228 . 4 Subnet mask: 255 . 255 . 255 . 0 Default gateway: 192 . 168 . 228 . 1 Obtain DNS server address automatically Use the following DNS server addresses: Preferred DNS server: 192 . 168 . 228 . 1 Alternate DNS server: . . . . Validate settings upon exit Advanced... OK Cancel② Open an IE browser and input the default address of IP-CAM and confirm. The IE browser will download Active X control automatically.
③ After downloading Active X control, the login dialog box will pop up.
④ Input the default username and password and then enter to view.
1.2 WAN
To access the camera via a router or virtual server:
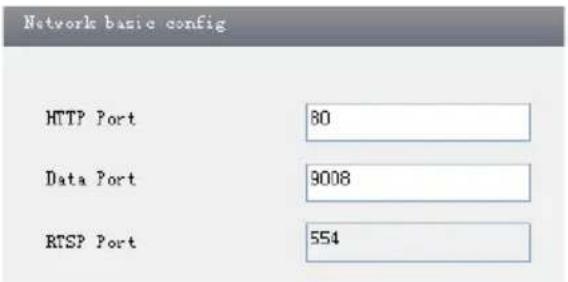
① Make sure the camera is connected via LAN and then log in the camera via LAN and go to the Config→Network Config→Port menu to set up the port number.
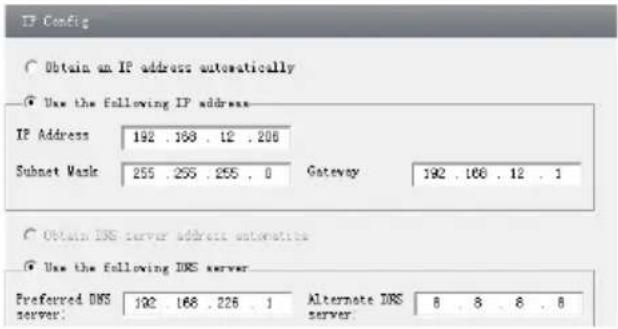
② Go to Config → Network Config → IP Address menu to modify the IP address.
③ Go to the router's management interface through IE browser to forward the IP
address and port of the camera in the "Virtual Server".
text_image
Network basic config HTTP Port 80 Data Port 9008 RTSP Port 554Port Setup
text_image
IP Config Obtain an IP address automatically Use the following IP address IP Address 192 . 188 . 12 . 206 Subnet Mask 255 . 255 . 255 . 0 Gateway 192 . 168 . 12 . 1 Obtain DNS server address automatics Use the following DNS server Preferred DNS 192 . 168 . 226 . 1 Alternate DNS server 8 . 8 . 8 . 8IP Setup

text_image
Port Range Application Start End Protocol IP Address Enable 1 9008,to 9008 Both 192.1686. 6 2 60,to 81 Both 192.1686. 6 3 10000,to 10001 Both 192.1686. 166 4 21000,to 21001 Both 192.1686. 156 5 7777,to 7778 Both 192.1686. 206 6 1029,to 1030 Both 192.1686. 207Router Setup
④ Open the IE browser and input its WAN IP and http port to access.
2 Remote Preview
2.1 The Remote Preview Interface
text_image
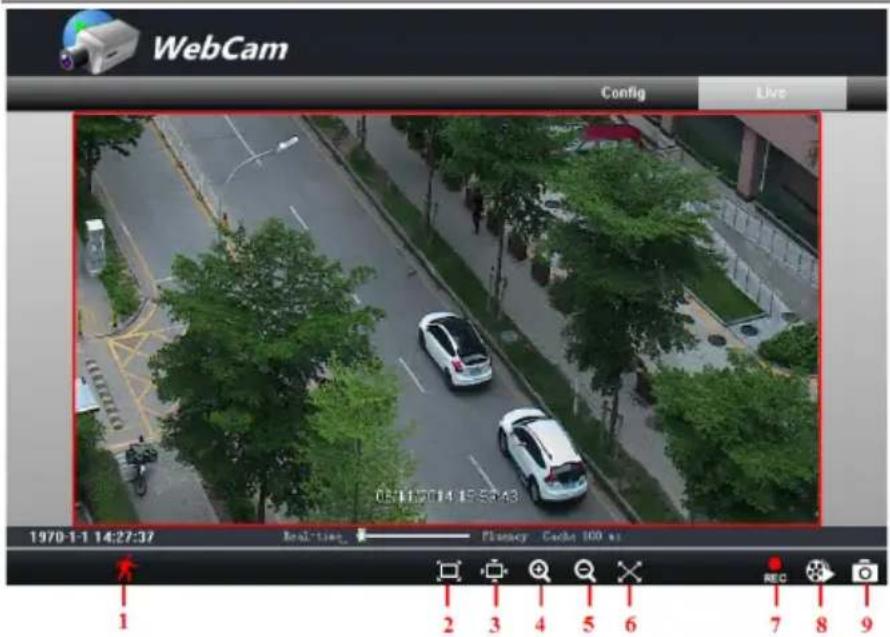
WebCam Config Live 05:11:00:14 19:50:43 1970-1-1 14:27:37 Real-time Flashway Code 100 w REC 1 2 3 4 5 6 7 8 9Remote Preview
| 1 | Motion Detection | 4 | Zoom in | 7 | Start recording |
| 2 | Fix size | 5 | Zoom out | 8 | Playback |
| 3 | Actual size | 6 | Full screen | 9 | Snap |
- When motion detection alarm is triggered, the people icon turns red.
Right click to pop up a pull-down list as shown below:
Stream: Three streams are optional.
Turn off the live: Click this item to close present live preview.
Full screen: The live preview picture will be full-screen display. Double click or right click mouse to return to the previous interface.
Online user: Display the current user connecting to the device.
| 1 1920x1080 25fps |
| 2 704x576 25fps |
| 3 352x288 25fps |
| Turn off the live |
| Enable audio |
| Full Screen |
| Online User |
| System Information |
System information: Display the device information: device name, firmware version, software build date, kernel version and hardware version.
2.2 Record Playback
Before you play the recorded files, please make sure you have recording. Click button to start recording and again to stop recording. Then click button to pop up a video player. Double click the recorded file to play the video as shown below.
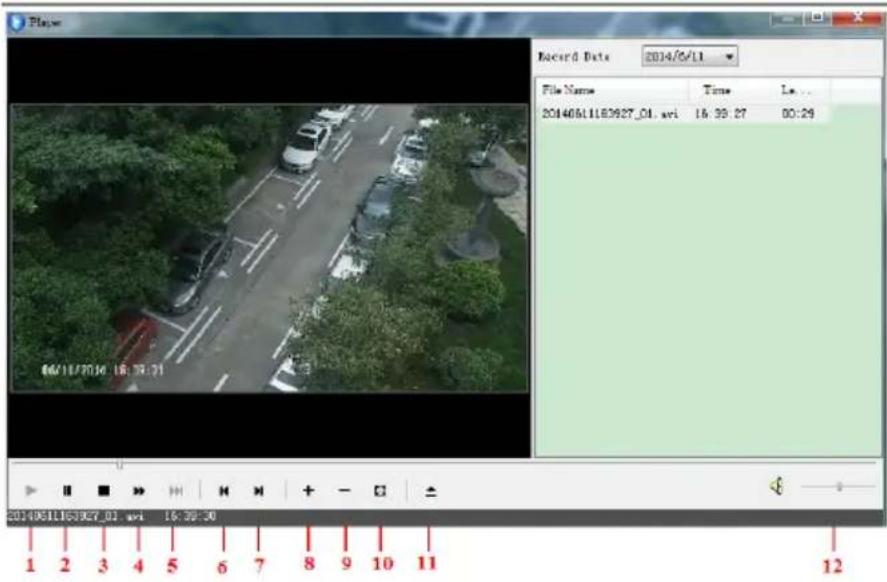
text_image
Player Record Date 2014/6/11 File Name Time Le... 20140611163927_01.avi 16:39:27 00:29 20140611163927_01.avi 16:39:30 1 2 3 4 5 6 7 8 9 10 11 12| 1 | Play | 5 | Next frame | 9 | Zoom out |
| 2 | Pause | 6 | The previous file | 10 | Full screen |
| 3 | Stop | 7 | The next file | 11 | Path |
| 4 | Forward | 8 | Zoom in | 12 | Volume |
2.3 Snap Pictures
Select the picture number and then click "Snap" icon as shown below.
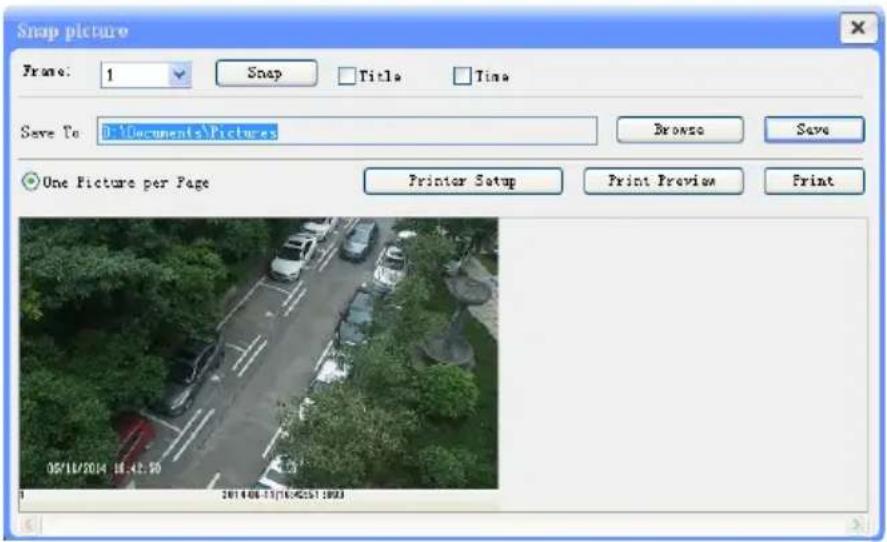
text_image
Snap picture Frame: 1 Snap Title Time Save To D:\Documents\Pictures Browse Save One Picture per Page Printer Setup Print Preview Print 06/18/2014 10:42:30 2014.06-7/16/2015 1:00:03Single Snap
User can snap multiple pictures. Select the picture number from Frame pull down list box, such as 2, and check "Title" and "Time" to show capture title and time on the snap pictures simultaneously.
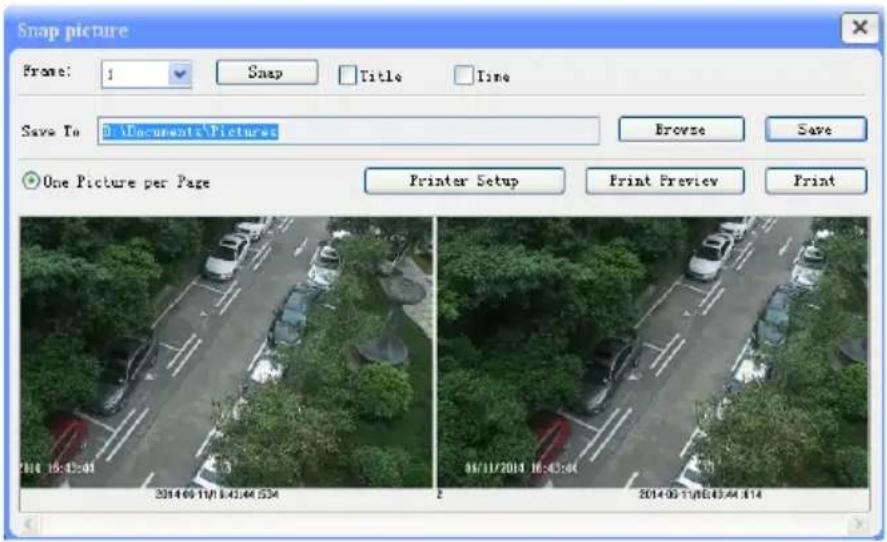
text_image
Snap picture Frame: 1 Snap Title Time Save To Documents\Pictures Browse Save One Picture per Page Printer Setup Print Preview Print 2014 16:32:04 2014 09:10/18:43:44.534 06/11/2014 16:43:04 2014 09:10/18:43:44.514Multi-picture Snap
Click "Browse" to set saving path. Click "Save" to save pictures to HDD on the computer; Click "Printer setup" to set the printer and print the snap pictures; drag the scroll bar to view all snapped pictures.
3 Remote Configuration
Functions of remote configuration include: System Configuration, Video Configuration, Alarm Configuration, Network Configuration and Advanced Configuration. You should
first select the menu on the left, and then set the relative parameters.
3.1 System Configuration
The "System configuration" includes two submenus: Basic Information and Date & Time.
3.1.1 Basic Information
In the basic information interface, user can set up the device name and also can check the relative information of the server.
Setting steps:
- Clicking the "Config" icon bring up the menu list.
- Clicking the "Basic Information" will pop up a window as shown below.
- Input the name of the device in the "Device name" text box.
- Press the "Save" button to save the settings.

text_image
System Infomotion Software Version 3.4 1 beta4 Software Build Date 2014-8-25 (YYYY-MM-DD) Kernel Version 20140819 Hardware Version 1.3 MAC 00:18:AE:39:97:4A Onvif Version 2.3 Device name name Maximum number of 103.1.2 Date & Time Configuration
Setting steps:
- Go to "System Configuration" → "Date & Time".
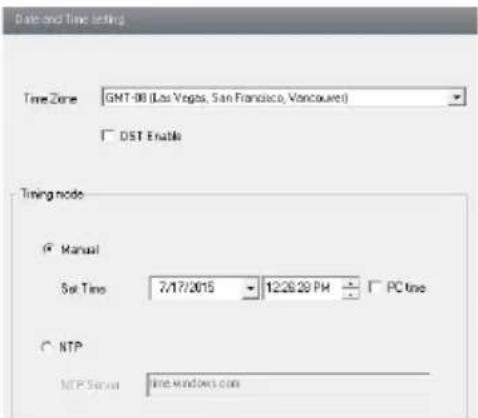
text_image
Date and Time Setting Time Zone GMT-08 (Los Vegas, San Francisco, Vancouver) □ DST Enable Timing node ○ Manual Set Time 7/17/2015 12:26:29 PM □ PC time ○ NTP MTP Server time.windows.com- Set time zone.
- Enable DST mode as required.
- Set time. You may set time manually or enable NTP.
3.2 Video Configuration
Camera Configuration includes five submenus: Camera Configuration, Video Stream,
OSD Config, Video Mask and ROI Config.
3.2.1 Camera Configuration
Setting steps:
- Go to "Video Configuration" → "Camera" interface as shown below.
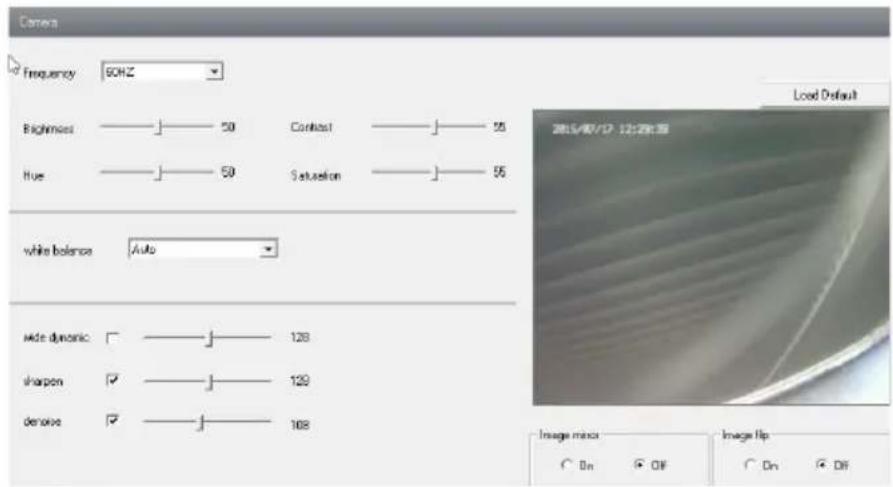
text_image
Camera Frequency 90HZ Brightness ———— 50 Contrast ———— 25 Hue ———— 50 Saturation ———— 55 White balance Auto Wide dynamic ———— 128 sharon ✓ ———— 129 derivate ✓ ———— 168 Load Default 35/47/7 注:注意 Image mask On Off On Off- You may adjust frequency, brightness, contrast, hue and saturation of the picture.
- Select white balance mode.
- Wide dynamic, sharpen and denoise are adjustable.
- You can also set the image mirror and image flip function.
- Press the "Save" button to save the settings.
3.2.2 Video Stream
Go to "Video configuration" → "Video Stream" to see an interface as shown below.

text_image
Video Stream Resolution Frame rate Bitrato type Video quality Bitrato 1 Frame Interval Video Encoding Profile 1 2304x1296 12 CBR Highest 4096 Kbps 100 H264 High Profile 2 352x288 23 CBR Highest 1024 Kbps 100 H264 High Profile 3 352x288 25 CBR Highest 1024 Kbps 100 H264 High Profile Alarm Picture Size Video encode silon splitThree video streams can be adjustable.
Resolution: The higher the resolution, the clearer the image is.
Frame rate: The higher the frame rate, the more fluency the video is. However, more storage room will be used.
Bitrate type: CBR and VBR. CBR means that no matter how much the video changes, the compression bitrate keeps constant. This will not only facilitate the image quality better in a constant bitrate but also help to calculate the capacity of the recording. VBR means that the compression bitrate can be adjustable according to the changes in the video. This will help to optimize the network bandwidth.
Video Quality: When VBR is selected, you need to choose image quality. The higher
the image quality, the more bitrate will be required.
Bitrate: Please choose it according to the actual network situation.
I Frame interval: It is recommended to use the default value. If the value is too high, the read speed of the group of pictures will slow resulting in quality loss of video.
Video encoding profile: Baseline, main and high profile are options. Baseline profile is mainly used in interactive application with low complexity and delay. Main/high profile is mainly used for higher coding requirement.
Alarm picture size: Please select it according to the actual situation.
Video encode slice split: If enabled, you may get more fluency in image even though using a low-performance PC.
3.2.3 OSD Configuration
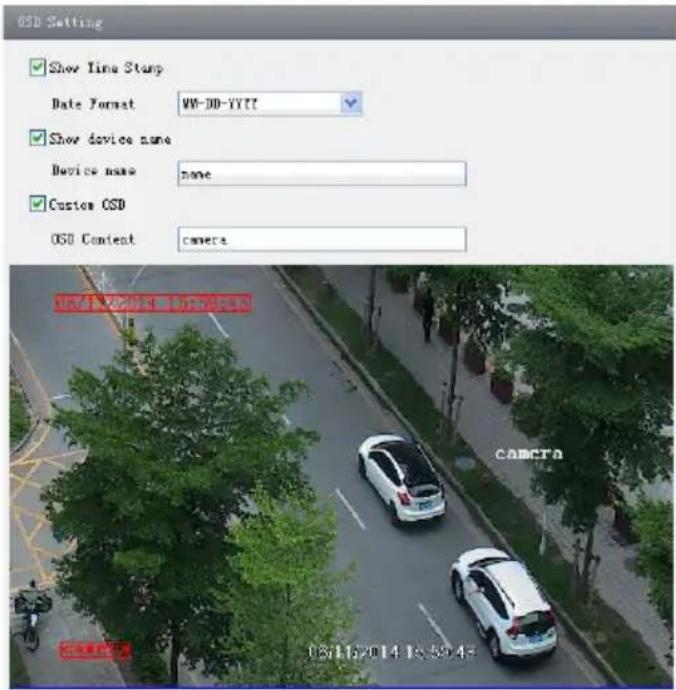
- Go to "Video Config" → "OSD Config" menu to display the interface as shown below.
You may set time stamp, device name and custom OSD here. Drag the time stamp and custom OSD to set their position. Then press the "Save" button to save the settings.
text_image
OSD Setting Show Time Stamp Date Format: WW-DD-YYYY Show device name Device name: none Custom OSD OSD Content: camera 06/11/2014 18:59:45 CAMCIA2.
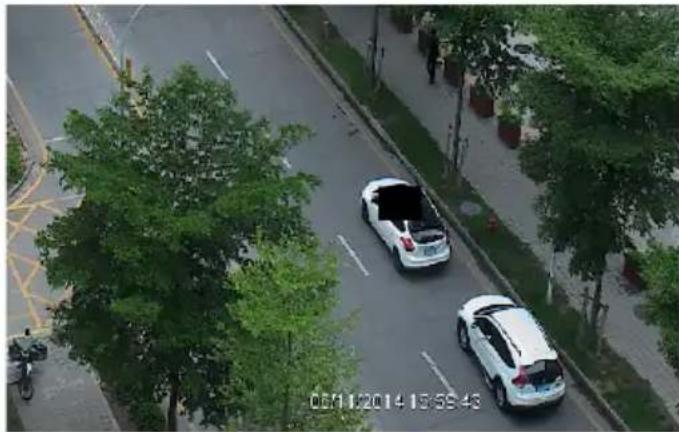
3.2.4 Video Mask
You can set up to 4 masked areas.

text_image
Video Mask 03/11/2014 15:39:43 Enable Video Mask Black Draw ClearTo set up video mask
- Enable video mask and select mask color.
- Click "Draw" button and then drag the mouse to draw the video mask area.
- Click "Save" button to save the settings.
- Return to live view to see the following picture.
natural_image
Aerial view of two cars parked on a tree-lined road with greenery, no visible text or symbols.Clear the video mask:
Go to video mask menu and then click "Clear" button to delete the current video mask area.
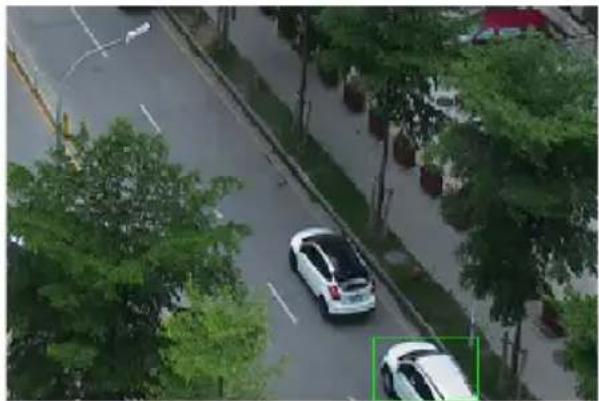
3.2.5 ROI Configuration
To set up ROI
- Go to Config→ROI Config menu.

text_image
ROI Setting 06/11/2014 18:52:43 Enable Draw Clear Level Low 0 High 1- Check "Enable" and then click "Draw" button.
- Drag the mouse to set the ROI area.
- Set the level.
- Click "Save" button to save the settings.
You will see the selected ROI area is clearer than other areas especially in low bitrate condition.
natural_image
Aerial view of a tree-lined road with two cars, one highlighted in green (no visible text or symbols)
natural_image
Aerial view of a tree-lined urban road with two cars driving along the roadside (no visible text or signage)3.3 Alarm Configuration
Alarm configuration includes three submenus: Motion Detection Area, Motion Detection Trigger and Motion Detection Schedule.
3.3.1 Motion Detection Area
- Go to "Alarm configuration" "Motion Detection Area" to see an interface as shown below.
- Move the "Sensitivity" scroll bar to set up the motion trace sensitivity.
- Check "Add", press the "Ctrl" button and move mouse to select the motion detection area: Select "Erase" and move the mouse to clear all motion detection area.
- Press the "Save" button to save the settings.

text_image
Motion Detection Area Sensitivity Select All Clear All Invert Selection Add Erase (Press Ctrl key drag mouse to select motion region.)3.3.2 Motion Detection Trigger
- Go to "Alarm Configuration" "Motion Detection Trigger" to display an interface as shown below.
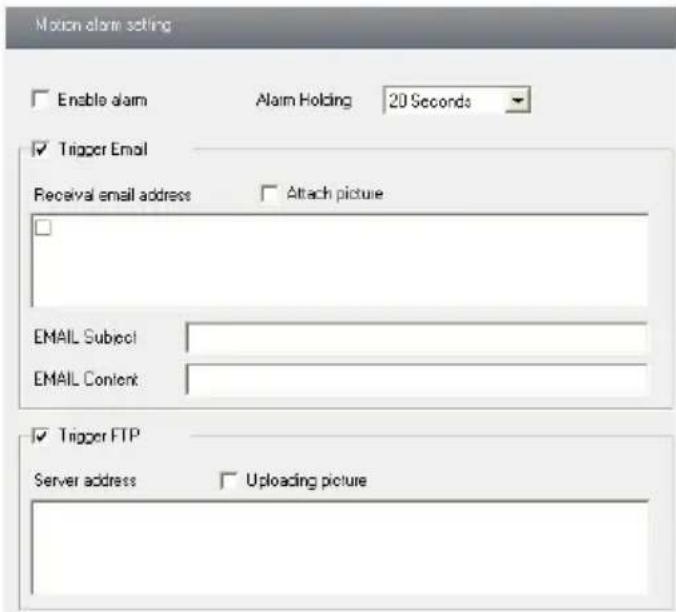
text_image
Motion alarm setting Enable alarm Alarm Holding 20 Seconds Trigger Email Receival email address Attach picture EMAIL Subject EMAIL Content Trigger FTP Server address Uploading picture- Check "Enable alarm" check box. Then all functions under this interface will be activated.
- Trigger Email: Check "Attach picture" and select email addresses in the "email address" text box (Email address shall be set first in the Mail config interface). Then the triggered snap pictures will be sent to those addresses. User can also define the subject and content of the email.
- Trigger FTP: Check "Uploading picture". The triggered snap pictures will be sent to the FTP server address.
Note: Please refer to FTP configuration chapter for more details.
- Press the "Save" button to save the settings.
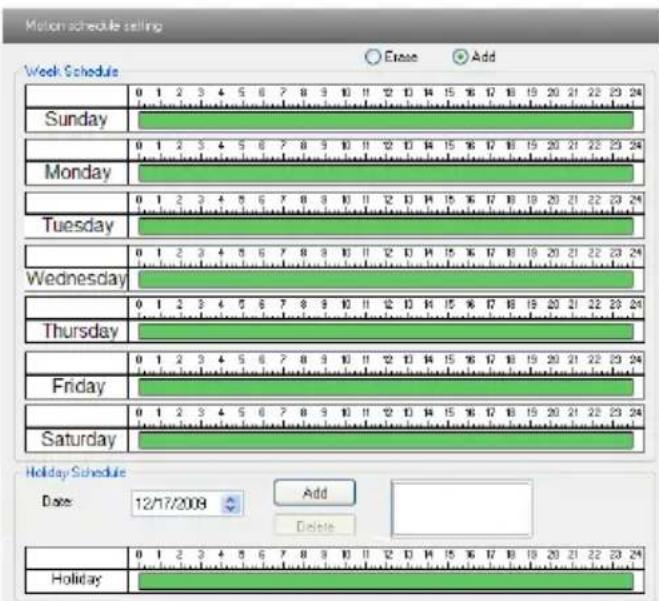
3.3.3 Motion Detection Schedule
Go to "Alarm configuration" "Motion Detection schedule" interface as shown below. Week schedule
User can set the alarm time from Sunday through Saturday for alarm everyday in one week.
Note: 0 \~ 24 are the hours in that day. Click on the pane to set the alarm hours. Green means selected area. Blank means unselected area.
Add: Add a schedule for a particular day.
Erase: Delete schedule.
Holiday schedule
User could set alarm time for a certain time of a special day, such as a holiday.
-
Select a date a "Date" and click "Add" button to add that date to the list box on the right side and then move the scroll bar to set the schedule of that day.
-
Select a date in the list box on the right side, and press "Erase" to remove the schedule on that day.
Press the "Save" button to save the settings.
Note: Holiday schedule has priority to Week schedule.
text_image
Motion schedule selling Week Schedule 0 1 2 3 4 5 6 7 8 9 10 11 12 13 14 15 16 17 18 19 20 21 22 23 24 Sunday 0 1 2 3 4 5 6 7 8 9 10 11 12 13 14 15 16 17 18 19 20 21 22 23 24 Monday 0 1 2 3 4 5 6 7 8 9 10 11 12 13 14 15 16 17 18 19 20 21 22 23 24 Tuesday 0 1 2 3 4 5 6 7 8 9 10 11 12 13 14 15 16 17 18 19 20 21 22 23 24 Wednesday 0 1 2 3 4 5 6 7 8 9 10 11 12 13 14 15 16 17 18 19 20 21 22 23 24 Thursday 0 1 2 3 4 5 6 7 8 9 10 11 12 13 14 15 16 17 18 19 20 21 22 23 24 Friday 0 1 2 3 4 5 6 7 8 9 10 11 12 13 14.15.16.17.18.19.20.21.22.23.24 Saturday 0 Holiday Schedule Date: Add Delete 0 [lower] [higher] [lower] [higher] [lower] [higher] Holiday3.4 Network Configuration
Network configuration includes 9 submenus: Port, IP Address, Server Configuration, IP Notify, DDNS Config, RTSP, UPnP, Mail Setting and FTP.
3.4.1 Port
- Go to "Network config"→ "Port" to see the interface as shown below.

text_image
Network basic config HTTP Port 88 Data Port 9008 RTSP Port 554- Input port number for web access in the "HTTP Port" textbox.
- Input the port number for audio & video transmission in the "Data Port" textbox.
3.4.2 IP Address
- Go to "Network Configuration"→ "IP Address" to see the interface shown below.
- There are two options for IP setup: obtain an IP address automatically by DHCP protocol and use the following IP address. You may choose one of the options as required.
- Use the following IP address: display the IP address, subnet mask, gateway and DNS of the device.
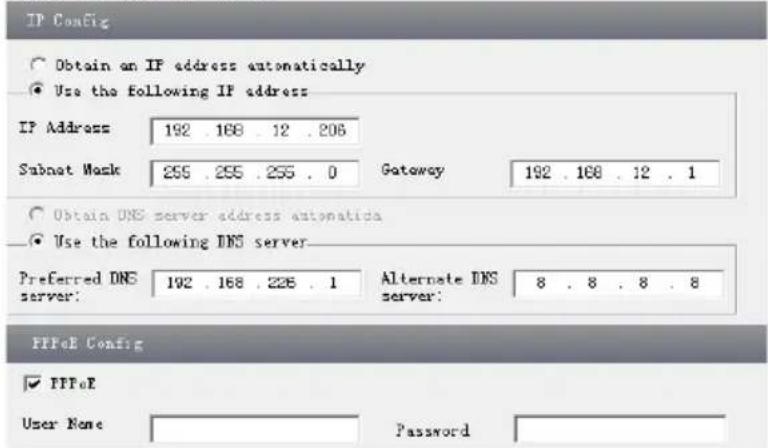
text_image
IP Config Obtain an IP address automatically Use the following IP address IP Address 192 . 168 . 12 . 206 Subnet Mask 255 . 255 . 255 . 0 Gateway 192 . 168 . 12 . 1 Obtain DNS server address automatica Use the following DNS server Preferred DNS server: 192 . 168 . 226 . 1 Alternate DNS server: 8 . 8 . 8 . 8 FIFoE Config FIFoE User None Password-
PPPoE: User needs to manual input the user name and password for dial-up internet. First, log in web client and then enter user name and password of PPPoE, save the setting and exit. Second, set up IP address change notice. Third, connect with Modem. The device will dial up internet automatically.
-
Press the "Save" button to save the settings.
3.4.3 Server Configuration
Go to "Network Configuration"→ "Server Config".
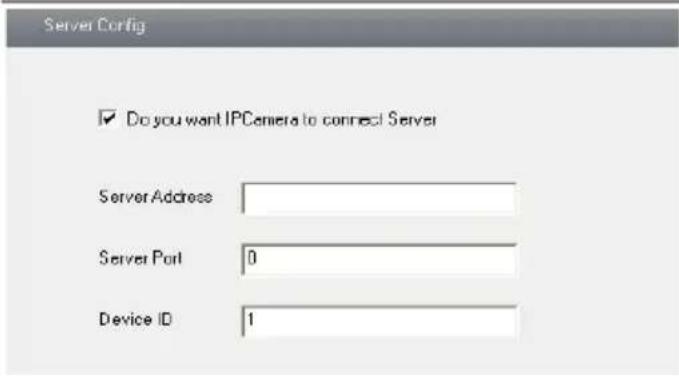
text_image
Server Config ✓ Do you want IPCamera to connect Server Server Address Server Port 0 Device ID 13.
- Check "Do you want IP Camera to connect Server".
- Check the IP address and port of the transfer media server in the CMS/NVMS. Then enable the auto report in the CMS/NVMS when adding a new device. Next, self-define the device ID and input the remaining information of the device in the CMS/NVMS.
- Input the above-mentioned server IP, server port and device ID in the relevant boxes.
- Click "Save" button to save the settings.
3.4.4 IP Notify
- Go to "Network Configuration"→ "IP Notify" to see a tab as shown below.
- If the "Enable notifying change of IP" is selected, when the IP address of the device is changed, a new IP address will be sent to the appointed mailbox automatically; if "FTP" is selected, when the IP address of the device is changed, a new IP address will be sent to the FTP server.

text_image
IP change notification Enable notifying change of IP FTP Receival email address Server address3.4.5 DDNS Configuration
- Go to "Network Configuration"→ "DDNS Configuration" tab as shown below.
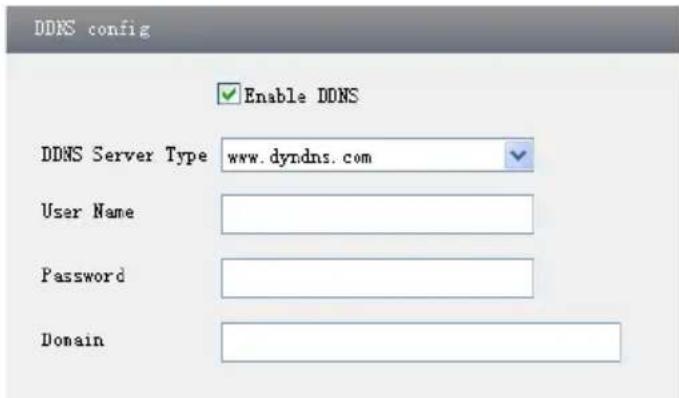
text_image
DDNS config Enable DDNS DDNS Server Type www.dyndns.com User Name Password Domain- Apply for a domain name. Take www.dvrdydns.com for example. Input www.dvrdydns.com in the WEB address bar to visit the website. Then click "Registration" button to register as shown below.

text_image
NEW USER REGISTRATION USER NAME XXXX PASSWORD ***** PASSWORD CONFIRM ***** FIRST NAME XXX LAST NAME XXX SECURITY QUESTION My first phone number ANSWER XXXXXXXX CONFIRM YOU'RE HUMAN 718408 New Captche Enter the text you see above Submit ResetCreate domain name.

text_image
You must create a domain name to continue. Domain name must start with (a-z, 0-9). Cannot end or start, but may contain a hyphen and is not case-sensitive. dvrdydns.com Request DomainAfter you successfully request your domain name, you will see your domain in the list.

text_image
Search by Domain. Search Click a name to edit your domain settings. NAME STATUS DOMAIN 654321ABC 654321abc.dvrdydns.com Last Update: Not yet updated IP Address: 210.21.229.138 Double additional domain named- Select the server type and then input the username, password and domain name you apply for in the DDNS configuration interface.
- Click "Save" button to save the settings.
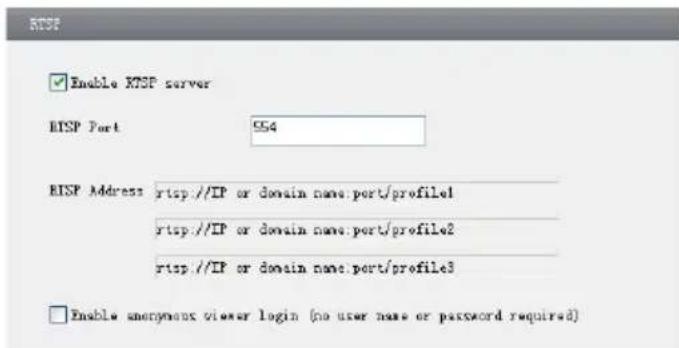
3.4.6 RTSP
- Go to "Network Configuration"→ "RTSP" interface as shown below.
text_image
Enable RTSP server RTSP Port 554 RTSP Address rtsp.//IP or domain name.port/profile1 rtsp.//IP or domain name.port/profile2 rtsp.//IP or domain name.port/profile3 Enable anonymous viewer login (no user name or password required)5. 1. Select "Enable RTSP server".
- RTSP Port: Access Port of the streaming media. The default number is 554.
- RTSP Address: The RTSP address you need to input in the media player.
- You can also choose to enable anonymous viewer login.
3.4.7 UPnP
Go to "Network Configuration"→ "UPnP" interface as shown below. Select "Enable UPnP" and then input friendly name.
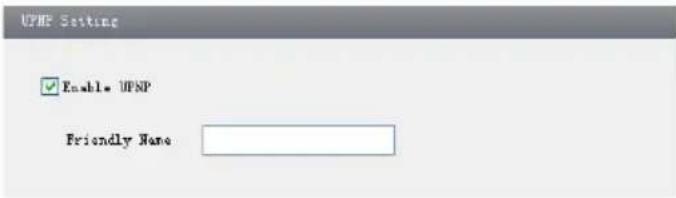
text_image
UPNP Setting Enable UPNP Friendly NoneThen double click "Network" icon on the desktop of the PC to see an icon with the friendly name and IP address of the camera. You may quickly access the device by double clicking this icon.
3.4.8 Mail Setting
Go to "Network Configuration" → "Mail Setting" interface.

text_image
Mail config From Email: test10007@gmail.com User Name: test10007@gmail.com Password: ******** Server address: smtp gmail.com Secure Connection not required SMTP Port: 465 Use default test your account settings Receive email address: Receive email address: Add Delete- From Email: Sender's e-mail address.
- User name and password: Sender's user name and password.
- Server address: SMTP name of sender.
- Select the secure connection type at the Secure Connection dropdown list according to user' actual needs.
- Email address list: Add email address into the list.
- Email address: Receiver's e-mail address.
- After all parameters are setup, you can click "Test your account settings". If email is sent successful, a "Test Successful" window will pop up, if not, you can try other email addresses or check the setting.
Notice: If you change the static IP into PPPoE and select mailbox, there will be an
e-mail sent to your mail box for notifying a new IP address.
3.4.9 FTP
Go to Network Configuration→FTP interface as shown below.

text_image
FTP Setting Server name Server address Port ... User Name Upload path: Add Modify Delete Test- Add: Click Add button to input FTP server's server name, address, port number, user name, password and upload path. Then click OK to confirm the setting.
- Modify: Click this button to change the information of the FTP server.
- Delete: Select a FTP account and click this button to delete this account.
- Test: Select a FTP account and click this button to test its validity.
Please refer to the following table for parameters and instructions of FTP configuration.
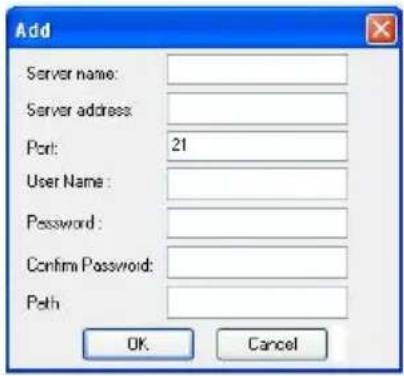
text_image
Add Server name: Server address: Port: 21 User Name: Password : Confirm Password: Path: OK Cancel3.5 Advanced Configuration
| Parameter | Meaning |
| Server name | The name of the FTP server |
| Server address | The address of the FTP server |
| Port | The port number of the FTP server |
| User name | The user name of the FTP server |
| Password | The password of the FTP server |
| Path | The save path for FTP files |
Advanced configuration includes four submenus: User Configuration, Security Configuration, Configure Backup & Restore, Reboot and Upgrade.
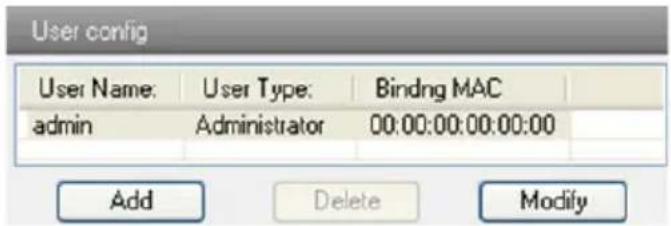
3.5.1 User Configuration
Go to "User Configuration" interface.
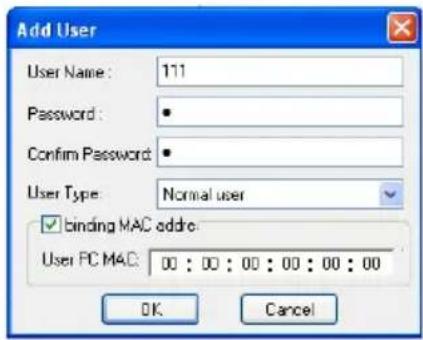
Add user:
- Clicking "Add" button pops up "Add User" dialog box.
text_image
User config User Name: User Type: Bindng MAC admin Administrator 00:00:00:00:00:00 Add Delete ModifyUser Configuration
text_image
Add User User Name: 111 Password: Confirm Password: User Type: Normal user ✓ binding MAC addre: User PC MAC: 00 : 00 : 00 : 00 : 00 : 00 OK CancelAdd User
Note: After binding physical address to the IP-CAM, you can access the device on this PC only. If the MAC address is "00:00:00:00:00:00", it means that it can be connected to any computers.
- Input user name in "User Name" textbox (only letters).
- Input characters in "Password" and "Confirm Password" textbox (letters or numbers).
- Input the MAC address of the PC in "Binding MAC address" textbox.
- Click "OK" button and then the new added user will display in the user list.
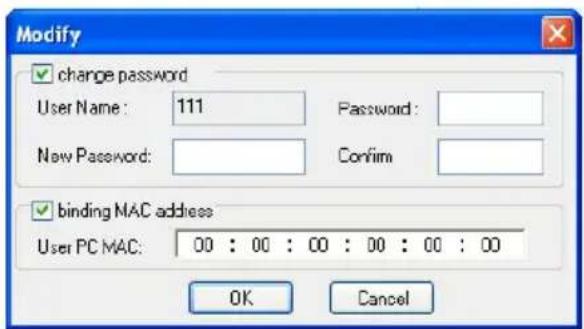
Modify user:
- Select the user you want to modify password and physical address in the user configuration list box.
- Clicking "Modify" button will pop up "Modify user" dialog box as shown below.
text_image
Modify change password User Name: 111 Password: New Password: Confirm binding MAC address User PC MAC: 00 : 00 : 00 : 00 : 00 : 00 OK CancelModify User
3. Input original password of this user in the "Password" text box.
4. Input new password in the "New password" and "Confirmation" text box.
5. Input computer's physical address which is used to access the server in the "User PC MAC" text box.
6. Click "OK" button to modify password and binding MAC address successfully.
Delete user:
-
Select the user you want to delete in the user configuration list box.
-
Click "Delete" button to pop up a confirm dialog box. Then click "OK" to delete the user.
Note: The default super administrator cannot be deleted.
| Parameter | Meaning |
| User Name | User name to operate the logon client end |
| User Type | Type of users, normal user, advanced user and super administrator |
| Binding MAC address | The MAC addresses of user access the server which should be set up according to actual MAC address of server. |
| Password | Password to log in the client terminal |
| Confirm Password | Password to log in the client terminal |
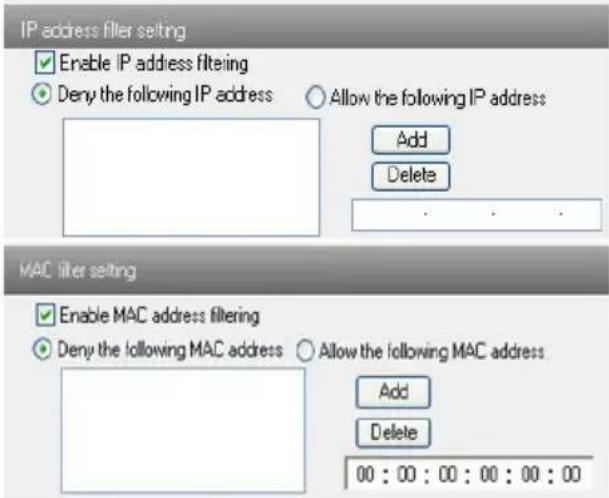
3.5.2 Security Configuration
-
Go to Advanced Configuration→Security Configuration to see a tab shown below.
-
- Check "Enable IP address" check box, select "Deny the following IP address" input IP address in the IP address list box and click "Add" button. Then this IP address will display in the list box; the operation step of "Allow the following IP address" is the same as that of "Deny the following IP address".
-
- Select the IP address you want to delete from the IP address list box and click "Delete" button to delete that IP address.
-
- Check "Enable MAC address" check box, select "Deny the following IP address", input MAC address in the MAC address list box and click "Add" button. Then this MAC address will display in the list box; the operation step of "Allow the following MAC address" is the same as that of "Deny the following IP address".
-
Select the MAC address you want to delete from the MAC address list box and click "Delete" button to delete that MAC address.
-
Click "Save" button to save the above setting.
text_image
IP address filter setting Enable IP address filtering Deny the following IP address Allow the following IP address Add Delete MAC filter setting Enable MAC address filtering Deny the following MAC address Allow the following MAC address Add Delete 00 : 00 : 00 : 00 : 00 : 003.5.3 Configure Backup & Restore
Go to Advanced configuration→Configure Backup & Restore Interface.
- Import & Export Configuration:
- Click "Browse" to select save path for import or export information on PC.
- You can import or export all setting information, but those two settings "User
Configuration" and "Network Configuration" are optional.

text_image
Import setting Path Browse All configuration exception for User Config Network Config import setting Export setting Export setting Default setting Load Default- Default Configuration
Click "Load default" button to restore all system settings to the default status.
3.5.4 Reboot Device
Go to Advanced configuration—Reboot device to see an interface as shown below. Click "Reboot device" button to reboot the device.

text_image
Reboot Reboot3.5.5 Upgrade
Go to Advanced Configuration—Upgrade interface as shown below.

text_image
Upgrade Path Browse Update server firmware- Click "Browse" button to select the saved path of the upgrade file.
- Click "Upgrade server firmware" button to start upgrading the application program.
- The device will restart automatically. After you successfully update the software, click "OK" button to close browser and then re-open browser to connect IP-CAM.
Notice: Do not shut down the PC or close the IP-CAM during upgrade.
Transcendent Series: IP Cameras
4 Q&A
Q: How to find my password if I forget it?
A : Reset the device to the default factory settings by IP-Tool.
Default IP: 192.168.226.201
User name: admin
Password: 123456
Q : Fail to connect devices through IE browser, why?
A: Network is not connected. Please check the connection and make sure it is connected.
B: IP is not available. Reset the valid IP.
C: Web port number has been revised: contact administrator to get the correct port number.
D: Exclude the above reasons. Recover default setting by IP-Tool.
Note: Default IP: 192.168.226.201, mask number: 255.255.255.0
Q : IP tool cannot search devices, why?
A: It may be caused by the anti-virus software in your computer. Please turn off and try to search device again.
Q : IE cannot download ActiveX control?
Transcendent Series: IP Cameras

text_image
Internet Options General Security Privacy Content Connections Programs Advanced Select a InWeb content zone to specify its security settings. Internet Local Intranet Trusted sites Restricted sites Internet The zone contains all InWeb sites you haven places other zones Security level to the zone Customs Custom settings - To change the settings, click Custom Level - To use the recommended settings, click Default Level Custom Level... Default Level OK Cancel Help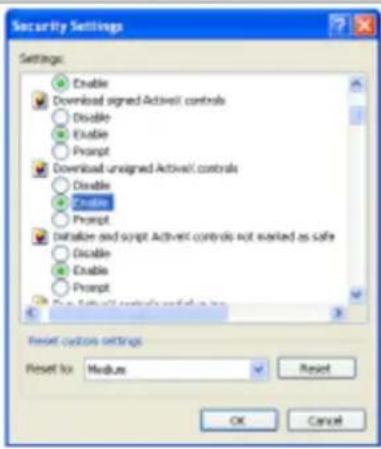
text_image
Security Settings Settings: Enable Download signed Activel controls Disable Enable Prompt Download unsigned Activel controls Disable Enable Prompt Initiate and script Activel controls do not want as safe Disable Enable Prompt Reset custom settings Reset to: Modus OK Cancel④ Then click OK to finish setup.
B. Other plug-ins or anti-virus blocks ActiveX. Please uninstall or close them.
Q: No sound can be heard, why?
A : Audio input device is not connected. Please connect and try again.
B: Audio function is not enabled on the corresponding channel. Please check AUDIO item to enable this function.
Detailed Specifications VTC-TNB42R3F VTC-TNB36R3V
| Image Sensor | 1/3" CMOS (GM8139 + Aptina0330) | |
| Image Size | 3 MegaPixel 2048x1536 | |
| Electronic Shutter | 1/25s~ 1/100000s | |
| Min. Illumination | 0 Lux (IR LED ON) | |
| Lens | 3.6mm Fixed | 2.8~12mm (Vari-Focal) |
| IR LEDs | 42 | 36 |
| IR Distance | 150' | 120' |
| Compression | H.264/MJPEG | |
| Resolution | 3 MP (2048x1536) / 1080P (1920x1080) / 720P (1280x720) / D1/CIF (480x240) | |
| Multi-Stream | 3 MP @ 1~15fps / 1920x1080, 1280x720, D1, CIF, 480x240 @ 1~30fps | |
| Bitrate | 64 kbps ~ 8 Mbps | |
| Encode Mode | VBR / CBR | |
| Quality | Five Level adjustable (VBR) / Random set (CBR) | |
| Image Setting | Saturation, Brightness, Contrast, WDR, Noise reduction | |
| ROI | Max 8 detailed areas can be viewed | |
| Network | RJ45 | |
| Remote Viewing | CMS / Web Browser / Mobile (iOS/Android) | |
| Online Connection | 10 online user max | |
| Protocol | TCP/IP, UDP, DHCP, NTP, RTSP, HTTP, PPPOE, DDNS, SMTP, FTP | |
| Connection Protocol | ONVIF, GB-T/28181-2011 | |
| Smart Alarm | Motion Alarm | |
| Day/Night | ICR | |
| Weather Resistance | IP66 | |
| Power supply | 12VDC / PoE | |
| Working Environment | -4~122 / 10%~90% Humidity | |
| Weight | 20.81 oz. / 1.30 lbs. / 590g | 21.16 oz. / 1.32 lbs. / 600g |
| Dimensions | 3.43 x 8.62" (87mm x 219mm) Dia x L | |
Detailed Specifications VTD-TND30R3V
| Image Sensor | 1/3" CMOS (GM8139 + Aptina0330) |
| Image Size | 3 MegaPixel 2048x1536 |
| Electronic Shutter | 1/25s~ 1/100000s |
| Min. Illumination | 0 Lux (IR LED ON) |
| Lens | 2.8~12mm (Vari-Focal) |
| IR LEDs | 30 |
| IR Distance | 100' |
| Compression | H.264/MJPEG |
| Resolution | 3 MP (2048x1536) / 1080P (1920x1080) / 720P (1280x720) / D1/CIF (480x240) |
| Multi-Stream | 3 MP @ 1~15fps / 1920x1080, 1280x720, D1, CIF, 480x240 @ 1~30fps |
| Bitrate | 64 kbps ~ 8 Mbps |
| Encode Mode | VBR / CBR |
| Quality | Five Level adjustable (VBR) / Random set (CBR) |
| Image Setting | Saturation, Brightness, Contrast, WDR, Noise reduction |
| ROI | Max 8 detailed areas can be viewed |
| Network | RJ45 |
| Remote Viewing | CMS / Web Browser / Mobile (iOS/Android) |
| Online Connection | 10 online user max |
| Protocol | TCP/IP, UDP, DHCP, NTP, RTSP, HTTP, PPPOE, DDNS, SMTP, FTP |
| Connection Protocol | ONVIF, GB-T/28181-2011 |
| Smart Alarm | Motion Alarm |
| Day/Night | ICR |
| Weather Resistance | IP66 |
| Power supply | 12VDC / PoE |
| Working Environment | -4~122 / 10%~90% Humidity |
| Weight | 34.22 oz. / 2.14 lbs. / 970g |
| Dimensions | 3.10" x 3.58" x 5.70" (78.7 × 90.9 × 144.7mm) H x W x Dia |
Detailed Specifications VTC-TNT30R3F VTC-TNT30R3V
| Image Sensor | 1/3" CMOS (GM8139 + Aptina0330) | |
| Image Size | 3 MegaPixel 2048x1536 | |
| Electronic Shutter | 1/25s~ 1/100000s | |
| Min. Illumination | 0 Lux (IR LED ON) | |
| Lens | 3.6mm Fixed | 2.8~12mm (Vari-Focal) |
| IR LEDs | 30 | 30 |
| IR Distance | 100' | 100' |
| Compression | H.264/MJPEG | |
| Resolution | 3 MP (2048x1536) / 1080P (1920x1080) / 720P (1280x720) / D1/CIF (480x240) | |
| Multi-Stream | 3 MP @ 1~15fps / 1920x1080, 1280x720, D1, CIF, 480x240 @ 1~30fps | |
| Bitrate | 64 kbps ~ 8 Mbps | |
| Encode Mode | VBR / CBR | |
| Quality | Five Level adjustable (VBR) / Random set (CBR) | |
| Image Setting | Saturation, Brightness, Contrast, WDR, Noise reduction | |
| ROI | Max 8 detailed areas can be viewed | |
| Network | RJ45 | |
| Remote Viewing | CMS / Web Browser / Mobile (iOS/Android) | |
| Online Connection | 10 online user max | |
| Protocol | TCP/IP, UDP, DHCP, NTP, RTSP, HTTP, PPPOE, DDNS, SMTP, FTP | |
| Connection Protocol | ONVIF, GB-T/28181-2011 | |
| Smart Alarm | Motion Alarm | |
| Day/Night | ICR | |
| Weather Resistance | IP66 | |
| Power supply | 12VDC / PoE | |
| Working Environment | -4~122 / 10%~90% Humidity | |
| Weight | 26.10 oz. / 1.63 lbs. / 740g | 26.46 oz. / 1.65 lbs. / 750g |
| Dimensions | 3.43" x 4.25" (87 × 108mm) Dia x H | 4.07" x 4.33" (130.3 × 110mm) Dia x H |

text_image
TRANSCENDENT HDMI High Definition Network Atlas Recorder TRANSCENDENT HDMI High Definition Network Atlas RecorderVT-TNR NVR SERIES
Transcendent 8/16 Channel Real Time Network Video Recorders with PoE
• 8 or 16 Channel Stand-alone Real-time IP Network Video Recorder
• Full 3 Megapixel Real-time recording 240fps (VT-TNR814) or 480fps (VT-TNR1628) with 120fps playback
• HDMI & VGA Video Outputs
• H.264 Compression Method
- Plug and Play & Auto configuration for many leading ONVIF compliant IP Camera models
• Alarm In/Out (VT-TNR1628 only)
- Internal 4-Port PoE (VT-TNR814) or 8-Port PoE (VT-TNR1628) Switch
• 1 Gigabit LAN Port
- Pentaplex: Live Display / Record / Playback / Backup / Remote Access
• Network Based PTZ Control
• Applications for iOS & Android
- Remote Viewing over the Internet via Web Browser or LAN
- VT-TNR814: 1 Internal SATA2/SATA3 HDD Slot supporting up to 4TB (1 x 4TB HDD) or VT-TNR1628: 2 Internal SATA2/SATA3 HDD Slots supporting up to 8TB (2 x 4TB HDD) Internal Storage
• Mac OS® Client & CMS Central Management Software Included
• Supports both Dynamic and Static IP Addresses
• Web-based remote configuration
• Control locally via Front Panel Controls, USB Mouse, or IR Remote control
LIMITED PRODUCT WARRANTY
VITEK products carry a three (3) year limited warranty. VITEK warrants to the purchaser that products manufactured by VITEK are free of any rightful claim of infringement or the like, and when used in the manner intended, will be free of defects in materials and workmanship for a period of three (3) years, or as otherwise stated above, from the date of purchase by the end user. This warranty is nontransferable and extends only to the original buyer or end user customer of a VITEK Authorized Reseller.
The product must have been used only for its intended purpose, and not been subjected to damage by misuse, willful or accidental damage, caused by excessive voltage or lightning.
The product must not have been tampered with in any way or the guarantee will be considered null and void.
This guarantee does not affect your statutory rights.
Contact your local VITEK Reseller should servicing become necessary.
VITEK makes no warranty or guarantee whatsoever with respect to products sold or purchased through unauthorized sales channels. Warranty support is available only if product is purchased through a VITEK Authorized Reseller.
CLASS A DIGITAL DEVICE (INDUSTRIAL & COMMERCIAL ENVIRONMENT)
This equipment has been tested and found to comply with the limits for a Class A digital device, pursuant to CE and FCC Rules. These limits are designed to provide reasonable protection against harmful interference when the equipment is operated in a commercial environment. This equipment generates, uses and can radiate radio frequency energy and, if not installed and used in accordance with the instruction manual, may cause harmful interference to radio communications. Operation of this equipment in a residential area is likely to cause harmful interference in which case the user will be required to correct the interference at his own expense.