ION100V-21SB-CT-RM - Lawn mower Snow Joe - Free user manual and instructions
Find the device manual for free ION100V-21SB-CT-RM Snow Joe in PDF.

User questions about ION100V-21SB-CT-RM Snow Joe
0 question about this device. Answer the ones you know or ask your own.
Ask a new question about this device
Download the instructions for your Lawn mower in PDF format for free! Find your manual ION100V-21SB-CT-RM - Snow Joe and take your electronic device back in hand. On this page are published all the documents necessary for the use of your device. ION100V-21SB-CT-RM by Snow Joe.
USER MANUAL ION100V-21SB-CT-RM Snow Joe
THANKS FOR YOUR PURCHASE OF A REMANUFACTURED PRODUCT.
To make sure you get the most out of your product, be sure to register online at
snowjoe.com
to enjoy full product support.
PASTE UPC LABEL HERE
IMPORTANT! Safety Instructions
All Operators Must Read These Instructions Before Use
Read all instructions when using cordless snow blowers. Basic safety precautions should always be followed to reduce the risk of fire, electric shock, and personal injury.
General Safety Rules
Notice the personal safety alert symbol ⚠️ used in this manual to draw your attention to a WARNING given along with the particular operating instruction. This means that the operation requires special ATTENTION, CAUTION, and AWARENESS.
- Keep work area clean and well lit – Cluttered, dark areas invite accidents.
- Use the right product – Do not use this machine for any job except that for which it is intended.
- CAUTION! – Exercise caution to avoid slipping or falling. Wear protective footwear that will protect your feet and improve your footing on slippery surfaces.
- Use safety glasses – Also use safety footwear, snug-fitting clothing, protective gloves, hearing and head protection.
- Stay alert – Watch what you are doing. Use common sense. Do not operate the snow blower when you are tired or under the influence of alcohol or drugs.
- Store indoors – When not in use, the snow blower should be kept dry and stored out of the reach of children in a high or locked place.
- Maintain snow blower with care – Follow instructions for lubricating and changing accessories.
⚠ WARNING! Always disengage the switch bar lever, and disconnect the battery pack; wait for all movement to stop before making any adjustments, inspecting, servicing, changing accessories, cleaning the snow blower, or when any other dangerous conditions present. Any such operation should be performed after revolving parts inside the snow blower stop completely. Such preventive safety measures reduce the risk of starting the power tool accidentally.
⚠ WARNING! When replacing any parts, you must strictly observe the instructions and procedures described in this user
manual. Special care should be paid to any rubber parts, since these parts may increase the engine load and decrease its mechanical power if damaged.
⚠ WARNING! If you notice that the snow blower is not running properly or hear abnormal sounds from the engine when it is in use, immediately stop the machine, disconnect the battery pack, and contact Snow Joe® + Sun Joe® customer service center at 1-866-SNOWJOE (1-866-766-9563).
- Moving parts present risks – Keep your face, hair, clothing, hands, and feet away from moving parts. All guards and safety attachments must be installed properly before using the unit. Shut off and disconnect the battery pack(s) before touching any parts other than the handles and switch.
For all Snow Blowers
- Do not use on graveled surfaces unless the snow blower is adjusted for such a surface in accordance with the manual.
- Keep children away. All visitors should be kept a safe distance from work area.
- Dress properly. Do not wear loose clothing or jewelry. They can be caught in moving parts.
- Wear rubber boots when operating the snow blower.
- Operation of the snow blower in the hand-held position is unsafe, except in accordance with the special instructions for such use provided in the operator's manual.
- Avoid accidental starting – Make sure the safety button is off and the switch bar lever is disengaged before inserting the battery pack(s) into the unit. Do not transport the snow blower with the safety button and the switch bar lever engaged.
- Keep hands away from moving parts.
- Keep guards in place and in working order.
- Do not force the snow blower. Use the snow blower at the rate for which it was designed to ensure optimal performance and safe operation.
- Do not overreach. Keep proper footing and balance at all times.
⚠ WARNING! If the snow blower strikes any object, follow these steps:
i) Stop the snow blower and remove the battery pack(s).
ii) Inspect for damage.
iii) Repair any damage before restarting and operating the snow blower.
For Walk-behind Snow Blowers
This snow blower is capable of amputating hands and feet and throwing objects. Failure to observe the following safety instructions could result in serious injury.
Training
- Read, understand and follow all instructions on the machine and in the manual before operating this unit. Be thoroughly familiar with the controls and the proper use of the equipment. Know how to stop the unit and disengage the controls quickly.
- Never allow children to operate the equipment. Never allow adults to operate the equipment without proper instruction.
- Keep the area of operation clear of all persons, particularly small children.
- Exercise caution to avoid slipping or falling. Especially when operating the snow blower in reverse.
Preparation
- Thoroughly inspect the area where the equipment is to be used and remove all doormats, sleds, boards, wires, and other foreign objects.
- Do not operate the equipment without wearing adequate winter garments. Avoid loose fitting clothing that can get caught in moving parts. Wear footwear that will improve footing on slippery surfaces.
- Never attempt to make any adjustment while the motor is running, except when specifically recommended by manufacturer.
- Always wear safety glasses or eye shields during operation or while performing an adjustment or repair to protect eyes from foreign objects that may be thrown from the machine.
Operation
- Do not put hands or feet near or under rotating parts. Keep clear of the discharge opening at all times.
- Exercise extreme caution when operating on or crossing gravel drives, walks, or roads. Stay alert for hidden hazards or traffic.
- After striking a foreign object, stop the motor, remove the battery pack(s), thoroughly inspect the snow blower for any damage, and repair the damage before restarting and operating the snow blower.
- If the unit start to vibrate abnormally, stop the motor and check immediately for the cause. Vibration is generally a warning of trouble.
-
Stop the motor whenever you leave the operating position, before unclogging the auger/impeller housing or discharge chute, and when making any repairs, adjustments or inspection.
-
When cleaning, repairing, or inspecting the snow blower, stop the motor and make sure the auger/impeller and all moving parts have stopped.
- Do not run the motor indoors. Except when starting the motor and for transporting the snow blower in or out of the building. Open the outside doors. Exhaust fumes are dangerous.
- Exercise extreme caution when operating on slopes.
- Never operate the snow blower without proper guards and other safety protective devices in place and working.
- Never direct the discharge toward people or areas where property damage can occur. Keep children and others away.
- Do not overload the machine at high transport speeds on slippery surfaces. Look behind and use care when operating in reverse.
- Do not overload the machine capacity by attempting to clear snow at too fast a rate.
- Disengage the power to the auger/impeller when snow blower is transported or not in use.
- Use only attachment and accessories approved by the manufacturer of the snow blower.
- Never operate the snow blower without good visibility or light. Always be sure of your footing, and keep a firm hold on the handle. Walk; Never run.
- Never touch a hot motor.
Clearing a Clogged Discharge Chute
⚠ WARNING! Rotating blades can cause serious injury. Never attempt to unclog or clean unit while auger is running.
Hand contact with the rotating auger/impeller inside the discharge chute is the most common cause of injury associated with snow blowers. Never use your hand to clean out the discharge chute.
To clean the chute:
- SHUT THE MOTOR OFF AND REMOVE THE BATTERY PACK(S).
- Wait 10 seconds to be sure the auger blades have stopped completely.
- Always use a clean-out tool, such as Snow Joe ^® universal chute clean-out tool (Model SJCOT). Visit snowjoe.com to purchase.
Maintenance and Storage
- Check shear bolts and other bolts at frequent intervals for proper tightness to be sure the equipment is in safe working condition.
- Always refer to the operator's manual for important details if the snow blower is to be stored for an extended period.
-
Maintain or replace safety and instruction labels, as necessary.
-
Run the machine a few minutes after plowing snow to prevent freeze-up of the auger/impeller.
Battery + Charger Safety Instructions
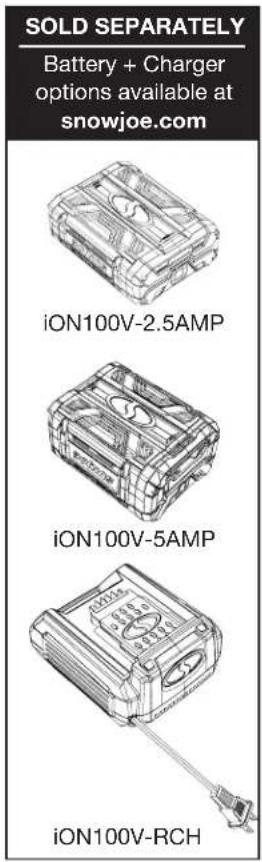
NOTE: This unit is a tool only. The battery and the charger are not included. They must be purchased separately. The iON100V-21SB-CT is compatible with the following batteries (models iON100V-2.5AMP and iON100V-5AMP) and charger (model iON100V-RCH). See page 20 for battery options and specifications, or visit snowjoe.com.
We pay a great deal of attention to the design of every battery pack to ensure that we supply you with batteries that are safe, durable and have a high energy density. The battery cells have a wide range of safety devices. Each individual cell is initially formatted and its electrical characteristic curves are recorded. This data is then used exclusively to be able to assemble the best possible battery packs.
Despite all the safety precautions, caution must always be exercised when handling batteries. The following points must be obeyed at all times to ensure safe use. Safe use can only be guaranteed if undamaged cells are used. Incorrect handling of the battery pack can cause cell damage.
IMPORTANT! Analyses confirm that incorrect use and poor care of high-performance batteries are the main factors responsible for personal and/or product damage.
⚠ WARNING! Use only approved replacement batteries; other batteries may damage the cordless snow blower and cause it to malfunction, which can lead to serious personal injury.
⚠️CAUTION! To reduce the risk of injury, charge the iON100V-2.5AMP battery pack or the iON100V-5AMP battery pack only in their compatible charger (model iON100V-RCH, sold separately). Other types of chargers present risk of fire, personal injury, and damage. Do not wire a battery pack to a power supply plug or car cigarette lighter. Such misuse will permanently disable or damage the battery pack.
- Avoid dangerous environments – Do not charge the battery pack(s) in rain, snow or in damp or wet locations. Do not use the battery pack(s) or charger in the presence of explosive atmospheres (gaseous fumes, dust or flammable materials) because sparks may be generated when inserting or removing the battery pack(s), which could lead to a fire.
- Charge in a well-ventilated area – Do not block the charger vents. Keep them clear to allow for proper ventilation. Do not allow smoking or open flames near a charging battery pack. Vented gases may explode.
NOTE: The safe temperature range for the batteries is -4^ (-20°C) to 113^ (45°C). Do not charge the battery pack(s) outside in freezing weather; charge it at room temperature.
- Maintain charger cord – When unplugging the charger, pull the plug, not the cord, from the receptacle to reduce the risk of damage to the electrical plug and cord. Never carry the charger by its cord or yank it by the cord to disconnect it from the receptacle. Keep the cord away from heat, oil and sharp edges. Make sure the cord will not be stepped on, tripped over or subjected to damage or stress when the charger is in use. Do not use the charger with a damaged cord or plug. Replace a damaged charger immediately.
- Do not use an extension cord unless it is absolutely necessary – Using the wrong, damaged or improperly wired extension cord poses a risk of fire and electric shock. If an extension cord must be used, plug the charger into a properly wired 18 gauge or larger extension cord with the female plug matching the male plug on the charger. Make sure that the extension cord is in good electrical condition.
- Use only recommended attachments – Use of an attachment not recommended or sold by the battery charger or battery pack manufacturer may result in risk of fire, electric shock or personal injury.
- Unplug charger when not in use – Make sure to remove battery pack from unplugged chargers.
⚠ WARNING! To reduce the risk of electric shock, always unplug the charger before performing any cleaning or maintenance. Do not allow water to flow into the charger. Use a Ground Fault Circuit Interrupter (GFCI) to reduce shock hazards.
- Do not burn or incinerate the battery pack(s) – Battery packs may explode, causing personal injury or damage. Toxic fumes and materials are created when battery packs are burned.
- Do not crush, drop or damage the battery pack(s) – Do not use the battery pack(s) or charger if they have sustained a sharp blow, been dropped, run over or have been damaged in any way (i.e. pierced with a nail, hit with a hammer, stepped on, etc.).
- Do not disassemble – Incorrect reassembly may pose a serious risk of electric shock, fire or exposure to toxic battery chemicals. If the battery pack(s) or charger are damaged, contact an authorized Snow Joe® + Sun Joe® dealer or call the Snow Joe® + Sun Joe® customer service center at 1-866-SNOWJOE (1-866-766-9563) for assistance.
- Battery chemicals cause serious burns – Never let a damaged battery pack contact the skin, eyes or mouth. If a damaged battery pack leaks battery chemicals, use rubber or neoprene gloves to safely dispose of it. If skin is exposed to battery fluids, wash the affected area with soap and water and rinse with vinegar. If eyes are exposed to battery chemicals, immediately flush with water for 20 minutes and seek medical attention. Remove and dispose of contaminated clothing.
- Do not short circuit – A battery pack will short circuit if a metal object makes a connection between the positive and negative contacts on the battery pack. Do not place a battery pack near anything that may cause a short circuit, such as paper clips, coins, keys, screws, nails and other metallic objects. A short-circuited battery pack poses a risk of fire and severe personal injury.
- Store your battery pack(s) and charger in a cool, dry place – Do not store the battery pack(s) or charger where temperatures may exceed 104°F (40°C), such as in direct sunlight or inside a vehicle or metal building during the summer.
Information about the battery
- The battery packs (model iON100V-2.5AMP or iON100V-5AMP) must be purchased separately for use with this cordless snow blower are only partially charged. The battery packs have to be charged completely before you use the tool for the first time.
- For optimum battery performance, avoid low discharge cycles by charging the battery pack(s) frequently.
- Store the battery pack(s) in a cool place, ideally at 59°F (15°C) and charged to at least 40%.
- Lithium-ion batteries are subject to a natural aging process. The battery pack(s) must be replaced at the latest when its capacity falls to just 80% of its capacity when new. Weakened cells in an aged battery pack are no longer capable of meeting the high power requirements needed for the proper operation of your snow blower, and therefore pose a safety risk.
- Do not throw battery packs into an open fire as this poses a risk of explosion.
- Do not ignite the battery packs or expose it to fire.
- Do not exhaustively discharge batteries. Exhaustive discharge will damage the battery cells. The most common cause of exhaustive discharge is lengthy storage or non-use of partially discharged batteries. Stop working as soon as the performance of the battery falls noticeably or the electronic protection system triggers. Place the battery pack(s) in storage only after it has been fully charged.
-
Protect the battery pack(s) and the tool from overloads. Overloads will quickly result in overheating and cell damage inside the battery housing even if this overheating is not apparent externally.
-
Avoid damage and shocks. Immediately replace batteries that have been dropped from a height of more than one meter or those that have been exposed to violent shocks, even if the housing of the battery pack appears to be undamaged. The battery cells inside the battery may have suffered serious damage.
- If the battery pack(s) suffers overloading and overheating, the integrated protective cutoff will switch off the equipment for safety reasons. If this situation happens, stop the tool and let the battery pack(s) cool down for a few minutes before restarting.
- Use only original battery packs. The use of other batteries poses a fire risk and may result in injuries or an explosion.
Information about the charger and the charging process
- Please check the data marked on the rating plate of the battery charger (sold separately). Be sure to connect the battery charger to a power supply with the voltage marked on the rating plate. Never connect it to a different mains voltage.
- Protect the battery charger and its cord from damage. Keep the charger and its cord away from heat, oil and sharp edges. Have damaged cords repaired without delay by a qualified technician at an authorized Snow Joe ^® + Sun Joe ^® dealer or call the Snow Joe ^® + Sun Joe ^® customer service center at 1-866-SNOWJOE (1-866-766-9563).
- Electrical plugs must match the outlet. Never modify the plug in any way. Do not use any adapter plugs with grounded appliances. Unmodified plugs and matching outlets will reduce the risk of electric shock.
- Keep the battery charger, battery pack(s) and the cordless tool out of the reach of children.
- Do not use the supplied battery charger to charge other cordless tools.
- During periods of heavy use, the battery pack(s) will become warm. Allow the battery pack to cool to room temperature before inserting it into the charger to recharge.
- Do not overcharge batteries. Do not exceed the maximum charging times. These charging times only apply to discharged batteries. Frequent insertion of a charged or partially charged battery pack will result in overcharging and cell damage. Do not leave batteries in the charger for days on end.
- Never use or charge batteries if you suspect that it has been more than 12 months since the last time they were charged. There is a high probability that the battery pack has already suffered dangerous damage (exhaustive discharge).
- Charging batteries at a temperature below 50^ F ( 10^ C) will cause chemical damage to the cells and may cause a fire.
-
Do not use batteries that have been exposed to heat during the charging process, as the battery cells may have suffered dangerous damage.
-
Do not use batteries that have suffered curvature or deformation during the charging process or those that exhibit other atypical symptoms (gassing, hissing, cracking, etc.)
- Never fully discharge the battery pack(s) (maximum recommended depth of discharge is 80%). A complete discharge of the battery pack will lead to premature aging of the battery cells.
Protection from environmental influences
- Wear suitable work clothes. Wear safety goggles.
- Protect your cordless tool and the battery charger from moisture and rain. Moisture and rain can cause dangerous cell damage.
- Do not use the cordless tool or the battery charger near vapors and flammable liquids.
- Use the battery charger only in dry conditions and at an ambient temperature of 50^ F - 104^ F ( 10^ C - 40^ C).
- Do not keep the battery charger in places where the temperature is liable to reach over 104^ F ( 40^ C). In particular, do not leave the battery charger in a car that is parked in the sunshine.
- Protect batteries from overheating. Overloads, overcharging and exposure to direct sunlight will result in overheating and cell damage. Never charge or work with batteries that have been overheated – replace them immediately, if possible.
- Store the charger and your cordless tool only in dry locations with an ambient temperature of 50^ F - 104^ F ( 10^ C - 40^ C). Store your lithium-ion battery pack(s) in a cool, dry place at a temperature of 50^ F - 68^ F ( 10^ C - 20^ C). Protect the battery pack(s), charger and cordless tool from humidity and direct sunlight. Only place fully charged batteries in storage (charged to at least 40%).
- Prevent the lithium-ion battery pack(s) from freezing. Battery packs that were stored below 32^ F ( 0^ C) for more than 60 minutes must be discarded.
- When handling batteries, be wary of electrostatic charge. Electrostatic discharges can damage the electronic protection system and the battery cells. Avoid electrostatic charging and never touch the battery poles.
Safety Symbols
The following table depicts and describes safety symbols that may appear on this product. Read, understand and follow all instructions on the machine before attempting to assemble and operate.
| Symbols SymbolsDescriptions Descriptions | |||
 | READ THE OPERATOR'S MANUAL(S) – Read, understand and follow all instructions in the user manual(s) before attempting to assemble and operate. |  | WARNING! Do not expose the unit to rain or wet conditions. Keep dry. |
 | SAFETY ALERT – Indicates a precaution, a warning or a danger. | 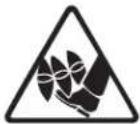 | DANGER! Cutting/dismemberment hazard - Keep feet away from the rotating auger. |
 | Wear hearing protection.Wear eye protection.Wear breathing protection. |  | CAUTION! Beware of stones and other foreign objects that could be thrown from the appliance. |
 | Keep hands, feet and clothing away from the rotating auger to avoid injury. |  | The rotating part will continuously run for several seconds after you turn off the machine. |
 | Wear protective gloves and non-slip footwear when using the machine and handling debris. | 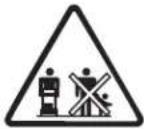 | Keep bystanders and children a safe distance (at least 33 ft/10 m) away from the work area. |
 | Do not use hands to unclog chute. | 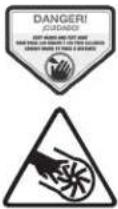 | DANGER! Cutting/dismemberment hazard – Keep hands away from the rotating auger. Do not use hands to unclog rotor housing. Stop motor before removing debris. |
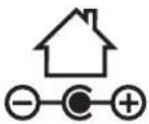 | Indoor use only. Only use battery charger indoors. | ||
Know Your Cordless Snow Blower
Read the owner's manual and safety rules carefully before operating your cordless snow blower. Compare the illustration below to the actual unit in order to familiarize yourself with the location of the various controls and adjustments. Save this manual for future reference.
text_image
SOLD SEPARATELY Battery + Charger options available at snowjoe.com iON100V-2.5AMP iON100V-5AMP iON100V-RCH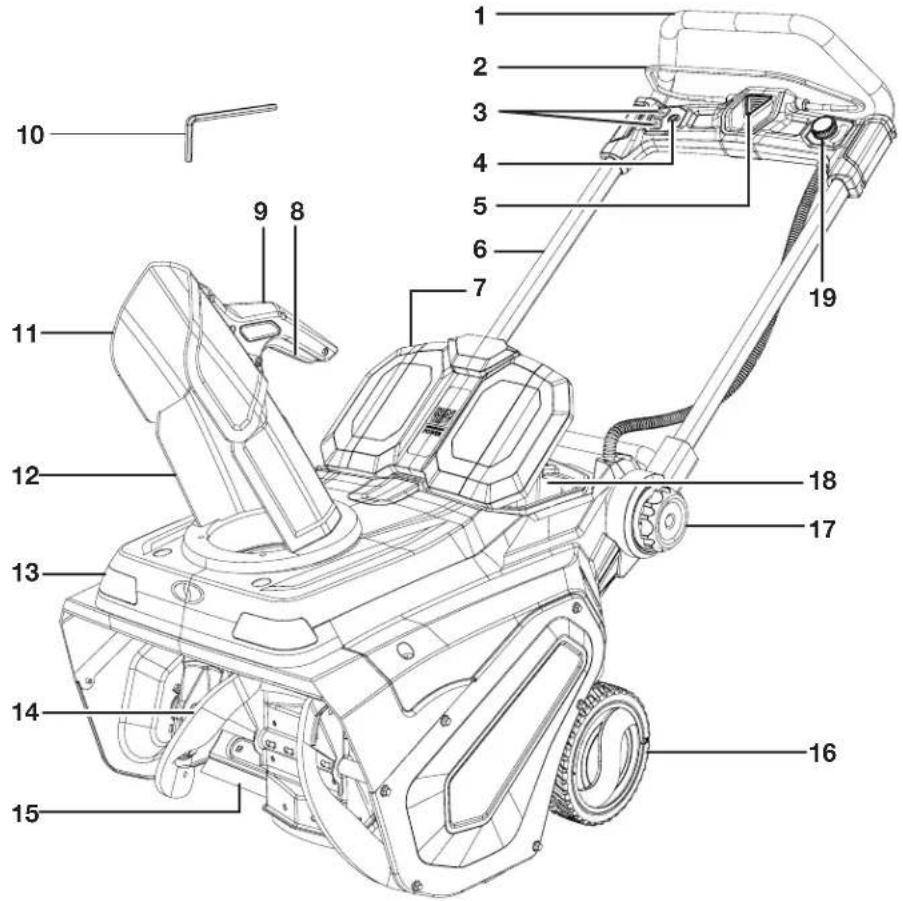
text_image
Technical diagram of a lawn mower with numbered parts for identification- Soft grip
- Switch bar level
- Chute rotate buttons (left and right)
- LED light button
-
Safety button
-
Handle frame
- Battery compartment cover
- Chute deflector trigger
- Chute deflector handle
-
Hex key wrench
-
Chute deflector
- Discharge chute
- LED lights (2)
- Auger blades
-
Scraper bar
-
Wheels (2)
- Handle frame locks (2)
- Battery compartment
- Auger speed dial
BATTERY COMBINATION
NOTE: This snow blower can be powered by either one (1) 5 AMP Snow Joe ^® 100-Volt lithium-ion battery or any combination of two (2) Snow Joe ^® 100-Volt lithium-ion batteries.
| BASIC ADVANCED PREMIUM | |||
| COMBINATION | One iON100V-5AMP battery | One iON100V-5AMP battery + one iON100V-2.5AMP battery | Two iON100V-5AMP battery |
Technical Data
Motor 2800 W Brushless
Battery Voltage Max ^* 100V D.C.
No Load Speed ....1000 - 1500 ± 10% RPM
Throw Distance Max.... 30 ft (9 m)
Auger 2-blade paddle auger
Clearing Width....21 in. (53 cm)
Depth of Snow Cut 12 in. (30 cm)
Stages .... Single stage
Directional Control....180° auto-rotate chute
LED Light....2.5 watt (each)
Net Weight.... 58.9 lbs (26.7 kg)
* Initial no-load voltage, when fully charged, peaks at 100.8 volts; nominal voltage under typical load is 86.4 volts.
NOTE: Battery runtime may vary depending on snow conditions.
NOTE: This unit is a tool only. In order to operate this snow blower, you will need to additionally purchase either the iON100V-2.5AMP or iON100V-5AMP lithium-ion battery and the 100V quick charger (model iON100V-RCH). See page 20 for battery options and specifications, or visit snowjoe.com.
Unpacking
Carton Contents:
- Cordless snow blower with handle frame
- Discharge chute assembly
• Discharge chute screws (3) - Hex key
-
Manual with registration card
-
Carefully remove the cordless snow blower and check to see that all of the above items are supplied.
-
Inspect the product carefully to make sure no breakage or damage occurred during shipping. If you find damaged or missing parts, DO NOT return the unit to the store. Please call the Snow Joe ^® + Sun Joe ^® customer service center at 1-866-SNOWJOE (1-866-766-9563).
NOTE: Do not discard the shipping carton and packaging material until you are ready to use the cordless snow blower. The packaging is made of recyclable materials. Properly dispose of these materials in accordance with local regulations or save the packaging for long-term product storage.
IMPORTANT! The equipment and packaging material are not toys. Do not let children play with plastic bags, foils or small parts. These items can be swallowed and pose a suffocation risk!
Battery Pack Operation
This equipment is powered by either one or two lithium-ion batteries (sold separately). The battery pack(s) are completely closed and maintenance free.
TOOL ONLY
BATTERY + CHARGER SOLD SEPARATELY
This snow blower can be powered by either one (1) 5-AMP Snow Joe ^® 100-Volt lithium-ion battery or any combination of two (2) Snow Joe ^® 100-Volt lithium-ion batteries. See page 20 for battery options and specifications, or visit sunjoe.com.
Battery Charge Level Indicator
The battery pack(s) is equipped with a push button for checking the charge level. Simply press the push button to read off the battery charge level from the LEDs of the battery indicator (Fig.1):
Fig. 1

text_image
1 85N Press 80MEN9Charge level indicator push button
- All 4 level monitoring LEDs are lit: Battery charge level is high.
- 3 level monitoring LEDs are lit: Battery charge level is decreasing.
- 2 level monitoring LEDs are lit: Battery charge level is decreasing. Stop work as soon as possible.
- 1 level monitoring LED is lit: Battery is flat. Stop work IMMEDIATELY and charge the battery. Otherwise the battery's service life will be greatly shortened.
| Light IndicatorsLights | |
 | The battery is at 20% capacity and requires charging |
 | The battery is at 50% capacity and requires charging soon |
 | The battery is at 70% capacity |
 | The battery is at full capacity |
NOTE: If the charge level button does not appear to be working, place the battery pack(s) on the charger and charge as needed.
NOTE: Immediately after using the battery pack(s), the charge level button may display a lower charge than it will if checked a few minutes later. The battery cells "recover" some of their charge after resting.
USB Charging Port
iON100V series batteries are equipped with a USB port (or ports, depending on your model) which can provide 5 V power for most popular smartphones, tablets, wearables and other USB devices.
To charge with the battery, Connect the USB cable that came with your device to the USB port (or ports) on your iON100V series battery and to your device. The charging process will start immediately (Fig. 2).

text_image
Fig. 2 USB charging ports iON100V-2.5AMP iON100V-5AMPNOTE: If you experience any issues with charging your particular device, ensure that the battery pack is fully charged.
WARNING! Make sure the battery's USB port(s) are not contaminated with lint or other debris. Use a canned-air type of product periodically to ensure that the port openings are clear.
LED light (iON100V-5AMP batteries only – sold separately)
The iON100V-5AMP battery is equipped with a 0.35 watt LED light located on the handle, which is good for camping and emergency illumination. To turn on the LED light, open the carry handle, and press the battery push button twice in a row. To turn off the LED light, press the battery push button twice again (Fig. 3).
NOTE: This function only comes with iON100V-5AMP battery. iON100V-2.5AMP battery is not equipped with the handle or the LED light.

text_image
Fig. 3 LED light USB Push twice to start/stopCharger Operation
TOOL ONLY BATTERY + CHARGER SOLD SEPARATELY
This snow blower can be powered by either one (1) 5-AMP Snow Joe ^® 100-Volt lithium-ion battery or any combination of two (2) Snow Joe ^® 100-Volt lithium-ion batteries. See page 20 for battery options and specifications, or visit sunjoe.com.
WARNING! Charge only the iON100V-2.5AMP or the iON100V-5AMP lithium-ion battery packs in compatible iON100V-RCH battery charger. Other types of batteries may cause personal injury and damage.
To reduce the risk of electric shock, do not allow water to flow into the charger's AC/DC plug.
When to Charge the iON100V Lithium-iON Batteries
NOTE: The iON100V-2.5AMP and iON100V-5AMP lithium-ion battery packs do not develop a "memory" when charged after only a partial discharge. Therefore, it is not necessary to run down the battery pack before placing it into the charger.
- Use the battery charge indicator lights to determine when to charge your iON100V-2.5AMP and iON100V-5AMP lithium-ion battery packs.
- You can "top-off" your battery pack's charge before starting a big job or after a long day of use.
Charging the Battery Packs
- Flip open the battery compartment cover, push the battery releasing button to release the battery pack(s). Pull the battery pack(s) out of the equipment. (Fig. 4).

text_image
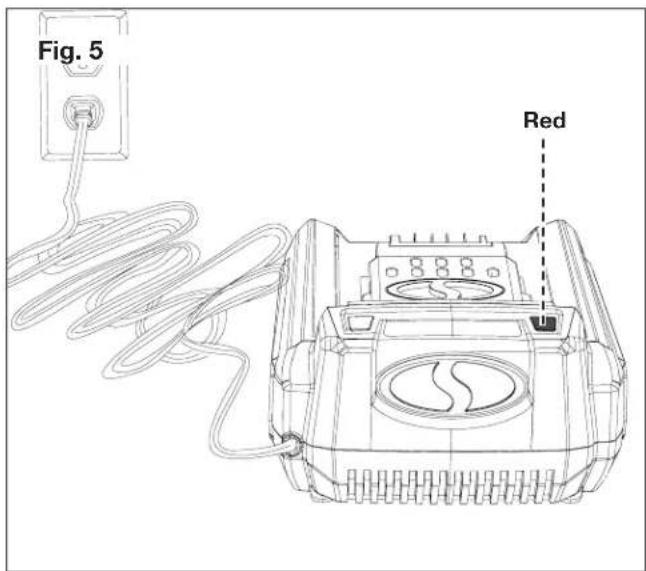
Fig. 4 Battery compartment cover Battery releasing buttons- Check that the mains voltage is the same as that marked on the rating plate of the battery charger. Then, insert the charger's plug into the electrical wall outlet. When you plug in the charger, the red light will illuminate steadily (Fig. 5).
text_image
Fig. 5 Red⚠️CAUTION! Charger iON100V-RCH is rated for 100 – 120 volt AC only. DO NOT plug the charger into any outlet that will provide power with a higher voltage. Over voltage charging will be harmful to both the battery and charger, and may cause the charger to burn out.
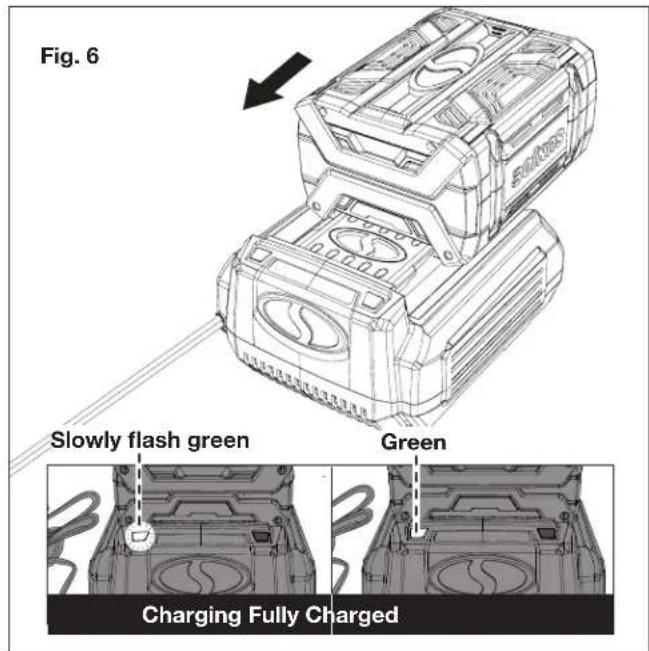
- Place the battery pack into the charger by sliding the pack as shown until it clicks into the position. When the battery is inserted properly, the green light will slowly flash to indicate that the battery is charging. The red light will turn off. You will also hear a fan sound (Fig. 6).
- When the green light stays on, the battery is fully charged (Fig. 6).
text_image
Fig. 6 Slowly flash green Green Charging Fully ChargedNOTE: If the green light is off while the red light flashes slowly, this indicates a temperature abnormality (i.e. that the battery pack is too hot). If the green light is off while the red light flashes rapidly, this indicates there's something wrong with the charger or the battery. Wait for a while and try to reinsert the battery into the charger. If the situation still persists, contact Snow Joe® + Sun Joe® customer service at 1-866-SNOWJOE (1-866-766-9563).

natural_image
Technical line drawing of a vehicle chassis with no visible text or symbolsTemperature abnormal (slowly flashing red)

natural_image
Technical line drawing of a mechanical component with no visible text or symbolsSomething is wrong (rapidly flashing red)
- A fully discharged iON100V-2.5AMP battery pack with an internal temperature in the normal range will fully charge in 50 minutes (between 50°F/10°C and 104°F/40°C). A fully discharged iON100V-5AMP battery pack with an internal temperature in the normal range will fully charge in 1 hr 40 minutes (between 50°F/10°C and 104°F/40°C). Heavily cycled battery packs may take longer to charge completely.
- When charging is complete, remove the battery from the charger by pulling the battery backward to unlock it from the charger (Fig. 7).

natural_image
Technical line drawing of a mechanical device with internal components and an arrow indicating direction (no text or symbols)- Timely recharging of the battery will help prolong the battery's life. You must recharge the battery pack(s) when you notice a drop in the equipment's power.
IMPORTANT! Never allow the battery pack(s) to become fully discharged as this will cause irreversible damage to the battery.
Charger Light Indicator Table
Use the table below to determine charger light patterns and possible causes. For all other issues, contact Snow Joe ^® + Sun Joe ^® customer service center at 1-866-SNOWJOE (1-866-766-9563).
| Indication | Possible Cause (Solution) |
| Red Light – SteadyGreen Light – Off | No load charging – There's no battery inserted in the charger. |
| Red Light – OffGreen Light – Slowly flashes | Normal charging – The battery is being charged. |
| Red Light – OffGreen Light – Steady | Fully charged – The battery is fully charged and the charging process is finished. |
| Red Light – OffGreen Light – Rapidly flashes | Discharged – The battery is heavily discharged. It may take longer time for charging. |
| Red Light – Slowly flashesGreen Light – Off | Temperature abnormal – Charging process will start when battery returns to normal temperature. |
| Red Light – Rapidly flashesGreen Light – Off | Over current charging – The current coming through the charger is greater than what the charger can support. Stop charging as soon as possible.Abnormal performance– Something is wrong with the battery or the charger. Contact Snow Joe® + Sun Joe® customer service at 1-866-SNOWJOE (1-866-766-9563). |
Assembly
⚠ WARNING! To avoid serious personal injury, read and understand all safety instructions provided.
WARNING! Unpacking and assembly should be completed on a flat and stable surface, with adequate space for moving the machine and its packaging.
Adjusting the Handle Frame
- Unlock the handle frame by rotating the handle frame locks on both sides clockwise (Fig. 8).

text_image
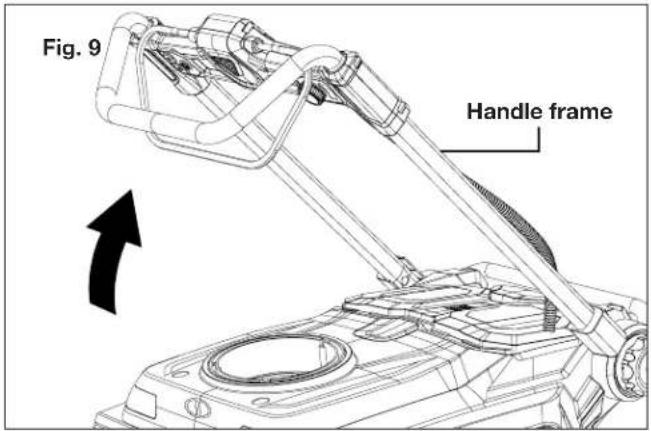
Fig. 8 Handle frame lock Handle frame- Rotate the handle frame up in a comfortable operation position (Fig. 9).
text_image
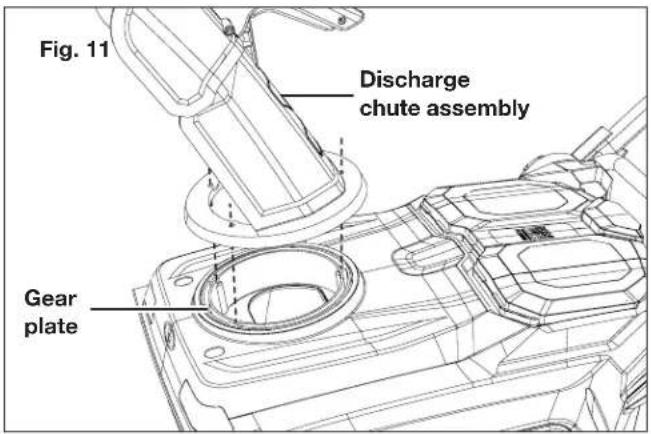
Fig. 11 Discharge chute assembly Gear plate- Use the 3 discharge chute screws to secure the discharge chute assembly to the gear plate as shown. Tighten with the provided hex key (Fig. 12).
text_image
Fig. 9 Handle frame- Lock the handle frame in position by rotating the handle frame locks on both sides counter-clockwise (Fig. 10).

text_image
Fig. 12 Discharge chute assembly Screws Gear plateOperations

text_image
Fig. 10 Handle frame Rotate to lockDischarge Chute Assembly
- Place the discharge chute assembly onto the gear plate, aligning the 3 holes in the gear plate, and push down until the chute is flush and flat against the housing (Fig. 11).
WARNING! AVOID INJURY. Read and understand the entire safety section before proceeding.
NOTE: Before inserting the battery pack(s), verify that the snow blower's auger and rubber plates are firmly secured. Perform a test run to ensure that the rotor turns freely.
Starting + Stopping
WARNING! The auger starts rotating immediately after the snow blower is switched on. Keep hands and feet away from the auger.
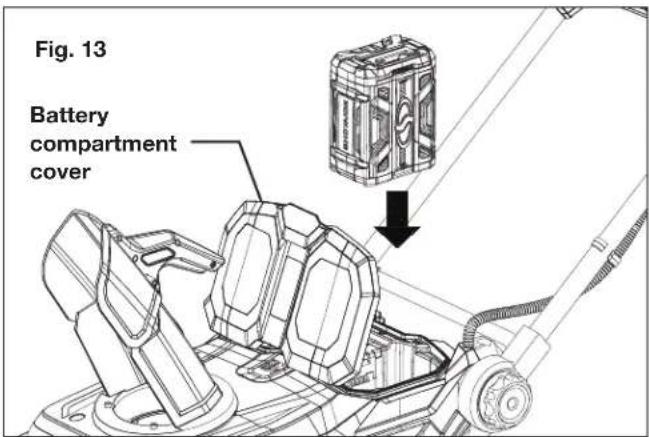
- Open the battery compartment cover and then push the battery pack(s) down until it clicks and locks into position (Fig. 13). Either side of the battery compartments may be used. Close the cover.
text_image
Fig. 13 Battery compartment coverTOOL ONLY BATTERY + CHARGER SOLD SEPARATELY
This snow blower can be powered by either one (1) 5-AMP Snow Joe ^® 100-Volt lithium-ion battery or any combination of two (2) Snow Joe ^® 100-Volt lithium-ion batteries. See page 20 for battery options and specifications, or visit sunjoe.com.
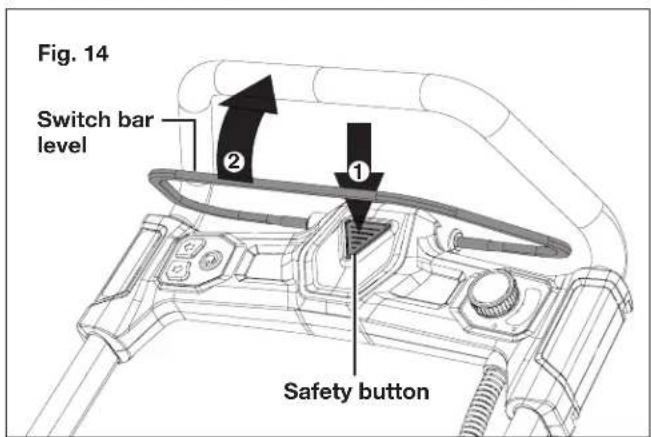
- To switch the snow blower ON, press the safety switch button, then squeeze the switch bar lever (Fig. 14).
text_image
Fig. 14 Switch bar level ② ① Safety button-
Once the snow blower starts, release the safety switch button and proceed with operation.
-
To power OFF, release the switch bar lever.
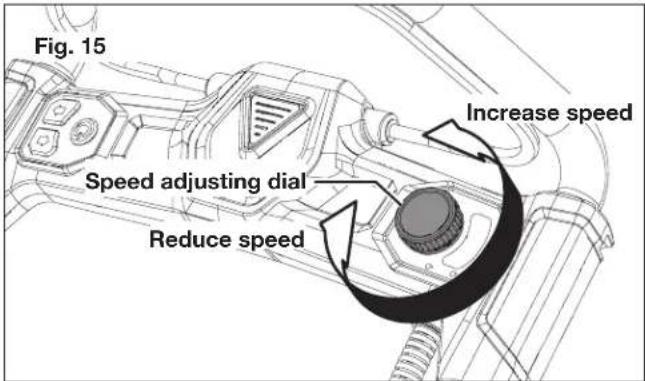
Adjust Auger Speed
This snow blower is equipped with auger speed adjustment system, which can set the auger speed from low to high. Follow the instruction to set the auger speed to fit in the working environment. Consider the working time, snow volume, and the surroundings when adjusting the auger speed. In general, lower auger speed provides longer battery runtime, but smaller plowing capacity and shorter throw distance. Check attached table for the specs that can be affected by the auger speed.
| MIN. Auger Speed | MAX. Auger Speed | |
| Throw Distance | 25 ft (7.6 m) 30 ft (9 m) | |
NOTE: Battery runtime may vary depending on snow conditions.
NOTE: The specs in above table are based on the power provided by one Snow Joe® iON100V-5AMP battery (sold separately). Different battery combinations will affect the specs and your unit's performance.
- To increase the auger speed, scroll the speed adjustable dial counterclockwise with the switch bar level squeezed (Fig. 15).
- To reduce the auger speed, scroll the speed adjustable dial clockwise with the switch bar lever squeezed (Fig. 15).
text_image
Fig. 15 Speed adjusting dial Reduce speed Increase speedChanging Throw Direction and Throw Height
⚠ WARNING! Never direct the snow discharge chute at the operator, at bystanders, at vehicles or at nearby windows. The discharged snow and foreign objects accidentally picked up by the snow blower can cause serious damage and personal injury.
Always orient the discharge chute in the opposite direction from where you, bystanders, surrounding vehicles or windows are located.
- The discharge chute can be adjusted 180 degrees by pressing the chute rotate button in the desired direction (Fig. 16).
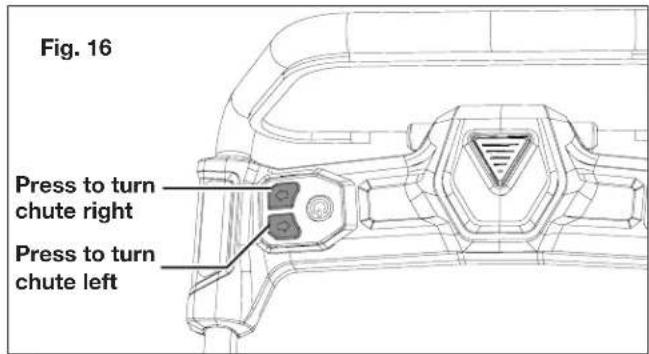
text_image
Fig. 16 Press to turn chute right Press to turn chute left- The chute deflector on the top of the discharge chute controls the height of the snow stream. To adjust the height that the snow is thrown, squeeze the trigger on the chute-deflector handle, and then raise/lower the chute deflector. Release the trigger on the chute deflector handle to lock the chute deflector in place (Fig. 17).

text_image
Fig. 17 Chute deflector triggerNOTE: ALWAYS position discharge chute deflector at a safe angle before engaging the auger. DO NOT throw snow any higher than necessary.
LED Headlights
The LED headlights are located on the front of the snow blower (Fig. 18).

text_image
Fig. 18 LED lights- To turn on the LED light, press the LED light button (Fig. 19).
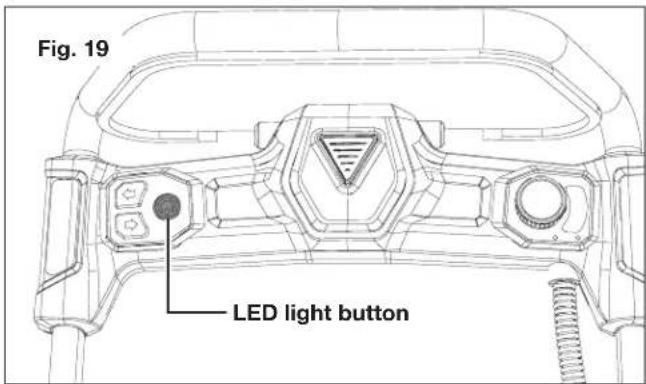
text_image
Fig. 19 LED light button- To turn off, press the LED light button again.
NOTE: After you have finished using your snow blower, remember to turn OFF the light switch.
Operating Tips
⚠ WARNING! Foreign objects, such as rocks, broken glass, nails, wire, or string, can be picked up and thrown by the snow blower, causing serious personal injury. Remove all foreign objects from the area to be plowed before operating the snow blower.
Snow is best removed as soon as possible after snow fall.
- Keep the area of operation free of foreign objects that can become thrown by the blades. Perform a thorough inspection of the area since some objects may be hidden from view by surrounding snow. If the snow blower hits an obstruction or picks up a foreign object during use, stop the snow blower, remove the battery pack(s), remove the obstruction, and inspect the unit for damage. Repair or
replace any damaged part before restarting and operating the unit.
-
Keep children, pets, and bystanders away from the area of operation. Be aware that the normal noise of the machine when turned on may make it difficult for you to hear approaching people.
-
To clear an area, run unit in an overlapping series of paths. For large areas, start in the middle and throw snow to each side, so snow is not cleared more than once.
-
Note the wind direction. If possible, move in the same direction as the wind so that the snow is not thrown against the wind (and thus back into your face and on the just cleared path).
-
Do not push the snow blower with excessive force. Do not exceed the unit's intake or throw rate.
-
Some parts of the snow blower may freeze under extreme temperature conditions. Do not attempt to operate the snow blower with frozen parts. If the parts freeze while the snow blower is in use, stop the snow blower, remove the battery pack(s), and inspect for frozen parts. Free all parts before restarting or operating the snow blower. Never force controls that have frozen.
-
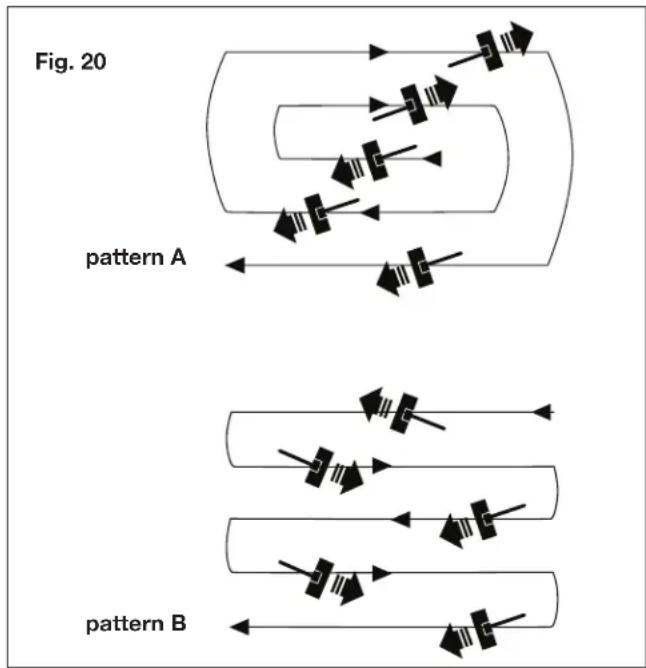
For larger areas, a definite pattern of operation is required to thoroughly clean an area of snow. These patterns will avoid throwing snow in unwanted places, a well as eliminate the need for a second removal of snow (Fig. 20).
Pattern A: Throw the snow to the right or left side where it is possible. For areas such as a long driveway, it is advantageous to start in the middle. Plow from one end to the other, throwing snow to both sides.
Pattern B: If the snow can only be thrown to one side of the area to be cleared, start on the opposite side.
flowchart
graph TD
    subgraph "Fig. 20"
        direction LR
        A1["Pattern A"] --> A2["Pattern B"]
        A2 --> A3["Pattern A"]
        A3 --> A4["Pattern B"]
        style A1 fill:#f9f,stroke:#333
        style A2 fill:#f9f,stroke:#333
        style A3 fill:#f9f,stroke:#333
        style A4 fill:#f9f,stroke:#333
Maintenance
To order genuine replacement parts or accessories for the Snow Joe ^® iON100V-21SB-CT cordless snow blower, please visit snowjoe.com or contact the Snow Joe ^® + Sun Joe ^® customer service center at 1-866-SNOWJOE (1-866-766-9563).
⚠ WARNING! Make sure to turn off the switch and remove the battery pack(s) before performing any maintenance task on your snow blower.
General Maintenance Tips
- Do not attempt to repair the machine unless you have the proper tools and instructions for disassembly and repair of the machine.
- Check bolts and screws at frequent intervals for proper tightness to ensure that the equipment is in safe working condition.
- After each snow removal, shut off the motor, wait for all revolving parts to stop completely, remove the battery pack(s) and wipe residual ice and snow off the unit.
Proper Care for Battery + Charger
⚠ WARNING! To reduce the risk of injury, always unplug the charger and remove the battery pack(s) from the charger before performing any maintenance task. Never disassemble the battery pack(s) or charger. Contact your Snow Joe® + Sun Joe® dealer or the Snow Joe® + Sun Joe® customer service center for ALL repairs.
-
To reduce the risk of injury and damage, never immerse your battery pack(s) or charger in liquid or allow any liquid to flow inside these components.
-
Clean out dust and debris from charger vents and electrical contacts by blowing with compressed air.
- Use only mild soap on a damp cloth to clean the battery pack and charger, keeping away from all electrical contacts. Certain cleaning agents and solvents are harmful to plastics and other insulated parts. Some of these include gasoline, turpentine, lacquer thinner, paint thinner, chlorinated cleaning solvents, ammonia and household detergents containing ammonia. Never use flammable or combustible solvents around battery packs, battery chargers or tools.
- The iON100V-RCH lithium-ion battery charger (sold separately) has no serviceable parts.
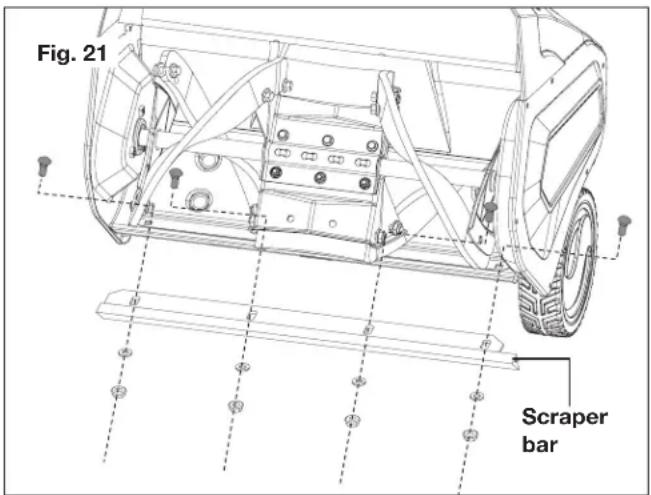
Replacing Scraper Bar
IMPORTANT! Damage to auger housing will result if the scraper bar wears down too far.
To replace scraper bar:
- Position unit on a hard, flat, smooth level surface.
- Detach the worn scraper bar from the snow blower by removing the 4 sets of nuts, washers and bolts that hold it in place (Fig. 21).
- Install the new scraper bar and fasten it securely to the snow blower with the original sets of nuts, washers and bolts.
text_image
Fig. 21 Scraper barReplacing Auger Blades
During use, the auger blades will wear down over time, which will eventually cause incomplete cleaning. If the unit cannot plow snow completely and leaves snow on ground, consider changing the auger blades.
⚠ WARNING! Replacing the auger blades involves close operation with the auger and the blades. To avoid injury caused by unintentional starting, make sure the battery pack(s) are not inserted before proceeding with the operation, and wear heavy duty gloves during operation.
Tools Required (Not Provided):
- 10 mm wrench
- 13 mm wrench
- Heavy duty gloves
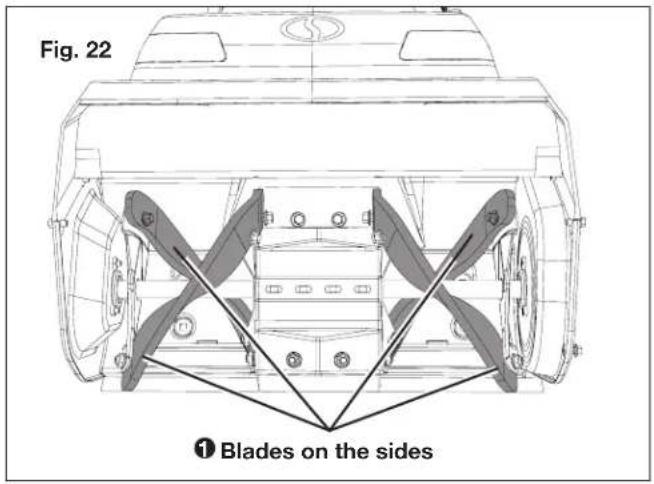
In total there are 6 blade pieces fixed by 16 sets of screws, washers and nuts in the unit. When replacing worn auger blades, pay close attention to the order in which you remove them. Remove the 4 blade pieces on the sides first, and then the 2 blade pieces fixed on the middle steel plate. Assemble the new auger blades in the reverse order of the disassembly (Figs. 22 – 23).
text_image
Fig. 22 ① Blades on the sides
text_image
Fig. 23 Blades on the plate- To remove the first blade on the side, use a 10 mm wrench to hold the bolt steady, and use a 13 mm wrench to loosen and remove the nut. Repeat the operation to remove all 3 sets of bolt and nut, and gently remove the blade from the auger (Fig. 24).
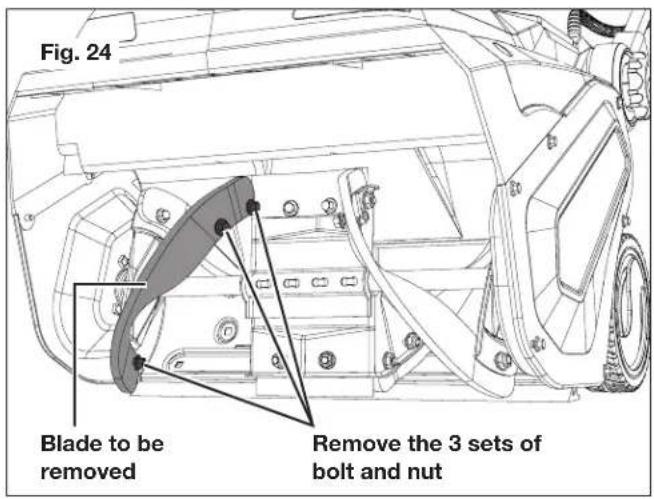
text_image
Fig. 24 Blade to be removed Remove the 3 sets of bolt and nut- Follow the same instruction to remove the other 3 blades located on the sides. Rotate the auger when working on the blades on the back.
- After 4 blades on the side are removed, move to the two blade pieces that are fixed on the middle steel plate. Use the 10 mm wrench to hold the bolt steady, and use the 13 mm wrench to loosen and remove the nut. Repeat on the other nut and bolt set, and gently remove the blade from the central plate (Fig. 25).

text_image
Fig. 25 Blade to be removed Remove the 2 sets of screws, washers and nuts- Rotate the auger to expose the other blade on the plate. Follow the same instruction to remove it.
- After all old blades are removed, follow the reverse order to assemble the new blades. Use the original sets of hardware to secure the blades on the auger.
Replacing Auger Belt
Tools Required (Not Provided):
- 10 mm wrench (2)
- Needle nose pliers
-
Heavy duty gloves
-
Position unit on a hard, flat, smooth level surface, with the battery pack(s) removed.
-
Use 2 10 mm wrenches to remove the bolts and nuts that are used to fix the right side panel. Then remove the right side panel to expose the belt, as shown (Fig. 26).
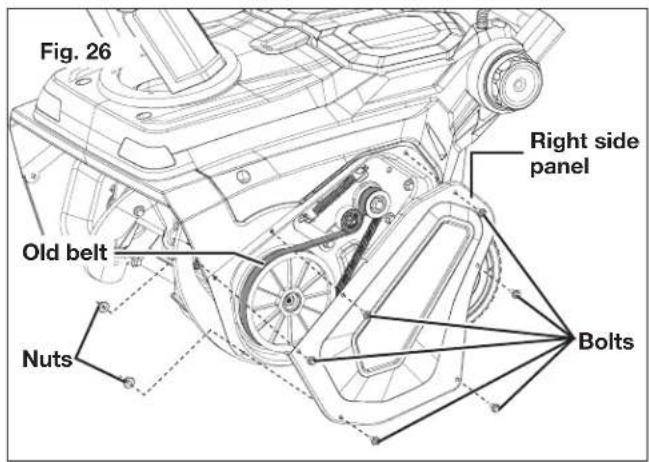
text_image
Fig. 26 Right side panel Old belt Nuts BoltsNOTE: The 2 bolts located on the left have 2 nuts on the back, while the other 4 bolts don't. Use one 10 mm wrench to hold the left two bolts steady and remove the nuts with the other 10 mm wrench first, and then remove all the bolts.
- Use the needle nose pliers to remove the spring from the hook to release the belt tension (Fig. 27).

text_image
Fig. 27 Spring Needle nose pliers- Remove the drive belt by slowly turning the auger pulley counterclockwise while pulling the belt outwards (Fig. 28).

text_image
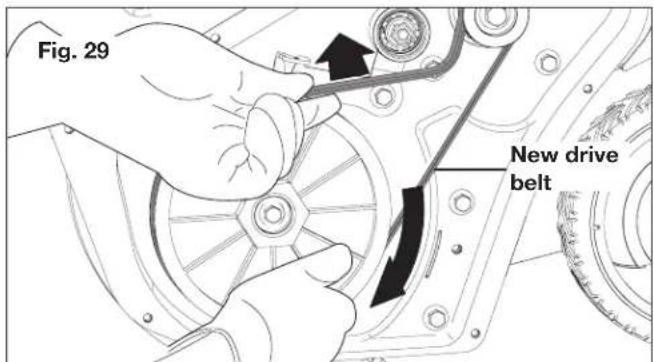
Fig. 28 Drive belt Auger pulley- Install the new drive belt, rotating it onto the pulleys (Fig. 29).
text_image
Fig. 29 New drive beltNOTE: Rotate the new drive belt first around the engine pulley, then the idle pulley, and finally around the auger pulley. Slowly turn the auger pulley clockwise to drive the belt inwards (Fig. 30).

text_image
Fig. 30 Spring Spring hook Engine pulley Idle pulley Belt Auger pulley- Use needle nose pliers to reinstall the spring onto the hook to tension the belt. Replace the side panel on the unit, secure with the original hardware. The snow blower is ready to use.
Storage
- Examine the cordless snow blower thoroughly for worn, loose or damaged parts. Should you need to repair or replace a part, contact an authorized Snow Joe ^® + Sun Joe ^® dealer or call the Snow Joe ^® + Sun Joe ^® customer service center at 1-866-SNOWJOE (1-866-766-9563) for assistance.
- Clean the snow blower before storing or transporting. Be sure to secure the unit while transporting.
- Remove the battery pack(s) from the cordless snow blower before storing.
- Store the cordless snow blower indoors in a locked, dry place out of the reach of children to prevent unauthorized use or damage.
Service + Support
If your Snow Joe ^® iON100V-21SB-CT cordless snow blower requires service or maintenance, please call the Snow Joe ^® + Sun Joe ^® customer service center at 1-866-SNOWJOE (1-866-766-9563).
Model + Serial Numbers
When contacting the company, reordering parts or arranging service from an authorized dealer, you will need to provide the model and serial numbers, which can be found on the decal located on the housing of the unit. Copy these numbers into the space provided below.
Record the following numbers from the housing or handle of your new product: Model #:

text_image
i |O |N |1 |0 |0 |V |- |2 |1 |S |B |- |C |T | Serial #:Troubleshooting
⚠ WARNING! Always turn the tool OFF and remove the battery pack(s) before performing any adjustments, maintenance, or repairs to your cordless blower vac.
| Problem Possible Cause Solution | ||
| Unit will not start | 1. Batteries are flat.2. Batteries are not locked in position.3. The safety button is not depressed | 1. Charge the batteries2. Reinsert the battery, and try to start the machine again.3. Depress the safety button, and pull the switch bar lever. |
| The auger doesn't rotate while the motor is running | 1. Auger belt is wore out2. Auger belt is not assembled properly | 1. Change the auger belt2. Check the auger belt, make sure it's assembled tightly on the rail |
| Chute doesn't rotate when pressing the button | 1. There's no power.2. Too much wet snow are accumulated around the chute and preventing the chute rotating. | 1. Make sure the battery pack(s) are charged and locked in position.2. Clean the wet snow around the chute. |
| Snow left on the ground after cleaning | 1. Worn out auger blades2. Worn out scraper bar | 1. Replace the blades2. Replace the scraper bar |
Optional Accessories
WARNING! ALWAYS use only authorized Snow Joe® + Sun Joe® replacement parts and accessories. NEVER use replacement parts or accessories that are not intended for use with this cordless snow blower. Contact Snow Joe® + Sun Joe® if you are unsure whether it is safe to use a particular replacement part or accessory with your cordless snow blower. The use of any other attachment or accessory can be dangerous and could cause injury or mechanical damage.
| ModelAccess | |||
| 1 |  | 100V 2.5 Ah Lithium-Ion Battery | iON100V-2.5AMP |
| 2 |  | 100V 5.0 Ah Lithium-Ion Battery | iON100V-5AMP |
| 3 |  | 100V Battery Quick Charger | iON100V-RCH |
| 4 |  | Universal Snow ThrowerChute Clean-Out Tool | SJCOT |
NOTE: Accessories are subject to change without any obligation on the part of Snow Joe ^® + Sun Joe ^® to provide notice of such changes. Accessories can be ordered online at snowjoe.com or via phone by contacting the Snow Joe ^® + Sun Joe ^® customer service center at 1-866-SNOWJOE (1-866-766-9563).
SNOW JOE® + SUN JOE® REFURBISHED GOODS WARRANTY
GENERAL CONDITIONS:
Snow Joe ^® + Sun Joe ^® operating under Snow Joe ^® , LLC warrants this refurbished product to the original purchaser for 90 days against defects in material or workmanship when used for normal residential purposes. If a replacement part or product is needed, it will be sent free of charge to the original purchaser except as noted below.
The duration of this warranty applies only if the product is put to personal use around the household. It is the owner's responsibility to correctly perform all maintenance and minor adjustments explained in the owner's manual.
HOW TO OBTAIN YOUR REPLACEMENT PART OR PRODUCT:
To obtain a replacement part or product, please visit snowjoe.com/help or email us at help@snowjoe.com for instructions. Please be sure to register your unit beforehand to speed up this process. Certain products may require a serial number, typically found on the decal affixed to the housing or guard of your product. All products require a valid proof of purchase.
EXCLUSIONS:
- Wearing parts like belts, augers, chains and tines are not covered under this warranty. Wearing parts can be purchased at snowjoe.com or by calling 1-866-SNOWJOE (1-866-766-9563).
- Batteries are covered in full for 90-days from the date purchase.
Snow Joe ^® + Sun Joe ^® may from time to time change the design of its products. Nothing contained in this warranty shall be construed as obligating Snow Joe ^® + Sun Joe ^® to incorporate such design changes into previously manufactured products, nor shall such changes be construed as an admission that previous designs were defective.
This warranty is intended to cover product defects only. Snow Joe ^® , LLC is not liable for indirect, incidental or consequential damages in connection with the use or misuse of the Snow Joe ^® + Sun Joe ^® products covered by this warranty. This warranty does not cover any cost or expense incurred by the purchaser in providing substitute equipment or service during reasonable periods of malfunction or non-use of this product while waiting for a replacement part or unit under this warranty. Some states do not allow exclusions of incidental or consequential damages so the above exclusions may not apply in all states. This warranty may give you specific legal rights in your state.
HOW TO REACH US:
We're here to help Monday through Friday from 9AM to 7PM EST and Saturday and Sunday 9AM to 4PM. You can reach us at 1-866-SNOWJOE (1 866-766-9563), online at snowjoe/com, via email at help@snowjoe.com or tweet us @snowjoe.
EXPORTS:
Customers who have purchased Snow Joe ^® + Sun Joe ^® products exported from the United States and Canada should contact their Snow Joe ^® + Sun Joe ^® distributor (dealer) to obtain information applicable to your country, province or state. If for any reason, you are not satisfied with the distributor's service, or if you have difficulty obtaining warranty information, contact your Snow Joe ^® + Sun Joe ^® seller. If in the event your efforts are unsatisfactory, please reach out to us directly.

