
5BC93190AU - Frying Pan BLAUPUNKT - Free user manual and instructions
Find the device manual for free 5BC93190AU BLAUPUNKT in PDF.

| Type | Integrated Electric Oven |
| Model | 5BC93190AU |
| Brand | Blaupunkt |
| Power Supply | 220-240 V~, 50/60 Hz |
| Nominal Power | 2.8 kW |
| Current | 11.70 A |
| Temperature Range | 50 °C – 250 °C |
| Timer | End-of-Cooking Timer up to 120 minutes |
| Oven Functions | ECO, Defrost, Double Grilling with Fan, Double Grilling, Radiant Grilling, Convection with Fan, Convection, Bottom Heater, 3D Convection, Oven Lamp |
| Number of Rack Positions | 5 levels |
| Accessories Included | Wire rack, dripping pan |
| Interior Light | Halogen lamp 25-40 W, 220-240 V, T300°C |
| Cooling Fan | Automatic |
| Door Glass Panels | 3 (removable for cleaning) |
| Convection Motor Cover | Removable for maintenance |
| Safety Features | Auto shut-off via timer, child lock (recommended), earthing required |
| Installation Type | Built-in (flush or under counter) |
| Energy Efficiency | ECO mode for energy saving |
| Cleaning | Catalytic enamel (do not clean with detergents), removable shelf supports and door |
| Spare Parts | Use only genuine spare parts from authorized service |
Frequently Asked Questions - 5BC93190AU BLAUPUNKT
User questions about 5BC93190AU BLAUPUNKT
0 question about this device. Answer the ones you know or ask your own.
Ask a new question about this device
Download the instructions for your Frying Pan in PDF format for free! Find your manual 5BC93190AU - BLAUPUNKT and take your electronic device back in hand. On this page are published all the documents necessary for the use of your device. 5BC93190AU by BLAUPUNKT.
USER MANUAL 5BC93190AU BLAUPUNKT
Instructions for installation and use
Integrated Oven
5BC93190AU
TABLE OF CONTENTS
- SAFETY INFORMATION 2
- SAFETY INSTRUCTIONS ....4
- PRODUCT DESCRIPTION 7
- PREPARING FOR FIRST USE 11
- CLEANING AND CARE 12
- TROUBLESHOOTING 15
- ENERGY EFFICIENCY/CLEANING AND CARE 16
- INSTALLATION 16
- COOKING GUIDE TABLE 19
This oven complies with the current safety provisions.
Improper use may cause damage to property and/or people.
Carefully read the instructions for use before operating the oven because they contain important information on safety, use and maintenance. In this way you protect yourself and avoid damage to the appliance.
Midea cannot be held liable for damage caused by non-observance of the safety instructions and warnings.
Keep the instructions for use and assembly and hand them over to any future user of the appliance.
WITH YOU IN MIND
- Thank you for purchasing a Midea appliance.
- To make it as enjoyable to prepare meals as it is to taste them, please read these instructions for use. This will make it possible to take advantage of all the oven's technical benefits.
- Here you will find important information on safety and a description of the single components of your new oven. The single set-up phases are illustrated as well: the procedure is extremely simple.
- The tables show the settings and shelf positions for many common recipes. All the data have been tested in our Laboratory.
- In the event of a failure, useful information is provided here on how to independently eliminate minor faults.
- A detailed table of contents will also help you quickly find the desired topics.
- And now it only remains to say Enjoy Your Meal!!
CUSTOMER SERVICE AND MAINTENANCE
- We recommend that you always use genuine spare parts.
- When contacting the authorized Service Centre, make sure you have the product code given in this booklet and on the serial number plate on the appliance.
- Never open the casing of the appliance.
- The right to warranty is forfeit if the oven is not repaired by Midea authorized technical service.
Warning/Caution Important Safety Information
i General information and tips
Environment Information
1. SAFETY INFORMATION
- This oven is intended solely for household use.
- It is not intended for outdoor use.
- For safety reasons, the oven must not be used unless it is built in.
-
Do not use this appliance in non-stationary places (eg. on ships).
-
The oven must always be used within the limits of normal household use, not for professional use, for cooking, roasting, grilling, thawing dishes, to prepare food for later storage or to dehydrate it.
- No other use is permissible.
- Please read the instructions before installing and using the appliance.
- The manufacturer is not liable if improper use and installation of the appliance cause injuries and damage.
- Always keep the instructions at hand for future reference.
1.1 Safety of children and vulnerable persons
- This appliance is not intended for use by persons (including children) with reduced physical, sensory or mental capabilities, or lack of experience and knowledge, unless they have been given supervision or instruction concerning use of the appliance by a person responsible for their safety.
- Children should be supervised to ensure that they do not play with the appliance.
- This appliance can be used by children aged from 8 years and above and persons with reduced psychal, sensory or mental capabilities or lack of experience and knowledge if they have been given supervision or instruction concerning use of the appliance in a safe way and understand the hazards involved. Children shall not play with the appliance. Cleaning and user maintenance shall not be made by children without supervision.
• Children less than 8 years of age shall be kept away unless continuously supervised. - WARNING: Accessible parts may become hot during use. Young children should be kept away.
- Keep the packaging materials out of the reach of children
- If the appliance has a safety device for children, we advise you activate it.
1.2 General safety instructions
- The installation of the appliance and replacement of the cables must be carried out solely by skilled personnel.
- To work properly, the oven needs a sufficient amount of fresh air to flow. Make sure the flow of air is not jeopardized (eg. by fitting slats for thermal insulation in the cabinet where the appliance is built in). In this case, the necessary cold air must not get excessively heated by other sources of heat (eg. solid fuel stoves).
- The appliance gets hot inside while it is in operation. Do not touch the appliance's heating elements. Always use the special oven gloves to remove or insert heat-resistant cookware and accessories.
- Before doing any maintenance work, disconnect the appliance from the electric mains.
- Ensure that the appliance is switched off before changing the light bulb to avoid the possibility of electric shock.
- A steam cleaner is not to be used.
- Do not use harsh abrasive cleaners or sharp metal scrapers to clean the oven door glass / the glass of hinged lids of the hob (as appropriate), since they can scratch the surface, which may result in shattering of the glass.
- If the supply cord is damaged, it must be replaced by the manufacturer, its service agent or similarly qualified person in order to avoid a hazard.
- To remove the shelf supports, first take off the front of the support and then the rear from the side walls. Install the rack supports by following the procedure described in reverse order.
- The oven must be switched off before removing the cover fan and that, after cleaning, the cover fan must be replaced in accordance with the instructions (chapter 5.7)
Danger of burns!
- The skin of children is much more delicate than that of adults. The glass door, the control panel and the slots for hot air to come out of the appliance's cooking chamber get hot. Prevent children from touching the appliance while it is operating.
Danger of injury!
• The door's capacity is max. 15 kg.
Children can also get injured when the door is open.
- Prevent them from leaning on the open door, sitting on it or hanging from it.
2. SAFETY INSTRUCTIONS
2.1 Installation

CAUTION!
- The appliance must be installed by skilled personnel.
- Remove all packaging materials.
- Do not install or use the appliance if it is damaged.
- Observe the instructions given together with the appliance.
• Always take care when moving the appliance as it is very heavy. Always wear safety gloves. - Do not pull the appliance by the handle.
- You must respect the minimum distance from other appliances.
- Make sure the appliance is installed under and near parts adequately anchored to a fixed structure.
- The sides of the appliance must remain adjacent to appliances or units with the same height.
- The appliance must not be installed behind a decorative door in order to avoid overheating.
2.2 Electrical connection

CAUTION!
- All the electrical connections must be made by a skilled electrician.
• The appliance must have earthing. - Check that the electrical data on the data plate match those of the system. Otherwise, contact an electrician.
- Always use an electric socket with a properly installed protective contact.
- Do not use multiple sockets or cable extensions.
- Make sure you do not damage the plug or the cable. If the power cable needs to be changed, the work must be done by our authorized Service Centre.
- Prevent cables from coming into contact or getting near the appliance's door, especially when the door is hot.
- Devices protecting against electric shock must be secured so that they cannot be disabled without using tools.
- Insert the power plug into the socket only at the end of installation. Check that the power plug remains accessible after installation.
- If the power plug is loose, do not connect it to the socket.
- Do not pull on the power cable to disconnect the appliance. Always pull on the plug itself.
- Use only suitable isolation devices: circuit breakers, fuses (plug fuses must be removed from the fuse holder), earth leakage circuit breakers and relays.
- The electrical system must be equipped with an isolation device which lets you disconnect the appliance from the power socket at all poles. The isolation device must have a contact opening width of no less than 3 mm.
- This appliance complies with EEC directives.
2.3 Use
CAUTION!
- Use the appliance solely in a domestic environment.
- Risk of injury, burns, electric shock or explosion.
- Do not make any changes to the specifications of this appliance.
- Ensure that the ventilation slots are not blocked.
- Never leave the appliance unattended during operation.
- Switch off the appliance after each use.
• Take care when opening the door of the appliance when it is in operation. Hot air can escape. - Do not turn on the appliance with wet hands or when there is contact with water.
- Do not push on the open door.
- Do not use the appliance as a work surface or as a support surface.
- Open the door of the appliance with caution. The use of ingredients containing alcohol may cause a mixture of alcohol and air.
- Avoid sparks or open flames near the appliance when opening the door.
- Do not place or store any flammable liquids or materials, nor any easily combustible objects, on the appliance, inside it or nearby.
- During use the appliance becomes hot. Care should be taken to avoid touching heating elements inside the oven.
- WARNING: The appliance and its accessible parts become hot during use. Care should be taken to avoid touching heating elements.
CAUTION!
- There is a risk of damaging the appliance. To avoid damage or discolouration of the enamel:
- Do not place heat-resistant cookware or other objects directly on the bottom surface of the appliance.
- Do not place aluminium foil directly on the bottom surface of the appliance.
- Do not put any water directly inside a hot appliance.
- Do not keep moist dishes and food inside the appliance after finishing the cooking process.
- Use caution when removing or inserting the accessories.
- The enamel of the bottom of the chamber may get damaged due to dragging these accessories.
- If you store pots or pans in the oven, never drag them, but move them with caution.
- Discolouration of the enamel does not affect the performance of the appliance. It is not a fault pursuant to the law.
- For very moist cakes, use a dripping pan. Fruit juices cause stains that can be permanent.
- The appliance is designed only for cooking. It must not be used for other purposes, such as for example heating a room.
- Cooking should always be carried out with the oven door closed.
- If the appliance is located behind a front panel (eg. a door), make sure that this is never closed when the appliance is in operation. Heat and humidity can build up on the back of a closed panel causing damage to the appliance, casing or floor. Do not close the cabinet panel until the appliance has completely cooled after use.
2.4 Cleaning and care
CAUTION!
- There is a risk of injury, fire or damage to the appliance.
- Before carrying out any maintenance work, switch off the appliance and remove the plug from the socket.
- Check that the appliance is cold. There is a risk that the glass panels might break.
- The door's glass panels must be replaced immediately if they get damaged, by contacting the Authorized Service Centre.
- Pay attention when removing the door from the appliance. The door is heavy!
- Regularly clean the appliance to prevent the materials forming the surface from deteriorating.
- Remains of food or fat in the appliance may cause a fire.
- Clean the appliance with a soft moist cloth. Use only neutral detergents. Do not use any abrasive products, scouring pads, solvents or metal objects.
- If you use an oven spray, carefully follow the safety instructions given on the package.
- Do not clean the catalytic enamel (if any) with any kind of detergent.
2.5 Interior light
CAUTION!
Risk of electric shock.
- The light bulbs used in this appliance are special lamps for electric household appliances. Do not use them for home lighting.
- Before replacing the light bulb, disconnect the appliance from the electric mains.
- Use only light bulbs with the same technical specifications.
2.6 Disposal
CAUTION!
Risk of injury or suffocation.
- Disconnect the plug from the power supply.
- Cut the mains cable and dispose of it.
- Remove the door block to prevent children and pets from getting closed inside the appliance.
2.7 Technical Service
CAUTION!
- Contact the Authorized Service Centre to repair the appliance.
- Only use genuine spare parts.
3. PRODUCT DESCRIPTION
3.1 Overview
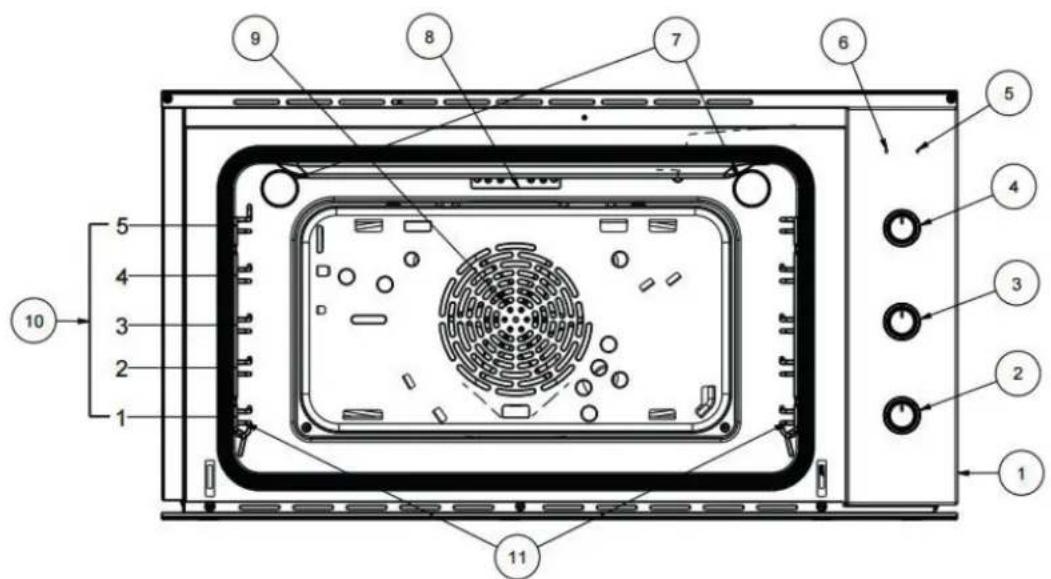
1) Control Panel
2) Functions Knob
3) End-of-Cooking Timer Knob
4) Temperature Knob
5) Temperature °C indicator / symbol / warning light
6) F switch indicator / symbol / warning light
7) Lamps
8) Heating element
9) Fan
10) Rack Positions
11) Shelf support (removable)
i 3.2 Selectors
The selectors are retractable knobs.
- Press them to extract them and reinsert them.
• N.B. It is advisable to keep the knob out while the Oven is working.
i 3.3 Functions Selector
- With the functions selector you can set the type of heating, the "F" switch indicator symbol warning light and the lamps inside the oven light up.
- N.B. In ECO mode the oven lights are off; to switch them on, set the selector to the 3D Convection function, then turn the selector back onto the ECO function to continue low-energy cooking.
F FUNC.

flowchart
graph TD
    A["ECO"] --> B(( ))
    C["O"] --> B
    D["□"] --> B
    E["="] --> B
    F["□"] --> B
    G["□"] --> B
    H["○"] --> B
    I["●"] --> B
    J["○"] --> B
    K["○"] --> B
    L["○"] --> B
    M["○"] --> B
    N["○"] --> B
| Oven function Application | |
| ▼ Off: | The appliance is switched off. |
| ○ Oven Lamp: | To switch on the lamp without a cooking function. |
| ○ Defrost: | To thaw eg. meat, poultry, bread and desserts. The fan causes the warm air to wrap around the food |
| ○ Double grilling with fan: | For roasting large cuts of meat or poultry on one rack position only.For gratinating and browning too (it is advisable to position the thermostat knob at 200°). |
| ○ Double grilling: | For grilling steaks, sausages, toast and small portions of fish. The entire surface is heated under the Grill Heating Element (it is advisable to position the thermostat knob at 200°). |
| ○ Radiant grilling: | For grilling small quantities of steaks, sausages, toast and small portions of fish. The central part of the Grill Heating Element heats up (it is advisable to position the thermostat knob at 200°). |
| ○ Convection with fan: | Quick and uniform cooking with the aid of the top and bottom Heating Element and the fan.Ideal for baking flans and sweets and for roasting. |
| ○ Convection: | For baking and roasting food on one rack position onlyThe heat gets distributed evenly from the top and bottom. |
| ○ Bottom heater: | For baking cakes with a crispy bottom and for preserving foods. The heat is distributed from the bottom. |
| ○ 3D Convection: | For sweets and biscuits on 1 and 2 levels. Inside the cooking chamber, the fan distributes the heat generated by the circular heating element on the rear wall of the oven. |
| ○ ECO function: | It is equivalent to the 3D Convection function but allows cooking without using the oven lamps allowing energy savings |
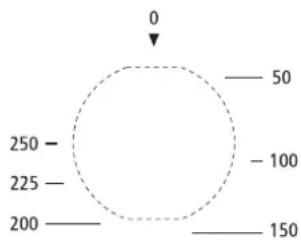
i 3.4 Temperature Selector
- The temperature selector is used to set the temperature.
- Position zero The oven does not heat up
- 50–250°C Temperature range (Temperature in the cooking chamber °C)
- The warning light with the ^ C indicator symbol lights up when the oven is in operation; it goes out instead during the pauses in heating.
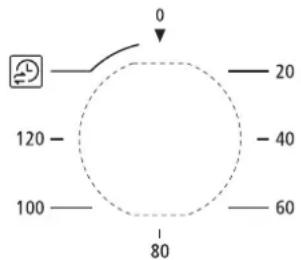
i 3.5 End-of-Cooking Timer Selector
- The end-of-cooking timer is a useful device that automatically switches the oven off on reaching the time selected in a range of between 1 and 120 minutes.
- To use the end-of-cooking timer, you need to wind up the ringer by turning the knob almost a full turn clockwise; then, turning back, set the desired time by aligning the fixed pointer on the front panel with the number corresponding to the set minutes.
- At the end of the set time, in addition to the ringer stopping, the oven will switch off automatically.
- N.B. Immediately after switching off and for a long time afterwards, the inside of the oven maintains a temperature close to that set for cooking; so to avoid over-cooking or burning foods, you should take them out of the oven.
°C TEMP.
TIMER
CAUTION!
- To use the oven in manual operation, that is without the end-of-cooking timer, you need to make the pointer of the knob match the fixed symbol on the front panel.
- When the oven is switched off, the end-of-cooking timer can be used as a normal timer.


i 3.6 Cooking Chamber
- In the cooking chamber there are the Oven Lamps that are on while the oven is working. By turning the functions selector onto this symbol you can light up the lamp when the oven is switched off too.
- N.B. In ECO mode the oven lights are off; to switch them on, set the selector to the 3D Convection function, then turn the selector back onto the ECO function to continue low-energy cooking.
- A cooling fan switches on and off when needed.
• Hot air escapes through the special slots located above the oven door
CAUTION!
- Do not cover the ventilation slots, otherwise the oven will overheat.
Ventilation Slots

natural_image
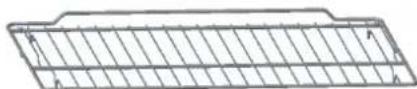
Close-up of a kitchen oven with a horizontal bar and control knob (no visible text or symbols)i 3.7 Accessories
- The accessory can be inserted in the oven at 5 different levels.
- To ensure the wire rack operate safely, correct placement of the wire rack between the side rail is imperative. Wire rack and the pan only can be used between the first and the fifth layers.
- The wire rack should use with the right direction, it will ensure that during careful removal of the wire rack and pan, hot food items should not slide out.
- The cooking guide table gives the ideal position for each use of the oven.

WIRE RACK:
- It is used as a support for your baking pans, pastry tins, and all the different containers starting from the dripping pans provided or for cooking mainly with the Grill and Fan Grill functions to grill meat and fish, toast bread, etc.
DRIPPING PAN:
- It is normally used to collect the juices of grilled foods or for cooking foods directly; if not used when cooking, the dripping pan must be taken out of the oven.

natural_image
Gray rectangular plastic container with side flanges (no text or symbols)4. PREPARING FOR FIRST USE
CAUTION!
• Refer to the chapters on safety.
i 4.1 Initial cleaning
• Take the accessories and removable shelf supports out of the appliance.
- Clean the appliance before using it for the first time. Place the accessories and removable shelf supports in their initial position
i 4.2 Switching on for the first time
• Take the accessories and removable shelf supports out of the appliance.
- Clean the appliance before using it for the first time. Place the accessories and removable shelf supports in their initial position
- Preheat the appliance with nothing inside it in order to burn off fat residues.
- Set the function □ and the maximum temperature.
- Leave the appliance in operation for one hour.
- Set the function and the maximum temperature.
- Leave the appliance in operation for 15 minutes.
- Set the function and the maximum temperature.
- Leave the appliance in operation for 15 minutes.
- The accessories may get hotter than usual.
- The oven can produce an unpleasant odour and smoke.
- This is not a malfunction.
- Make sure the airflow inside the room is adequate.
5. CLEANING AND CARE
CAUTION!
• Refer to the chapters on safety.
i 5.1 Notes on cleaning
- Clean the front of the appliance with a soft cloth moistened with warm soapy water.
- To clean the metal surfaces, use a regular detergent.
- Clean the inside of the appliance after each use. Fat or other food remains can cause a fire. The risk is higher for the baking pan.
- Remove stubborn dirt with special oven detergents.
- After each use, clean the accessories and let them dry thoroughly. Use a soft cloth moistened with warm soapy water.
- Do not clean non-stick accessories with strong detergents, sharp objects or in the dishwasher. This could damage the non-stick coating.
- All surfaces can discolour or alter if you use unsuitable products. In particular the front of the oven gets damaged by cleaning sprays and descalers. Remove residual detergent immediately.
- Danger of injury. Steam from an electric household appliance could reach live parts and cause short-circuiting. Never use a steam appliance to clean the oven.
- Danger of burns! The heating elements must be switched off. The cooking chamber must not be hot.
Products that are not suitable for cleaning and maintenance.
To avoid damaging the surfaces do not use the following cleaning products:
– detergents containing soda, ammonia, acids or chlorides,
– descaling products on the front of the oven,
- abrasive detergents, such as powders, milk or abrasive pastes,
– products containing solvents,
– detergents for stainless steel,
– detergents for dishwashers,
– detergents for glass,
– detergents for ceramic hobs,
- abrasive brushes and sponges such as steel wool or sponges which still contain residues of abrasive detergents,
- dirt erasers,
– sharp metal scrapers,
- steel wool,
– we also do not recommend regular cleaning with mechanical products,
- oven spray
– stainless steel scouring pads
i 5.2 Notes on cleaning
- Clean the oven door only with a moist sponge. Dry it with a soft cloth.
- Do not use steel wool, acids or abrasive products that could damage the surface of the oven. Clean the oven control panel, taking the same precautions.
i 5.3 Notes on cleaning
- Regularly check the door seal. The door seal is around the frame of the oven compartment.
- To keep the door seals clean, use a non-abrasive sponge with warm water. The seals must be soft and elastic.
- Do not operate the appliance if the door seal is damaged. Contact an authorized Service Centre.
• To clean the door seal please refer to the general information on cleaning.
i 5.4 Removing the shelf supports
• To clean the oven, remove the shelf supports
- First remove the extraction rail from the side wall by pulling it forward.

natural_image
Line drawing of a hand holding a wall-mounted device with a circular inset showing internal components (no text or symbols)- Pull out the back of the shelf support from the side wall and remove it.
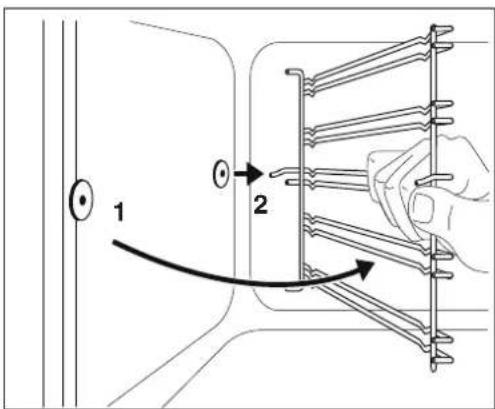
- Install the rack supports by following the procedure described in reverse order.
5.5 Removing and Cleaning the oven door
• The oven door is equipped with three glass panels. You can remove the oven door and the internal glass panels to clean them.
• The oven door could close again if you try to remove the glass panels before taking off the oven door.
CAUTION!
• Refer to the chapters on safety.
REMOVING THE OVEN DOOR
-
Open the oven door completely
-
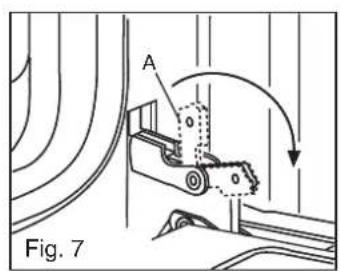
Position the hooks "A" of the hinges outwards (Fig.7)
-
Slowly close the door to reach the hooks "A", making sure that they lock in the slots "B" of the door, as shown in Fig.8
-
Using both hands, press lightly inwards on the door, allowing the door hinges "C" to detach from the slots "D" (see Fig.9), and pull the door towards yourself until it has unhooked from the oven.
-
After cleaning, fit the door back on properly by following the procedure in reverse order. Reposition the hooks "A" inwards before closing the door (Fig.10)


CLEANING THE OVEN DOOR
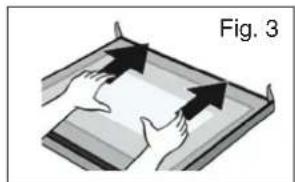
• After removing the oven door from the framework, place it on a surface with the inner glass (double glazing) facing towards yourself (Figure 3)
natural_image
Illustration of two hands pressing down on a tray with arrows indicating motion (no text or symbols)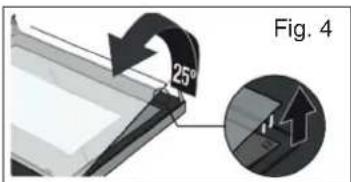
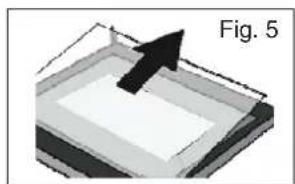
- Remove the double glazing carefully by raising it approximately 25 degrees (Figure 4) until the retaining springs unhook
natural_image
3D diagram showing a black arrow pointing to a layered structure, labeled 'Fig. 5' (no text or symbols on the diagram itself)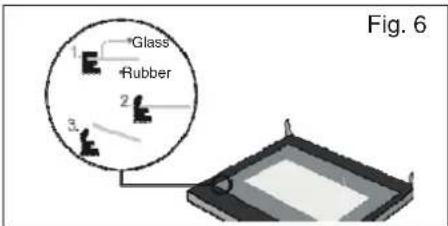
- Push the double glazing in the direction of the arrow (Figure 5) and pull it completely out in order to proceed with cleaning. At this point you can also remove the middle glazing in the oven door (follow the procedure of Figure 6) and proceed with cleaning.
- When cleaning is completed, fit the parts back on by following the reverse procedure to that described above to put the oven door back into its original condition.
5.6 Changing the light bulb
CAUTION!
- WARNING: Ensure that the appliance is switched off before replacing the lamp to avoid the possibility of electric shock.
- Wear protective gloves to change the light bulb.
- To make the replacement, proceed as follows:
- Disconnect the power supply from the power socket or switch off the circuit breaker of the unit's power socket.
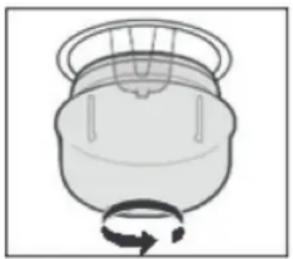
- Unscrew the glass lamp cover anticlockwise (note that it might be stiff) and change the light bulb with a new one of the same type.
- Screw the glass lamp cover back into place.
- NOTE: Use only halogen lamps 25-40 W / 220 V-240 V, T300°C.
natural_image
Simple line drawing of a mechanical component with a rotating arrow (no text or symbols)5.7 Disassembly of convection motor.
WARNING: Turn off the electrical power supply to the appliance prior to servicing it. Failure to disconnect the power supply during service may result in an electrical shock or fire hazard.
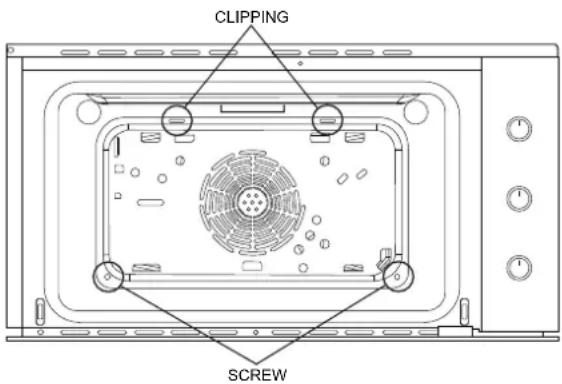
Step 1: Use a screwdriver to remove the screws on the back of the cavity inside to disassemble the convection motor cover, and then pull it out from the clipping hole.
Step 2: To reassemble the convection motor cover, perform the operations described above in reverse
6. TROUBLESHOOTING
CAUTION! Refer to the chapters on safety.
11.1 What to do if...
| Problem Cause Possible Solution | |
| The oven fails to heat. The oven is off. Switch on the oven. | |
| The oven fails to heat. The end of cooking is on position "0" Position the End of Cooking on manual | |
| The oven fails to heat. You have not selected the required settings. Check that all the settings are correct. |
7. CLEANING AND CARE
i 7.1 Energy saving
The appliance is equipped with features to help you save energy during everyday cooking.
General tips
- Ensure that the oven door is closed properly when the appliance is in operation and keep it closed as much as possible during cooking.
- Use metal plates to improve energy efficiency.
- If possible, place the food in the oven without heating it.
- When cooking longer than 30 minutes, reduce the oven temperature to the minimum for 3 - 10 minutes, depending on the cooking time. Cooking will continue due to the residual heat in the oven.
- Use the residual heat to warm up other foods.
- Cooking with fan
- If possible, use the cooking functions that include the fan to save energy.
- Keeping food hot
- If you want to use the residual heat to keep a dish hot, choose the lowest temperature setting possible.
| Correct disposal of this product | |
| This symbol on the product, or in its packaging, indicates that this product may not be treated as household waste. Instead, it should be taken to the appropriate waste collection point for the recycling of electrical and electronic equipment.By ensuring this product is disposed of correctly, you will help prevent potential negative consequences for the environment and human health, which could otherwise be caused by the inappropriate waste handling of this product. For more detailed information about the recycling of this product, please contact your local council. your household waste disposal servise, or the shop where you purchased the product. |
8. INSTALLATION
Important: installation must be done in compliance with the standards and in accordance with the regulations in force. It must be performed by skilled personnel only.
i CHARACTERISTIC FEATURES OF THE CABINET
- For flush-mounted cabinets, the components (plastic or veneered wood) must be held together by heat-resistant adhesives (with at least 100^ C); unsuitable materials and adhesives can cause buckling and ungluing.
- The cabinet must permit the free passage of the electrical wiring and must be strong enough to bear the weight of the appliance.
- The oven must be mounted in a secure manner in the envisaged recess, it can be inserted into a column cabinet or under the top of a modular cabinet, while still providing adequate ventilation.
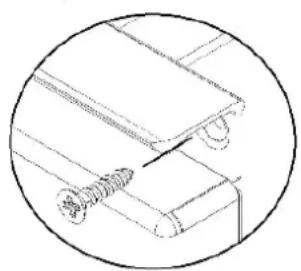
i ASSEMBLY INSTRUCTIONS
1) Insert the appliance into the compartment
2) Fix the body to the cabinet with the 2 screws provided using the holes in the upper profile (right and left).

natural_image
Technical line drawing of a mechanical assembly with springs and rollers (no text or symbols)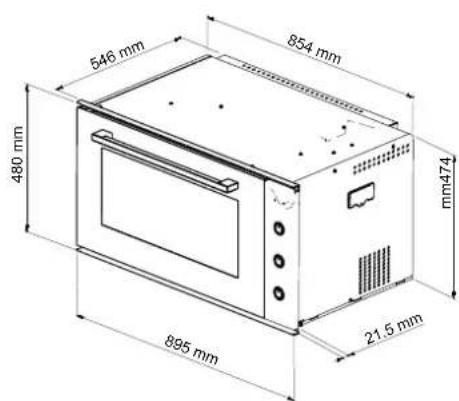
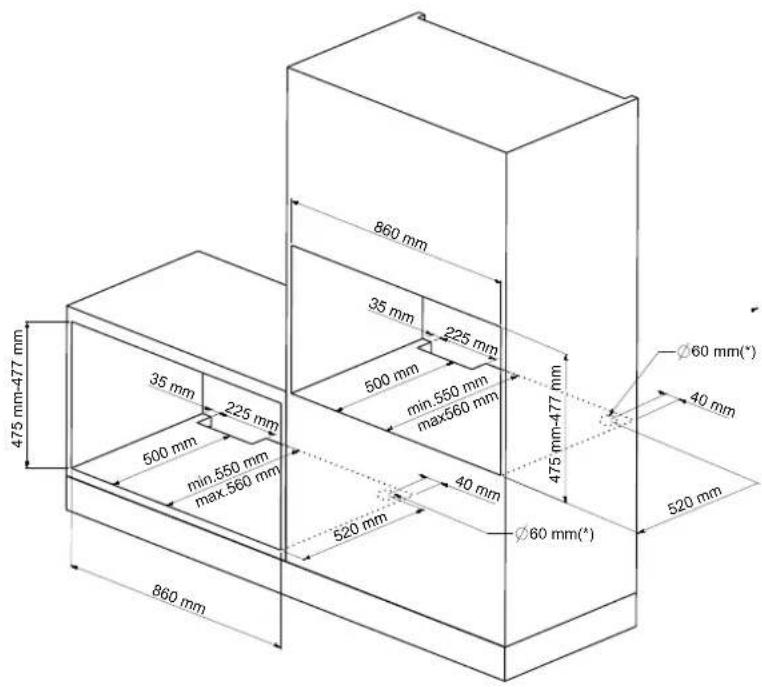
(*) Through the hole diameter 60 mm it is imperative to pass the electric cable of the oven.
i CONNECTING TO THE ELECTRIC MAINS
- The oven is provided with a three-pole power cable with free terminals.
- If the oven is connected permanently to the mains, install a device ensuring disconnection from the mains, with a contact opening distance (of at least 3 mm) that allows complete disconnection in the conditions of overvoltage category III. Check that:
a) The plug and socket are suitable for a current of 16^
b) Both are within easy reach and placed so that no live part can be accessed while plugging in or unplugging
c) The plug can be inserted without difficulty
d) Once the plug has been inserted, the oven does not rest on it when it is installed in the cabinet
e) The terminals of two appliances are not connected to the same plug
f) If changing the power cable, use one with 3 x 1.5 mm specifications ^2 type H05VV-F or H05RR-F
g) It is essential that the coupling polarities of the free terminals are respected (Brown = Live; Blue = Neutral; Yellow-Green = Earth).
N.B. Make sure the characteristics of your household electrical power supply (voltage, maximum power and current) are compatible with those of your new oven.

EARTHING
- The system must have an earthing wire, distinguished by the yellow-green colour of the protective sleeve.
- All electric household appliances must be connected to earth.
- This wire, in its turn, is connected to an earth plate (formed by metal poles stuck deep into the ground), whose task is to disperse the current that may accidentally be present on the surface of the user appliances.


| Nominal Power 2.8 kW 11.70 A Supply cord: 3 x 1.5 mm2type H05VV-F or H05RR-F | 220-240V~ | |
| Components | Oven | Nominal Power |
| oven light: 50 Watts | Bottom heating element | 1.50 kiloWatts |
| rotisserie motor: 4 Watts | Turbo heating element | 2.50 kiloWatts |
| oven fan: 33 Watts | Top heating element | 0.90 kiloWatts |
| cooling fan: 23 Watts | Grill heating element | 1.80 kiloWatts |
| oven timer: -- | ||
EARTH
i IMPORTANT INFORMATION ABOUT WARRANTY
- Every electric household appliance is covered by full warranty in the terms covered in the handbook. Warranty is granted for the period provided for by the current national legislation. Nothing is owed for call-out charges.
• Further information can be found in the enclosed warranty terms.
i Directions for control bodies In accordance with DIN 44547 and EN 60350 standards
Baking
In accordance with DIN 44547 and EN 60350 standards
| Dishes Accessories | pre-heating Rack Function | (minutes) | position from bottom | Temperature (°C) | Time minutes |
| Biscuits* Baking pan + baking paper 25 2 150-160 30-35 | |||||
| Small cakes* Baking pan 8 3 165-175 30-35 | |||||
| Sponge cake with water* | Springform pan on the rack | 8 3 165-175 37-42 | |||
| Leavened sweet* | Baking pan | 8 3 165-175 35-40 | |||
| Apple pie* | Tin-plate springform pan ∅ 20 cm directly | 14 | 2 | 180-190 | |
* Pre-heat the oven at max
In case of preparation of more cooking, is possible insert in the cooking compartment, two / three casseroles one next to it other.

| Dishes Weight (kg) Accessories pre-heating | Rack Function Temperature Time(minutes) | positionfrom bottom | (°C) | minutes | |||
| Cheese Cake 1,5-4 Kg | Cookware, uncovered onto the wire rack | 15 | 2 | 160 | |||
| Roast Beef 1-4 Kg | Cookware, uncovered onto the wire rack | 25 | 2 | 250 | |||
| Meatloaf | 1-4 Kg | Baking paper on baking tray | 20 | 3 | 200 | ||
| Lasagne | 1-3 kg | Cookware, uncovered onto the wire rack | 15 | 3 | 200 | ||
| Baked pasta | 1-3 kg | Cookware, uncovered onto the wire rack | 15 | 3 | 200 | ||
| Roast veal 1-3 kg | Cookware, uncovered onto the wire rack | 15 | 3 | 190 - 200 | |||
| Pork loin | 1-3 kg | Cookware, uncovered onto the wire rack | 15 | 3 | 85 | ||
| Pork shoulder | 1-3 kg | Cookware, uncovered onto the wire rack | 15 | 3 | 180 - 190 | ||
| Roast rabbit 1-3 kg | Cookware, uncovered onto the wire rack | 15 | 3 | 180 - 190 | |||
| Turkey rump | 2-4 kg | Cookware, uncovered onto the wire rack | 15 | 3 | 170 - 180 | ||
| Pork neck | 2-4 kg | Cookware, uncovered onto the wire rack | 15 | 3 | 170 | ||
| Roast chicken or Roast guinea-fowl | 1-2,5 kg | Cookware, uncovered onto the wire rack | 15 | 3 | 200 | ||
| Pork sausages | 1,2 kg | wire grid | 10 | 4 | 250 | ||
| Pork chops | 1,2 kg | wire grid | - | 4 | 250 | ||
| Hamburgers (EN60350) | 2 kg | wire grid | 10 | 4 | 250 | ||
| Pork belly | 1.2 kg | wire grid | 5 | 4 | 250 | ||
| Grilled chicken | 1.2 kg | Grill rotisserie | - | - | 250 | ||
| 6 - 9 Toast | - | wire grid | 10 | 4 | 250 | ||
| Rainbow trout | 0.8-1.6 kg | Cookware, uncovered onto the wire rack | 15 | 3 | 60 | ||
| Pizza | 1.4 kg | baking tray | 15 | 2 | 225 | ||
| Bread *** | 0.8-1 kg | baking paper on baking tray | 20 | 3 | 200 - 210 | ||
| Flat bread | 0.5-1 kg | baking paper on baking tray | 20 | 3 | 215 - 225 | ||
| Ciambella cake | 0.8 kg/ 1.6 kg | Cookware, uncovered onto the wire rack | 15 | 3 | 180 | ||
| Jam tart | 0.8-1.6 kg | Cookware, uncovered onto the wire rack | 15 | 3 | 160 | ||
| Short pastry | 0.8 kg/ 1.6 kg | Cookware, uncovered onto the wire rack | 15 | 3 | 160 - 170 | ||
| Cream puffs | 0.8 kg | baking paper on baking tray | 15 | 3 | 150 - 160 | ||
| Angel food cake | 0.8-1.6 kg | Cookware, uncovered onto the wire rack | 10 | 3 | 160 | ||
| Rice cake | 1-2 kg | Cookware, uncovered onto the wire rack | 15 | 3 | 160 | ||
| 8 -10 Brioches | 0.8-1 kg | baking paper on baking tray | 15 | 3 | 170 | ||
| 16 Brioches | 1.6 kg | baking paper on baking tray | 15 | 2 - 4 | 150 - 160 | ||
| Shortbread biscuits | 1 kg | baking tray | 8 | 3 | 170 - 180 | ||
| 2 frozen pizza | 0,65 kg | baking paper on wire grid | 10 | 3 | 190 - 210 | ||
| 4 frozen pizza | 1,3 kg | baking paper on wire grid | 10 | 2 - 4 | 180 - 200 | ||
| 15 frozen sandwiches | 0.5 kg | baking paper on wire grid | 15 | 2 | 170 - 190 | ||
| 30 frozen sandwiches | 1.1 kg | baking paper on wire grid | 15 | 2 - 4 | 170 - 190 | ||
| 8 frozen brioches | 0.5 kg | baking paper on wire grid | 10 | 3 | 150 - 170 | ||
| 16 frozen brioches * | 1 kg | Cookware, uncovered onto the wire rack | 15 | 2 - 4 | 170 - 180 | ||
| 3 frozen erbazzone ** | 1,8 kg | Cookware, uncovered onto the wire rack | 15 | 2 - 4 | 190 - 210 | ||
| 5 frozen strudel | 1,2 kg | Cookware, uncovered onto the wire rack | 15 | 3 | 190 - 210 | ||
| Frozen baked fried potatoes | 1 Kg | Baking paper on baking tray | 20 | 3 | 160 | ||
* it is recommended to place the food in aluminum trays for oven, positioning them on the wire grid
** for the cooking of a portion we recommend positioning on the wire grid + baking paper on the 2nd level, for cooking 2 or + portions we recommend positioning
on wire grid + baking paper on the 4th level
*** during the baking of the bread it is recommended to put a container with a little water inside the oven
Service

- Instructions for installation and use
- TABLE OF CONTENTS
- WITH YOU IN MIND
- CUSTOMER SERVICE AND MAINTENANCE
- SAFETY INFORMATION
- Safety of children and vulnerable persons
- General safety instructions
- Danger of burns!
- Danger of injury!
- SAFETY INSTRUCTIONS
- Installation
- CAUTION!
- Electrical connection
- Use
- Cleaning and care
- Interior light
- Disposal
- Technical Service
- PRODUCT DESCRIPTION
- Overview
- i 3.2 Selectors
- i 3.3 Functions Selector
- i 3.4 Temperature Selector
- i 3.5 End-of-Cooking Timer Selector
- i 3.6 Cooking Chamber
- i 3.7 Accessories
- WIRE RACK:
- DRIPPING PAN:
- PREPARING FOR FIRST USE
- i 4.1 Initial cleaning
- i 4.2 Switching on for the first time
- CLEANING AND CARE
- i 5.1 Notes on cleaning
- Products that are not suitable for cleaning and maintenance.
- i 5.2 Notes on cleaning
- i 5.3 Notes on cleaning
- i 5.4 Removing the shelf supports
- Removing and Cleaning the oven door
- REMOVING THE OVEN DOOR
- CLEANING THE OVEN DOOR
- Changing the light bulb
- Disassembly of convection motor.
- TROUBLESHOOTING
- CLEANING AND CARE
- i 7.1 Energy saving
- General tips
- INSTALLATION
- i CHARACTERISTIC FEATURES OF THE CABINET
- i ASSEMBLY INSTRUCTIONS
- i CONNECTING TO THE ELECTRIC MAINS
- EARTHING
- i IMPORTANT INFORMATION ABOUT WARRANTY
- Baking
- Service
Brand : BLAUPUNKT
Model : 5BC93190AU
Category : Frying Pan