
Power Wand Assembly - Awning Accessory DOMETIC - Free user manual and instructions
Find the device manual for free Power Wand Assembly DOMETIC in PDF.


| Product Type | Awning Cleaning Tool |
| Brand | Dometic |
| Model | Power Wand Assembly |
| Compatible Awnings | Most Dometic RV awnings |
| Handle Material | Aluminum |
| Brush Material | Plastic with nylon bristles |
| Overall Length | 1.8 m (telescopic) |
| Brush Width | 25 cm |
| Weight | 0.5 kg |
| Water Connection | Standard garden hose |
| Water Flow Control | Trigger handle with on/off |
| Cleaning Method | Water spray with scrubbing |
| Maintenance | Rinse brush after use; store dry |
| Safety Precautions | Do not use harsh chemicals; avoid contact with eyes |
| Included Components | Wand assembly, hose adapter |
| Warranty | 1 year limited |
Frequently Asked Questions - Power Wand Assembly DOMETIC
User questions about Power Wand Assembly DOMETIC
0 question about this device. Answer the ones you know or ask your own.
Ask a new question about this device
Download the instructions for your Awning Accessory in PDF format for free! Find your manual Power Wand Assembly - DOMETIC and take your electronic device back in hand. On this page are published all the documents necessary for the use of your device. Power Wand Assembly by DOMETIC.
USER MANUAL Power Wand Assembly DOMETIC
IMPORTANT SAFETY INSTRUCTIONS AND DOCUMENT SYMBOLS. 2
A. Recognize Safety Information....2
B. Understand Signal Words 2
C. Supplemental Directives....2
D. General Safety Messages 2
GENERAL INFORMATION 2
INSTALLATION 3
A. Installing The Battery 3
B. Mounting The Connection Enclosure.... 3
C. Connecting The Wires.... 4
OPERATION 4
A. Operating The Power Wand 4
MAINTENANCE....4
A. Removing The Battery 4
B. Charging the Battery 4

Read these instructions carefully. These instructions MUST stay with this product.
REVISION D
Form No. 3316779.000 6/17
(French 3316780.000_D)
©2017 Dometic Corporation
LaGrange, IN 46761
USA
SERVICE OFFICE
Dometic Corporation
1120 North Main Street
Elkhart, IN 46514
CANADA
Dometic Corporation
46 Zatonski, Unit 3
Brantford, ON N3T 5L8
CANADA
SERVICE CENTER &
DEALER LOCATIONS
Visit:
www.eDometic.com
IMPORTANT SAFETY INSTRUCTIONS AND DOCUMENT SYMBOLS
This manual has safety information and instructions to help you eliminate or reduce the risk of accidents and injuries.
A. Recognize Safety Information

This is the safety alert symbol. It is used to alert you to potential physical injury hazards. Obey all safety messages that follow this symbol to avoid possible injury or death.
B. Understand Signal Words
A signal word will identify safety messages and property damage messages, and will indicate the degree or level of hazard seriousness.
WARNING
indicates a hazardous situation that, if NOT avoided, could result in death or serious injury.
CAUTION
indicates a hazardous situation that, if NOT avoided, could result in minor or moderate injury.
NOTICE
is used to address practices NOT related to physical injury.

Indicates additional information that is not related to physical injury.
C. Supplemental Directives

Read and follow all safety information and instructions to avoid possible injury or death.
Read and understand these instructions before [installation / use / service / maintenance] of this product.
Incorrect [installation / operation / service / maintenance] of this product can lead to serious injury.
The installation MUST comply with all applicable local or national codes, including the latest edition of the following standards:
U.S.A.
• ANSI/NFPA70, National Electrical Code (NEC)
• ANSI/NFPA 1192, Recreational Vehicles Code
CANADA
• CSA C22.1, Parts I & II, Canadian Electrical Code
• CSA Z240 RV Series, Recreational Vehicles
D. General Safety Messages
WARNING
Failure to obey the following warnings could result in death or serious injury:
- This product MUST be [installed / serviced] by a qualified service technician.
- PROJECTILE HAZARD. The unit can become a projectile if left attached during transit. Do NOT modify this product to allow permanent installation. Failure to obey this warning could result in death or serious injury.
- FIRE OR EXPLOSION HAZARD. Use only an approved Dometic charger. Failure to obey this warning could result in battery damage, death or serious injury.
- FIRE OR EXPLOSION HAZARD. Do NOT disassemble, crush, puncture or incinerate product. Failure to obey this warning could result in death or serious injury. If the battery is disassembled, crushed or punctured, it could cause a fire or explode. If it is incinerated, it could explode.
NOTICE
- Always disconnect the Power Wand and remove it from the awning after use. Be sure to install the mud plug on the connector to prevent debris from collecting. Otherwise, damage to product and/or RV could occur.
- This product is NOT intended for use on awnings with wind sensors, controllers, or devices that require constant power. Otherwise, damage to product and/or RV could occur.
GENERAL INFORMATION
INCLUDED HARDWARE
| (1) Connection Enclosure (1) Connection Harness | |
| (1) Mud Plug | |
| BASIC COMPONENTS | |
| Power Wand Battery | |
| Charger | |
| REQUIRED TOOLS | |
| Wire Strippers Crimp Tool | |
| 3/8" Socket/Bit Electric Drill | |
INSTALLATION

These instructions assume an awning is already installed. The awning pictured may vary from the actual awning installed but the installation procedure remains the same.
A. Installing The Battery
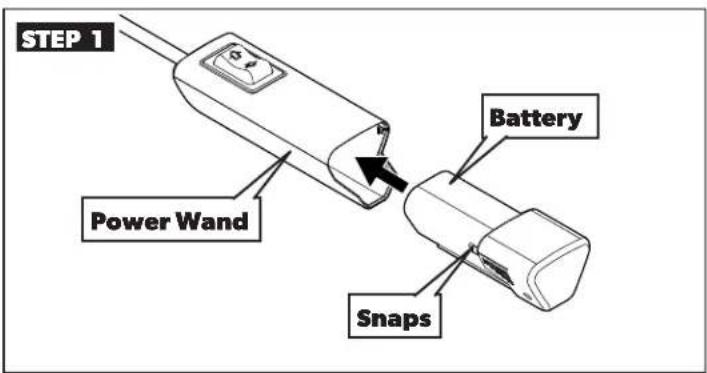
B. Mounting The Connection Enclosure


The awning may have to be opened slightly to allow room to mount the connection enclosure.
- TEMPORARILY connect the Power Wand to the hardware arm wiring by carefully pushing the black and red wires of the hardware arm harness into the two-place connector on the Power Wand.
- Open the awning by operating the switch on the Power Wand.
- Remove the temporary connection before proceeding with the installation.


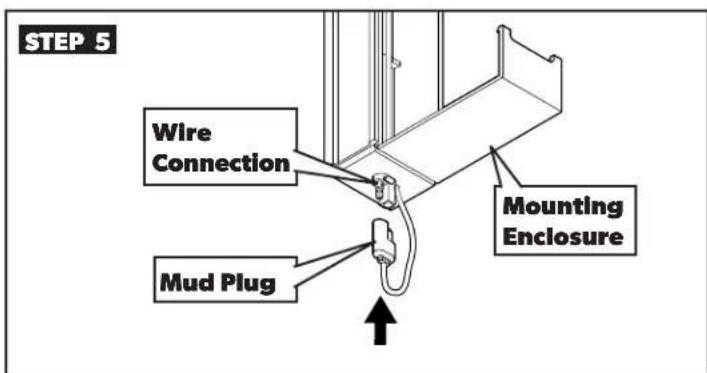
- Re-install the screws or pop rivets that were removed in STEP 3.
- Place the mud plug over the red and black connection wires from the hardware arm.
INSTALLATION
C. Connecting The Wires

- Connect the black wire to the black wire and red wire to the red wire by stripping and crimping the wire splices.

- Coil excess wire inside enclosure and then close the lid and firmly snap in place.
- Cut wire cover removed in Section B to length and reinstall.
OPERATION
WARNING PROJECTILE HAZARD. Do NOT leave the power wand attached to the awning while the vehicle is in motion. The unit can become a projectile if left attached during transit. Failure to obey this warning could result in death or serious injury.
A. Operating The Power Wand


- To disconnect the Power Wand reverse the instructions in STEP 1, reinstall the mud plug, and store for next use.
MAINTENANCE
A. Removing The Battery
- To remove the battery, reverse the instructions in "A. Installing The Battery" STEP 1.
B. Charging the Battery
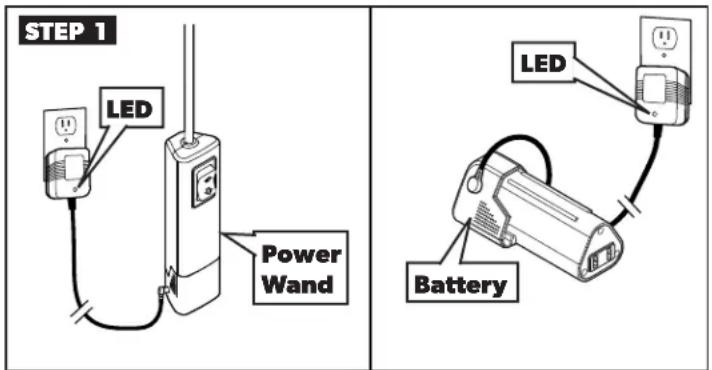
The battery can be charged while attached to the Power Wand, or it can be removed and charged separately.
Charging time is approximately four (4) hours. Spare batteries can be purchased separately from your local Dometic supplier.
- LED color - with charger connected to battery and connected to 110 VAC power source.
GREEN = Battery fully charged.
RED = Battery is being charged.
WARNING
Do not charge or use the Power Wand c
in locations where the temperature may reach or exceed 115^ F ( 45^ C). The Power Wand and batteries must be stored indoors, away from open flame, out of direct sunlight between 15^ F and 140^ F (- 20^ C and 60^ C). Otherwise, the battery could catch fire or explode. Failure to obey this warning could result in death or serious injury.
- IMPORTANT SAFETY INSTRUCTIONS AND DOCUMENT SYMBOLS. 2
- GENERAL INFORMATION 2
- INSTALLATION 3
- OPERATION 4
- MAINTENANCE....4
- REVISION D
- USA
- CANADA
- SERVICE CENTER &
- DEALER LOCATIONS
- Visit:
- IMPORTANT SAFETY INSTRUCTIONS AND DOCUMENT SYMBOLS
- Recognize Safety Information
- Understand Signal Words
- WARNING
- CAUTION
- NOTICE
- Supplemental Directives
- U.S.A.
- General Safety Messages
- GENERAL INFORMATION
- INSTALLATION
- OPERATION
- MAINTENANCE
- Removing The Battery
Brand : DOMETIC
Model : Power Wand Assembly
Category : Awning Accessory