
HelpingHands GN-88 - Unspecified Carson - Free user manual and instructions
Find the device manual for free HelpingHands GN-88 Carson in PDF.

| Product Type | Hands-Free Magnifier |
| Brand | Carson |
| Model | HelpingHands GN-88 |
| Power Source | 2 AA alkaline batteries (rechargeable not recommended) |
| Polarity Indicators | Marked inside battery compartment |
| LED Illumination | Yes, slide switch on magnifier handle |
| Magnifier Use | Handheld or base-mounted via keyed adapter |
| Flexible Arms | 2 metal arms with alligator clips, adjustable |
| Alligator Clip Adjustment | Wing nuts for position locking |
| Base Type | U-shaped base with keyed snap-in adapter |
| Included Items | Magnifier, base, 2 flexible arms, 2 alligator clips, adapter |
| Cleaning Instructions | Soft microfiber cloth, water if needed; no harsh chemicals |
| Safety Warning | Keep away from direct sunlight (fire hazard); avoid hot soldering iron |
| Customer Support (US) | 1-631-963-5000, info@carson.com |
| Customer Support (UK/EU) | +44 (0) 1938 557440, uksupport@carson.com / eusupport@carson.com |
| Manual Length | 3 pages (English) |
Frequently Asked Questions - HelpingHands GN-88 Carson
User questions about HelpingHands GN-88 Carson
0 question about this device. Answer the ones you know or ask your own.
Ask a new question about this device
Download the instructions for your Unspecified in PDF format for free! Find your manual HelpingHands GN-88 - Carson and take your electronic device back in hand. On this page are published all the documents necessary for the use of your device. HelpingHands GN-88 by Carson.
USER MANUAL HelpingHands GN-88 Carson
natural_image
Line drawing of a handheld device with adjustable arms and connectors, labeled GN-88 (no text or symbols on the device itself)Instructions for use:
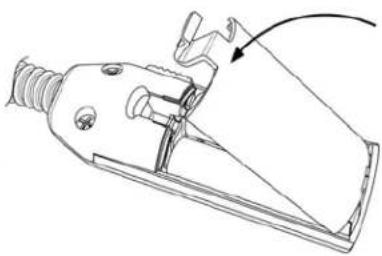
Installing Batteries
Pull open battery door (Fig. 1). Insert 2 AA batteries as shown in Fig. 2. Make sure to follow polarity indicators marked inside battery compartment. Replace battery door (Fig. 3).

natural_image
Technical line drawing of a mechanical tool or connector with an arrow indicating direction (no text or symbols present)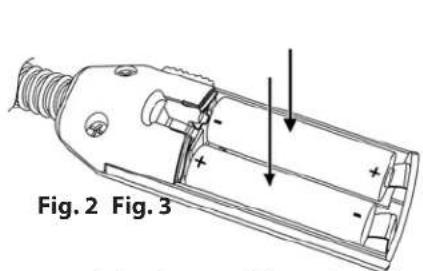
natural_image
Technical line drawing of a mechanical clamp or connector component (no text or symbols)Warning: Use only alkaline batteries. Mixing old and new, different brands or types within brands may cause batteries to leak, overheat or explode. Keep away from fire or excessive heat. Inspect batteries for corrosion or leakage. Insert in direction indicated. Rechargeable batteries not recommended.
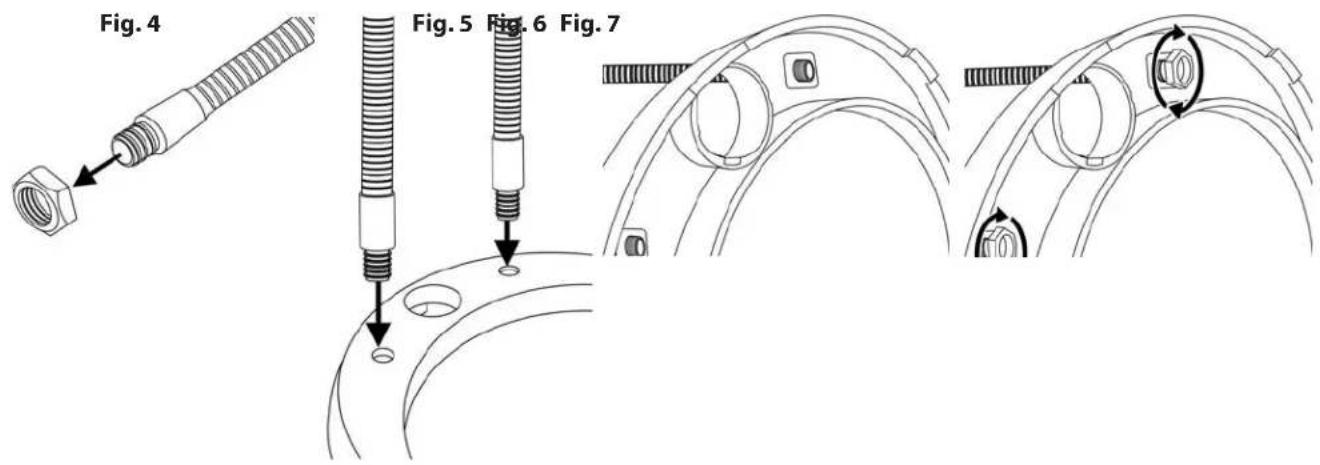
Attaching Flexible Arms
Locate flexible metal arms and remove nuts from ends (Fig. 4). Insert ends of metal arms into holes in U shaped base (Fig. 5-6). Reattach nuts to secure arms to base (Fig. 7).
To Use Hands-Free
Snap adapter into base. Please note that adapter is "keyed" to fit only one way (Fig. 8). Place magnifier handle into adapter (Fig. 9). It is also keyed and will easily "click-lock" into base when correctly inserted. Adjust flexible arms and position lens as needed (Fig. 10).

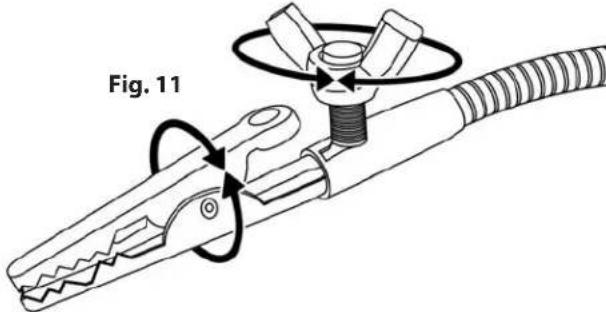
To Adjust Alligator Clips
Loosen wing nuts to adjust position of alligator clips as desired (Fig. 11). Tighten wing nuts to lock into place.
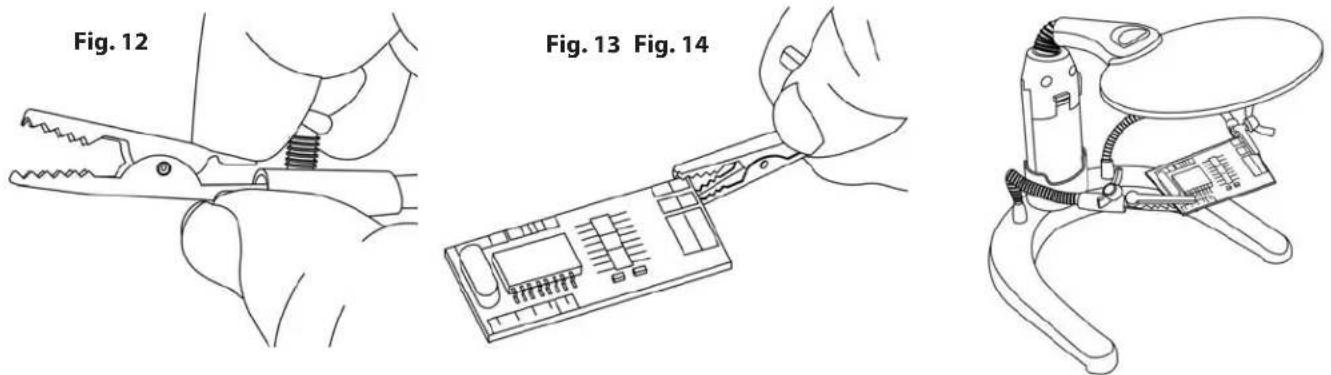
Using Alligator Clips
Pinch to open each alligator clip (Fig. 12) and clamp onto viewing subject (Fig. 13). Position arms as needed to view subject under the lens (Fig. 14).
To Activate LED Light
To turn light on, slide switch (located on side of magnifier handle) forward (Fig. 15).

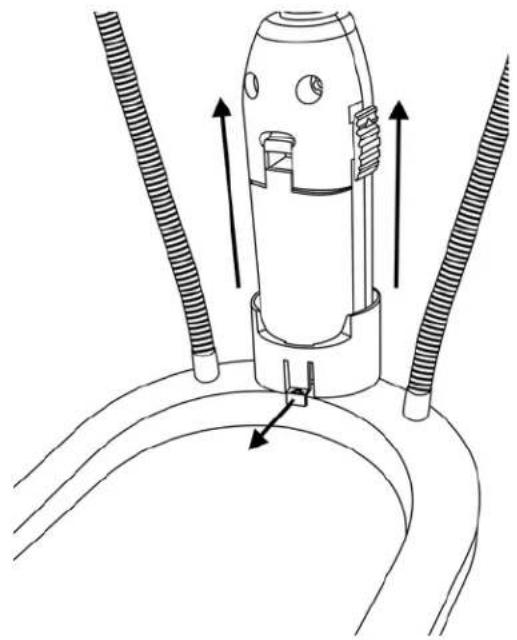
To Remove Magnifier From Base
Lift lock tab outward and lift magnifier from base (Fig. 16) to use as hand-held magnifier.
natural_image
Technical line drawing of a mechanical component with three coiled tubes and directional arrows indicating assembly or movement (no text or symbols)Cleaning Your Magnifier
Clean lens with a soft, clean microfiber cloth by rubbing gently in a circular motion. Moisten the lens cloth with water if needed. Do not use harsh chemicals, solvents or abrasives as they may damage the lens.
Note: To avoid damaging the craft magnifier, do not touch lens or plastic body with hot soldering iron.
CAUTION - FIRE HAZARD:
Keep magnifier away from direct sunlight to prevent accidental fire.
Customer Service:
If you experience any difficulties, please contact us and we will be happy to help you.
In the U.S.A.
Phone: 1-631-963-5000
Email: info@carson.com
In the U.K.
Phone: +44 (0) 1938 557440
Email: uksupport@carson.com
In the E.U.
Phone: +44 (0) 1938 557440
Email: eusupport@carson.com
Brand : Carson
Model : HelpingHands GN-88
Category : Unspecified