
GK17TIYSZ - Cooker V-ZUG - Free user manual and instructions
Find the device manual for free GK17TIYSZ V-ZUG in PDF.


| Product Type | Teppan Yaki (Built-in Cooktop) |
| Model | GK17TIYSZ |
| Product Family | 31076 |
| Number of Frying Zones | 2 |
| Frying Surface Dimensions (each zone) | 31 cm x 17.7 cm |
| Total Frying Surface | Approx. 62 cm x 17.7 cm |
| Temperature Range | 70°C to 240°C |
| Preset Temperatures | Fish (180°C), Vegetables (160°C), Meat (200°C) |
| Key Functions | Bridging, Pause Cooking, Timer, Childproof Lock, Wipe Protection, OptiClean, Restore, Operating Time |
| Residual Heat Indicator | Yes (H display) |
| Automatic Safety Shut-off | Yes (time-dependent based on temperature) |
| Control Type | Touch sliders and buttons |
| Cleaning Program | OptiClean: soak at 70°C for 10 minutes |
| Accessories Included | Cooking bell (250 mm diameter), 2 spatulas |
| Installation | Built-in, requires qualified electrician |
| Power Supply | 230 V ~ (typical) |
| Safety Features | Childproof lock, residual heat indicator, automatic shut-off, wipe protection |
| Spare Parts & Service | Available from V-ZUG Customer Services |
Frequently Asked Questions - GK17TIYSZ V-ZUG
User questions about GK17TIYSZ V-ZUG
0 question about this device. Answer the ones you know or ask your own.
Ask a new question about this device
Download the instructions for your Cooker in PDF format for free! Find your manual GK17TIYSZ - V-ZUG and take your electronic device back in hand. On this page are published all the documents necessary for the use of your device. GK17TIYSZ by V-ZUG.
USER MANUAL GK17TIYSZ V-ZUG
natural_image
Two white rectangular devices on a gray background, one with a blank center and the other with a blank base (no text or symbols)Operating instructions
GK17TIYSZ | GK27TIYSZ
Teppan Yaki
Thank you for choosing to buy one of our products. Your appliance is made to high standards and is easy to use. Nevertheless, please take the time to read these operating instructions in order to familiarise yourself with the appliance and get the best use out of it.
Please follow the safety precautions.
Modifications
Text, diagrams and data correspond to the technical standard of the appliance at the time these operating instructions went to press. The right to make technical modifications for the purpose of the further development of the appliance is reserved.
Validity
The product family (model number) corresponds to the first alphanumerics on the identification plate. These operating instructions apply to:
| Type Product family | |
| GK17TIYSZ 31076 | |
| GK27TIYSZ 31077 |
Variations depending on the model are noted in the text.
Contents
2
1 Safety precautions 5
1.1 Symbols used 5
1.2 General safety precautions 6
1.3 Appliance-specific safety precautions.... 7
1.4 Instructions for use 8
2 Disposal 10
3 Using for the first time 11
4 Your appliance 12
4.1 Appliance overview.... 12
4.2 Accessories supplied.... 12
4.3 Operating and display elements 13
5 Operating the appliance 14
5.1 Switching the appliance on and off.... 14
5.2 Selecting the frying zone 14
5.3 Overview of frying temperatures 15
5.4 Switching the frying zone off.... 15
5.5 Residual heat indicator 15
5.6 Bridging function.... 16
5.7 Multi-function button 16
5.8 Pause cooking.... 17
5.9 Restore function 17
5.10 Operating time.... 18
5.11 Timer....20
5.12 Childproof lock 21
5.13 Wipe protection 22
6 User settings 23
6.1 Changing user settings.... 24
6.2 Cancelling user settings 24
7 Care and maintenance 25
7.1 OptiClean 26
8 Trouble-shooting 27
9 Accessories 30
0 Technical data 31
10.1 Product fiche.... 31
11 Index 32
12 Notes 34
13 Service & Support 35
1 Safety precautions
1.1 Symbols used

Denotes important safety precautions.
Failure to observe said precautions can result in injury or in damage to the appliance or fittings!

Information and precautions that should be observed.
Information on disposal

Information about the operating instructions
▶ Indicates step-by-step instructions.
– Describes how the appliance reacts to the steps taken.
- Indicates a list.
1.2 General safety precautions

- Read the operating instructions before using the appliance for the first time!

- This appliance can be used by children aged 8 and above and by persons with reduced physical, sensory or mental capabilities, or lack of experience and/or knowledge, provided they are supervised or have been instructed on the safe use of the appliance and have understood the hazards involved. Children shall not play with the appliance. Cleaning and user maintenance shall not be undertaken by children without supervision.
- If an appliance is not equipped with a mains cable and a plug or other means for disconnecting from the mains with a contact opening on each pole complying with the conditions of overvoltage category III for full isolation, an isolating device must be incorporated into the permanently installed electrical installation in accordance with the installation regulations.
- If the mains cable of this appliance is damaged, it must be replaced by the manufacturer or its Customer Services or a similarly qualified person in order to avoid hazard.
1.3 Appliance-specific safety precautions

- WARNING: If the surface is cracked or the control panel glass is damaged, switch the appliance off and disconnect it from the mains to avoid possible electric shock.
- Accessible parts can get hot during use. Children under 8 years of age must not operate the appliance unless they are constantly supervised.
- WARNING: The appliance and its accessible parts get hot during use. Be careful not to touch the heated surface.
- Do not place metal objects such as knives, forks, spoons, lids or aluminium foil on the teppan yaki as they can get hot.
- WARNING: The cooking process should always be supervised. Shorter cooking processes, in particular, must be supervised the entire time.
- WARNING: It can be dangerous to leave the teppan yaki unattended when cooking with fat or oil, as this can lead to fires. Never attempt to extinguish a fire with water. Instead, switch the appliance off and then carefully smother the flames with, for example, a fire blanket. Switch the appliance off when no longer in use.
- WARNING: Never store objects on the teppan yaki due to the risk of fire.
- Do not operate the appliance using an external time switch or a separate remote control system.
- Under no circumstances use a steam cleaner to clean this appliance.
1.4 Instructions for use
Before using for the first time
- The appliance must be installed and connected to the electricity supply in accordance with the separate installation instructions. Have a qualified fitter/electrician carry out the necessary work.
Correct use
NOTE: This appliance is only intended for cooking purposes. It may not used for other purposes, such as heating a room. Prepare the food directly on the frying surface – do not use cookware.
- The appliance is designed for use in the home for preparing food. No liability is assumed for any damage caused by improper use or incorrect handling.
- Any repairs, modifications or manipulations to the appliance, especially any electrically live parts, may only be carried out by the manufacturer, its Customer Services or a similarly qualified person. Repairs if carried out incorrectly may cause serious injury, damage to the appliance and fittings, as well as affect the functioning of the appliance. If the appliance is not working properly or in case a repair is needed, follow the instructions given in the «Service and support» section. Contact our Customer Services if necessary.
- Use original spare parts only.
- Retain these operating instructions for future reference. If you sell the appliance or pass it on to a third party, please ensure these operating instructions accompany the appliance, together with the installation instructions.
- The appliance corresponds to recognized technology standards and the relevant safety regulations. However, proper use of the appliance is essential to avoid damage and accidents. Please therefore follow the precautions given in these operating instructions.
- The heated surface will remain hot for some time after it is switched off and will cool down only slowly to room temperature. Please allow sufficient time for the appliance to cool down before, for instance, cleaning it.
Note on use
- Tests have shown that under normal circumstances there is no risk to cardiac pacemaker users. If, as the user of a cardiac pacemaker, a hearing aid or another type of implant, you would like to be reassured that using the appliance does not pose a risk, you are advised to consult a competent medical authority.
Caution: Fire hazard!
- The frying zones become very hot. Do not rest any objects on the teppan vaki.
- Do not store or use corrosive, chemical or flammable cleaning agents or products underneath or near to this household appliance.
Caution: Burns hazard
- Overheated fat and oil can easily catch fire. Never attempt to extinguish burning oil or fat with water. Danger of explosion! Smother the flames with a fire blanket. Keep doors and windows closed.
Caution: Risk of injury
- Do not tamper inside the appliance. Any work inside the appliance may only be performed by our Customer Services.
- Use of unsuitable protective guards can cause accidents.
- Keep pets away from the appliance.
Caution: Risk to life
- Packaging materials such as plastic film and polystyrene can be dangerous for children. Danger of suffocation! Keep packaging material away from children.
How to avoid damaging the appliance
■ Under no circumstances place hot objects on the display!
- In case of overheating, switch the appliance off and allow it to cool down completely. Do not put any dishes on it. Under no circumstances use cold water to cool it down quickly.
- Do not climb on to the appliance.
- Do not cut or prepare food on the surface and avoid impact with hard objects. Do not drag rough objects across the surface or the display.
- The teppan yaki is designed to be used – signs of use, such as scratches or the discolouration of the surface, are normal. The more intensively it is used, the greater the signs of use; however, the appliance remains in perfect working order and therefore does not give a right of complaint. Safety is guaranteed at all times.
2 Disposal
Packaging
- All packaging materials (cardboard, plastic film (PE) and polystyrene (EPS)) are marked and should, if possible, be collected for recycling and disposed of in an environmentally friendly way.
Disconnection
- Disconnect the appliance from the mains. With a fixed appliance, this is to be carried out by a qualified electrician!
Safety
- Disable the appliance to prevent accidents caused by improper use, especially through children playing.
- Pull the plug out of the mains socket or have the appliance disconnected from the mains by an electrician. Then cut the mains cable off flush with the appliance.
Disposal
- The old appliance should not be discarded as worthless rubbish. If disposed of correctly, the raw materials can be recovered for recycling.
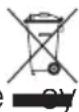
- The symbol on the identification plate warns that the appliance may not be disposed of in normal household waste.
- The appliance must be disposed of in accordance with local regulations on waste disposal. For more information on the handling, disposal and recycling of the product, please contact the local authorities, the local recycling facilities for household waste or the retailer from whom you purchased the appliance.
3 Using for the first time

The appliance must be installed and connected to the electricity supply in accordance with the separate installation instructions. Have a qualified fitter/electrician carry out the necessary work.

A frying zone can give off an unpleasant smell during the first few hours of use. This is normal for brand new appliances. Ensure that the room is well ventilated.
Where is the identification plate?
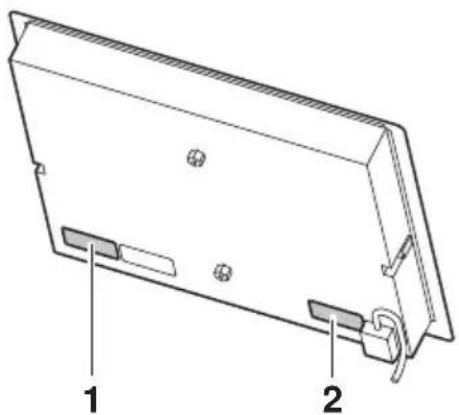
The identification plate and the connection plate are located on the underside of the teppan yaki.
natural_image
Technical line drawing of a rectangular electronic device with labeled parts (1 and 2), showing internal components and mounting holes (no text or symbols beyond labels)1 Identification plate with serial number (FN)
2 Connection plate
A second identification plate is supplied and should be affixed in the fitted unit underneath the teppan yaki.
Note down the serial number (FN) of your appliance on the back page of these operating instructions.

The serial number is required for identifying the appliance. Only then can customer services guarantee a faultless service.
4 Your appliance
4.1 Appliance overview
GK17TIYSZ
Frying area with 2 separately heatable frying zones
GK27TIYSZ
Frying area with 2 separately heatable frying zones

natural_image
Computer monitor with blank screen and gray base (no text or symbols)
natural_image
Computer monitor with blank screen and stand (no text or symbols)4.2 Accessories supplied
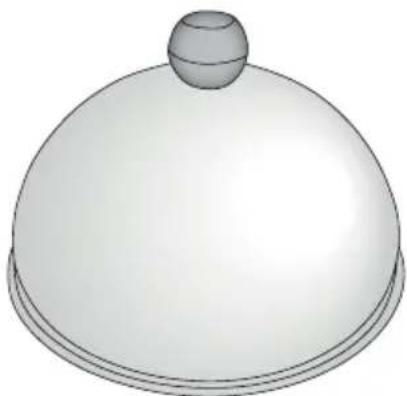
- Cooking bell, 250 mm in diameter
- 2 spatulas
natural_image
3D illustration of a dome-shaped object with a small protrusion on top (no text or symbols)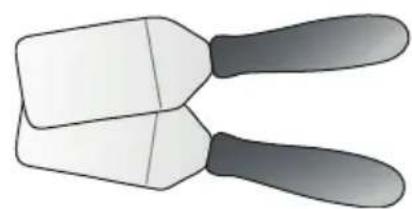
natural_image
Illustration of two pushpins with black handles, no text or symbols present4.3 Operating and display elements
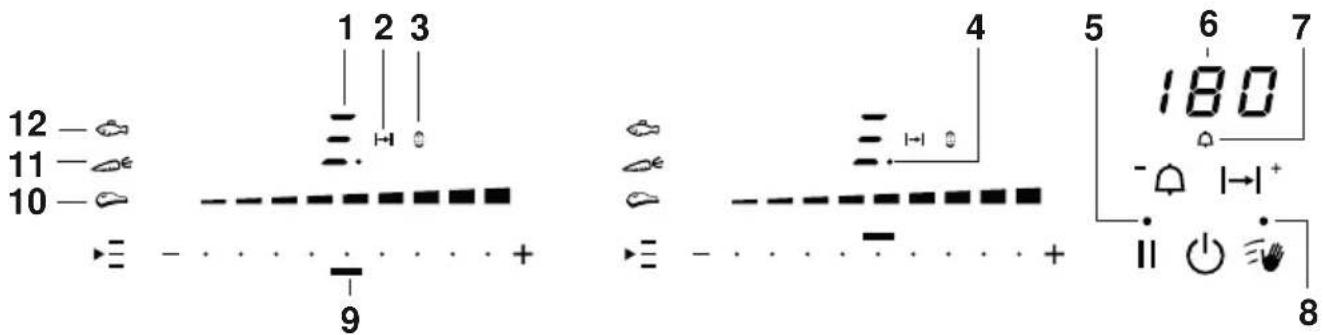
Buttons
Appliance ON/OFF Timer/Function as minus
- · · + Slider (for setting the power level) |→|⁺ Operating time/Function as plus button Wipe protection ON/OFF and OptiClean
|| button Pause cooking ON/OFF and restore function ►≡ Multi-function button/ Temperature selector
Displays
1 Heating-up/cooling-down/residual-heat indicator
2 Operating time activated
3 Bridging function activated
4 Frying zone temperature indicator
5 Pause activated
6 Operating time/timer and temperature display
7 Timer activated
8 Wipe protection activated
9 Corresponding frying zone for slider
10 Temperature selector for meat activated
11 Temperature selector for vegetables activated
12 Temperature selector for fish activated
5 Operating the appliance
5.1 Switching the appliance on and off
All the appliances are operated in the same way.
▶ To switch the appliance on: Depress the ⏻ button for 1 second.
- flashes in the temperature display.
- If no other entry is made, the appliance switches off again after about 10 seconds for safety reasons.
▶ To switch the appliance off: Press the ⏻ button.
5.2 Selecting the frying zone
- Press the slider for the required frying zone or slide your finger along it to set the frying temperature.
- The frying zone indicator illuminates above the corresponding slider.
- The frying temperature selected illuminates in the temperature display.
- When the appliance is heating up,—appears in the display above the slide.
- As soon as the frying temperature is reached, the heating-up indicator goes out.

If a lower frying temperature is selected, appears as long as the frying zone still remains too hot.
Even if using only one frying zone, the whole frying surface can get hot. Do not put objects on the frying surface as they can melt or get hot.
The frying temperature for fish (180 °C), vegetables (160 °C) and meat (200 °C) can also be set directly via the temperature selection button ▶.
5.3 Overview of frying temperatures
| Cooking method | Frying temperature °C | Use |
 | 180 Temperature selector for fish | |
 | 160 Temperature selector for vegetables | |
 | 200 Temperature selector for meat | |
| Keep warm 70 Prepared food under the cooking bell | ||
| Gentle frying 1 | 60 Vegetables | |
| 170 Fruit | ||
| Joint of meat 1 | 80 Fish and seafood, sausages, tofu, grilled cheese | |
| 190 Omelettes, egg dishes, fried rice and noodles | ||
| 200 Poultry | ||
| 210 Burgers | ||
| Flash frying 2 | 20 Meat (steak) | |
| 240 Meat (chopped or minced meat) | ||
5.4 Switching the frying zone off
▶ Touch «—» on the slider.
- If no other entry is made and the other frying zone is switched off, the appliance switches off after 10 seconds.
5.5 Residual heat indicator
After a cooking zone is switched off, H remains illuminated as long as there is a risk of burns.
5.6 Bridging function
The bridging function allows two individual cooking zones lying one behind the other to be switched on together and to be adjusted together.
Switching the bridging function on
▶ Touch both sliders at the same time.
- 📄Illuminates next to the slider.
▶ Set the desired temperature.

If, when the bridging function is switched on, a cooking zone is already running, the power level and operating time of this cooking zone will be taken over for both zones. If both frying zones are already running, they are switched off, the operating times are cleared and 000 flashes in the power level displays.
Switching the bridging function off
▶ Touch both sliders at the same time.
- Both cooking zones revert to the previous settings.
– Each cooking zone can be regulated individually again.
5.7 Multi-function button
Use the ▶ button to set a preselected temperature.
Switching on temperature selector for meat
- The symbol illuminates.
Switching on temperature selector for vegetables
▶ Touch the ▶ button 2×:
- The symbol illuminates.
Switching on temperature selector for fish
▶ Touch the ▶ button 3×:
- The symbol illuminates.
Switching off temperature selector
▶ Use the slider to set any power level or switch off with« ».
5.8 Pause cooking
With this function, all frying zones that are switched on can be temporarily reduced to 70 °C for up to 10 minutes.
Thereafter, the appliance can continue to be operated using the previous settings.
▶ Touch the I button.
- The indicator light for the button illuminates.
- The temperature of the frying zone switched on changes to 70^ .
– The operating time is interrupted. - The timer continues to run.
- All buttons are inactive except for ⏻, I and .

If the pause cooking function is not turned off within 10 minutes, the appliance switches off completely.
▶ Touch the I button again to resume cooking.
- The frying zones resume operation using the previous settings.
If the appliance has been inadvertently switched off with the ⏻ button, the settings can be restored within 6 seconds.
▶ Switch the appliance on.
- The indicator light for the II button flashes.
▶ Touch the I button.
- Frying zones that were switched on when the appliance was accidentally switched off come back on automatically.
5.10 Operating time

Do not leave the hob unattended during use. Risk of boiling over, burning on and igniting!
With the operating time function, a Frying zone switches off automatically after a set time 1 min. - 1 h 59 min..
Setting the operating time
▶ Select the required frying zone.
▶ Touch the I button.
- 0 flashes in the display.
▶ Touch the slider for the desired frying zone.
- The symbol for the frying zone selected illuminates.
- The indicator light for the frying zone selected illuminates.
▶ Use the I button to increase the operating time or use the button to reduce the operating time.
- The first time the l l^+ button is touched, illuminates in the display.
- The first time the button is touched, illuminates in the display.

The recommended value 30 can be adjusted in the user settings.
If the setting is not changed, it will be automatically accepted after 5 seconds. Alternatively, the setting can also be confirmed manually by touching the slider for the corresponding frying zone.
Changing the operating time
▶ Touch the I button.
- 0 flashes in the display.
- Touch the slider for the desired frying zone.
- The remaining operating time for the frying zone selected is displayed.
- The indicator light for the frying zone illuminates.
▶ Use the - or button to change the operating time.

To quickly change the operating time, press and hold the | |^+ button.
If the setting is not changed, it will be automatically accepted after 5 seconds. Alternatively, the setting can also be confirmed manually by touching the slider for the corresponding frying zone.
Switching the operating time function off before time
▶ Touch the I button.
- Touch the slider for the desired frying zone.
- Touch the - and buttons at the same time.
- 0 flashes in the display.
- The frying zone continues to run.
End of the operating time
When the operating time is up
– the relevant frying zone switches off
– an acoustic signal is emitted
- and flash in the display and above the slider respectively.
Touch the ^- of button to switch off the acoustic signal and the display.
- If no buttons are pressed, the acoustic signal switches off automatically after 1 minute.
Several operating times
If operating times are set for several frying zones,
– the shortest operating time is displayed.
– the corresponding frying zone indicator light illuminates.
- the symbol illuminates with the set operating time for each frying zone.
To display another operating time:
▶ Touch the I button.
- Touch the slider for the desired frying zone.
- The operating time is displayed and can be changed.
5.11 Timer
The timer functions like an egg timer (1 min.-9 h 59 min.).
It can be used at any time and independently of all other functions.
Setting the timer
▶ Switch the appliance on.
▶ Touch the button.
- The symbol illuminates.
- 0.0 flashes in the display.
▶ Use the I button to increase the duration of the timer or use the button to reduce the duration of the timer.
- The first time the button is touched, illuminates in the display.
▶ The first time the button is touched, illuminates in the display.

The standard value 30 can be adjusted in the user settings.

To quickly change the duration of the timer, press and hold the I ^+ button.
If the setting is not changed, it will be automatically accepted after 5 seconds. Alternatively, if another setting is selected it will be accepted immediately.
Changing the timer
If no Frying zone is in use, first switch the appliance on.
▶ Touch the button.
- The time left on the timer flashes.
▶ Use the ^- or button to change the duration of the timer.
If the setting is not changed, it will be automatically accepted after 5 seconds.
Alternatively, if another setting is selected it will be accepted immediately.
Switching the timer off before time
If no Frying zone is in use, first switch the appliance on.
▶ Touch the button.
▶ Touch the ^- and buttons at the same time.
- 0 flashes in the display.
5.12 Childproof lock
The childproof lock is to prevent the appliance from being accidentally switched on.
Switching the childproof lock on
▶ Switch the appliance on.
Ensure all frying zones are switched off.
▶ Touch the I and buttons at the same time.
– An acoustic signal is emitted.
▶ Touch the I button again.
– An acoustic signal is emitted.
- «» illuminates in all the power level displays.
Operating the appliance with the childproof lock activated
▶ Switch the appliance on.
▶ Touch the I and buttons at the same time.
– An acoustic signal is emitted.
- The childproof lock is temporarily deactivated. The appliance can now be used as normal.
The childproof lock is automatically reactivated 1 minute after the frying area has been switched off.
Switching the childproof lock off
▶ Switch the appliance on.
Ensure all frying zones are switched off.
▶ Touch the ll and buttons at the same time.
- An acoustic signal is emitted.
▶ Touch the button again.
- A double acoustic signal is emitted.
- 0.00 flashes in the temperature display.
5.13 Wipe protection
This function prevents the power level from being changed accidentally, for instance when wiping the control panel with a cloth.
▶ Touch the button.
- The indicator light for the button illuminates.
▶ Wipe protection is switched off by touching the button again or automatically after 30 seconds.

Press the ⏻ button to switch the appliance off at any time.
6 User settings
The following user settings can be set and stored individually:
| User setting Setting value Factory | setting | |||
| P0 | Acoustic signal volume | 0 Low 2 | ||
| 1 Medium | ||||
| 2 High | ||||
| P1 | Acoustic signal at end of operating time/timer | 0 No acoustic signal 2 | ||
| 1 Automatically off after 10 seconds | ||||
| 2 Automatically off after 1 minute | ||||
| P4 | Recommended value operating time/timer | 0 Default time 0 minutes 3 | ||
| 1-9 Adjustable in steps from 10-90 minutes | ||||
| P5* | Acoustic signal when buttons are pressed | 0 Acoustic signal off 1 | ||
| 1 Acoustic signal on | ||||
| P6 | Restore factory settings | 0 Restore factory settings: Hold the button depressed for 2 seconds. | - | |
* When the operating time or timer is up or when error messages appear, an acoustic signal is emitted at the level of loudness set in P0.
6.1 Changing user settings
- With the teppan yaki switched off, simultaneously hold the - and but-I+ tons depressed for 3 seconds.
- An acoustic signal is emitted.
▶ Touch both sliders at the same time.
- An acoustic signal is emitted.
- The user setting, e.g., appears in display 3.
- The current user setting value is shown in display2.
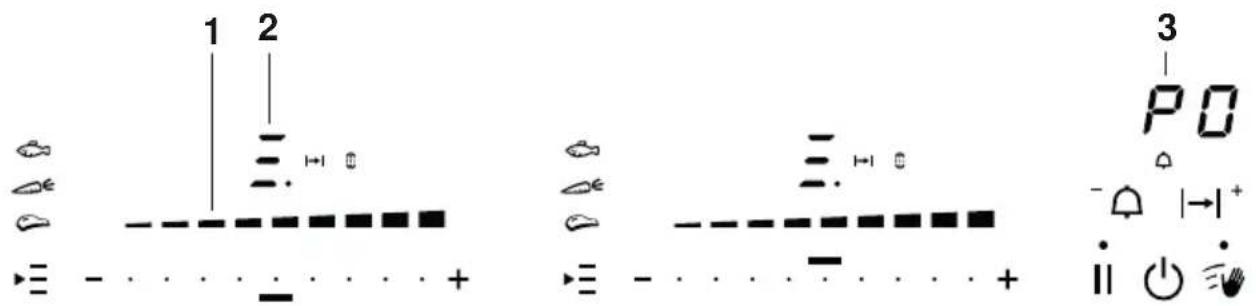
▶ Use the I button to select the next highest and the button the next lowest user setting.
▶ Touch or swipe slider 1 to select a higher or lower setting value.
▶ To save entries: Hold the I button depressed for 2 seconds.
- An acoustic signal is emitted.
- The «User settings» mode is ended.
6.2 Cancelling user settings
▶ Press the ⏻ button.
– Any changes made to the default values are not saved.
- The «User settings» mode is ended.
7 Care and maintenance

Clean the appliance only when it has completely cooled down. Burns hazard!
Always clean the appliance after use. This prevents food residue from burning on. Dried-on or burned-on food is harder to clean off.
Use of improper cleaning techniques can result in damage to the markings or surface.
- Use only a soft cloth or sponge with water and a non-abrasive detergent suitable for metal surfaces for cleaning everyday soiling. Always follow the detergent manufacturer's instructions for use.
- Soften and remove crusty deposits when cool with the «OptiClean» programme.
▶ Remove limescale stains when cool with a small amount of limescale remover, e.g. vinegar or lemon juice. Then wipe clean with a damp cloth.

Blue tarnish spots and condensate residue can be removed using a mildly acidic cleaning agent or some lemon juice.
Cleaning the operating unit

Avoid cleaning the surface of the glass ceramic hob with abrasive cleaning agents, scouring pads, wire wool, etc. This could damage the operating unit.
▶ Clean the operating unit using glass cleaner.
7.1 OptiClean
This programme allows the frying surface to be covered with water and soaked at a temperature of 70 °C for 10 minutes. This softens up crusty deposits, making them easier to remove.
Switching OptiClean on
▶ Pour 0.3 l (GK17TIYSZ) or 0.5 l (GK27TIYSZ) water on to the frying surface.
▶ Hold the button depressed for 2 seconds.
– A double acoustic signal is emitted.
- Dilluminates in the display.
- The frying surface is heated up to 70 °C.
Deactivating at end of programme
- After 10 minutes, an acoustic signal is emitted and the frying surface switches off.
- Dilluminates in the display for another 10 minutes.
- Soak up the water with a sponge and clean the surface with a suitable cleaning agent.
Switching OptiClean off before time
▶ Hold the button depressed for 2 seconds.
– A double acoustic signal is emitted.
- The frying zones are switched off.
- 0.00 flashes in the display.
8 Trouble-shooting
What to do if ...
... the appliance is not working and all the displays are dark?
| Possible cause Solution | |
| The fuse or circuit breaker in the house wiring system has tripped. | ▶ Change the fuse.▶ Reset the circuit breaker. |
| The fuse or circuit breaker keeps blowing. | ▶ Call Customer Services. |
| An interruption in the power supply. | ▶ Check fuse.▶ Have the house wiring checked by a competent electrician. |
| The demo mode is switched on. | The demo mode can only be turned off via the service menu.▶ Call Customer Services. |
... -illuminates in the displays?
| Possible cause Solution | |
| The childproof lock is activated. | For operating the appliance with the childproof lock activated, see the «Operating the appliance» section.Switch the childproof lock off. |
... A continuous acoustic signal is emitted, flashes in a display and the appliance switches off?
| Possible cause Solution | |
| A button or a slider was touched for longer than 10 seconds. | Remove object or food that has boiled over.The appliance can be used again as normal. |
| Object (e.g. pan, dish) on the control panel. | |
| Food boiled over on to the control panel. |
... Hand flash alternately in the display?
| Possible cause Solution | |
| The automatic safety shut-off was triggered. | Switch the frying zone back on again if required. |

If a frying zone has been running for longer without any settings being changed, the appliance switches the frying zone off automatically, after how much time depends on the temperature set.
| Temperature setting °C | 70 | 160 | 170 | 180 | 1 | 90 | 20 | 0 | 210 | 220 | 240 | ||
| Safety shut-off after mins. | 120 | 120 | 1 | 20 | 120 | 0 | 120 | 120 | 120 | 60 | |||
... Hflashes in the display?
| Possible cause Solution | |
| The excess temperature protection of a frying zone has been triggered. | Allow the frying zone to cool down.Continue cooking on a different frying zone. |
... Uflashes in the display?
| Possible cause Solution | |
| An interruption in the power supply. | Touch any button to quit the error message.The appliance can be used again as normal. |
... E and B are illuminated in the display?
| Possible cause Solution | |
| An object (e.g. paper) underneath the teppan yaki is obstructing the air intake. | Remove any objects in the drawer underneath the teppan yaki.Touch any button to cancel the error.After 10 minutes the appliance can be used again as normal. |
| Ventilation is defective. ▶ Note | down the error number.Note down the serial number (FN) of the appliance. See the identification plate for this.Call Customer Services. |
...E or E and a number are illuminated in the display?
| Possible cause Solution | |
| • Internal error occurred. ▶ Note | down the error number. ▶ Note down the serial number (FN) of the appliance. See the identification plate for this. ▶ Call Customer Services. |
9 Accessories
Please give product family of the appliance and exact designation of the accessory when ordering parts.
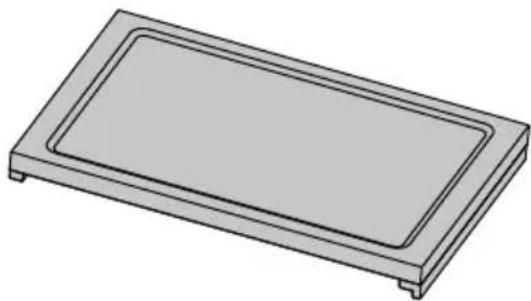
- Cutting board
natural_image
3D rendering of a rectangular electronic component with a recessed top and mounting base (no text or symbols)10 Technical data
10.1 Product fiche
| Model number 31076 | |||
| Type designation GK17TIYSZ | |||
| Number of frying zones 2 | |||
| Frying surfaces | 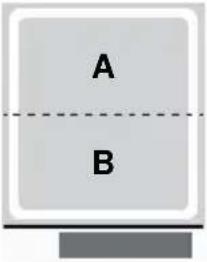 | AB: 31 ×T: 17.7 cm | BB: 31 ×T: 17.7 cm |
| Model number 31077 | |||
| Type designation GK27TIYSZ | |||
| Number of frying zones 2 | |||
| Frying surfaces | 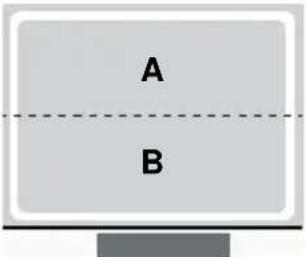 | AB: 49.8 ×T: 17.7 cm | BB: 49.8 ×T: 17.7 cm |
11 Index
A
Accessories 30
Accessories supplied.... 12
Appliance Switching on and off.... 14
Appliance-specific safety precautions 7
B
Bridging function.... 16
Switching off.... 16
Switching on.... 16
C
Care and maintenance 25
Childproof lock 21
Operating the appliance with the childproof lock activated.... 21
Switching off.... 21
Switching on.... 21
Connection plate.... 11
D
Disconnection.... 10
Disposal.... 10
F
Frying zone Selecting 14
Switching off.... 15
|
Instructions for use 8
M
Model number 2
Multi-function button 16
N
Notes.... 34
O
Operating and display elements.... 13
Buttons 13
Displays.... 13
Operating time.... 18
Changing 18
Finished.... 19
Setting 18
Several operating times 19
Switching off before time 19
OptiClean 26
Overview of frying temperatures 15
P
Packaging 10
Pause cooking.... 17
Product family.... 2
Quick instructions 36
R
Residual heat indicator.... 15
Restore function 17
S
Safety 10
Safety precautions General.... 6
Safety shut-off 28
Serial number (FN) 11
Service & Support...... 35
Symbols 5
T
Technical questions.... 35
Timer 20
Changing 20
Ending before time.... 20
Setting 20
Trouble-shooting 27
Type.... 2
U
User settings.... 23
Changing 24
Switching off before time 24
Using for the first time.... 11
V
Validity.... 2
W
Warranty extensions 35
Where is the identification plate?...... 11
Wipe protection 22
12 Notes
13 Service & Support

The «Troubleshooting» chapter provides valuable information for dealing with minor operating faults. This saves you the time, effort and potential cost of having to call out a service technician.
Information on the V-ZUG warranty can be found at www.vzug.com →Service →Warranty information. Please read this information carefully.
Please register your V-ZUG appliance online immediately at www.vzug.com →Service →Warranty registration. This will allow you to take advantage of the best possible support in the event of an fault in the appliance during the warranty period. You will require the serial number (FN) and appliance designation to complete the registration process. This information can be found on the identification plate for your appliance.
My appliance information:
FN: ____ Appliance: ____
Always have this appliance information to hand when you contact V-ZUG. Thank you.
The identification plate is located on the underside of the teppan yaki.
Your repair order
At www.vzug.com →Service→Service number you will find the telephone number of your nearest V-ZUG service centre.
Technical questions, accessories, warranty extensions
V-ZUG is happy to help you with any general administrative or technical queries, to take your orders for accessories and spare parts and to inform you about our progressive service agreements.
Quick instructions
Please first read the safety precautions in the operating instructions!
To switch appliance on
▶ Hold the ⏻ button depressed for 1 second.
To select frying zone
- Touch the slider for the required frying zone or slide your finger along it to set the frying temperature.
To switch frying zone off
To switch appliance off
▶ Touch the ⏻ button.
- Operating instructions
- Please follow the safety precautions.
- Modifications
- Validity
- Contents
- Safety precautions 5
- Disposal 10
- Using for the first time 11
- Your appliance 12
- Operating the appliance 14
- User settings 23
- Care and maintenance 25
- Trouble-shooting 27
- Safety precautions
- Symbols used
- General safety precautions
- Appliance-specific safety precautions
- Instructions for use
- Before using for the first time
- Correct use
- Note on use
- Caution: Fire hazard!
- Caution: Burns hazard
- Caution: Risk of injury
- Caution: Risk to life
- How to avoid damaging the appliance
- Disposal
- Packaging
- Disconnection
- Safety
- Disposal
- Using for the first time
- Where is the identification plate?
- Your appliance
- Appliance overview
- GK17TIYSZ
- GK27TIYSZ
- Accessories supplied
- Operating and display elements
- Buttons
- Displays
- Operating the appliance
- Switching the appliance on and off
- Selecting the frying zone
- Overview of frying temperatures
- Switching the frying zone off
- Residual heat indicator
- Bridging function
- Switching the bridging function on
- Switching the bridging function off
- Multi-function button
- Switching on temperature selector for meat
- Switching on temperature selector for vegetables
- Switching on temperature selector for fish
- Switching off temperature selector
- Pause cooking
- Operating time
- Do not leave the hob unattended during use. Risk of boiling over, burning on and igniting!
- Setting the operating time
- Changing the operating time
- Switching the operating time function off before time
- End of the operating time
- Several operating times
- Timer
- Setting the timer
- Changing the timer
- Switching the timer off before time
- Childproof lock
- Switching the childproof lock on
- Operating the appliance with the childproof lock activated
- Switching the childproof lock off
- Wipe protection
- User settings
- Changing user settings
- Cancelling user settings
- Care and maintenance
- Clean the appliance only when it has completely cooled down. Burns hazard!
- Cleaning the operating unit
- OptiClean
- Switching OptiClean on
- Deactivating at end of programme
- Switching OptiClean off before time
- Trouble-shooting
- What to do if ...
- Accessories
- Technical data
- Product fiche
- Index
- A
- B
- C
- D
- F
- |
- M
- N
- O
- P
- R
- S
- T
- U
- V
- W
- Notes
- Service & Support
- Your repair order
- Technical questions, accessories, warranty extensions
- Quick instructions
- To switch appliance on
- To select frying zone
- To switch frying zone off
- To switch appliance off
Brand : V-ZUG
Model : GK17TIYSZ
Category : Cooker