SRS36 - Range hood ZLine - Free user manual and instructions
Find the device manual for free SRS36 ZLine in PDF.


| Type | Stainless Steel Kitchen Sink |
| Model | SRS-36 |
| Material | Premium Stainless Steel (16 gauge) |
| Mounting Options | Undermount or Top Mount |
| Bowl Configuration | Single Bowl Round |
| Approximate Dimensions | 36 inches diameter (typical) |
| Finish | Satin (grain lines) |
| Included Accessories | Bottom Grid, Basket Strainer, Microfiber Cloth |
| Drain Type | Standard 3.5-inch strainer with basket |
| Installation Requirements | Certified plumber recommended; silicone sealant |
| Care Instructions | Rinse and towel dry after each use; weekly mild abrasive cleaner |
| Warranty | Limited lifetime warranty (contact ZLINE) |
Frequently Asked Questions - SRS36 ZLine
User questions about SRS36 ZLine
0 question about this device. Answer the ones you know or ask your own.
Ask a new question about this device
Download the instructions for your Range hood in PDF format for free! Find your manual SRS36 - ZLine and take your electronic device back in hand. On this page are published all the documents necessary for the use of your device. SRS36 by ZLine.
USER MANUAL SRS36 ZLine
natural_image
Stylized blue water droplet icon with gradient shading (no text or symbols)SINK
Installation Guide and Users Manual


CONTENTS
- SAFETY INSTRUCTIONS
1
SINK DIMENSIONS
2
Undermount Bar Sink
Top Mount Bar Sink
Round Sink Single Bowl
Round Sink Double Bowl
Ledge Sink Single Bowl
Stamp Ledge Sink Single Bowl
Apron Sink Single Bowl
Apron Sink Double Bowl
Arc Sink Single Bowl
Arc Sink Double Bowl
SINK INSTALLATION
12
Before Installation
Top Mount Installation
Undermount Installation
Sink Drain Schematics
CARE AND CLEANING
16
Easy Cleaning
Scratches
Knives
Water Quality
Foods
• DOS AND DON'TS
18
INCLUDED ACCESSORIES
17
SAFETY INSTRUCTIONS
The installer and/or user must read, understand and follow these instructions before installing the product. This product must be properly installed before it is used. If instructions are not followed, the manufacturer will not be held responsible for any problems or product malfunction. Failure to follow installation and/or operating instructions voids the warranty.
We recommend that this product be installed by a certified plumber. In some states or provinces, it is a legal requirement for this type of product to be installed by a certified plumber, according to the plumbing and building codes effective in the region where the sink is used.
Shut off the water valves before installing the sink or doing any maintenance.
Open the sink packaging and verify that the sink is in perfect condition. Put the sink back in its packaging to protect it until time of installation.
To replace a sink, ensure that the hole in the counter is adequate.
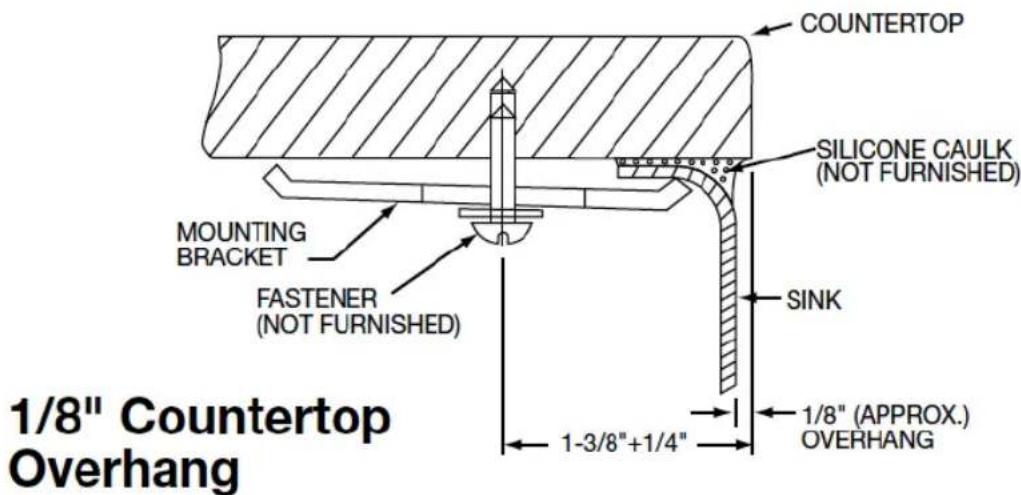
If you have a sink with 1/8" overhang, the enclosed cutout template will create an overhang of approximately 1/8". It is recommended that you discuss this with your customer and agree that this finished appearance is the desired effect. ZLINE is not responsible for improper sink or countertop installations. Due to the aesthetic qualities of the converging bowl radii, the template furnished with each sink provides the only opening recommended for intsalition of undermount sinks. See illustration below.
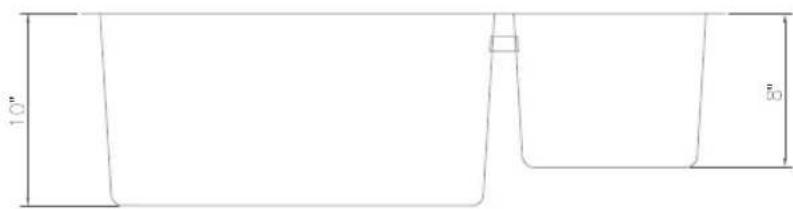
SINK DIMENSIONS
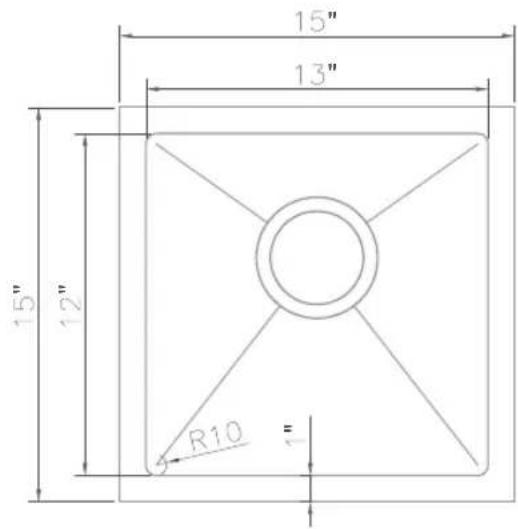
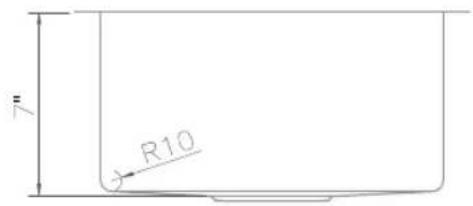
Undermount Bar Sink
SUS-15
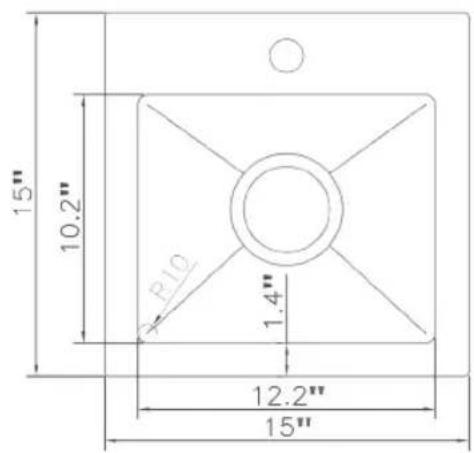
Top Mount Bar Sink
STS-15
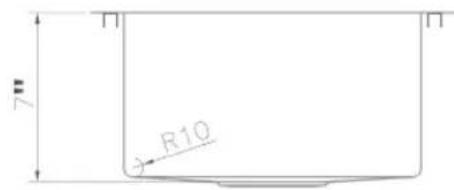
SINK DIMENSIONS
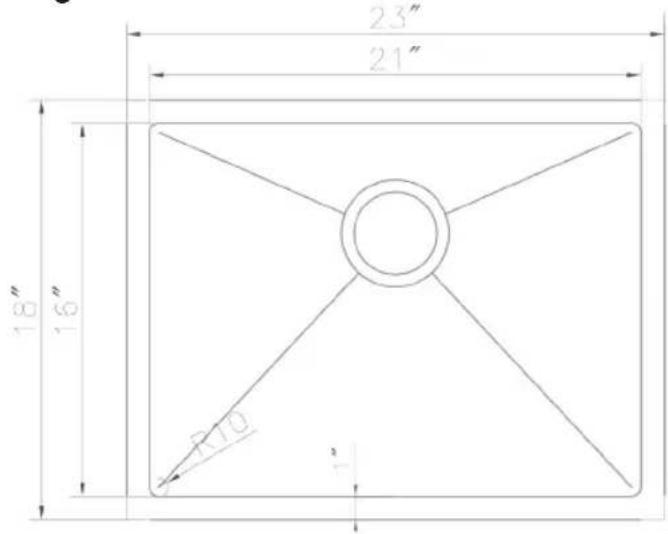
Round Sink Single Bowl
SRS-23
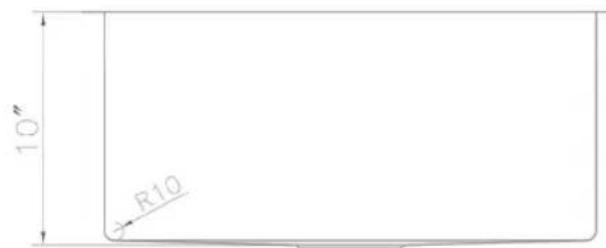
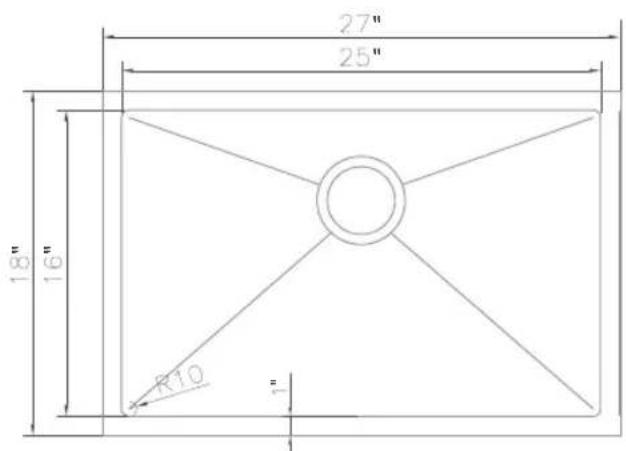
SRS-27
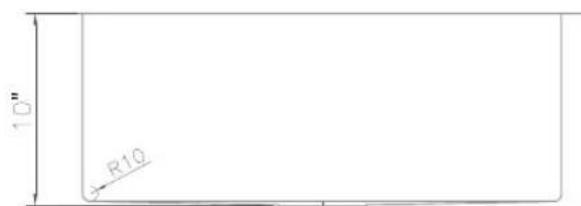
SINK DIMENSIONS
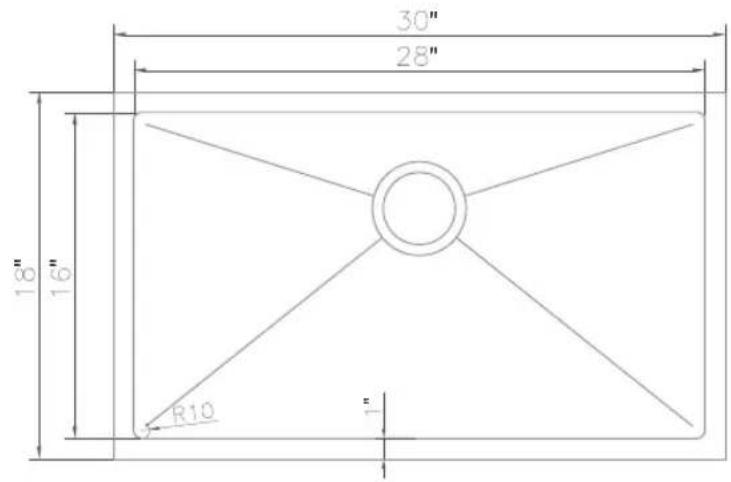
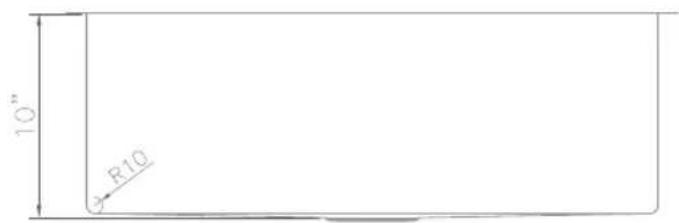
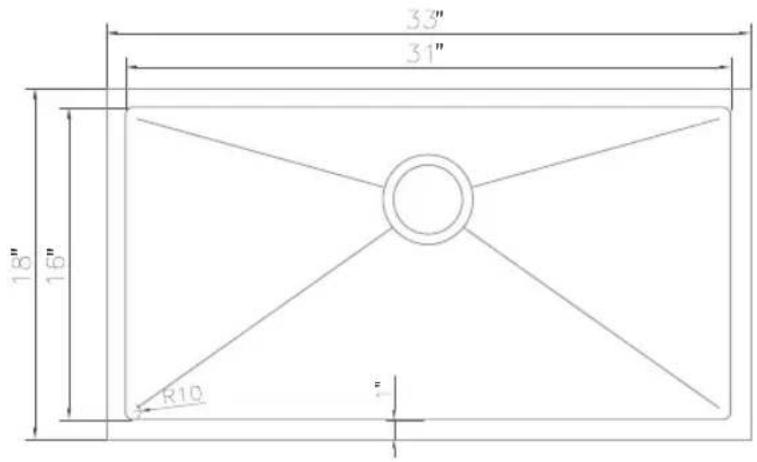
Round Sink Single Bowl
SRS-30
SRS-33
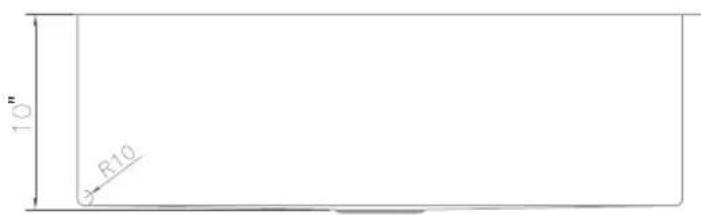
SINK DIMENSIONS
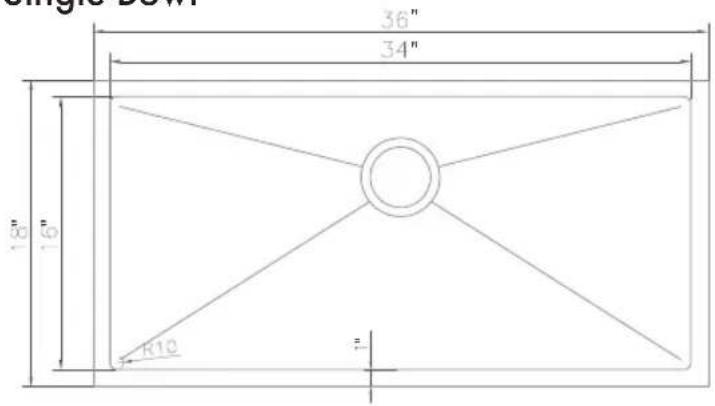
Roundsink Single Bowl
SRS-36
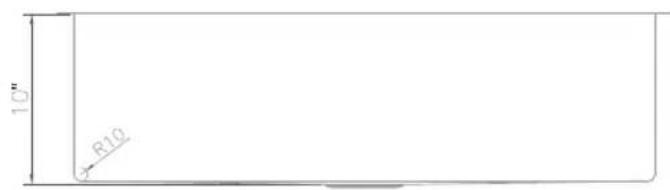
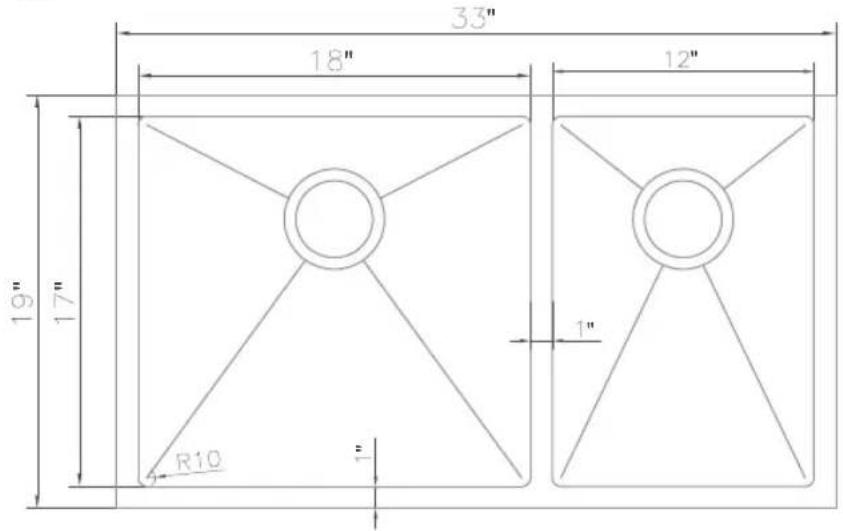
Roundsink Double Bowl
SR60D-33
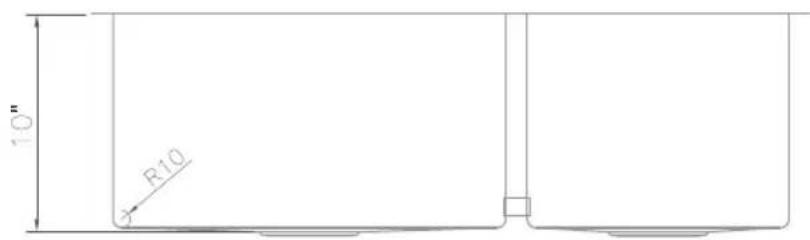
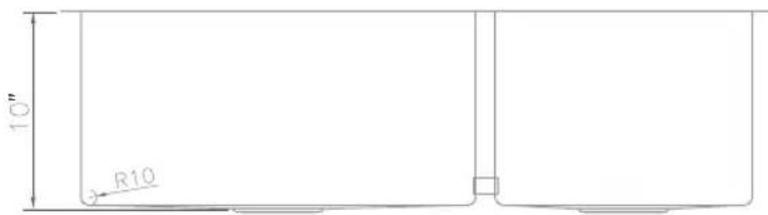
SINK DIMENSIONS
Round Sink Double Bowl
SR50D-33
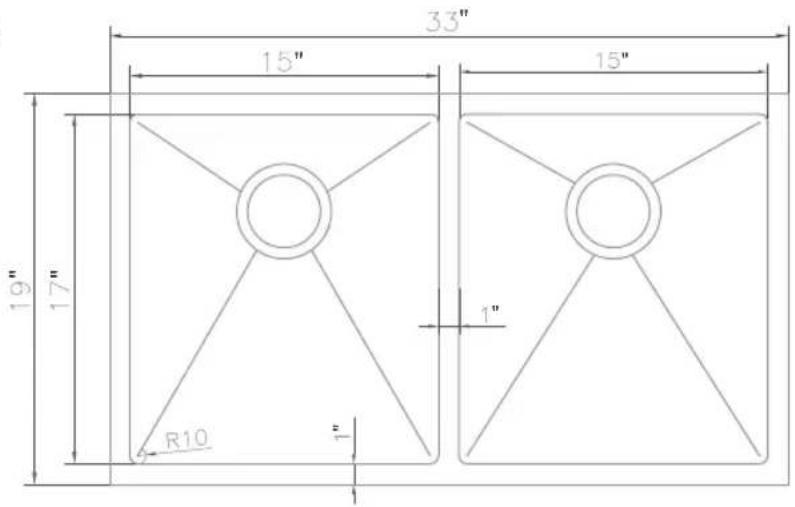
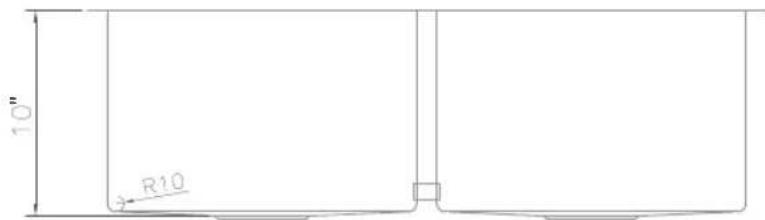
SR60D-36
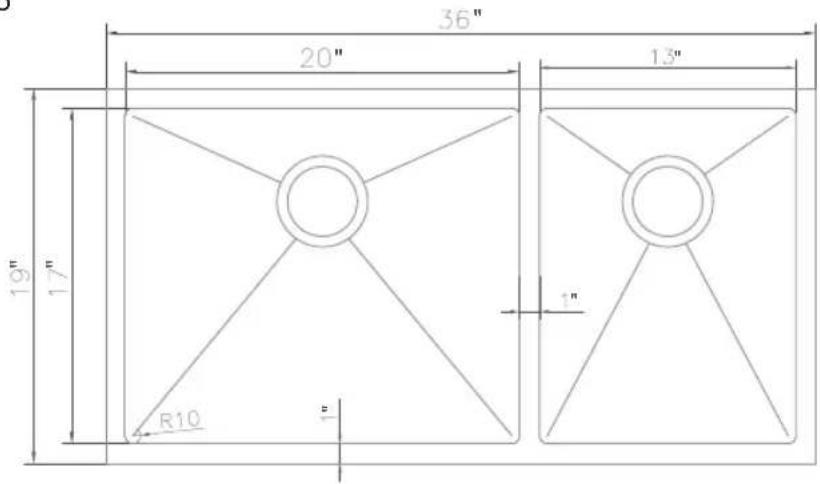
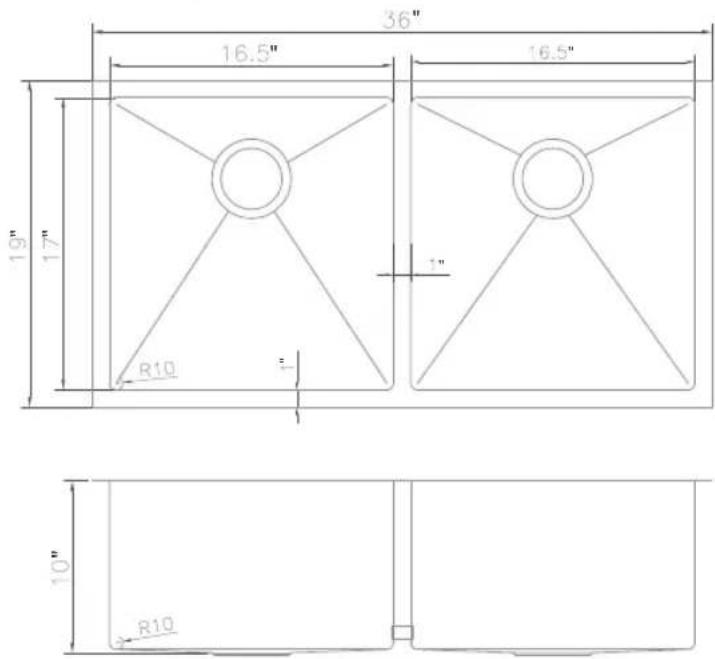
SINK DIMENSIONS
Roundsink Double Bowl
SR50D-36
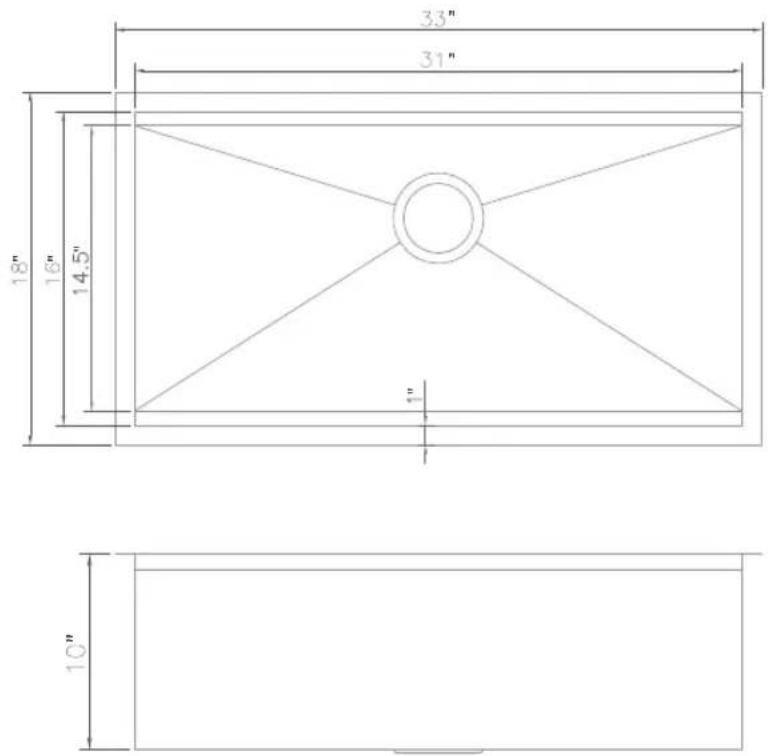
Ledge Sink Single Bowl
SLS-33
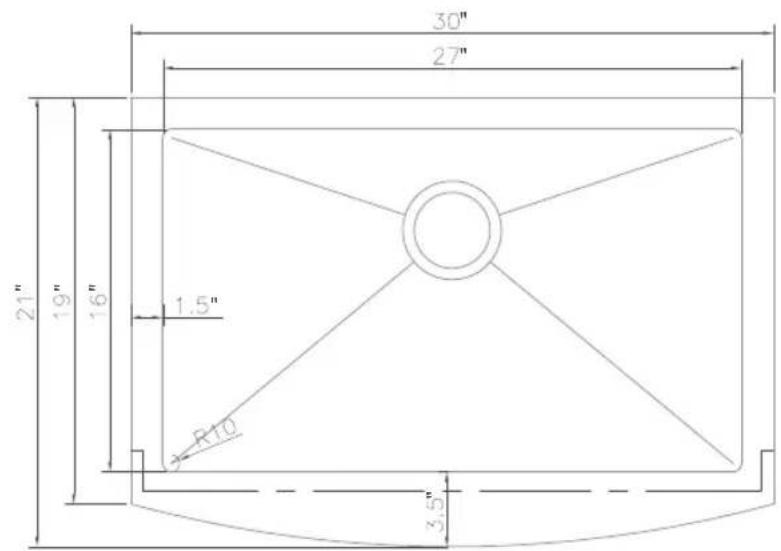
SINK DIMENSIONS
Apron Sink Single Bowl
SAS-30
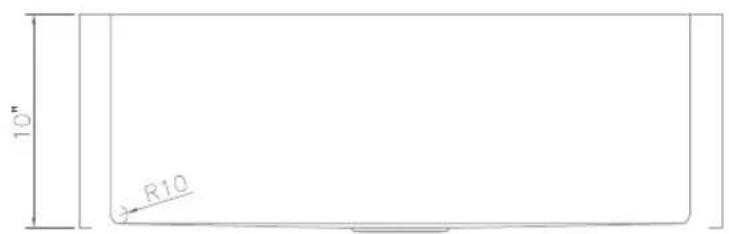
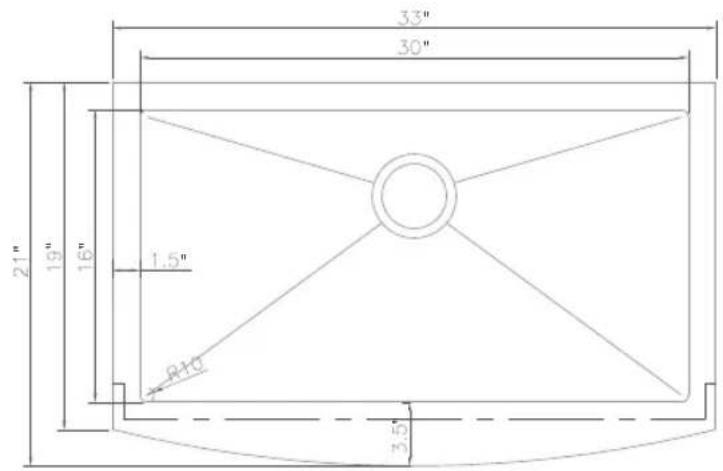
SINK DIMENSIONS
Apron Sink Single Bowl
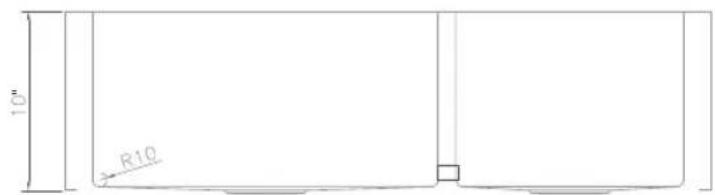
SAS-33
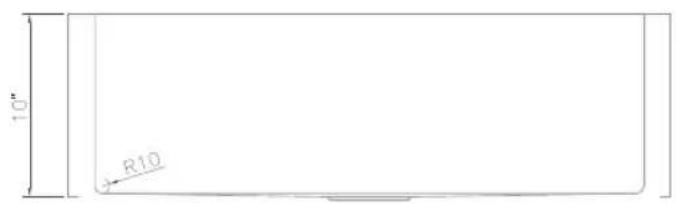
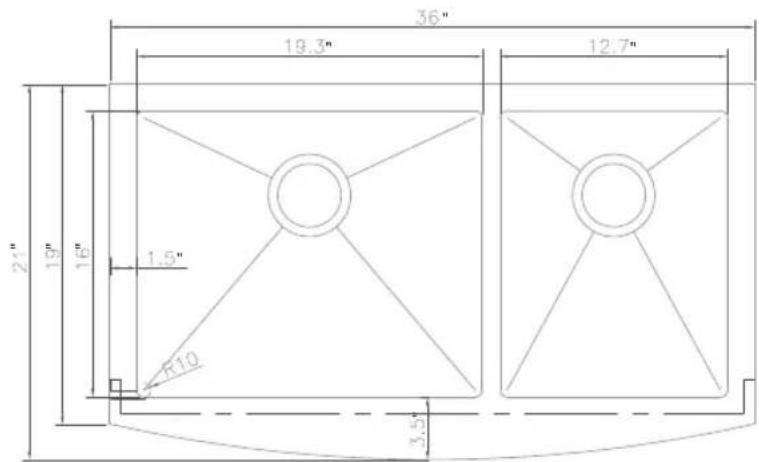
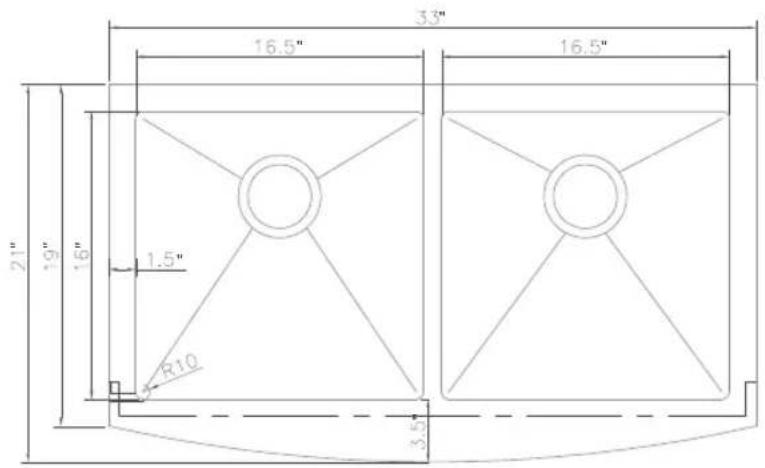
Apron Sink Double Bowl
SA60D-36
SINK DIMENSIONS
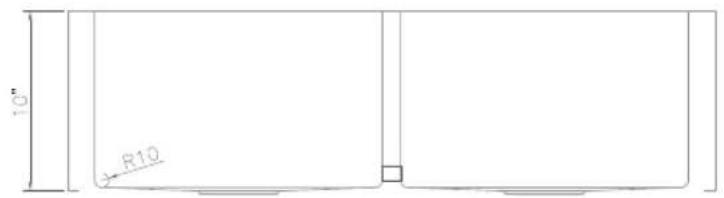
Apron Sink Double Bowl
SA50D-36
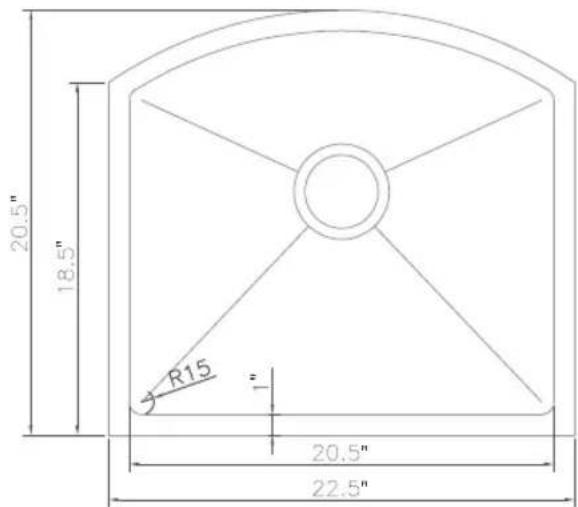
Arc Sink Single Bowl
SCS-22
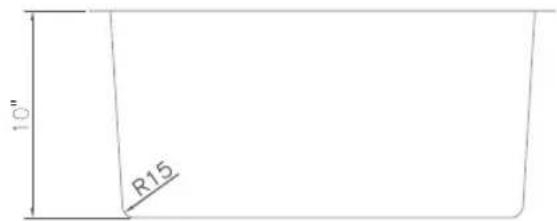
SINK DIMENSIONS
Arc Sink Double Bowl
SC30D-33
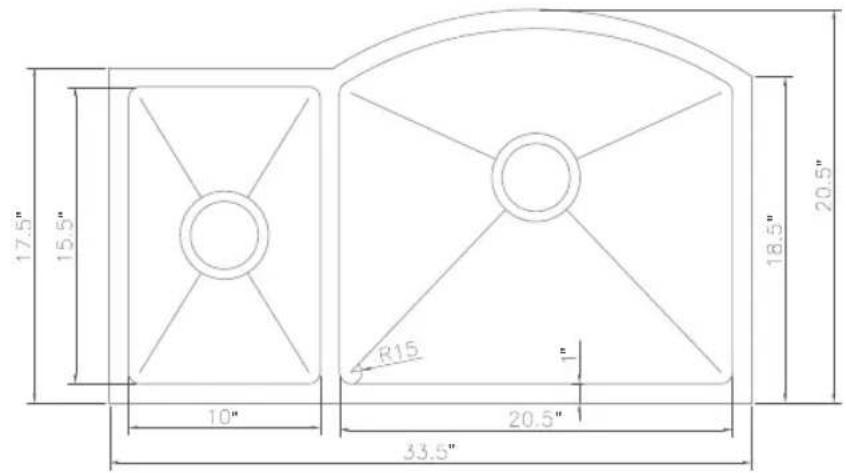
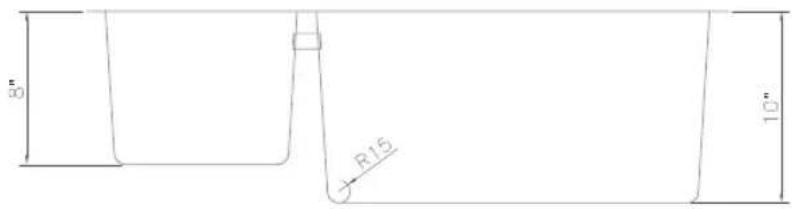
Arc Sink Double Bowl
SC70D-33
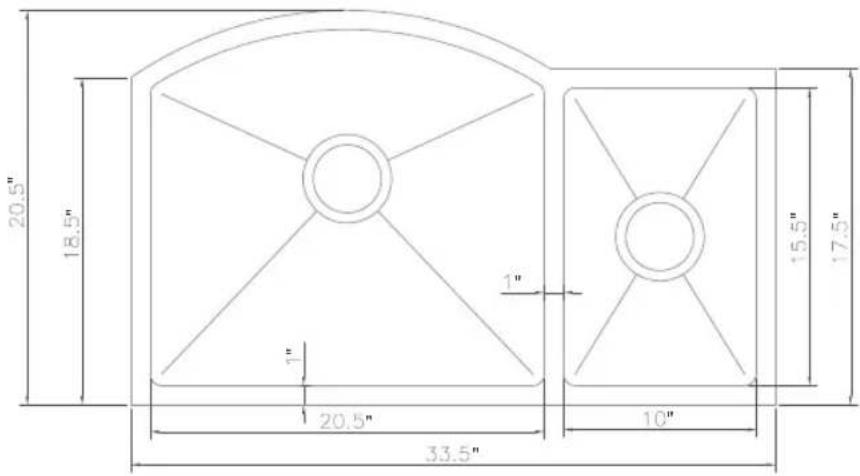
SINK INSTALLATION
Before Installation
Inspect the sink for any visible defects. Do not install the sink if defects are found. Call customer service for assistance.
Remove the drain by unscrewing the screw from the drain until it is completely separated from the sink.
Top Mount Installation
1. Trace the opening.
Locate the "top mount" template in the box.
Carefully cut along the dotted lines. Keep the inside portion of the template. It contains important information concerning the care and maintenance for your sink. Place the template on the counter where you would like your sink to be installed.
When installing the template, make sure that the tank will not interfere with cabinet doors or panels. Ensure that there is enough space for the water supply installation. Fix the template on the counter using masking tape. Trace the inside of the template meticulously with a pencil. Remove the template.
OR
Turn the sink upside down and place it on top of the counter. Note the location of cabinet doors and panels to ensure that they will be compatible with the sink installation.
Ensure that there is enough space for the water supply installation.
Trace the outer edge of the sink with a pencil, then remove the sink.
Measure 7 mm from the initial sink measurement and trace another line on the inside of the drawing. This second line will be the cutting line.
2. Cut the Opening
Using the drill, make a small starting hole of about 1.2 cm (0.5 in) on the inside of the cutting line. Drill a second time in this same hole with a larger bit so the jigsaw can be inserted properly.
Put masking tape on the outer side of the cutting line. This will protect the counter from scratches and shattered fragments caused by the jigsaw.
Using the jigsaw, trim the inside of the cutting line.
Insert the sink and adjust the opening if required.
SINK INSTALLATION
Top Mount Installation Continued
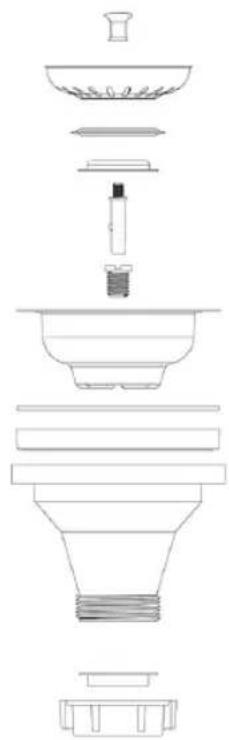
3. Drain Installation
Insert the metal strainer into the rubber seal, and then into the draining hole.
Install the rubber gasket and the main drain body underneath the sink.
Using the screw, tighten the main drain body and the metal strainer into place.
Install the basket on top of the metal strainer.
Repeat the same procedure for the installation of the second draining hole (twin and double bowls only).
Note: plumber putty is not required for the installation of these drains.
4. Insert Sink
Verify that the sink fits perfectly. The lip of the sink should be resting on the countertop.
5. Insert Clips
Insert clips into the rails.
6. Fix the Clips
Fix the clips into place.
7. Seal with Silicone-based Sealant.
Seal with silicone-based sealant all around the sink.
8. Pipe Installation
Install the faucet following the manufacturer's instructions.
Excess sealant must be removed promptly with a suitable clean-up solvent recommended for use on both the counter and sink to ensure damage does not occur.
SINK INSTALLATION
Undermount Installation
1. Trace the Opening
Locate the undermount installation template in the box.
Cut carefully along the dotted lines. Keep the inside portion of the template. It contains important information concerning the care and maintenance for your sink. Place the template on the counter where you would like your sink to be. When installing the template, make sure that the tank will not interfere with cabinet doors or panels. Ensure that there is enough space for the water supply installation.
Fix the template on the counter using masking tape.
Trace the inside of the template meticulously with a pencil.
Remove the template.
2. Cut the Opening
Using a drill, make a small starting hole of about 1.2 cm (0.5 in) inside of the cutting line.
Drill a second time in this same hole with a larger bit so the jigsaw can be inserted properly.
Put masking tape on the outer side of the cutting line. This will protect the counter from scratches and shattered fragments caused by the jigsaw.
Using the jigsaw, trim the inside of the cutting line.
Make sure to complete the cut with a proper finition.
3. Build a Support Frame
Build a support frame to hold the sink.
Make sure there is enough space for the rails on the support frame.
4. Drain Installation
Insert the metal strainer into the rubber seal, and then into the draining hole.
Install the rubber gasket and the main drain body underneath the sink.
Using the screw, tighten the main drain body and the metal strainer into place.
Install the basket on top of the metal stainer.
Repeat the same procedure for the installation fo the second draining hold (twin and double bowls only).
Note: Plumber putty is not required for the installation of these drains.
SINK INSTALLATION
Undermount Installation Continued
5. Insert the Sink
Insert the sink on the support frame. Apply silicone-based sealant to each corner between the frame and the sink.
6. Seal with Silicone-based Sealant
Apply silicone-based sealant on the border of the sink and install the countertop. Remove excess sealant.
7. Pipe Installation
Install the faucet following the manufacturer's instructions. Make proper water and waste pipe connections.
Excess sealant must be removed promptly with a suitable clean-up solvent recommended for use on both the counter and sink to ensure damage does not occur.
Sink Drain Schematics
natural_image
Exploded view diagram of a funnel-shaped mechanical assembly (no text or labels)CARE AND CLEANING
Easy Cleaning Instructions
Rinsing is the most important part of sink care. A stainless steel sink finish will retain its original bright appearance if the sink is rinsed thoroughly after each use. Running the water from the spray hose for a few minutes will be thorough. Typically, a rinse and towerl drying after each use take care of most everyday clean ups. Ideally, once a week the sink should be scoured with a mildly abrasive cleaner, such as Comet. Rubbing back and forth in the direction of the polish or grain lines will not only remove stubborn stains and greasy film buildups, but will blend usage scratches into the satin finish of the sink. After scouring, rinse thoroughly and wipe dry.
Scratches
Like most metals, your new stainless steel sink will scratch. These are merely usage scratches and over time will blend into the overall finish of your sink with proper cleaning.
Knives
Your sink is designed to serve as many things but not as a cutting board or chopping block. This type of use will lead to deep scratches in the sink finish and will dull your knives.
Water Quality
The quality of your water can affect your sink's appearance. If your water has a high iron content, a brown surface stain can form on the wink giving the appearance of rust. Additionally, in areas with a high concentration of minerals, or with oversoftened water, a white film may develop on the sink. To combat these problems, we suggest that the sink be towel dried after use, and again, on a weekly basis, the sink should be cleaned using a recommended cleanser.
Foods
Heavy salt concentration or foods containing high levels of salt should not be allowed to dry on the sink surface. Rinse your sink thoroughly after use.
DOS AND DON'TS
Do rinse thoroughly after each use.
Do towerl dry after each use to prevent mineral deposits from building up on the surface of the sink.
Do clean the sink once a week, being sure to rub in the direction of the satin finish grain lines.
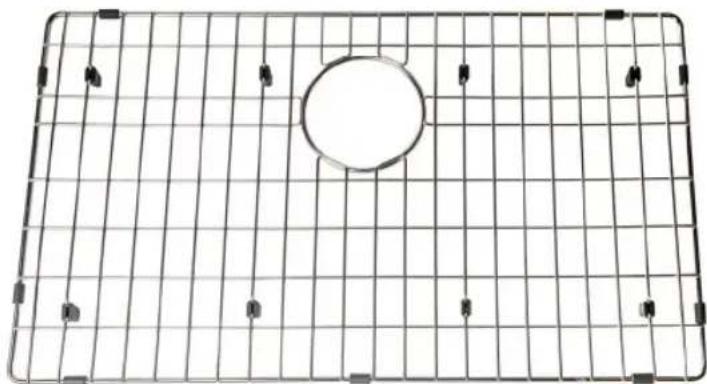
Do use a bottom grid or rinsing basket to "protect" the finish. Bottom grids and rinsing baskets can remain in the sink and will not cause rusting or pitting.
Do Not rub the sink across the satin finish lines. Scouring across the satin finish lines can damage the original sink finish.
Do Not allow soap or other household cleansers to dry on the surface of the sink. Most brands contain chemical additives which will affect the original finish.
Do Not use solutions of chlorine bleach and water in the sink. Chlorides, which are found in most soaps, detergents, bleaches, and cleansers, are very aggressive to stainless steel. If left on the sink too long they can cause surface pitting.
Do Not use a steel wool pad to clean your sink. If a more abrasive product is needed, use a green Scotch Brite pad being sure to rub in the direction of the satin finish grain lines. Steel wool pads have a tendency to break apart and small particles of steel can become embedded in the surface of the sink. The steel particles will rust and will give the appearance that the sink itself is rusting.
Do Not use rubber mats or dishpans in the sink. Leaving rubber mats or dishpans in the sink can lead to surface rust or possible pitting. However, if you insist on using mats or dishpans, please remove them after each use and rinse thoroughly.
Do Not leave wet sponges, cloths, or cleaning pads on the sink. This can lead to surface rust.
Following these recommendations for the care and cleaning of your stainless steel sink will insure that it will provide you with many years of service.
Included Accessories
natural_image
Grid-patterned metal grate with a central circular hole and eight small square markers (no text or symbols)Bottom Grid (not included with certain models)
natural_image
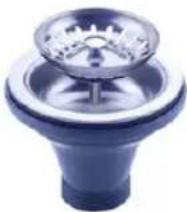
Close-up of a blue plastic mechanical component with a circular top and central knob (no visible text or symbols)Basket Strainer

natural_image
Black textured surface with a small white 'Z' logo and the word 'ZEINE' at the bottom (no other text or symbols)Microfiber Cloth
Certain models will include a cutting board*

ZLINE KITCHEN AND BATH
Two Locations:
916 Delaware Avenue
Marysville, Ohio 43040
350 Parr Circle
Reno, NV 89512
www.zlinekitchen.com
1-614-777-5004
- CONTENTS
- - SAFETY INSTRUCTIONS
- SINK DIMENSIONS
- SINK INSTALLATION
- CARE AND CLEANING
- • DOS AND DON'TS
- INCLUDED ACCESSORIES
- SAFETY INSTRUCTIONS
- Undermount Bar Sink
- Top Mount Bar Sink
- Roundsink Double Bowl
- Ledge Sink Single Bowl
- Apron Sink Single Bowl
- Apron Sink Double Bowl
- Arc Sink Double Bowl
- Before Installation
- Top Mount Installation
- Trace the opening.
- OR
- Cut the Opening
- Top Mount Installation Continued
- Drain Installation
- Insert Sink
- Insert Clips
- Fix the Clips
- Seal with Silicone-based Sealant.
- Pipe Installation
- Undermount Installation
- Trace the Opening
- Build a Support Frame
- Drain Installation
- Undermount Installation Continued
- Insert the Sink
- Seal with Silicone-based Sealant
- Pipe Installation
- Easy Cleaning Instructions
- Scratches
- Knives
- Water Quality
- Foods
- DOS AND DON'TS
- ZLINE KITCHEN AND BATH
Brand : ZLine
Model : SRS36
Category : Range hood