PM8GD-W - Loudspeaker Atlas Sound - Free user manual and instructions
Find the device manual for free PM8GD-W Atlas Sound in PDF.


| Product Type | Pendant Mount Loudspeaker |
| Model | PM8GD-W |
| Brand | Atlas Sound |
| Series | PM Series |
| Application | Commercial audio, indoor/outdoor with sealing |
| Mounting Type | Pendant mount (ceiling suspension) via cables or down pipe (not included) |
| Weight | Approximately 21 lbs (9.5 kg) for similar models |
| Driver Size | 8 inches (PM8 model) |
| Safety Factor | 5:1 design factor recommended for suspension |
| Secondary Safety | Required independent safety cable with max drop 6 inches |
| Installation Hardware | Includes mounting cables, clamp, carabiner (PM8) or screw (PM4), top cover screws |
| Power Handling | Not specified; refer to amplifier rating |
| Impedance | Typical 8 ohms (assumed) |
| Outdoor Use | Possible with RTV silicone sealing of plug |
| Compliance | Install according to local safety codes |
| Color | White (W in model) |
| Tech Support | Atlas Sound Tech Support: 800-876-3333 |
| Manual Pages | 7 pages |
Frequently Asked Questions - PM8GD-W Atlas Sound
User questions about PM8GD-W Atlas Sound
0 question about this device. Answer the ones you know or ask your own.
Ask a new question about this device
Download the instructions for your Loudspeaker in PDF format for free! Find your manual PM8GD-W - Atlas Sound and take your electronic device back in hand. On this page are published all the documents necessary for the use of your device. PM8GD-W by Atlas Sound.
USER MANUAL PM8GD-W Atlas Sound
Please Read Carefully Before Installing or Operating
- Read all instructions carefully
- Heed all warnings
• Assure that the speaker is securely mounted
Hearing Damage
CAUTION:
This professional loudspeaker systems is capable of generating very high sound pressure levels.
Use care with placement and operation to avoid exposure to excessive levels that can cause permanent hearing damage.
Suspension & Mounting
Suspension or "flying" speaker systems requires training and expertise. Improper rigging of a flying speaker may result in injury, death, equipment damage, and legal liability. Installation must be carried out by fully qualified installers, in accordance with all required safety codes and standards at the place of installation.
A 5:1 design factor is a generally accepted minimum standard. However, legal requirements for overhead suspension vary by municipality, please consult your local safety standards office before installing any product. We also recommend that you thoroughly check any laws and bylaws prior to installation.
Loudspeakers flown in theaters, nightclubs, conference centers, or other places of work and entertainment must be provided with an independent, correctly rated and securely attached secondary safety — in addition to the principle suspension point(s). This secondary safety must prevent the loudspeaker from dropping more than (6") should the principle suspension device fail. If you lack the skills, training, and proper ancillary equipment to fly a speaker system, do not attempt to do so.
• Always assure power is off to amplifiers before making any connections
• Assure that all electrical equipment is properly grounded
- Keep instructions for future reference
- Should any questions arise after reading this document, please call Atlas Sound Tech Support at 800-876-3333
PM Series
Pendant Mount Loudspeakers
Installation Via Mounting Cables (Included)
General considerations and hardware recommendations
CAUTION: PM series models weigh as much as 21 pounds (7.9kg) – model PM8CX. A fall from almost any height could result in serious injury or death. Assure that the speaker is firmly mounted to an object that can handle the weight of the PM speaker. The mounting surface the PM speaker is being attached to should be able to handle five or more times the weight of the PM speaker
The hardware employed must be safely and securely attached both to the loudspeaker and the structure in question, using only the mounting holes. A general rule for soft surface installations (wood beams) is to multiply the corresponding working load limit by 75%: the result will be approximate working load strength. Use thread locking compound for all installations.
CAUTION: Mounting the PM loudspeaker may require two people.
When in doubt contact a qualified structural/mechanical engineer for approval of the mounting materials and methods.
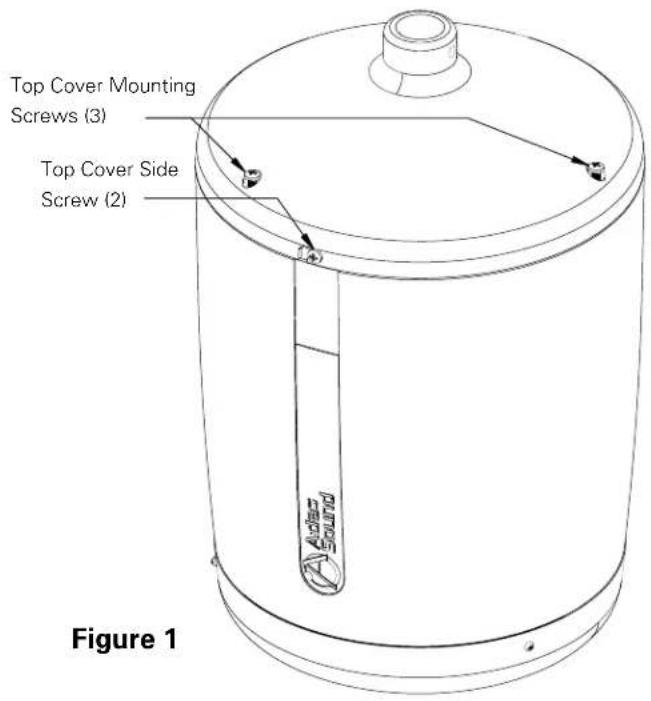
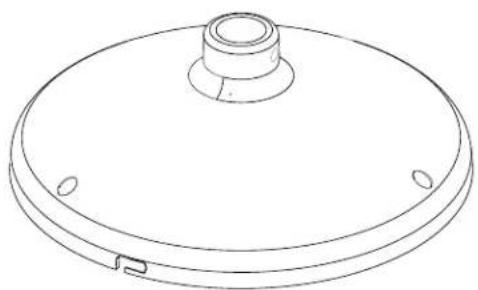
- Remove the 3 top cover mounting screws, loosen the 2 side top cover screws rotate the top cover counterclockwise, and pull up to remove the top cover. (Fig 1 and 2)
- Locate suitable support structure in the area the speaker is to be installed.
- Route the bare end of the main support cable though the included clamp, then around the mounting structure, and back through the clamp. (Fig 3 and 4)
- Adjust the cable length in the clamp so that the eyelet end of the cable is at the final height above the floor. (Fig 5)
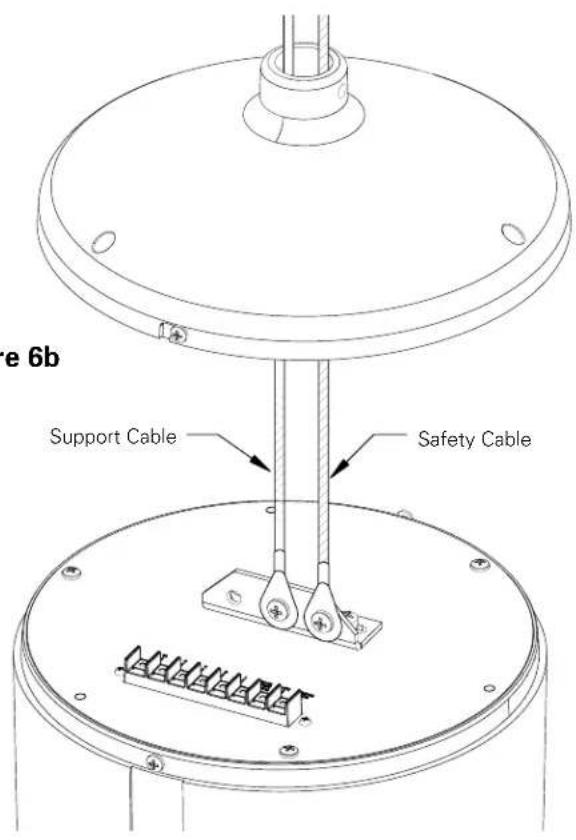
- (For PM8) Route the eyelet end of the main support cable through the top cover of the PM speaker, attach the included carabiner clip to the eyelet and the large mounting hole on the back of the PM speaker. (Fig 6a) (For PM4) Route the eyelet end of the main support cable through the top cover of the PM speaker, attach the eyelet to the large mounting hole on the back of the PM speaker using included mounting screw. (Fig 6b)
- Repeat steps 1-4 for the safety cable and attach it the one of the smaller mounting holes on the support plate of the PM speaker with the included mounting screw. (Fig 6)
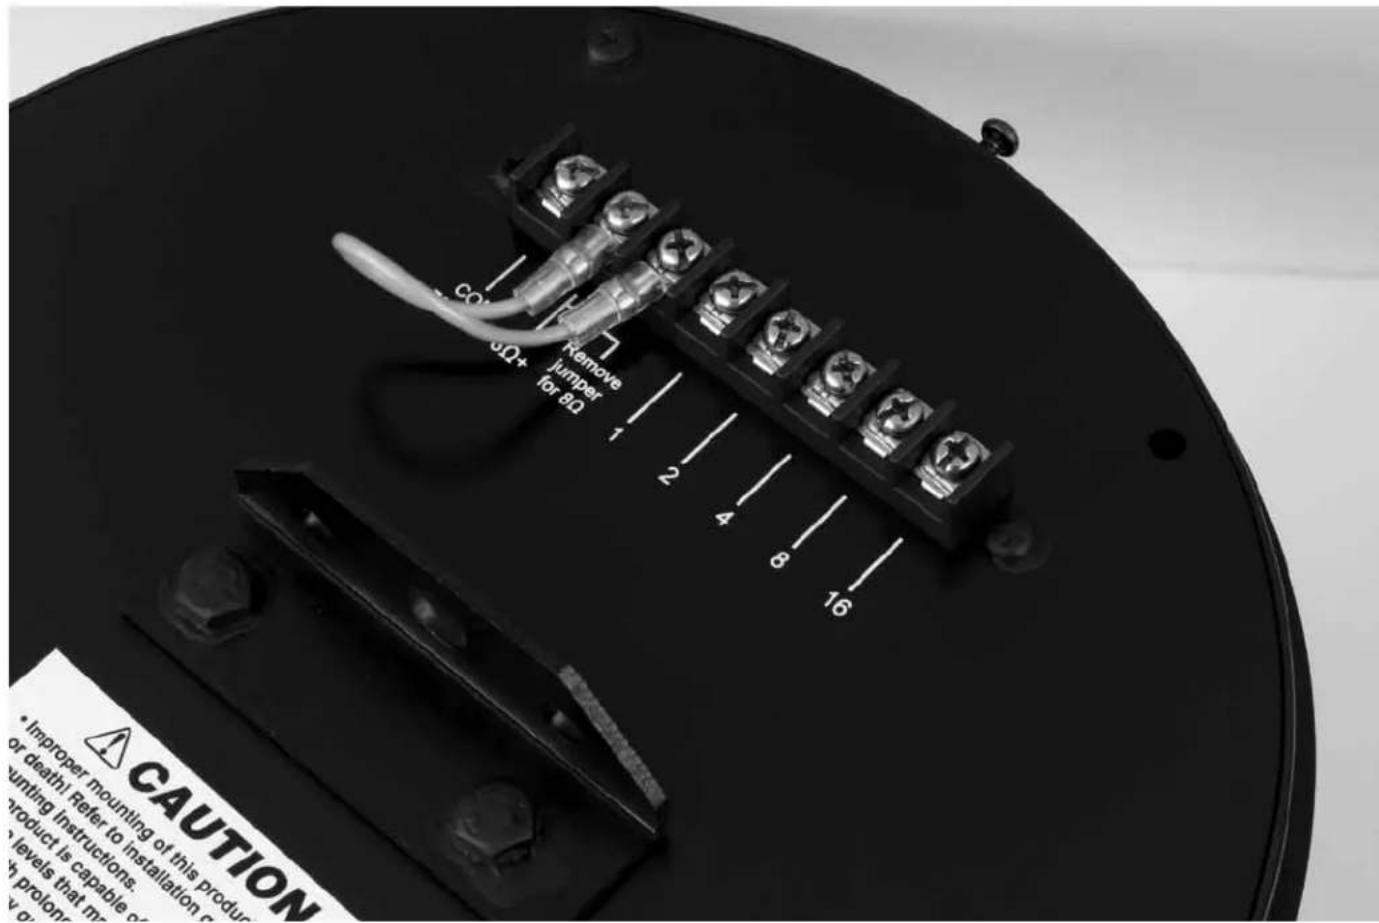
- Route the speaker cable through the top cover and connect to the appropriate terminals.
- Position the top cover over the side cover screws and rotate the cover clockwise to align the top cover mounting screw holes. Reinstall the 3 mounting screws, tighten and tighten the side cover screws.
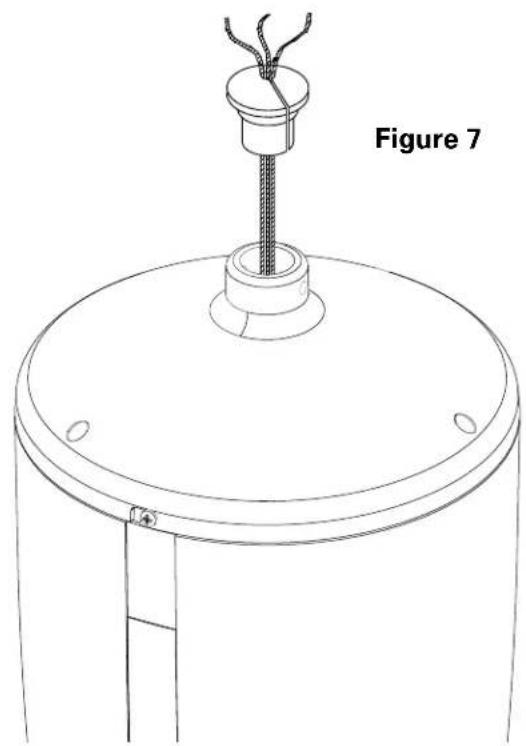
- Slide the top hole plug over the main support cable, safety cable, and speaker cable using the opening on the side of the plug. Then slide the plug down the cable and into the top cover hole. (Fig 7 and 8)
Note: If the speaker is being installed outdoors, seal plug with RTV silicone to prevent moisture from entering speaker.
PM Series
Pendant Mount Loudspeakers
natural_image
Line drawing of a circular mechanical component with a central hub and mounting holes (no text or symbols)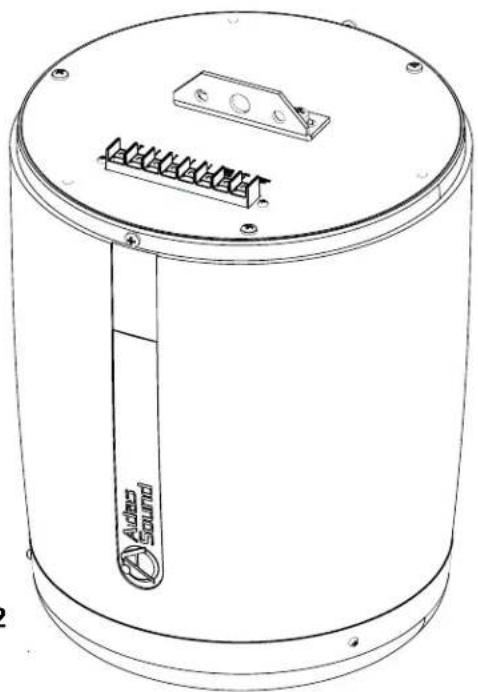
natural_image
Technical line drawing of a cylindrical electronic device with labeled component 'Ausb Sound' (no text or symbols beyond label)Figure 2
PM Series
Pendant Mount Loudspeakers

natural_image
Simple line drawing of a device with an arrow pointing left, labeled Figure 3 (no text or symbols on the diagram itself)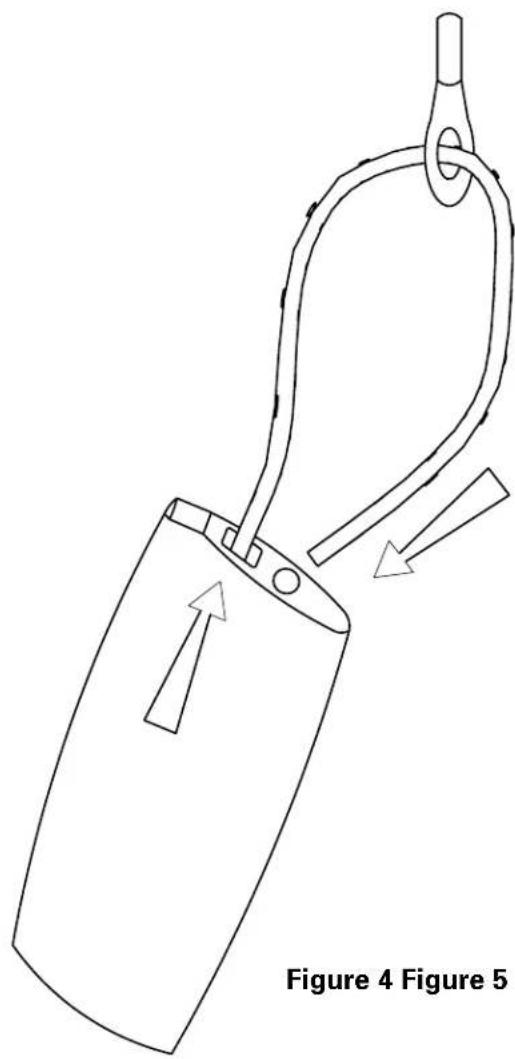
natural_image
Line drawing of a hook-like object with directional arrows indicating movement or force, labeled Figure 4 and Figure 5 (no text on the diagram itself)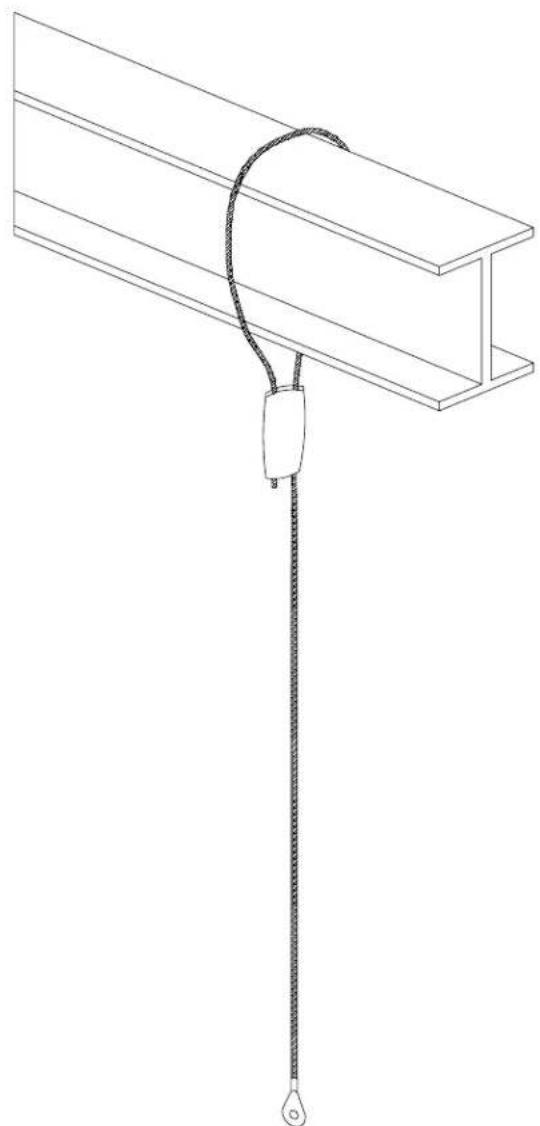
natural_image
Technical line drawing of a structural support with a rope and hanging hook (no text or symbols)PM Series
Pendant Mount Loudspeakers
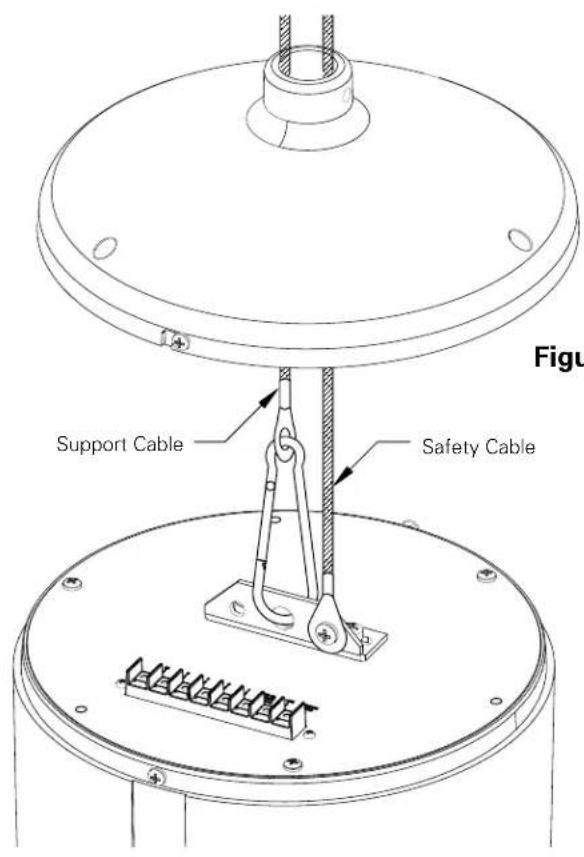
Figure 6a Figure 6b
natural_image
Technical line drawing of a cylindrical device with a central sensor and labeled 'Figure 7' (no other text or symbols)Figure 8
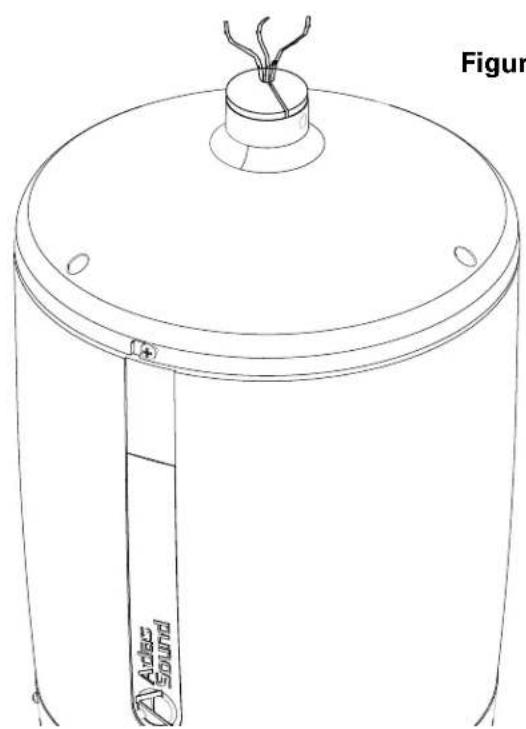
natural_image
Line drawing of a cylindrical device with a top-mounted sensor and labeled 'Audas Sound' (no text or symbols beyond label)PM Series
Pendant Mount Loudspeakers
Suspended Installation Via Down Pipe (Not-Included) Using 34 " Diameter Ceiling Fan Hardware
Atlas Sound's PM series speaker may also be installed using industry standard ceiling fan hardware. This hardware is available at most local hardware stores. Using this type of installation allows speaker cable and safety cable to be concealed with the down pipe providing a very clean installation.
- Remove the 3 top cover mounting screws, loosen the 2 side top cover screws rotate the top cover counterclockwise, and pull up to remove the top cover. (Figure 1 and 2)
- Locate suitable support structure in the area the speaker is to be installed.
- Mount the ceiling mount canopy and down pipe per manufacturer instructions.
- Screw the PM speaker top cover onto the bottom of the down pipe, install the safety screw though the side of the top cover and through the end of the down pipe. (Figure 9)
- Route the bare end of the safety cable though the included clamp, then around a suitable support structure, and back through the clamp. (Figure 3 and 4)
- Route the eyelet end of the safety cable through down pipe and the cover of the PM speaker, attach the eyelet to one of the smaller mounting holes on the support plate of the PM speaker with the included mounting screw. (Figure 9)
- Route the speaker cable through the down pipe and connect to the appropriate terminals.
- Position the speaker under the top cover, align the side cover screws and rotate the speaker clockwise to align the top cover mounting screw holes. Reinstall the 3 mounting screws, tighten and tighten the side cover screws. (Figure 9)
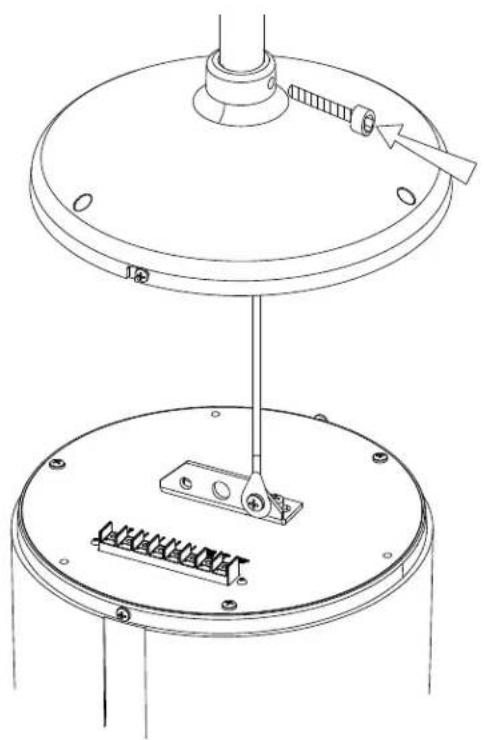
natural_image
Technical line drawing of a mechanical assembly with a circular base and a vertical rod inserted into a housing (no text or symbols)Figure 9
PM Series
Pendant Mount Loudspeakers
Troubleshooting
| PROBLEM | POSSIBLE CAUSE | REMEDY |
| There is no sound Power off. Equipment setting is wrong.Volume set too low. | Assure that power is applied to all equipment in system.Check that routing (input/output) controls are set correctly.Check that volume level is above minimum. | |
| There is no sound Loose connection. Check system from start to finish for crossed wires, loose connection, etc. On the PM location check for correct connection. | ||
| Low sound level Setting/volume control is set too low.Connection is shorted or bad. | Check volume levels or amplifiers and related equipment (equalizer). Check that connections aren't partially shorted/ corroded. | |
| Sound cuts in and out System overload/oscillation intermittent connection. | Check for overload condition or bad connection. | |
| Distortion at increased levels | Amplifier/speaker overdriven. | Check that power to speaker isn't over limits. Check that amplifier isn't overdriven. Reduce power to amplifier slightly. |
| Speaker makes "buzzing" noise | Hardware loose or speaker damaged. Make sure speaker grille is tight. Check other hardware connections. Check speakers for loose parts or speaker damage. | |
- Hearing Damage
- CAUTION:
- Suspension & Mounting
- PM Series
- Pendant Mount Loudspeakers
- Installation Via Mounting Cables (Included)
- General considerations and hardware recommendations
- When in doubt contact a qualified structural/mechanical engineer for approval of the mounting materials and methods.
- Suspended Installation Via Down Pipe (Not-Included) Using 34 " Diameter Ceiling Fan Hardware
Brand : Atlas Sound
Model : PM8GD-W
Category : Loudspeaker