
WRF613WA - Fridge WESTINGHOUSE - Free user manual and instructions
Find the device manual for free WRF613WA WESTINGHOUSE in PDF.


| Product Type | Cooker Hood (Rangehood) |
| Model | WRF613WA |
| Brand | Westinghouse |
| Compatible Models | WRF610WA, WRF610SA, WRF910WA, WRF910SA, WRF613WA, WRF613SA, WRF913WA, WRF913SA |
| Installation Type | Under-cabinet, recirculating or ducted |
| Control Type | Slide switch or press button (depending on variant) |
| Fan Speeds | 3 speeds (Low, Medium, High) |
| Lighting | 1 x E14 5.5W LED lamp |
| Ducting Diameter | 125 mm round exhaust ducting recommended |
| Power Supply | 220-240 V, 50 Hz (typical mains voltage, verify on data plate) |
| Grease Filter Cleaning | Every 3-4 weeks; wash in hot soapy water or dishwasher at ≥65°C |
| Body Cleaning | Every 2-3 months with warm soapy water; apply stainless steel protector |
| Carbon Filter | Optional ARCFD for recirculating mode; replace every 3 months |
| Warranty | 24 months (Australia and New Zealand) |
| Safety Features | Auto shut-off when removing filters; do not flambé; adequate ventilation required |
| Compliance | AS/NZS 3350.2.31 |
| Accessories Included | Grease filter(s), installation screws not provided |
| Spare Parts Availability | Through Electrolux spare parts (Australia 13 13 50, New Zealand 0800 10 66 20) |
Frequently Asked Questions - WRF613WA WESTINGHOUSE
User questions about WRF613WA WESTINGHOUSE
0 question about this device. Answer the ones you know or ask your own.
Ask a new question about this device
Download the instructions for your Fridge in PDF format for free! Find your manual WRF613WA - WESTINGHOUSE and take your electronic device back in hand. On this page are published all the documents necessary for the use of your device. WRF613WA by WESTINGHOUSE.
USER MANUAL WRF613WA WESTINGHOUSE
natural_image
Line drawing of a standard kitchen air conditioner with ventilation grille and ventilation slots (no text or symbols)RANGEHOOD
WRF610WA, WRF610SA, WRF910WA, WRF910SA, WRF613WA, WRF613SA, WRF913WA, WRF913SA
Universal Cooker Hood Installation and Operation Manual
These cooker hoods are domestic appliances which have been manufactured and tested to comply with Australian and New Zealand Standard AS/NZS 3350.2.31.
These appliances are intended to be used in household and similar applications such as:
-Staff kitchen areas in shops, offices and other working environments
-Farm Houses
-By clients in hotels, motels and other residential type environments
-Bed and breakfast type environments
Safety Warning
This appliance is not intended for use by persons (including children) with reduced physical, sensory or mental capabilities, or lack of experience and knowledge, unless they have been given supervision or instruction concerning use of the appliance by a person responsible for their safety.
Children should be supervised to ensure that they do not play with the appliance.
There is a fire risk if cleaning is not carried out in accordance with the instructions;
▶ Ensure the cooker hood is switched off before carrying out maintenance, to avoid any possibility of electric shock.
▶ Grease filters must be removed every four weeks (maximum) for cleaning to reduce the risk of fire.
Do not flamb'e under the cooker hood.
This cooker hood is not recommended for barbeques.
The air must not be discharged into a flue that is used for exhausting fumes from appliances burning gas or other fuels.
Exhaust air must not be discharged into a wall cavity, unless the cavity is designed for the purpose.
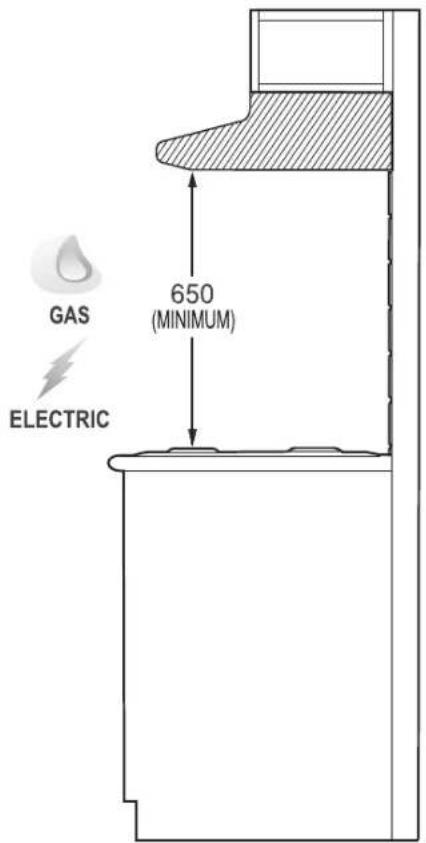
There must be adequate ventilation of the room when the cooker hood is used at the same time as appliances burning gas or other fuels.
▶ Always cover lit gas burners with pots or pans when the cooker hood is in use.
▶ Always switch off gas burners before you remove pots or pans.
CAUTION: Accessible parts may become hot when used with cooking appliance.
▶ Regulations concerning the discharge of air have to be fulfilled.
Cleaning
Every 2-3 months wipe the cooker hood body with a sponge or soft cloth soaked in warming soapy water, dry thoroughly and apply a stainless steel protector, Do not use oven cleaners or other abrasive materials.
Electrical Connection
▶ Check that the mains voltage matches with the voltage on the data plate inside the cooker hood.
▶ Check that the installation complies with standards of local gas and electricity authorities.
If the supply cord is damaged, it must be replaced by the manufacturer or its service agent or a similarly qualified person in order to avoid a hazard.
Accessories
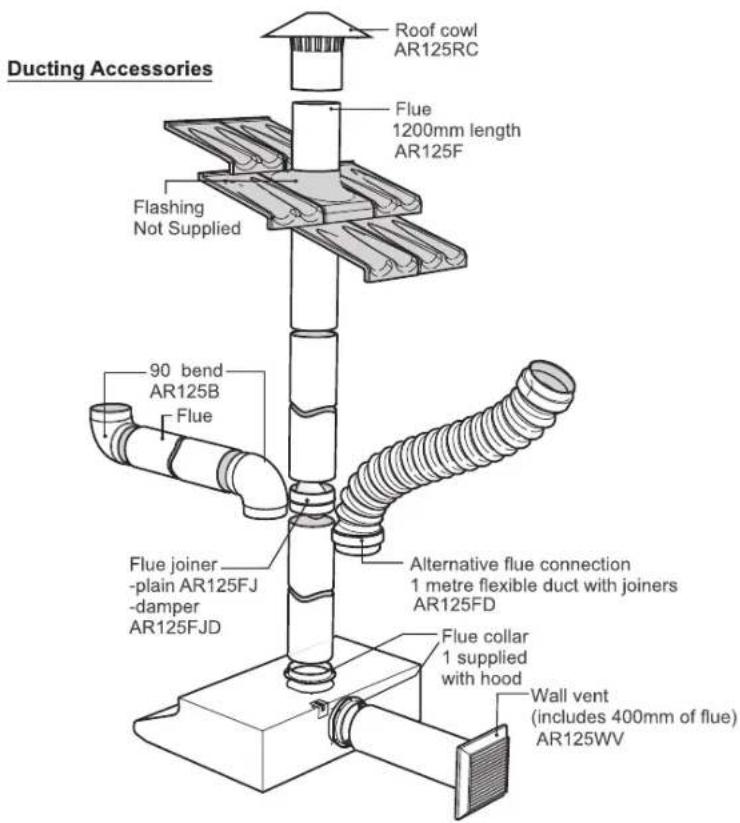
▶ Use 125mm round exhaust ducting for best performance.
When using flexible duct always install duct with the wire helix pulled taut to minimise pressure loss.
▶ Try to keep exhaust duct short and straight.
Keep bends in the exhaust duct to a minimum.
Do not reduce the size or restrict exhaust duct.
Stainless Steel Models
Before installing the cooker hood, remove all protective plastic covering from stainless steel surfaces.
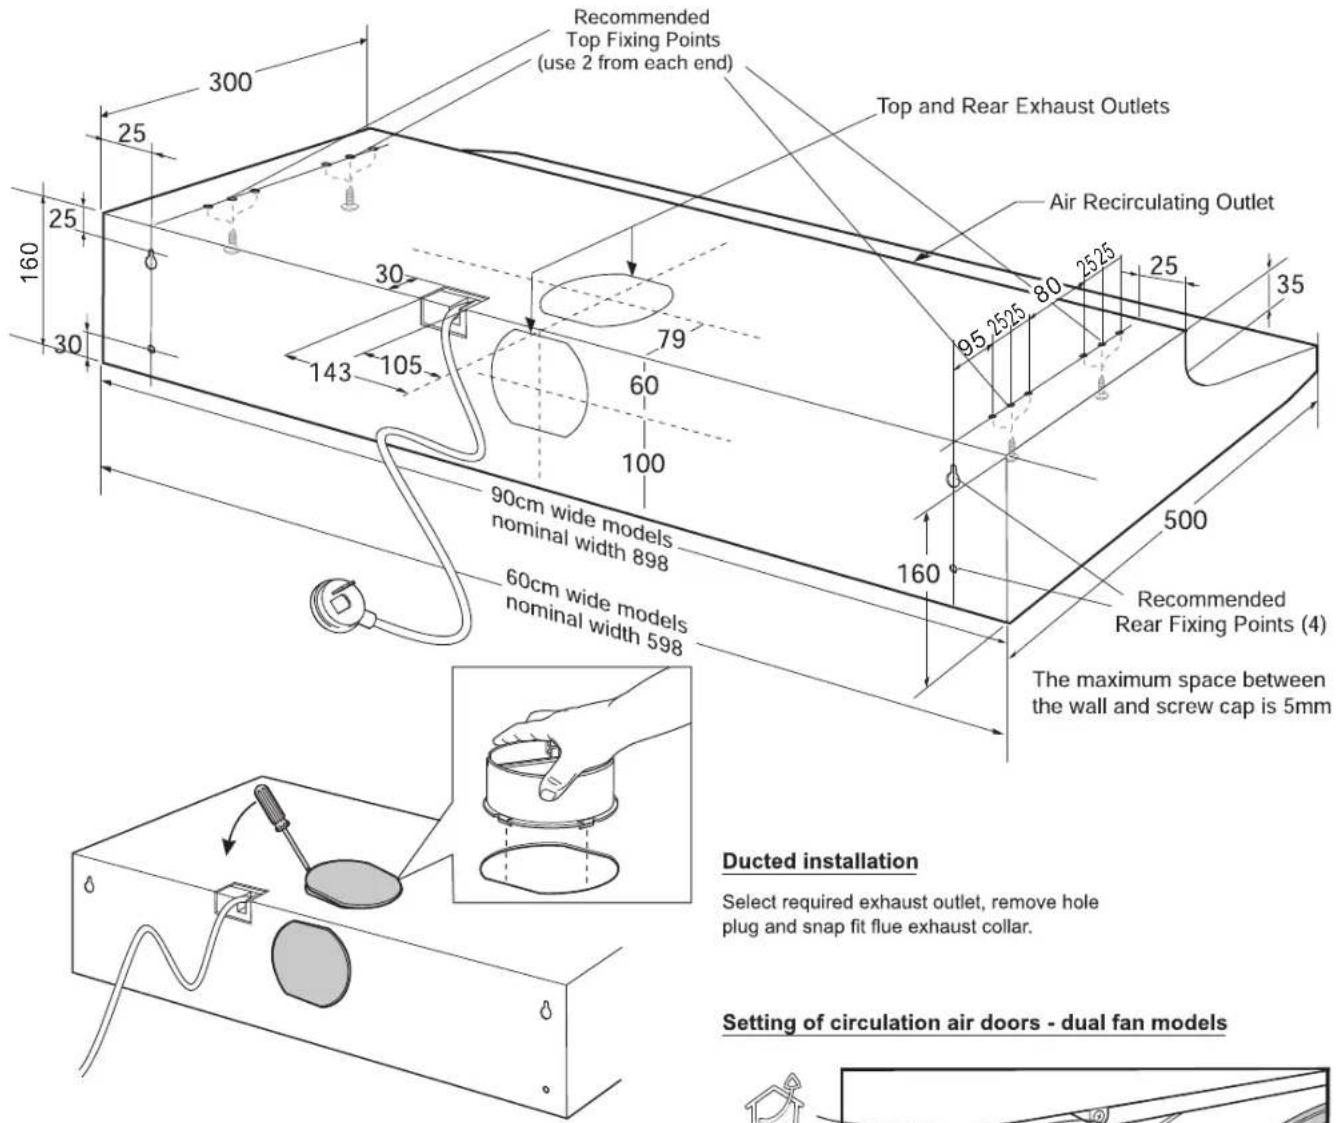
Use at least 4 screws (not provided) and the mounting holes provided to securely mount the cooker hood. Make sure that the cooker hood is level and free from twist.
After installation, apply a stainless steel protector to the external surfaces.
Warning: Failure to install the screws or fixing device in accordance with these instructions may result in electrical hazards.
Setting of circulation air door - single fan models
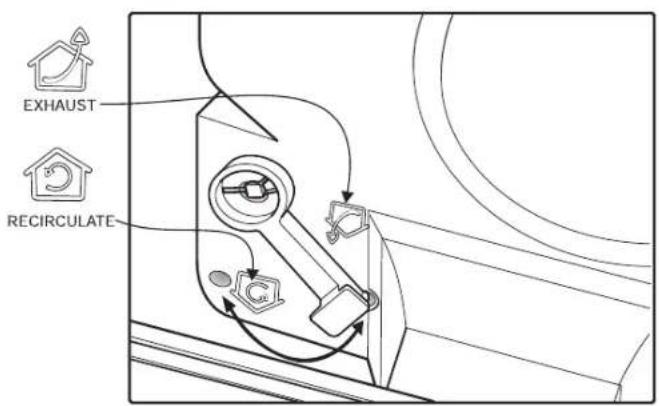
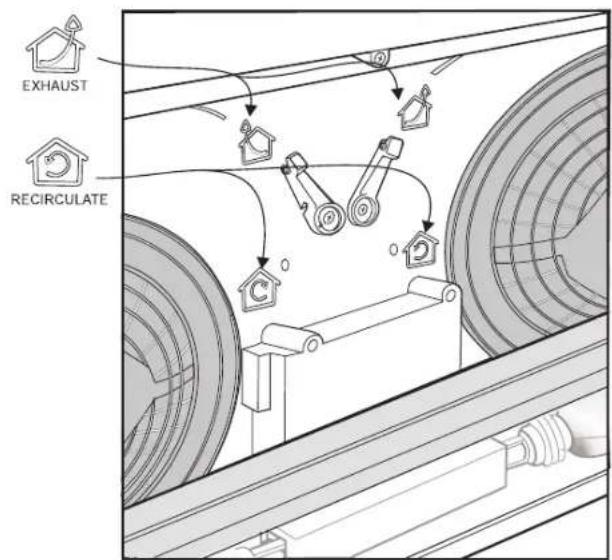
IMPORTANT: SET CIRCULATING MODES BEFORE INSTALLING THE HOLE PLUGS.
Cooker Hood Operation
IMPORTANT: The Edison Screw lamps may have come loose during transportation. Ensure that lamps are tightened firmly into the socket before power is applied.
Best results are obtained by using a low speed for normal conditions and a high speed when odours are more concentrated. Turn the hood on a few minutes before you start cooking. It should be left on after cooking for about 15 minutes or until all odours have disappeared.
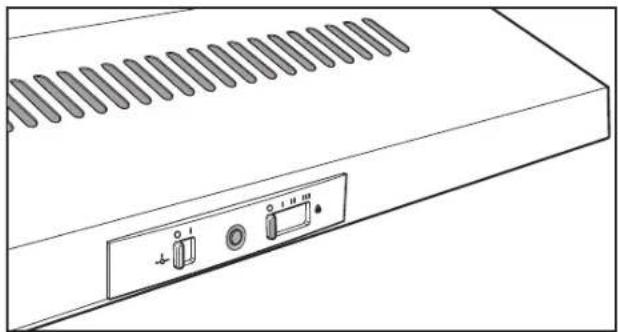
natural_image
Line drawing of a server rack with ventilation slots and two buttons (no text or symbols)Slide switch controls
Light switch: This switch is used to turn the light fitted in the hood on and off.
Extractor fan switch: Used to select fan speeds
Slide position I: Fan speed Lo.
Slide position II: Fan speed Med.
Slide position III: Fan speed High.
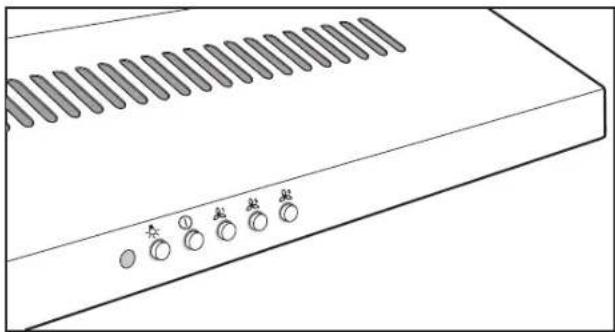
natural_image
Line drawing of a rectangular electronic device with ventilation slots and six circular buttons labeled '太' (no text or symbols on the device itself)Press button switch controls
Light switch: Depress light button to turn light ON. Press light button to turn light OFF.
Extractor fan switch interlocked switching: Select a fan speed, depress button to turn fan ON. Press button (①) to turn fan OFF.
Replacing lamps:
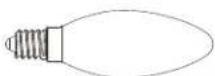
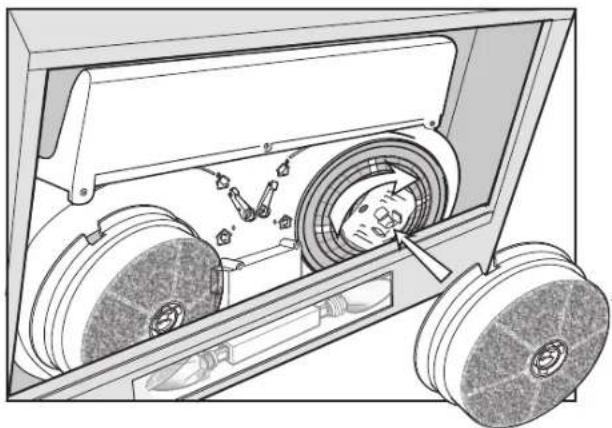
Ensure the appliance is switched off before carrying out maintenance, to avoid any possibility of electric shock. Remove grease filter to replace lamp. Replace with 5.5W E14 LED lamp. Only replacement lamp with the silicone seal should be used.
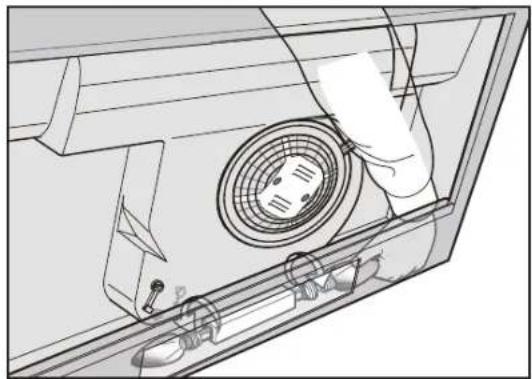
natural_image
Technical line drawing of a mechanical component with a circular component inserted, showing internal parts and mounting holes (no text or symbols)Suitable lamp for replacement
E14 5.5W LED -> DBL-5.5-H-E14-35/102
natural_image
Technical line drawing of a mechanical device with rollers and a housing (no text or symbols)Maintenance:
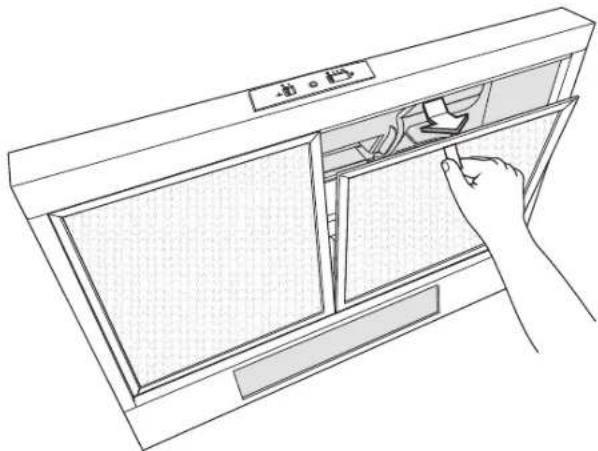
Clean grease filters every three to four weeks maximum. Greasy filters are a fire risk.
Remove the grease filters, soak and agitate in hot soapy water. Rinse, drain and shake well before replacing filters.
Alternatively, palce the grease filtrs in the dishwasher. Select the most powerful washing program and hightest temperature, at least 65^ C. When washing the grease filter in the dishwasher a slight discolouration of the filter can occur, this does not have any impact on it's performance.
Do not use oven cleaners or other caustic materials.
natural_image
Line drawing of a hand inserting a fan into a cabinet (no text or symbols)Recirculating accessory:
Optional carbon filter ARCFD for recirculating mode only.
The activated carbon filter is not washable and cannot be regenerated, and must be replaced approximately every 3 months of operation, or more frequently for particularly heavy usage.
- Note: Replacement carbon filter is available from Electrolux spare parts.

Electrolux Warranty
FOR SALES IN AUSTRALIA AND NEW ZEALAND
APPLIANCE: WESTINGHOUSE RANGEHOODS
This document sets out the terms and conditions of the product warranties for Westinghouse Appliances. It is an important document. Please keep it with your proof of purchase documents in a safe place for future reference should there be a manufacturing defect in your Appliance. This warranty is in addition to other rights you may have under the Australian Consumer Law.
1. In this warranty:
(a) 'ACL' or 'Australian Consumer Law' means Schedule 2 to the Competition and Consumer Act 2010;
(b) 'Appliance' means any Electrolux product purchased by you and accompanied by this document;
(c) 'ASC' means Electrolux's authorised serviced centres;
(d) 'Westinghouse' is the brand controlled by Electrolux Home Products Pty Ltd of 163 O'Riordan Street, Mascot NSW 2020, ABN 51 004 762 341 in respect of Appliances purchased in Australia and Electrolux (NZ) Limited (collectively "Electrolux") of 3-5 Niall Burgess Road, Mount Wellington, in respect of Appliances purchased in New Zealand;
(e) 'Warranty Period' means the period specified in clause 3 of this warranty;
(f) 'you' means the purchaser of the Appliance not having purchased the Appliance for re-sale, and 'your' has a corresponding meaning.
-
Application: This warranty only applies to new Appliances, purchased and used in Australia or New Zealand and is in addition to (and does not exclude, restrict, or modify in any way) other rights and remedies under a law to which the Appliances or services relate, including any non-excludable statutory guarantees in Australia and New Zealand.
-
Warranty Period: Subject to these terms and conditions, this warranty continues for in Australia for a period of 24 months and in New Zealand for a period of 24 months, following the date of original purchase of the Appliance.
-
Repair or replace warranty: During the Warranty Period, Electrolux or its ASC will, at no extra charge if your Appliance is readily accessible for service, without special equipment and subject to these terms and conditions, repair or replace any parts which it considers to be defective. Electrolux may, in its absolute discretion, choose whether the remedy offered for a valid warranty claim is repair or replacement. Electrolux or its ASC may use refurbished parts to repair your Appliance. You agree that any replaced Appliances or parts become the property of Electrolux.
-
Travel and transportation costs: Subject to clause 7, Electrolux will bear the reasonable cost of transportation, travel and delivery of the Appliance to and from Electrolux or its ASC. Travel and transportation will be arranged by Electrolux as part of any valid warranty claim.
-
Proof of purchase is required before you can make a claim under this warranty.
-
Exclusions: You may not make a claim under this warranty unless the defect claimed is due to faulty or defective parts or workmanship. This warranty does not cover:
(a) light globes, batteries, filters or similar perishable parts;
(b) parts and Appliances not supplied by Electrolux;
(c) cosmetic damage which does not affect the operation of the Appliance;
(d) damage to the Appliance caused by:
(i) negligence or accident;
(ii) misuse or abuse, including failure to properly maintain or service;
(iii) improper, negligent or faulty servicing or repair works done by anyone other than an Electrolux authorised repairer or ASC;
(iv) normal wear and tear;
(v) power surges, electrical storm damage or incorrect power supply;
(vi) incomplete or improper installation;
(vii) incorrect, improper or inappropriate operation;
(viii) insect or vermin infestation;
(ix) failure to comply with any additional instructions supplied with the Appliance;
In addition, Electrolux is not liable under this warranty if:
(a) the Appliance has been, or Electrolux reasonably believes that the Appliance has been, used for purposes other than those for which the Appliance was intended, including where the Appliance has been used for any non-domestic purpose;
(b) the Appliance is modified without authority from Electrolux in writing;
(c) the Appliance's serial number or warranty seal has been removed or defaced
- How to claim under this warranty: To enquire about claiming under this warranty, please follow these steps:
(a) carefully check the operating instructions, user manual and the terms of this warranty;
(b) have the model and serial number of the Appliance available;
(c) have the proof of purchase (e.g. an invoice) available;
(d) telephone the numbers shown below.
-
Australia: For Appliances and services provided by Electrolux in Australia: Electrolux goods come with guarantees that cannot be excluded under the Australian Consumer Law. You are entitled to a replacement or refund for a major failure and for compensation for any other reasonably foreseeable loss or damage. You are also entitled to have the Appliance repaired or replaced if the Appliance fails to be of acceptable quality and the failure does not amount to a major failure. 'Acceptable quality' and 'major failure' have the same meaning as referred to in the ACL.
-
New Zealand: For Appliances and services provided by Electrolux in New Zealand, the Appliances come with a guarantee by Electrolux pursuant to the provisions of the Consumer Guarantees Act, the Sale of Goods Act and the Fair Trading Act. Where the Appliance was purchased in New Zealand for commercial purposes the Consumer Guarantee Act does not apply.
-
Confidentiality: You accept that if you make a warranty claim, Electrolux and its agents including ASC may exchange information in relation to you to enable Electrolux to meet its obligations under this warranty.
Important Notice
Before calling for service, please ensure that the steps listed in clause 8 above have been followed.
| AUSTRALIA | FOR SERVICEor to find the address of your nearest authorised service centre in AustraliaPLEASE CALL 13 13 49For the cost of a local call | FOR SPARE PARTSor to find the address of your nearest spare parts centre in AustraliaPLEASE CALL 13 13 50For the cost of a local call |
| NEW ZEALAND | FOR SERVICEor to find the address of your nearest authorised service centre in New ZealandPLEASE CALL 0800 10 66 10 | FOR SPARE PARTSor to find the address of your nearest spare parts centre in New ZealandPLEASE CALL 0800 10 66 20 |
NOTES
NOTES
For more information on all Westinghouse appliances, or for dimension and installation information, call into your retailer, phone or email our customer care team or visit our website:
AUSTRALIA
phone: 13 13 49
fax: 1800 350 067
email: customercare@electrolux.com.au
web: westinghouse.com.au
NEW ZEALAND
phone: 0800 436 245
fax: 0800 225 088
email: customercare@electrolux.co.nz
web: westinghouse.co.nz
- RANGEHOOD
- Universal Cooker Hood Installation and Operation Manual
- Safety Warning
- Cleaning
- Electrical Connection
- Accessories
- Stainless Steel Models
- Cooker Hood Operation
- Slide switch controls
- Press button switch controls
- Replacing lamps:
- Maintenance:
- Recirculating accessory:
- Electrolux Warranty
- In this warranty:
- NOTES
- AUSTRALIA
- NEW ZEALAND
Brand : WESTINGHOUSE
Model : WRF613WA
Category : Fridge