
My Book Studio WDBCPZ0040HAL - External hard drive WESTERN DIGITAL - Free user manual and instructions
Find the device manual for free My Book Studio WDBCPZ0040HAL WESTERN DIGITAL in PDF.


| Product Type | External hard drive |
| Brand | Western Digital |
| Model | My Book Studio WDBCPZ0040HAL |
| Capacity | 4 TB |
| Interface | USB 3.0 (backward compatible with USB 2.0) |
| Form Factor | Desktop external drive |
| Enclosure Material | Aluminum |
| Compatibility | Mac OS X (Leopard, Snow Leopard, Lion, Mountain Lion); also compatible with Windows via reformatting |
| File System | HFS+ Journaled (HFS+J) |
| Time Machine Support | Yes |
| Security | Password protection with hardware encryption (WD Security software) |
| Software Included | WD Security, WD Drive Utilities, WD +TURBO |
| Power Supply | AC adapter (included) |
| Cooling | Passive ventilation slots |
| Physical Security | Kensington security slot |
| LED Indicator | Power/activity LED (steady idle, fast flash activity, slow flash standby) |
| Warranty | 3 years (varies by region) |
| Data Transfer Rate | Up to 5 Gb/s (USB 3.0) |
Frequently Asked Questions - My Book Studio WDBCPZ0040HAL WESTERN DIGITAL
User questions about My Book Studio WDBCPZ0040HAL WESTERN DIGITAL
0 question about this device. Answer the ones you know or ask your own.
Ask a new question about this device
Download the instructions for your External hard drive in PDF format for free! Find your manual My Book Studio WDBCPZ0040HAL - WESTERN DIGITAL and take your electronic device back in hand. On this page are published all the documents necessary for the use of your device. My Book Studio WDBCPZ0040HAL by WESTERN DIGITAL.
USER MANUAL My Book Studio WDBCPZ0040HAL WESTERN DIGITAL
natural_image
Simple line drawing of a rectangular object with a small square marker on the side (no text or symbols)WD Service and Support
Should you encounter any problem, please give us an opportunity to address it before returning this product. Most technical support questions can be answered through our knowledge base or email support service at http://support.wdc.com. If the answer is not available or if you prefer, please contact WD ^® at the best telephone number shown below.
Your product includes 30 days of free telephone support during the warranty period. This 30-day period starts on the date of your first telephone contact with WD Technical Support. Email support is free for the entire warranty period and our extensive knowledge base is available 24/7. To help us keep you informed of new features and services, remember to register your product online at http://register.wdc.com.
Accessing Online Support
Visit our product support website at http://support.wdc.com and choose from these topics:
- Downloads—Download drivers, software, and updates for your WD product.
- Registration—Register your WD product to get the latest updates and special offers.
- Warranty & RMA Services—Get warranty, product replacement (RMA), RMA status, and data recovery information.
- Knowledge Base—Search by keyword, phrase, or answer ID.
- Installation—Get online installation help for your WD product or software.
- WD Community—Share your thoughts and connect with other WD users.
Contacting WD Technical Support
When contacting WD for support, have your WD product serial number, system hardware, and system software versions available.
North America Asia Pacific
English 800.ASK.4WDC Australia 1 800 42 9861
(800.275.4932) China 800 820 6682/+65 62430496
Spanish 800.832.4778 Hong Kong +800 6008 6008
India 1 800 11 9393 (MNTL)/1 800 200 5789 (Reliance)
011 26384700 (Pilot Line)
Europe (toll free)* 00800 ASK4 WDEU Indonesia +803 852 9439
(00800 27549338) Japan 0120 994 120/00531 65 0442
Korea 02 703 6550
| Europe | +31 880062100 | Malaysia | +800 6008 6008/1 800 88 1908/+65 62430496 |
| Middle East | +31 880062100 | Philippines | 1 800 1441 0159 |
| Africa | +31 880062100 | Singapore | +800 6008 6008/+800 608 6008/+65 62430496 |
| Taiwan | +800 6008 6008/+65 62430496 |
* Toll free number is available in the following countries: Austria, Belgium, Denmark, France, Germany, Ireland, Italy, Netherlands, Norway, Spain, Sweden, Switzerland, United Kingdom.
Table of Contents
WD Service and Support .... ii
Accessing Online Support .... ii
Contacting WD Technical Support....ii
1 About Your WD Drive .... 1
Features 1
Kit Contents 2
Optional Accessories 2
Operating System Compatibility 2
Disk Drive Format 3
Physical Description....3
Power/Activity LED....3
USB 3.0 Interface....3
Kensington ^® Security Slot 4
Registering the Drive 4
Handling Precautions 4
2 Connecting the Drive and Getting Started 5
Connecting the Drive 5
Enhancing Performance with WD +TURBO 7
Installing the WD Security Software....9
Installing the WD Drive Utilities Software 11
3 Locking and Unlocking the Drive 13
Password Protecting the Drive.... 13
Unlocking the Drive 14
Unlocking the Drive with the WD Security or WD Drive Utilities Software ..... 15
Unlocking the Drive with the WD Drive Unlock Utility 16
Changing Your Password.... 17
Turning Off the Drive Lock Feature.... 18
4 Managing and Customizing the Drive 19
Checking Drive Health 20
Setting the Drive Sleep Timer....21
Erasing the Drive. 22
Using the Drive Erase Function 22
Using the WD Drive Unlock Utility 23
Registering the Drive 25
Safely Dismounting the Drive 27
Restoring the WD Software and Disk Image 27
5 Using the Drive with Windows 28
Reformatting the Drive 28
Restoring the WD Software and Disk Image 28
6 Troubleshooting 29
Installing, Partitioning, and Formatting the Drive 29
Frequently Asked Questions....29
A Compliance and Warranty Information.... 31
Regulatory Compliance 31
FCC Class B Information 31
ICES/NMB-003 Compliance....31
Safety Compliance....31
CE Compliance for Europe....31
GS Mark (Germany only) 32
KC Notice (Republic of Korea only) 32
Environmental Compliance (China). 32
Warranty Information (All Regions Except Australia/New Zealand) 32
Obtaining Service 32
Limited Warranty 33
Warranty Information (Australia/New Zealand) 33
Obtaining Service 34
Warranty 34
GNU General Public License ("GPL") 35
Index....36
About Your WD Drive
Welcome to your My Book ^® Studio ^TM external hard drive, an elegant, high-capacity storage solution for all the chapters of your digital life.
This chapter includes the following topics:
Features
Kit Contents
Optional Accessories
Operating System Compatibility
Disk Drive Format
Physical Description
Registering the Drive
Handling Precautions
Features
Designed for the expert Mac user, this drive offers ultra-fast USB 3.0 connectivity, a premium aluminum enclosure, compatibility with Apple Time Machine, and password protection with hardware encryption.
Ultra-fast data transfers—Save and access files faster than ever with the ultra-fast USB 3.0 interface. Transfer a full-length HD movie in under 5 minutes.
USB 3.0 and USB 2.0 compatibility—With this single drive you get compatibility with your USB 2.0 devices today and the ultra-fast speed of USB 3.0 when you are ready to step up to the next generation.
Sleek aluminum enclosure complements your Mac—The premium aluminum enclosure matches your Mac and remains cool to the touch, even as the drive delivers blistering fast performance.
Designed for the Mac professional—Formatted HFS+ journaled, My Book Studio is plug-and-play ready for Mac computers. It is ideal for videographers, photographers, video editors and other graphic professionals.
WD Security™—The WD Security software allows you to set password protection and hardware encryption to secure your files from unauthorized access.
WD Drive Utilities™—Register your drive, run diagnostics and more using the WD Drive Utilities software.
WD quality inside and out—We know your data is important to you. So we build the drive inside to our demanding requirements for durability, shock tolerance and long-term reliability. Then we place the drive in a robust enclosure designed for beauty and protection.
Important: For the latest WD product information and news, visit our website at http://www.westerndigital.com. For the latest software, firmware, and product documentation and information, go to http://support.wdc.com/downloads.
Kit Contents
As shown in Figure 1, your My Book Studio disk drive kit includes the following:
• My Book Studio external hard drive
- USB 3.0 cable
- AC adapter
- Quick Install Guide
• WD Security and WD Drive Utilities software (included on the drive)
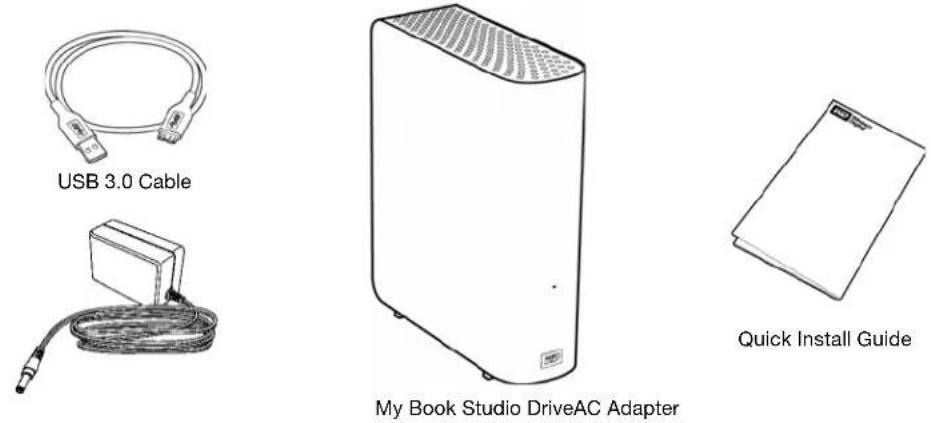
Figure 1. My Book Studio Drive Kit Components
Optional Accessories
For information about optional accessories for WD products, visit:
| US | http://www.shopwd.com or http://www.wdstore.com |
| Canada | http://www.shopwd.ca or http://www.wdstore.ca |
| Europe | http://www.shopwd.eu or http://www.wdstore.eu |
| All others Contact WD Technical Support in your region. For a list of Technical Support contacts, visit http://support.wdc.com and see Knowledge Base answer ID 1048. | |
Operating System Compatibility
Your My Book Studio drive and the WD Security and WD Drive Utilities software are compatible with the following operating systems:
Mac OS X Windows
- Leopard
- Snow Leopard
- Lion
- Mountain Lion

- Windows XP
- Windows Vista®
- Windows 7
- Windows 8
Compatibility can vary, depending on hardware configuration and operating system.
For highest performance and reliability, always install the latest software update and service pack (SP). For Mac computers, go to the Apple menu and select Software Update. For Windows computers, go to the Start menu and select Windows Update.
Disk Drive Format
Your My Book Studio drive is preformatted as a single HFS+J partition for Mac OS X operating systems. If you want to use this drive with a Windows system, see "Reformatting the Drive" on page 28 and "Troubleshooting" on page 29.
Physical Description
As shown in Figure 2, the My Book Studio drive has:
• A power/activity indicator on the front
- The power connector, interface port, and a security slot on the back
Power/Activity LED
The power/activity LED shows the drive's power state and activity as follows:
| LED Appearance Power State/Activity | |
| On steady Idle | |
| Fast flashing, approximately 3 times per second Activity | |
| Slow flashing, approximately every 2.5 seconds System standby | |
USB 3.0 Interface
Super-Speed USB 3.0 supports data transfer rates up to 5 Gb/s. USB 3.0 is backward-compatible with USB 2.0. Connection to a USB 2.0 port transfers data at the port speed—up to 480 Mb/s.
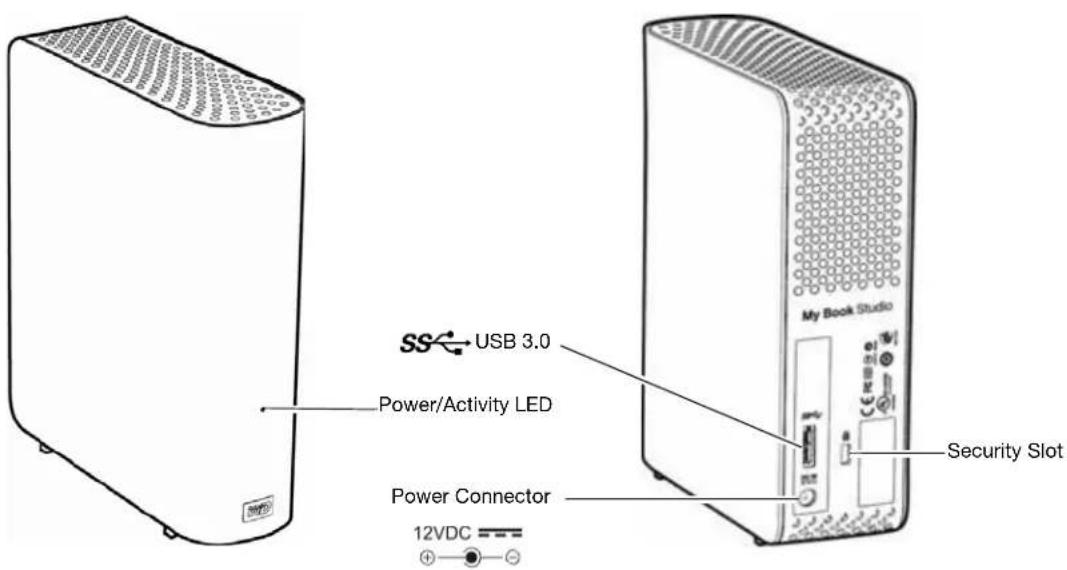
Figure 2. My Book Studio Drive
Kensington® Security Slot
For physical drive security, the Kensington security slot accepts a standard Kensington security cable (sold separately). For more information about the Kensington security slot and available products, visit www.kensington.com.
Registering the Drive
Always register your My Book Studio drive to get the latest updates and special offers. You can easily register your drive using the WD Drive Utilities software, as described in "Registering the Drive" on page 25. Another way is to register online at http://register.wdc.com.
Handling Precautions
WD products are precision instruments and must be handled with care during unpacking and installation. Drives may be damaged by rough handling, shock, or vibration. Always observe the following precautions when unpacking and installing your external storage product:
- Do not drop or jolt the drive.
- Do not move the drive during activity.
- Do not use this product as a portable drive.
- To allow proper ventilation, do not block any of the drive enclosure's air slots.
2
Connecting the Drive and Getting Started
This chapter provides instructions for connecting the drive to your computer and installing the WD software. It includes the following topics:
Connecting the Drive
Enhancing Performance with WD +TURBO
Installing the WD Security Software
Installing the WD Drive Utilities Software
Connecting the Drive
To connect the My Book drive to your Mac computer:
- Depending on your region, if required, change the power adapter as follows:
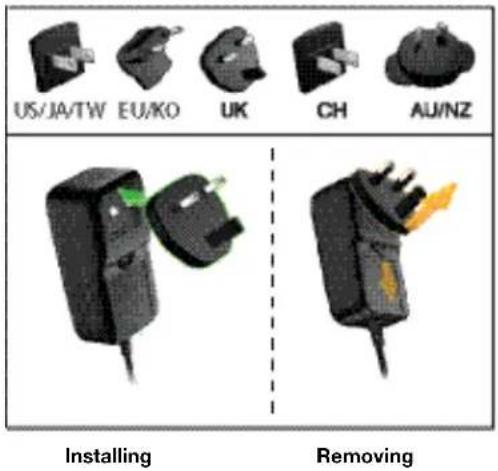
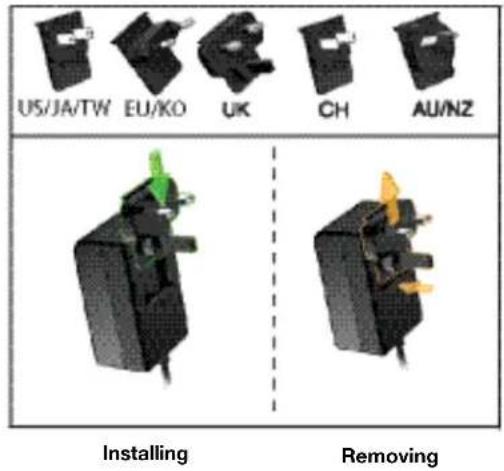
- Turn on your computer.
- Connect the My Book drive as shown in Figure 3.
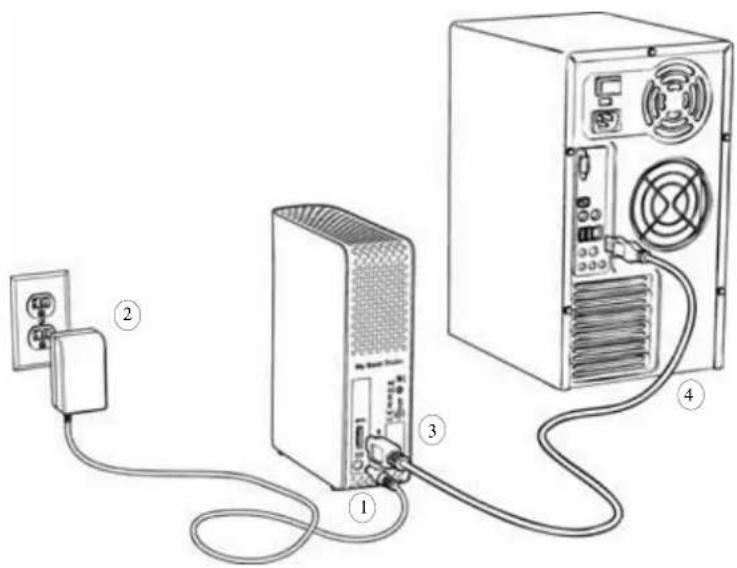
Figure 3. Connecting the My Book Drive
- Verify that the My Book drive appears under DEVICES in the Sidebar area of your Finder display:
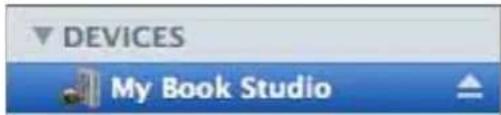
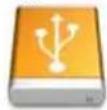
Note: If the External disks check box is selected on your Finder Preferences dialog, the My Book icon displays on your desktop:
My Book Studio
- The first time you connect your My Book drive to your computer, a message asks if you want to use the drive to back up with Time Machine:
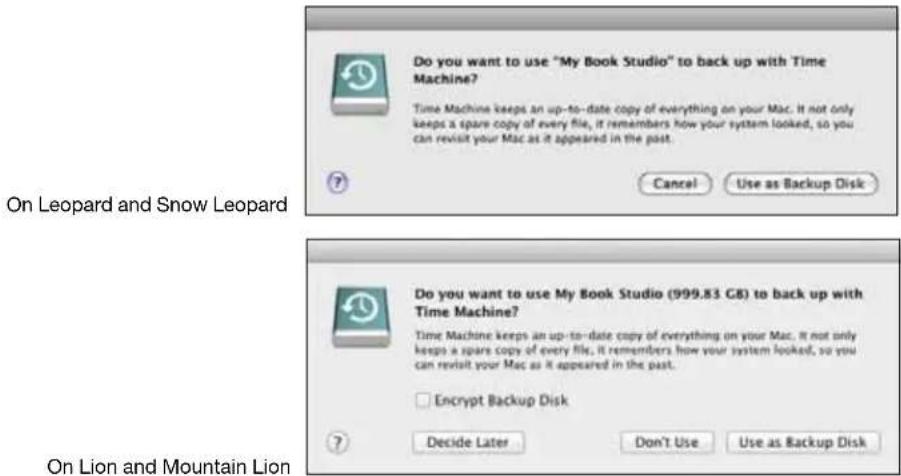
Note: Currently the Encrypt Backup Disk check box only appears on computers using the Lion or Mountain Lion operating system.
Depending on your operating system:
- On Leopard or Snow Leopard, proceed to step 6.
- On Lion or Mountain Lion, skip to step 7.
- On Leopard or Snow Leopard:
| IF you . . . want to use the drive with the Time Machine software, | THEN click . . . |
| Do not Cancel and skip to step 7. | |
| Do Use as Backup Disk and skip to step 8 on page 7. | |
- On Lion or Mountain Lion:
| IF you . . . want to use the drive with the Time Machine software, | THEN . . . |
| Do not Click Don't Use and skip to step 8 on | page 7. |
| Do Proceed to step a on page 7. |
a. If you want to create a password to secure your backup files, select the Encrypt Backup Disk check box.
b. Click Use as Backup Disk.
c. If you selected the Encrypt Backup Disk check box at step a, complete the backup password dialog that displays:
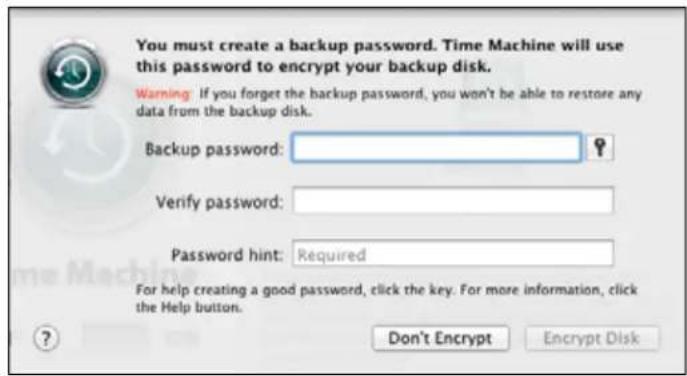
Your My Book drive is now ready to use as an external storage device. You can enhance its performance by installing the following software that is on the drive:
- WD +TURBO utility (see "Enhancing Performance with WD +TURBO" in the next section)
- WD SmartWare software (see "Installing the WD Security Software" on page 9)
Enhancing Performance with WD +TURBO
WD +TURBO is a utility on the My Book drive that you can install to improve the performance of the drive on a Mac computer.
To install WD +TURBO:
- Double-click the My Book icon, and then double-click the .dmg file on the screen that displays:
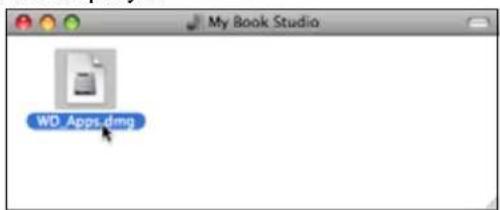
- Double-click the Extras folder on the screen that displays:
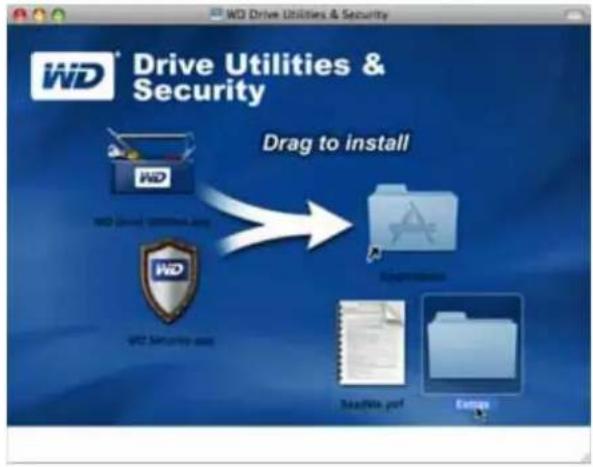
- Double-click the WD +TURBO Installer application:
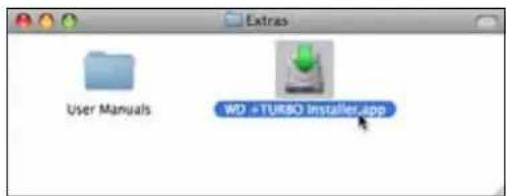
- Click Install on the WD +TURBO Driver Installer screen:
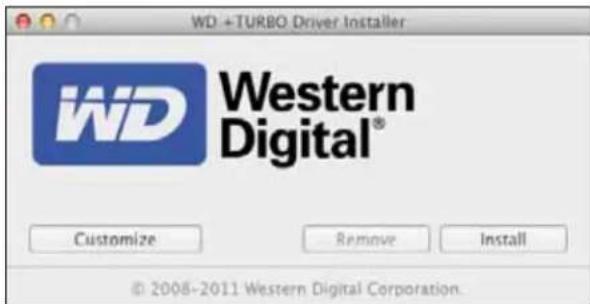
- Read the license agreement and click Accept to continue.
- A message informs you that installing the drivers requires you to restart your computer to make them active:
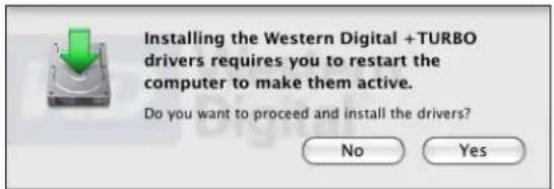
Click Yes to continue.
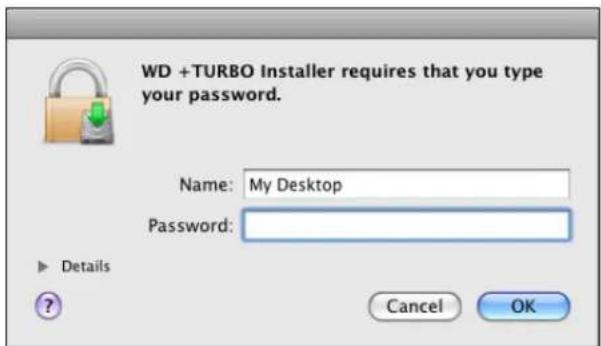
- Type the password that you use to access the computer in the Password box and click OK:
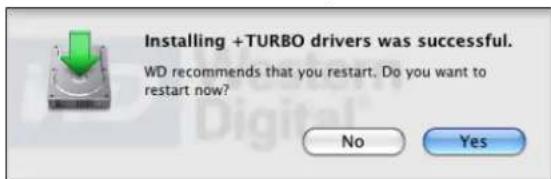
- When the installation completes, click Yes to restart the computer:
- When the computer restarts, the My Book icon looks like this:
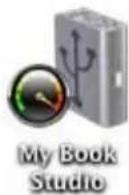
Your My Book drive is now ready to use as an enhanced-performance external storage device.
Installing the WD Security Software
The WD Security software allows you to set password protection and hardware encryption to secure your files from unauthorized access.
To install the WD Security software:
- Double-click the My Book icon, and then double-click the .dmg file on the screen that displays:
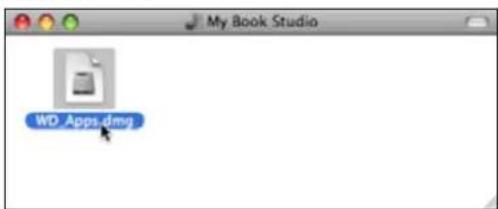
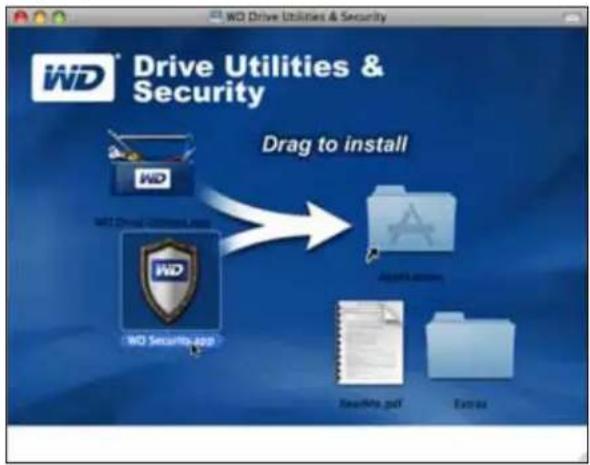
- Drag the WD Security application to the alias Applications folder on the screen that displays:
- In the alias Applications folder, double-click the WD Security application.
- Read the license agreement and click Accept to continue and display the WD Security screen:
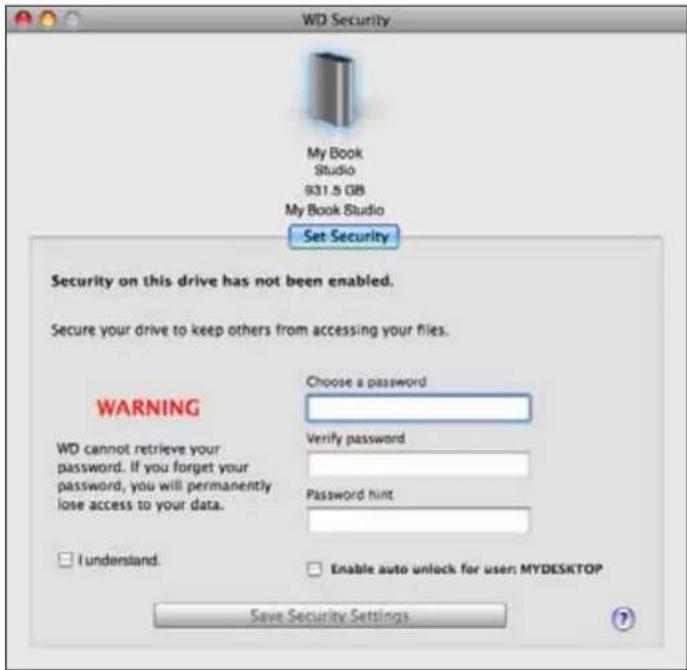
- See "Locking and Unlocking the Drive" on page 13.
Installing the WD Drive Utilities Software
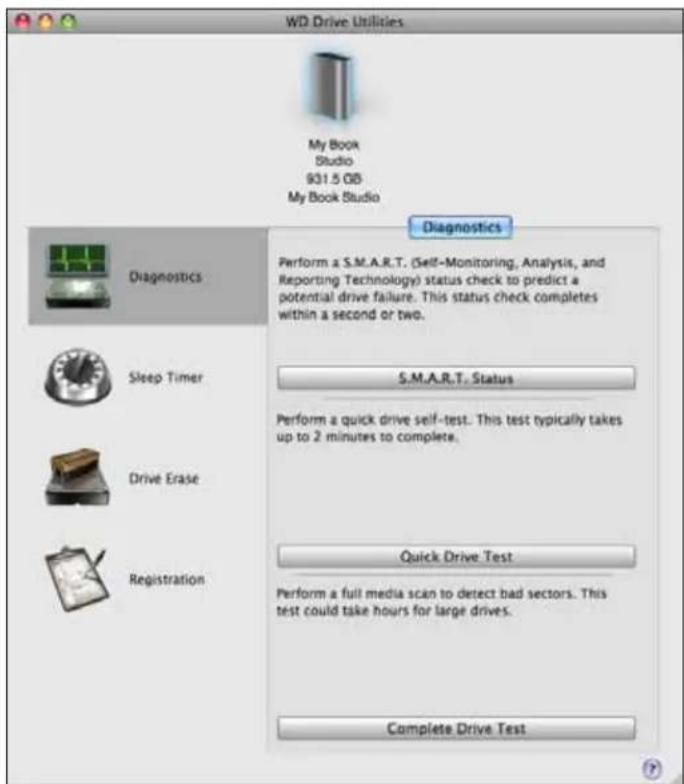
The WD Drive Utilities software allows you to register your drive, run diagnostics and more.
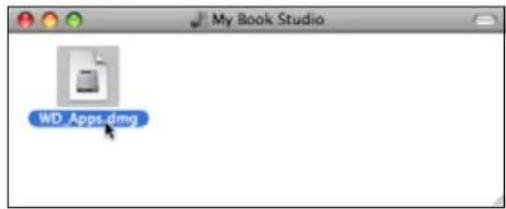
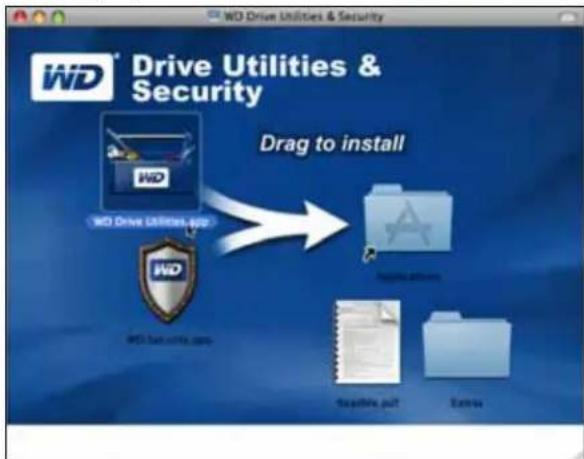
To install the WD Drive Utilities software:
- Double-click the My Book icon, and then double-click the .dmg file on the screen that displays:
- Drag the WD Drive Utilities application to the alias Applications folder on the screen that displays:
-
In the alias Applications folder, double-click the WD Drive Utilities application.
-
Read the license agreement and click Accept to continue and display the WD Drive Utilities screen:
- See "Managing and Customizing the Drive" on page 19.
Locking and Unlocking the Drive
This chapter includes the following topics:
Password Protecting the Drive
Unlocking the Drive
Changing Your Password
Turning Off the Drive Lock Feature
Password Protecting the Drive
You should password protect your drive if you are worried that someone else will gain access to your drive and you do not want them to see your files on the drive.
CAUTION! The WD Security software uses your password to electronically lock and unlock your drive. If you forget your password, you will not be able to access the data that is on your drive or write new data to it. You will have to erase the drive before you can use it again.
Use the WD Security software to:
- Create a password
- Change a password
- Eliminate the need for a password
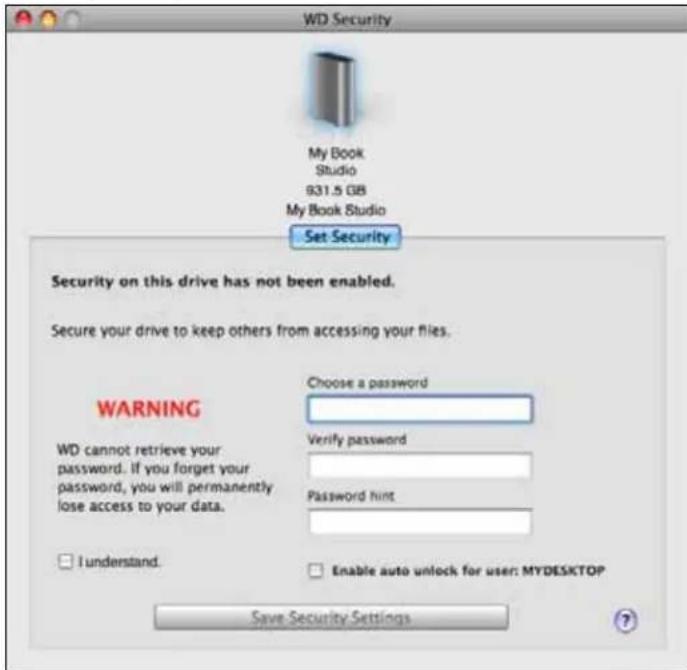
To create a password and keep others from accessing the files on your drive:
- Click Go > Applications > WD Security to display the WD Security screen, Set Security dialog:
- If you have more than one supported drive connected to your computer, select the one that you want to create a password for.
-
Type your password in the Choose a password box, using up to 25 characters.
-
Retype your password in the Verify password box.
- Type a hint to help remember your password in the Password hint box.
- Select the Enable auto unlock for user: check box if you want the WD Security software to remember your password for the selected drive on this computer.
Important: If you select the Enable auto unlock for user: check box, the first time you restart your computer or disconnect and reconnect the drive after creating a password, your operating system requests permission to allow the WD Security software to access your password:
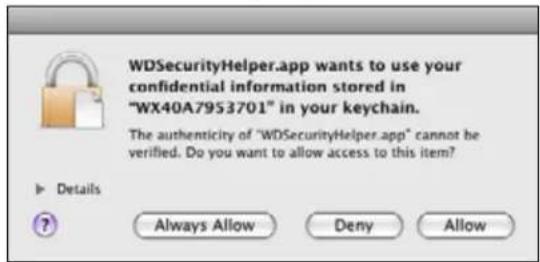
Click Always Allow to avoid this dialog in the future.
- Read the warning about the possibility of data loss if you forget your password.
- Click the I understand check box to signify that you accept the risk.
- Click Save Security Settings to save your password and enable hardware encryption for your drive.
CAUTION! After creating a password, the drive remains unlocked for as long as you continue your current work session. Then the WD Security software:
- Locks the drive when you shut down your computer, disconnect your drive, or your computer goes into the sleep mode
- Requires you to type your password to unlock the drive when you restart your computer or reconnect your drive, UNLESS you selected the Enable auto unlock for user: check box when you created your password
Unlocking the Drive
After you have created a password to keep others from accessing the files on your drive, unless you selected the Enable auto unlock for user: check box, you will have to type your password to unlock the drive whenever:
• You shut down and restart your computer
• You disconnect and reconnect the drive to your computer
- Your computer exits the sleep mode
You will have to do this even if you do not have the WD Security software installed on your computer.
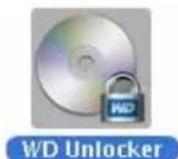
In each case, the WD Security software replaces the desktop icon for your My Book drive with the WD Unlocker virtual CD (VCD) icon:
WD Unlocker
The WD Unlocker VCD provides the WD Drive Unlock utility that you can use to unlock the drive. Or you can use either the WD Security or the WD Drive Utilities software to unlock the drive.
Unlocking the Drive with the WD Security or WD Drive Utilities Software
Whenever you shut down and restart your computer or disconnect and reconnect the drive to your computer, starting either the WD Security or WD Drive Utilities software displays the Unlock Drive dialog:
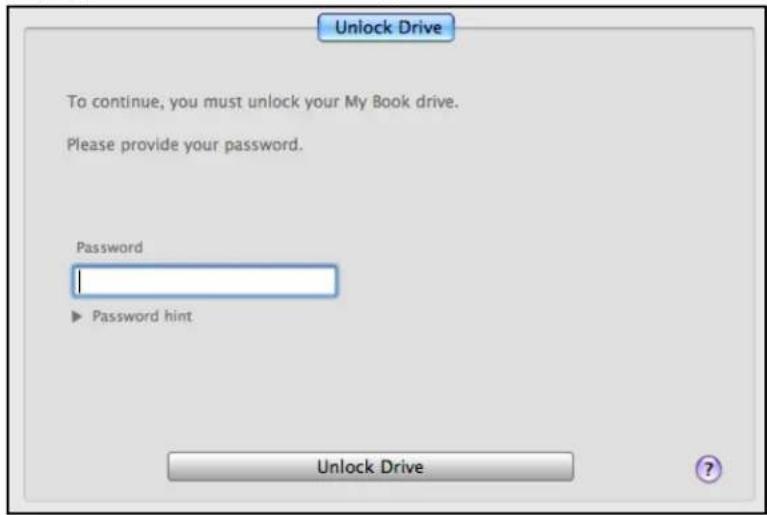
This happens either:
• Automatically if you only have the one locked drive connected to your computer
- When you select the locked drive on either the WD Security or WD Drive Utilities screen if you have more than one supported drive connected to your computer
To unlock the drive:
-
If you do not see the Unlock Drive dialog, click either:
-
Go > Applications > WD Security
-
Go > Applications > WD Drive Utilities
-
If you have more than one supported drive connected to your computer, select the one that is locked to display the Unlock Drive dialog.
- On the Unlock Drive dialog:
a. Type your password in the Password box.
b. Click Unlock Drive.
Unlocking the Drive with the WD Drive Unlock Utility
Whenever you connect your password-protected drive to a computer that does not have the WD Security or WD Drive Utilities software installed, you can use the WD Drive Unlock utility to unlock the drive there. The Drive Unlock utility is on a virtual CD (VCD) drive that appears on your desktop display.
To unlock the drive:
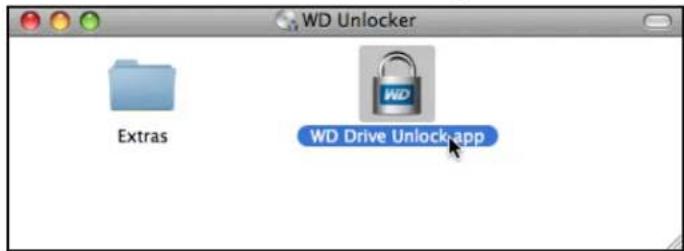
- Double-click the WD Unlocker VCD icon on your desktop:
WD Unlocker
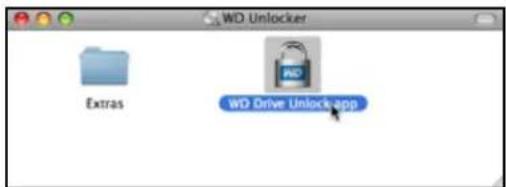
- Double-click the WD Drive Unlock application on the screen that displays:
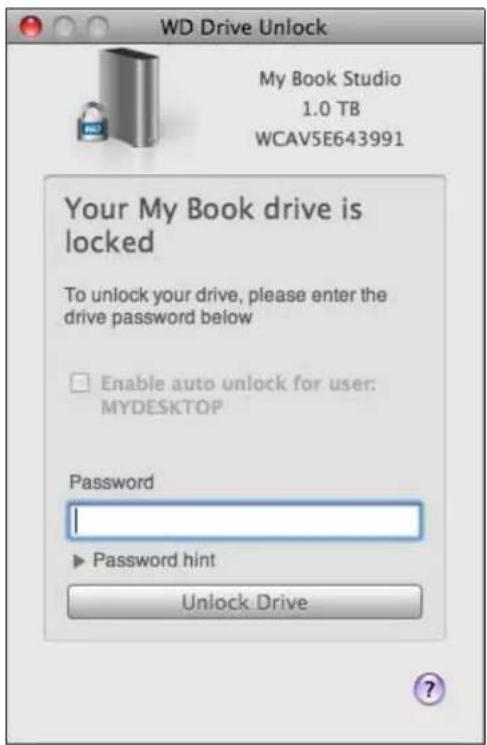
The WD Drive Unlock utility screen displays:
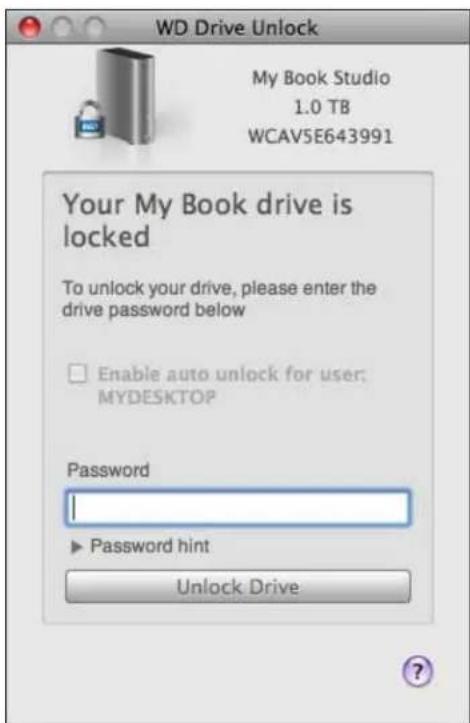
- On the WD Drive Unlock utility screen:
a. Type your password in the Password box.
b. Select the Enable auto unlock for user: check box if you want the WD Drive Unlock utility to remember your password on this computer.
c. Click Unlock Drive.
d. At the Your drive is now unlocked prompt, click Exit to close the WD Drive Unlock utility screen.
Changing Your Password
To change your password:
- Click Go > Applications > WD Security to display the WD Security screen, Change Security dialog:
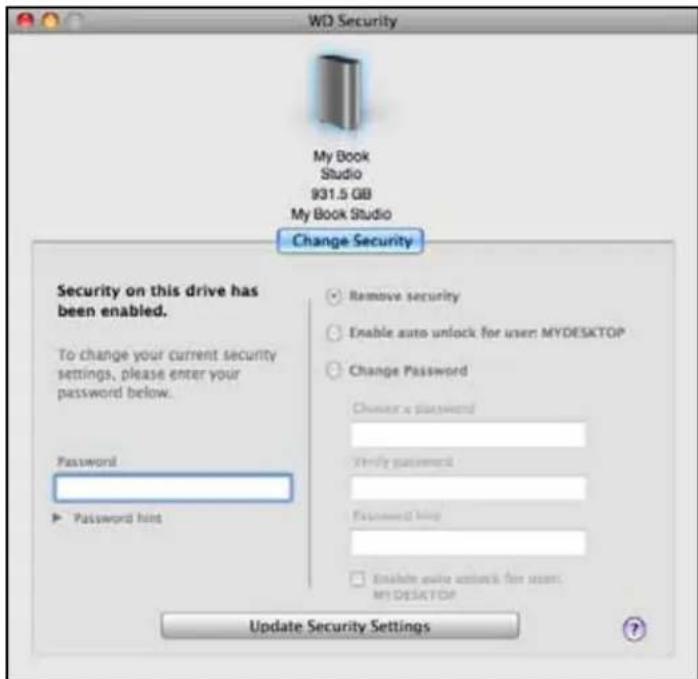
- If you have more than one supported drive connected to your computer, select the one with the password that you want to change.
- Type your current password in the Password box.
- Select the Change password option.
- Type your new password in the Choose a password box, using up to 25 characters.
- Retype your new password in the Verify password box.
- Type a hint to help remember your new password in the Password hint box.
- Select or clear the Enable auto unlock for user: check box to signify whether you want the WD Security software to remember your new password for the selected drive on this computer.
- Click Update Security Settings.
CAUTION! After changing your password, the drive remains unlocked for as long as you continue your current work session. Then the WD Security software:
- Locks the drive when you shut down your computer, disconnect your drive, or your computer goes into the sleep mode
- Requires you to type your password to unlock the drive when you restart your computer or reconnect your drive, UNLESS you selected the Enable auto unlock for user: check box when you changed your password
Turning Off the Drive Lock Feature
To remove password protection from your drive:
- Click Go > Applications > WD Security to display the WD Security screen, Change Security dialog:
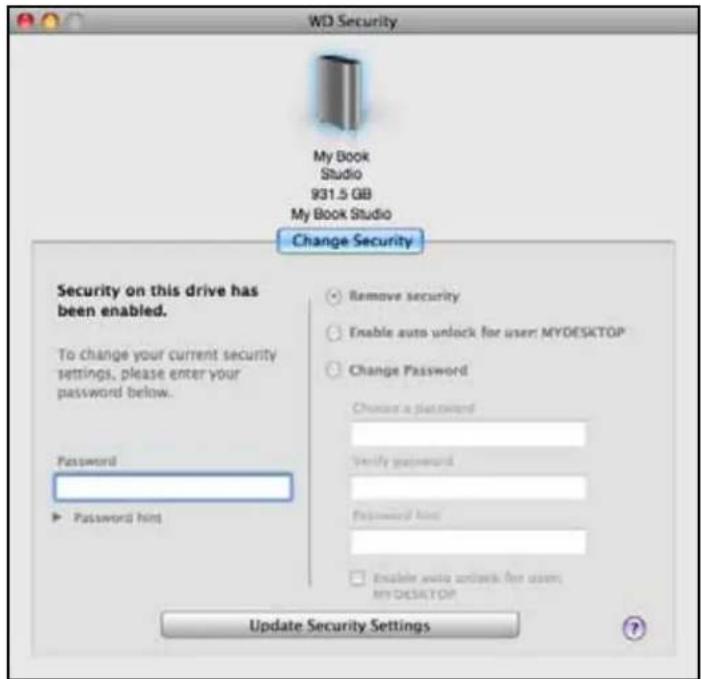
- If you have more than one supported drive connected to your computer, select the one that you want to remove password protection from.
- Type your password in the Password box.
- Select the Remove security option.
- Click Update Security Settings.
4
Managing and Customizing the Drive
This chapter includes the following topics:
Checking Drive Health
Setting the Drive Sleep Timer
Erasing the Drive
Registering the Drive
Safely Dismounting the Drive
The WD Drive Utilities software (see Figure 4) makes it easy for you to manage and customize your drive for the best possible performance:
- Diagnostics—Run diagnostics and status checks to make sure your drive is working properly.
- Sleep Timer—Turn your drive off during extended periods of inactivity to conserve power and extend the life of the drive.
- Drive Erase—Erase all of the data on the drive, including your password if you have one.
- Registration—Register your drive to receive free technical support during the warranty period and find out about software updates, product enhancements, and price discount opportunities.
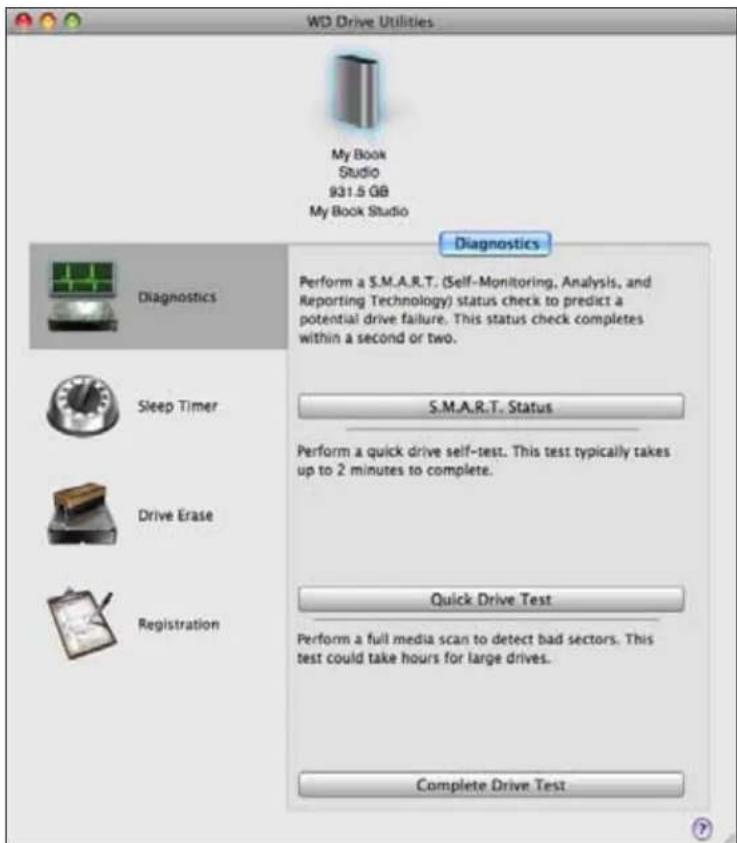
Figure 4. WD Drive Utilities Screen
On the WD Drive Utilities screen:
| IF you want to . . . THEN click . . . | AND see . . . | |
| Run drive diagnostics and status checks, | Diagnostics “Checking Drive Health” in the next section. | |
| Specify an inactive time interval to turn off your drive, | Sleep Timer “Setting the Drive Sleep Timer” on page 21. | |
| Erase your drive so you can retrieve the space and start over, | Drive Erase “Erasing the Drive” on page 22. | |
| Register your drive to receive free technical support during the warranty period and keep up-to-date on the latest WD products, | Registration “Registering the Drive” on page 25. | |
Checking Drive Health
The WD Drive Utilities software provides three diagnostic tools to help make sure that your drive is performing well. Run the following tests if you are concerned that your drive is not operating properly:
• S.M.A.R.T. Status
S.M.A.R.T. is a failure-prediction function that continuously monitors key internal performance attributes of the drive. A detected increase in drive temperature, noise, or read/write errors, for example, can provide an indication that the drive is approaching a serious failure condition. With advanced warning, you could take precautionary measures, like moving your data to another drive, before a failure occurs.
The result of a S.M.A.R.T. status check is a pass or fail evaluation of the drive's condition.
- Quick Drive Test
Your drive has a built-in Data Lifeguard™ diagnostic utility that tests the drive for error conditions. The quick drive test checks the drive for major performance problems.
The result of a quick drive test is a pass or fail evaluation of the drive's condition.
- Complete Drive Test
The most comprehensive drive diagnostic is the complete drive test. It tests every sector for error conditions, and inserts bad sector markers as required.
The best time to run the drive diagnostics and status checks is on a regular basis, before you encounter any problems with your drive. And, because they are so fast, running the S.M.A.R.T. status check and the quick drive test provides a high level of assurance with minimal inconvenience. Then, run all three whenever you encounter disk errors when writing or accessing files.
To run drive diagnostics and status checks:
-
Click Go > Applications > WD Drive Utilities to display the WD Drive Utilities screen (see Figure 4 on page 19).
-
If you have more than one supported drive connected to your computer, select the one that you want to check.
-
Click Diagnostics to display the Diagnostics dialog:
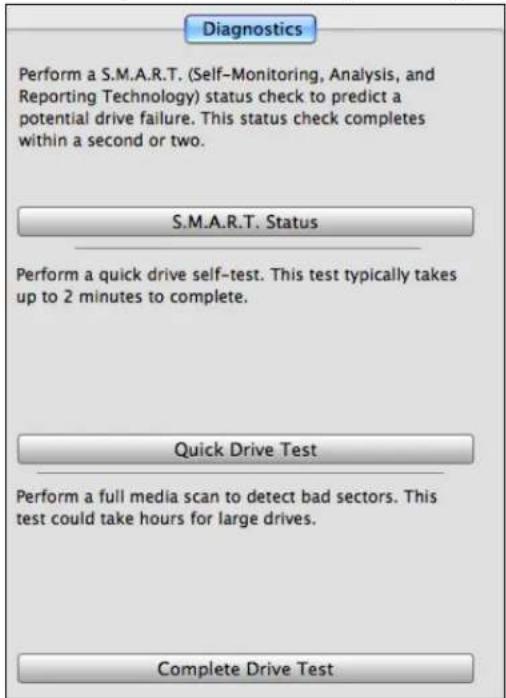
- On the Diagnostics dialog, click the button for the test that you want to run:
• S.M.A.R.T. Status
- Quick Drive Test
- Complete Drive Test
Setting the Drive Sleep Timer
The drive sleep timer turns off the power to your drive after a certain period of inactivity to conserve power and minimize long-term wear on the drive.
To set the inactivity period for the drive:
- Click Go > Applications > WD Drive Utilities to display the WD Drive Utilities screen (see Figure 4 on page 19).
- If you have more than one supported drive connected to your computer, select the one that you want to set.
- Click Sleep Timer to display the Sleep Timer dialog:
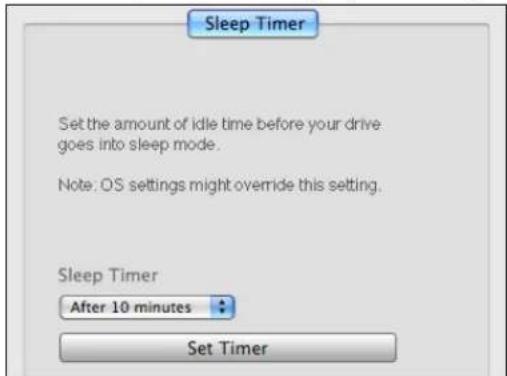
- On the Sleep Timer dialog:
a. In the Sleep Timer box, select the inactivity time interval at which you want to turn off the drive.
b. Click Set Timer.
Erasing the Drive
CAUTION! Erasing your drive permanently deletes all of the data on the drive. Always make sure that you no longer need any of the data on your drive before erasing it.
Note: Erasing your drive also deletes the WD software and all of the support files, utilities, and user manual files. You can download these to restore your drive to its original configuration after erasing it.
WD Drive Utilities provides two ways to erase your drive, depending on whether your drive is locked or not:
| IF your drive is . . . AND you . . . THEN see . . . | |
| Not locked, | Want to erase the drive, |
| Locked, Have forgotten | or lost your password and must erase the drive, |
Using the Drive Erase Function
To erase your drive when it is not locked:
- Click Go > Applications > WD Drive Utilities to display the WD Drive Utilities screen (see Figure 4 on page 19).
- If you have more than one supported drive connected to your computer, select the one that you want to erase.
- Click Drive Erase to display the Drive Erase dialog:
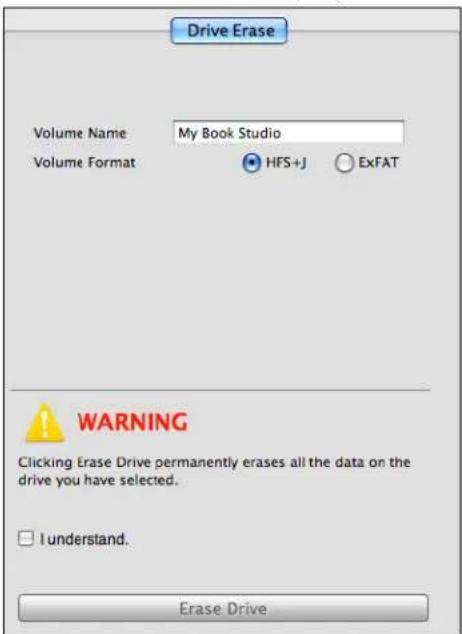
- On the Drive Erase dialog:
a. If you want to change the name of the volume when you erase the drive, type a new name in the Volume Name box.
b. If you want to change the format of the volume when you erase the drive, select the format option that you want:

Note: Go to http://support.wdc.com and see Knowledge Base answer ID 3849 for information about the Extended File Allocation Table (exFAT) format.
c. Read the warning about the loss of data if you erase your drive.
d. Click the I understand check box to signify that you accept the risk.
e. Click Erase Drive.
After the drive erase operation completes, go to http://support.wdc.com and see Knowledge Base answer ID 7 for information about downloading and restoring the WD software and disk image on your drive.
Note: Erasing your drive also removes your password. If you used a password to protect your drive, you will need to re-create it after restoring the WD software and disk image. (See "Password Protecting the Drive" on page 13.)
Using the WD Drive Unlock Utility
To erase your drive when it is locked and you have forgotten or lost your password:
- Double-click the WD Unlocker virtual CD icon on your desktop:
- Double-click the WD Drive Unlock application on the screen that displays:
The WD Drive Unlock utility screen displays:
- Make five attempts to unlock the drive by:
a. Typing a password in the Password box.
b. Clicking Unlock Drive.
- The fifth invalid password attempt displays the too many password attempts prompt:
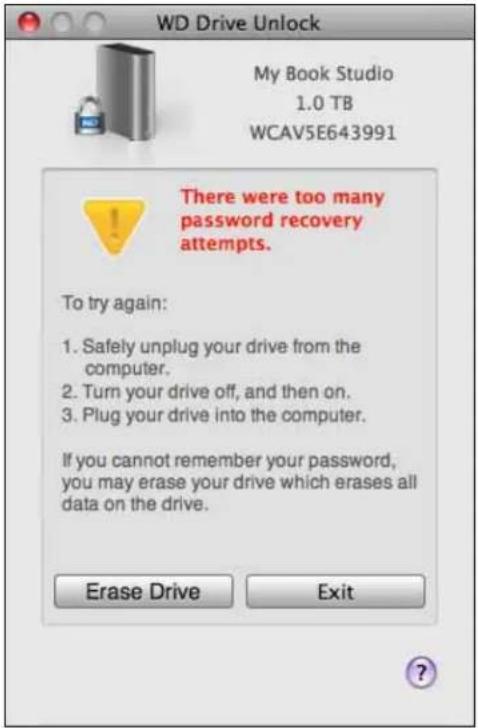
- Click Erase Drive to display a warning about erasing all of the data on the drive:
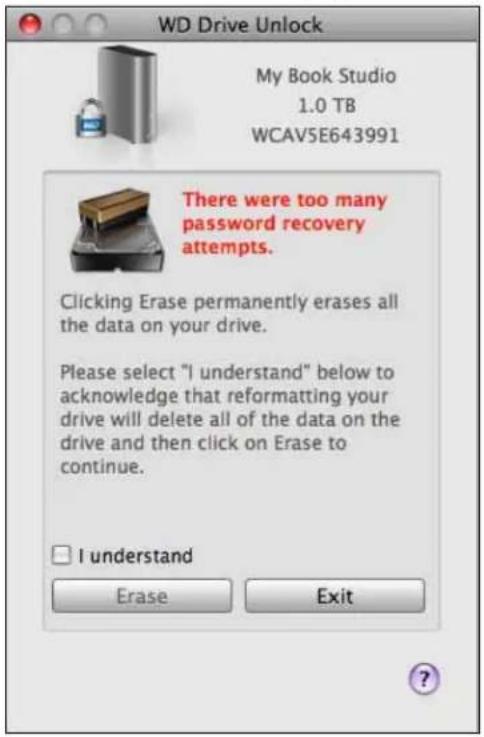
- Read the warning and select the I understand check box to signify that you accept the risk.
7. Click Erase.
After the drive erase operation completes, go to http://support.wdc.com and see Knowledge Base answer ID 7 for information about downloading and restoring the WD software and disk image on your drive.
Note: Erasing your drive also removes your password. If you still want to use a password to protect your drive, you will need to re-create it after restoring the WD software and disk image. (See "Password Protecting the Drive" on page 13.)
Registering the Drive
The WD Drive Utilities software uses your computer's Internet connection to register your drive. Registering the drive provides free technical support during the warranty period and keeps you up-to-date on the latest WD products.
To register yo ur dri ve :
-
Make sure that your computer is connected to the Internet.
-
Click Go > Applications > WD Drive Utilities to display the WD Drive Utilities screen (see Figure 4 on page 19).
-
If you have more than one supported drive connected to your computer, select the one that you want to register.
-
Click Registration to display the Registration dialog:
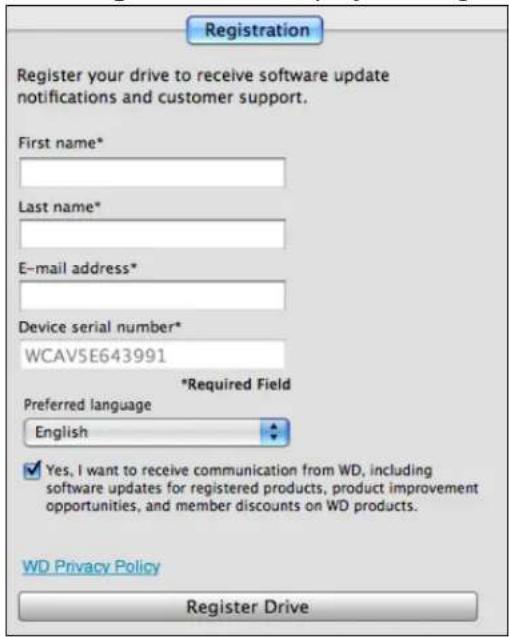
- On the Registration dialog:
a. Type your first name in the First name box.
b. Type your last name in the Last name box.
c. Type your email address in the E-mail address box.
d. Select your language in the Preferred language box.
e. Select or clear the Yes, I want to receive communication... check box to specify whether you want to receive notifications about software updates, product enhancements, and price discount opportunities.
f. Click Register Drive.
Safely Dismounting the Drive
CAUTION! To prevent data loss, close all active windows and applications before shutting down or disconnecting the drive.
Use the My Book icon to safely dismount the drive:
- Right- or control-click the My Book icon on the desktop and select Eject "My Book Studio":
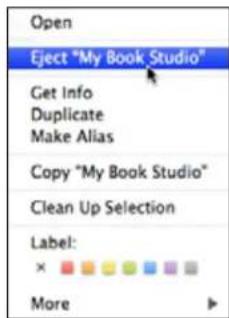
You might hear the drive power down.
- Wait for the drive icon to disappear from the desktop before disconnecting the drive.
Restoring the WD Software and Disk Image
In addition to deleting all of the data on your drive, erasing or reformatting it also removes the WD Security and WD Drive Utilities software and all of the support files, utilities, and user manual files.
If you ever need to remove and reinstall the WD software on your computer, or move the drive to another computer and install the software there, you will need to restore the WD software and disk image on your drive. To do this, after you have erased or reformatted the drive, go to http://support.wdc.com and see Knowledge Base answer ID 7.
Using the Drive with Windows
The My Book drive is formatted as a single HFS+J partition for compatibility with Mac OS X operating systems. To use the drive on Windows computers, you must reformat it to a single NTFS partition.
This chapter includes the following topics:
Reformatting the Drive
Restoring the WD Software and Disk Image
Reformatting the Drive
CAUTION! Reformatting the drive erases all its contents. If you have already saved files on the drive, be sure to back them up before reformatting it.
Go to http://support.wdc.com and refer to Knowledge Base answer ID 3865 for information about reformatting the drive.
See "Troubleshooting" on page 28 for more information about reformatting a drive.
Restoring the WD Software and Disk Image
After you have reformatted your My Book drive for use on Windows computers, go to http://support.wdc.com and see Knowledge Base answer ID 7 for information about downloading and restoring the Windows versions of the WD Drive Utilities and WD Security software and disk image on your My Book drive.
Troubleshooting
This chapter includes the following topics:
Installing, Partitioning, and Formatting the Drive Frequently Asked Questions
If you have problems installing or using this product, refer to this troubleshooting section or visit our support Web site at http://support.wdc.com and search our knowledge base for more help.
Installing, Partitioning, and Formatting the Drive
How to Answer ID
■ Partition, and format a WD drive on Windows (7, 8, Vista, XP, 2000) and Mac OSX 3865
■ Reformat from Mac GPT to Windows XP NTFS 3645
■ Reformat the drive from Mac GPT to Windows 7, 8, or Vista NTFS format 3647
■ Obtain and reinstall the original software included with this product 1425
■ Format a WD hard drive in FAT32* (for use in both Windows and MAC OSX) 291
*The FAT32 file system has a maximum individual file size of 4 GB and cannot create partitions larger than 32 GB in Windows. To create partitions larger than 32 GB in FAT32 when reformatting the drive, download the External USB/FireWire FAT32 Formatting Utility from http://support.wdc.com/product/download.
Windows users can avoid these size limitation by formatting the drive to NTFS using either the Windows Disk Management utility or similar third-party software. For further details, see:
• Answer ID 291 at http://support.wdc.com
• Article IDs 314463 and 184006 at support.microsoft.com
- The appropriate third-party software documentation or support organization
Frequently Asked Questions
Q: Why is the drive not recognized under My Computer or on the computer desktop?
A: If your system has a USB 3.0 or USB 2.0 PCI adapter card, be sure that its drivers are installed before connecting your WD USB 3.0 external storage product. The drive is not recognized correctly unless USB 3.0 or USB 2.0 root hub and host controller drivers are installed. Contact the adapter card manufacturer for installation procedures.
Q: Why won't my computer boot when I connect my USB drive to the computer before booting?
A: Depending on your system configuration, your computer might try to boot from your WD external USB drive. Refer to your system's motherboard BIOS setting documentation to disable this feature or visit http://support.wdc.com and see Knowledge Base answer ID 1201. For more information about booting from external drives, refer to your system documentation or contact your system manufacturer.
Q: Why is the data transfer rate slow?
A: Your system may be operating at USB 1.1 speeds due to an incorrect driver installation of the USB 3.0 or USB 2.0 adapter card or a system that does not support USB 3.0 or USB 2.0.
Q: How do I determine whether or not my system supports USB 3.0 or USB 2.0?
A: Refer to your USB card documentation or contact your USB card manufacturer.
Note: If your USB 3.0 or USB 2.0 controller is built in to the system motherboard, be sure to install the appropriate chipset support for your motherboard. Refer to your motherboard or system manual for more information.
Q: What happens when a USB 3.0 or USB 2.0 device is plugged into a USB 1.1 port or hub?
A: USB 3.0 and USB 2.0 are backward-compatible with USB 1.1. When connected to a USB 1.1 port or hub, a USB 3.0 or USB 2.0 device operates at the USB 1.1 full speed of up to 12 Mbps.
If your system includes a PCI Express slot, you can achieve USB transfer rates by installing a PCI Express adapter card. Contact the card manufacturer for installation procedures and more information.
Compliance and Warranty Information
This appendix includes the following topics:
Regulatory Compliance
Environmental Compliance (China)
Warranty Information (All Regions Except Australia/New Zealand)
Warranty Information (Australia/New Zealand)
GNU General Public License ("GPL")
Regulatory Compliance
FCC Class B Information
This device has been tested and found to comply with the limits of a Class B digital device, pursuant to Part 15 of the FCC Rules. These limits are designed to provide reasonable protection against harmful interference in a residential installation. This unit generates, uses, and can radiate radio frequency energy and, if not installed and used in accordance with the instructions, may cause harmful interference to radio or television reception. However, there is no guarantee that interference will not occur in a particular installation. Any changes or modifications not expressly approved by WD could void the user's authority to operate this equipment.
ICES/NMB-003 Compliance
This device complies with Canadian ICES-003 Class B.
Safety Compliance
Approved for US and Canada. CAN/CSA-C22.2 No. 60950-1, UL 60950-1: Safety of Information Technology Equipment.
This product is intended to be supplied by a listed limited power source, double insulated, or direct plug-in power unit marked “Class 2.”
CE Compliance for Europe
Marking by the CE symbol indicates compliance of this system to the applicable Council Directives of the European Union, including the EMC Directive (2004/108/EC) and the Low Voltage Directive (2006/95/EC). A “Declaration of Conformity” in accordance with the applicable directives has been made and is on file at Western Digital Europe.
GS Mark (Germany only)
KC Notice (Republic of Korea only)
Environmental Compliance (China)
Warranty Information (All Regions Except Australia/New Zealand)
Obtaining Service
WD values your business and always attempts to provide you the very best of service. If this Product requires maintenance, either contact the dealer from whom you originally purchased the Product or visit our product support website at http://support.wdc.com/warranty/policy.asp for information on how to obtain service or a Return Material Authorization (RMA). If it is determined that the Product may be defective, you will be given an RMA number and instructions for Product return. An unauthorized return (i.e., one for which an RMA number has not been issued) will be returned to you at your expense. Authorized returns must be shipped in an approved shipping container, prepaid and insured, to the address provided on your return paperwork. Your original box and packaging materials should be kept for storing or shipping your WD product. To conclusively establish the period of warranty, check the warranty expiration (serial number required) via http://support.wdc.com/warranty/policy.asp. WD shall have no liability for lost data regardless of the cause, recovery of lost data, or data contained in any Product placed in its possession.
Limited Warranty
WD warrants that the Product, in the course of its normal use, will for the term defined below, be free from defects in material and workmanship and will conform to WD's specification therefor. The term of your limited warranty depends on the country in which your Product was purchased. The term of your limited warranty is for 3 years in the North, South and Central America region, 3 years in the Europe, the Middle East and Africa region, and 3 years in the Asia Pacific region, unless otherwise required by law. The term of your limited warranty period shall commence on the purchase date appearing on your purchase receipt. WD shall have no liability for any Product returned if WD determines that the Product was stolen from WD or that the asserted defect a) is not present, b) cannot reasonably be rectified because of damage occurring before WD receives the Product, or c) is attributable to misuse, improper installation, alteration (including removing or obliterating labels and opening or removing external enclosures, unless the product is on the list of limited user-serviceable products and the specific alteration is within the scope of the applicable instructions, as found at http://support.wdc.com/warranty/policy.asp), accident or mishandling while in the possession of someone other than WD. Subject to the limitations specified above, your sole and exclusive warranty shall be, during the period of warranty specified above and at WD's option, the repair or replacement of the Product.
The foregoing limited warranty is WD's sole warranty and is applicable only to products sold as new. The remedies provided herein are in lieu of a) any and all other remedies and warranties, whether expressed, implied or statutory, including but not limited to, any implied warranty of merchantability or fitness for a particular purpose, and b) any and all obligations and liabilities of WD for damages including, but not limited to accidental, consequential, or special damages, or any financial loss, lost profits or expenses, or lost data arising out of or in connection with the purchase, use, or performance of the Product, even if WD has been advised of the possibility of such damages. In the United States, some states do not allow exclusion or limitations of incidental or consequential damages, so the limitations above may not apply to you. This warranty gives you specific legal rights, and you may also have other rights which vary from state to state.
Warranty Information (Australia/New Zealand)
Nothing in this warranty modifies or excludes your legal rights under the Australian Competition and Consumer Act or the New Zealand Consumer Guarantees Act. This warranty identifies WD's preferred approach to resolving warranty claims which is likely to be quick and simple for all parties.
No other warranties either express or implied by law, including but not limited to those contained in the Sale of Goods Act, are made with respect to the Product. If you purchased your Product in New Zealand for the purposes of a business, you acknowledge and agree that the New Zealand Consumer Guarantees Act does not apply. In Australia, our goods come with guarantees that cannot be excluded under the Australian Consumer Law. You are entitled to a replacement or refund for a major failure and compensation for any other reasonably foreseeable loss or damage. You are also entitled to have the goods repaired or replaced if goods fail to be of acceptable quality and the failure does not amount to a major failure. What constitutes a major failure is set out in the Australian Consumer Law.
Obtaining Service
WD values your business and always attempts to provide you the very best of service. Should you encounter any problem, please give us an opportunity to address it before returning this Product. Most technical support questions can be answered through our knowledge base or e-mail support service at http://support.wdc.com. If the answer is not available or, if you prefer, please contact WD at the applicable telephone number shown in the front of this document.
If you wish to make a claim, you should initially contact the dealer from whom you originally purchased the Product. If you are unable to contact the dealer from whom you originally purchased the Product, please visit our product support Web site at http://support.wdc.com for information on how to obtain service or a Return Material Authorization (RMA). If it is determined that the Product may be defective, you will be given an RMA number and instructions for Product return. An unauthorized return (i.e., one for which an RMA number has not been issued) will be returned to you at your expense. Authorized returns must be shipped in an approved shipping container, prepaid and insured, to the address provided with your RMA number. If following receipt of a qualifying claim under this warranty, WD or the dealer from whom you originally purchased the Product determines that your claim is valid, WD or such dealer shall, at its discretion, either repair or replace the Product with an equivalent or better Product or refund the cost of the Product to you. You are responsible for any expenses associated with a claim under this warranty. The benefits provided to you under this warranty are in addition to other rights and remedies available to you under the Australian Competition and Consumer Act or the New Zealand Consumer Guarantees Act.
Your original box and packaging materials should be kept for storing or shipping your WD product. To conclusively establish the period of warranty, check the warranty expiration (serial number required) via http://support.wdc.com.
Western Digital Technologies, Inc.
3355 Michelson Drive, Suite 100
Irvine, California 92612
E-mail: support@wdc.com
Warranty
WD warrants that the Product, in the course of its normal use, will for the term defined below, be free from defects in material and workmanship and will conform to WD's specifications. The term of your warranty is 3 year in Australia and New Zealand, unless otherwise required by law. The term of your warranty period shall commence on the purchase date appearing on your purchase receipt from an authorized distributor or authorized reseller. Proof of purchase shall be required to be eligible for this warranty and to establish the commencement date of this warranty. Warranty service will not be provided unless the Product is returned to an authorized distributor, authorized reseller or regional WD return center where the Product was first shipped by WD. WD may at its discretion make extended warranties available for purchase. WD shall have no liability for any Product returned if WD determines that the Product was (i) not purchased from an authorized distributor or authorized reseller, (ii) not used in accordance with WD specifications and instructions, (iii) not used for its intended function, or (iv) stolen from WD, or that the asserted defect a) is not present, b) cannot reasonably be rectified because of damage occurring before WD receives the Product, or c) is attributable to misuse, improper installation, alteration (including removing or obliterating labels and opening or removing external enclosures, including the mounting frame, unless the
product is on the list of limited user-serviceable products and the specific alteration is within the scope of the applicable instructions, as found at http://support.wdc.com), accident or mishandling while in the possession of someone other than WD.
PRODUCTS ARE COMPLEX AND FRAGILE ITEMS THAT MAY OCCASSIONALY FAIL DUE TO (A) EXTERNAL CAUSES, INCLUDING WITHOUT LIMITATION, MISHANDLING, EXPOSURE TO HEAT, COLD, AND HUMIDITY, AND POWER FAILURES, OR (B) INTERNAL FAULTS. SUCH FAILURES CAN RESULT IN THE LOSS, CORRUPTION, DELETION OR ALTERATION OF DATA. NOTE THAT YOU SHALL BE RESPONSIBLE FOR THE LOSS, CORRUPTION, DELETION OR ALTERATION OF DATA HOWSOEVER CAUSED, AND FOR BACKING UP AND PROTECTING DATA AGAINST LOSS, CORRUPTION, DELETION OR ALTERATION. YOU AGREE TO CONTINUALLY BACK UP ALL DATA ON THE PRODUCT, AND TO COMPLETE A BACKUP PRIOR TO SEEKING ANY GENERAL SERVICE AND TECHNICAL SUPPORT FROM WD.
In Australia, if the Product is not of a kind ordinarily acquired for personal, domestic or household use or consumption, provided it is fair and reasonable to do so, WD limits its liability to replacement of the Product or supply of equivalent or better Product.
This warranty shall extend to repaired or replaced Products for the balance of the applicable period of the original warranty or ninety (90) days from the date of shipment of a repaired or replaced Product, whichever is longer. This warranty is WD's sole manufacturer's warranty and is applicable only to Products sold as new.
GNU General Public License ("GPL")
Firmware incorporated into this product may include third party copyrighted software licensed under the GPL or Lesser General Public License (“LGPL”) (collectively, “GPL Software”) and not Western Digital’s End User License Agreement. In accordance with the GPL, if applicable: 1) the source code for the GPL Software may be downloaded at no charge from http://support.wdc.com/download/gpl or obtained on CD for a nominal charge from http://support.wdc.com/download/gpl or by calling Customer Support within three years of the date of purchase; 2) you may re-use, re-distribute, and modify the GPL Software; 3) with respect solely to the GPL Software, no warranty is provided, to the extent permitted by applicable law; and 4) a copy of the GPL is included herewith, may be obtained at http://www.gnu.org, and may also be found at http://support.wdc.com/download/gpl. Modification of or tampering with the Software, including but not limited to any Open Source Software, is solely at your own risk. Western Digital is not responsible for any such modification or tampering. Western Digital will not support any product in which you have or have attempted to modify the Software supplied by Western Digital.
Index
A
Accessories, optional 2
B
Box contents 2
C
CAUTION
about erasing the drive 22
about lost passwords 13
about preventing data loss when dis- connecting 27
about your unlocked drive 14, 17
China RoHS compliance 32
Compatibility with operating systems 2
Compliance, regulatory 31
Connecting the drive 5
Converting drive format 29
Creating a password 13
D
Disconnecting the drive 27
Disk image, downloading and restoring 27, 28
Drive
connecting 5
diagnostics and status checks 20
erase 22
handling precautions 4
sleep timer 21
Drive settings
drive erase 20, 22
registration 20, 25
security 13
sleep timer 20, 21
E
Environmental compliance, China 32
Erase Drive dialog 22
Erasing the drive 22
CAUTION about erasing the drive 22
F
FCC information, class B 31
Front and back views 3
Full media scan 20
G
GNU General Public License 35
H
Handling precautions 4
Hardware 2
K
KC notice (Republic of Korea) 32
Kensington security slot 4
Kit contents 2
L
Limited warranty information 33
N
NTFS format 3
0
Obtaining service 32, 34
Online support, accessing ii
Operating system compatibility 2
Operating system requirements 2
P
Password protecting your drive 13
CAUTION about lost passwords 13
Physical description 3
Precautions for handling the drive 4
Product features 1
Product registration 4
Q
Quick drive test 20
R
Reformatting the drive 28, 29
Register Drive dialog 26
Registering your drive 25
Registration drive setting 20
Registration, online 4
Regulatory compliance 31
Requirements, operating systems 2
Restoring the software disk image27, 28
RoHS compliance 32
Run Diagnostics dialog 21
S
Safety compliance 31
Set
sleep timer dialog 21
Setting the drive sleep timer 21
Sleep timer drive setting 20
SMART status check 20
Settings
See Drive Settings
System compatibility 2
T
Technical support, contacting ii
U
Unlocking the drive 14
from the virtual CD 16
with the WD Security software 15
without the WD Security software 16
USB drive interface 3
W
Warranty information 32, 33, 34
WD service 32, 34
WD technical support, contacting ii
Information furnished by WD is believed to be accurate and reliable; however, no responsibility is assumed by WD for its use nor for any infringement of patents or other rights of third parties which may result from its use. No license is granted by implication or otherwise under any patent or patent rights of WD. WD reserves the right to change specifications at any time without notice.
Western Digital, WD, the WD logo, and My Book are registered trademarks and My Book Studio and Data Lifeguard are trademarks of Western Digital Technologies, Inc. Apple, Mac, OS X, and Time Machine are trademarks of Apple, Inc., registered in the U.S. and other countries. Other marks may be mentioned herein that belong to other companies.
© 2012 Western Digital Technologies, Inc. All rights reserved.
Western Digital
3355 Michelson Drive, Suite 100
Irvine, California 92612 U.S.A. 4779-705087-A00 Oct 2012
- WD Service and Support
- Accessing Online Support
- Contacting WD Technical Support
- North America Asia Pacific
- Table of Contents
- About Your WD Drive .... 1
- Connecting the Drive and Getting Started 5
- Locking and Unlocking the Drive 13
- Managing and Customizing the Drive 19
- Using the Drive with Windows 28
- Troubleshooting 29
- A Compliance and Warranty Information.... 31
- Index....36
- About Your WD Drive
- Features
- Kit Contents
- Optional Accessories
- Operating System Compatibility
- Mac OS X Windows
- Disk Drive Format
- Physical Description
- Power/Activity LED
- USB 3.0 Interface
- Kensington® Security Slot
- Registering the Drive
- Handling Precautions
- 2
- Connecting the Drive and Getting Started
- Connecting the Drive
- Enhancing Performance with WD +TURBO
- Installing the WD Security Software
- Installing the WD Drive Utilities Software
- Locking and Unlocking the Drive
- Password Protecting the Drive
- Unlocking the Drive
- Unlocking the Drive with the WD Security or WD Drive Utilities Software
- Unlocking the Drive with the WD Drive Unlock Utility
- Changing Your Password
- Turning Off the Drive Lock Feature
- 4
- Managing and Customizing the Drive
- Checking Drive Health
- Setting the Drive Sleep Timer
- Erasing the Drive
- Using the Drive Erase Function
- Using the WD Drive Unlock Utility
- Click Erase.
- Safely Dismounting the Drive
- Restoring the WD Software and Disk Image
- Using the Drive with Windows
- Reformatting the Drive
- Troubleshooting
- Installing, Partitioning, and Formatting the Drive
- How to Answer ID
- Frequently Asked Questions
- Compliance and Warranty Information
- Regulatory Compliance
- FCC Class B Information
- ICES/NMB-003 Compliance
- Safety Compliance
- CE Compliance for Europe
- GS Mark (Germany only)
- Warranty Information (All Regions Except Australia/New Zealand)
- Obtaining Service
- Limited Warranty
- Warranty Information (Australia/New Zealand)
- Warranty
- GNU General Public License ("GPL")
- Index
- A
- B
- C
- D
- E
- F
- G
- H
- K
- L
- N
- 0
- P
- Q
- R
- S
- T
- U
- W
Brand : WESTERN DIGITAL
Model : My Book Studio WDBCPZ0040HAL
Category : External hard drive