ZRB291W - Refrigerator Zanussi-Electrolux - Free user manual and instructions
Find the device manual for free ZRB291W Zanussi-Electrolux in PDF.


| Product Type | Refrigerator with freezer compartment |
| Brand | Zanussi-Electrolux |
| Model | ZRB291W |
| Net Capacity - Refrigerator | 208 L |
| Net Capacity - Freezer | 61 L |
| Total Net Capacity | 269 L |
| Energy Class | A |
| Energy Consumption | 0.843 kWh/24h, 307 kWh/year |
| Freezing Capacity | 4 kg/24h |
| Climate Class | SN, N, ST (10-38°C) |
| Dimensions (W x H x D) | 595 x 1540 x 632 mm |
| Weight | 59 kg |
| Electrical Supply | 230-240 V, 0.7 A, 13 A fuse |
| Refrigerant | Isobutane (R600a) |
| Compressor | 1 |
| Defrost - Refrigerator | Automatic |
| Defrost - Freezer | Manual (plastic scraper provided) |
| Light Bulb | 25 W, E14 screw (T25, 230-240 V) |
| Shelves | Glass shelves, variable positioning |
| Door Reversibility | Yes, left/right |
| Noise Level | Normal operation sounds (compressor, circulation) |
Frequently Asked Questions - ZRB291W Zanussi-Electrolux
User questions about ZRB291W Zanussi-Electrolux
0 question about this device. Answer the ones you know or ask your own.
Ask a new question about this device
Download the instructions for your Refrigerator in PDF format for free! Find your manual ZRB291W - Zanussi-Electrolux and take your electronic device back in hand. On this page are published all the documents necessary for the use of your device. ZRB291W by Zanussi-Electrolux.
USER MANUAL ZRB291W Zanussi-Electrolux
This instruction book contains safety precautions, information on use and helpful hints and tips.
To ensure you use this appliance effectively and safely, please read this instruction book carefully before installing or using it and retain for future reference.
The symbols below help you to find things more easily:

Safety precautions
Warnings and Safety information

Hints, useful information

Environmental information

The symbol on the product or on its packaging indicates that this product may not be treated as household waste. Instead it shall be handed over to the applicable collection point for the recycling of electrical and electronic equipment. By ensuring this product is disposed of correctly, you will help prevent potential negative consequences for the environment and human health, which could otherwise be caused by inappropriate waste handling of this product. For more detailed information about recycling of this product, please contact your local city office, your household waste disposal service or the shop where you purchased the product.
IMPORTANT SAFETY INSTRUCTIONS
These warnings are provided in the interests of your safety. Ensure that you understand them all before installing or using this appliance. Your safety is of paramount importance. If you are unsure about any of the meanings or these warnings contact the Customer Care Department.
Prior to installation
- Check the appliance for transport damage. Under no circumstances should a damaged appliance be installed. In the event of damage please contact your retailer.
Installation
- This appliance is heavy. Care should be taken when moving it.
- It is dangerous to alter the specifications or attempt to modify this product in any way.
- Ensure that the appliance does not stand on the electrical supply cable. If the supply cable is damaged, it must be replaced by a cable available from your local Service Force Centre.
- Make sure that the power plug has not been squashed or damaged during transit.
- A damaged power plug may overheat and cause a fire.
- As you unpack the appliance, check carefully for any signs of transit damage.
- Do not place heavy articles or the fridge/freezer itself on the power cord.
- There is a risk of a short circuit and fire.
- Do not remove the power cord by pulling on its lead, particularly when the fridge/freezer is being pulled out of its niche.
- Damage to the cord may cause a short-circuit, fire and/or electric shock.
- If the power cord is damaged, it must be replaced by a certified service agent or qualified service personnel.
- If the power plug socket is loose, do not insert the power plug.
- There is a risk of electric shock or fire.
- Any electrical work required to install this appliance should be carried out by a qualified electrician or competent person.
- Parts which heat up should not be exposed. Whenever possible, the back of the appliance should be close to a wall, but leaving the required distance for ventilation, as stated in the installation instructions.
- The appliance should be left for 2 hours after installation before it is turned on, in order to allow the refrigerant to settle.
Child Safety
- Do not allow children to tamper with the controls or play with the product.
- Keep packaging materials away from children to prevent the risk of suffocation!
Safety precautions for isobutane
Warning
- The refrigerant isobutane (R 600a) is contained within the refrigerant circuit of the appliance, a natural gas with a high level of environmental compatibility, which is nevertheless flammable.
- Keep ventilation openings, in the appliance enclosure or in the built-in structure, clear of obstruction.
-
Do not use mechanical devices or other means to accelerate the defrosting process, other than those recommended by the manufacturer.
-
Do not damage the refrigerant circuit.
- Do not use electrical appliances inside the food storage compartments of the appliance.
During Use
- This appliance is designed for domestic use only, specifically for the storage of edible foodstuffs. It is not intended for commercial or industrial use.
- Containers with flammable gases or liquids can leak at low temperatures. Do not store any containers with flammable materials, such as spray cans, fire extinguisher refill cartridges etc. in the appliance.
- Frozen food should not be refrozen once it has thawed out.
- Do not place carbonated or fizzy drinks in the freezer compartment.
- Ice lollies can cause 'frost/freezer burns' if consumed straight from the freezer.
- Do not remove items from the freezer compartment if your hands are damp/wet, as this could cause skin abrasions or frost/freezer burns.
- Bottles and cans must not be placed in the freezer compartment they can burst when the contents freeze.
- Manufacturers' recommended storage times should be adhered to. Refer to relevant instructions.
Maintenance and Cleaning
- Before cleaning, always switch off the appliance and disconnect from the electrical supply.
- When unplugging always pull the plug from the mains socket, do not pull on the cable.
Servicing
- This product should be serviced by an authorised engineer and only genuine spare parts should be used.
- Under no circumstances should you attempt to repair the appliance yourself. Repairs carried out by inexperienced persons may cause injury or serious malfunctioning. Contact your local Service Force Centre.
At the end of the Appliance Life
- When disposing of your appliance use an authorised disposal site.
- Remove the plug and ensure that any locks or catches are removed, to prevent young children being trapped inside.

The Appliance and the Environment
This appliance does not contain gases which could damage the ozone layer.
Avoid damaging the cooling unit.
The packaging used on this appliance marked with the

symbol is recyclable.
Keep this instruction book for future reference and ensure it is passed on to any new owner.
CONTENTS
Instructions for the User
Important Safety Instructions 3
General Information 5
Description of the appliance, main parts 5
Handling the appliance 6
Putting it into use 6
Controlling the temperature, setting 6
How to use the refrigerator 6
Storing in the refrigerator 7
Storage time and temperature of foods 7
How to use the freezer 7
Freezing 7
Storing in the freezer 8
Removal of freezing baskets from the freezer 8
How to make ice cubes 8
Some useful information and advice 9
Hints and ideas 9
How to save energy 9
The appliance and environment 9
Maintenance 10
Defrosting 10
Regular cleaning 11
When the refrigerator is not in use 11
Trouble shooting 12
How to change the bulb 12
If something does not work 12
Service and Spare Parts 14
Customer Care Department 14
Guarantee Conditions 15
Instructions for the Installer
Technical data 16
Installing the appliance 16
Transportation, unpacking 16
Cleaning 16
Placement 17
Removal of glass shelf blockers from the product 18
Change of door opening direction 18
Electrical connection 20
Storage time chart 21
INSTRUCTIONS FOR THE USER
General information
This appliance is designed for the storage of refrigerated and frozen food in a domestic environment.
To ensure correct operation, the appliance should be located where the ambient temperature is between 10-32 °C.
Description of the appliance, main parts

A - Refrigerator
B - Freezer
- Top
- Lighting box
- Glass shelves
- Cooling surface
- Defrost water drain
- Glass shelf
- Vegetable boxes
- Data label
- Freezing compartment
- Storing compartment(s)
- Defrost water outlet
- Adjustable feet
-
Butter compartment lid
-
Egg tray
- Door shelf
- Door gasket
- Bottle shelf
- Handles
- Ice tray
- Condenser
- Defrost water outlet tube
- Spacer
- Evaporator tray
- Compressor
- Rollers
Handling the appliance
Putting it into use
Place the accessories into the appliance then plug to the mains socket.
The thermostat knob is on the light box in the refrigerator. You can switch the appliance on and set the temperature with it by turning the knob clockwise.
The next paragraph will give instructions for setting.
Controlling the temperature, setting
The thermostat interrupts the operation of the appliance automatically for more or less time depending on the setting then restarts it assuring the required temperature.
The closer it is set to maximum position the more intensive the refrigerating will be. When the thermostat knob is set to a medium position (between minimum and maximum), in the freezing compartment -18 °C, in the fresh food compartment +5 °C can be reached. Setting it to a medium position is adequate for everyday use.
The temperature coming about in the refrigerator is effected by not only the position of the thermostat but the ambient temperature, frequency of door openings and the quantity of food put into it newly, etc.
In the maximum position - in case of increased demand e.g. during heatwaves - the compressor may operate continually. This does not cause damages to the appliance.
How to use the refrigerator
For adequate cooling developing interior air circulation is necessary. For this reason you are asked not to cover the air circulation gaps behind the shelves (e.g. with tray etc.).
Do not put hot food into the refrigerator. Allow it to reach room temperature naturally. In this way the unnecessary frost building up can be avoided.
Foods can take over odours from each other. So it is essential to put foods in closed dishes or wrap them in cellophane, aluminium foil, grease-proof paper or cling film before placing them into the refrigerator. This way foods will keep their moisture e.g. vegetables will not dry out after some days.

Storing in the refrigerator
When placing the different kinds of food take into consideration the sketch below in figure:
- Confectionery, ready-cooked foods, foods in dishes, fresh meat, cold cuts, drinks
- Milk, dairy products, foods in dishes
- Fruits, vegetables, salads
- Cheese, butter
- Eggs
- Yoghurt, sour cream
- Small bottles, soft drinks
- Big bottles, drinks

Storage time and temperature of foods
The storage time chart at the end of the instruction book gives information about storage time.
The storage time can not be determined exactly in advance, as it depends on the freshness and handling of the cooled food. That is why the storage time made known is only informative.
If you do not want to use up deep-frozen foods bought immediately they can be stored for about 1 day (until dissolving) in the refrigerator.
How to use the freezer
Freezing
The appliance can be used to freeze fresh food of quantity specified on the data label. Freezing different products should always be done after proper preparing as follows.
Set the thermostat knob to a medium position.
Put the previously frozen food - or some of it - to another basket or baskets. Put the fresh food into the upper basket, leaving enough space for airflow. If there is some previously frozen food left in the upper basket, put this food into the back of the basket avoiding the contact between the fresh food and the already frozen food.
Run the appliance this way for 24 hours.
After 24 hours set the thermostat knob according to your choice or leave it in a medium position, which is in general appropriate for everyday cooling needs.
Setting the thermostat knob to a higher (e.g. maximum) position is not recommended. Although doing so would make the freezing time shorter, on the other hand the temperature of the fridge compartment may go permanently below 0°C, what yields freezing the food and drinks stored there.
i Never freeze food in bigger quantity than given in the 'Technical data' at the same
time, otherwise freezing will not be thorough and after dissolving various deterioration may take place (losing taste and aroma, lysing, etc.).
Do not make ice during freezing preferably, because making ice reduces freezing capacity.
Storing in the freezer
It is practical to replace frozen products into the basket(s) after freezing has finished. Doing this you could make room in the freezing compartment for another freezing. Intermediate freezing does not deteriorate foods already stored.
In large quantities of food are to be stored, remove the baskets except the lowermost one from appliance and place food on the cooling surface.
Do not forget to keep to the storage time given on the packaging of frozen products if you buy them frozen. To store home-frozen products see the storing instructions placed in the door of the freezer. Symbols signify the various foods, numbers mean maximum storing time given in months.
It is safe to store quick-frozen, frozen foods only if they have not dissolved even for a short time until placing them into the freezer. If the deep-frozen food has already dissolved, refreezing is not recommended, it has to be used up as soon as possible.
Removal of freezing baskets from the freezer
The freezing baskets have a limit stop to prevent their accidental removal or falling out. At the time of its removal from the freezer, pull the basket towards yourself and, upon reaching the end point, remove the basket by tilting its front upwards.
At the time of putting it back, slightly lift the front of the basket to insert it into the freezer. Once you are over the end points, push the baskets back in their position.
How to make ice cubes
To make ice cubes fill the enclosed ice cube tray with water and put it to the frozen food compartment. Wetting the bottom of the tray and setting thermostatic control knob to maximum position can shorten preparing time. After finishing do not forget to reset the thermostatic control to the suitable position.
Ready ice cubes can be taken out of the tray under running water then twist or hit it. If the ice tray freezes to the compartment, avoid using metal tools or knife to take it out as the cooling system can be damaged.

i Some useful information and advice
- The variable shelves are worth paying attention to, which increases the usability of the fresh food compartment considerably. Rearranging the shelves is also possible when the door is open at an angle of 90°.
- After opening and closing the door of freezer vacuum will rise inside the appliance because of the low temperature. So wait 2-3 minutes after closing the door - if you want to open it again - while inner pressure equalises.
- Take care of operating the freezer at a position of thermostatic control so that the inside temperature can never go above -18 °C, since temperature higher than this can deteriorate frozen foods.
- It is practical to make sure of faultless operation of the appliance daily so as to notice possible failure in time and prevent deterioration of frozen foods.
Hints and ideas
In this chapter practical hints and ideas are given about how to use the appliance to reach maximum energy saving and there is environmental information about the appliance as well.
How to save energy
- Avoid putting the appliance in a sunny place and near anything that gives off heat.
- Be sure that the condenser and the compressor are well ventilated. Do not cover the sections where ventilation is.
- Wrap products in tightly closing dishes or cling film to avoid building up unnecessary frost.
- Do not leave the door open longer than necessary and avoid unnecessary openings.
- Put warm foods into the appliance only when they are at room temperature.
- Keep the condenser clean.
The appliance and environment
This appliance does not contain gases which could damage the ozone layer, in either its refrigerant circuit or insulation materials. The appliance shall not be discarded together with the urban refuse and rubbish. Avoid damaging the cooling unit, especially at the rear near the heat exchanger. Information on your local disposal sites may be obtained from your municipal authorities.
The materials used on this appliance marked with the symbol 📋 are recyclable.
Maintenance
Defrosting
Bleeding part of the moisture of cooling chambers in form of frost and ice goes with the operation of the appliance.
Thick frost and ice has an insulating effect, so it reduces cooling efficiency as the temperature increases in the cooling chambers, they need more energy.
At this type of appliance defrosting the cooling surface of the refrigerator is automatic without any external intervention. The thermostatic control interrupts the operation of compressor at regular intervals for more or less time - during this cooling is interrupted - the temperature of the cooling surface goes above 0 °C due to interior heating load of the compartment, so defrosting occurs. When the surface temperature of the cooling surface has reached +3 - +4 °C the thermostatic control restarts operation of the system.
Melting water flows through defrost water outlet leaded through the back into the evaporator tray maintained on the top of compressor and evaporates due to its warmth.
Check and clean the outlet of melting water coming during defrosting regularly - a label inside the appliance warns you for this. If it is clogged the melting water gathered can cause earlier failure as it can go to the insulating of the appliance.
Clean the melting water outlet with the supplied pipe scraper that can be seen in the figure. The pipe scraper has to be stored in the outlet.
The most typical case of clogging up in the melting water outlet when you put food wrapped in some paper into the appliance and this paper contacts back plate of the refrigerator and freezes to it. If you remove the food right at this moment the paper will tear and it can cause clogging up in the outlet by getting into it. So you are asked to be careful - because of the above - when placing foods wrapped in paper into the appliance.
In case of increased demand e.g. during heatwaves, the refrigerator temporarily happens to operate constantly - during this the automatic defrosting does not work.
Remaining small ice and frost stains on back plate of the refrigerator after defrosting period is not abnormal.
The freezer can not be equipped with automatic defrosting set since the deep-frozen and frozen foods do not endure melting temperature.
When small frost and ice occurs scrape off and remove frost and ice coating with the supplied plastic scraper.
When ice coating is so thick that it cannot be removed with the plastic scraper, the cooling gill have to be defrosted. Frequency of defrosting depends on usage

natural_image
Line drawing of a hand holding a tool inside a window frame, with no text or symbols present.(generally 2-3 times a year).
Take the frozen foods out of the appliance, and put them into a basket lined with paper or cloth. Store them in a possibly cool place or replace them into another refrigerator.
Pull out the mains plug from the mains socket, so both parts of the appliance are out of operation.
Open the doors of both parts of the appliance and clean the refrigerator according to 'Regular cleaning'. Maintain and clean the freezer as following:
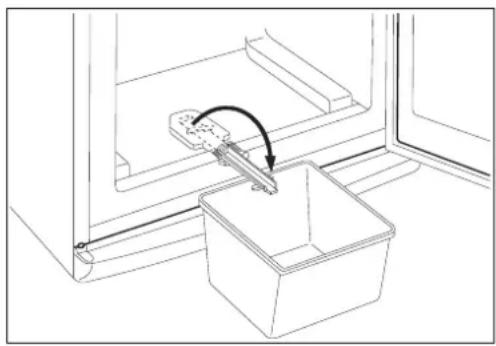
Sweep off the melting water with a cloth or sponge in direction of sides of the cooling plates. The melting water swept down gathers in the outlet channel practically formed in the bottom of the appliance and can be removed according to figure.
Put an adequately high bowl or dish under the outlet.
The bowl in figure is not a piece of accessories to the appliance!
Wipe the surfaces after defrosting and leading the water out.
Put the mains plug into the mains socket and put foods taken out back to their places.
It is recommended to operate the appliance at the highest position of the thermostatic control for some hours so that it can reach the sufficient storing temperature as soon as possible.
Regular cleaning
It is recommended to wash the inside of the refrigerator in 3-4 weeks time using lukewarm water then wipe it (it is practical to clean the inside of the freezer and defrost it at a time).
Household cleaner or soap must not be used.
After breaking the circuit wash the appliance with lukewarm water then wipe it. Clean the door gasket with clean water. After cleaning apply voltage to the appliance.
It is recommended to remove the dust and dirt collected on the back of the refrigerator and the condenser and to clean the evaporative tray on top of the compressor once or twice a year.
When the refrigerator
is not in use
In case the appliance will not be used for a long time follow these steps:
Break the circuit of the appliance.
Remove foods from the refrigerator.
Defrost and clean it as written before.
Leave the door open to avoid a build up of air inside.
natural_image
Line drawing of a door latch with a lever and bucket, no text or symbols presentTrouble shooting
How to change the bulb
Should the light fail to work you can change it as below:
Break the circuit of the appliance.
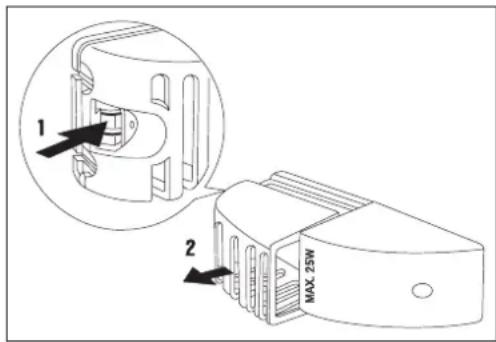
Press the rear hook (1) and at the same time slide the cover in the direction indicated by the arrow (2). So the bulb can be replaced. (Bulb type: T 25 230-240 V, 25 W, E 14 thread)
After changing the bulb replace the cover, snap it in place and apply voltage to the appliance.
If something does not work
During operation of the appliance some smaller but annoying trouble can often occur, which does not require calling a technician out. In the following chart information is given about them to avoid unnecessary charges on service.
We draw your attention that operation of appliance goes with certain sounds (compressor- and circulating sound). This is not trouble, but means normal operation.
We draw it to your attention again that the appliance operates discontinuously, so the stopping of compressor does not mean being no-current. That is why you must not touch the electrical parts of the appliance before breaking the circuit.
| Problem | Possible cause | Solution |
| It is too warm in the refrigerator. | Thermostatic control can be set wrongly.If products are not cold enough or placed wrongly.The door does not close tightly or it is not shut properly. | Set the thermostat knob to higher position.Place the products to the appropriate place.Check if the door closes well and the gasket is unhurt and clean. |
| It is too warm in the freezer. | Thermostatic control can be set wrongly.The door does not close tightly or it is not shut properly.Products in big quantity to be frozen were put in.Products to be frozen are placed too closely to each other. | Set the thermostat knob to higher position.Check if the door closes well and the gasket is unhurt and clean.Wait some hours and then check the temperature again.Place the products in a way so that cold air could circulate among them. |
| Water flows at the back plate of the refrigerator.Water flows into the chamber.Water flows onto the floor. | It is normal. During automatic defrosting frost melts on the back plate.The outlet of the chamber can be clogged up.Products placed in can prevent water from flowing into the collector.The melting water outlet flows not into the evaporative tray above the compressor. | Clean the outlet.Replace the products so that they can not touch the back plate directly.Put the melting water outlet to the evaporative tray. |
| There are too much frost and ice. | Products are not wrapped properly.Doors are not shut properly or do not close tightly.The thermostatic control can be set wrongly. | Wrap the products better.Check if the doors close well and the gaskets are undamaged and clean.Set the thermostat knob to a position that gives higher temperature. |
| The compressor operates continually. | The thermostatic control is set wrongly.Doors are not shut properly or do not close tightly.Products in big quantity to be frozen were put in.Too warm food was put in.The appliance is in too warm place. | Set the thermostat knob to a position that gives higher temperature.Check if the doors close well and the gaskets are unhurt and clean.Wait some hours and then check the temperature again.Put food at max. room temperature.Try to reduce the temperature in the room where the appliance stands. |
| The appliance does not work at all. Neither cooling, nor lighting works. | Plug is not connected to the mains socket properly.The fuse burnt out.The thermostatic control is not on.There is no voltage in the mains socket.(Try to connect another appliance into it.) | Connect the mains plug properly.Change the fuse.Start the appliance according to instructions in chapter 'Putting it into use'.Call an electrician. |
| The appliance is noisy. | The appliance is not supported properly. | Check if the appliance stands stable (all the four feet should be on the floor). |
Inasmuch as the advice does not lead to result, call the nearest brand-mark service.
Service and Spare Parts
In the event of your appliance requiring service, or if you wish to purchase spare parts, please contact your local Service Force Centre by telephoning:-
08705 929929
Your telephone call will be automatically routed to the Service Force Centre covering your post code area.
For the address of your local Service Force Centre and further information about Service Force, please visit the website at www.serviceforce.co.uk
Before calling out an engineer, please ensure you have read the details under the heading "Something Not Working."
When you contact the Service Force Centre you will need to give the following details:
- Your name, address and post code
- Your telephone number
- Clear and concise details of the fault
- The model and serial number of the appliance (found on the rating plate)
- The purchase date
Please note that a valid purchase receipt or guarantee documentation is required for in-guarantee service calls.
For Customer Service in Ireland please contact us at the adress below:
Zanussi - Electrolux Electrolux Group (Irl) Ltd Long Mile Road Doublin 12 Republic of Ireland
Tel: +353 (0)1 4090751
Email: service.eid@electrolux.ie
Customer Care Department
For general enquiries concerning your Zanussi - Electrolux appliance or for further information on Zanussi - Electrolux products, please contact our Customer Care Department by letter or telephone at the addresses below or visit our website at www.zanussi-electrolux.co.uk
Major Appliances - Customer Care Department
Zanussi - Electrolux
101 Oakley Road
Luton
Bedfordshire
LU4 9QQ
08705 727727 (*)
* calls to this number may be recorded for training purposes.
Guarantee Conditions
We Zanussi - Electrolux undertake that if within 12 months of the date of the purchase this ZANUSSI - ELECTROLUX appliance or any part thereof is proved to be defective by reason only of faulty workmanship or materials, the company will, at our option repair or replace the same FREE OF CHARGE for labour, materials or carriage on condition that:
- The appliance has been correctly installed and used only on the electrical supply stated on the rating plate.
- The appliance has been used for normal domestic purposes only, and in accordance with the manufacturer's instructions.
- The appliance has not been serviced, maintained, repaired, taken apart or tampered with by any person not authorised by us.
- All service work under this guarantee must be undertaken by a Service Force Centre.
- Any appliance or defective part replaced shall become the Company's property.
Home visits are made between 8.30am and 5.30pm Monday to Friday. Visits may be available outside these hours in which case a premium will be charged.
EXCLUSIONS
This Guarantee does not cover:
Damage or calls resulting from transportation, improper use or neglect, the replacement of any light bulbs or removable parts of glass or plastic.
- Costs incurred for calls to put right an appliance improperly installed or calls to appliances outside the United Kingdom.
- Appliances found to be in use within a commercial environment, plus those which are the subject of rental agreements.
- Products of Zanussi - Electrolux manufacture which are not marketed by Zanussi - Electrolux.
The guarantee is in addition to your statutory and legal rights.
EUROPEAN GUARANTEE
If you should move to another country within Europe then your guarantee moves with you to your new home subject to the following qualifications:
- The guarantee starts from the date you first purchased your product.
- The guarantee is for the same period and to the same extent for labour and parts as exists in the new country of use for this brand or range of products.
-
This guarantee relates to you and cannot be transferred to another user.
-
Your new home is within the European Community (EC) or European Free Trade Area.
- The product is installed and used in accordance with our instructions and is only used domestically, i.e. a normal household.
- The product is installed taking into account regulations in your new country.
Before you move please contact your nearest Customer Care Centre, listed below, to give them details of your new home. They will then ensure that the local Service Organisation is aware of your move and able to look after you and your appliances.
France Senlis +33 (0) 344 62 29 29
Germany Nurenberg +49 (0) 800 234 7378
Italy Pordenone +39 (0) 0434 39 4700
Sweden Stockholm +46 (0) 8 672 53 90
UK Luton +44 (0) 8705 727 727
Ireland Dublin +353 (0)1 4090751
Instructions for the Installer
Technical data
| Model | ZRB 291 W |
| Gross capacity (l) | Freezer: 211Refrigerator: 79 |
| Net capacity (l) | Freezer: 208Refrigerator: 61 |
| Width (mm) | 595 |
| Height (mm) | 1540 |
| Depth (mm) | 632 |
| Energy consumption (kWh/24h)(kWh/year) | 0,843,7 |
| Energy class, according to EU standards | A |
| Freezing capacity (kg/24h) | 4 |
| Rising time (h) | 20 |
| Rated current (A) | 0,7 |
| Weight (kg) | 59 |
| Number of compressors | 1 |
Installing the appliance
Transportation, unpacking
It is recommended to deliver the appliance in original packaging, in vertical position considering the protective warning on packaging.
After each transportation the appliance must not be switched on for approx. 2 hours.
Unpack the appliance and check if there are damages on it. Report possible damages immediately to the place you bought it. In that case retain packaging.
Cleaning
Remove every adhesive tape and everything else, which ensure the accessories not to move in the appliance.
Wash the inside of the appliance using lukewarm water and mild detergent. Use soft cloth.
After cleaning wipe out the inside of the appliance.
Placement
The ambient temperature has an effect on the energy consumption and proper operation of the appliance. When placing, take into consideration that it is practical to operate the appliance between ambient temperature limits according to the climate class that is given in the chart below and can be found in the data label.
| Class of climate Ambient temperature | |
| SN +10 ... +32 °C | |
| N +16 ... +32 °C | |
| ST +18 ... +38 °C |
If the ambient temperature goes below the lower data the temperature of the cooling compartment can go beyond the prescribed temperature.
If the ambient temperature goes beyond the upper data this means longer operating time of the compressor, breakdown in the automatic defrosting increasing temperature in the cooling compartment or increasing energy consumption.
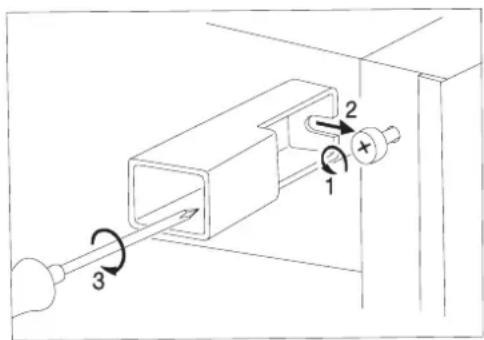
In the bag of the accessories there are two spacers which must be fitted in the two top corners.
Slacken the screws and insert the spacer under the screw head, the re-tighten the screws.
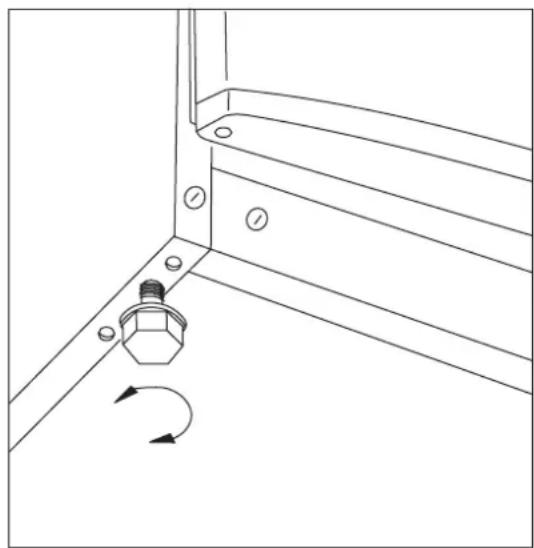
When placing the appliance ensure that it stands level. This can be achieved by two adjustable feet at the bottom in front.
Do not stand the appliance on a sunny place or close to a radiator or cooker.
If it is unavoidable because of furnishing and the appliance has to be stood near a cooker take these minimum distances into consideration:
- In case of gas or electric cooker 3 cm must be left, when it is less put a 0.5-1 cm non-flam insulation between the two appliances.
- In case of oil or coal-fired stove the distance must be 30 cms since they give off more heat.
The refrigerator is designed to operate when it is totally pushed to the wall.

When placing the refrigerator keep minimal distances recommended in figure.
A : placing it under a wall-cupboard
B : placing it freely
natural_image
Technical line drawing of a corner-mounted bracket with a bolt and rotation arrow (no text or symbols)
Removal of glass shelf blockers from the product
The glass shelf blockers are used to fix the shelves into position during product transport. These blockers will not be necessary for the further operation of the product.
Open the refrigerator door as wide as possible.
1 Slide the blocker tabs to the front of the shelf.
2 Lift the back of the shelf from its nest and then pull it towards yourself by tilting its front upwards/downwards.
3 Remove the blocker tabs.
Change of door opening direction
Should the setting-up place or handling demand it, door-opening direction can be refitted from right-handed to left-handed.
Appliances on the market are right-handed.
Following operations are to be done on the basis of figures and explanations:
- To perform the operations listed below it is recommended to ask another person for help who safely can keep the doors while performing the operations.
- Disconnect the appliance from the electricity supply.
- Open the doors and dismount the double door hinge (a, b) by removing the screws (2 pieces) (c). (fig.2)
- Take off the double door hinge (a, b, c) by gradually removing it from the cabinet, slightly tilting both doors. Do not forget to remove the plastic spacer (b) under the hinge. (fig.2)
- Take off the refrigerator door by pulling it slightly downwards.
• Take of the freezer door by pulling it slightly upwards. - Remove the plug on the upper side of the refrigerator door and put it to the other side.
- Remove the plug on the upper side of the freezer door and put it to the other side.
- Unscrew the top door hinge pin (d) of the refrigerator then screw it back on the other side. (fig.1)
- Remove the plugs (u) at the bottom of the appliance. (fig.3)
- Remove the lower hinge (e) by removing its screws (s) and mount it on the other side. (fig.3)
- Unmount the lower hinge pin (f) and its washer (h) and mount them into the other hole of the lower hinge. (fig.3)
- Replace the plugs (u) on the other side.
- Remove the covering nails (3 pieces) (n, k) of the double door holder on the left side and put them to the other side. (fig.2)
- Fit the pin of the double door hinge (m) into the left drill of the freezer door. (fig.2)
- Fit the freezer door to the lower door hinge pin (f). (fig.3)


fig. 1.

fig. 2.
- Fit the refrigerator door to the upper door hinge pin (d) then slightly tilting both doors fit the pin of the double door hinge (m) into the left drill of the refrigerator door.
- Opening both doors fix the double door hinge onto the left side using the screws (2 pieces) (c). Do not forget to replace the plastic spacer (b) under the hinge. Be careful that the door edges are parallel with the edge of the mantle.
- Put the appliance to its place, set it level, and apply voltage to it.
In case you do not want to perform the procedures above, call the nearest brand-mark service.
Technicians will accomplish the refitting expertly for charge.

fig. 3.
Electrical Connection

Any electrical work required to install this appliance should be carried out by a qualified electrician or competent person.
This appliance must be earthed.
The manufacturer declines any liability should these safety measures not be observed.
Electrical Requirements
Before switching on, make sure the electricity supply voltage is the same as that indicated on the appliance rating plate.
The appliance is supplied with a 13 amp plug fitted. In the event of having to change the fuse in the plug supplied, a 13 amp ASTA approved (BS 1362) fuse must be used. Should the plug need to be replaced for any reason. The wires in the mains lead are coloured in accordance with the following code:
Green and Yellow: Earth
Blue: Neutral
Brown: Live
The wire coloured green and yellow must be connected to the terminal marked with the letter „E“ or by the earth symbol of coloured green and yellow.
The wire coloured blue must be connected to the terminal „N“ or coloured black.
The wire coloured brown must be connected to the terminal marked „L“ or coloured red.
Upon completion there must be no cut, or stray strands of wire present and the cord clamp must be secure over the outer sheath.
Important!
The plug is must still be accessible after the appliance has been installed.
The appliance should not be connected to the electrical supply by means of an extension cable. In case that the electrical cable has to be replaced, please contact your local Service Force Centre.
Warning!
A cut off plug inserted into a 13 amp socket is a serious safety (shock) hazard. Ensure that it is disposed of safely.

This appliance complies with the following E.E.C. Directives:
- 73/23 EEC of 19.02.73 (Low Voltage Directive) and subsequent modifications,
- 89/336 EEC of 03.05.89 (Electromagnetic Compatibility Directive) and subsequent modifications.

Storage time chart
Time and method of storage of fresh foods in the refrigerator
| Foods Storage time in days Method of packaging | ||||||||
| Raw meat X X x x x cling film, airtight | ||||||||
| Cooked meat X X X x x x dish covered | ||||||||
| Roasted meat X X X x x dish covered | ||||||||
| Raw minced meat X dish covered | ||||||||
| Cooked minced meat X X x x dish covered | ||||||||
| Cold cuts X X x x cling film, cellophane, grease- | proof paper | |||||||
| Fresh fish X x x | cling film, airtight | |||||||
| Cooked fish | X | X | x x dish covered | |||||
| Tinned fish, open | X | x | x | dish covered | ||||
| Fresh chicken | X | X | X | x | x | x | cling film, airtight | |
| Fried chicken | X | X | X | x | x | x | dish covered | |
| Fresh duck, goose | X | X | X | x | x | x | cling film, airtight | |
| Roasted duck, goose | X | X | X | X | x | x | x | dish covered |
| Butter unopened | X | X | X | X | X | X | X | original packaging |
| Butter opened | X | X | x | x | x | x | x | original packaging |
| Milk | X | X | X | x x original packaging | ||||
| Cream | X | X | x x plastic box | |||||
| Sour cream | X | X | X | X | x | x | x | plastic box |
| Cheese (hard) | X | X | X | X | X | X | X | aluminium foil |
| Cheese (soft) | X | X | X | X | x | x | x | cling film |
| Egg | X | X | X | X | X | X | X | |
| Spinach, sorrel | X | X | x x cling film | |||||
| Green peas, green beans | X | X | X | X | x | x | x | cling film |
| Mushroom | X | X | x x x cling film | |||||
| Carrot | X | X | X | X | X | X | X | cling film |
| Tomato | X | X | X | X | X | X | X | cling film |
| Cabbage | X | X | X | X | X | x | x | cling film |
| Fruits (Strawberry, raspberry, etc.) | X | X | X | x | x | cling film | ||
| Tinned fruits opened | X | X | X | x | x | dish covered | ||
| Cakes filled with cream | X | X | x | x | dish covered | |||
Notation:
X recommended storage time
x maximum recommended storage time
© Electrolux plc 2006
ELECTROLUX HOME PRODUCTS OPERATIONS EUROPE

From the Electrolux Group. The world's No.1 choice.
The Electrolux Group is the world's largest producer of powered appliances for kitchen, cleaning and outdoor use. More than 55 million Electrolux Group products (such as refrigerators, cookers, washing machines, vacuum cleaners, chain saws and lawn mowers) are sold each year to a value of approx. USD 14 billion in more than 150 countries around the world.
- Safety precautions
- Environmental information
- IMPORTANT SAFETY INSTRUCTIONS
- Prior to installation
- Installation
- Child Safety
- Safety precautions for isobutane
- Warning
- During Use
- Maintenance and Cleaning
- Servicing
- At the end of the Appliance Life
- The Appliance and the Environment
- CONTENTS
- Instructions for the User
- Important Safety Instructions 3
- Handling the appliance 6
- Storage time and temperature of foods 7
- How to use the freezer 7
- Some useful information and advice 9
- Hints and ideas 9
- Maintenance 10
- Trouble shooting 12
- Instructions for the Installer
- Electrical connection 20
- General information
- Handling the appliance
- Putting it into use
- Controlling the temperature, setting
- How to use the refrigerator
- Storing in the refrigerator
- Storage time and temperature of foods
- How to use the freezer
- Freezing
- Storing in the freezer
- Removal of freezing baskets from the freezer
- How to make ice cubes
- i Some useful information and advice
- Hints and ideas
- How to save energy
- The appliance and environment
- Maintenance
- Defrosting
- Regular cleaning
- When the refrigerator
- is not in use
- Trouble shooting
- How to change the bulb
- If something does not work
- Service and Spare Parts
- 929929
- Customer Care Department
- Guarantee Conditions
- EXCLUSIONS
- This Guarantee does not cover:
- EUROPEAN GUARANTEE
- Installing the appliance
- Transportation, unpacking
- Cleaning
- Placement
- Removal of glass shelf blockers from the product
- Change of door opening direction
- Electrical Connection
- Electrical Requirements
- Warning!
- Storage time chart
- Notation:
Brand : Zanussi-Electrolux
Model : ZRB291W
Category : Refrigerator