ZECBFF/W - Refrigerator Zanussi-Electrolux - Free user manual and instructions
Find the device manual for free ZECBFF/W Zanussi-Electrolux in PDF.


| Product Type | Refrigerator with freezer (Fridge-Freezer) |
| Model | ZECBFF/W |
| Brand | Zanussi-Electrolux |
| Height | 1850 mm |
| Width | 595 mm |
| Depth | 670 mm |
| Power Supply | 220-240 V / 50 Hz |
| Total Power | 150 W |
| Energy Consumption | 372.3 kWh/year (1.02 kWh/day) |
| Freezing Capacity | 10 kg per 24 hours |
| Gross Capacity - Fridge | 205 litres |
| Gross Capacity - Freezer | 130 litres |
| Net Capacity - Fridge | 200 litres |
| Net Capacity - Freezer | 103 litres |
| Climate Class | SN, N, ST, T (ambient +10°C to +43°C) |
| Defrost Type | Frost-free (automatic) |
| Control Type | Electronic thermostat controls (separate for fridge and freezer) |
| Door Alarm | Audible and visual alarm if door left open |
| Temperature Alarm | Audible and visual alarm if internal temperature too high |
| Fast Freeze Function | Yes, activates 3 hours before freezing fresh food; auto-off after 36 hours |
| Door Reversible | Yes, instructions included |
| Adjustable Feet | Yes, 2 front feet for levelling |
| Light Bulb | 25W max, E14 screw thread, 220-240V |
| Service & Spare Parts | Contact local Service Force Centre (UK: 08705 929929) or visit www.serviceforce.co.uk |
| Guarantee | 12 months standard; European guarantee available |
Frequently Asked Questions - ZECBFF/W Zanussi-Electrolux
User questions about ZECBFF/W Zanussi-Electrolux
0 question about this device. Answer the ones you know or ask your own.
Ask a new question about this device
Download the instructions for your Refrigerator in PDF format for free! Find your manual ZECBFF/W - Zanussi-Electrolux and take your electronic device back in hand. On this page are published all the documents necessary for the use of your device. ZECBFF/W by Zanussi-Electrolux.
USER MANUAL ZECBFF/W Zanussi-Electrolux
Instructions for the User
Safety Instructions 2
Description of the Appliance 3
Control Panel 4
Using the Appliance 5
Before Use 5
Starting the Appliance 5
Freezer Compartment 5
Freezing Fresh Food 5
Frozen Food Storage 5
Refrigerator Compartment 5
Chill Compartment 5
Food Storage 6
Energy Saving Advice 6
In the Event of a Power Failure 6
Maintenance and Cleaning 7
Something Not Working 8
Normal Operating Sounds 9
Service & Spare Parts 9
Customer Care Department 9
Guarantee Conditions 10
Instructions for the Installer
Technical Specifications 11
Installation 12
Unpacking 12
Positioning 12
Ventilation 12
Levelling 12
Electrical Connection 13
Electrical Requirements 13
Door Reversal 14
Safety Instructions

These warnings are provided in the interests of your safety. Ensure that you understand them all before installing or using this appliance. If you are unsure of the meanings of these warnings contact the Customer Care Department.
Installation
- This appliance is heavy. Care should be taken when moving it.
- It is dangerous to alter the specifications or attempt to modify this product in any way.
- Ensure that the appliance does not stand on the electrical supply cable. If the supply cable is damaged, it must be replaced by a cable available from your local Service Force Centre.
- Any electrical work required to install this appliance should be carried out by a qualified electrician or competent person.
- Parts which heat up should not be exposed. Whenever possible, the back of the appliance should be close to a wall, but leaving the required distance for ventilation, as stated in the installation instructions.
- The appliance should be left for 2 hours after installation before it is turned on, in order to allow the refrigerant to settle.
Child Safety
- Do not allow children to tamper with the controls or play with the product.
- Keep all packaging material away from children.
During Use
- This appliance is designed for domestic use only, specifically for the storage of edible foodstuffs only. It is not intended for commercial or industrial use.
- Containers with flammable gases or liquids can leak at low temperatures. Do not store any containers with flammable materials, such as spray cans, fire extinguisher refill cartridges etc. in the refrigerator.
- Frozen food should not be refrozen once it has thawed out.
- Do not place carbonated or fizzy drinks in the freezer compartment.
- Ice lollies can cause frost/freezer burns if consumed straight from the freezer compartment.
-
Do not remove items from the freezer compartment if your hands are damp/wet, as this could cause skin abrasions or frost/freezer burns.
-
Bottles and cans must not be placed in the freezer compartment as they can burst as the contents freeze.
- Manufacturers recommended food storage times should be adhered to. Refer to the relevant instructions.
- Do not use electrical appliances inside the fridge / freezer.
Maintenance and Cleaning
- Before cleaning, always switch off the appliance and disconnect from the electrical supply.
- When unplugging always pull the plug from the mains socket, do not pull on the cable.
Servicing
- This product should be serviced by an authorised engineer and only genuine spare parts should be used.
- Under no circumstances should you attempt to repair the appliance yourself. Repairs carried out by inexperienced persons may cause injury or serious malfunction. Contact your local Zanussi Service Force Centre.
Disposing of Old Appliances
- Remove the doors to prevent small children being trapped in side. Cut off and dispose of the plug and cable.
- Use an authorised disposal site.
Keep this instruction book for future reference and ensure it is passed on to any new owner
Description of Appliance
The model shown here is ZX99/5W

Control Panel
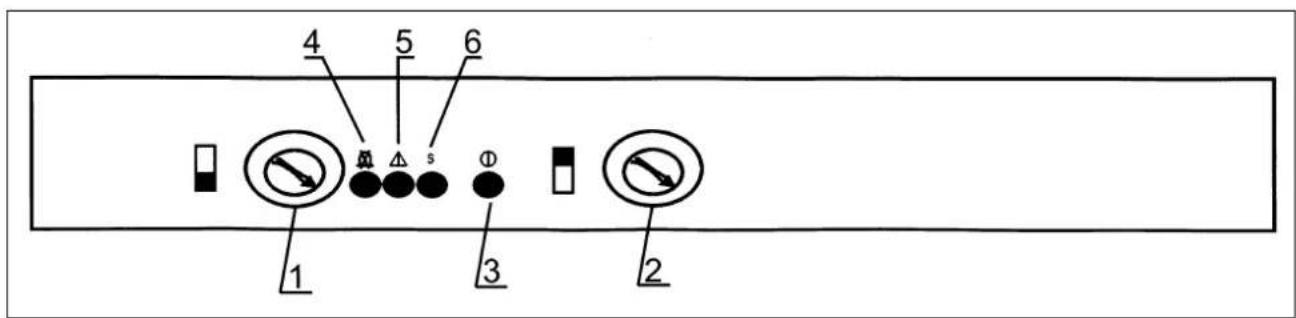
1 Freezer Temperature Control
2 Fridge Temperature Control
3 ON/OFF Button
4 Door Alarm
5 Temperature Alarm
6 Fast Freezer Button
Control Panel
The appliance controls are located in the top panel inside the refrigerator compartment.
Thermostat Control
The freezer and fridge thermostats control the temperature inside the freezer and refrigerator respectively.
1. The Freezer Temperature Control
The freezer temperature control, regulates the temperature within the freezer compartment. A change in the control setting in the freezer compartment could affect the temperature in the refrigerator compartment under certain circumstances.
7 Maximum coldness
1 Minimum coldness
An intermediate position is usually the most suitable, although the temperature will be affected by:
- Room temperature
• How often the door is opened
• How much food is stored - Position of the appliance
In determining the correct temperature control setting all these factors have to be considered and some experimentation may be necessary.
When altering the temperature settings, allow 24 hours for the temperature to stabilise before making further changes.
2. The Fridge Temperature Control
The fridge temperature control regulates the temperature within the fridge compartment, by regulating the cold airflow. An intermediate setting is usually the most suitable, although some experimentation may be necessary to obtain the correct temperature.
5 Maximum coldness
1 Minimum coldness
Standby
Turn the control knob to the standby position if you wish to switch off the fridge, but leave the freezer in operation (for example, when on holiday). Leave the doors shut when in Standby operation.
3. ON/OFF Button
To switch the appliance on or off, press the ON/OFF button continuously for 3 seconds. When the appliance is switched on, the ON/OFF button will illuminate.
4. The Door Alarm
If either of the doors are left open, the door alarm will sound and the alarm button will flash red. Press the alarm button to switch off the alarm, the light will stop flashing but will remain red. To switch off the alarm and the light shut the doors.
5. Temperature Alarm
If the internal temperature inside the appliance is too high for the safe storage of frozen food, an alarm will sound and the temperature alarm button light will start to flash. The temperature may rise for the following reasons:
• The doors have been left open
• There has been a power failure
- A large quantity of food has been added to the appliance.
- The thermostat controls may be incorrectly set.
- There is a fault.
To switch off the alarm, press the alarm button. The audible signal will stop. The light will stop flashing, but will remain on until the internal temperature has reached the correct storage temperature for frozen food.
6. Fast Freeze Button
Press the fast freeze button approximately 3 hours before freezing fresh food. Once the food is frozen, switch off the fast freeze function by pressing the fast freeze button. The fast freeze function will automatically switch off after 36 hours.
Using the Appliance

This appliance is designed for domestic use only, specifically for storage of edible foodstuffs.
This appliance is designed to operate in ambient temperatures (surrounding air temperature) between 10^ C ( 50^ F) and 32^ C ( 90^ F).
If these temperatures are exceeded i.e. colder or warmer, the appliance may not operate correctly.
Before Use
Remove all transit packaging.
Wash the inside of the appliance with lukewarm water with a little bicarbonate of soda added (5ml to 0.5 litre of water). Do not use soap or detergent as the smell may linger. Dry the appliance thoroughly.

Do not use detergents, abrasive powders, highly perfumed cleaning products, wax polishes or products containing alcohol.
Starting the Appliance
- Allow the appliance to stand for 2 hours after installation.
- Insert plug into mains socket. Within 20 seconds the electronics carry out a system test and switch the appliance on. The ON/OFF button lights up in green, the interior lighting comes on and the appliance starts working.
Starting up when the appliance is switched off:
Press the ON/OFF button continuously for 3 seconds. The appliance will start operating after a 4 minute delay and the internal light will switch on. The ON/OFF button will illuminate.
The temperature alarm (a beeping sound) may come on during the start up phase. If this happens push the temperature alarm button.
- Set the thermostat controls for the fridge and freezer compartments. See Control Panel section.
- To ensure safe food storage, allow the appliance to operate with the doors closed for at least 3 hours, before loading with food.
Freezer Compartment
The freezer will store frozen food at -18°C or colder allowing for long-term frozen food storage and freezing of fresh food.
Freezing Fresh Food
The maximum quantity of food that can be frozen in 24 hours is shown on the rating plate and in the technical specifications section of this instruction book.
When freezing fresh foods, press the fast freeze button 3 hours before placing the food into the freezer compartment.
When the food is frozen, switch off the fast freeze function. The fast freeze function automatically switch off after 36 hours..
The Temperature alarm may sound if a lot of new food is put into the freezer, due to a rise in temperature. The alarm will switch off automatically, as the freezer temperature drops. Push the alarm button to switch off the audible signal.
Frozen Food storage
The freezer will store frozen food at -18^ C or colder allowing for long term frozen food storage and freezing of fresh food.
Pre packed commercially frozen food should be stored in accordance with the manufacturers instructions for a 4 star frozen food compartment and should be put in the freezer as soon as possible after purchase. Your freezer provides for long-term storage which generally means up to 3 months but the length of the time can vary and it is important to follow the recommended times shown on packets of commercially frozen food.
Refrigerator Compartment
This compartment is designed to store drinks and fresh food. The inner temperature is normally uniform and is kept cool by cold circulating air. Try to avoid putting food products flush against the air vents at the back of the fridge as this could cause the foods to freeze.
Food Storage Energy Saving Advice
- Do not install the cabinet close to sources of heat, such as a cooker, dishwasher or radiator.
- Locate the appliance in a cool well-ventilated room and make sure that the air openings of the cabinet are not obstructed.
- Avoid unnecessary frosting in the cabinet by packing all foodstuffs into airtight packages before placing them in the freezer.
- Always leave warm food to cool down to room temperature before placing in the fridge or freezer.
- Food that is to be frozen (when cool) should be placed in the fridge before being transferred to the freezer.
- Do not put any hot food into the fridge or freezer.
- Thaw frozen food in the fridge. This will ensure safer defrosting of foods and reduce the work of the refrigeration unit.
- Try to avoid keeping the door open for long periods, or opening the door too frequently as warm air will enter the cabinet, and cause the compressor to switch on unnecessarily often.
- Ensure there are no obstructions preventing the door from closing properly.
- To obtain the best results from your appliance, neither hot foods nor liquids, which may evaporate should be placed in the larder compartment.
- Avoid buying frozen food if you cannot store it straight away. The use of an insulated container is advisable. When you arrive home place the frozen food in the freezer immediately.
- Keep the time between buying chilled food and placing it in your fridge as short as possible.
- Do not push food together too much; try to allow air to circulate around each item.
- Do not store food uncovered.
-
Wrap the food up properly or place it in airtight containers before putting it into the fridge freezer.
-
Ensure that food placed in the freezer is dated and labeled and used in date order to ensure that food is consumed at its best.
- Remove suspect food from your fridge freezer and clean, refer to 'Maintenance and Cleaning'.
- Do not put any newly introduced food for freezing near to already frozen food
- Food and drinks, which have a strong odor, may affect other foods and drinks if not stored correctly.
In the Event of a Power Failure
If there is a power failure during the storage of frozen foods, keep the door closed. If the temperature within your freezer should rise do not refreeze the food without checking its condition. The following guidelines should assist you.
Ice Cream: Once thawed should be discarded.
Fruit and Vegetables: If soft should be cooked and used up.
Bread and Cakes: Can be refrozen without danger.
Shellfish: Should be refrigerated and used up quickly.
Cooked Dishes: i.e. casseroles should be refrigerated and used up.
Large Pieces of Meat: Can be re-frozen providing there are ice crystals remaining within them.
Small Joints: Should be cooked and then re-frozen as cooked dishes.
Chicken:
Should be cooked and re-frozen as a fresh dish.
Maintenance and Cleaning

Before any maintenance or cleaning work is carried out DISCONNECT the appliance from the ELECTRICITY supply.
External Cleaning
Wash the outer cabinet with warm soapy water.

Do not use abrasive products.
There may be sharp edges on the under-side of the product so care should be taken when cleaning.
Ensure the vents at the back of the appliance are clear of dust and debris etc.
Internal Cleaning
Clean the inside and accessories with warm water and bicarbonate of soda (5ml to 0.5 litre of water). Rinse and dry thoroughly.

Do not use detergents, abrasive powders, highly perfumed cleaning products, wax polishes or cleaning products containing bleach or alcohol.
Regularly check the door seals and wipe clean to ensure they are clean and free from debris.
Cleaning the Condenser
Accumulation of dust at the condenser increases energy consumption. For this reason carefully clean the condenser at the rear of the appliance once a year with a soft brush or a vacuum cleaner.

natural_image
Illustration of a hand holding a circular object over a multi-layered panel or rack structure (no text or symbols)Defrosting
Your appliance is frost free, which means there is no need to manually defrost your appliance, as this will be carried out automatically.
Changing the light bulb
- Switch off the appliance by pressing the ON/OFF button, and then unplug the appliance.
- Open the plastic light cover, by pushing upwards on the centre clip. The cover will then swing down.
- Unscrew the light bulb and replace with a bulb with the following specifications:
Standard Bulb
E14 screw thread
220-240 Volts
25 watts (max)

When the appliance is not in use
When the appliance is not in use for long periods, disconnect from the electricity supply, empty all of the food and clean the inside of the appliance. Switch off the appliance and leave the door ajar to prevent unpleasant smells.
Something Not Working
If your appliance is not operating correctly, carry out the following checks before contacting your local Service Force Centre.
Important: If you call out an engineer to a fault listed below, or to repair a fault caused by incorrect use or installation a charge will be made, even if the appliance is under guarantee.
| Symptom Cause Solution | ||
| Interior Light (refrigerator) • Ap does not work • The appliance | Appliance is not plugged in • Plug in the appliance | |
| is not switched on • Switch on the appliance | ||
| • There is no power to the appliance • | Check the main fuse box in the house | |
| • The bulb is not fitted correctly or • Refit the bulb or replace with a has fused. new bulb | ||
| The appliance does not cool • down sufficiently properly | The doors have not been closed • Close the doors | |
| • A door has been opened frequently | • Avoid frequent opening of the doors | |
| • The temperature control knob is not set correctly | • Reset as required | |
| • Food has been introduced into the appliance due course. | • The appliance will cool down in | |
| Food is freezing in the fridge | • The temperature control knob is incorrectly set | • Reset as required |
| • Food is too close to ventilation holes at the back | • Reposition food, leaving a gap. | |
| The motor works continuously. | • Temperature control knob is incorrectly set | • Change the setting |
| • The doors are not properly closed | • Close the doors | |
| • Doors have been opened frequently | • Avoid frequent opening of the doors | |
| • Food has recently been introduced into the appliance | • The appliance will cool down in due course. | |
| • The condenser is dirty | • Clean (read the Maintenance & Cleaning section). | |
| Water/condensation in the vegetable drawer | • Wet vegetables have been put into the box | • This may occur from time to time |
| Condensation on the outside of the cabinet | • High humidity level in the room. | • It does not affect the performance of the appliance. Increase the room ventilation. |
| Doors do not close | • The appliance is not level | • Level the appliance correctly |
| • The doors are incorrectly aligned • Re-align the doors | ||
| • Food is preventing the doors shutting | • Re-position food | |
| Noises | • The appliance may not be level | • Level the appliance |
| • Something may be vibrating inside | • Check the contents and shelves are properly positioned. | |
| All product lights start flashing and the alarm sounds | • Your product has a major fault | • Contact your local Service Force Centre |
Normal Operating Sounds
1. Temperature control
May cause clicking sounds when the system is connected or disconnected.
2. Cooling system
The injected cooling gas may produce a gurgling sound while passing through the tubes.
3. Motor
May cause a humming noise and or slight knocking sound.
4. Fans
You may occasionally hear the fans working. This is normal; the fans help to ensure the air circulates more effectively.
Service and Spare Parts
SERVICE FORCE
In the event of your appliance requiring service, or if you wish to purchase spare parts, please contact your local Service Force Centre by telephoning:
08705 929929
Your telephone call will be automatically routed to the Service Force Centre covering your post code area.
For the address of your local Service Force Centre and further information about Service Force, please visit the website at www.serviceforce.co.uk
Before calling out an engineer, please ensure you have read the details under the heading «Something Not Working».
When you contact the Service Centre you will need to give the following details.
- Your name, address and postcode
- Your telephone number
- Clear and concise details of the fault
- The model and serial number of the appliance (found on the rating plate)
- The purchase date
Please note that a valid purchase receipt or guarantee documentation is required for in-guarantee service calls.
Customer Care Department
For general enquiries concerning your Zanussi Electrolux appliance or for further information on Zanussi Electrolux products, please contact our Customer Care Department by letter or telephone at the address below or visit our website at www.zanussi-electrolux.co.uk
Customer Care Department
Zanussi Electrolux
55-77 High Street
Slough
Berkshire
SL1 1DZ
08705 727727 *
* Calls to this number may be recorded for training purposes.
GUARANTEE CONDITIONS
Standard guarantee conditions
We, Zanussi Electrolux, undertake that if within 12 months of the date of purchase this ZANUSSI ELECTROLUX appliance or any part thereof is proved to be defective by reason only of faulty workmanship or materials, we will, at our option repair or replace the same FREE OF CHARGE for labour, materials or carriage on condition that:
• The appliance has been correctly installed and used only on the electricity supply stated on the rating plate.
- The appliance has been used for normal domestic purposes only, and in accordance with the manufacturer's instructions.
- The appliance has not been serviced, maintained repaired, taken apart or tampered with by any person not authorized by us.
- All service work under this guarantee must be undertaken by a Service Force Centre.
- Any appliance or defective part replaced shall become the Company's property.
- This guarantee is in addition to your statutory and other legal rights.
Home visits are made between 8.30am and 5.30pm Monday to Friday. Visits may be available outside these hours in which case a premium will be charged.
Exclusions
This guarantee does not cover:
- Damage or calls resulting from transportation, improper use or neglect, the replacement of any light bulbs or removable parts of glass or plastic.
- Costs incurred for calls to put right an appliance, which is improperly installed, or calls to appliances outside the United Kingdom.
- Appliances found to be in use within a commercial environment, plus those, which are subject to rental agreements.
- Products of Zanussi Electrolux manufacture which are not marketed by Zanussi Electrolux.
European Guarantee
If you should move to another country within Europe then your guarantee moves with you to your new home subject to the following qualifications:
- The guarantee starts from the date you first purchased your product.
- The guarantee is for the same period and to the same extent for labour and parts as exists in the new country of use for this brand or range of products.
- This guarantee relates to you and cannot be transferred to another user.
- Your new home is within European Community (EC) or European Free Trade Area. The product is installed and used in accordance with our instructions and is only used domestically, i.e. a normal household.
- The product is installed taking into account regulations in your new country.
- Before you move please contact your nearest Customer Care Centre, listed below, to give them details of your new home. They will then ensure that the local Service Organisation is aware of your move and able to look after you and your appliance.
France Senlis +33 (0) 344 62 29 29
Germany Nuremberg +49 (0) 0800 234 7378
Italy Pordenone +39 (0) 0434 39 4700
Sweden Stockholm +46 (0) 8 672 53 90
UK Slough +44 (0) 1753 219897
Technical Specifications


natural_image
Line drawing of an open refrigerator with lid, doors, and side shelves, showing 90° angle and 1.166 mm dimension (no text or symbols on the diagram itself)A distance of 56mm must exist between the appliance and the wall, to allow the door to be fully opened. The refrigeration system and the insulation of this appliance do not contain CFCs or HCFCs.
ZECBFF/W
Height (mm) 1850
Width (mm) 595
Depth (mm) 670
Power Supply 220-240V / 50Hz
Total Power Absorbed 150W
Energy Consumption kWh/year 372.3
kWh/day 1.02
Freezing Capacity (Kg/24hrs) 10
Gross Capacity (ltrs/cu.ft)
Fridge 205/7.3
Freezer 130/4.6
Net Capacity (ltrs/cu.ft)
Fridge 200/7.1
Freezer 103/3.4
Installation
Unpacking
Remove all transit packaging.
Positioning
The appliance should be located in a well-ventilated, dry room. To ensure correct operation the appliance should:
- Not be exposed to direct sunlight.
- Not be installed next to radiators, cookers or other sources of heat.
- Only be installed in a location where the ambient temperature corresponds to the climate classification for which the appliance is designed.
The climate classification can be found on the rating plate, which is located on the bottom, left hand side of the fridge compartment. The table shows the correct operating ambient temperature for each climate class. (Fig 1)
| Climate Classification Ambient Operating Temp. | |
| SN +10 to +32°C | |
| N +16 to +32°C | |
| ST +18 to +38°C | |
| T +18 to +43°C |
If the temperature rises above or falls below the stated ambient temperature for the climate class, the operation of the appliance may be affected.
Ventilation
You should also ensure that air can circulate freely around the back and the top of the cabinet. Assemble the spacers that you can find in the documentation badge in the condenser as shown in the figure 2.
Never put something on the ventilator grill of the appliance (see fig. 3)
Levelling
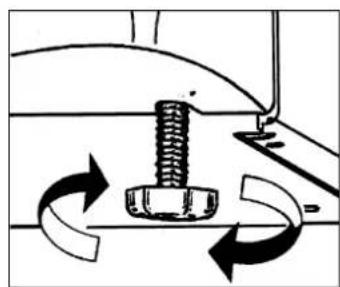
Level the appliance by turning the 2 adjustable feet at the front of the appliance. The appliance must be level to prevent vibration and excessive noise and to ensure the doors shut correctly. (Fig 4)
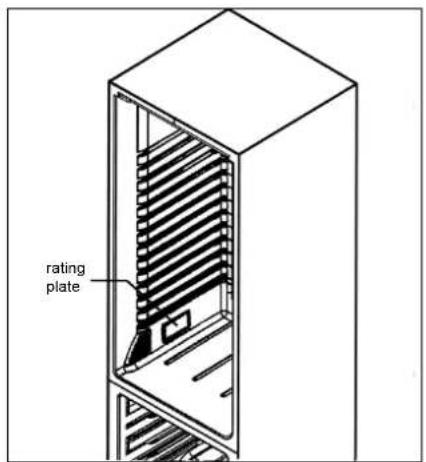
Fig. 1

Fig. 2

natural_image
Line drawing of a vertical refrigerator with two upward arrows indicating airflow or ventilation (no text or symbols)Fig. 3
natural_image
Diagram of a screw fastener pressing into a curved pipe, with rotational arrows indicating motion (no text or symbols)Fig. 4
Electrical Connection

Any electrical work required to install this appliance must be carried out by a qualified electrician or competent person.
This appliance must be earthed.

The manufacturer declines any liability should these safety measures not be observed.
Electrical Requirements
Before switching on, make sure the electricity supply voltage is the same as that indicated on the appliance rating plate.
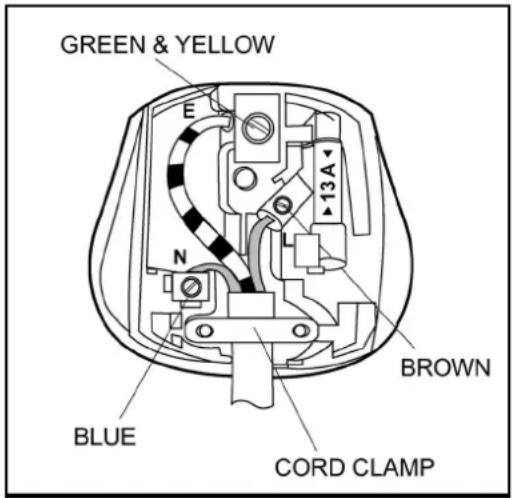
The appliance is supplied with a 13 amp plug fitted. In the event of having to change the fuse in the plug supplied, a 13 amp ASTA approved (BS 1362) fuse must be used.
Should the plug need to be replaced for any reason, the wires in the mains lead are coloured in accordance with the following code:
Green and Yellow - Earth
Blue - Neutral
Brown - Live
The wire coloured green and yellow must be connected to the terminal marked with the letter 'E' or by the earth symbol 12 or coloured green and yellow.
The wire coloured blue must be connected to the terminal marked 'N' or coloured black.
The wire coloured brown must be connected to the terminal marked 'L' or coloured red.
Upon completion there must be no cut, or stray strands of wire present and the cord clamp must be secure over the outer sheath.
Important
If the mains supply cable is damaged, it must be replaced by a cable available from your local Service Force Centre.
Door reversal
If you wish to change the opening direction of the doors, proceed as follows:
- Open the freezer door. Remove the plinth (A) at the bottom of the appliance, by pushing downwards and pulling outwards. (See fig 5)
- Remove the hinge cover (B) in the plinth and reposition on the opposite side of the plinth.
- Whilst supporting the lower door, use a 8mm nut driver to remove the 3 hinge retaining bolts and remove the lower hinge.
- Carefully lower the door off the central hinge.
- Support the upper door and remove the two securing screws from the centre hinge. Remove the hinge, taking care that the upper door does not fall, retain the plastic spacer washer.
- Carefully remove the upper door.
- Unscrew the small blanking plugs (3) and refit on the opposite side to cover the vacant hinge holes.
- Unscrew the hinge pin (4) in the upper and lower hinge blades and refit on the opposite side.
- Change the door self-closing system (5), putting the freezer door's on the fridge door and viceversa.
- Refit the spacer washers and the upper door onto the upper hinge pin and refit the centre hinge in position.
- Relocate the lower door onto the central hinge pin, and refit the lower hinge assembly.
- Refit the plinth.
After reversing the door ensure the internal light turns off when the fridge door is closed, and the door gasket seals correctly to the cabinet. If the gasket is not sealing correctly, apply warm air to the non-sealing area using a hair dryer set to gentle heat.
This will make the rubber more supple and allow it to revert to its original shape and seal correctly.

Fig. 5

Fig. 6
ZANUSSI
Electrolux
From the Electrolux Group. The world's No.1 choice.
The Electrolux Group is the world's largest producer of powered appliances for kitchen, cleaning and outdoor use. More than 55 million Electrolux Group products (such as refrigerators, cookers, washing machines, vacuum cleaners, chain saws and lawn mowers) are sold each year to a value of approx. USD 14 billion in more than 150 countries around the world.
- Instructions for the User
- Safety Instructions 2
- Description of the Appliance 3
- Using the Appliance 5
- Food Storage 6
- Maintenance and Cleaning 7
- Instructions for the Installer
- Safety Instructions
- Installation
- Child Safety
- During Use
- Maintenance and Cleaning
- Servicing
- Disposing of Old Appliances
- Description of Appliance
- Control Panel
- Thermostat Control
- The Freezer Temperature Control
- The Fridge Temperature Control
- ON/OFF Button
- The Door Alarm
- Temperature Alarm
- Fast Freeze Button
- Using the Appliance
- Before Use
- Starting the Appliance
- Freezer Compartment
- Freezing Fresh Food
- Frozen Food storage
- Refrigerator Compartment
- Food Storage Energy Saving Advice
- In the Event of a Power Failure
- External Cleaning
- Internal Cleaning
- Cleaning the Condenser
- Defrosting
- Changing the light bulb
- When the appliance is not in use
- Something Not Working
- Normal Operating Sounds
- Temperature control
- Cooling system
- Motor
- Fans
- Service and Spare Parts
- SERVICE FORCE
- 929929
- Customer Care Department
- GUARANTEE CONDITIONS
- Standard guarantee conditions
- Exclusions
- This guarantee does not cover:
- European Guarantee
- Technical Specifications
- ZECBFF/W
- Unpacking
- Positioning
- Ventilation
- Levelling
- Electrical Connection
- Electrical Requirements
- Important
- Door reversal
- ZANUSSI
- Electrolux
Brand : Zanussi-Electrolux
Model : ZECBFF/W
Category : Refrigerator