Medium Confidence MFQUS - Wall mount Chief - Free user manual and instructions
Find the device manual for free Medium Confidence MFQUS Chief in PDF.


| Product Type | Wall Mount |
| Brand | Chief |
| Model | Medium Confidence MFQUS |
| Weight Capacity | 125 lbs (56.7 kg) |
| VESA Compatibility | 200x200 to 600x400 mm |
| Tilt Range | +5° / -15° |
| Swivel Range | ±90° |
| Material | Cold-rolled steel |
| Finish | Powder-coated black |
| Dimensions (H x W x D) | 19.4 x 21.7 x 2.1 in (49.3 x 55.1 x 5.3 cm) |
| Net Weight | 6.2 lbs (2.8 kg) |
| What's in the Box | Mounting plate, arm(s), hardware kit, installation manual |
| Installation | Professional installation recommended; DIY possible with stud finder |
| Warranty | 5 years limited |
| Safety Certification | UL listed |
| Max Screen Size | 55" - 85" (estimated) |
| Built-in Cable Management | Yes, through arms |
| Wall Plate Dimensions | 11.0 x 8.5 in (27.9 x 21.6 cm) |
| Tools Required | Stud finder, drill, socket wrench (not included) |
| Mounting Type | Fixed to wall studs |
Frequently Asked Questions - Medium Confidence MFQUS Chief
User questions about Medium Confidence MFQUS Chief
0 question about this device. Answer the ones you know or ask your own.
Ask a new question about this device
Download the instructions for your Wall mount in PDF format for free! Find your manual Medium Confidence MFQUS - Chief and take your electronic device back in hand. On this page are published all the documents necessary for the use of your device. Medium Confidence MFQUS by Chief.
USER MANUAL Medium Confidence MFQUS Chief
INSTALLATION INSTRUCTIONS
natural_image
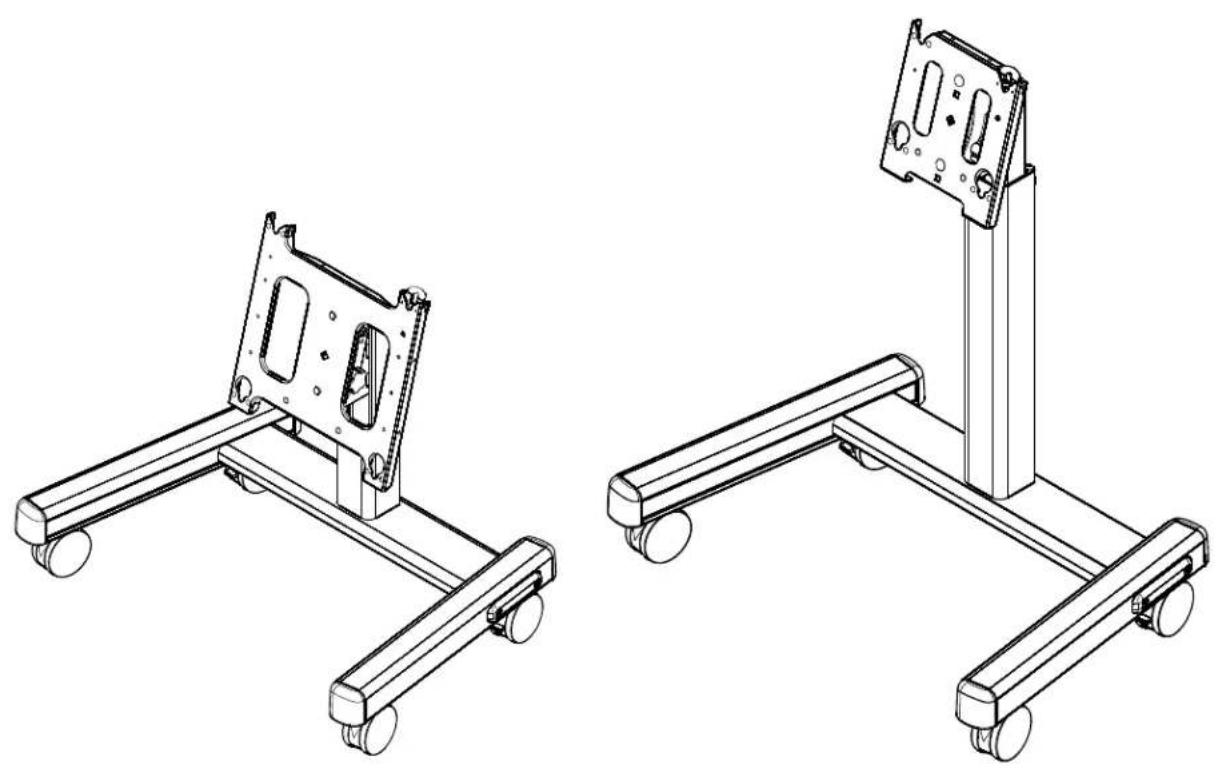
Technical line drawings of two mechanical support systems with wheels and mounting brackets (no text or symbols)Confidence Carts
CHIEF MFM, PFM, MFQ, PFQ
DISCLAIMER
CSAV, Inc., and its affiliated corporations and subsidiaries (collectively, "CSAV"), intend to make this manual accurate and complete. However, CSAV makes no claim that the information contained herein covers all details, conditions or variations, nor does it provide for every possible contingency in connection with the installation or use of this product. The information contained in this document is subject to change without notice or obligation of any kind. CSAV makes no representation of warranty, expressed or implied, regarding the information contained herein. CSAV assumes no responsibility for accuracy, completeness or sufficiency of the information contained in this document.

IMPORTANT WARNINGS AND TIONS!

WARNING: A WARNING alerts you to the possibility of serious injury or death if you do not follow the instructions.

CAUTION: A CAUTION alerts you to the possibility of damage or destruction of equipment if you do not follow the corresponding instructions.

WARNING: Failure to read, thoroughly understand, and follow all instructions can result in serious personal injury, damage to equipment, or voiding of factory warranty! It is the installer's responsibility to make sure all components are properly assembled and installed using the instructions provided.

WARNING: Failure to provide adequate structural strength for this component can result in serious personal injury or damage to equipment! It is the installer's responsibility to make sure the structure to which this component is attached can support five times the combined weight of all equipment. Reinforce the structure as required before installing the component.

WARNING: Exceeding the weight capacity can result in serious personal injury or damage to equipment! It is the installer's responsibility to make sure the combined weight of all components on the cart does not exceed 125 lbs (56.70 kg) for the MFM and MFQ, and 200 lbs (90.72 kg) for the PFM and PFQ.
DIMENSIONS
![[918] 36-1/8" [640] 25-1/4" [755] 29-3/4" [254] 10" [100] 4"](/content/2026/06/1203822/images/ddf58bcaf20e7b2821dabc80dd0dc913b79f122f8671fb73a7e9abdfae06cb69.jpg)
NOTE: CUSTOM INTERFACE BRACKET NOT SHOWN. THE CUSTOM INTERFACE BRACKET NEEDED FOR YOUR DISPLAY WILL ADD BETWEEN ½"AND 2" IN DEPTH AND MAY AFFECT LOCATION OF DISPLAY ON THE MOUNT. SEE PSBU DRAWING ALSO.
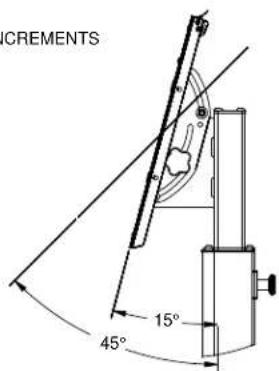
WEIGHT CAPACITY: 125 LBS HEIGHT ADJUSTMENT: 37-5/8" TO 49-5/8" IN 2" INCREMENTS (GROUND TO MIDDLE OF SCREEN) TILT/ROLL/YAW: +15° TO +45°±0°/±0°
ALL MEASUREMENTS IN: [MILLIMETERS] INCHES
MFM
![[1088] 42-7/8" [157] 6-1/4" [39] 1-1/2" [65] 2-1/2" [955] 37-5/8" [177] 7"](/content/2026/06/1203822/images/ed6f29e40ebaf414e8233e37f159517c94e6994222009cad9022f275b8bb6587.jpg)
![[1393] 54-7/8" [810] 31-7/8" [1259] 49-5/8"](/content/2026/06/1203822/images/91c2f12f48132fc0bb1043d730bdf62b8d41d687c9b8eed69ae10821651e2c6e.jpg)
![[918] 36-1/8" [640] 25-1/4" [755] 29-3/4" [253] 10" [100] 4"](/content/2026/06/1203822/images/7c746f6ead715d050bb89e4e0c1ba67aaa0f2b291ca54a47fe36d5820813ca62.jpg)
NOTE: CUSTOM INTERFACE BRACKET NOT SHOWN. THE CUSTOM INTERFACE BRACKET NEEDED FOR YOUR DISPLAY WILL ADD BETWEEN 1/2"AND 2" IN DEPTH AND MAY AFFECT LOCATION OF DISPLAY ON THE MOUNT. SEE PSBU DRAWING ALSO.
WEIGHT CAPACITY: 200 LBS HEIGHT ADJUSTMENT: 37-5/8" TO 49-5/8" IN 2" INCREMENTS (GROUND TO MIDDLE OF SCREEN) TILT/ROLL/YAW: +15° TO +45°/±0°/±0°
ALL MEASUREMENTS IN: [MILLIMETERS] INCHES
PFM
![[1146] 45-1/8" [39] 1-1/2" [65] 2-1/2" [955] 37-5/8" [157] 6-1/4" [177] 7"](/content/2026/06/1203822/images/878e37deb19fccb1ba0e01b13cc8814c5f4d33f3785575e44e24f05b0ebd2ae5.jpg)
![[1455] 57-1/4" [810] 31-7/8" [1261] 49-5/8"](/content/2026/06/1203822/images/c1d237b11f7b67a79c81043b437c885ca6698986a520b8f2637066e3c5b9b357.jpg)
DIMENSIONS
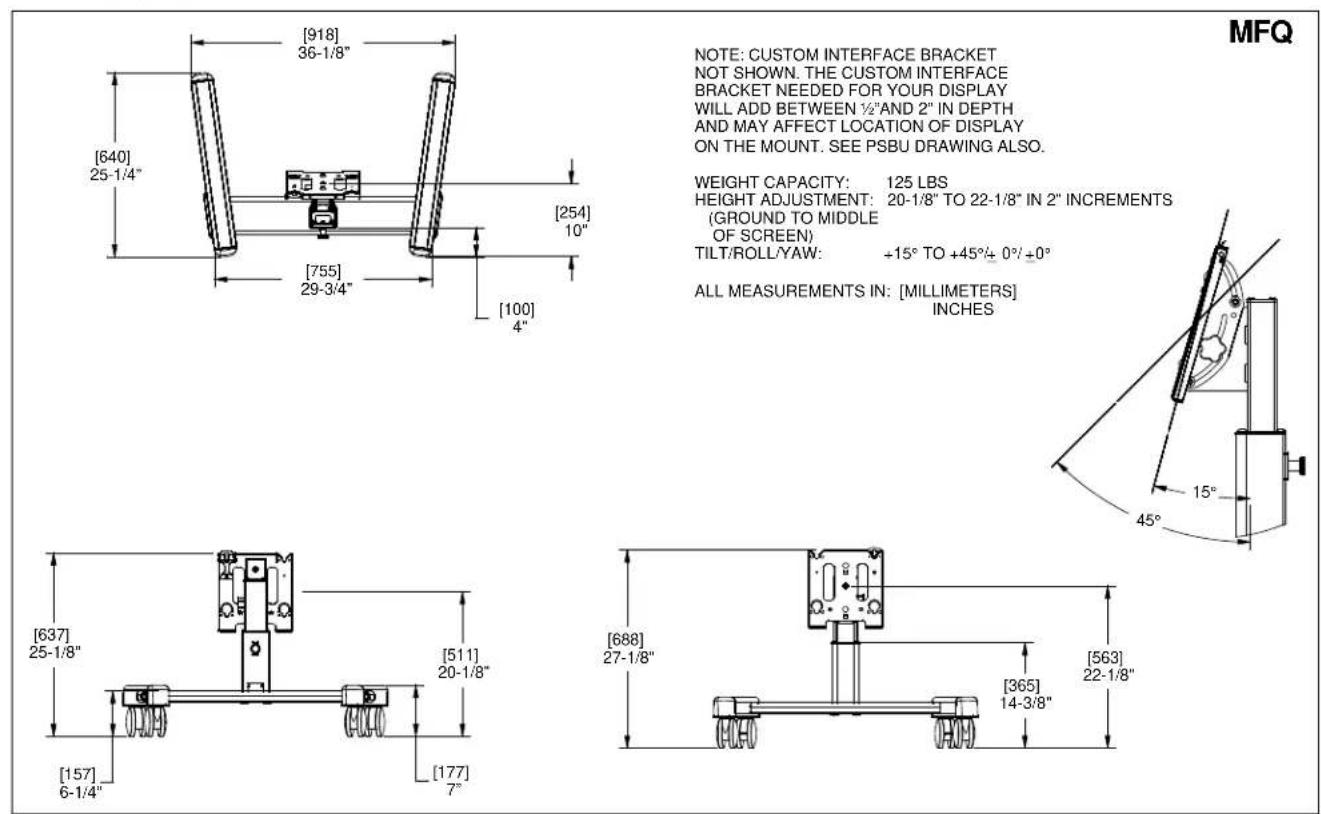
NOTE: CUSTOM INTERFACE BRACKET
NOT SHOWN. THE CUSTOM INTERFACE
BRACKET NEEDED FOR YOUR DISPLAY
WILL ADD BETWEEN 1/2"AND 2" IN DEPTH
AND MAY AFFECT LOCATION OF DISPLAY
ON THE MOUNT. SEE PSBU DRAWING ALSO.
WEIGHT CAPACITY: 125 LBS
HEIGHT ADJUSTMENT: 20-1/8" TO 22-1/8" IN 2" INCREMENTS
(GROUND TO MIDDLE
OF SCREEN)
TILT/ROLL/YAW: +15° TO +45°/+ 0°/+0°
ALL MEASUREMENTS IN: [MILLIMETERS]
INCHES
![[918] 36-1/8" [640] 25-1/4" [755] 29-3/4" [253] 10" [100] 4"](/content/2026/06/1203822/images/429d166e0370e9f8f851c0b7e51f29af85f0812c87d87f75e4960bedb5743218.jpg)
PFQ
NOTE: CUSTOM INTERFACE BRACKET
NOT SHOWN. THE CUSTOM INTERFACE
BRACKET NEEDED FOR YOUR DISPLAY
WILL ADD BETWEEN 1/2"AND 2" IN DEPTH
AND MAY AFFECT LOCATION OF DISPLAY
ON THE MOUNT. SEE PSBU DRAWING ALSO.
WEIGHT CAPACITY: 200 LBS
HEIGHT ADJUSTMENT: 19-7/8" TO 21-7/8" IN 2" INCREMENTS
(GROUND TO MIDDLE
OF SCREEN)
TILT/ROLL/YAW: +15° TO +45°/± 0°/ ±0°
ALL MEASUREMENTS IN: [MILLIMETERS]
INCHES
![[695] 27-3/8" [157] 6-1/4" [504] 19-7/8" [177] 7"](/content/2026/06/1203822/images/33eac343fae4ec9837a67552793491a2c933d274314dbd6a26df30e6aa2a1716.jpg)
![[751] 29-1/2" [365] 14-3/8" [556] 21-7/8"](/content/2026/06/1203822/images/57d20de57477251f25da159919e451ca76cf6f169062b65ea6d28e09b90ecf11.jpg)
LEGEND
 | Tighten Fastener |  | Pencil Mark |
| Apretar elemento de fijación | Marcar con lápiz | ||
| Befestigungsteil festziehen | Stiftmarkierung | ||
| Apertar fixador | Marcar com lápis | ||
| Serrare il fissaggio | Segno a matita | ||
| Bevestiging vastdraaien | Potloodmerkteken | ||
| Serrez les fixations | Marquage au crayon | ||
 | Loosen Fastener |  | Drill Hole |
| Aflojar elemento de fijación | Perforar | ||
| Befestigungsteil lösen | Bohrloch | ||
| Desapertar fixador | Fazer furo | ||
| Allentare il fissaggio | Praticare un foro | ||
| Bevestiging losdraaien | Gat boren | ||
| Desserrez les fixations | Percez un trou | ||
 | Phillips Screwdriver |  | Adjust |
| Destornillador Phillips | Ajustar | ||
| Kreuzschlitzschraubendreher | Einstellen | ||
| Chave de fendas Phillips | Ajustar | ||
| Cacciavite a stella | Regolare | ||
| Kruiskopschroevendraaier | Afstellen | ||
| Tournevis à pointe cruciforme | Ajuster | ||
 | Open-Ended Wrench |  | Remove |
| Llave de boca | Quitar | ||
| Gabelschlüssel | Entfernen | ||
| Chave de bocas | Remover | ||
| Chiave a punte aperte | Rimuovere | ||
| Steeksleutel | Verwijderen | ||
| Clé à fourche | Retirez | ||
 | By Hand |  | Optional |
| A mano | Opcional | ||
| Von Hand | Optional | ||
| Com a mão | Opcional | ||
| A mano | Opzionale | ||
| Met de hand | Optie | ||
| À la main | En option | ||
 | Hex-Head Wrench | 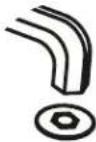 | Security Wrench |
| Llave de cabeza hexagonal | Llave de seguridad | ||
| Sechskantschlüssel | Sicherheitsschlüssel | ||
| Chave de cabeça sextavada | Chave de segurança | ||
| Chiave esagonale | Chiave di sicurezza | ||
| Zeskantsleutel | Veiligheidssleutel | ||
| Clé à tête hexagonale | Clé de sécurité |
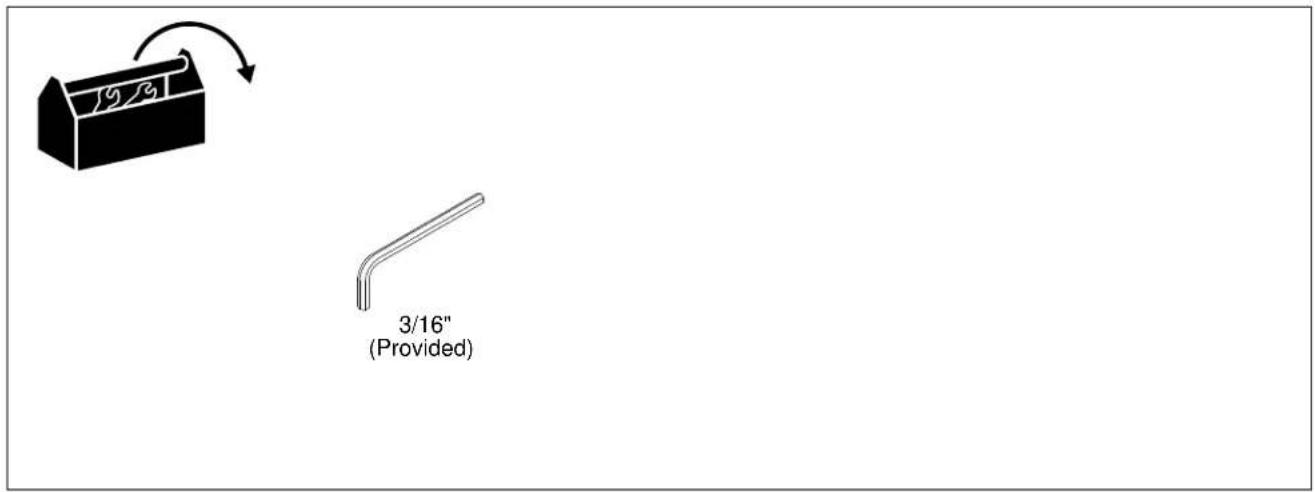
TOOLS REQUIRED FOR INSTALLATION
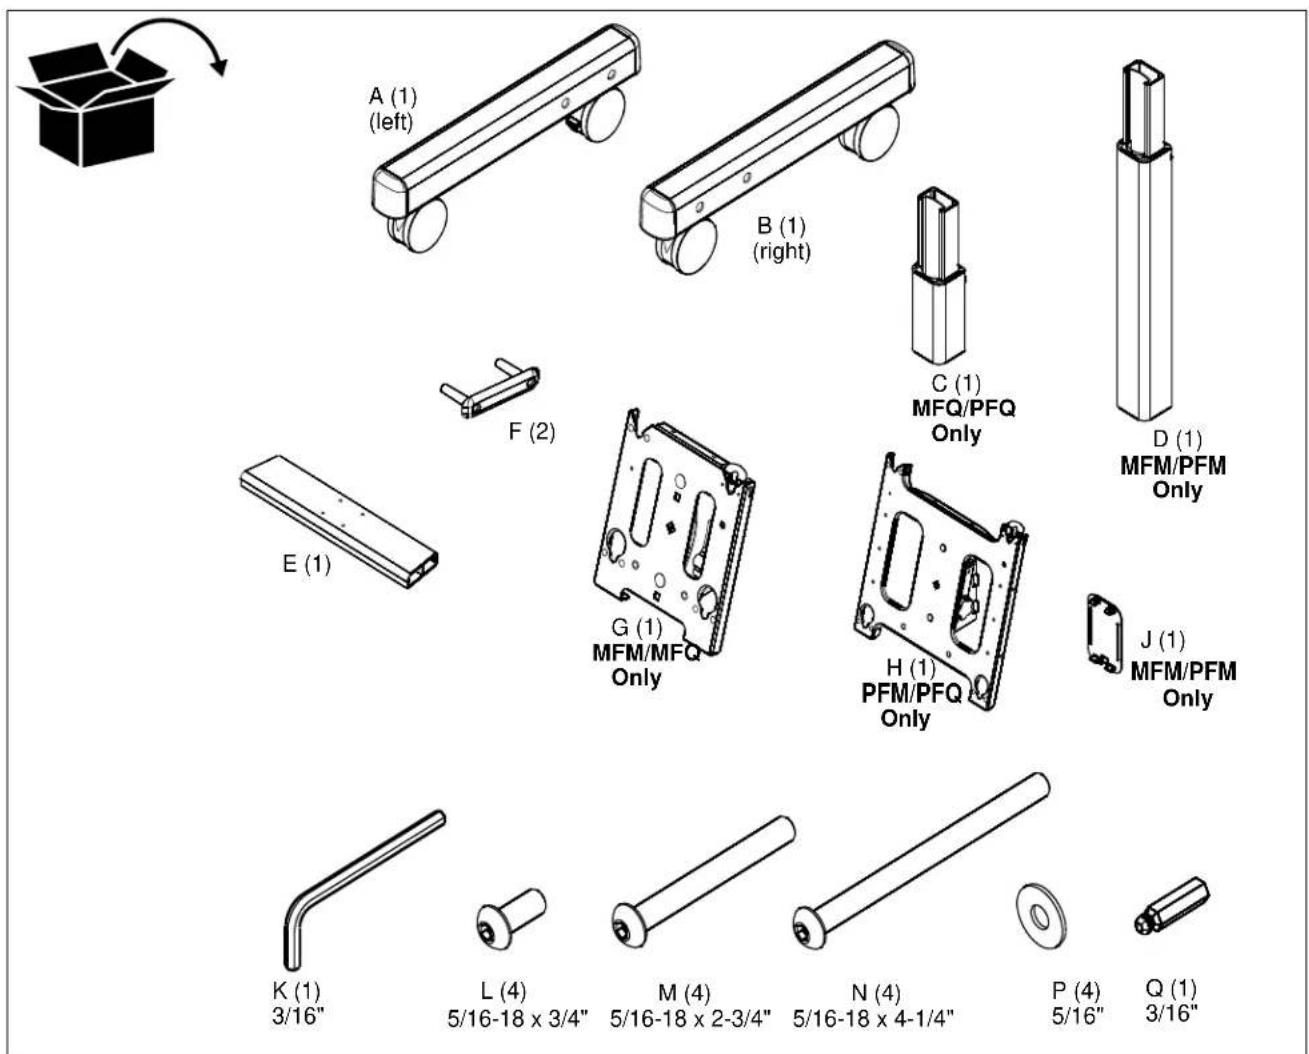
PARTS
ASSEMBLY

CAUTION: Attachment holes may be damaged if a power drill is used to insert button head cap screws. Screws should first be inserted and turned BY HAND with the hex key or with a handheld screwdriver BEFORE using the hex head drill bit (Q) and power drill to complete the attachment.
Assembling Cart
- Assemble two legs (A) and (B) to the cart cross bracket (E) using two 5/16-18x4-1/4" button head cap screws (N) and one end cap (F) per leg. (See Figure 1)
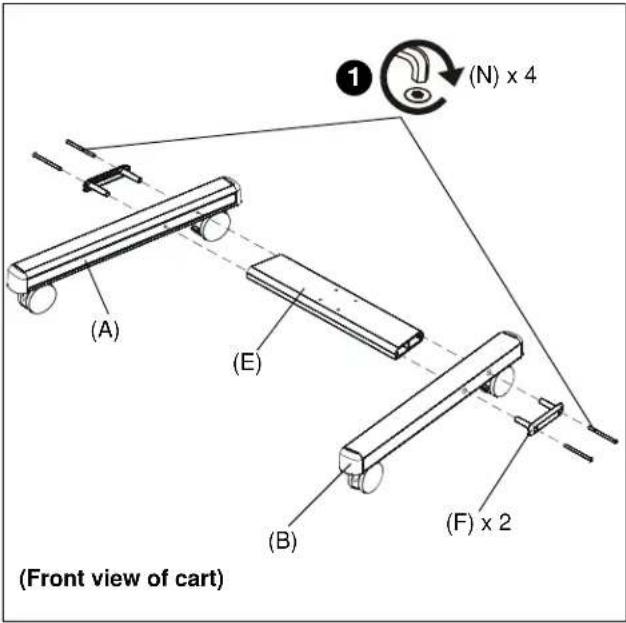
Figure 1

CAUTION: Attachment holes may be damaged if a power drill is used to insert button head cap screws. Screws should first be inserted and turned BY HAND with the hex key or with a handheld screwdriver BEFORE using the hex head drill bit (Q) and power drill to complete the attachment.
NOTE: Insert and turn screws in order shown (1, 2, 3, 4) in Figure 2.
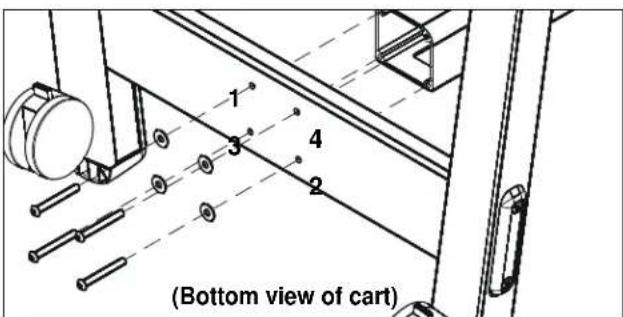
Figure 2
- Attach center post (C or D) to leg assembly using four 5/16-18 x 2-3/4" button head cap screws (M) and four 5/16" washers (P). (See Figures 2 and 3)
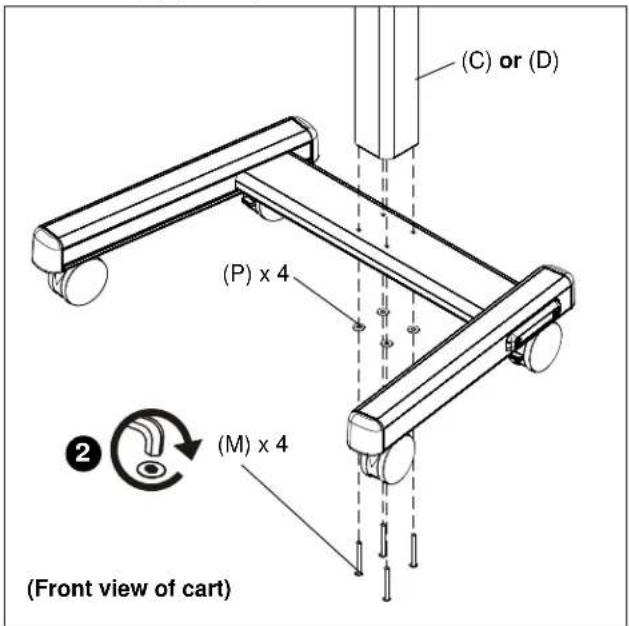
Figure 3
- Attach head assembly (G) or (H) to the cart assembly using four 5/16-18 x 3/4" button head cap screws (L). (See Figure 4)
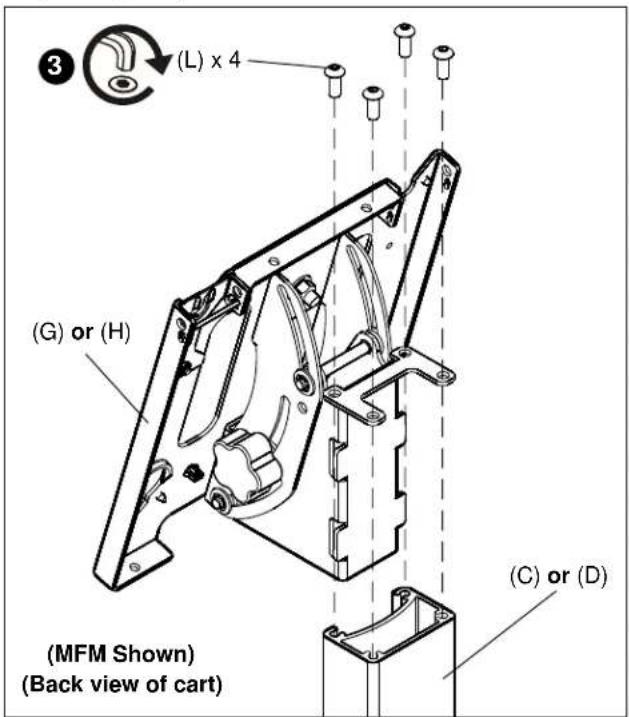
Figure 4
Attaching Display to Cart

WARNING: EXCEEDING MAXIMUM WEIGHT CAPACITY MAY LEAD TO SERIOUS PERSONAL INJURY OR DAMAGE TO EQUIPMENT! It is the installer's responsibility to ensure the total amount of weight placed on the cart does not exceed 125 lbs (56.70 kg) for the MFM and MFQ, and 200 lbs (90.72 kg) for the PFM and PFQ.

WARNING: Before attaching display to cart set the brakes on the back wheels by pressing down on the tab. (See Figure 5)
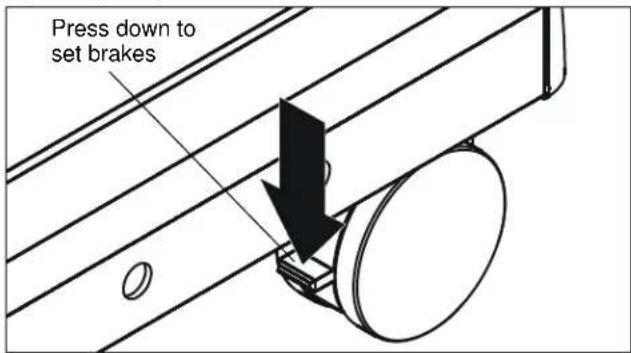
Figure 5
- Adjust the cart to the desired height by holding the top part of the post, pulling out knob on the center post and turning 90^ in either direction to disengage the locking mechanism.
- Raise or lower the center post, then turn the knob 90 ° either direction to engage the knob and lock the cart at desired height. (See Figure 6)
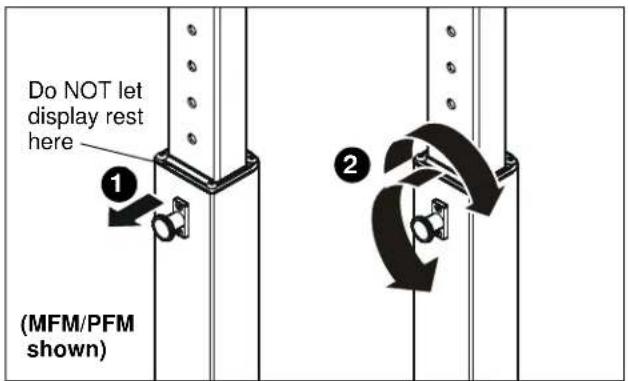
Figure 6
IMPORTANT ! : Set the height of the cart so the display does NOT rest on the lower part of the center post. (See Figure 6.) Always set the height so the knob is engaged in a hole in the center post.
- Attach a PSBU or MSBU interface bracket to the display following the instructions included with the bracket.
- While supporting both sides of display, align four mounting buttons on display or interface bracket with four mounting holes in head assembly. (See Figures 7 and 8)
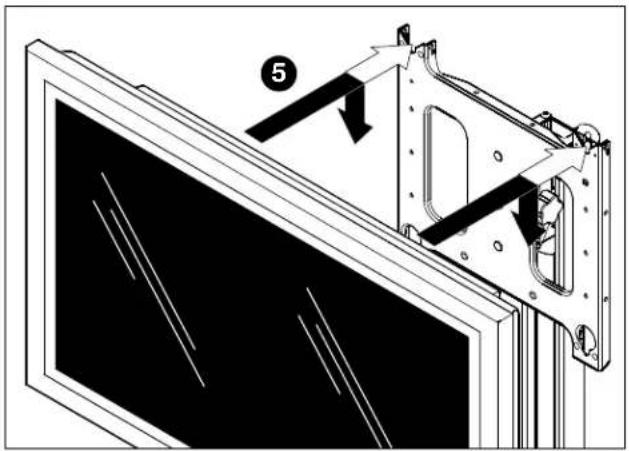
Figure 7

WARNING: DISPLAY MAY WEIGH IN EXCESS OF 40 LBS! Always use two people and proper lifting techniques when installing or positioning display on cart.
- Lower display into place listening for audible "click" to ensure recessed area of mounting buttons are properly seated in lower area of mounting holes. (See Figures 7 & 8)

WARNING: IMPROPER INSTALLATION CAN LEAD TO CART OR DISPLAY FALLING CAUSING SERIOUS PERSONAL INJURY OR DAMAGE TO EQUIPMENT! Ensure mounting buttons are completely engaged in mounting holes.
NOTE: Holes are provided in the faceplate for use with a padlock or similar locking device, if desired. In addition, the pin and nut may be removed from the upper holes and moved to the lower holes for use as a more permanent locking device. (See Figure 8).
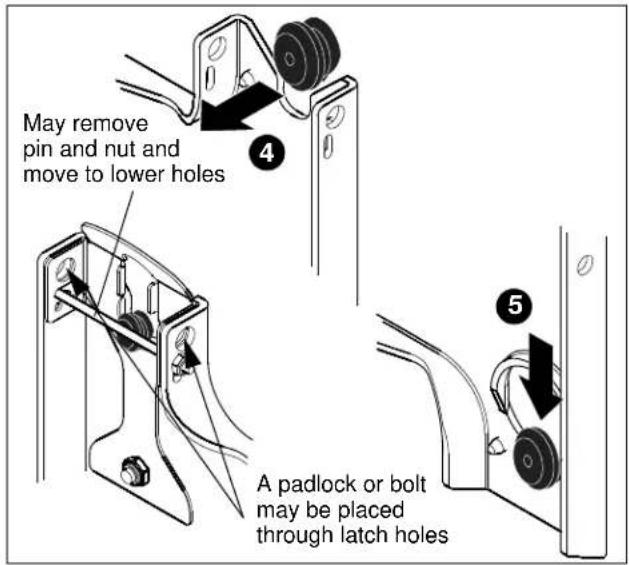
Figure 8
Tilting Display
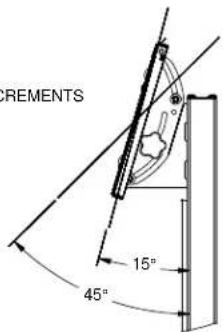
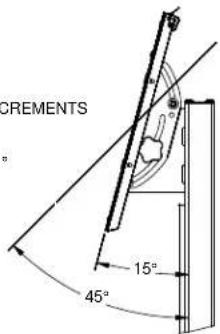
The display can be tilted from 15^ to 45^ .
- Turn knob counterclockwise on back of head assembly to loosen the tilt. (See Figure 9)
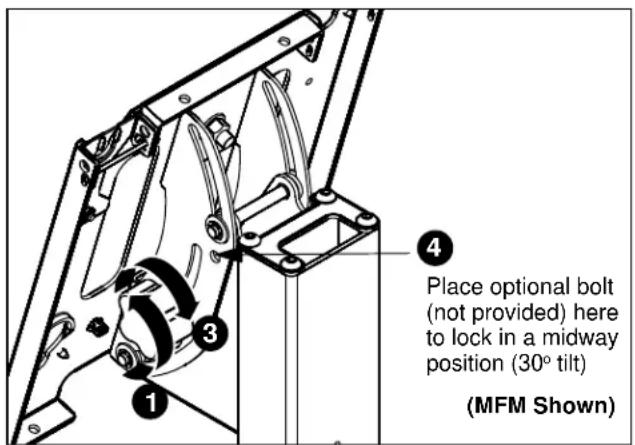
Figure 9
- Tilt display as desired, to a maximum of 45 ° either forward or backward.
- Turn knob clockwise to tighten display on head assembly. (See Figure 9)

CAUTION: Tighten knob on back of head assembly to prevent damage when moving the cart and display.
- If leaving the display in a midway position (30 ° tilt), it is recommended that a bolt (not provided) be placed through the head assembly (see Figure 9) to lock the display into the midway position.
Cable Management
MFM/PFM Models Only
- Signal cables and display power cord can be run through the top and down through the post to exit out the back. (See Figure 10)
- Any accessory power cords can be run through the front and down through the post to exit out the back. (See Figure 10)
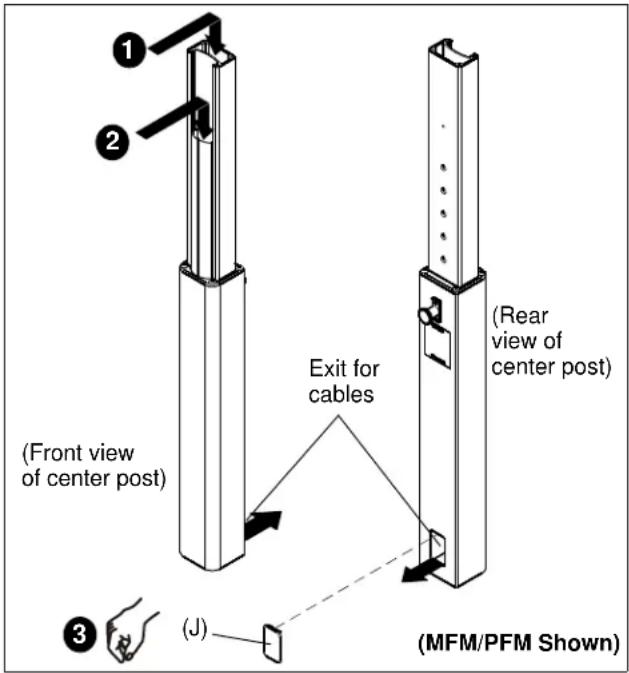
Figure 10
- Install the snap-on covers to any opening that is not being used. (See Figure 10)
- To remove the snap-on covers, grip the sides of the cover in the middle and pull off. They can also be removed by inserting a flat-blade screwdriver into the bottom slot and rotating the screwdriver.
- Proceed to Cart Use and Maintenance.
MFQ/PFQ Models Only
- Signal cables and display/accessory power cords can be run through the top and down through the post to exit out the back. (See Figure 11)
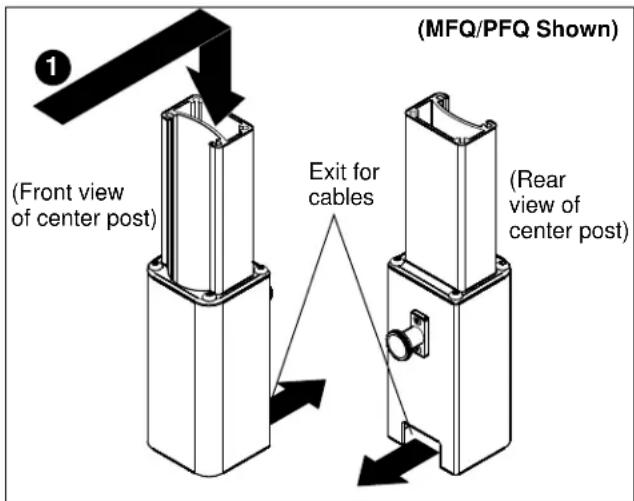
Figure 11
Cart Use and Maintenance

CAUTION: This cart is intended for use only with the products and maximum weights indicated (125 lbs (56.70 kg) for the MFM and MFQ, and 200 lbs (90.72 kg) for the PFM and PFQ). Use with other products or products heavier than the maximum weights indicated may result in instability causing possible injury.

WARNING: CART CAN TIP OVER RESULTING IN RISK OF INJURY. Do not allow children under 16 to move cart. Only adults should move this cart. Move cart slowly. Apply moving force on narrow dimension. Never apply force at top - always push near middle. Push, don't pull.
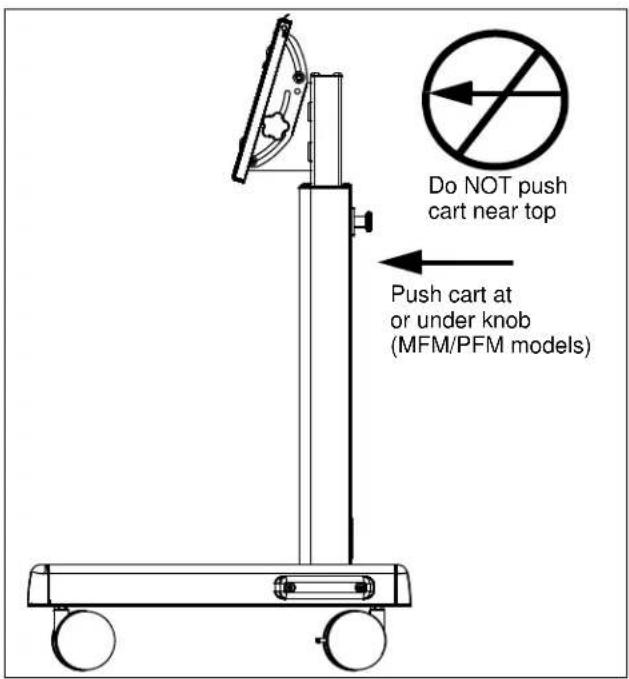
Figure 12
- Always place cart on level surface.
- Always lock the wheels when the cart is not moving.
- Check and tighten the hex nuts on the casters occasionally. (See Figure 12) These should be checked especially after use on uneven ground.
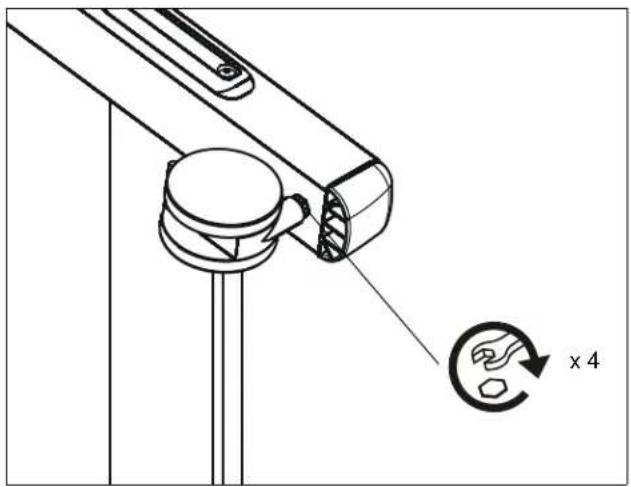
Figure 13
Removing Display from Cart
- Remove bolt or padlock from faceplate (if used). (See Figure 13)
NOTE: The pin may have been used as a more permanent locking device. If so, remove nut and pin and move from the lower holes to the upper holes.
- Pull back on flag on upper mounting hole and press pin down into "Open" position. (See Figure 13)

WARNING: EACH DISPLAY MAY WEIGH IN EXCESS OF 40 LBS! Always use two people and proper lifting techniques when installing or positioning display on stand.
- Carefully lift display from cart.
- Lift up on pin and place flag back against faceplate to return it to "Closed" position. (See Figure 13)
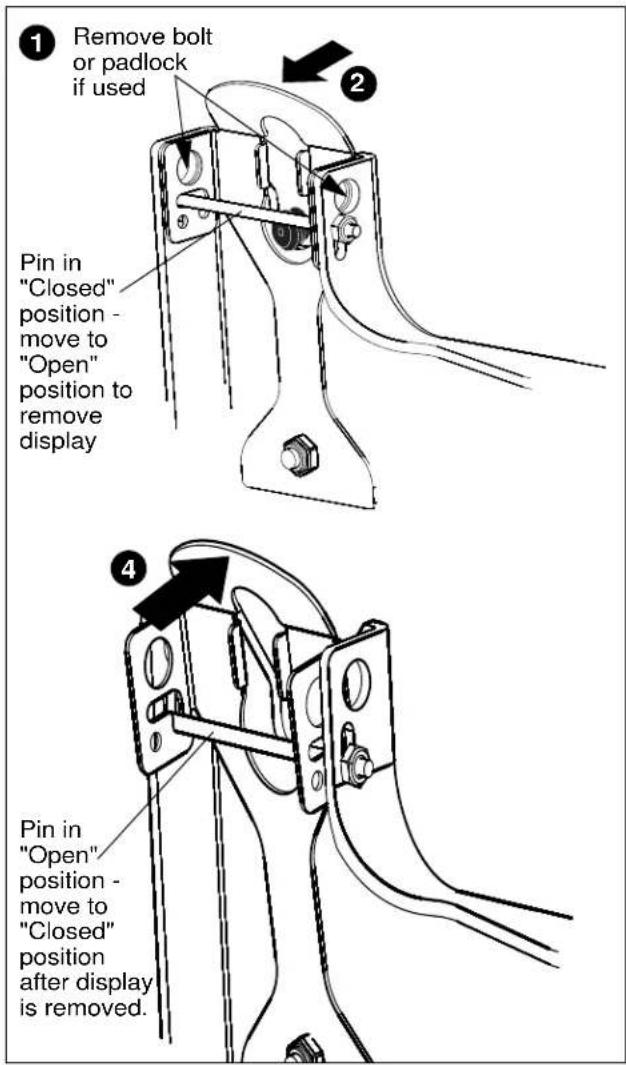
Figure 14

CHIEF®
8809-000042
©2007 Chief Manufacturing
www.chiefmfg.com
08/07
USA/International A 8401 Eagle Creek Parkway, Savage, MN 55378
P 800.582.6480 / 952.894.6280
F 877.894.6918 / 952.894.6918
Europe A Fellenoord 130 5611 ZB EINDHOVEN, The Netherlands
P +31 (0)40 2668620
F +31 (0)40 2668615
Asia Pacific A Room 30I, Block D, Lily YinDu International Building
LuoGang, BuJi Town, Shenzhen, CHINA. Post Code: 518112
Brand : Chief
Model : Medium Confidence MFQUS
Category : Wall mount