
IRI6WE3 - Range hood Euromaid - Free user manual and instructions
Find the device manual for free IRI6WE3 Euromaid in PDF.


| Product Type | Integrated Range Hood |
| Brand | Euromaid |
| Model | IRI6WE3 |
| Width | 60 cm |
| Color | White |
| Installation Type | Ducted or Recirculating (optional carbon filter CF260) |
| Minimum Distance from Cooktop | 600 mm |
| Duct Diameter | 150 mm |
| Number of Speeds | 3 (Low, Medium, High) |
| Lighting | LED (non-user replaceable) |
| Filter Type | Aluminum grease filters (washable) |
| Control Type | Push buttons |
| Power Supply | 220-240 V, 10 A, earthed plug |
| Warranty | 2 years (domestic use) |
| Optional Accessories | Carbon filter CF260 |
| Weight (approx.) | 12 kg |
Frequently Asked Questions - IRI6WE3 Euromaid
User questions about IRI6WE3 Euromaid
0 question about this device. Answer the ones you know or ask your own.
Ask a new question about this device
Download the instructions for your Range hood in PDF format for free! Find your manual IRI6WE3 - Euromaid and take your electronic device back in hand. On this page are published all the documents necessary for the use of your device. IRI6WE3 by Euromaid.
USER MANUAL IRI6WE3 Euromaid
Please read the User Manual carefully before use
IRI6WE3 - 60cm Integrated Rangehood - White
IRI9WE3 - 90cm Integrated Rangehood - White
CONTENTS
For You Safety....3
Safety Precautions....3
Before Connecting....3
Warnings....4
Use and Care 6
LED Lamps....6
Operating Instructions....6
Cleaning your rangehood....7
Installation ....8
Electrical Connection 8
Instructions for Installation....9
Installing the carbon filter 15
Troubleshooting 16
Disposal 16
Warranty....17
For Your Safety
Carefully read the following important information regarding installation safety and maintenance. Keep this information booklet accessible for future reference.
This appliance has been designed for use in Ducted or Recirculated installation.
Optional extras: Carbon filters for recirculated installation. Part CF260
Safety Precautions
Take care when the Range Hood is operating simultaneously with an open fireplace or burner that depend on natural ventilation as the Range Hood removes air from the room, which a burner or fireplace may need for combustion.
Provide adequate ventilation for safe operation of the Range Hood. Follow any local laws that apply to external air evacuation.
Before connecting to the electricity network:
Look at the data plate (located inside the appliance) to ascertain that the voltage and power correspond to the available power supply and the power outlet is suitable. If in doubt ask a qualified electrician.
If the appliance is used intensively for a long period of time, you may need to opening a window to improve airflow.
For Your Safety

WARNINGS!
- Do not check the status of the filters while the Range Hood is operating.
- Do not touch bulbs or adjacent areas, during or straight after use.
- CAUTION: Accessible parts may become hot when used with cooking appliances.
- Do not flambé under the Range Hood.
- Avoid free flame, as it is damaging to the filters and can cause fire hazard.
- Constantly check food frying, overheated oil may become a fire hazard.
- Disconnect the electrical plug prior to any maintenance.
- This appliance is not intended for use by persons (including children) with reduced physical, sensory or mental capabilities, or lack of experience and knowledge, unless they have been given supervision or instruction concerning use of the appliance by a person responsible for their safety.
- Children should be supervised to ensure that they do not play with the appliance.
- There shall be adequate ventilation in the room when the Range Hood is used at the same time as appliances burning gas or other fuels.
- There is a fire risk if cleaning is not carried out in accordance with the instructions.
- WARNING: DO NOT penetrate any screws into the range hood as this may result in electrical hazards.
- WARNING: Failure to install the screws or fixing device in accordance with these instructions may result in electrical hazards.
For Your Safety

WARNINGS!
- If the supply cord is damaged, it must be replaced by the manufacturer, its service agent or similarly qualified persons in order to avoid a hazard.
- The air must not be discharged into a flue that is used for exhausting fumes from appliances burning gas or other fuels.
- The minimum distance between the cooktop hob and the lowest part of the range hood shall be at least 60cm. If the instructions for installation of the gas hob specify a greater distance, this has to be taken into account.
- Regulation concerning the discharge of air has to be fulfilled.
- 565cm rangehoods can only be installed above hobs with 4 or less burners / elements.
- 865cm rangehoods can only be installed above hobs with 6 or less burners / elements.
THE MANUFACTURER DECLINES ALL RESPONSIBILITY FOR DAMAGES CAUSED BY BREACHING THE ABOVE WARNINGS.
LED Lamps
LED lamp assemblies are a spare part and are not repairable or replaceable by the customer.
If an LED lamp fails, it must be replaced by a suitably qualified technician.
Please call Glen Dimplex after sales service.
Operating Instructions

natural_image
Five circular icons representing different renewable energy and power symbols (propane, fan, sun, power) without any text or labels.- Turn the rangehood on by pushing the POWER button.
- To start the rangehood on its 1^st speed, push the LOW SPEED button. An indicator light surrounding the button will illuminate. Push the LOW SPEED again to turn the motor off.
- To operate the 2^nd and 3^rd speed of the rangehood, push either the MEDIUM SPEED or HIGH SPEED buttons
- To operate the lights, push the LIGHT button. To switch off, push the LIGHT button again.
- The rangehood can be switched off by pushing the POWER button once to firstly cease operation of the motor and then a second time to power down the unit.
It is recommended to start the Range Hood prior to commencing to cook and leave the Range Hood in operation for 15 minutes after cooking is finished in order to completely eliminate cooking vapours and odours.
Use and Care
Cleaning your rangehood
The proper function of the rangehood requires regular maintenance operations.
The anti-grease filters capture the grease particles suspended in the air, and are therefore subject to clogging according to the frequency of the use of the appliance.
In order to prevent fire hazard, it is recommendable to clean the filter at a minimum of every 2 months by carrying out the following instructions:
- Remove the filters from the cooker hood and wash them in a solution of water and neutral liquid detergent, leaving to soak.
- Rinse thoroughly with warm water and leave to dry.
- The filters may also be washed in the dishwasher.
The aluminum panels may alter in color after several washes. This is not cause for customer complaint nor replacement of panels.
Clean the fan and other surfaces of the cooker hood regularly using a cloth moistened with denatured alcohol or non abrasive liquid detergent.
Keep motor and other parts free from water as this will cause damage to the appliance.
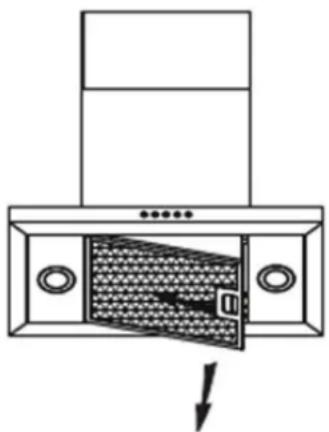
Removing the anti grease filters:
- Slide the plastic filter handle inwards and pull the filter down.
To refit the filters:
- Angle the tabs on the filter into slots at one end.
- Slide plastic filter handle inwards and push the filter into place.
natural_image
Diagram of a kitchen chimney with ventilation grilles and a downward arrow indicating airflow (no text or symbols)Installation
Assembly and electrical connections must be carried out by authorised personnel.
Electrical Connection
The Range Hood is fitted with a power cord and 3 pin plug. Install the Range Hood so that the plug is easily accessible. Plug the 3-pin plug into a properly earthed, 10A general purpose power outlet.
If the supply cord is damaged, it must be replaced by the manufacturer or its service agent or a similarly qualified person in order to avoid a hazard.
The appliance has been manufactured as a class I, therefore earth cable is necessary.
The connection to the mains is carried out as follow:
| IEC227 North America | ||
| L = Live Brown Black | ||
| N = Neutral Blue White | ||
| E = Earth Green/Yellow Green |
If not provided, connect a plug for the electrical load indicated on the description label. Where a plug is provided, the cooker hood must be installed so that the plug is easily accessible after installation.
An omnipolar switch with a minimum aperture of 3mm between contacts, in line with the electrical load and local standards, must be placed between the appliance and the network in the case of direct connection to the electrical network.
Installation
Instructions for Installation
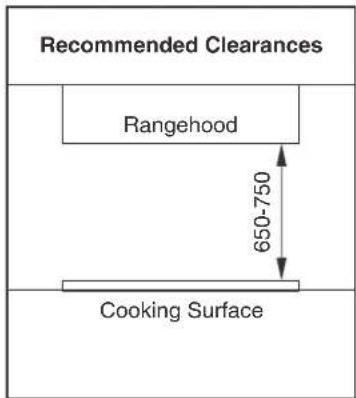
Install Range Hoods in accordance with the manufacturer's instructions. For optimum performance, we recommend that all Range Hood clearances be a minimum of 650mm to a maximum of 750mm between the top of the cooking surface to the underside of the Range Hood. The distance may be reduced to 600mm to align with AS/NZS 5601.
WARNING: DO NOT penetrate any screws into the range hood as this may result in electrical hazards.
WARNING: Failure to install the screws or fixing device in accordance with these instructions may result in electrical hazards.
If a connection flue composed of two parts is used, the upper part must be placed outside the lower part.
Exhaust air must not be discharged into a flue which is used for exhausting fumes from appliances burning gas or other fuels. Installation must comply with any local regulations concerning the discharge of exhaust air.
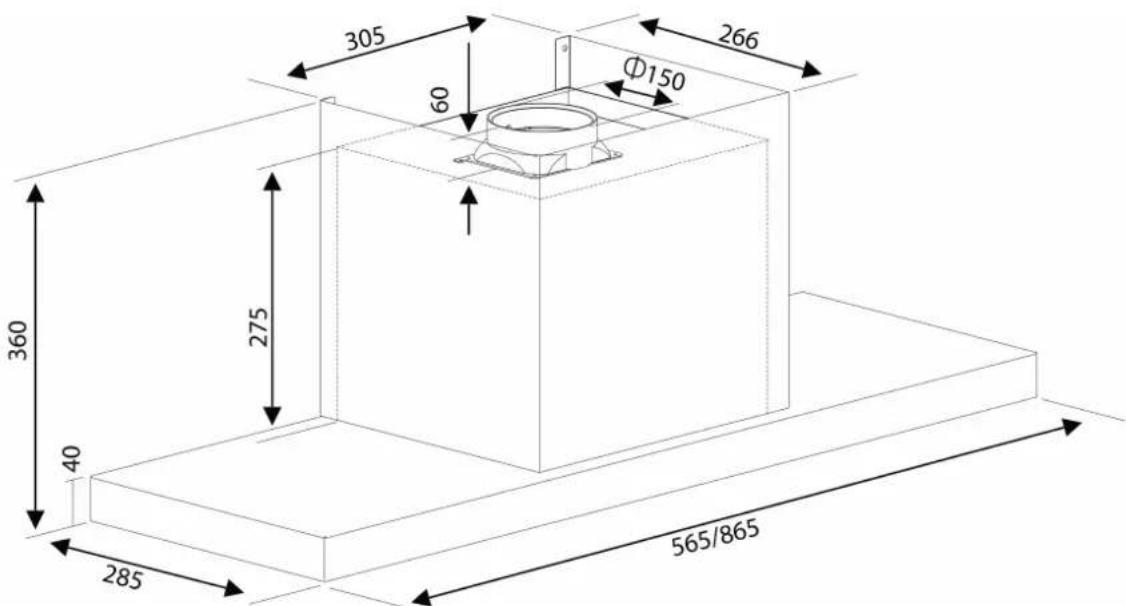
Before proceeding with the assembly, remove the anti-grease filter so that the unit is easier to handle. Prepare the hole in the ceiling or wall for the evacuation of the air.
Installation
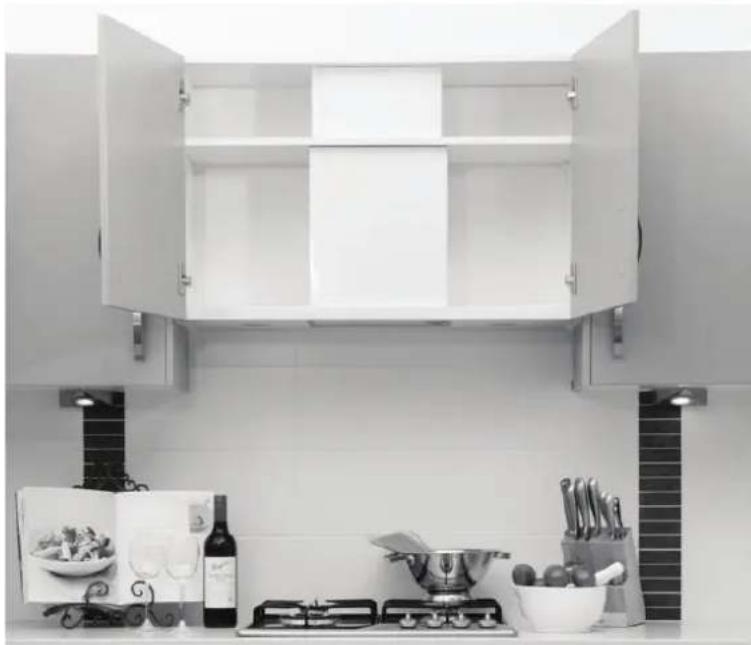
The IRI6WE3, IRI9WE3, IRI6SE1 & IRI9SE1 are designed to be installed fully integrated into an overhead cupboard as pictured below. The IRI6WE3& IRI6SE1 are suited for a 600mm cupboard and the IRI9WE3 & IRI9SE1 are suited for a 900mm cupboard.
natural_image
Interior kitchen scene with white cabinet, cooking utensils, and a wine bottle on a stove (no visible text or symbols)Installation of the IRI9WE3Integrated rangehood in an overhead cupboard
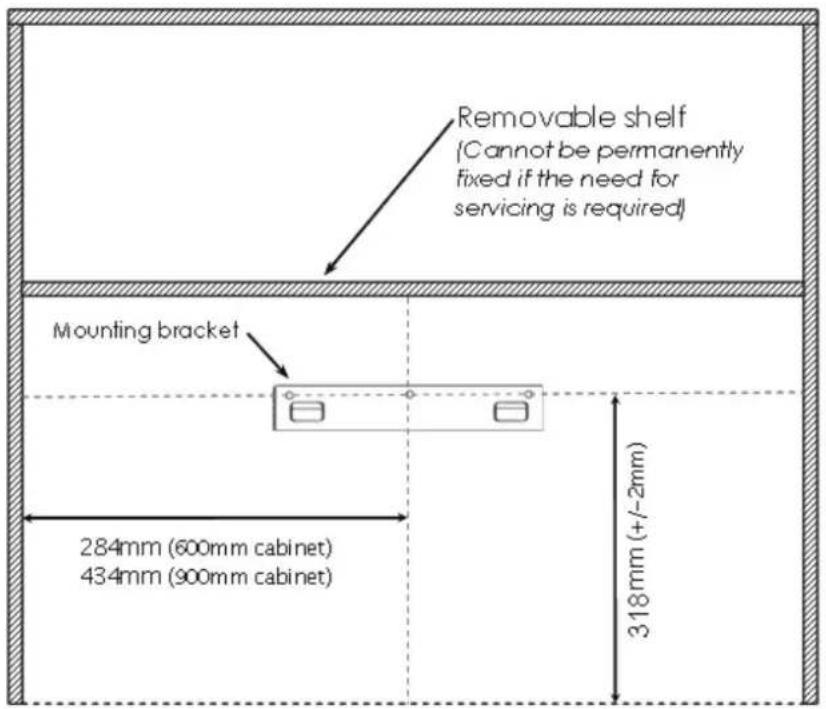
The Integrated Rangehood is mounted to the rear of the overhead cupboard. Supplied with the rangehood is a mounting bracket (Fig. 2)

natural_image
Simple diagram with two rectangular shapes and three small circles, no text or symbols presentFig. 2
Installation
Mount the Integrated Rangehood onto the two tabs on the mounting bracket into the two matching slots located at the rear of the rangehood. (Fig. 4)
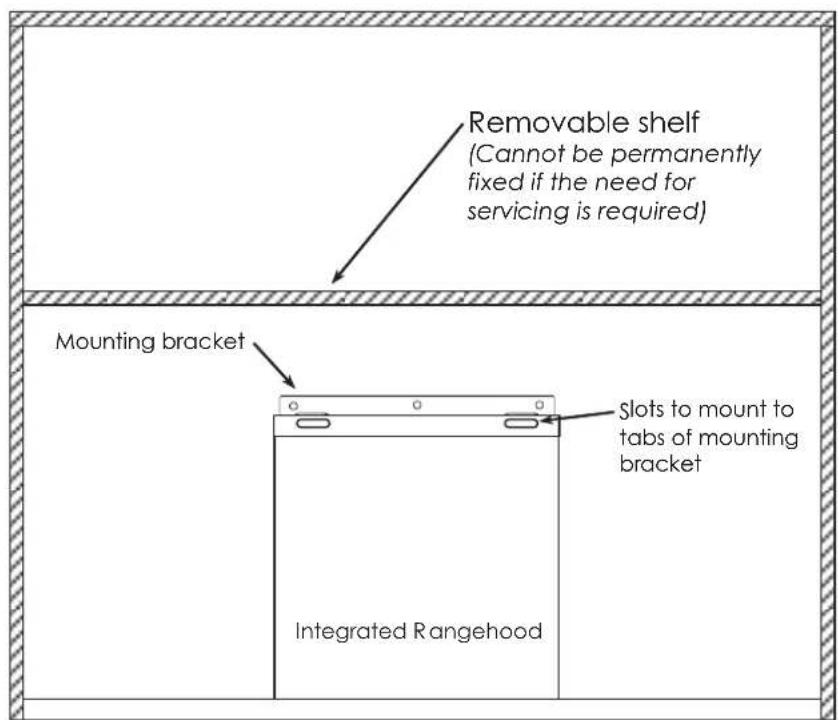
Fig. 4
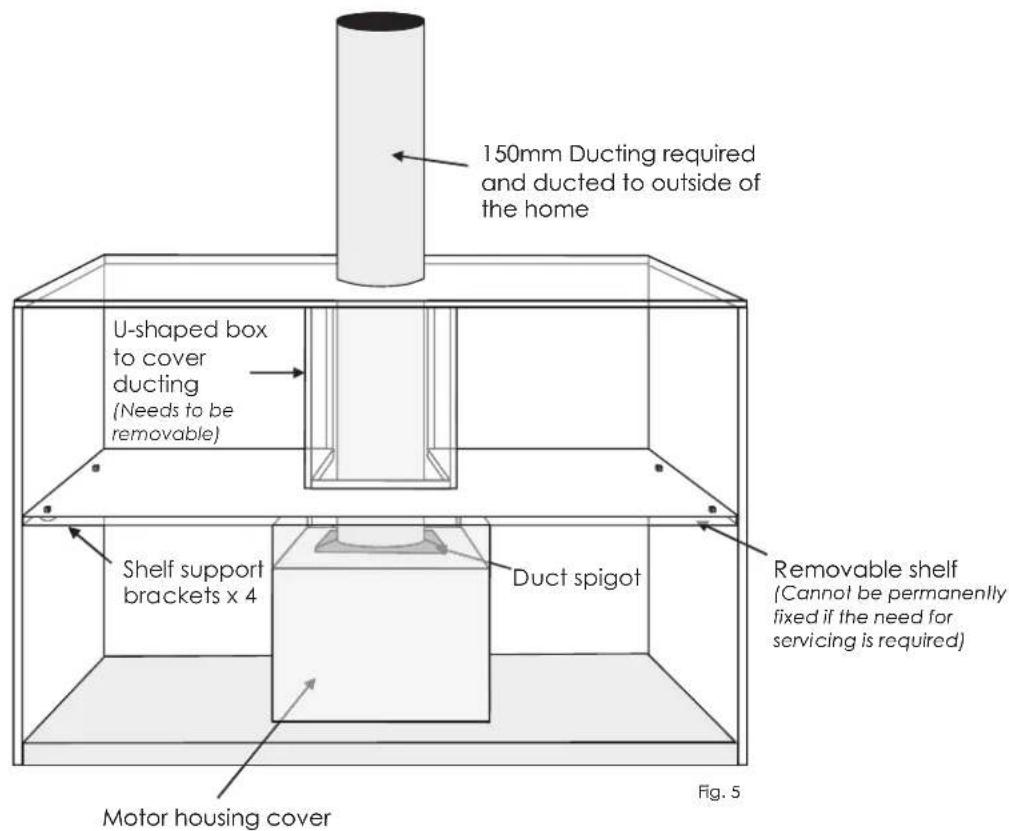
The shelf above the top of the rangehood needs to removable, should the need for servicing be required at a later date. The shelf needs to be located no less than 400mm above the top of the rangehood as the metal motor housing supplied needs to be put in place after the rangehood has been installed.
Installation
Above the shelf a U-shaped box can be made to cover the duct so it cannot be seen when the overhead cupboard is open. (Fig.5)
Ducting
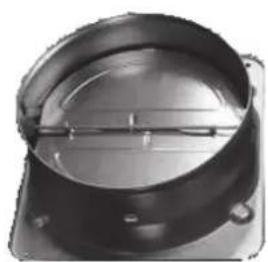
Fit 150mm duct spigot (pictured below) with the four 8mm screws provided over the rectangular hole located at the top rear of the integrated rangehood. Fit 150mm flexible ducting (pictured below), supplied, to the ducting spigot, Using one of the nylon ties, supplied, secure the ducting to the duct spigot.
A hole or cutout needs to be made in the centre rear of the removable shelf positioned above the integrated rangehood for the ducting to go through.
natural_image
Close-up of a metallic mechanical component with a circular top and flange (no visible text or symbols)
natural_image
Close-up of a cylindrical container filled with granular material (no visible text or symbols)150mm duct spigot 150mm flexible ducting
Installation
The integrated rangehood can be installed in either ducted or re-circulating method. The integrated rangehood is supplied with a small length of flexible duct, although may not be sufficient in all installations. The installer needs to determine the method in which the rangehood will be installed and may need to supply the appropriate components to duct the rangehood correctly.
Ducting components will need to be supplied by the installer as every installation can be different. The size of the duct pipe needs to be no less than 150mm in diameter. Use of smaller diameter duct pipe will effect performance and create air noise from the rangehood
Re-circulation installation
150mm flexible duct is provided with the integrated rangehood for re-circulating installation. This type of installation can be executed to the top of a cupboard or through a bulkhead above the cupboard. In both cases a mesh cover will need to be supplied by the installer to keep out insects and vermin. The size of the duct pipe needs to be no less than 150mm in diameter. Use of smaller diameter duct pipe will effect performance and create air noise from the rangehood.
The shelf above the top of the rangehood needs to removable, should the need for servicing be required at a later date. The shelf needs to be located no less than 400mm above the top of the rangehood as the metal motor housing supplied needs to be put in place after the rangehood has been installed. Above the shelf a U-shaped box can be made to cover the duct so it cannot be seen when the overhead cupboard is open. (Fig.6)
Installation
Carbon filters may be required to reduce any fumes or smells being re-directed back into the kitchen environment.
OPTIONAL Carbon Filter code - CF260
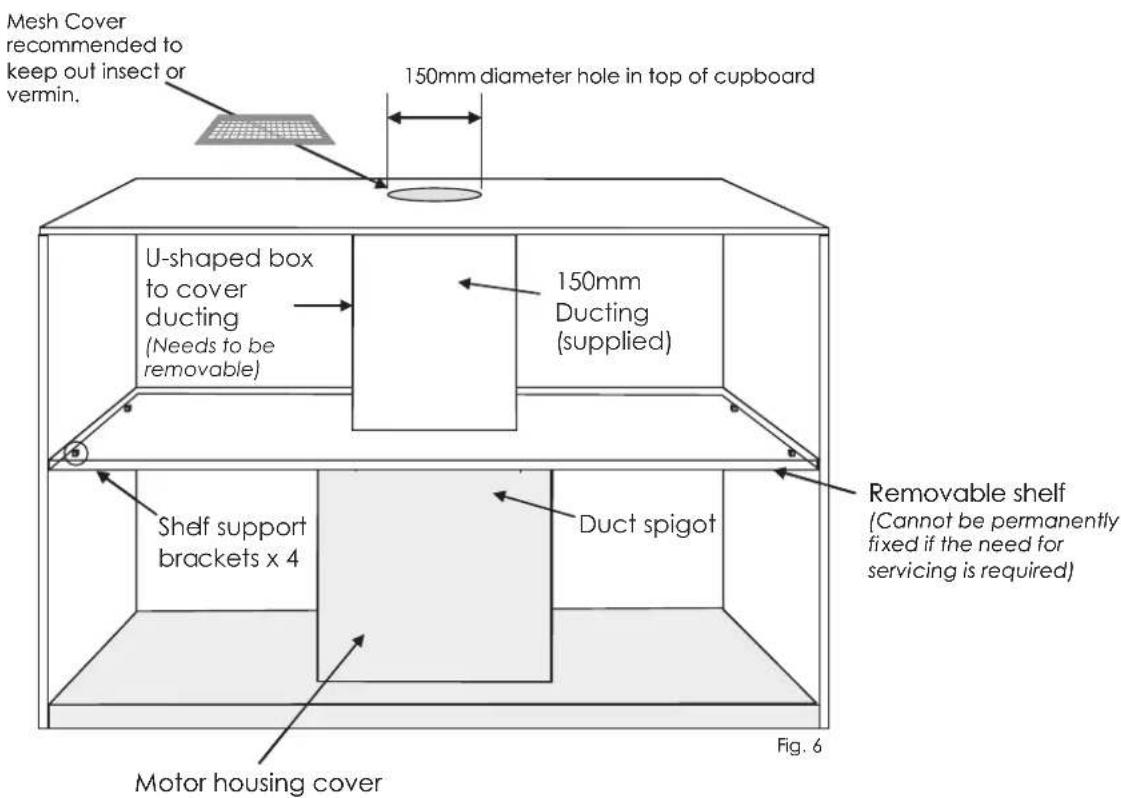
INSTALLING AND CHANGING THE CARBON FILTER - PART NO. CF260
This rangehood can be fitted with an optional carbon filter that will aid in the removal of grease, smoke and cooking odours from the air before it is recirculated into the room.
The square carbon filter attaches to the base of the motor housing above the aluminum mesh filters. Detailed instructions for fitting and replacing the carbon filter can be found below.
We recommend replacing the carbon filter every 3-4 months or sooner, depending on how frequently the rangehood is used, otherwise the performance of the rangehood can be impeded.
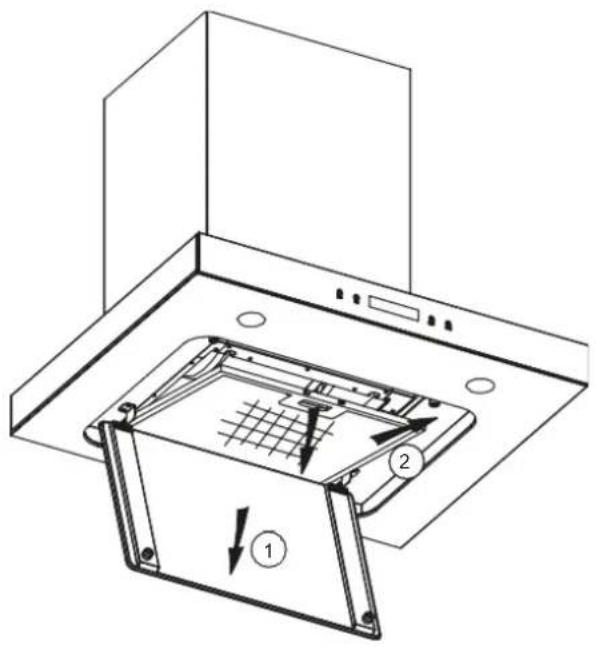
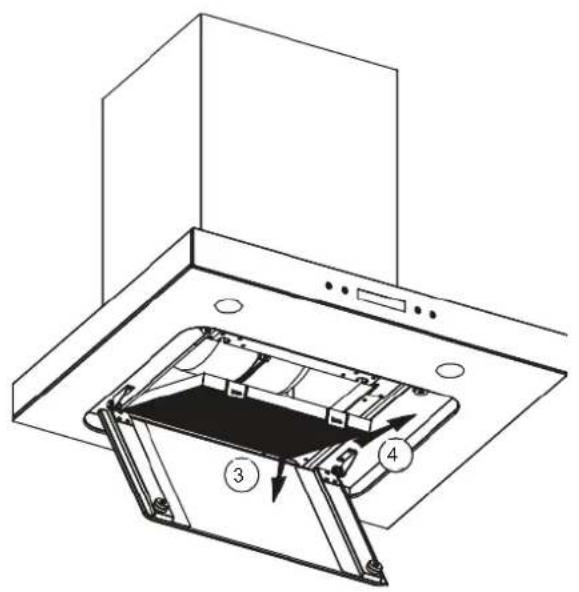
-
If the rangehood has a perimeter panel, then pull down to reveal the mesh filters, otherwise proceed directly to Step 2.
-
Push the handle of the aluminum mesh filters towards the rear of the rangehood until they're released from the housing and then remove them and set aside.
-
If replacing a carbon filter, release the old one from the housing and pull down.
-
Insert the new carbon filter and snap into the housing.
-
Re-insert aluminum mesh filters (set aside in step 2) into the housing ensuring they click into place.
-
Close the perimeter panel (if applicable)
Use and Care
Troubleshooting
| Problem | Possible reason | Solution |
| Hood doesn’t work | No electricity supply | Check the plug is connected |
| Check that the main switch/circuit breaker/safety switch is turned on | ||
| Poor airflow | Aluminum grease filters clogged | Clean the filters and replace when dry |
| Motor running but no air flow | Butterfly valve jammed | Contact service department |
| Motor turns off after a few minutes | High temperature safety device activated | The kitchen is not sufficiently ventilated |
| The hood is installed too near to the cooktop | The hood must be at least 600mm from the top of the cooktop | |
| Oil dripping onto stove | Aluminum grease filter saturated | Wash the aluminum grease filters |
| Whirring sound | Something in contact with fan blade | Contact service department |
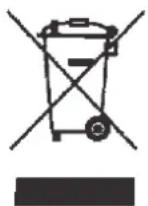
Disposal
By ensuring this product is disposed of correctly, you will help prevent potential negative consequences for the environment and human health, which could otherwise be caused by inappropriate waste handling of this product.
The symbol on the product indicates that this product may not be treated as household waste. Instead it shall be handed over to the applicable collection point for the recycling of electrical and electronic equipment.
Disposal must be carried out in accordance with local environmental regulations for waste disposal.
For more detailed information about treatment, recovery and recycling of this product, please contact your local city council office.
MANUFACTURER GUARANTEE
This warranty is provided in Australia by Glen Dimplex Australia Pty Limited ABN 69 118 275 460 (Phone number 1300 556 816) and in New Zealand by Glen Dimplex New Zealand Limited NZBN 9429000069823 (Phone number 09 274 8265) in respect of the Glen Dimplex product.
1. Glen Dimplex Express Warranty
Subject to the exclusions below, we warrant that the product will not have any electrical or mechanical breakdowns within:
a) In the case of Glen Dimplex products used for personal, domestic or household purposes, a period of 2 years from the date the product is purchased as a brand-new product from a retailer located in Australia / New Zealand.
b) In the case of Glen Dimplex products used for purposes other than personal, domestic or household purposes (including business or commercial use), a period of 90 days from the date the product is purchased as a brand-new product from a retailer located in Australia / New Zealand. Glen Dimplex products are designed and intended for domestic use only; and
c) All warranty repairs must be carried out by Glen Dimplex or their nominated service agent
Note: warranty periods detailed above may vary in line with agreements with select retail and builder partners and may differ between Australia and New Zealand.
The benefits conferred by this express warranty are in addition to the Consumer Guarantees referred to in section 3 and any other statutory rights you may have under the Australian / New Zealand Consumer Law and/or other applicable laws.
2. Warranty exclusions
This express warranty does not apply where:
a) The product has been installed, used or operated otherwise than in accordance with the product manual or other similar documentation provided to you with the product;
b) The product requires repairs due to damage resulting from accident, misuse, incorrect installation, insect or vermin infestation, improper liquid spillage, cleaning or maintenance, unauthorised modification, use on an incorrect voltage, power surges and dips, voltage supply problems, tampering or unauthorised repairs by any persons, use of defective or incompatible accessories or exposure to abnormally corrosive conditions, events independent of human control which occurred after the goods left the control of Glen Dimplex;
c) The repair relates to the replacement of consumable parts such as fuses and bulbs or any other parts of the product which require routine replacement;
d) You are unable to provide us with reasonable proof of purchase for the product;
e) the breakdown occurs after the expiry of the express warranty period set out in section 1 or
f) the product was not purchased in Australia / New Zealand as a brand-new product.
3. Consumer guarantees
Our goods come with guarantees that cannot be excluded under the Australian / New Zealand Consumer Law. You are entitled to a replacement or refund for a major failure and for compensation for any other reasonably foreseeable loss or damage. You are also entitled to have the goods repaired or replaced if the goods fail to be of acceptable quality and the failure does not amount to a major failure.
4. How to make a claim
You may make a claim under this warranty through our website, contacting our customer care line or via email. Contact details for Glen Dimplex Australia and New Zealand can be found at the end of this document
To make a valid claim under this warranty, you must:
a) Lodge the claim with us as soon as possible and no later than 14 days after you first become aware of the breakdown;
b) Provide us with the product serial number;
c) Provide us with reasonable proof of purchase for the product. This can take the form of a store receipt, new home handover form or other payment receipt documentation; and
d) If required by us, provide us (or any person nominated by us) with access to the premises at which the product is located at times nominated by us (so that we can inspect the product).
5. Warranty claims
If you make a valid claim under this warranty and none of the exclusions set out in section 2 apply, we will, at our election, either repair the product or replace the product with a product of identical specification (or where the product is superseded or no longer in stock, with a product of as close a specification as possible).
Goods presented for repair may be replaced by refurbished goods of the same type rather than being repaired. Refurbished parts may be used to repair the goods.
Products are designed and supplied for normal domestic use. We will not be liable to you under this warranty for business loss or damage of any kind whatsoever.
Glen Dimplex Australia Pty Ltd Glen Dimplex New Zealand Ltd
www.glendimplex.com.au
www.glendimplex.co.nz
Australia
New
Zealand
Ph: 1300 556 816 Ph: 09 274 8265
customer.care.ha@glendimplex.com.au nztechserv@glendimplex.co.nz
READ THE INSTRUCTION BOOKLET BEFORE INSTALLING AND USING THE APPLIANCE.
The manufacturer will not be responsible for any damage to property or to persons caused by incorrect installation or improper use of the appliance.
The manufacturer is not responsible for any inaccuracies, due to printing or transcription errors, contained in this manual. In addition, the appearance of the figures reported is also purely indicative.
The manufacturer reserves the right to make changes to its products when considered necessary and useful, without affecting the essential safety and operating characteristics.
Glen Dimplex constantly seeks ways to improve the specifications and designs of their products. Whilst every effort is made to produce up to date literature, this document should not be regarded as an infallible guide. Actual product only should be used to derive cut out sizes.
All appliances must be installed by a qualified person/s with adherence to the relevant electrical, plumbing and building codes, with compliance being issued as required by state or national legislation.
Additionally, all upright cookers must have the anti-tilt device installed correctly in adherence to the relevant standards by a licenced installer.
For maximum effectiveness and efficiency all rangehoods should be installed with the use of ductwork, by a licenced installer with adherence to the relevant state and national building codes and regulations.
All Glen Dimplex appliances are for Domestic use only, and must be installed by a licence installer into Domestic Applications only, without exception and to the required Authorities guidelines. Any installation outside of this will VOID warranty. Alfresco areas are not a Domestic application.

Distributed by:
Glen Dimplex New Zealand Ltd Glen Dimplex Australia F
For full terms and conditions, or to register your product warranty, please visit our website: www.glendimplex.com.au www.glendimplex.co.nz
For service advice, please contact the Customer Care Centre by phone or email below.
Australia New Zealand
Ph: 09 274 8265 Ph: 1300 556 816
customer.care.ha@glendimplex.com.au nztechserv@glendimplex.co.nz
- CONTENTS
- For You Safety....3
- Use and Care 6
- Installation ....8
- For Your Safety
- Safety Precautions
- Before connecting to the electricity network:
- WARNINGS!
- LED Lamps
- Operating Instructions
- Use and Care
- Cleaning your rangehood
- Installation
- Electrical Connection
- Instructions for Installation
- Ducting
- Re-circulation installation
- OPTIONAL Carbon Filter code - CF260
- INSTALLING AND CHANGING THE CARBON FILTER - PART NO. CF260
- Disposal
- MANUFACTURER GUARANTEE
- Glen Dimplex Express Warranty
- Warranty exclusions
- Consumer guarantees
- How to make a claim
- Warranty claims
- Glen Dimplex Australia Pty Ltd Glen Dimplex New Zealand Ltd
- READ THE INSTRUCTION BOOKLET BEFORE INSTALLING AND USING THE APPLIANCE.
Brand : Euromaid
Model : IRI6WE3
Category : Range hood