
ZKB7313N - Oven ZANKER - Free user manual and instructions
Find the device manual for free ZKB7313N ZANKER in PDF.


| Product Type | Built-in Electric Oven |
| Brand | Zanker |
| Model | ZKB7313N |
| Overall Dimensions (H x W x D) | 59.5 cm x 56.0 cm x 50.0 cm |
| Cavity Dimensions (H x W x D) | 32.5 cm x 44.0 cm x 40.0 cm |
| Capacity | 58 L |
| Power Supply | 230 V ~ 50 Hz |
| Maximum Power Consumption | 1825 W |
| Heating Elements | Top: 800 W, Bottom: 1000 W, Grill: 1750 W |
| Oven Functions | Conventional Cooking, Bottom Heat, Top Heat, Grill |
| Temperature Range | 50 °C to 250 °C |
| Oven Light | 25 W, replaceable (E14, 300 °C rated) |
| Control Type | Rotary knobs (Function & Thermostat) |
| Safety Features | Safety thermostat, auto shut-off on overheating |
| Door Type | Removable for easy cleaning |
| Cleaning | Manual cleaning with mild detergent; no steam cleaners |
| Installation | In-column or undertop recess; requires qualified electrician |
Frequently Asked Questions - ZKB7313N ZANKER
User questions about ZKB7313N ZANKER
0 question about this device. Answer the ones you know or ask your own.
Ask a new question about this device
Download the instructions for your Oven in PDF format for free! Find your manual ZKB7313N - ZANKER and take your electronic device back in hand. On this page are published all the documents necessary for the use of your device. ZKB7313N by ZANKER.
USER MANUAL ZKB7313N ZANKER
Warnings - Built-in ovens
It is most important that the instruction book should be retained with the appliance for future reference. Should the appliance be sold or transferred to another owner, or should you move house and leave the appliance, always ensure that the book is supplied with the appliance in order that the new owner can be acquainted with the functioning of the appliance and the relevant warnings. These warnings are provided in the interest of safety. You must read them carefully before installing or using the appliance.
Installation
- Any installation work must be undertaken by a qualified electrician or competent person.
- Installation and initial adjustment of your oven MUST be carried out by qualified personnel in compliance with current regulations. Specific installation instructions for the installer are given in this booklet.
During use
- This appliance has been designed for cooking edible foodstuffs only, and must not be used for any other purposes.
- It is dangerous to alter the specifications or modify the product in any way.
- Appliances become very hot with use, and retain their heat for a long period after use.
- Always ensure that the control knobs are in the "off" position when not in use.
- For hygiene and safety reasons, this appliance should be kept clean at all times. A build-up of fats or foodstuffs could result in a fire.
- Never line any part of the oven with aluminium foil.
- Easy clean-liners (if provided) should never be cleaned with any other than soapy water.
- Before any maintenance or cleaning work is carried out on the appliance, always turn off the isolator switch at the cooker point, and allow to cool.
- During oven cooking and grilling, the appliance door and the surrounding parts are warmed up to a very high temperature. Be careful and keep children away from
the appliance while you are using it. When you connect other appliances to a plug near the oven, check carefully that the wire does not touch warm parts of the oven and does not get taken in the oven door.
- Ensure that the shelves are put in place in the correct way.
- This oven (even if it is linked to an electrical cooking table) is made to function at 230 V mono, double or three-phase with neutral.
- A polyphase linking without neutral (400 V) can induce the distraction of the oven and of the eventual cooking table.
Child safety
- This appliance is designed to be operated by adults. Children should not be allowed to tamper with the controls or play with the product.
- Children should be supervised at all times and should not be allowed to touch the hot surfaces or be in the vicinity when in use or until the appliance has cooled after use.
Technical assistance
- This appliance should be serviced by an authorized Network Service Centre, and only genuine spare parts should be used.
- Under no circumstances should you attempt to repair the appliance yourself. Repairs carried out by inexperienced persons may cause injury or serious malfunctioning. Refer to your local Service Centre. Always insist on genuine spare parts.
Guide to Use the instructions

Safety Instructions

Step by step instructions for an operation

Hints and Tips
MANUFACTURER:
ELECTROLUX ZANUSSI S.p.A.
Viale Bologna, 298
47100 FORLÌ (Italy)
When the oven is first installed

Once the oven has been installed:
a) set the thermostat knob to MAX (250);
b) switch the oven function control knob to conventional cooking
c) allow the oven to run empty for approximately 45 minutes;
d) open a window for ventilation.
During this time, an unpleasant odour may be emitted. This is absolutely normal, and is caused by residues of manufacturing.
Repeat this operation for the grill and fan cooking function.
Once this operation is carried out, let the oven cool down, then clean the oven cavity with a soft cloth soaked in warm soapy water.

Before cooking for the first time, carefully wash the oven accessories.
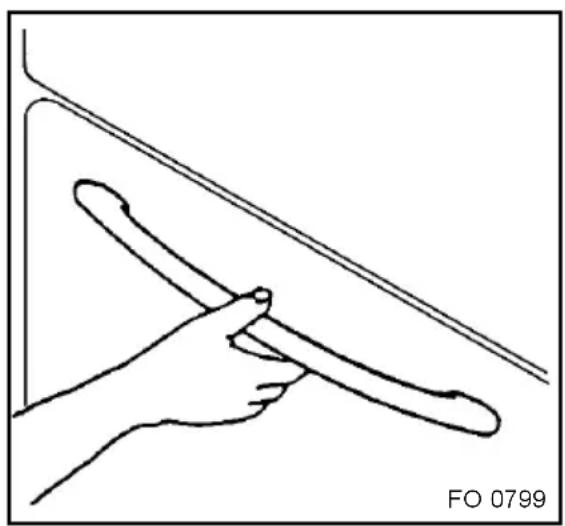
Fig. 1
natural_image
Line drawing of a hand holding a curved object against a diagonal line, no text or symbols present
To open the oven door, always catch the handle in its central part (Fig. 1).
Description of the appliance

- Control panel
- Oven Function control knob
- Oven Thermostat control knob
- Overall control light
- Oven thermostat control light
- Oven lamp
Electric oven
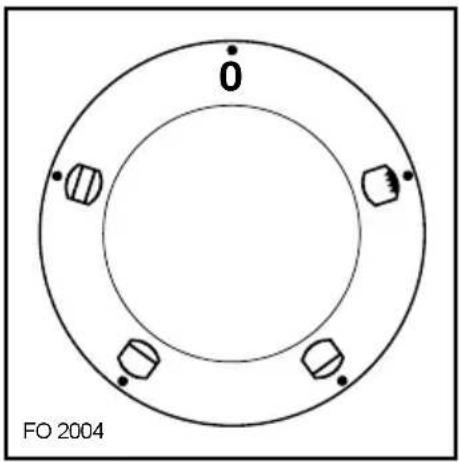
Oven Function (Fig. 2) and Thermostat (Fig. 3) control knobs
They enable to select the most appropriate type of heating for the different cooking requirements by appropriately connecting the heating elements and adjusting temperature to the required level.
Meaning of the symbols

Conventional cooking

Bottom heating element

Top heating element

Grilling
Conventional cooking
— Turn the oven function knob to
— turn the thermostat knob to the desired temperature setting.

Bottom heating element
— Turn the oven function knob to
— turn the thermostat knob to the desired temperature setting.

Top heating element
— Turn the oven function knob to
— turn the thermostat knob to the desired temperature setting.

Grilling
— Turn the oven function knob to
— turn the thermostat knob to the desired temperature setting.

Oven thermostat control light (°C)
This light goes off when the oven heats up to the temperature set and comes on again every time the thermostat cuts in to stabilize temperature.
natural_image
Circular mechanical component diagram with four holes and mounting holes, labeled 'FO 2004' (no text or symbols on the diagram itself)Fig. 2

Fig. 3
Operating control light
It indicates that one or more of the heating elements are turned on.
Safety thermostat
In order to avoid excessive overheating due to incorrect use of the appliance or else to a faulty component, the oven is equipped with a safety thermostat which cuts off the power supply if necessary. Operation is restored automatically when the oven temperature decreases to normal values. Therefore, if the thermostat cuts in because you have not been using the appliance correctly, the oven can be used again simply by waiting for the appliance to cool down. If, instead, the thermostat cuts in because of a faulty component, you should call the Service Department.
Hints and tips for using the oven

Always cook with the oven door closed.
Conventional cooking
Heat comes from the top and from the bottom, therefore it is preferable to use the central runners. If cooking requires more heat from the top or from the bottom use the top or the bottom runners or turn the control knob to the relevant positions (bottom heating and top heating).
Grilling
When grilling meat or fish, spread a little oil on them and always place them on the oven grid. The shelf level depends on the thickness of the food.
Always place the dripping pan at the lowest level, with some water in it, to avoid smoke and unpleasant smells.

Some hints
For baking cakes
Cakes require a moderate temperature (normally between 150 and 200°C). In addition, the oven must be heated up beforehand - for about 10 minutes.
The oven door should not be opened before at least 3/4 of the set cooking time is up.
Normal short pastry dough should be cooked in a mould or tin for 2/3 of total cooking time required and then garnished as desired before being cooked completely.
Clearly, the remaining cooking time depends on the type of garnish used (jam, fruit, etc.).
Care should be taken to ensure that any dough and cake mixes are of the right consistency since an unduly moist mix lengthens cooking time unnecessarily. The raw dough or mix should therefore be fairly difficult to detach from the spoon or beater.
For cooking meat and fish
Meat cooked in the oven should weigh at least 1 kg to prevent it from becoming too dry during cooking. Very tender red meat to be cooked rare, i.e. well cooked on the outside but extremely juicy inside, requires high-temperature cooking (200-250°C).
White meat, poultry and fish instead require low-temperature cooking (150-175°C).
The ingredients for the accompanying sauce or gravy should be put in the baking pan at the very beginning only when cooking times are short. Otherwise they should be added during the last half hour. A simple way of checking whether meat is done or not is to press it with a spoon; if the meat does not yield under this pressure it means that it is done to a turn. In the case of roast beef and fillet steaks, the inside of which should remain fairly pink in color, cooking times must be short. The meat can be cooked in a baking pan or else directly on the shelf - in this case a dripping pan must obviously be placed underneath the shelf to collect the juice. Once the meat is cooked, it is advisable to let it rest for at least 15 minutes before carving so that the juice does not seep out. To prevent the formation of too much smoke in the oven during roasting, it is a good idea to pour a little water into the

Fig. 4
dripping pan and—to prevent steam—to add a little bit more during cooking if the original amount dries up too much.
Before serving, the various courses can be kept hot in the oven which should be turned down to the minimum temperature.

Attention! - Do not place pans, dripping pans, biscuit pans or aluminium foil on the oven bottom. This could cause a heat build-up which would affect the baking results and damage the oven enamel.
Cooking times
Cooking times vary according to the type of food to be cooked, its consistency, and volume. We suggest that you take particular note of your first cooking experiments with the oven, since operating in the same conditions for the same dishes you will of course obtain similar results.
Only experience will enable you to make the appropriate changes to values given on charts.
Grilling table
| TYPE OF DISH | Quantity | Grilling | Cooking time(minutes) | |||
| PIECES | WEIGHT | Level | temp. °C | Upperside | Lowerside | |
| Steaks | 4 800 | 4 max | 10 8 | |||
| Chops | 4 600 | 4 max | 12 8 | |||
| Sausages 8 500 4 max | 10 6 | |||||
| Chicken (cut in pieces) | 6 800 | 3 max | 30 | 20 | ||
| Kebabs | 4 700 | 4 max | 12 | 10 | ||
| Chicken (breast) | 4 400 | 4 max | 13 | 10 | ||
| Tomatoes | 8 500 | 4 max | 12 | — | ||
| Fish (fillets) | 4 400 | 4 max | 8 6 | |||
| Sandwiches | 4 | — | 4 | max | 8 | — |
| Toast | 4 | — | 4 | max | 2~3 | 1 |
Always place the dripping pan at the lowest level, with some water in it.
Roasting and baking table
| WEIGHT (GR) | TYPE OF DISH | Conventional Cooking | Cooking time minutes minutes | NOTES | |
 | temp.°C | ||||
| Cakes | |||||
| Whipped up kneading | 2 180 | 45 ~ 60 | |||
| Leavened kneading | 2 180 | 20 ~ 35 | |||
| Shortbread dough | 2 180 | 20 ~ 30 | |||
| Butter-milk cheese cake | 1 175 | 60 ~ 80 | |||
| Apple cake 1 180 40 ~ 60 | |||||
| Strudel 2 175 60 ~ 80 | |||||
| Jam-tart 2 180 45 ~ 60 | |||||
| Small cakes 2 180 15 ~ 25 | |||||
| Biscuits 2 180 10 ~ 20 | |||||
| Meringues 2 100 90 ~ 120 | |||||
| Bread and Pizza | |||||
| 1000 | White bread | 1 200 45 ~ 60 | 1 piece | ||
| 500 | Rye bread | 2 | 200 | 30 ~ 45 | In bread pan |
| 500 | Bread rolls | 2 200 | 20 ~ 35 | 8 rolls | |
| 250 | Pizza | 1 | 220 | 20 ~ 35 | In baking pan |
| Flans | |||||
| Pasta flan | 2 200 | 40 ~ 50 | |||
| Vegetable flan | 2 200 | 45 ~ 60 | |||
| Quiches | 2 200 | 35 ~ 45 | |||
| Lasagne | 2 200 | 45 ~ 60 | |||
| Meat | |||||
| 1000 | Beef | 2 | 200 | 50 ~ 70 | On grid |
| 1200 | Pork | 2 | 200 | 100 ~ 130 | On grid |
| 1000 | Veal | 2 | 200 | 90 ~ 120 | On grid |
| 1500 | English roast beef | 2 220 | 50 ~ 70 | On grid | |
| 1200 | Lamb | 2 200 | 110 ~ 130 | Leg | |
| 1000 | Chicken | 2 | 200 | 60 ~ 80 | Whole |
| 4000 | Turkey | 2 | 200 | 210 ~ 240 | Whole |
| 1500 | Duck | 2 | 175 | 120 ~ 150 | Whole |
| 3000 | Goose | 2 | 175 | 150 ~ 200 | Whole |
| 1200 | Hare | 2 200 60 ~ 80 | Cut in pieces | ||
| Fish | |||||
| 1000 | Whole | 2 200 40 ~ 60 | 2 fishes | ||
| 800 | Fillets | 2 200 30 ~ 40 | 4 fillets | ||
NOTES: Cooking times do not include pre-heating time. We recommend a short oven pre-heating (about 10 minutes) before baking or cooking pizza.
(*) If you need to cook more than one dish at the same time, we recommend you to place them on the levels quoted between brackets.
Cleaning and Maintenance

Before any cleaning switch the oven off and let it cool down. This appliance cannot be cleaned with steam or with a steam cleaning machine.
Important! Before carrying out maintenance and cleaning operations, make sure that your oven is disconnected from the mains power supply.
Cleaning must be carried out after the oven has cooled down. Wash the enamelled parts with lukewarm water and detergent. Do not use abrasive products, such as steel wool pads, acids etc. since these could damage the various surfaces. Rinse stainless steel parts with water after use, and dry them with a soft cloth or chamois leather.
In the case of persistent stains, you can use normal non-abrasive detergents or products specific for stainless steel readily available on the market. Another alternative is a drop of hot vinegar.
When cleaning the oven door with the glass top cover use just hot water, taking care to avoid using coarse cloths or abrasive products.
The hot acids of fruit (e.g. lemons, stewed prunes, etc.) leave difficult-to-remove stains on the enamelled surfaces; this inconvenient may remove enamel gloss, but, it does not impair oven operation.
Clean the oven thoroughly after use; in this way it will be possible to remove cooking residuals more easily, thus avoiding these from burning the next time the oven is used.
Replacing the oven light
Disconnect the appliance from its power supply point. Push in and unscrew the glass cap (Fig. 5). Unscrew the light bulb and replace it with a new heat-proof bulb (300°C) having the following features: - Operative tension: 230 V (50 Hz); - Power: 25 W; - Fitting: E 14. Reconnect the appliance.
Oven door cleaning
For a better cleansing of the oven door, you are suggested to remove it from the appliance with the following procedure: open the door completely; lift the small levers placed on the two hinges and turn the levers toward the inside (Fig. 6). Slowly close the oven door, until it touches the two levers, then push it towards the oven and remove it by pulling it towards the outside. Place the door on a horizontal level. After cleaning, assemble the door again by carrying out the procedure described above backwards. When the two small levers are placed again on the hinges, the door will have been accurately fit.

Fig. 5

Fig. 6
Technical Data
Dimension of the oven recess
Height 59,5 cm
Width 56,0 cm
Depth 50,0 cm
Dimensions of the oven cavity
Height 32,5 cm
Width 44,0 cm
Depth 40,0 cm
Capacity 58 dm 3
Oven thermostat regulation: from 50 up to 250 °C
Heating elements
Oven lamp 25 W
Top Heating Element 800 W
Bottom Heating Element 1000 W
Top + Bottom Heating Elements 1800 W
Grill element 1750 W
Maximum Power absorbed: 1825 W
Operating Voltage (50Hz) 230 V
CE This appliance complies with the following E.E.C. Directives:
- 73/23 - 90/683 (Low Voltage Directive);
- 89/336 (Electromagnetical Compatibility Directive);
- 93/68 (General Directives) and subsequent modifications.
Instructions for the installer

The instructions given below are designed specifically for a qualified installer and should aid him or her to perform all installation, adjustment, and maintenance operations with absolute precision and in compliance with all current legislation and regulations. We strongly recommend that all operations for the installation of your cooker be carried out by Qualified Personnel in accordance with existing rules and regulations.
Electrical connection
Prior to making the electrical connection, make sure that:
— the protection fuse and the domestic wiring system are suitable to carry the total electric load of the oven (see rating plate);
— your domestic wiring system has an efficient earth connection in compliance with rules and laws in force;
— the wall socket or the omnipole switch used for the electrical connection can easily be reached after the oven is built in.
This appliance is delivered without an electric supply cable, therefore, you will have to fit to it a supply cable with standard plug, suitable for the total electric load shown on the rating plate. The plug is to be inserted into a suitable wall socket. If you require a direct connection to the electric network (mains), it will be necessary to fit between the appliance and the mains an omnipole switch, with a minimum gap between contacts of 3 mm, suitable for the required load and in compliance with rules in force. The green & yellow ground wire must not be interrupted by the switch. The supply cable must in all cases be laid out in such a way as to ensure that it does not reach at any given point a temperature 50^ C higher than the ambient temperature.
Suitable power supply cables are the following types, considering the respective necessary section of cable: H07 RN-F, H05 RN-F, H05 RR-F, H05 VV-F, H05 V2V2-F (T90), H05 BB-F.
Terminal block
The oven has an easily accessible terminal block, which is meant to work with an electric single-phase rate of 230 V (Fig. 7).
The Manufacturer disclaims any liability in case these accident-preventing rules are not observed.

Fig. 7
Building-in
To ensure correct operation of the built-in assembly, the kitchen cabinet and the recess for the built-in appliance must have suitable dimensions.
When the appliance is fitted-in, there must be no open spaces left and it must be closed on all sides by the kitchen furniture to prevent the possibility of inadvertently touching “live” (current carrying) parts of the oven. All parts ensuring such a protection, including any covering panel (for instance, if the appliance is installed at the end or at the beginning of a kitchen counter) must be fastened in such a way as to prevent removal of the same without the aid of some tool. This appliance belongs to the “Y” class relevant to protection against ambient over-heating. This means that the appliance can be placed with its back and with one side close to appliances or walls of higher height. The other side, instead, must be placed close to furniture or appliances, having the same height.
Overall oven dimensions (Fig. 8) In-Column recess dimensions
The recess must have the dimensions shown in Fig. 9.
Undertop recess dimensions
The recess must have the dimensions shown in Fig. 10.
Securing the oven to the cabinet
- Fit the appliance into the cabinet recess.
- Open teh oven door and secure the oven to the kitchen cabinet with four wood screws, which fit the holes provided in the oven frame (Fig.11).

Fig. 8
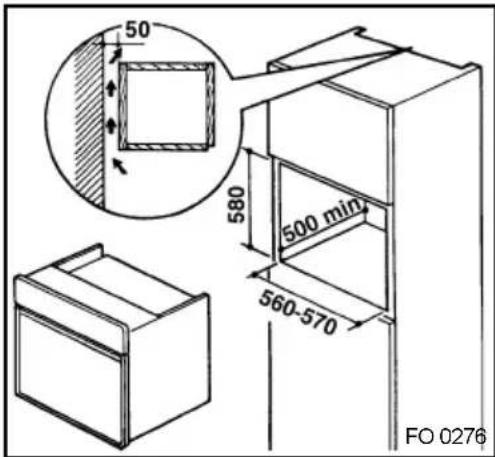
Fig. 9

Fig. 11

GUARANTEE - SPARE PARTS (only for BENELUX)
When calling for repairs during the period of guarantee of the appliance, the original invoice or receipt must be shown or sent together with the appliance to be repaired.
General conditions of guarantee
1 The manufacturer guarantees the appliance indicated on the relative invoice for a period of one year from the date of purchase. In case of a fault during this period if caused by a defect in materials and/or construction, the client is entitled to repair free of charge.
1a Concerning vacuum cleaners for domestic use, the total periodof guarantee is two years. Accessories are subject to a direct usage, consequently these articles are excluded from the guarantee.
2 The manufacturer guarantees technical assistance and repairs for one year. Spare parts fitted during repair are also covered by a one year guarantee from the date of repair. In case of fault during this period, as a direct result of the repair work carried out or caused by the new parts fitted on such occasion, the client is entitled to repair free of charge. The execution of repairs does not prolong the total period of guarantee covering the appliance.
3 Technical Assistance at domicile will be provided only for large apparatus which are difficult to transport such as: washing machines, spin-driers, dishwashers, refrigerators, freezers (vertical or horizontal), ovens, cookers and built-in appliances.
3a The above-mentioned conditions are also valid for refrigerators for caravens on condition that they are situated within the national boundaries and are accessible by roads open to traffic. Furthermore, at the time of the intervention the appliance and its owner, or the person so authorized, must be present at the place agreed upon for the intervention.
4 If, in the opinion of the manufacturer, the appliance as described in point 3 must be transported to a Technical Assistance laboratory, the transportation will be carried out as established by the manufacturer, at his expense and under his responsibility.
5 All appliances not mentioned under points 3 and 3a, including appliances having the same functional characteristics but whose transport is easy, must be sent to the Technical Assistance or taken to them. Throughout the period of guarantee the cost of return transportation will be taken care by the manufacturer.
6 If during the period of guarantee a disfunction occurs due to a defect which cannot be repaired, the appliance will be replaced free of charge.
Extension of the guarantee
7 For motorcompressors of refrigerators/ freezers (excluding the starting device and thermal interrupter) a decreasing guarantee of 20% per year for a period of five years from the date of purchase of the appliance indicated on the relative invoice with repairs free of charge throughout the entire period under guarantee. On completion of the total period of guarantee the cost of travel, workmanship and eventual spare parts will be at the expense of the client.
Exclusion from guarantee
8 The free execution of work for the repair and/or substitution as set out above will not apply if:
- The purchase invoice or receipt indicating the date of purchase and the identification of the appliance cannot be presented or was not sent with the appliance to be repaired;
- The appliance is used for purposes other than those of the domestic nature for which it was made;
- The appliance was not installed, handled or used in conformity with the indications in the instruction manual or in the modalities for use;
- The appliance has been repaired or modified incorrectly by unqualified personnel.
8a If the appliance has been built-in, underinserted, suspendedor installed in such a way that the time required to move it and put it back in position exceeds thirty minutes in total, the extra expenditures occurred will be billed to the owner of the appliance.
8b In case of deterioration due to an irregular installation carried out in agreement with the owner of the appliance, the manufacturer and the technical assistance decline all responsibility.
8c Damage such as scratches, knocks or breakage of movable or dismountable units which were not notified to the manufacturer at the time of delivery are not covered by the guarantee.
Important notice
This appliance has been made to be safe. Inadequate repairs can nonetheless compromise this safety. To avoid such problems and to prevent any eventual damage we advise you to have repairs carried out exclusively by qualified
personnel. We advise you to have repairs or maintenance carried out by the retailer or the Electrolux Service and to request only original spare parts.
Electrolux
DISTRIPARTS
Belgium
Bergensesteenweg 719 / B - 1520 Halle (Lembeek)
Repairing to customer's house:
Tel.: 02-3630444
Fax.: 02-3630400
Spare parts:
Tel.: 02-3630555
Fax.: 02-3630500
Luxembourg


- Warnings - Built-in ovens
- Installation
- During use
- Child safety
- Technical assistance
- Guide to Use the instructions
- When the oven is first installed
- Description of the appliance
- Electric oven
- Oven Function (Fig. 2) and Thermostat (Fig. 3) control knobs
- Meaning of the symbols
- Conventional cooking
- Bottom heating element
- Top heating element
- Grilling
- Oven thermostat control light (°C)
- Operating control light
- Safety thermostat
- Hints and tips for using the oven
- Some hints
- For baking cakes
- For cooking meat and fish
- Cooking times
- Cleaning and Maintenance
- Replacing the oven light
- Oven door cleaning
- Technical Data
- Dimension of the oven recess
- Dimensions of the oven cavity
- Heating elements
- Instructions for the installer
- Electrical connection
- Terminal block
- Building-in
- Overall oven dimensions (Fig. 8) In-Column recess dimensions
- Undertop recess dimensions
- Securing the oven to the cabinet
- GUARANTEE - SPARE PARTS (only for BENELUX)
- General conditions of guarantee
- Extension of the guarantee
- Exclusion from guarantee
- Important notice
- Belgium
- Luxembourg
Brand : ZANKER
Model : ZKB7313N
Category : Oven