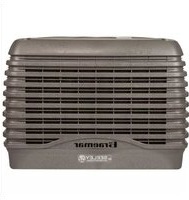
Paradigm LCQ 250 - Air conditioner Braemar - Free user manual and instructions
Find the device manual for free Paradigm LCQ 250 Braemar in PDF.


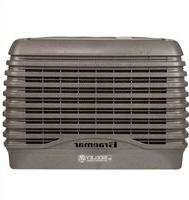
| Product Type | Evaporative Air Conditioner (Cooler) |
| Brand | Braemar |
| Model | Paradigm LCQ 250 |
| Control Type | Wall-mounted control panel |
| Modes of Operation | Automatic, Manual (Cool/Vent) |
| Fan Speed Settings | Adjustable via ▲/▼ buttons |
| Timed Start/Stop | Up to 24 hours |
| Pre-Cool Cycle | Yes (saturates pads before fan starts) |
| Water Management | Automatic drain valve or alternative bleed system |
| Required Exhaust Opening | Minimum 2.0 m² (for model LCQ 250) |
| Maintenance Interval | Before and after summer season; professional service every 2 years |
| Pad Material | Cooling pads (replaceable) |
| Power Supply | 240V AC (typical for Australia) |
| Warranty Contact | 1300 650 644 |
| Installation | Roof-mounted or ground-level; requires professional installation |
| Estimated Dimensions (H x W x D) | 1000 x 600 x 600 mm |
| Estimated Weight | 30 kg |
Frequently Asked Questions - Paradigm LCQ 250 Braemar
User questions about Paradigm LCQ 250 Braemar
0 question about this device. Answer the ones you know or ask your own.
Ask a new question about this device
Download the instructions for your Air conditioner in PDF format for free! Find your manual Paradigm LCQ 250 - Braemar and take your electronic device back in hand. On this page are published all the documents necessary for the use of your device. Paradigm LCQ 250 by Braemar.
USER MANUAL Paradigm LCQ 250 Braemar
Warranty Service
1300 650 644

CONTENTSCONTENTS
Introduction Page 2
Wall Control Functions Page 3
Drain Valve and Alternative Bleed System Page 7
Maintenance Page 8
Troubleshooting Page 10
INTRODUCTION INTRODUCTION
Congratulations on choosing a new Braemar cooler for your home.
Your cooler is built from the highest quality materials and engineered to provide many years of economical, trouble free cooling.
Please take a few minutes to read these instructions so you have a full understanding of how to operate your cooler. Your installer should demonstrate the features and procedures set out in these instructions. The installer should also provide you with a Model and Serial number, which can be filled out on the last page.
Keep these instructions in a safe place for future reference.
EFFECTIVE COOLING
To provide efficient cooling or ventilation the building must have sufficient exhaust openings to outdoors in the form of doors, windows or other vents. To assist air circulation, open windows or doors that are furthest from the outlet vent in each room. In every room that has an outlet vent, provide an exhaust opening about 2 or 2.5 times the vent size of the room. Where the design of the building prevents adequate exhaust, consideration should be given to the provision of mechanical extraction such as an exhaust fan.
Total minimum openings for the whole building are demonstrated by the following table:
| Cooler Model | Exhaust Opening |
| LCB250 | 2.0m2 |
| LCB350 | 2.5m2 |
| LCB450 | 3.0m2 |
| LCB550 | 4.0m2 |
Please note that an average size door is 1.5m2 .
The POWER button turns the cooler on and off.
There are two modes of operation to choose from, Automatic mode or Manual mode. When the cooler is turned on, it will start in the mode of operation it was in when last turned off.
If your cooler has not been operated for a while, then when you start it, "Pre Cool Cycle" may sometimes flash on the display as shown. This indicates that the water pump will operate to saturate the cooling pads for a few minutes before the fan is turned on. This is to ensure that when the fan starts, only cool air enters your home.

ILL1128-A

ILL1085-A
WALL CONTROL FUNCTIONSALL CONTROL FUNCTIONS
AUTOMATIC MODE
The AUTO button switches between Automatic mode and Manual mode. When "Auto" is displayed the cooler is under Automatic control and will operate according to the temperature sensed at the wall control.
When the cooler is turned on, it will read the temperature and set the cooler operation accordingly. If the temperature increases at the wall control, then the fan speed will increase. As the temperature decreases the fan speed will decrease until the cooler turns off.
Press ▲ or ▼ to override the automatic cooling level setting and adjust your room temperature.
MANUAL MODE
To switch to Manual mode, press AUTO until "Man" appears in the display. In Manual mode the cooling level can be manually adjusted. In Manual mode, press COOL
choose between circulating cool air or uncooled air. When "Cool" is displayed, fresh cool air will circulate into your home. When "Vent" is displayed as shown, fresh uncooled air will circulate through your home.
Press ▲ to increase the fan speed and circulate more air. Press ▼ to decrease the fan speed and circulate less air. Press once to change the speed by one increment. Hold the button down to change the speed more quickly.
AUTOMATIC MODE DISPLAY

ILL1096-A
MANUAL MODE DISPLAY

ILL1097-A

ILL1098-A
WALL CONTROL FUNCTIONSALL CONTROL FUNCTIONS
TIMED AUTOMATIC START
You can set the cooler so that it will turn on after a set number of hours.
- To set the delayed start time, press TIMERTIM with the cooler turned OFF. "Starting in" will be displayed as shown with the last mode of operation (Manual or Automatic).
- If you want the cooler to turn on in Automatic mode with the previous settings, then press AUTO until "Auto" is displayed. Alternatively, if you want the cooler to turn on in Manual mode, press AUTO until "Man" is displayed and then press COOL and then ▲ or ▼ to set the required fan speed.
- To set the time until the start, pressTIMERTIM
- Then press ▲ or ▼ to adjust the time. The cooler can start up to 24 hours in advance.
- Press TIMER TIMER to initiate the timed automatic start. The timed start will not repeat.


OR


ILL1136-A
TIMED AUTOMATIC STOP
You can also set the cooler so that it will turn off after a set number of hours.
- To set a delayed stop time, pressIMERTUMER the cooler running. "Stopping in" will display.
- Press ▲ or ▼ to adjust the number of hours before the cooler will stop. The maximum delay setting is 24 hours.
- Press TIMERTager to begin the timed stop.

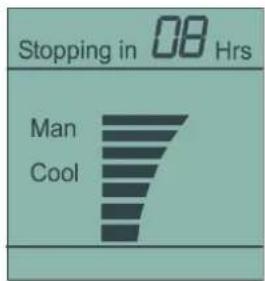
ILL1137-A


WALL CONTROL FUNCTIONSALL CONTROL FUNCTIONS
USING THE COOLER
Now that you have read these instructions, press the POWERPOWER to turn your cooler on. If the cooler has not operated for a while, "Pre Cool Cycle" will flash on the display. The "Pre Cool Cycle will begin and will take only a few minutes to complete. After this time, the fan will come on automatically, and you can enjoy the comfort of cool fresh air!
AIR TOO COLD
With the cooler running in Automatic mode, you may find that you are too cold or that the cooler is blowing too much air. Press ▼ to lower the automatic temperature setting and reduce the amount of cooling.
If you are too cold with the cooler running in Manual mode, then press ▼ to reduce the fan speed. You can also circulate fresh uncooled air by pressing COOLGQDLVent" displays.
AIR NOT COLD ENOUGH
You may find that with the cooler running in Automatic mode, you are not cool enough. Simply press ▲ to increase the cooling rate.
If you are not cool enough with the cooler running in Manual mode, then press ▲ to increase the fan speed. Ensure that cooled air is circulating by pressing COOLCool "Cool" displays.
You can experiment with the settings on your wall control. This is the best way to get the most from your cooler.
DRAIN VARAMAND ALVERANATE BLOOD SYSTEMTIVE BLEED SYSTEM
This cooler comes with an automatic drain valve or an alternative simplified bleed system.
AUTOMATIC DRAIN VALVE
If the drain valve was installed instead of the alternative bleed system then your cooler will automatically drain during operation when the water salinity becomes too high. This ensures the water is always fresh and helps maintain your cooler in good condition to ensure optimum cooling performance. The frequency of the automatic drain may have been adjusted by your installer.
When the cooler is turned off for 72 hours, the drain valve will open automatically and empty water from the cooler. When the cooler is turned on again, fan operation will delay for a few minutes while the tank refills and the cooling pads are saturated again.
At any time when the wall control is OFF, you can drain the cooler by pressing and holding ▲ and ▼ for 1 second. The display will show "dr" to confirm the operation has activated.
ALTERNATIVE BLEED SYSTEM
During operation, the bleed system will drain small amounts of water. This ensures fresh water is continually added to dilute salt accumulation in the water caused through evaporation. This helps keep the cooler in good condition and ensure optimum performance.
The bleed rate will depend on local operating conditions and will be set by the installer.
Draining water from your cooler at the end of the summer season is not required if your cooler is fitted with an automatic drain valve. However, it is a requirement to check the cooler, it's operation, the pump, drain valve, solenoid and fan motor after the first year, then every two (2) years as routine maintenance. If the alternative bleed system is installed then maintenance should be conducted before and after every summer season as outlined below.

WARNING: We recommend maintenance is carried out by an authorised service agent. Climbing onto the roof is hazardous and can result in personal injury or property damage. Failure to carry out maintenance will affect your warranty coverage.

natural_image
Technical line drawing of a mechanical assembly or structural component, showing layered components and a downward arrow indicating a process (no text or symbols present)END OF SEASON SERVICE
- Turn off the power supply to the cooler.
- Turn off the water supply to the cooler.
- Remove the pad frames as shown.
• A.Turn off the power switch inside the cooler.
• B. Check and clean the lid water channels
• C. If fitted, unclip and remove the bleed system as shown. Allow tank water to drain. Take care not to lose the o-ring. - Thoroughly clean the tank and pump filter. Do not replace the bleed system. (If a drain valve is fitted this is not necessary- it will automatically drain).
- Re-fit the pad frames.

Note that some state regulations require that coolers are serviced at specific intervals.
PRE-SEASON SERVICE
- Turn off the power supply to the cooler
- Remove the pad frames as shown.
- Ensure the power switch in the cooler is off.
• Gently wash the pads to remove any dust build up during the winter period. If the pads are in poor condition, replace them.
natural_image
Stacked fabric or paper sheets with a magnified inset showing a detail labeled 'ILL1152-A' (no text or symbols on the main image)IMPORTANT: Do not damage the pads with high pressure water spray.
- Replace the bleed system if it was removed during previous maintenance and ensure the o-ring is fitted. (If fitted with a drain valve this will not be necessary as it will automatically close when the cooler is turned on).
- Turn on the power switch inside the cooler.
- Turn on the water and then the power.
• Re-fit the pad frames and run the cooler.
WARNING: Do not run the cooler with
the pad frames removed.
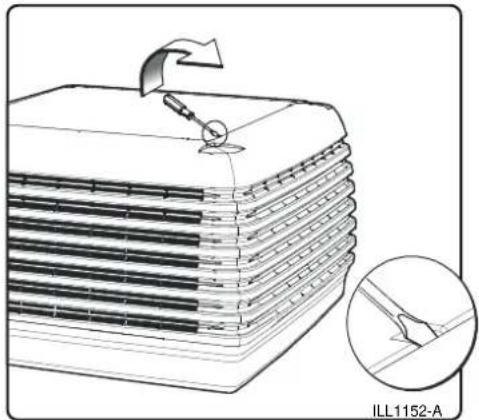
REMOVAL OF PAD FRAMES
To remove a pad frame, insert a flat screw driver tip into the slot as shown and lever until disengagement occurs.
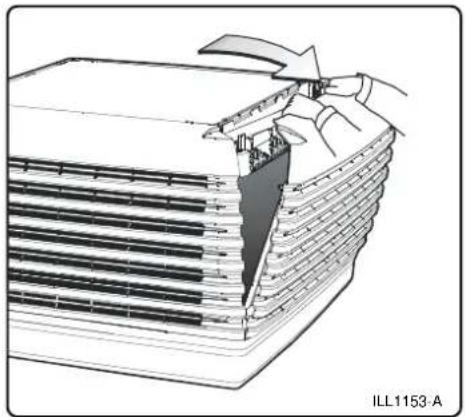
Take hold of the pad frame and pull it towards you until the internal side clips disengage.
Pivot the pad frame outwards and lift up. Take care not to damage the pad. Repeat these steps for the remaining pad frames.
natural_image
Diagram of a layered electronic component with a hand inserting a clip, no text or symbols present
natural_image
Diagram of a layered structure with a hand inserting a paper into it, labeled ILL1154-A (no text or symbols on the diagram itself)TROUBLESHOOTRIGUESEIDETING GUIDE
PROBLEM - Unpleasant Odour
CAUSE ACTION
- Odour from new pads.

Allow time to condition by running the cooler.
PROBLEM - Inadequate Cooling
CAUSE ACTION
- Dry pads.

Check water flow to pads. Ensure water supply is turned on.
- Insufficient exhaust openings for conditioned air.

Ensure sufficient openings. Refer to chart on page 2.
- Excessive ambient humidity. (See also insufficient exhaust.)

On days during the summer when the ambient humidity is high, the cooler will not reduce the temperature as much as on drier days.
PROBLEM - Wall Control Flashes "Service"
CAUSE ACTION
- An operational fault has been detected.

Ensure the water supply is turned on. Check the cooler drain pipe is not blocked. Turn off the wall control and record the number displayed on the screen. Quote this number to your Service Agent.
If your wall control display flashes "Service" or should you consider that your cooler requires service, you should contact your local Dealer or the Warranty Service number shown on the back cover.
When you contact your Dealer regarding service or warranty please quote the unit model number and serial number as shown below.
Model No. ____ Serial No. ____

Warranty Service
1300 650 644
- CONTENTSCONTENTS
- INTRODUCTION INTRODUCTION
- EFFECTIVE COOLING
- WALL CONTROL FUNCTIONSALL CONTROL FUNCTIONS
- AUTOMATIC MODE
- MANUAL MODE
- TIMED AUTOMATIC START
- TIMED AUTOMATIC STOP
- USING THE COOLER
- AIR TOO COLD
- AIR NOT COLD ENOUGH
- DRAIN VARAMAND ALVERANATE BLOOD SYSTEMTIVE BLEED SYSTEM
- AUTOMATIC DRAIN VALVE
- ALTERNATIVE BLEED SYSTEM
- END OF SEASON SERVICE
- PRE-SEASON SERVICE
- IMPORTANT: Do not damage the pads with high pressure water spray.
- WARNING: Do not run the cooler with
- the pad frames removed.
- REMOVAL OF PAD FRAMES
- TROUBLESHOOTRIGUESEIDETING GUIDE
- PROBLEM - Unpleasant Odour
- CAUSE ACTION
- PROBLEM - Inadequate Cooling
- PROBLEM - Wall Control Flashes "Service"
Brand : Braemar
Model : Paradigm LCQ 250
Category : Air conditioner