
My Net BMRD0000NBL - NAS WESTERN DIGITAL - Free user manual and instructions
Find the device manual for free My Net BMRD0000NBL WESTERN DIGITAL in PDF.


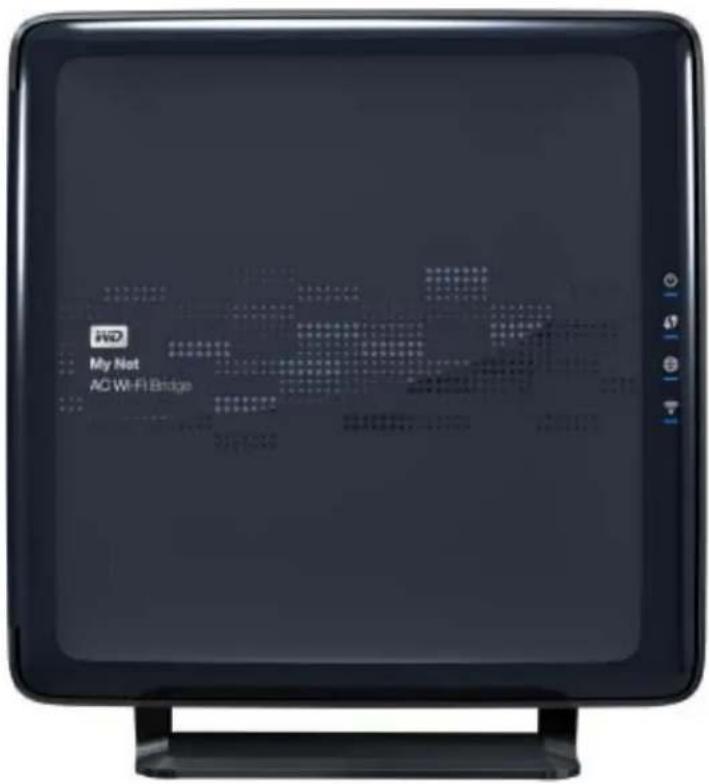
| Product Type | AC Wi-Fi Bridge |
| Brand | Western Digital |
| Model | My Net BMRD0000NBL |
| Wireless Standard | IEEE 802.11ac, n, a |
| Frequency Band | 5 GHz |
| Maximum Wireless Link Speed | 1300 Mbps |
| Ethernet Ports | 4 x Gigabit Ethernet |
| Antennas | 3x3 internal |
| Security | WEP, WPA, WPA2, WPA/WPA2-PSK |
| Dimensions (Width x Height x Depth) | 6.98 x 7.524 x 2.48 in (177.4 x 191.1 x 63.0 mm) |
| Weight | 0.83 lb (0.38 kg) |
| Power Supply Input | 100-240V AC, 50-60 Hz |
| Power Supply Output | 12V DC, 1.5A |
| Power Consumption | 18W |
| Operating Temperature | 0°C to 40°C (32°F to 104°F) |
| Storage Temperature | -40°C to 70°C (-40°F to 158°F) |
| Setup Method | WPS push-button or manual via web browser |
| Management Interface | My Dashboard (web-based) |
| Included Accessories | AC power adapter, Ethernet cable, Quick Install Guide |
| Cleaning Instructions | Clean with a dry cloth only |
| Safety Compliance | FCC, IC, CE, UL, CSA |
Frequently Asked Questions - My Net BMRD0000NBL WESTERN DIGITAL
User questions about My Net BMRD0000NBL WESTERN DIGITAL
0 question about this device. Answer the ones you know or ask your own.
Ask a new question about this device
Download the instructions for your NAS in PDF format for free! Find your manual My Net BMRD0000NBL - WESTERN DIGITAL and take your electronic device back in hand. On this page are published all the documents necessary for the use of your device. My Net BMRD0000NBL by WESTERN DIGITAL.
USER MANUAL My Net BMRD0000NBL WESTERN DIGITAL
My Net™ AC Wi-Fi Bridge
User Manual
WD® Service and Support
Should you encounter a problem, please give us an opportunity to address it before returning this product. Most technical support questions can be answered through our knowledge base or e-mail support service at http://support.wdc.com. If the answer is not available or, if you prefer, please contact WD at the best telephone number shown below.
Your product includes 30 days of free telephone support during the warranty period. This 30-day period starts on the date of your first telephone contact with WD technical support. E-mail support is free for the entire warranty period and our extensive knowledge base is available 24/7. To help us keep you informed of new features and services, remember to register your product online at http://register.wdc.com.
Accessing Online Support
Visit our product support website at http://support.wdc.com and choose from these topics:
- Downloads - Download drivers, software, and updates for your WD product.
- Registration - Register your WD product to get the latest updates and special offers.
- Warranty & RMA Services - Get Warranty, Product Replacement (RMA), RMA Status, and Data Recovery Information.
- Knowledge Base - Search by keyword, phrase, or answer ID.
- Installation - Get online installation help for your WD product or software.
- WD Community – Share your thoughts and connect with other users.
Contacting WD Technical Support
When contacting WD for support, have your WD product serial number, system hardware, and system software versions available.
| United States/North America | |
| English/Spanish | 855.842.5370 |
| Asia Pacific 00 +80085584253 | |
| Australia | 0011 +80085584253 |
| Hong Kong/Singapore/Thailand | 001 +80085584253 |
| Japan | 001/0033/0061 +80085584253 |
| Europe 00 +80085584253 | |
| Finland | 990/999 +80085584253 |
| Middle East 0031.880062100 | |
| Africa 0031.880062100 | |
| South Africa | 09 +80085584253 |
Go to http://support.wdc.com/contact for a list of additional phone support numbers by region.
Table of Contents
WD® Service and Support .... ii
1 Important User Information .... 1
Important Safety Instructions .... 1
Recording Your WD Product Information 2
Registering Your WD Product 2
2 Product Overview .... 3
Introduction....3
Features 3
Package Contents 4
Components....5
3 Getting Started 8
Setting up the Wi-Fi Bridge 8
Connecting to the Router Using the WPS Button 10
Connecting to the Router Manually.... 10
4 Basic Settings 16
Opening My Dashboard After Setup 16
Reviewing Current Settings 17
Configuring Wireless Settings 18
5 Advanced Settings 19
Opening and Closing the Advanced Settings Screen 19
Configuring LAN Settings 19
Configuring Administrative Settings 21
6 Troubleshooting 27
7 Regulatory and Warranty Information 29
Warranty Information (All Regions Except Australia/New Zealand) 33
Warranty Information (Australia/New Zealand only) 34
GNU General Public License ("GPL") 35
Appendix: Technical Specifications 36
Index 37
1
Important User Information
Important Safety Instructions
This device is designed and manufactured to assure personal safety. Improper use can result in electric shock or fire hazard. The safeguards incorporated into this unit will protect you if you observe the following instructions for installation, use, and servicing.
- Read these instructions.
- Keep these instructions.
■ Heed all warnings.
■ Follow all instructions.
■ Do not use this apparatus near water.
■ Clean only with dry cloth. - Do not block any ventilation openings. Install in accordance with the manufacturer's instructions.
- Do not install near any heat sources such as radiators, heat registers, stoves, or other apparatus (including amplifiers) that produce heat.
- Protect the power cord from being walked on or pinched particularly at plugs, convenience receptacles, and the point where they exit from the apparatus.
■ Only use attachments/accessories specified by the manufacturer.
■ Unplug this apparatus during lightning storms or when unused for long periods of time. - Refer all servicing to qualified service personnel. Servicing is required when the apparatus has been damaged in any way, such as power-supply cord or plug is damaged, liquid has been spilled or objects have fallen into the apparatus, the apparatus has been exposed to rain or moisture, does not operate normally, or has been dropped.
- Carefully read and follow the Quick Install Guide and User Manual.
- Do not operate this device outside the temperature range of 5°C–35°C (41°F–95°F).
■ Do not drop or shake the device.
■ Do not move the device when it is powered on.
■ Power supply cords should be routed so that they are not likely to be walked on or pinched by items placed upon them or against them. - Do not overload wall outlets.
For additional safety information, refer to www.wdc.com.
Recording Your WD Product Information
In the following table, write the serial and model numbers of your new WD product. You can find this information on the label on the bottom of the device. You should also note the date of purchase. This information may be required when requesting technical support.
| Serial Number: |
| Model Number: |
| Purchase Date: |
| System and Software Notes: |
Registering Your WD Product
Your WD product includes 30 days of free technical support during the applicable warranty period for your product. The 30-day period commences on the date of your first telephone contact with WD technical support. Register your WD product online at http://register.wdc.com.
2
Product Overview
Thank you for purchasing the My Net™ AC Wi-Fi Bridge. This user manual provides step-by-step instructions for installing and using your new bridge. For the latest WD product information and news, visit our website at www.wdc.com.
This chapter contains the following topics:
Features
Package Contents
Components
Introduction
The My Net™ AC Wi-Fi Bridge provides an Ethernet connection to remote devices via a wireless connection at AC speeds.
Features
The table below displays the basic specifications:
Note: For more detailed technical specifications, see Appendix A.
Feature Description
Wireless link speed 5 GHz band: 1300 Mbps
Protocol(s) 802.11 ac, n, a
Ethernet ports (4) Gigabit Ethernet
Next generation Wi-Fi — Bring powerful, next generation AC Wi-Fi to your home network and enjoy surfing, streaming, and sharing at a new level of Wi-Fi speed.
Simple push-button set up — Easy to set up with a push of two buttons (WPS) for hassle-free connection.
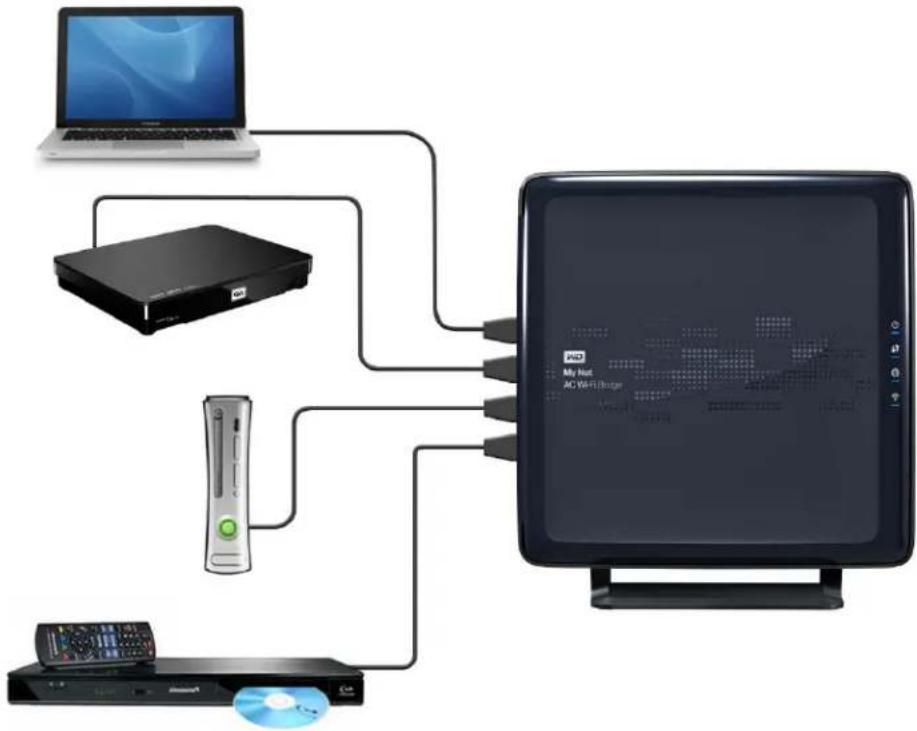
4 Gigabit ports — Convert up to four Ethernet-enabled devices like smart TVs, DVRs, Blu-ray™ Disc players, game consoles, and more to wireless AC.
Package Contents
In addition to your My Net AC Wi-Fi Bridge, the package contains:
■ Network (Ethernet) cable
- AC power adapter
■ Quick Install Guide
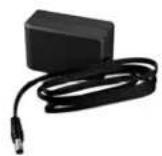
AC power adapter
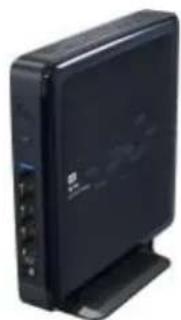
natural_image
Black wireless router device with ports and indicator lights (no visible text or labels)My Net AC Wi-Fi Bridge
Ethernet cable
Quick Install Guide
Accessories
For U.S. residents, visit www.shopwd.com to view additional accessories available for your My Net AC Wi-Fi Bridge. For users outside the U.S., visit http://support.wdc.com/.
AC Power Adapters
The AC power adapter varies, depending on your location. Some locations do not require a power plug clip. Units sold in those locations have a fixed power plug. Refer to the illustrations below.
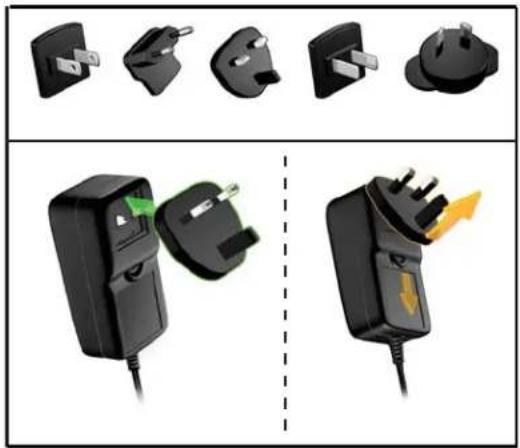
natural_image
Three black electrical plug icons with different internal components, shown from top, side, and bottom views (no text or symbols)Installing
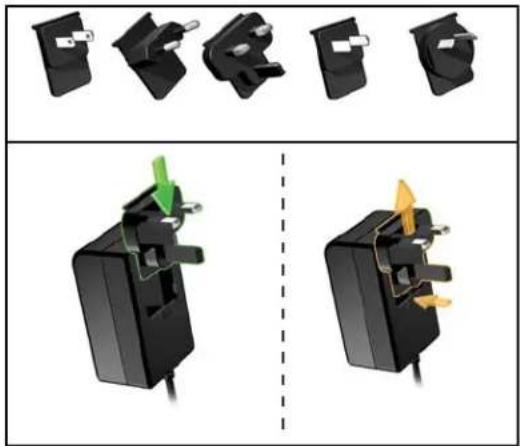
natural_image
Diagram showing three views of a black plastic electrical plug with internal components, connected by wires (no text or symbols present)Removing
Installing
Removing
Components
Front Panel
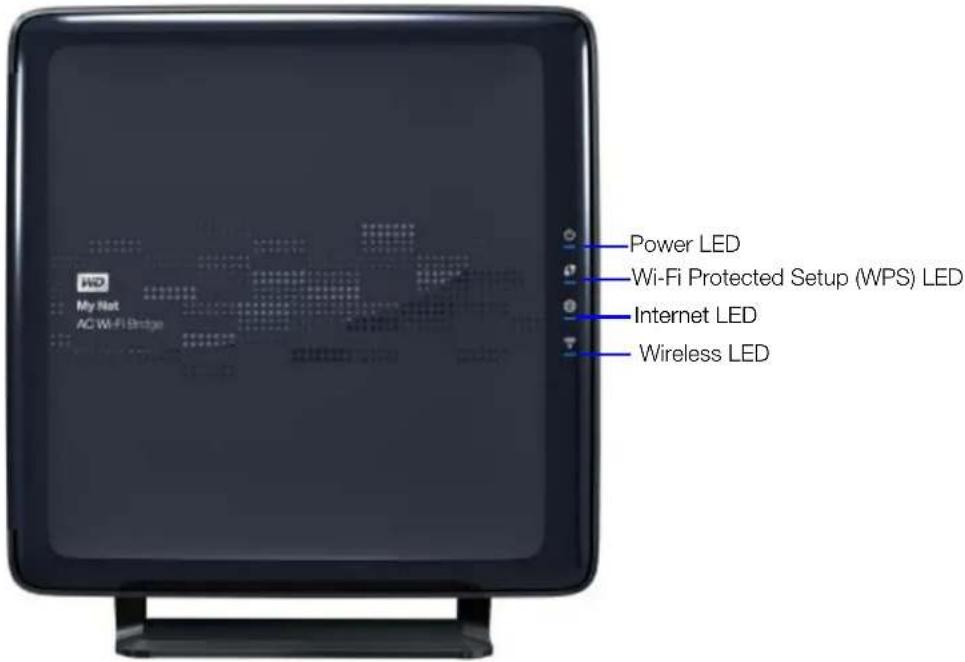
Front LED indicators
LED Description
| Power Steady when the bridge is powered on and operational; flashes slowly during firmware upgrades. | |
| Wi-Fi Protected Setup (WPS) | When connecting the bridge to a wireless device (e.g., a router) on your network, the LED indicates the status of WPS:When WPS is connecting a wireless device, the light blinks slowly.If an error occurs during setup, the light blinks quickly.After setup, the light is solid when WPS pairing is successful. A few minutes later, the light turns off and remains off under normal operation. |
| Internet Lit when Internet connection is active. | |
| Wireless Lit when wireless connection is active. | |
Side Panel
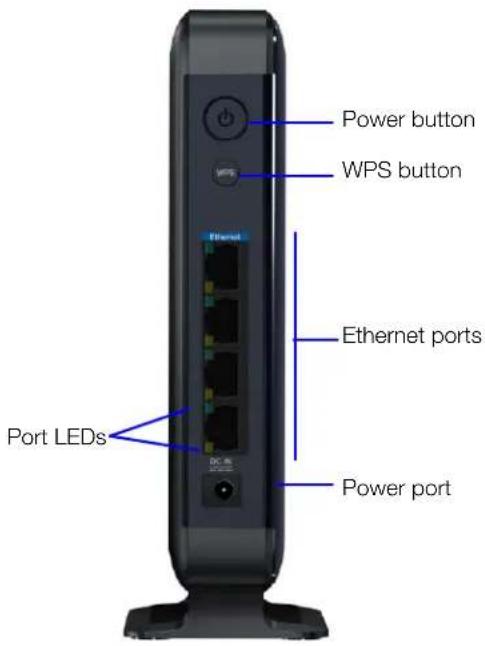
Side components
| Component Description | |
| Power button Press to turn the bridge on. Press again to turn it off. | |
| WPS (Wi-Fi Protected Setup) button | Press this button to establish an initial connection between a WPS-enabled router and the bridge. |
| Ethernet (LAN) port(s) | Use Ethernet cables to connect these ports to wired network devices to these ports. |
| Power port Use the included AC power adapter to connect this port to the power source. | |
Port LED indicators
| Component LED Description | |
| Ethernet port Link LED (Green) Steady on when a cable connects the port to another Ethernet port. | |
| Activity LED (Yellow) Blinks to indicate network activity of the Ethernet port. | |
Back
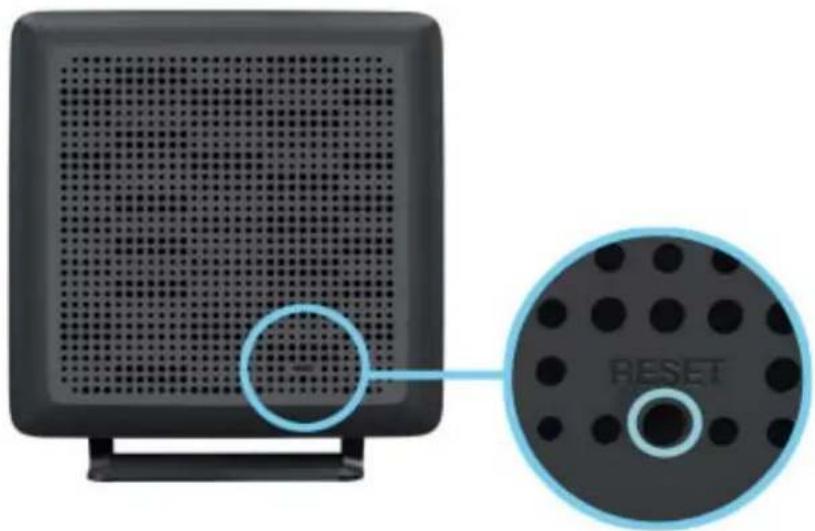
natural_image
Close-up of a black computer monitor with a grid pattern and a close-up of its circular display showing the 'RESET' button (no text or symbols on the device itself)Component Description
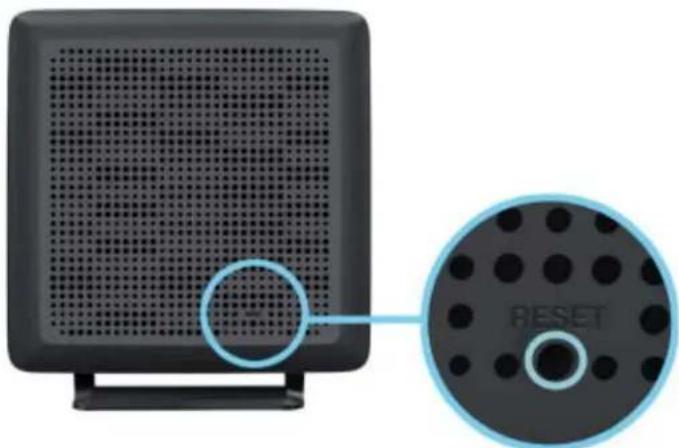
Reset button
To reset the bridge to factory default settings, press the Reset button for at least 8 seconds and release. The power LED flashes on the bridge, indicating a reset/reboot. This LED is solid when the reset/reboot has been completed.
3
Getting Started
This chapter contains the following topics:
Setting up the Wi-Fi Bridge
Connecting to the Router Using the WPS Button
Connecting to the Router Manually
Setting up the Wi-Fi Bridge
- Make sure your router supports 5 GHz. It may also be referred to as a dual-band router or concurrent dual-band router. The 5 GHz band helps ensure the highest speeds and seamless entertainment traffic.
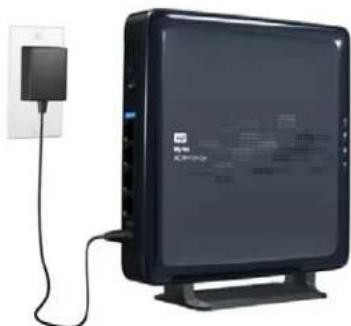
- Connect the Wi-Fi bridge to a power source and press the Power button. The power LED on the front of the bridge blinks during boot-up and becomes solid once the process is complete.
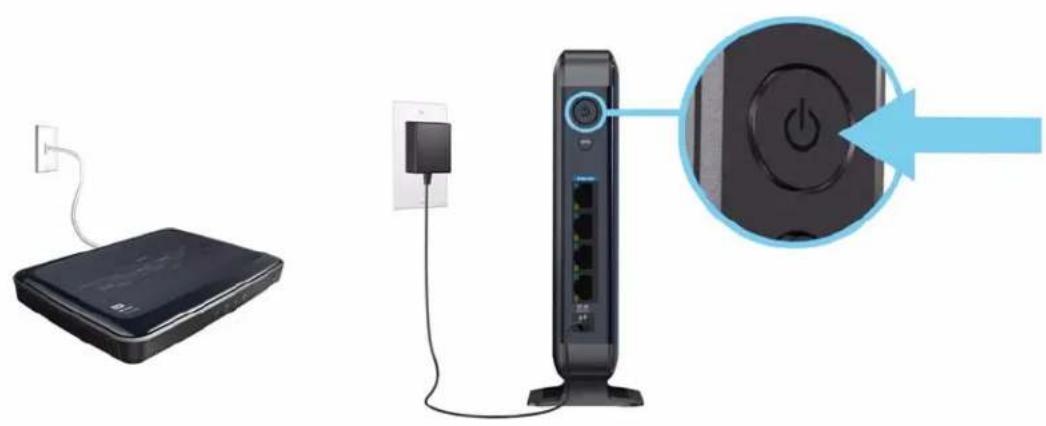
natural_image
Diagram showing a wireless router connected to a power outlet via a plug, with an attached power button icon (no text or symbols present)- Connect up to four entertainment and other wired network devices to the bridge.
flowchart
graph TD
    A["Laptop"] --> B["Router"]
    B --> C["Monitor"]
    C --> D["CD"]
    D --> E["Remote Controller"]
    E --> F["PCD"]
4.
IF your router ... THEN continue with ...
| Has a WPS or 🎨 button, | “Connecting to the Router Using the WPS Button” on page 10. |
| Does not have a WPS or 🎨 button or WPS is disabled | “Connecting to the Router Manually” on page 10. |
Connecting to the Router Using the WPS Button
- Press the router's WPS button and the Wi-Fi bridge's WPS button within a period of two minutes.
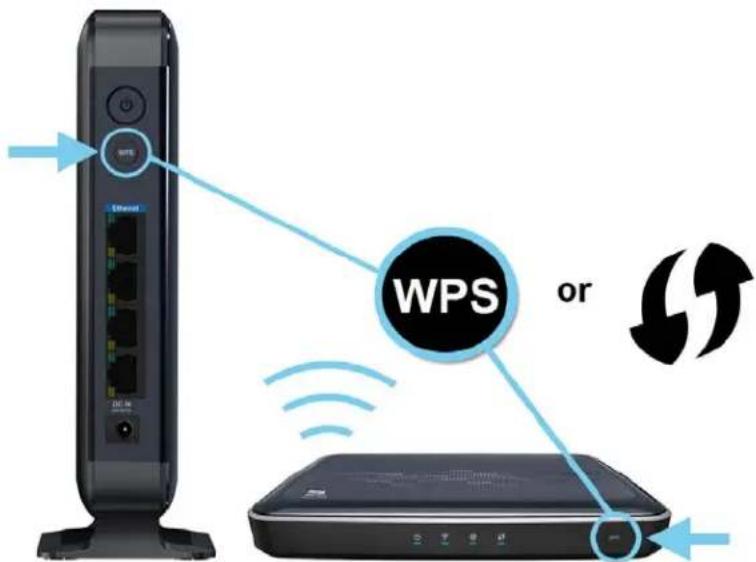
■ The WPS LED blinks while the connection is being established.
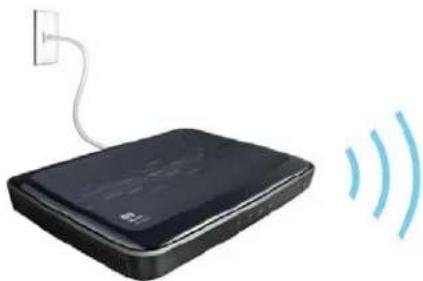
- When the wireless connection between the router and the bridge is established, the wireless and Internet LEDs are solid.
The router and bridge are connected wirelessly.
natural_image
Black electronic device with wireless signal waves, connected to a white cable (no text or symbols visible)
natural_image
Black network router connected to a power outlet cable (no visible text or symbols)- Congratulations! You can start using the Wi-Fi bridge in conjunction with the router, or if you want to configure the bridge's settings, proceed to "Basic Settings" on page 16.
Connecting to the Router Manually
There are cases requiring you to set up the bridge manually, for example, when:
■ Wi-Fi Protected Setup (WPS) is disabled.
■ The router does not support WPS.
■ Some interference is preventing WPS from working.
- SSID broadcast is disabled.
■ WPA only is enabled.
■ WEP is enabled.
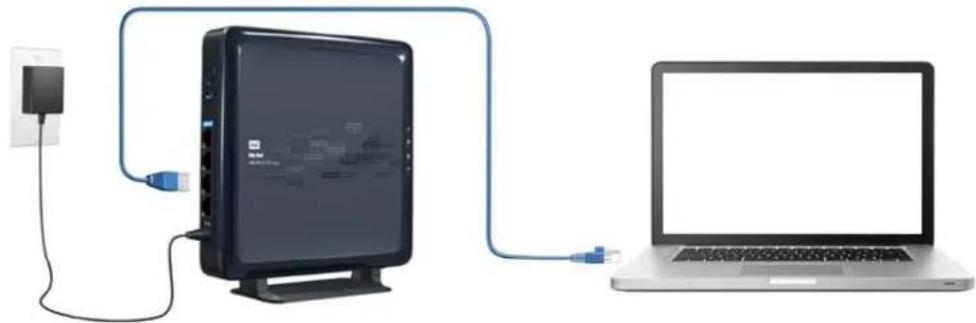
- Connect the bridge directly to your computer using an Ethernet cable,
natural_image
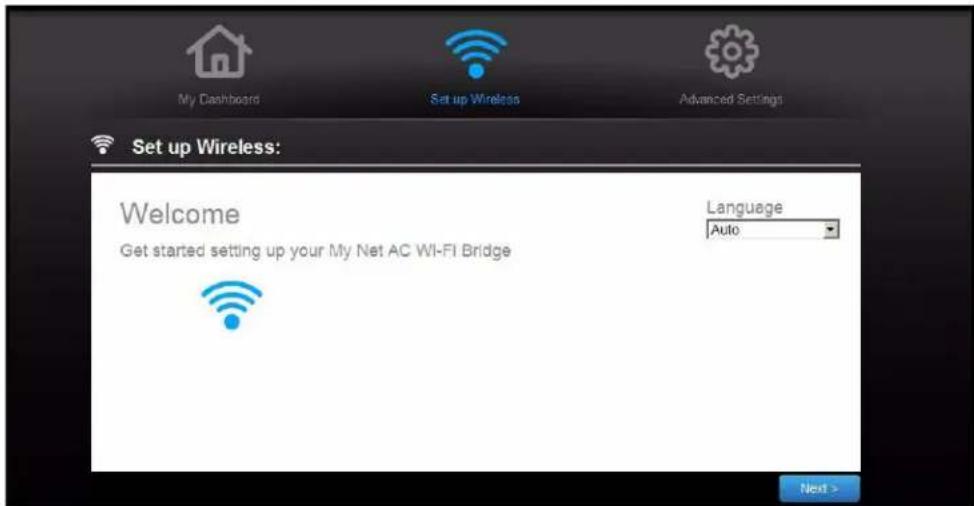
Illustration of a desktop computer connected to a laptop via cable, showing network connection (no text or symbols)- Launch a web browser. If the Wi-Fi bridge's Welcome screen does not appear automatically, enter http://myacbridge, http://myacbridge.local (Mac computers), or http://192.168.1.240 in the address field to display it.
-
On the Welcome screen, select a language from the Language drop-down list (upper right of screen). The language defaults to Auto, the language setting on the browser.
-
Click Next to display the Select an available network screen. After a few seconds, the screen displays a list of networks.
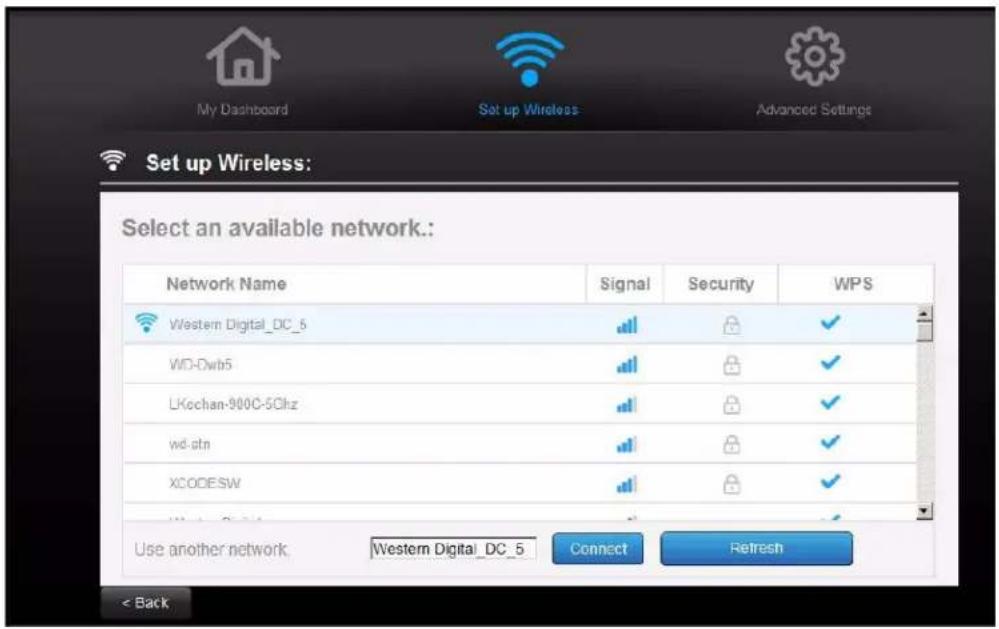
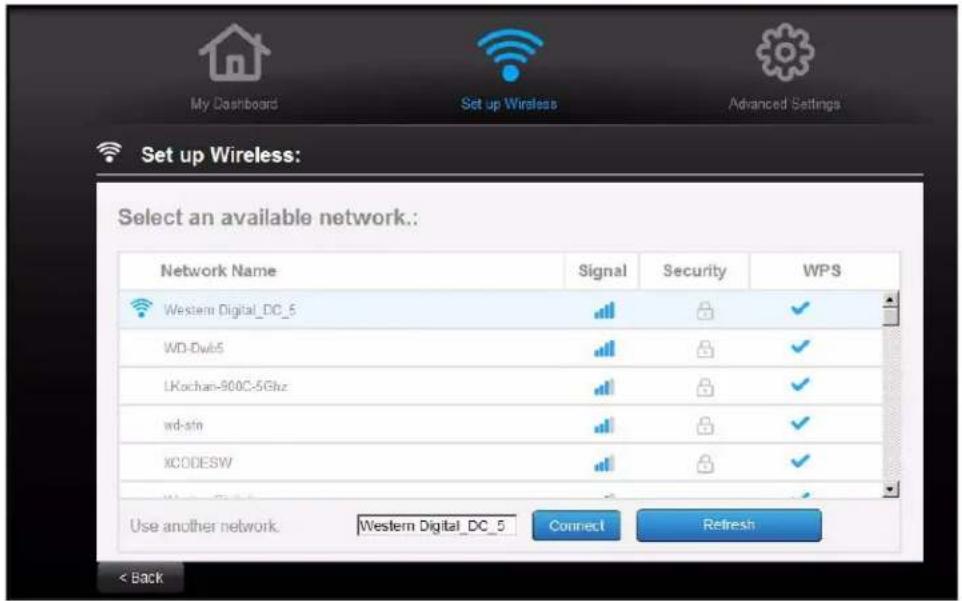
- Select a Network Name (or click anywhere in its row) and click Connect. If you do not see your router's name in the list, enter it in the Use another network field at the bottom of the screen and click Connect.
The Secure Network Connection screen displays.
Note: For an open (unsecured) system, this screen does not appear.
- If the router does not support WPS, or WPS is not enabled, the following screen displays:
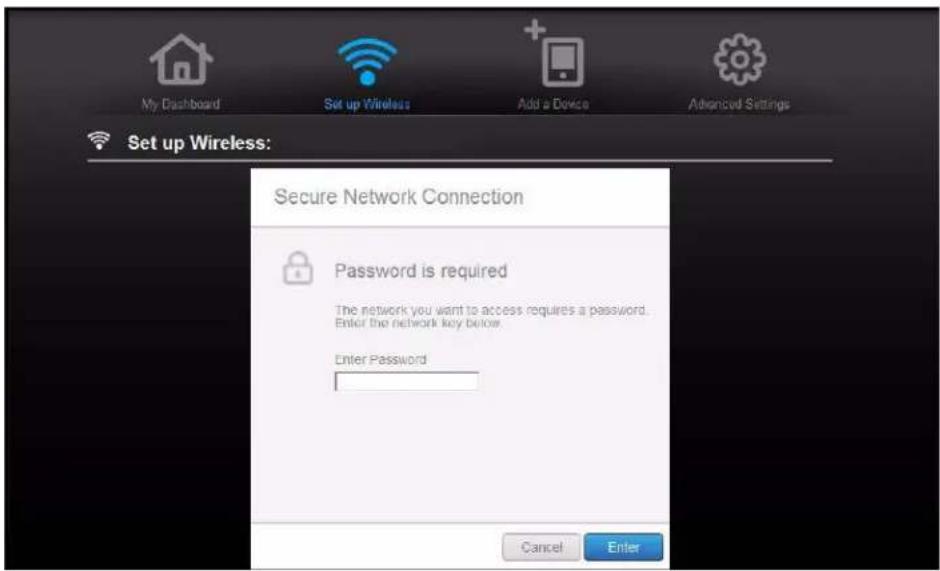
Enter the network password and click Enter. Continue to step 10.
- If the router supports WPS, the following screen displays:
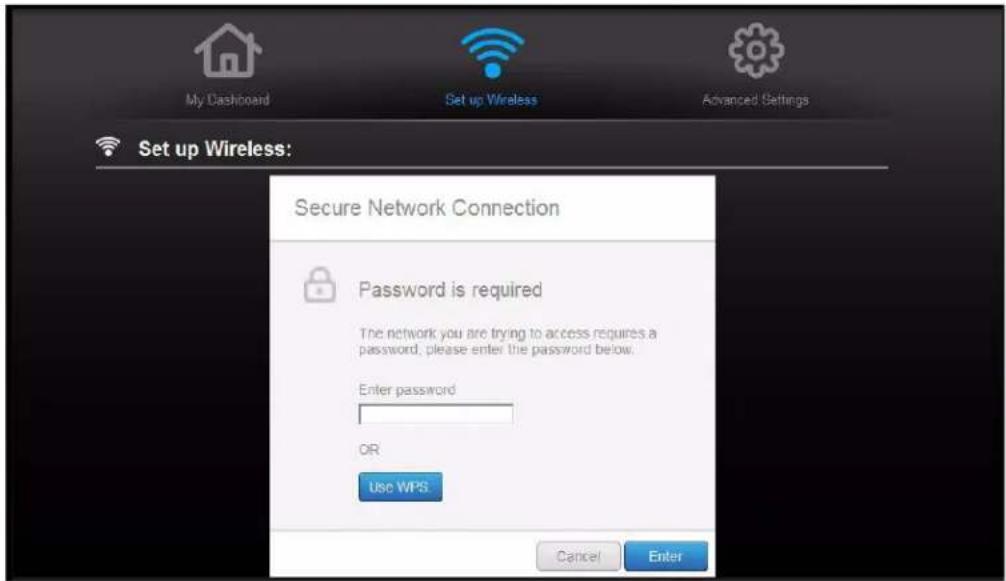
You have two options for configuring the Wi-Fi bridge's security:
-
Enter the router's password and click Enter. Continue to step 10.
■ Use WPS. Continue to step 8. -
Click Use WPS to display the Secure Network Connection Wi-Fi Protected Setup screen:
9. You have the following options:
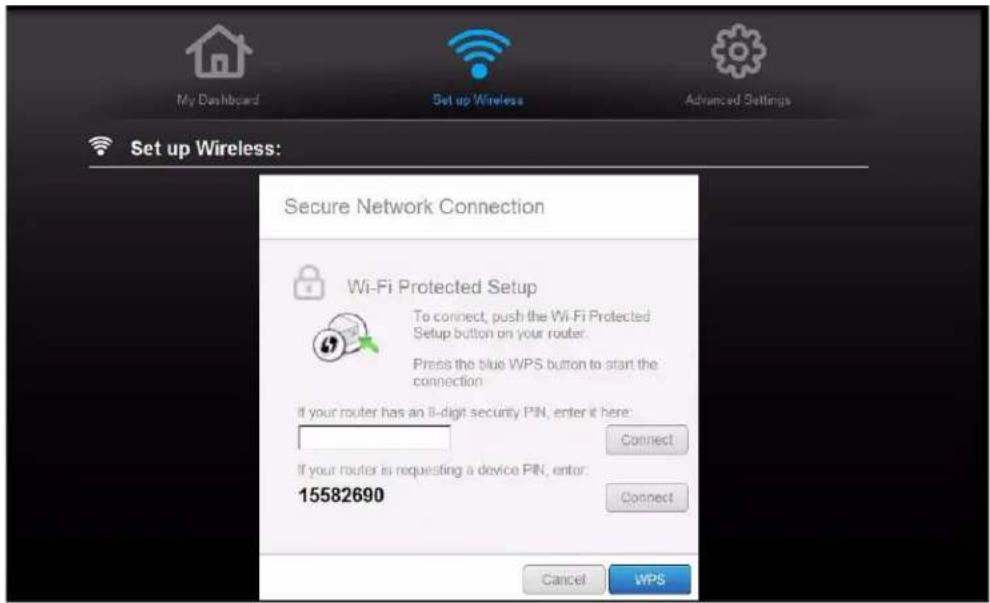
- To use WPS buttons, press the WPS button on the router and click the blue WPS button on the screen within a two-minute period.
- If your router has an 8-digit security PIN, enter it and click Connect (to the right of the PIN).
If your router requests a PIN, at your router's prompt, enter the PIN displayed at the bottom of the screen. Click Connect (to the right of the displayed PIN) on the Wi-Fi bridge's screen.
10. Wait for the connection to be made. When a connection verification screen displays, click Next.
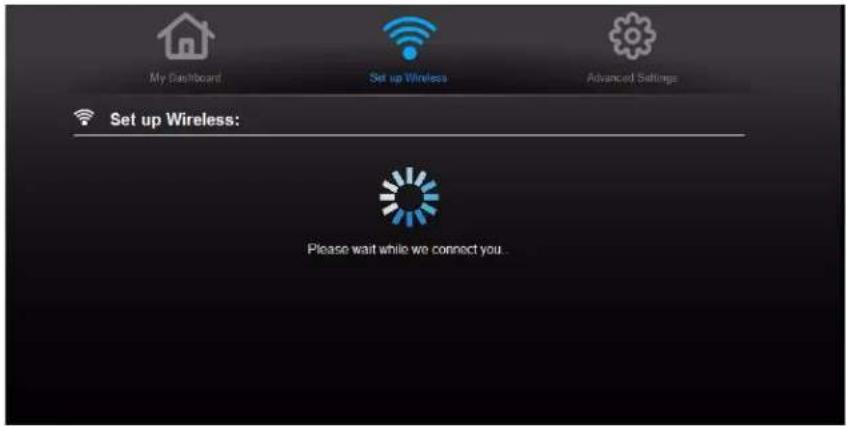
The Setup Complete screen displays.
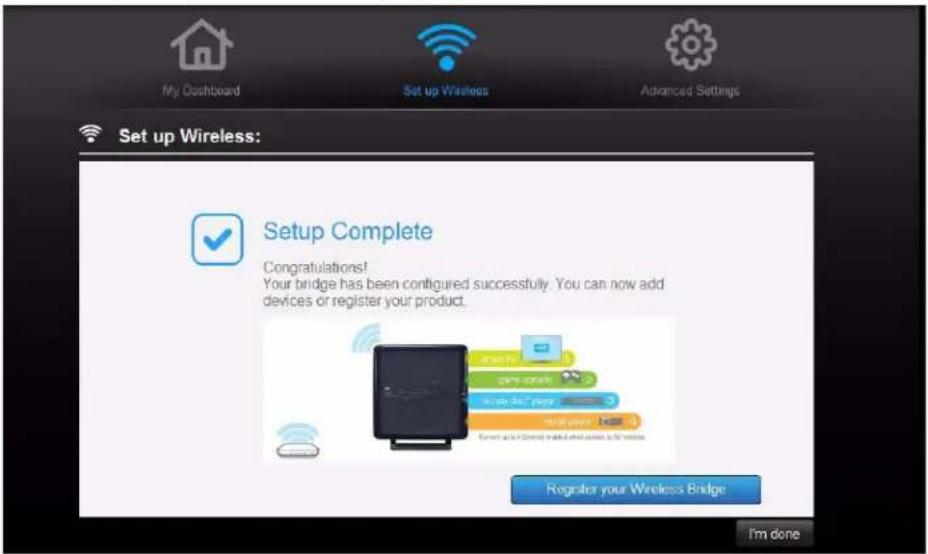
You have the following options:
| IF you want to... THEN... | |
| Ensure that you will receive important product information and firmware update notices, | Click Register Your Wireless Bridge and continue with “Registering the Wi-Fi Bridge” on page 25. |
| Configure the wireless bridge using the My Dashboard interface, | Click I'm done and continue with “Basic Settings” on page 16. |
| Start using the wireless bridge with no further configuration, | Close the window. |

Basic Settings
This chapter contains the following topics:
Opening My Dashboard After Setup
Reviewing Current Settings
Configuring Wireless Settings
Opening My Dashboard After Setup
To open the Wi-Fi bridge dashboard after initial configuration:
- Type http://myacbridge or http://myacbridge.local (Mac computers) in the address field of your browser. The login screen displays:
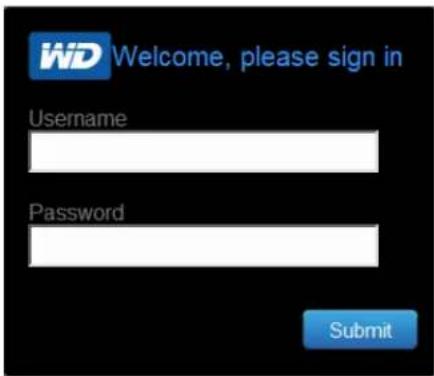
- Enter the username (default value is admin) and password (default value is lowercase password) and click Submit. The My Dashboard home screen displays:
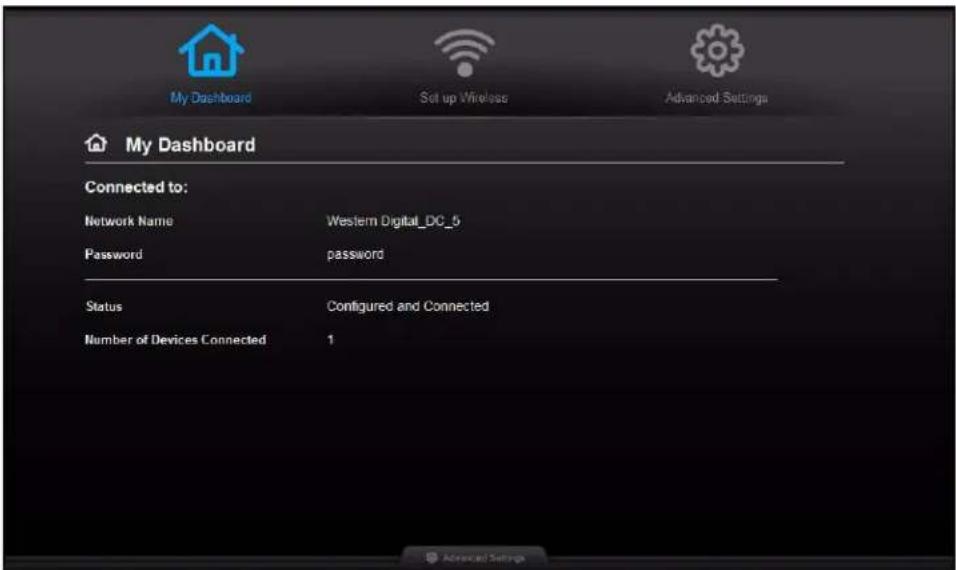
Note: The settings have values resulting from the initial setup.
The icons at the top of the screen open screens and wizards for performing important tasks:
Icon Name Actions See ...

My Dashboard
Review and change current settings.
"Basic Settings" on page 16.

Set up Wireless Configure wireless settings such as network name and security.
"Configuring Wireless Settings" on page 18.

Advanced Settings
Configure system administration and advanced wireless settings.
"Advanced Settings" on page 19.

Alert Click to display recent alerts about new firmware and network issues and shortcuts to important settings.
Reviewing Current Settings

The My Dashboard's home screen is a simple snapshot of the Wi-Fi bridge's configuration with the most essential information in one screen. It includes summary information for wireless settings and status.
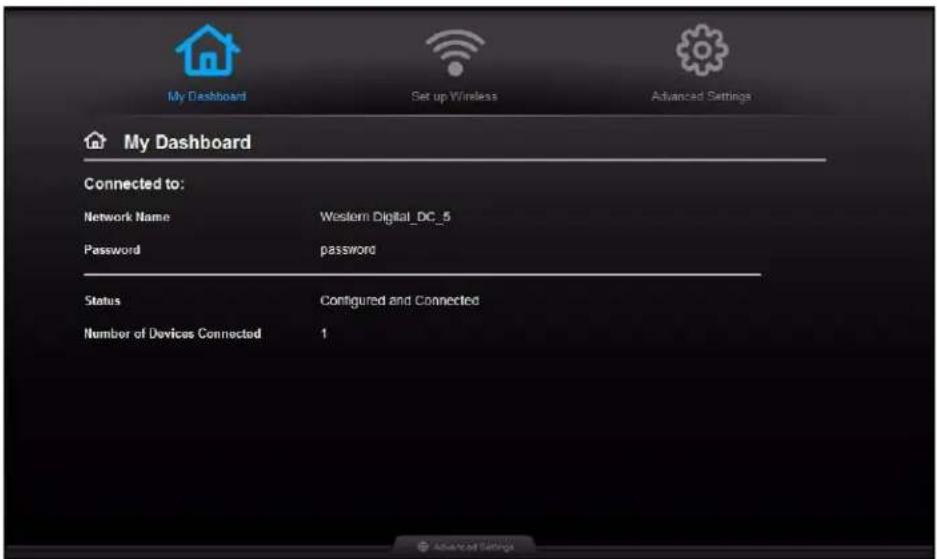
Review the following settings:
Setting Description
Network Name Unique identifier of the wireless network.
Password Password for accessing the wireless network.
Status Status can be Unconfigured, Configured and
Connected, or Unconnected.
Number of Devices Connected Number of devices connected to the Wi-Fi bridge by Ethernet cables.
Configuring Wireless Settings

- To reconfigure wireless settings, click the Set Up Wireless icon.
- Follow the instructions starting with step 3 in "Connecting to the Router Manually" on page 10.
5
Advanced Settings

This chapter contains the following topics:
Opening and Closing the Advanced Settings Screen
Configuring LAN Settings
Configuring Administrative Settings
Opening and Closing the Advanced Settings Screen
To open the Advanced Settings screen:
- To display the Advanced Settings screen, click the Advanced Settings icon. This screen provides the LAN and Admin icons.
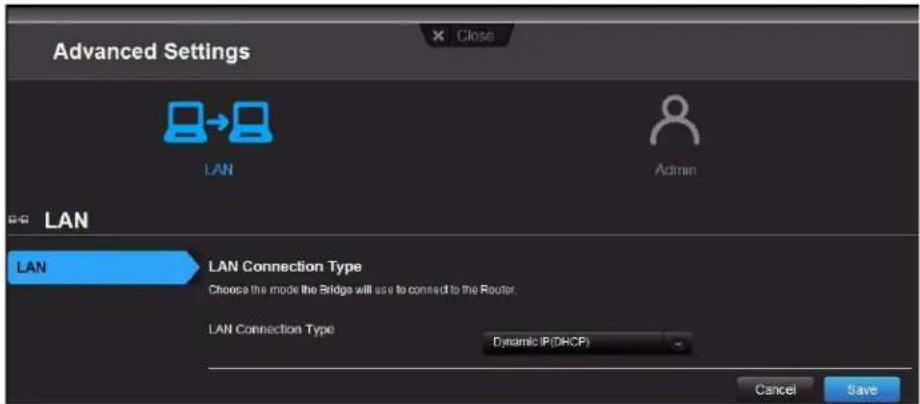
- To close any advanced setting screen and return to the My Dashboard home screen, click Close at the very top of the screen.
Configuring LAN Settings

The LAN icon enables you to view the current Internet connection information and change the LAN Connection Type.
To change the LAN Connection Type:
- On the Advanced Settings screen, click the LAN icon to display the LAN screen.
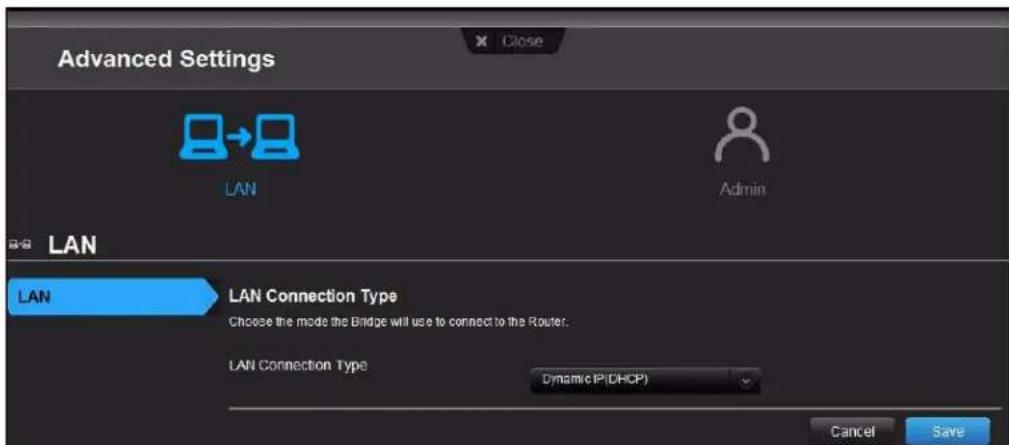
- To change from Dynamic IP (DHCP), the default setting, to Static IP, select Static IP from the LAN Connection Type drop-down list. The screen displays additional settings.
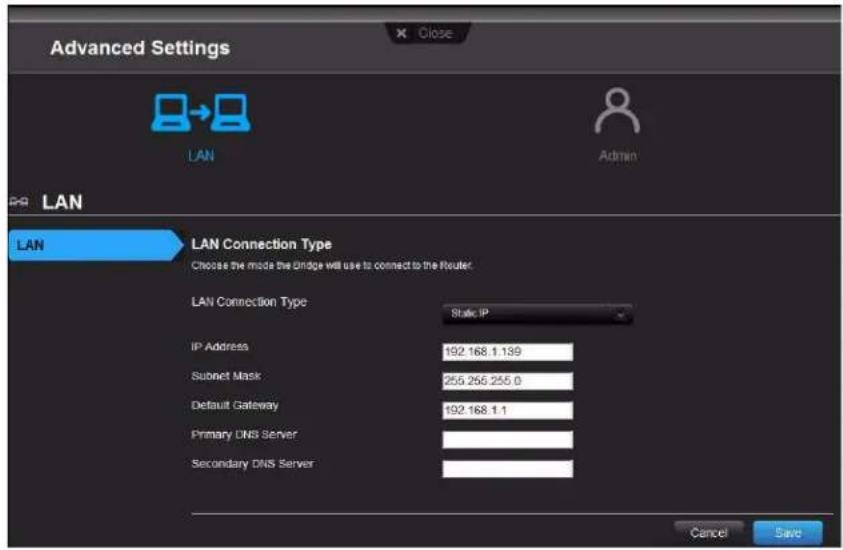
- Review and complete the settings:
Setting Description
LAN IP address IP address of the bridge. The IP address should be on the same network as your existing router.
Subnet Mask The subnet mask is used to control how many subnetworks can exist in your local network.
Default Gateway IP address of the router to which this device is connected wirelessly.
Primary/Secondary DNS Server Your ISP configures and maintains the primary and secondary DNS Server addresses. You can find them on your main router or by contacting your ISP.
- Click Save.
Configuring Administrative Settings

The Admin icon provides screens for registering the Wi-Fi bridge, changing the administrative password, updating the Wi-Fi bridge's firmware, restoring factory settings, saving and restoring settings, and rebooting the Wi-Fi bridge.
Changing the Administrator Password
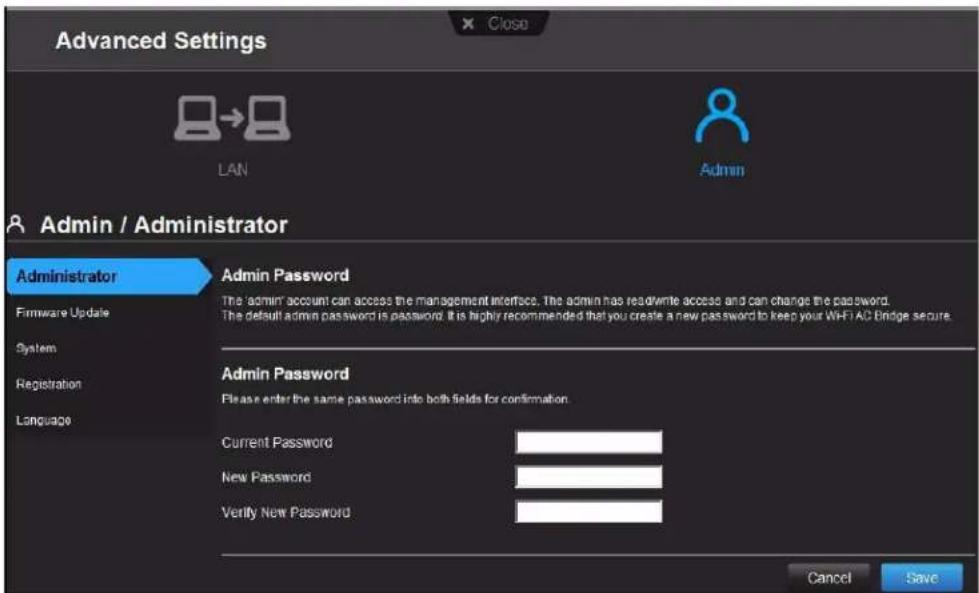
The admin account manages the Wi-Fi bridge interface. The default password is password. To keep your Wi-Fi bridge secure, it is a best practice to create a new password.
To change the administrator password:
- Click the Admin icon to display the Admin/Administrator screen.
-
Enter the existing administrator password in the Current Password field and the new administrator password in the New Password and Verify Password fields.
-
Click Save.
Updating the Wi-Fi Bridge's Firmware
WARNING! Do not disconnect or turn off the Wi-Fi bridge while the update is in process.
To check for Wi-Fi bridge firmware updates and upload new firmware:
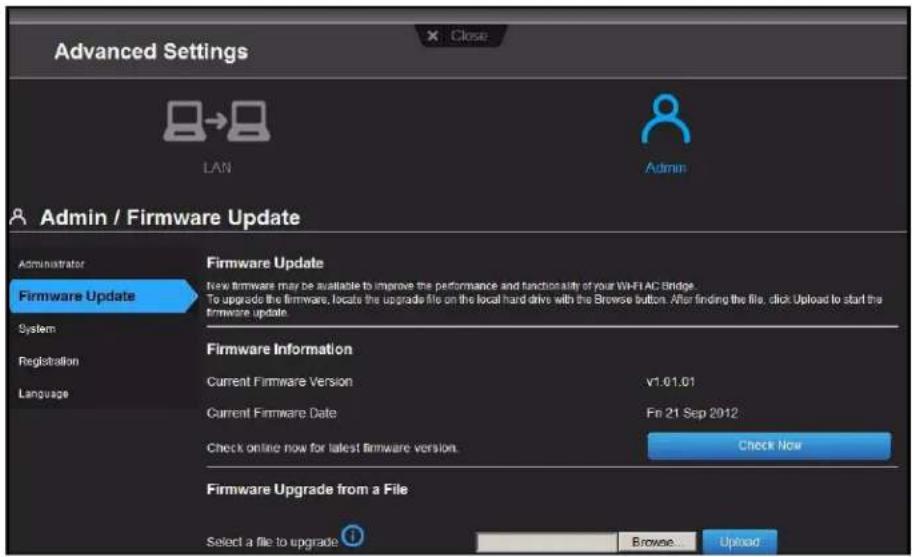
- On the Admin screen, click the Firmware Update tab on the left:
To check for the latest firmware version:
- Click Check Now. The Wi-Fi bridge searches the WD website for a new firmware file. If a new file exists, the latest firmware version and an Update Now button appear.
- Click Update Now to begin the firmware update. A message tells you how long the upload will take. Please wait while the firmware update is taking place.
To update from a file:
- Locate the firmware file on the WD Support site at http://support.wdc.com and download it to your computer.
- On the Wi-Fi bridge screen, click Browse and locate the firmware file you saved.
- Click Open. The file name displays in the browser field on the Wi-Fi bridge screen.
- Click Upload. A message indicates how long the upload will take. Please wait while the firmware update is taking place.
Saving and Restoring Your Wi-Fi Bridge's Settings
To save your settings:
- On the Admin screen, click the System tab on the left of the screen to display the Admin / System screen:
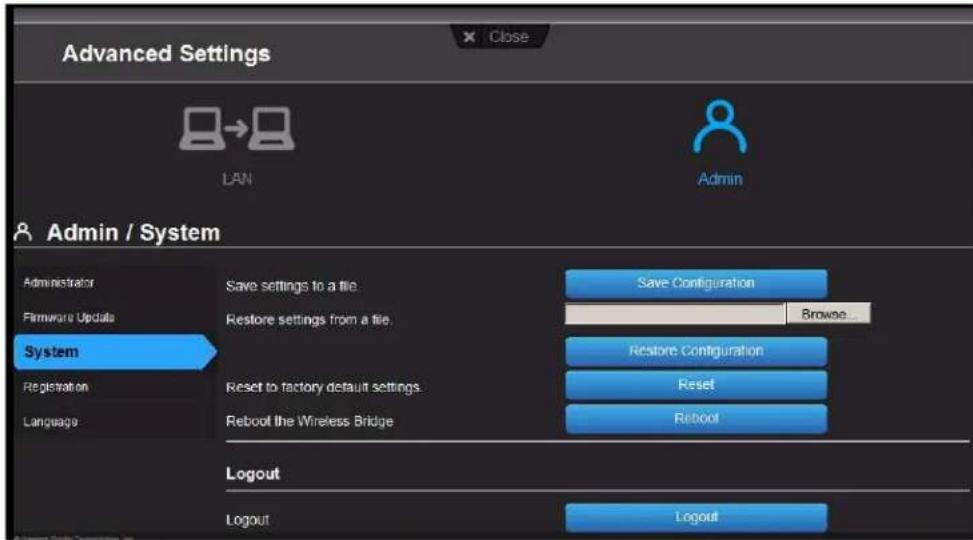
- Click Save Configuration.
- Name and save the configuration file.
To restore your Wi-Fi bridge's settings:
- Browse to locate the saved configuration file.
- Click Restore Configuration.
Resetting the Wi-Fi Bridge to Factory Defaults
You may want to reset the Wi-Fi bridge to how it was when you bought it.
Important: After a reset to factory defaults, you need to reconfigure the wireless connection, and optionally, other settings.
You have two options for restoring factory defaults: through the user interface or through the Reset button on the back of the Wi-Fi bridge.
WARNING! Do not reboot the Wi-Fi bridge while the reset is taking place. The Wi-Fi bridge reboots as part of the reset process.
Using the Dashboard
- On the Admin screen, click the System tab on the left to display the Admin / System screen:
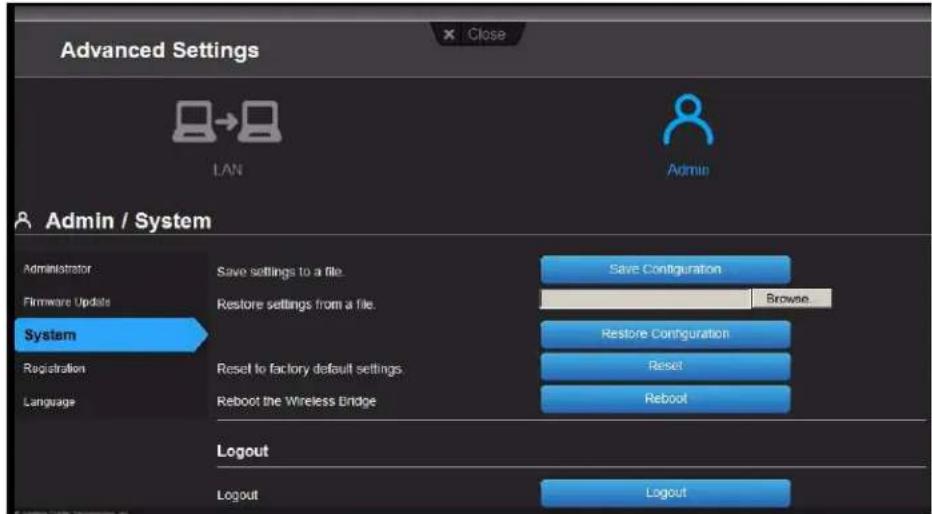
- Click Reset to the right of Reset to Factory Default Settings.
- When a confirmation message displays, click OK.
- Wait until the Wi-Fi bridge reboots before using it.
Using the Reset button
To reset the Wi-Fi bridge manually:
- Press and hold the Reset button on the bottom of the Wi-Fi bridge for at least 8 seconds.
natural_image
Close-up of a black electronic device with grid pattern and a circular inset showing a CD (no text or symbols visible)When the reset finishes, the Power LED blinks.
- Wait until the reset finishes before using the Wi-Fi bridge.
Rebooting
You can reboot the Wi-Fi bridge two ways. If you are physically close to it, just press the On/Off button on the Wi-Fi bridge. If you cannot easily press the button:
- Click the Advanced Settings icon and then the System tab on the left of the screen.
- Click Reboot.
Logging Out
On the Admin / System screen, click Logout.
Registering the Wi-Fi Bridge
Register your router to receive software notifications and customer support.
- On the Admin screen, click the Registration tab on the left of the screen to display the Admin / Registration screen.
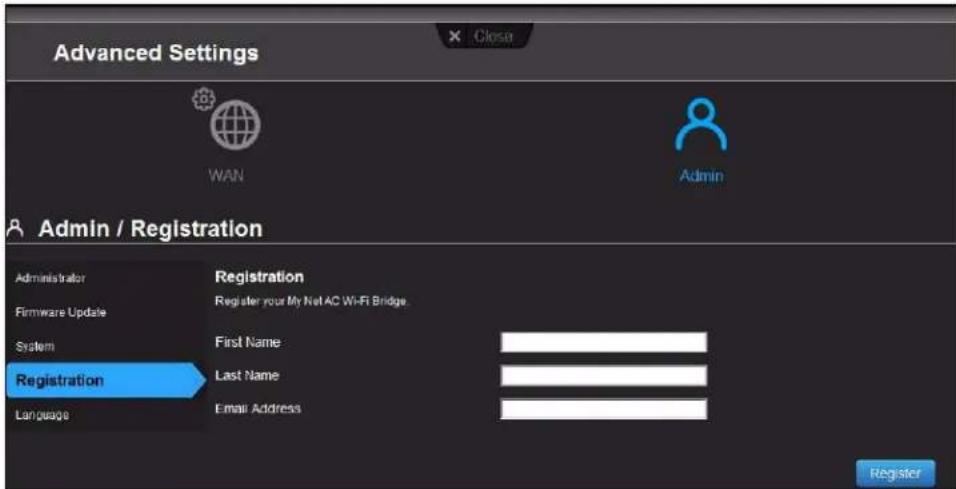
- Enter your name and email address, and click Register.
Selecting a Language
To change the language of the Wi-Fi bridge's screens:
Note: Auto represents the language of the browser.
- On the Admin screen, click Language on the left to display the Admin / Language screen:
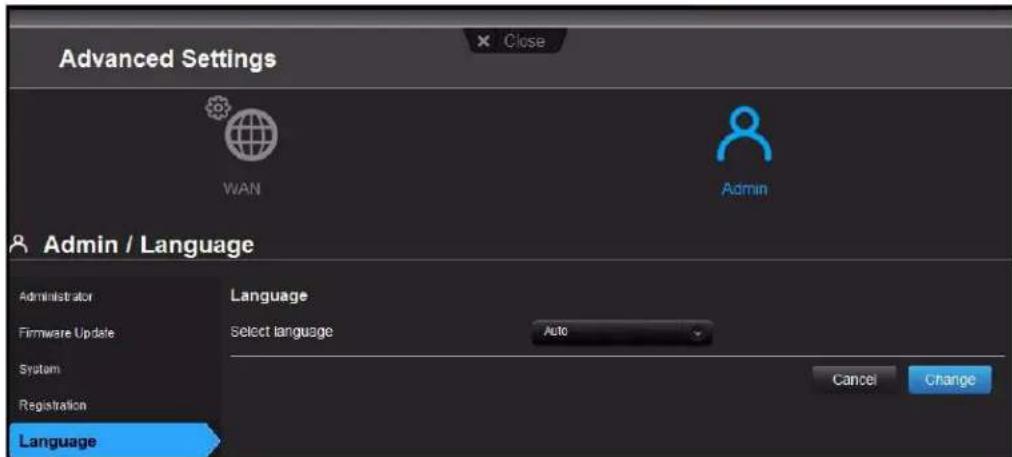
- Select a language from the Select language drop-down list.
- Click Change.

Troubleshooting
| Problem/Question Solution | |
| The power LED does not illuminate. | 1. Push the power button on the Wi-Fi bridge to make sure the bridge is powered on.2. Make sure that the power cord is connected to the Wi-Fi bridge correctly.3. Make sure that the electrical outlet is working properly. To do this, plug a different electronic device into the outlet and try to power it on.4. Make sure that you are using the AC adapter provided with the Wi-Fi bridge. |
| Computers are unable to access the Internet. | 1. Make sure that the Wi-Fi bridge is powered on. The power LED should be solid and not flashing.2. Make sure the cable connections are set up correctly and are firmly in place.3. Power off and power on your modem/ router, Wi-Fi bridge, and computer.4. Make sure the computer is connected to the Wi-Fi bridge physically.5. Make sure you do not have a cable connecting the Wi-Fi bridge to the router.6. Make sure the wireless and Internet LEDs are solid on the device. |
| All front panel LEDs flash continuously. | 1. Relocate your Wi-Fi bridge to a place that has good ventilation.2. Turn off your Wi-Fi bridge, and set it aside for 15 to 20 minutes until it cools down. Turn your Wi-Fi bridge back on to resume operation. |
| The Wi-Fi bridge cannot connect to the router. | 1. Ensure the Wi-Fi bridge is powered on2. If you are using a WPS method, make sure the router supports WPS.3. If WPS fails, connect using the manual method described on page 10.4. Make sure your router supports 5 GHz clients.5. If all of these solutions fail, reset the Wi-Fi bridge and try again. |
| How do I reset the Wi-Fi bridge? | For a soft reset using My Dashboard or a hard reset, using the Reset button, see “Resetting the Wi-Fi Bridge to Factory Defaults” on page 23. |
| How do I change wireless settings or connect a new router? | If the router has a WPS button, and WPS is enabled, follow the steps in “Connecting to the Router Using the WPS Button” on page 10.If the router does not have a WPS button, or WPS is disabled, reset the Wi-Fi bridge to factory defaults and follow the steps in “Connecting to the Router Manually” on page 10. |
Problem/Question Solution
What is the IP address of the Wi-Fi bridge after it is configured?
The IP address of the Wi-Fi bridge depends on the IP address of the router or access point to which the Wi-Fi bridge is connected.
You may be able to connect to the Wi-Fi bridge by typing http://myacbridge or
http://myacbridge.local (Mac computers) in the address field of your browser.
To determine the IP address:
-
Check the client table on the router's or access point's web UI. The web UI varies depending on the model of the router.
-
Locate the Wi-Fi bridge and its IP address on the table.
If you continue to have the problem, contact Technical Support at http://support.wdc.com.
Regulatory and Warranty Information
This chapter contains the following topics:
Federal Communication Commission Interference Statement Warranty Information (All Regions Except Australia/New Zealand) Warranty Information (Australia/New Zealand only) GNU General Public License ("GPL")
Federal Communication Commission Interference Statement
This device complies with Part 15 of the FCC Rules. Operation is subject to the following two conditions: (1) This device may not cause harmful interference, and (2) this device must accept any interference received, including interference that may cause undesired operation.
This equipment has been tested and found to comply with the limits for a Class B digital device, pursuant to Part 15 of the FCC Rules. These limits are designed to provide reasonable protection against harmful interference in a residential installation. This equipment generates, uses and can radiate radio frequency energy and, if not installed and used in accordance with the instructions, may cause harmful interference to radio communications. However, there is no guarantee that interference will not occur in a particular installation. If this equipment does cause harmful interference to radio or television reception, which can be determined by turning the equipment off and on, the user is encouraged to try to correct the interference by one of the following measures:
■ Reorient or relocate the receiving antenna.
■ Increase the separation between the equipment and receiver.
- Connect the equipment into an outlet on a circuit different from that to which the receiver is connected.
- Consult the dealer or an experienced radio/TV technician for help.
Regulatory Information/Disclaimers
Installation and use of this Wireless LAN device must be in strict accordance with the instructions included in the user documentation provided with the product. Any changes or modifications (including the antennas) made to this device that are not expressly approved by the manufacturer may void the user's authority to operate the equipment. The manufacturer is not responsible for any radio or television interference caused by unauthorized modification of this device, or the substitution of the connecting cables and equipment other than manufacturer specified. It is the responsibility of the user to correct any interference caused by such unauthorized modification, substitution or attachment. Manufacturer and its authorized resellers or distributors will assume no liability for any damage or violation of government regulations arising from failing to comply with these guidelines.
For operation within 5.15 \~ 5.25 GHz frequency range, it is restricted to indoor environment. This device meets all the other requirements specified in Part 15E, Section 15.407 of the FCC Rules.
CAUTION: To comply with FCC RF exposure compliance requirements, the antenna used for this transmitter must be installed to provide a separation distance of at least 20 cm from all persons and must not be co-located or operating in conjunction with any other antenna or transmitter.
Note: The country code selection is for non-US models only and is not available for all US models. Per FCC regulations, all WiFi products marketed in the US must be fixed to US operation channels only.
Industry Canada (IC)
This device complies with RSS-210 of the Industry Canada Rules. Operation is subject to the following two conditions: (1) This device may not cause harmful interference, and (2) this device must accept any interference received, including interference that may cause undesired operation.
CAUTION! The device for operation in the band 5150-5250 MHz is only for indoor use to reduce the potential for harmful interference to co-channel mobile satellite systems.
Radiation Exposure Statement: This equipment complies with IC radiation exposure limits set forth for an uncontrolled environment. This equipment should be installed and operated with minimum distance 20 cm between the radiator and your body.
This device complies with Canadian ICES-003 Class B.
This product is intended to be supplied by a listed limited power source, double insulated, or direct plug-in power unit marked “Class 2.”
Safety Compliance
Approved for US and Canada. CAN/CSA-C22.2 No. 60950-1, UL 60950-1: Safety of Information Technology Equipment.
This device is only for use with the compatible UL Listed AC adapter.
CE Compliance for Europe
Operation of this device is subjected to the following National regulations and may be prohibited to use if certain restriction should be applied.
Marking by the CE symbol indicates compliance of this system to the applicable Council Directives of the European Union, including the EMC Directives (2004/108/EC), (1999/5/EC), the Low Voltage Directive (2006/95/EC), and EuP Directive (2005/32/EC). A “Declaration of Conformity” in accordance with the applicable directives has been made and is on file at Western Digital Europe.
Environmental Compliance (China)
产品中毒有害物质或元素的名称及含量
Warranty Information (All Regions Except Australia/New Zealand)
Limited Warranty
WD warrants that the Product, in the course of its normal use, will for the term defined below, be free from defects in material and workmanship and will conform to WD's specification therefor. The term of your limited warranty depends on the country in which your Product was purchased. The term of your limited warranty is for 1 year in the North, South and Central America region, 2 years in the Europe, the Middle East and Africa region, and 3 years in the Asia Pacific region, unless otherwise required by law. The term of your limited warranty period shall commence on the purchase date appearing on your purchase receipt. WD may at its discretion make extended warranties available for purchase. WD shall have no liability for any Product returned if WD determines that the Product was stolen from WD or that the asserted defect a) is not present, b) cannot reasonably be rectified because of damage occurring before WD receives the Product, or c) is attributable to misuse, improper installation, alteration (including removing or obliterating labels and opening or removing external enclosures, unless the product is on the list of limited user-serviceable products and the specific alteration is within the scope of the applicable instructions, as found at http://support.wdc.com), accident or mishandling while in the possession of someone other than WD. Subject to the limitations specified above, your sole and exclusive warranty shall be, during the period of warranty specified above and at WD's option, the repair or replacement of the Product with an equivalent or better Product. The foregoing warranty of WD shall extend to repaired or replaced Products for the balance of the applicable period of the original warranty or ninety (90) days from the date of shipment of a repaired or replaced Product, whichever is longer.
The foregoing limited warranty is WD's sole warranty and is applicable only to products sold as new. The remedies provided herein are in lieu of a) any and all other remedies and warranties, whether expressed, implied or statutory, including but not limited to, any implied warranty of merchantability or fitness for a particular purpose, and b) any and all obligations and liabilities of WD for damages including, but not limited to accidental, consequential, or special damages, or any financial loss, lost profits or expenses, or lost data arising out of or in connection with the purchase, use, or performance of the Product, even if WD has been advised of the possibility of such damages. In the United States, some states do not allow exclusion or limitations of incidental or consequential damages, so the limitations above may not apply to you. This warranty gives you specific legal rights, and you may also have other rights which vary from state to state.
Obtaining Service
WD values your business and always attempts to provide you the very best of service. If this Product requires maintenance, either contact the dealer from whom you originally purchased the Product or visit our product support Web site at http://support.wdc.com for information on how to obtain service or a Return Material Authorization (RMA). If it is determined that the Product may be defective, you will be given an RMA number and instructions for Product return. An unauthorized return (i.e., one for which an RMA number has not been issued) will be returned to you at your expense. Authorized returns must be shipped in an approved shipping container, prepaid and insured, to the address provided on your return paperwork. Your original box and packaging materials should be kept for storing or shipping your WD product. To conclusively establish the period of warranty, check the warranty expiration (serial number required) via http://support.wdc.com. WD shall have no liability for lost data regardless of the cause, recovery of lost data, or data contained in any Product placed in its possession.
Warranty Information (Australia/New Zealand only)
For consumers purchasing products in Australia and New Zealand, please refer to this warranty information.
Nothing in this warranty modifies or excludes your legal rights under the Australian Competition and Consumer Act or the New Zealand Consumer Guarantees Act. This warranty identifies WD's preferred approach to resolving warranty claims which is likely to be quick and simple for all parties.
No other warranties either express or implied by law, including but not limited to those contained in the Sale of Goods Act, are made with respect to the Product. If you purchased your Product in New Zealand for the purposes of a business, you acknowledge and agree that the New Zealand Consumer Guarantees Act does not apply.
In Australia, our goods come with guarantees that cannot be excluded under the Australian Consumer Law. You are entitled to a replacement or refund for a major failure and compensation for any other reasonably foreseeable loss or damage. You are also entitled to have the goods repaired or replaced if goods fail to be of acceptable quality and the failure does not amount to a major failure. What constitutes a major failure is set out in the Australian Consumer Law.
Warranty
WD warrants that the Product, in the course of its normal use, will for the term defined below, be free from defects in material and workmanship and will conform to WD's specifications. The term of your warranty is 3 years in Australia and New Zealand, unless otherwise required by law. The term of your warranty period shall commence on the purchase date appearing on your purchase receipt from an authorized distributor or authorized reseller. Proof of purchase shall be required to be eligible for this warranty and to establish the commencement date of this warranty. Warranty service will not be provided unless the Product is returned to an authorized distributor, authorized reseller or regional WD return center where the Product was first shipped by WD. WD may at its discretion make extended warranties available for purchase. WD shall have no liability for any Product returned if WD determines that the Product was (i) not purchased from an authorized distributor or authorized reseller, (ii) not used in accordance with WD specifications and instructions, (iii) not used for its intended function, or (iv) stolen from WD, or that the asserted defect a) is not present, b) cannot reasonably be rectified because of damage occurring before WD receives the Product, or c) is attributable to misuse, improper installation, alteration (including removing or obliterating labels and opening or removing external enclosures, including the mounting frame, unless the product is on the list of limited user-serviceable products and the specific alteration is within the scope of the applicable instructions, as found at http://support.wdc.com), accident or mishandling while in the possession of someone other than WD.
PRODUCTS ARE COMPLEX AND FRAGILE ITEMS THAT MAY OCCASSIONALY FAIL DUE TO (A) EXTERNAL CAUSES, INCLUDING WITHOUT LIMITATION, MISHANDLING, EXPOSURE TO HEAT, COLD, AND HUMIDITY, AND POWER FAILURES, OR (B) INTERNAL FAULTS. SUCH FAILURES CAN RESULT IN THE LOSS, CORRUPTION, DELETION OR ALTERATION OF DATA. NOTE THAT YOU SHALL BE RESPONSIBLE FOR THE LOSS, CORRUPTION, DELETION OR ALTERATION O HOWSOEVER CAUSED, AND FOR BACKING UP AND PROTECTING DATA AGAINST LOSS, CORRUPTION, DELETION OR ALTERATION. YOU AGREE TO CONTINUALLY BACK UP ALL DATA ON THE PRODUCT, AND TO COMPLETE A BACKUP PRIOR TO SEEKING ANY GENERAL SERVICE AND TECHNICAL SUPPORT FROM WD.
In Australia, if the Product is not of a kind ordinarily acquired for personal, domestic or household use or consumption, provided it is fair and reasonable to do so, WD limits its liability to replacement of the Product or supply of equivalent or better Product.
This warranty shall extend to repaired or replaced Products for the balance of the applicable period of the original warranty or ninety (90) days from the date of shipment of a repaired or replaced Product, whichever is longer. This warranty is WD's sole manufacturer's warranty and is applicable only to Products sold as new.
Obtaining Service
WD values your business and always attempts to provide you the very best of service. Should you encounter any problem, please give us an opportunity to address it before returning this Product. Most technical support questions can be answered through our knowledge base or e-mail support service at http://support.wdc.com. If the answer is not available or, if you prefer, please contact WD at the applicable telephone number shown in the front of this document.
If you wish to make a claim, you should initially contact the dealer from whom you originally purchased the Product. If you are unable to contact the dealer from whom you originally purchased the Product, please visit our product support Web site at http://support.wdc.com for information on how to obtain service or a Return Material Authorization (RMA). If it is determined that the Product may be defective, you will be given an RMA number and instructions for Product return. An unauthorized return (i.e., one for which an RMA number has not been issued) will be returned to you at your expense. Authorized returns must be shipped in an approved shipping container, prepaid and insured, to the address provided with your RMA number. If following receipt of a qualifying claim under this warranty, WD or the dealer from whom you originally purchased the Product determines that your claim is valid, WD or such dealer shall, at its discretion, either repair or replace the Product with an equivalent or better Product or refund the cost of the Product to you. You are responsible for any expenses associated with a claim under this warranty. The benefits provided to you under this warranty are in
addition to other rights and remedies available to you under the Australian Competition and Consumer Act or the New Zealand Consumer Guarantees Act.
Your original box and packaging materials should be kept for storing or shipping your WD product. To conclusively establish the period of warranty, check the warranty expiration (serial number required) via http://support.wdc.com.
Western Digital Technologies, Inc.
3355 Michelson Drive, Suite 100
Phone: 949-672-7000
E-mail: support@wdc.com
GNU General Public License ("GPL")
Firmware incorporated into this product may include third party copyrighted software licensed under the GPL or Lesser General Public License ("LGPL") (collectively, "GPL Software") and not Western Digital's End User License Agreement. In accordance with the GPL, if applicable: 1) the source code for the GPL Software may be downloaded at no charge from http://support.wdc.com/download/gpl or obtained on CD for a nominal charge from http://support.wdc.com/download/gpl or by calling Customer Support within three years of the date of purchase; 2) you may re-use, re-distribute, and modify the GPL Software; 3) with respect solely to the GPL Software, no warranty is provided, to the extent permitted by applicable law; and 4) a copy of the GPL is included herewith, may be obtained at http://www.gnu.org, and may also be found at http://support.wdc.com/download/gpl.
Modification of or tampering with the Software, including but not limited to any Open Source Software, is solely at your own risk. Western Digital is not responsible for any such modification or tampering. Western Digital will not support any product in which you have or have attempted to modify the Software supplied by Western Digital.
Appendix: Technical Specifications
| Specification Value | |
| Wireless standard IEEE 802.11ac, n, a | |
| Ethernet (4) Gigabit Ethernet ports | |
| Bands 5 GHz | |
| Antennas 3x3 | |
| Security WEP | WPAWPA2WPA/WPA2 -PSK |
| Supported operating systems | Windows XP with Service Pack 3 |
| Windows Vista with Service Pack 2 | |
| Windows 7 with Service Pack 1 | |
| Mac OS X Leopard | |
| Mac OS X Snow Leopard | |
| Mac OS X Lion | |
| Mac OS X Mountain Lion | |
| Supported web browsers | For PCs only: IE7, IE8, and IE9 |
| For PCs and Macs: Firefox, Google Chrome, and Safari | |
| Physical dimensions | Width: 6.98" (177.4 mm) |
| Height: 7.524" (191.1 mm) | |
| Depth: 2.48 " (63.0 mm) | |
| Weight: .83 lb (.38 Kg) | |
| Power supply | Input voltage: 100V to 240V AC |
| Input frequency: 50 to 60 Hz | |
| Output voltage: 12V DC, 1.5A | |
| Power supply: 18W | |
| Temperature | Operating temperature: 0°C to 40°C (32 to 104°F) |
| Storage temperature: -40°C to 70°C (-40°F to 158°F). | |
Index
A
AC power adapters 5
accessories 4
administrative settings 21
B
basic settings 16
box contents 4
button
Reset 7
WPS 7
C
configuration, saving and restoring 23
connecting entertainment devices 9
connecting to a router 10
current settings 17
E
entertainment devices, connecting 9
environmental compliance (China) 33
F
factory defaults reset 23
firmware update 22
front LEDs 6
G
GPL software 35
|
icons on My Dashboard 17
L
LAN settings 19
language selection 26
LEDs 6, 7
logging in 16
logging out 25
M
manually connecting to a router 10
My Dashboard
current settings 17
icons 17
opening 16
0
obtaining service 33
obtaining service in Australia and New
Zealand 34
opening and closing Advanced Settings
screen 19
operating precautions 1
options after setup complete 15
overview 3
P
package contents 4
password, changing 21
port LEDs 7
product
accessories 4
overview 3
power adapters 5
recording information 2
registration 2
safety information 1
warranty 33
R
rebooting 25
recording product information 2
registering the product 2, 25
regulatory compliance 29
Reset button 7, 24
resetting to factory defaults 23
restoring a configuration 23
RoHS 33
s
safety
compliance 30
instructions 1
saving a configuration 23
service 33
service in Australia and New Zealand 34
settings
administrative 21
advanced 19
basic 16
firmware 22
LAN 19
language 26
resetting 24
saving and restoring 23
setup complete options 15
setup options 8
software, GPL 35
T
technical specifications 36
troubleshooting
All front panel LEDs flash continuously.
27
Computers are unable to access the Internet. 27
How do I change wireless settings or connect a new router? 27
How do I reset the Wi-Fi bridge? 27
Power LED does not illuminate. 27
What is the IP address of the Wi-Fi bridge after configuration? 28
Wi-Fi bridge cannot connect to the router. 27
U
updating firmware 22
W
warranty 33
Wi-Fi bridge, components, views, LEDS 5
wireless settings 18
WPS button 7
WPS button connection method 10
WPS LED 6
Information furnished by WD is believed to be accurate and reliable; however, no responsibility is assumed by WD for its use nor for any infringement of patents or other rights of third parties which may result from its use. No license is granted by implication or otherwise under any patent or patent rights of WD. WD reserves the right to change specifications at any time without notice.
Western Digital, WD and the WD logo are registered trademarks in the U.S. and other countries; My Net is a registered trademark of Western Digital Technologies, Inc. Adobe and Adobe Reader and the included Adobe Reader logo are either registered trademarks or trademarks of Adobe Systems Incorporated in the United States and/or other countries. Other marks may be mentioned herein that belong to other companies.
© 2012 Western Digital Technologies, Inc. All rights reserved.
Western Digital
3355 Michelson Drive, Suite 100
Irvine, California 92612 U.S.A.
- My Net™ AC Wi-Fi Bridge
- WD® Service and Support
- Accessing Online Support
- Contacting WD Technical Support
- Table of Contents
- Important User Information .... 1
- Product Overview .... 3
- Getting Started 8
- Basic Settings 16
- Advanced Settings 19
- Troubleshooting 27
- Regulatory and Warranty Information 29
- Appendix: Technical Specifications 36
- 1
- Important User Information
- Important Safety Instructions
- Recording Your WD Product Information
- Registering Your WD Product
- 2
- Product Overview
- Introduction
- Features
- Feature Description
- Package Contents
- Accessories
- AC Power Adapters
- Components
- Front Panel
- Front LED indicators
- Side Panel
- Side components
- Port LED indicators
- Back
- Component Description
- 3
- Getting Started
- Setting up the Wi-Fi Bridge
- Connecting to the Router Using the WPS Button
- Connecting to the Router Manually
- You have the following options:
- Wait for the connection to be made. When a connection verification screen displays, click Next.
- Basic Settings
- Opening My Dashboard After Setup
- Icon Name Actions See ...
- Reviewing Current Settings
- Setting Description
- Configuring Wireless Settings
- 5
- Advanced Settings
- Opening and Closing the Advanced Settings Screen
- Configuring LAN Settings
- Configuring Administrative Settings
- Changing the Administrator Password
- Updating the Wi-Fi Bridge's Firmware
- WARNING! Do not disconnect or turn off the Wi-Fi bridge while the update is in process.
- Saving and Restoring Your Wi-Fi Bridge's Settings
- To save your settings:
- Resetting the Wi-Fi Bridge to Factory Defaults
- Using the Dashboard
- Using the Reset button
- Rebooting
- Logging Out
- Registering the Wi-Fi Bridge
- Selecting a Language
- Troubleshooting
- Problem/Question Solution
- What is the IP address of the Wi-Fi bridge after it is configured?
- Regulatory and Warranty Information
- Federal Communication Commission Interference Statement
- Regulatory Information/Disclaimers
- Industry Canada (IC)
- Safety Compliance
- CE Compliance for Europe
- Environmental Compliance (China)
- Warranty Information (All Regions Except Australia/New Zealand)
- Limited Warranty
- Obtaining Service
- Warranty Information (Australia/New Zealand only)
- For consumers purchasing products in Australia and New Zealand, please refer to this warranty information.
- Warranty
- GNU General Public License ("GPL")
- Index
- A
- B
- C
- E
- F
- G
- |
- L
- M
- 0
- P
- R
- s
- T
Brand : WESTERN DIGITAL
Model : My Net BMRD0000NBL
Category : NAS