
ThinkVision C500 - Video projector LENOVO - Free user manual and instructions
Find the device manual for free ThinkVision C500 LENOVO in PDF.


| Product Type | Video projector |
| Brand | Lenovo |
| Model | ThinkVision C500 |
| Display Technology | DLP with 0.7-inch DMD |
| Native Resolution | XGA (1024 x 768) |
| Brightness | 3200 lumens |
| Contrast Ratio | 2000:1 |
| Lamp Type | High-pressure mercury vapor lamp, 250W (Eco mode 200W) |
| Projection Distance | 1.5 to 8 meters (4.9 to 26 feet) |
| Projection Screen Size | 0.94 to 6.1 meters (37 to 240 inches) diagonal |
| Zoom Ratio | 1.22:1 manual zoom |
| Keystone Correction | Vertical +/-15 degrees, automatic and manual |
| Weight | 3.55 kg (7.5 lbs) |
| Dimensions (W x D x H) | 32.8 x 23.8 x 8.8 cm (12.9 x 9.4 x 3.5 inches) |
| Power Consumption | Normal: <350W, Eco: <250W, Standby: <20W |
| Audio Speaker | 2W mono |
| Input Connectors | DVI-I, RGB in, USB, Composite video, S-video, Component video (Y, Pb/Cb, Pr/Cr), Audio in (mini-jack and RCA) |
| Output Connectors | RGB out, Audio out (mini-jack) |
| Network Connectivity | RJ-45 for remote web control |
| Remote Control | Infrared with laser pointer and USB mouse emulation |
| Security Slot | Kensington lock compatible |
| Warranty | 3 years parts and labor (worldwide) |
| Included Accessories | Remote control, AAA batteries, USB cable, S-video cable, DVI-A to VGA cable, audio cable, power cord, composite video cable, carrying case, quick start guide, user manual CD |
Frequently Asked Questions - ThinkVision C500 LENOVO
User questions about ThinkVision C500 LENOVO
0 question about this device. Answer the ones you know or ask your own.
Ask a new question about this device
Download the instructions for your Video projector in PDF format for free! Find your manual ThinkVision C500 - LENOVO and take your electronic device back in hand. On this page are published all the documents necessary for the use of your device. ThinkVision C500 by LENOVO.
USER MANUAL ThinkVision C500 LENOVO
Lenovo C500 Projector User's Guide
Lenovo C500 Projector User's Guide
Note: Before using this information and the product it supports, read the information in Appendix D, "Service and Support," on page D-1 and Appendix E, "Lenovo Statement of Limited Warranty," on page E-1.
Second Edition (June 2006)
© Copyright Lenovo 2006.
Portions © Copyright International Business Machines Corporation 2005.
Allrightsreserved.
U.S. GOVERNMENT USERS – RESTRICTED RIGHTS: Our products and/or services are provided with RESTRICTED RIGHTS. Use, duplication or disclosure by the Government is subject to the GSA ADP Schedule contract with Lenovo Group Limited, if any, or the standard terms of this commercial license, or if the agency is unable to accept this Program under these terms, then we provide this Program under the provisions set forth in Commercial Computer Software–Restricted Rights at FAR 52.227-19, when applicable, or under Rights in Data-General, FAR 52.227.14 (Alternate III).
Contents
Safety information . . . . . . . . . . v
General safety guidelines. . . . . . . vii
Mercury lamp information . . . . . . . . . . . vii
Service. . . . . . . . . . . . . . . . . . . . vii
Power cords and power adapters . . . . . . . vii
Extension cords and related devices . . . . . viii
Plugs and outlets . . . . . . . . . . . . . . . viii
Batteries . . . . . . . . . . . . . . . . . . . viii
Heat and product ventilation . . . . . . . . ix
CD and DVD drive safety. . . . . . . . . . ix
Registering your option. . . . . . . xi
Chapter 1. Product description . . . . 1-1
Packing checklist . . . . . . . . . . . . . . 1-2
Projector features . . . . . . . . . . . . . 1-3
Chapter 2. Setting up the projector . . 2-1
Starting and shutting down the projector . . . . 2-1
Positioning the projector. . . . . . . . . . . 2-2
Adjusting the projector level and height . . . . 2-4
Adjusting the image . . . . . . . . . . . . 2-4
Image resolution 2-5
Adjusting the volume. . . . . . . . . . . 2-5
Chapter 3. Connecting devices to the projector 3-1
Connecting devices 3-1
Connecting to a USB device. . . . . . . . . 3-2
Chapter 4. Using the projector features 4-1
Using the remote control. . . . . . . . . . . 4-1
Inserting the remote control batteries . . . . 4-2
Operating range 4-3
Projector and remote control buttons. . . . . 4-3
Chapter 5. On-screen Display menu controls . . . . . . . . . . . . . . . . . . . . . 5-1
Navigating the On-screen Display ..... 5-1
Quality menu 5-2
Properties menu . . . . . . . . . . . . 5-3
Options menu . . . . . . . . . . . . . 5-7
Setup menu . . . . . . . . . . . . . . 5-8
Language menu . . . . . . . . . . . . 5-11
Information menu . . . . . . . . . . . 5-12
Chapter 6. Remote network operation 6-1
Network setup . . . . . . . . . . . . . . . 6-1
Direct connection (ad hoc) Setup . . . . . . . 6-1
C500 Ethernet operation . . . . . . . . . . 6-2
Updating Ethernet firmware . . . . . . . 6-6
Appendix A. Maintenance ..... A-1
Cleaning the lens . . . . . . . . . . . . . A-1
Replacing the projector lamp . . . . . . . . A-1
Resetting the lamp A-3
Using the security slot . . . . . . . . . . . A-4
Appendix B. Troubleshooting ..... B-1
Projector LEDs . . . . . . . . . . . . . . B-2
Thermal protector . . . . . . . . . . . . B-3
Appendix C. Specifications ..... C-1
Appendix D. Service and Support. . . D-1
Online technical support . . . . . . . . . . D-1
Telephone technical support . . . . . . . . D-1
Appendix E. Lenovo Statement of Limited Warranty . . . . . . . . . . . E-1
Part 1 - General Terms . . . . . . . . . . . E-1
Part 2 - Country-unique Terms . . . . . . . E-3
Part 3 - Warranty Information . . . . . . . E-13
Warranty Period . . . . . . . . . . . . E-13
Types of Warranty Service. . . . . . . . E-13
Worldwide telephone list . . . . . . . . E-14
Guarantee supplement for Mexico . . . . . . E-17
Appendix F. Notices. . . . . . . . . . F-1
Trademarks . . . . . . . . . . . . . . . . . F-2
Appendix G. Electronic emission notices . . . . . . . . . . . . . . . . . . G-1
Federal Communications Commission (FCC)
Declaration of Conformity . . . . . . . . . G-1
Safetyinformation
Before installing this product, read the Safety Information.
Always observe the following precautions to reduce the risk of injury and property damage:
Mercurylampinformation
CAUTION:
This product contains a high-pressure mercury vapor lamp. The lamp may break without warning, denoted by a loud popping sound, and mercury vapor may be released into the air. Inhaling mercury or mercury compounds in vapor or powder form can lead to health problems.
Protection against lamp breakages
To reduce the risk of health problems, we recommend the following if the lamp breaks:
- Leave the room immediately and carefully ventilate the room for at least 180 minutes.
- Use care when cleaning up any material ejected from the projector. Use cut proof gloves to avoid contact of material with skin. Wash your hands after cleaning up the area.
- Discard any nearby food and drink, and thoroughly clean the surface around the projector.
- Disposal of waste may be regulated under applicable environmental laws due to the presence of mercury. Dispose of these materials as required by local ordinances and regulations.
- If you experience any discomfort or irritation, seek medical attention immediately.
- Contact Service and Support for instructions on bulb replacement.
Service
Do not attempt to service a product yourself unless instructed to do so by the Customer Support Center. Use only a service provider who is approved to repair your particular product.
Note: Some parts can be upgraded or replaced by the customer. These parts are referred to as Customer Replaceable Units, or CRUs. Lenovo expressly identifies CRUs as such, and provides documentation with instructions when it is appropriate for customers to replace those parts. You must closely follow all instructions when performing such replacements. Always make sure that the power is turned off and that the product is unplugged from any power source before you attempt the replacement. If you have any questions or concerns, contact the Customer Support Center.
Power cords and power adapters
Use only the power cords and power adapters supplied by the product manufacturer.
Never wrap a power cord around the power adapter or other object. Doing so can stress the cord in ways that can cause the cord to fray, crack or crimp. This can present a safety hazard.
Always route power cords so that they will not be walked on, tripped over, or pinched by objects.
Protect the cord and power adapters from liquids. For instance, do not leave your cord or power adapter near sinks, tubs, toilets, or on floors that are cleaned with liquid cleansers. Liquids can cause a short circuit, particularly if the cord or power adapter has been stressed by misuse. Liquids can also cause gradual corrosion of the power cord terminals and/or the connector terminals on the adapter which can eventually result in overheating.
Always connect power cords and signal cables in the correct order and ensure that all power cord connectors are securely and completely plugged into receptacles.
Do not use any power adapter that shows corrosion at the ac input pins and/or shows signs of overheating (such as deformed plastic) at the ac input or anywhere on the power adapter.
Do not use any power cords where the electrical contacts on either end show signs of corrosion or overheating or where the power cord appears to have been damaged in any way.
Extension cords and related devices
Ensure that extension cords, surge protectors, uninterruptible power supplies, and power strips that you use are rated to handle the electrical requirements of the product. Never overload these devices. If power strips are used, the load should not exceed the power strip input rating. Consult an electrician for more information if you have questions about power loads, power requirements, and input ratings.
Plugsandoutlets
If a receptacle (power outlet) that you intend to use with your computer equipment appears to be damaged or corroded, do not use the outlet until it is replaced by a qualified electrician.
Do not bend or modify the plug. If the plug is damaged, contact the manufacturer to obtain a replacement.
Some products are equipped with a three-pronged plug. This plug fits only into a grounded electrical outlet. This is a safety feature. Do not defeat this safety feature by trying to insert it into a non-grounded outlet. If you cannot insert the plug into the outlet, contact an electrician for an approved outlet adapter or to replace the outlet with one that enables this safety feature. Never overload an electrical outlet. The overall system load should not exceed 80 percent of the branch circuit rating. Consult an electrician for more information if you have questions about power loads and branch circuit ratings.
Be sure that the power outlet you are using is properly wired, easily accessible, and located close to the equipment. Do not fully extend power cords in a way that will stress the cords.
Connect and disconnect the equipment from the electrical outlet carefully
Batteries
All personal computers manufactured by Lenovo contain a non-rechargeable coin cell battery to provide power to the system clock. In addition many mobile products such as notebook PCs utilize a rechargeable battery pack to provide system power when in portable mode. Batteries supplied by Lenovo for use with your product have been tested for compatibility and should only be replaced with Lenovo approved parts.
Never attempt to open or service any battery. Do not crush, puncture, or incinerate batteries or short circuit the metal contacts. Do not expose the battery to water or other liquids. Only recharge the battery pack strictly according to instructions included in the product documentation.
Battery abuse or mishandling can cause the battery to overheat, which can cause gasses or flame to "vent" from the battery pack or coin cell. If your battery is damaged, or if you notice any discharge from your battery or the buildup of foreign materials on the battery leads, stop using the battery and obtain a replacement from the battery manufacturer.
Batteries can degrade when they are left unused for long periods of time. For some rechargeable batteries (particularly Lithium Ion batteries), leaving a battery unused in a discharged state could increase the risk
of a battery short circuit, which could shorten the life of the battery and can also pose a safety hazard. Do not let rechargeable Lithium-Ion batteries completely discharge or store these batteries in a discharged state.
Heat and product ventilation
Computers generate heat when turned on and when batteries are charging. Notebook PCs can generate a significant amount of heat due to their compact size. Always follow these basic precautions:
- Do not leave the base of your computer in contact with your lap or any part of your body for an extended period when the computer is functioning or when the battery is charging. Your computer produces some heat during normal operation. Extended contact with the body could cause discomfort or, potentially, a skin burn.
- Do not operate your computer or charge the battery near flammable materials or in explosive environments.
- Ventilation slots, fans and/or heat sinks are provided with the product for safety, comfort, and reliable operation. These features might inadvertently become blocked by placing the product on a bed, sofa, carpet, or other flexible surface. Never block, cover or disable these features.
CD and DVD drive safety
CD and DVD drives spin discs at a high speed. If a CD or DVD is cracked or otherwise physically damaged, it is possible for the disc to break apart or even shatter when the CD drive is in use. To protect against possible injury due to this situation, and to reduce the risk of damage to your machine, do the following:
• Always store CD/DVD discs in their original packaging
• Always store CD/DVD discs out of direct sunlight and away from direct heat sources
- Remove CD/DVD discs from the computer when not in use
- Do not bend or flex CD/DVD discs, or force them into the computer or their packaging
- Check CD/DVD discs for cracks before each use. Do not use cracked or damaged discs
Registeringyouroption
Thank you for purchasing this Lenovo™ product. Please take a few moments to register your product and provide us with information that will help Lenovo to better serve you in the future. Your feedback is valuable to us in developing products and services that are important to you, as well as in developing better ways to communicate with you. Register your option on the following Web site:
http://www.lenovo.com/register
Lenovo will send you information and updates on your registered product unless you indicate on the Web site questionnaire that you do not want to receive further information.
Chapter 1. Product description
The Lenovo C500 projector can be used for both business presentations and home entertainment and is easy to connect, use, and maintain. Some main features of this projector are:
- Bright (3200 lumen) and brilliant images from the DLP technology and XGA-native resolution.
- Clear and sharp images with a high contrast ratio of 2000:1.
- Three lamp brightness modes (boost, normal, and economy), automatic vertical keystone correction, dual PC inputs and a monitor output.
- Fully-featured remote control including laser pointer, mouse emulation and page up and down functionality.
- Remotely check the status (lamp life and menu settings) of your C500 projector via a Web browser (password protected) through an RJ-45 connection and send e-mail to your projector administrator.
• Extremely powerful, lightweight, and portable at 3.4 kg (7.5 lbs). - Beautiful reproduction of high-quality images from your PC, DVDs, and other media sources.
- Digital technology which automatically corrects the vertical keystone distortion of the projector pictures.
Packingchecklist
In addition to this user's guide, your option package contains the following:

Figure 1-1. Standard accessories
| 1 | Projector with lamp housing and lens cap |
| 2 | Remote control |
| 3 | Two AAA batteries |
| 4 | USB cable |
| 5 | S-video cable |
| 6 | Video cable (DVI-A) to VGA |
| 7 | Audio cable (mini jack-to-RCA) |
| 8 | Power cord |
| 9 | Composite video cable |
| 10 | User's guide and installation CD |
| 11 | Multi-language quick start guide |
| 12 | Carrying case |
| 13 | Carrying case strap |
If any of the items listed above are missing or damaged, contact your place of purchase.
Note: Be sure to retain your proof of purchase; it will be required to receive warranty service.
For information on optional accessories for your projector, go to http://www.lenovo.com.
Important:
- Avoid using the projector in dusty environments
- Leave the power cable plugged in (for 2-5 minutes) until the projector returns to room temperature before placing the projector inside the soft case. Placing the projector into the case too soon after switching off the power could cause the projector to overheat and will shorten lamp life.
- Be sure to attach the lens cap before placing the projector into the soft case to avoid damaging the lens.
Projectorfeatures
The figures below show the different angles and features of the projector.
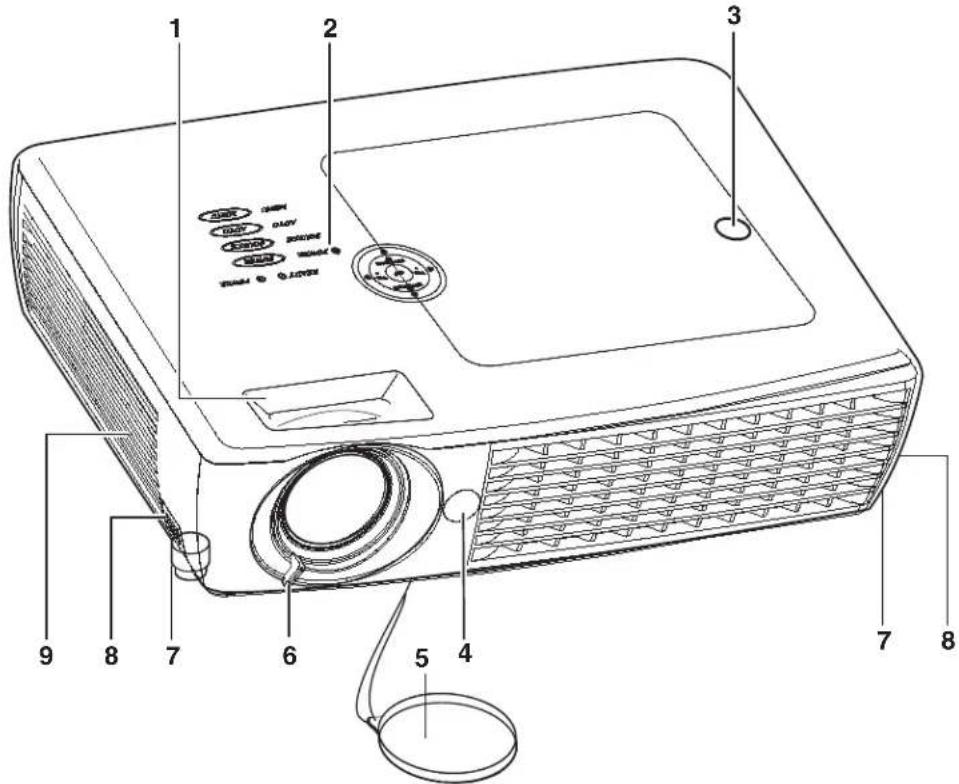
Figure 1-2. Front angle of projector
| 1 Zoom | Enlarges the projected image |
| 2 On-screen Display buttons | See following table |
| 3 Projection lamp cover | Remove when changing lamp |
| 4 IR receiver | Receiver for IR signal from remote control |
| 5 Lens cover | Protects the lens |
| 6 Focus | Remove cover, turn lens to focus |
| 7 Height adjuster | Adjusters drop when adjuster buttons are pushed |
| 8 Height adjuster button | Push to release height adjuster |
| 9 Speaker | Built-in mono speaker |

Figure 1-3. On-screen Display buttons and LEDs
| 1 Keystone/Down cursor | Corrects image-trapezoid (widens bottom) effectNavigates and changes settings in the On-screen Display |
| 2 VOL-/Left cursor | Decreases volumeNavigates and changes settings in the On-screen Display |
| 3 Keystone/Up cursor | Corrects image-trapezoid (widens top) effectNavigates and changes settings in the On-screen Display |
| 4 Enter | Changes settings in the On-screen Display |
| 5 VOL+/Right cursor | Increases volumeNavigates and changes settings in the On-screen Display |
| 6 Ready LED | Orange: Lamp - Ready, you can safely turn on/off the projectorFlashing: Green - Not ready, do not press the Power button |
| 7 Power LED | Green: Unit is on and working correctlyOff: Unit is powered offFlashing: Operational error code(s), seeAppendix B, "Troubleshooting," orpage B-1for more information. |
| 8 Power | Turns the projector off |
| 9 Source | Detects and changes the input device |
| 10 Auto | Optimizes image size, position and resolution |
| 11 Menu | Opens and exits the On-screen Display |
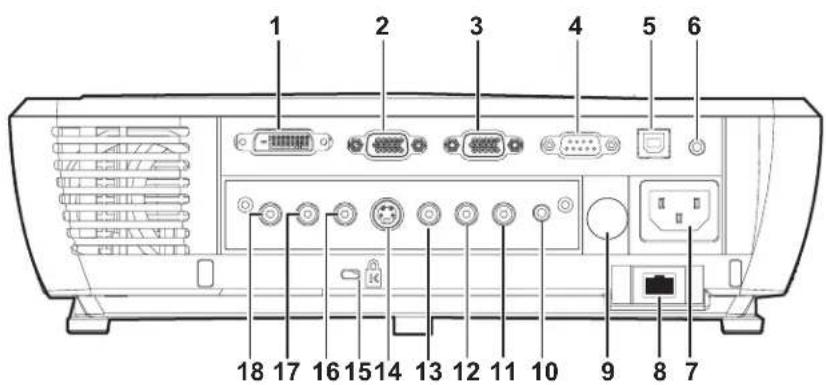
Figure1-4.Rearview
| 1 DVI-I | Connect the supplied DVI cable from a computer |
| 2 RGB IN | Connect a VGA cable (not supplied) from a computer |
| 3 RGB out | Connect to an external monitor |
| 4 RS-232 | Service port, not intended for personal use |
| 5 USB | Connect the USB cable from a computer |
| 6 Audio-in | Connect the audio cable from an input device |
| 7 Power connector | Connect the supplied power cord |
| 8 RJ-45 | Connect the projector to a cable or network |
| 9 IR receiver | Receiver for IR signal from remote control |
| 10 Audio-out | Connect to external speakers |
| 11 Audio-in-R | Connect an RCA audio cable (not supplied) from the input device channel |
| 12 Audio-in-L | Connect an RCA audio cable (not supplied) from the input device left channel |
| 13 Video | Connect the supplied composite video cable from a video device |
| 14 S-video | Connect the supplied S-video cable from a video device |
| 15 Kensington lock | Secure to permanent object with the Kensington lock system |
| 16 Pr/Cr, 17 Pb/Cb, and 18 Y | (Component video in) Connect to a component video-enabled device (not supplied) |
Attention: If your video equipment has multiple outlets, the suggested order for connection to provide the best quality images is:
- Component Video
- S-video
- Composite Video

1
Figure 1-5. Bottom view of projector
| 1 Height adjuster buttons | Push to release leveling legs |
| 2 Leveling legs | Adjusters drop down when you push adjuster buttons, these may be rotated for fine adjustment |
| 3 Ceiling support holes | Contact your dealer for information on mounting the projector to the ceiling |
Attention: For ceiling installations, use approved mounting hardware and M4 screws with a maximum screw depth of 6 mm (1/4 inch). To allow for proper ventilation, keep a distance of 50 cm (20 inches) from walls and ceiling. For permanent installation, follow local codes.
Chapter 2. Setting up the projector
This chapter provides information on positioning the projector, connecting a computer source, using the projector with Microsoft Windows, and displaying and adjusting a computer source image.
Starting and shutting down the projector
Please follow the steps below to start your projector, and to shut off the projector.
Attention: Before moving the projector, be sure to power down the projector normally and disconnect the projector from the main power source.
- Connect the power cord to the projector as shown. Connect the other end to a wall outlet. The Power LED turns on and the buttons illuminate.

- Remove the lens cover.
- Attach input devices.
- Turn on the connected devices.
- Ensure the Power LED is on a steady (not flashing) orange and then press the Power button to turn on the projector. The projector splash screen displays and connected devices are detected.
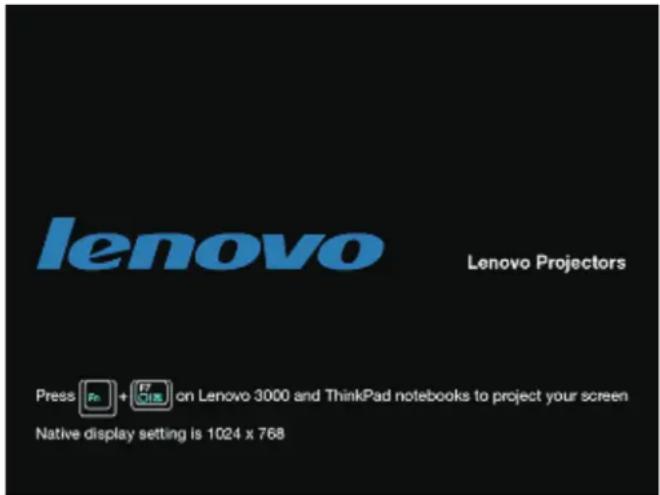
Figure 2-1. Lenovo splash screen
Attention: Do not look directly into the projection lens when the lamp is turned on. The bright light might harm your eyes.
- Use the appropriate appliance cable to connect to a video device.
- To turn off the projector, press the Power button. The projector prepares for shut-down and a "Wait a moment please..." message appears, as shown below.

- When the "Power off" message appears, press the Power button again to switch off power.
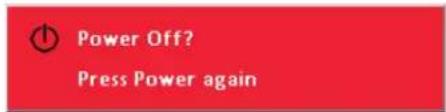
Note: This operation can be cancelled by pressing a button other than the Power button.
Note: Leave the power cable plugged in for at least 2-5 minutes, or until the Ready LED stops flashing, to allow the projector to return to room temperature before placing the projector inside the soft case. Placing the projector into the case too soon after switching off the power could cause the projector to overheat.
Attention: Before moving the projector, be sure to power down the projector normally and disconnect the projector from the main power source.
Positioning the projector
To determine where to position the projector, consider the size and shape of your screen, the location of your power outlets, and the distance between the projector and the rest of your equipment. Following are somegeneralguidelines:
- Position the projector on a flat surface at a right angle to the screen. The projector must be at least 1.5 m (4.9 ft) from the projection screen.
- Position the projector within 2.7 m (9 ft.) of your power source and within 1.8 m (6 ft.) of your video device (unless you purchase extension cables). To ensure adequate cable access, do not place the projector within .15 m (6 in.) of a wall or other object.
- Position the projector the desired distance from the screen. The distance from the lens of the projector to the screen, the zoom setting, and the video format determines the size of the projected image.

| Projection Distance L | Max. Screen Size | Min. Screen Size | ||||
| Diagonal | Width A | Height C | Diagonal | Width B | Height D | |
| 1.5m | 1.14m | 0.91m | 0.68m | 0.94m | 0.75m | 0.56m |
| 4.92' | 45" | 36" | 27" | 36.88" | 29.5" | 22.1" |
| 2m | 1.52m | 1.22m | 0.91m | 1.25m | 1m | 0.75m |
| 6.56' | 60" | 40" | 36" | 49.18" | 39.34" | 29.51" |
| 2.4m | 1.83m | 1.46m | 1.1m | 1.5m | 1.20m | 0.90m |
| 7.87' | 72" | 57.6" | 43.2" | 59" | 47.2" | 35.4" |
| 2.8m | 2.13m | 1.71m | 1.28m | 1.75m | 1.4m | 1.05m |
| 9.18' | 84" | 67.2" | 50.4" | 68.85" | 55.08" | 41.31" |
| 3.2m | 2.44m | 1.95m | 1.46m | 2m | 1.8m | 1.20m |
| 10.5' | 86" | 68.8" | 51.6" | 70.49" | 56.39" | 42.29" |
| 3.6m | 2.74m | 2.19m | 1.65m | 2.25m | 1.80m | 1.35m |
| 11.81' | 108" | 86.4" | 64.8" | 88.52" | 70.82" | 53.11" |
| 4m | 3.05m | 2.44m | 1.83m | 2.5m | 2.00m | 1.50m |
| 13.12' | 120" | 96" | 72" | 98.36" | 78.69" | 59.02" |
| 4.4m | 3.35m | 2.68m | 2.01m | 2.75m | 2.2m | 1.65m |
| 14.43' | 132" | 105.6" | 79.2" | 108.19" | 86.55" | 64.91" |
| 4.8m | 3.66m | 2.93m | 2.19m | 3.00m | 2.40m | 1.80m |
| 15.74' | 144" | 115.2" | 86.4" | 118.03" | 94.42" | 70.82" |
| 5.2m | 3.96m | 3.17m | 2.38m | 3.25m | 2.60m | 1.95m |
| 17.06' | 156" | 124.8" | 93.6" | 127.86" | 102.29" | 76.72" |
| 5.6m | 4.27m | 3.41m | 2.56m | 3.50m | 2.80m | 2.10m |
| 18.37' | 168" | 134.4" | 100.8" | 137.7" | 110.16" | 82.62" |
| 6m | 4.57m | 3.66m | 2.74m | 3.75m | 3.00m | 2.25m |
| 19.68' | 180" | 144" | 108" | 147.54" | 118.03" | 88.52" |
| 8m | 6.10m | 4.88m | 3.66m | 5.00m | 4.00m | 3.00m |
| 26.24' | 240" | 192" | 144" | 196.72" | 157.38" | 118.03" |
Shaded rows are equivalent measurement in feet and inches
Adjusting the projector level and height
To adjust the projector level and height, complete the following procedure:
-
To raise the height of the projector A, lift the projector and press the height-adjuster buttons B. The leveling legs C drop down.
-
To lower the level of the projector, press the height-adjuster buttons and press down on the top of the projector.
-
Fine adjustment for level and height can be made by rotating the leveling legs.

Adjustingtheimage
To adjust the zoom, focus, and keystone for the image, complete the following steps:
- Use the image-zoom control (on the projector only) to resize the projected image and screen size A.

-
Use the Image-focus control (on the projector only) to sharpen the projected image B.
-
If the image is wider at the top or the bottom, this image can be corrected using the keystone adjustment.

- If you press the keystone buttons on the projector or remote, the keystone control appears.

- Use the up/down buttons to adjust the keystone.
Note: The C500 Projector features automatic keystone correction. For more information, see Chapter 5 "On-screen Display menu controls," on page 5-1.
Imageresolution
The projected image resolution is 1024 × 768 (XGA). The projector is compatible with screen resolutions up to 1280 × 1024 (SXGA). If your computer screen resolution is higher than 1280 × 1024 (SXGA), reset it to a lower resolution before you connect the projector.
Note: The image automatically expands 640 x 480 (VGA) and 800 x 600 (SVGA), SDTV, and HDTV images to 1024 x 768 (XGA). This expansion can cause some slight blurriness to the image. If this is a problem, try to change the resolution of the signal source to 1024 x 768.
Adjustingthevolume
To adjust the volume, please follow the steps below:
- Press the Volume +/- buttons (shown below) on the projector or the remote control. The volume control appears on the On-screen Display.

- Use the Volume +/- buttons to adjust the level.

- Press the Mute button (on the remote control only) to turn off the volume. Press the Mute button again to turn off mute. The On-screen Display displays when Mute is activated.

Chapter 3. Connecting devices to the projector
This chapter provides information on connecting devices to the C500 projector.
Connectingdevices
Computers and video devices can be connected to the projector at the same time. Check the user's manual of the connecting device to confirm that it has the appropriate output connector.

| A DVI-I | Connect the supplied DVI-A cable or a DVD-D cable (not supplied) from a computer |
| B RGB in | Connect a VGA cable (not supplied) from a computer |
| C RGB out | Connect a VGA cable (not supplied) to a monitor |
| D RS-232 | Reserved for installation control and firmware updates |
| E USB | Connect the supplied USB cable from a computer |
| F Audio-in | Connect an audio cable (not supplied) from the computer's audio-out connector |
| G Audio-out | Audio loop-through |
| H L-Audio in-R | Connect the audio cable (not supplied) from an audio input device |
| I Video | Connect the supplied composite video cable from a video device |
| J S-video | Connect the supplied S-video cable from a video device |
| K Component video in | Connect a component video cable (not supplied) from a video device |
Attention: As a safety precaution, disconnect all power to the projector and devices before making connections.
Connecting to a USB device
To control your computer mouse using the projector remote control, connect the projector to the computer with a USB cable as shown below.

natural_image
Diagram showing a laptop connected to an audio player via cable (no text or symbols present)Note: The USB mouse function is only supported with Microsoft® Windows® 2000 and Windows XP operating systems.
Chapter 4. Using the projector features
This chapter provides information on using the remote control, audio, keypad buttons, and other projectorfeatures.
Using the remote control
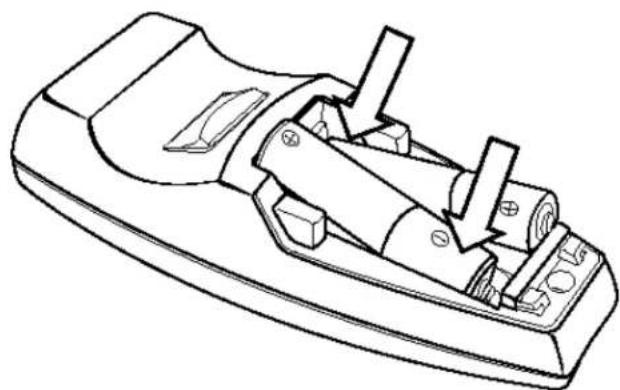
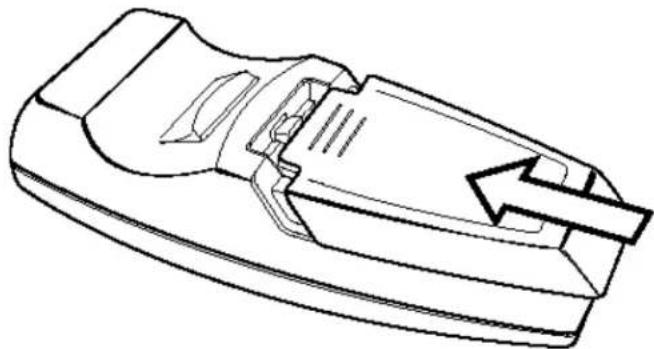
The remote uses two provided AAA batteries. They are easily installed by sliding the cover off the back of the remote, aligning the + and - ends of the batteries, sliding them into place, and then replacing the cover.

CAUTION:
To reduce the risk of injury to the eyes, do not look directly into the remote control laser light and do not point the laser light into anyone's eyes. The remote control is equipped with a Class II laser that emits radiation.
The figure below provides an illustration of the remote.
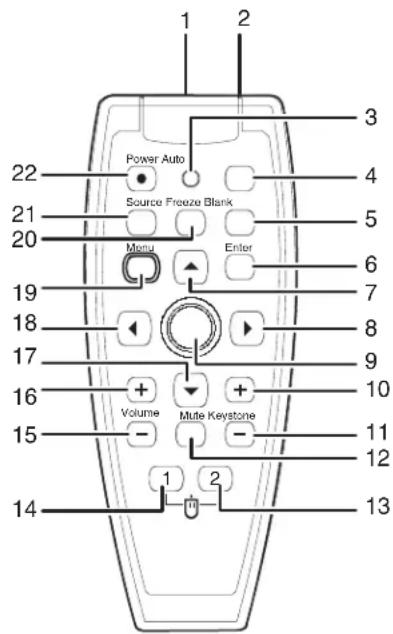
Figure 4-1. Remote control functions
| 1 Laser | Use as pointer |
| 2 IR transmitter | Transmits signals to projector |
| 3 Status LED | Lights when a remote button is pressed |
| 4 Auto | Automatic adjustment for phase, tracking, size and position |
| 5 Blank | Makes screen blank |
| 6 Enter | Changes On-screen Display settings |
| 7 Up cursor | Navigates and changes On-screen Display settings. Up arrow when connected through USB to a PC and when On-screen Display is off. |
| 8 Right cursor | Navigates and changes On-screen Display settings. Right arrow when connected through USB to a PC and when On-screen Display is off. |
| 9 Cursor pad | Moves the On-screen cursor (when connected through USB to a PC) |
| 10 Keystone top | Corrects image trapezoid effect (wider top) |
| 11 Keystone bottom | Corrects image trapezoid effect (wider bottom) |
| 12 Mute | Silences the built-in speaker |
| 13 Right mouse | Right mouse button (when connected through USB to a PC) |
| 14 Left mouse | Left mouse button (when connected through USB to a PC) |
| 15 Volume down | Turns down the volume |
| 16 Volume up | Turns up the volume |
| 17 Down cursor | Navigates and changes On-screen Display settings. Down arrow when connected through USB to a PC and when On-screen Display is off. |
| 18 Left cursor | Navigates and changes On-screen Display settings. Left arrow when connected through USB to a PC and when On-screen Display is off. |
| 19 Menu | Opens and navigates the On-screen Display |
| 20 Freeze | Pauses the picture |
| 21 Source | Detects/switches input device |
| 22 Power | Turns projector on or off |
Inserting the remote control batteries
When using the remote control for the first time, install the batteries that were supplied. Follow the steps below for inserting new batteries into your remote control.
- Remove the battery compartment cover by sliding the cover in the direction of the arrow, as shown.

natural_image
Line drawing of a handheld device with an arrow indicating direction (no text or symbols)- Insert the supplied batteries taking note of the polarity (+/-), as shown.
natural_image
Line drawing of a remote control device with handle and buttons (no text or symbols)- Replace the cover, as shown.
natural_image
Line drawing of a mechanical component with an arrow indicating a specific feature (no text or symbols present)Note:
- Only use AAA alkaline batteries.
- Dispose of used batteries according to local government ordinance regulations.
- Remove the batteries when not using the remote for prolonged periods.
Operatingrange
This remote control uses infrared transmission to control the projector. It is not necessary to point the remote directly at the projector. Provided you are not holding the remote to the sides or the rear of the projector, the remote will function within a maximum radius of 10m (33ft) and 30° above or below the projector level. If the projector does not respond to the remote control, move closer.
Note: You can also point the remote at the projected image.
Projector and remote control buttons
The projector can be operated using the remote control or the buttons on the top of the projector. All operations can be carried out with the remote control. The figure below shows the corresponding buttons on the remote control and on the projector for On-screen Display menu operation. Some buttons have two functions. For example, item 3/5 on the projector functions both as the keystone button and as the up cursor key in On-screen Display menus.

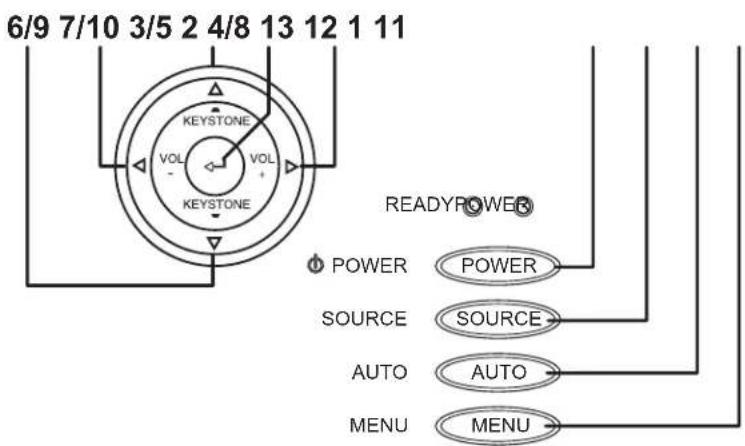
| 1 Auto | Auto adjustment for phase, tracking, size, and position |
| 2 Enter | Changes On-screen Display settings. |
| 3 Up cursor | Navigates and changes On-screen Display settings. Opens keystone quick menu when On-screen Display is off. |
| 4 Right cursor | Navigates and changes On-screen Display settings. Right arrow when connected through USB to a computer and when On-screen Display is off. |
| 5 Keystone top | Corrects image trapezoid effect (widens top). |
| 6 Keystone bottom | Corrects image trapezoid effect (widens bottom). |
| 7 Volume down | Turns down the volume. |
| 8 Volume up | Turns up the volume. |
| 9 Down cursor | Navigates and changes On-screen Display settings. Down arrow when connected through USB to a computer and when On-screen Display is off. |
| 10 Left cursor | Navigates and changes On-screen Display settings. Left arrow when connected through USB to a computer and when On-screen Display is off. |
| 11 Menu | Opens and navigates the On-screen Display. |
| 12 Source | Detects or switches input device. |
| 13 Power | Turns the projector on or off |
Chapter 5. On-screen Display menu controls
This projector has an On-screen Display that lets you make image adjustments and change various settings.
Note: You must have a display on the screen in order to access the On-screen Display.
Navigating the On-screen Display
You can use the remote control or the buttons on the top of the projector to navigate and make changes to the On-screen Display. The following sections show the menus in the On-screen Display.
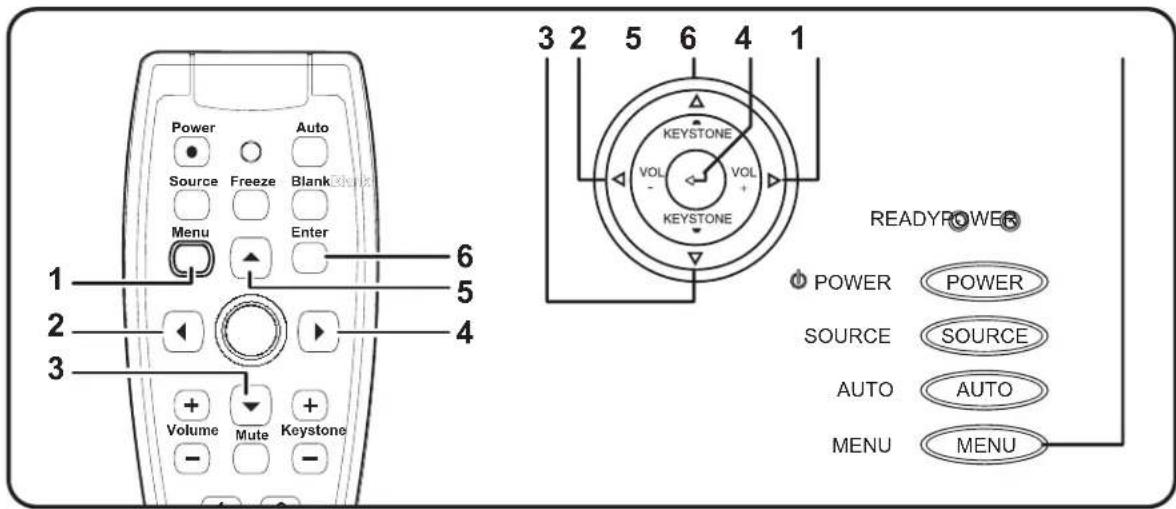
| 1 Menu | Opens and closes the On-screen Display. |
| 2 Left cursor | Navigates and changes settings in the On-screen Display menus. |
| 3 Down cursor | Navigates and changes settings in the On-screen Display menus. |
| 4 Right cursor | Navigates and changes settings in the On-screen Display menus. |
| 5 Up cursor | Navigates and changes settings in the On-screen Display menus. |
| 6 Enter | Changes On-screen Display settings. |
To access the On-screen Display menus, do the following:
- To open the On-screen Display, press the Menu button.
- There are six menus. Press the left or right cursor buttons to move though the menus.
- Press the up or down cursor button to move up and down in a menu.
- Press the left or right cursor button to change values for settings.
- Press the up or down cursor button to select a different sub-menu item for change.
- If you wish to cancel all changes made within a sub-menu, select Cancel and press the Enter button.
- Press Menu to confirm the new setting and leave the sub-menu, or to close the On-screen Display from the main menu screen.
Qualitymenu
The Quality menu can be found through the main menu. To access the Quality menu,
- Press the Menu button to open the On-screen Display.
- Press the left or right cursor button to move to the Quality menu.
- Press the up or down cursor button to move up and down in the Quality menu.
- Press the left or right cursor button to change values for settings.
- Press the up or down cursor button to select a different Quality menu item for change.
- If you wish to cancel all changes made within the Quality menu, select Cancel and press the Enter button.
- Press Menu to confirm the new settings and leave the Quality menu.

The following table shows Quality menu and default options.
| ItemDescriptionDefault | ||
| Brightness | Press the left or right cursor button to adjust the display brightness. Range: 0 - 100 | 50 |
| Contrast | Press the left or right cursor button to adjust the display contrast. Range: 0 - 100 | 50 |
| Sharpness | Press the left or right cursor button to select different sharpness levels. Range: 1 - 5 | 3 |
| Color Temperature | Press the left or right cursor button to select different color temperatures. Range: Cool/Normal/Warm | Normal |
| Color Saturation | Press the left or right cursor button to adjust the video saturation. Range: 1 - 100 | 50 |
| Color Tint | Press the left or right cursor button to adjust the video tint/hue. Range: 0 - 100 | 50 |
| Gamma | Press the left or right cursor button to select different gamma corrections. Range: (Input/Gamma/Brightness) PC/2.2/High - MAC/1.8/High - Video/2.4./Low - Chart/2.2/Low - B&W/2.4/High | PC |
| Color Space | Press the left or right cursor button to adjust the color space. Range: Auto - RGB - YPbPr - YCbCr | Auto |
| Cancel | Cancels changes made in the On-screen Display screen and returns all parameters to their previous settings. | n/a |
InputSources
| Function | RGB | DVI | Component video | Composite video | SVideo |
| Brightness | x | x | x | x | x |
| Contrast | x | x | x | x | x |
| Sharpness | x | x | x | x | x |
| Color Temp | x | x | x | x | x |
| Color Saturation | x | x | x | ||
| Color Tint | x | x | x | ||
| Gamma | x | x | x | x | x |
| Color Space | x | x | x | x | x |
| Cancel | x | x | x | x | x |
Properties menu
To access the Properties menu,
- Press the Menu button to open the On-screen Display.
- Press the left or right cursor button to move to the Properties menu.
- Press the up or down cursor button to move up and down in the Properties menu.
- Press the left or right cursor button to change values for settings.
- Press the up or down cursor button to select a different Properties menu item for change.
- If you wish to cancel all changes made within the Properties menu, select Cancel and press the Enter button.
- Press Menu to confirm the new settings and leave the Properties menu.
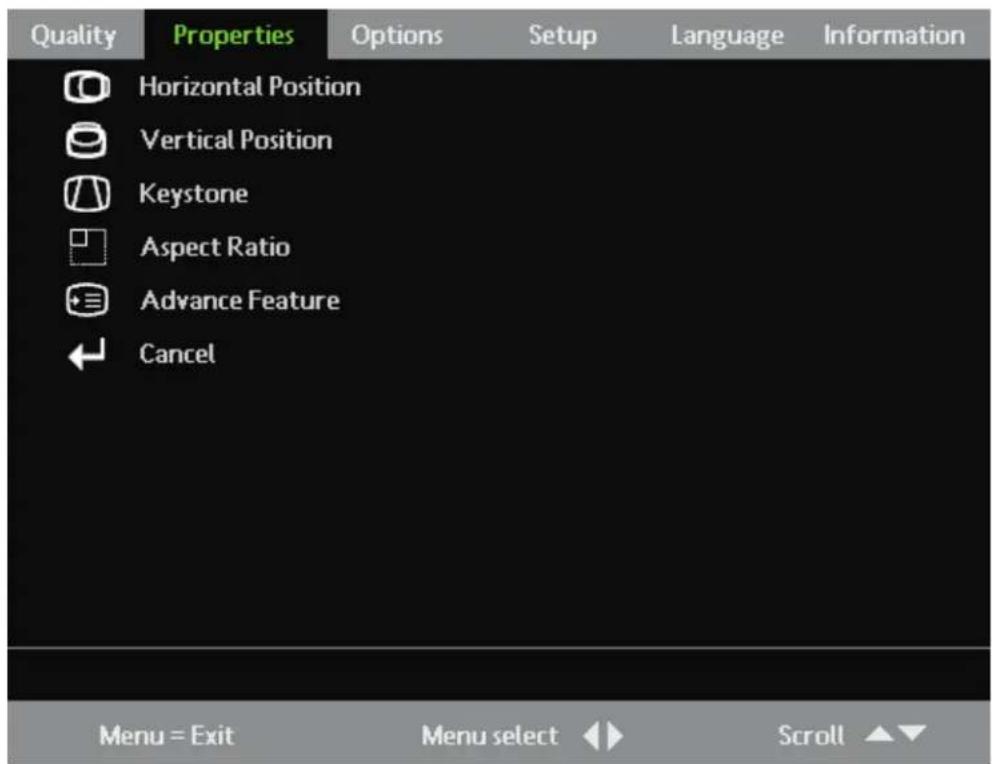
The following table shows Properties menu and default options.
| ItemDescriptionDefault | ||
| Horizontal Position | Press the left or right cursor button to adjust the horizontal display. Range: 0-100 | 50 |
| Vertical Position | Press the left or right cursor button to adjust the vertical display. Range: 0-100 | 50 |
| Keystone | Press the left or right cursor button to adjust the volume. Range: -50 to +50 | 0 |
| Aspect Ratio | Press the left or right cursor button to adjust the video aspect ratio. Range: 4:3 (standard format) - 16:9 (high definition TV - HDTVformat) | 4:3 |
| Advance Feature | Enters the Advance feature menu. For more information, see "Advance Feature menu" on page 5-5 | n/a |
| Cancel | Cancels changes made in the On-screen Display screen and returns all parameters to their previous settings. | n/a |
InputSources
| Function | DVI-A/RGB | DVI-D | Component video | Composite video | SVideo |
| HPositionx | |||||
| VPositionx | |||||
| Keystone | x | x | x | x | x |
| Aspect Ratio | x | x | x | x | x |
| Advance Feature | x | x | x | x | x |
| Cancel | x | x | x | x | x |
Advance Feature menu
To access the Advance Feature menu,
- Press the Menu button to open the On-screen Display.
- Press the left or right cursor button to move to the Properties menu.
- Press the up or down cursor button to move to the Advance Feature menu and then press Enter button.
- Press the up or down cursor button to move up and down in the Advance Feature menu. Press the left or right cursor button to change values for settings. Press the up or down cursor buttons to select a different Advance Feature menu item for change.
- If you wish to cancel all changes made within the Advance Feature menu, select Cancel and press the Enterbutton.
- Press Menu to confirm the new settings and leave the Advance Feature menu.

| ItemDescriptionDefault | ||
| User Color | This feature adjusts the color balance in each color of RGB (red, green, blue) and their neutral colors (cyan, magenta, yellow, white) by using color correction adjustment. Increasing a color's setting heightens the intensity of that color on the screen, while a lower setting makes a color less intense. Press the up or down cursor button to select a color. Press the left or right cursor button to adjust the selected color. Range: 0 - 100 | n/a |
| White Peaking | White Peaking increases the output in the brightest whites without changing blacks and grays. It does not seriously obscure white detail. For a stronger image, adjust toward a stronger setting. Press the left or right cursor button to adjust the white peaking value. Range: 0 - 10 | Datasource:10; Videosource2 |
| Logo Display | Press the right or left cursor button to enable or disable if the logo displays when the projector starts, and when no source is detected. range: On - Off | On |
| Auto Keystone | When enabled, the projector automatically corrects any keystone distortion in the image when you press the Auto button (from the remote control or the keypad). Press the left or right cursor button to enable or disable Auto Keystone. | Off |
| AutoKeystone Calibrate | Press Enter to re-calibrate keystone correction function. | n/a |
| Cancel | Cancels changes made in the On-screen Display screen and returns all parameters to their previous settings. | n/a |
Usercolor
To access the User color menu,
- Press the Menu button to open the On-screen Display.
- Press the left or right cursor button to move to the Properties menu.
- Press the up or down cursor button to move to the Advance Feature menu and then press Enter button.
-
Press the up or down cursor button to move to the User Color menu and then press the Enter button.
-
Press the up or down cursor button to select a color. Press the left or right cursor button to change values for settings and then press Enter to confirm the new setting.
- If you wish to cancel all changes made within the User color menu, select Cancel and press the Enter button.
- Press Menu to confirm the new settings and leave the User color menu.

| ItemDescriptionDefault | ||
| Red,Green,Blue,Cyan,Magenta,Yellow,White | Press the left or right cursor to adjust the color levels from 0 - 100. | 80 |
| Cancel | Cancels changes made in the On-screen Display screen and returns all parameters to their previous settings. | n/a |
Optionsmenu
To access the Options menu,
- Press the Menu button to open the On-screen Display.
- Press the left or right cursor button to move to the Options menu.
- Press the up or down cursor button to move up and down in the Options menu.
- Press the left or right cursor button to change values for settings.
- Press the up or down cursor button to select a different Options menu item for change.
- If you wish to cancel all changes made within the Options menu, select Cancel and press the Enter button.
- Press Menu to confirm the new settings and leave the Options menu.

The following table shows the options that you will see in the Options Menu and the default.
| ItemDescriptionDefault | ||
| Blank screen | Press the left or right cursor button to select color at blank screen. Range: Black - Red - Green - Blue - White | Blue |
| Auto Source | Press the left or right cursor button to enable or disable automatic input port searching. Range: Off - On | On |
| Auto Power Off | Press the left or right cursor button to enable or disable the automatic shutdown of the lamp after 10 minutes of inactivity. Range: Off - On | Off |
| Volume | Press the left or right cursor button to adjust volume. Range: 0 - 10 | 5 |
| Menu Position | Press the left or right cursor button to select On-screen Display location. Range: Left - Right - Center - Down - Up | Center |
| Menu Display | Press the left or right cursor button to select the On-screen Display timeout delay. Range: 10 - 20 seconds | 15seconds |
| Translucent Menu | Press the left or right cursor button to select the On-screen Display background translucency level. Range: 0% - 100% | 0% |
| Cancel | Cancels changes made in the On-screen Display screen and returns all parameters to their previous settings. | n/a |
Setupmenu
To access the Setup menu,
- Press the Menu button to open the On-screen Display.
- Press the left or right cursor button to move to the Setup menu.
- Press the up or down cursor button to move up and down in the Setup menu.
- Press the left or right cursor button to change values for settings.
- Press the up or down cursor buttons to select a different Setup menu item for change.
- If you wish to cancel all changes made within the Setup menu, select Cancel and press the Enter button.
- Press Menu to confirm the new settings and leave the Setup menu.

The following table shows the options that you will see in the Setup menu and the default.
| ItemDescriptionDefault | ||
| Video Type | Press the left or right cursor button to select a video type. Range: Auto - NTSC - PAL - SECAM | Auto |
| Video AGC | Press the left or right cursor button to enable or disable the automatic gain control for the video source. Range: On - Off | On |
| Projection | Press the left or right cursor button to select a different projection type. Range: Desktop mount-front of screen, desktop mount-rear of screen, ceiling mount-front of screen, ceiling mount-rearofscreen | DesktopFront |
| Frequency | Press the left or right cursor button to adjust the A/D sampling clock. Range: 0 - 180 degrees | Auto-detected |
| Tracking | Press left or right cursor button to adjust the sampling number. Range: 0 - 100 | Auto-detected |
| Digital Zoom | Digital operation for zoom and pan adjustment. Press Enter. The Zoom menu appears.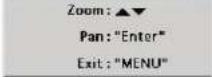 Press the up cursor button to zoom in. Press the down cursor button to zoom out. Press Enter to open the Pan menu. (You must zoom in before you can enter the Pan menu.) Press the up cursor button to zoom in. Press the down cursor button to zoom out. Press Enter to open the Pan menu. (You must zoom in before you can enter the Pan menu.) Use the cursor buttons to pan to the zoomed image. Press the Menu button to exit. Use the cursor buttons to pan to the zoomed image. Press the Menu button to exit. | n/a |
| Control | Press the left or right cursor button to select remote control method. Range: RS-232C - RJ-45 | RS-232C |
| Network Setting | Press the Enter button to adjust network settings fortheprojector. | n/a |
| Cancel | Cancels changes made in the On-screen Display screen and returns all parameters to their previoussettings. | n/a |
Inputsources
| Function | RGB | DVI | Component video | Composite video | SVideo |
| Video Type | x | x | x | ||
| Video AGC | x | x | x | ||
| Projection | x | x | x | x | x |
| Frequency | x | x | |||
| Tracking | x | ||||
| Digital Zoom | x | x | x | x | |
| Cancel | x | x | x | x | x |
Network Setting
To access the Network setting menu,
- Press the Menu button to open the On-screen Display.
- Press the left or right cursor button to move to the Setup menu.
- Press the up or down cursor button to move to the Network Setting menu and then press the Enter button.
- Press the left or right cursor button to change values for settings and then press Enter to confirm the newsetting.
- If you wish to cancel all changes made within the Network Setting menu, select Cancel and press the Enterbutton.
- Press Menu to confirm the new settings and leave the Network Setting menu.
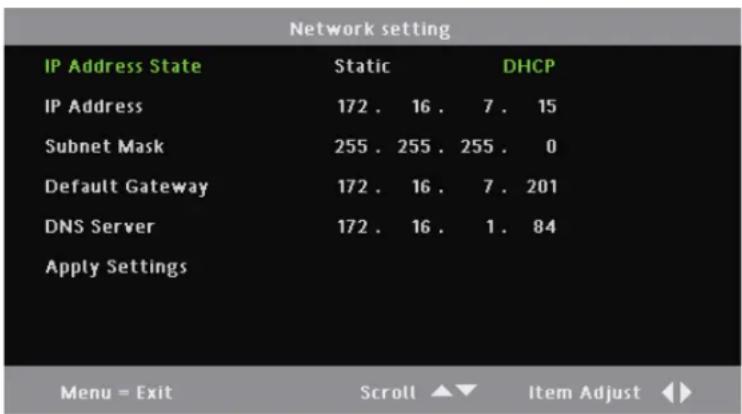
| Item | Description | Default |
| IP Address State | Press the left of right cursor button to toggle between DHCP and Static. Select DHCP (Dynamic Host Configuration Protocol) if your router automatically assigns temporary IP addresses. If you select Static, you must manually assign an IP address, subnet mask, default gateway, and DNSserver. | DHCP |
| ItemDescriptionDefault | ||
| IP Address | Press the up or down cursor button to change the values. Press the Menu button followed by the left or right cursor button to go to the next field. Press the Menu button followed by the up or down cursor button to go to the next menu item. | n/a |
| Subnet Mask | Press the up or down cursor button to change the values. Press the Menu button followed by the left or right cursor button to go to the next field. Press the Menu button followed by the up or down cursor button to go to the next menu item. | n/a |
| Default Gateway | Press the up or down cursor button to change the values. Press the Menu button followed by the left or right cursor button to go to the next field. Press the Menu button followed by the up or down cursor button to go to the next menu item. | n/a |
| DNS Server | Press the up or down cursor button to change the values. Press the Menu button followed by the left or right cursor button to go to the next field. Press the Menu button followed by the up or down cursor button to go to the next menu item. | n/a |
| Apply Settings | Press Enter to apply the settings. | n/a |
Languagemenu
To access the Language menu,
- Press the Menu button to open the On-screen Display.
- Press the left or right cursor button to move to the Language menu.
- Press the up or down cursor button to move up and down in the Language menu.
- Press the left or right cursor button to change values for settings.
- Press the up or down cursor button to select a different Language menu item for change.
- If you wish to cancel all changes made within the Language menu, select Cancel and press the Enter button.
- Press Menu to confirm the new settings and leave the Language menu.
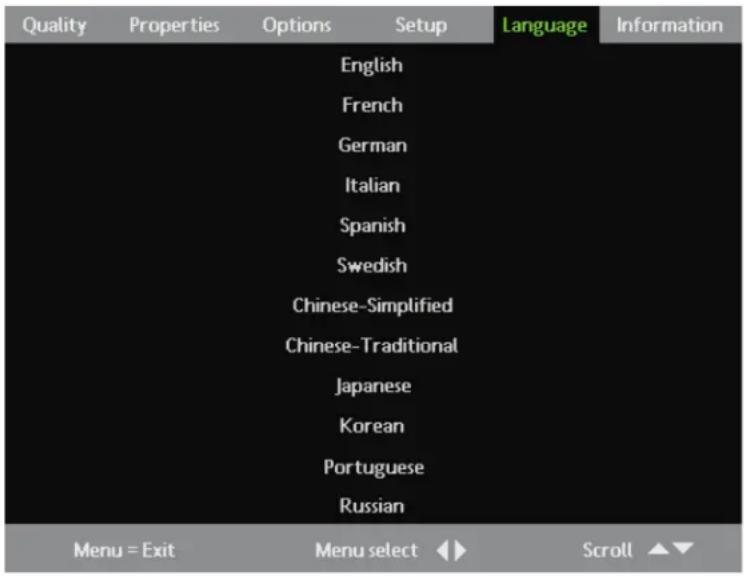
The following table shows the options that you will see in the Language menu and the default.
| ItemDescriptionDefault | ||
| Languages | Press the up or down cursor button to select a language (localization menu). Range: English, French, German, Italian, Spanish, Swedish, Simplified Chinese, Traditional Chinese, Japanese, Korean, Portuguese and Russian | English |
Informationmenu
To access the Information menu,
- Press the Menu button to open the On-screen Display.
- Press the left or right cursor button to move to the Information menu.
- Press the up or down cursor button to move up and down in the Information menu.
- Press the left or right cursor button to change values for settings.
- Press the up or down cursor buttons to select a different Information menu item for change.
- If you wish to cancel all changes made within the Information menu, select Cancel and press the Enterbutton.
- Press Menu to confirm the new settings and leave the Information menu.

The following table shows the Info menu options.
| ItemDescription | |
| Video Information | Displays resolution and refresh rate for RGB/DVI mode. Displays the color standard in Video mode. |
| Active Source | Displays which source has been activated. |
| Software Version | Displays software version. |
| Network DHCP | Displays the IP server status (enabled by Web admin). |
| Network IP Address | Displays the current IP address. |
| Lamp Hours | Displays lamp hour information. Range: Normal, Boost and ECO |
| Lamp Mode | Press the left or right cursor button to select normal lamp mode for higher brightness. Range: ECO - Boost. Default: Normal |
| Lamp Hour Reset | Reset this item after replacing the projector lamp. For more information, refer to “Resetting the lamp” on page A-3 |
Chapter 6. Remote network operation
This section provides information on using the remote network with your projector.
Networksetup
When connected to a local area network (LAN) through the RJ-45 connector, the projector can be controlled remotely through a Web browser by any of the clients (PCs connected to the LAN) on the LAN. The projector can also be accessed outside the LAN, with a correctly configured firewall.

flowchart
graph TD
    A["PC for remote projector"] --> B["Network"]
    C["Wireless Station"] --> B
    D["C500 Projector"] --> B
    E["Laptop"] --> B
    F["Network Printer"] --> B
Direct connection (ad hoc) Setup
You can control the projector by connecting from a computer directly to the projector, as shown.

natural_image
Diagram showing two connected electronic devices with connectors and ports, no text or symbols presentPlease check the Lenovo Personal Computing Web site for updated User's Guide, product overview, and technicalsupportinformation.
- Go to http://www.lenovo.com/support
- Select "Accessories" from the drop-down menu under the "Browse by product" section.
C500Ethernetoperation
Ensure that the projector is connected to the network, that the Control option in the On-screen Display menu is set to RJ45, and that the Network Settings in the On-screen Display are correct. Please see the Setup Menu section in Chapter 5, "On-screen Display menu controls," on page 5-1 for more information.
Open a browser application and type the IP address of the projector into the URL address bar. The browser accesses the projector and displays the following window:

This Projector Status and Control window shows the current status of the projector. If the projector is off, other values may be blank. If any values are missing, click the Refresh All button.
To change a setting, click the appropriate radio button, or enter a value into the appropriate field and click the corresponding SET button. The projector changes to the new setting and the following window opens in the browser:

Click the Back Remote1 button to return to the Projector Status and Control window.
The Projector Remote Control window provides similar functions as the hand-held projector remote control. Click the corresponding button in the remote control window to perform the same function as you would with the hand-held projector remote. See Chapter 4, "Using the remote control" on page 4-1, formoreinformation.

In the Administrator Settings window, you can enable or disable the Ethernet security or enter a new password. To enter a new password, enter the old password, the new password, and the new password again for confirmation. Then click the SET button. If the old password is correct, and the two values for the new password match, a Password Changed window displays.
Note: The Default value for the password is 123.
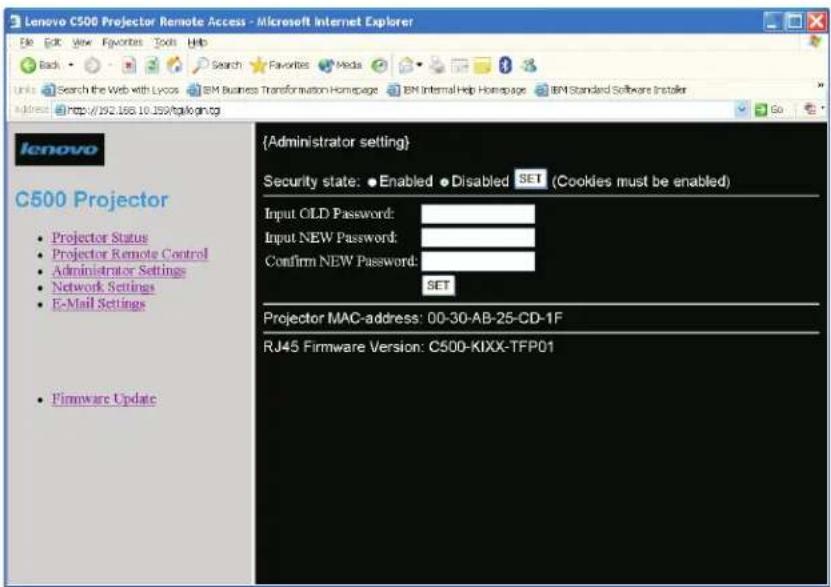
The default value for security in the Administrator Settings window is set to Disabled. If the security state is changed, the browser needs to be closed and a new session started.

If security is Enabled when the browser session first starts, the following window displays:
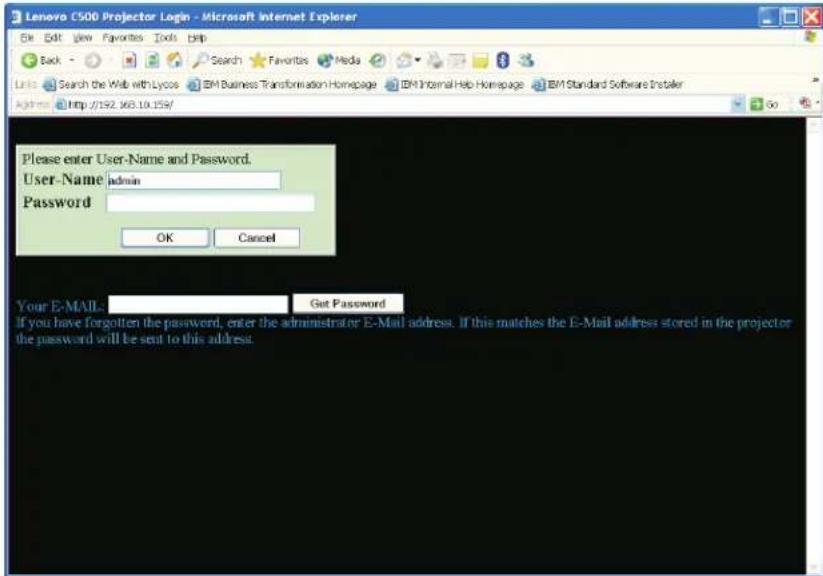
In the Administrator window shown above, the User Name admin is fixed. To gain access to the projector control windows, enter the password in the field provided.
Notes:
-
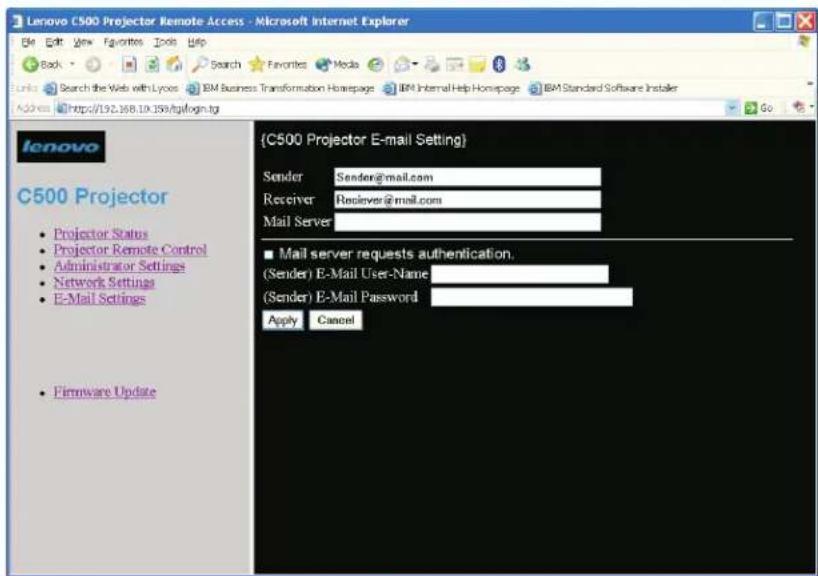
In the E-mail Settings window, enter the administrator E-mail address and Mail Server settings. Pre-filling this information provides you with a way to retrieve a forgotten password. If the password is forgotten, go to the Administrator Settings window, enter the E-mail address of the administrator in the Your E-MAIL field provided, and click Get Password. The password is then e-mailed to the administrator.
-
Passwords are case sensitive. The default password is 123.
The Network Settings window is used to enable or disable DHCP. If DHCP is enabled, the window shows the values assigned by the DHCP server. If a static IP address is used, enter values for the IP address, Subnet Mask, Default Gateway, and DNS Server appropriate for your network. If you are unsure about these values, contact your network administrator.

When data is entered in the E-Mail Settings window, the projector is prompted to send E-mail status messages to an administrator, such as lamp timer warnings. In most cases the sender and receiver E-mail addresses are the same. Some mail servers require a sender address, otherwise the E-mail is blocked. If you are unsure about these settings, contact your network administrator.
UpdatingEthernetfirmware
To update the firmware that controls the Ethernet functions of the projector, begin by downloading the revised firmware to a computer on the network, and then click the Firmware Update link.
Notes:
-
If the firmware update process is interrupted, the Ethernet function of the C500 projector will not work and cannot be recovered. Therefore, it is strongly recommended that the firmware update be through a wired connection and not by WAN.
-
The firmware update can only be performed if the DHCP client in the projector is turned off and a static IP address is used. Ensure that a static IP address, Subnet Mask, Default Gateway, and DNS server are set up before attempting to update Ethernet firmware.
If the computer with the revised firmware has a reliable connection to the projector, and a static IP address has been set up, click the Update button. Otherwise, click the Cancel button and make corrections. When the Update button is clicked, the projector will pause while it prepares for the update.
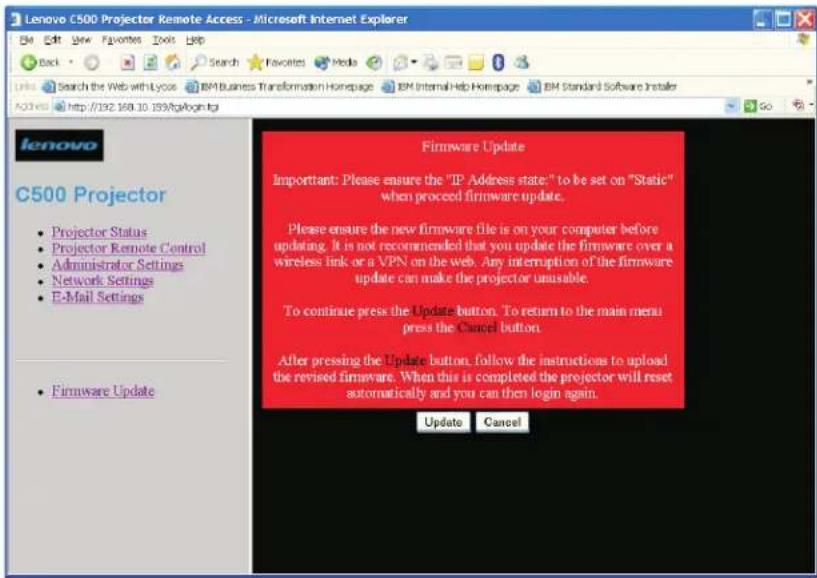
When the projector is ready, click the Continue button to go to the next window.

In the Firmware Update window, click the Browse button to open a file selection dialog window. Navigate and select the revised firmware file.
Note: Ensure that you select the correct file. The Ethernet function of the projector may not work properly if you update with a non-firmware file.
After selecting the file, click the Update button. The projector transfers the revised firmware into its memory. When it is finished, the projector resets itself.
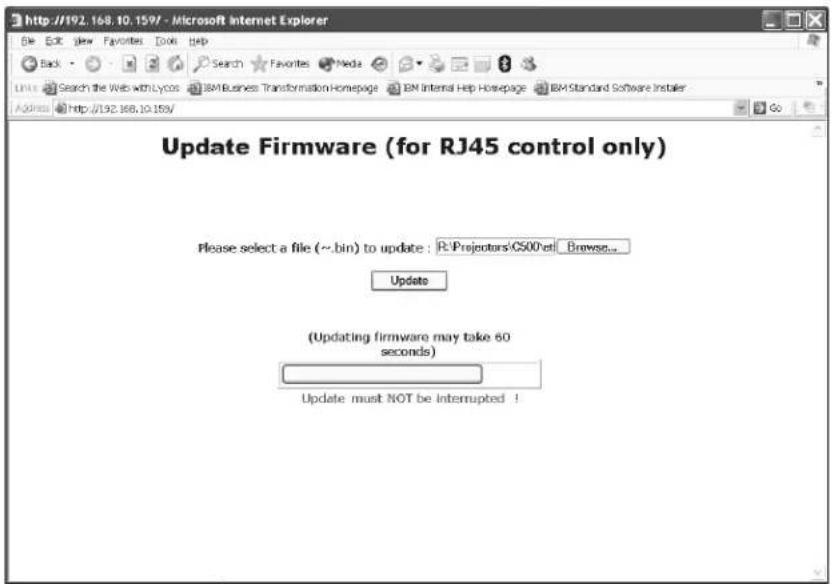
Wait for the projector to compete the reset, then click the Re Login button to return to the main window.

AppendixA.Maintenance
This chapter provides information on projector maintenance.
Cleaningthelens
To clean the lens, complete the following procedure:
- Apply a non-abrasive camera lens cleaner to a soft, dry cloth.
Note: Avoid using an excessive amount of cleaner, and do not apply the cleaner directly to the lens. Abrasive cleaners, solvents or other harsh chemicals might scratch the lens.
- Lightly wipe the cleaning cloth over the lens in a circular motion. If you do not intend to use the projector immediately, replace the lens cap.
Replacing the projector lamp
The projector lamp should only be replaced with an Lenovo certified replacement part, which you can order from your business partner or go to www.Lenovo.com/support.
Turn off and unplug the projector at least an hour before replacing the lamp to avoid burns.
Attention: This product contains a Metal Arc Lamp, which contains Mercury. Dispose of it as required by local ordinances and regulations.
The USA restricts or prohibits the disposal of some or all lamps containing mercury in the municipal waste stream. Please visit www.lamprecycle.org for more information on specific state disposal requirements and recycling facilities.
For users in Connecticut and Rhode Island, please call Northeast Lamp Recycling toll-free at 1-888-657-5267 to place an order for the delivery of a kit that includes a box for the lamp, tape, and a returnshippinglabel.
To replace the projector lamp, complete the following procedure:
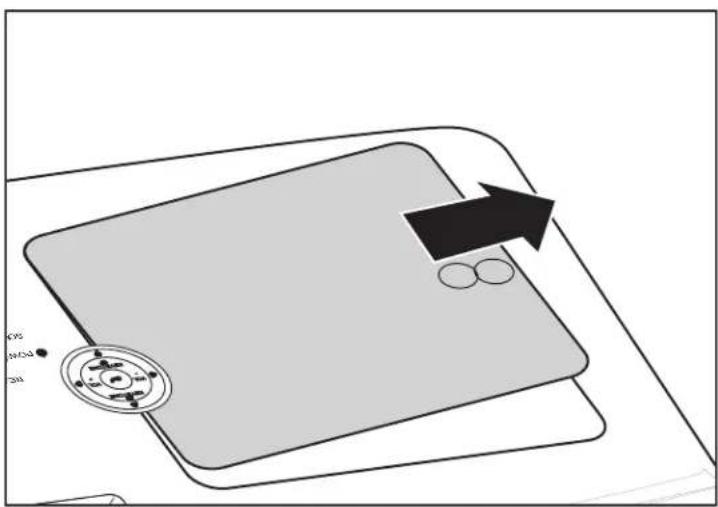
- Loosen the captive screw on the lamp compartment cover.
- Remove the lamp compartment cover.
natural_image
Diagram of a device with a magnified view showing internal components and a black arrow pointing to a component (no text or symbols present)-
Remove the two screws from the lamp module A.
-
Lift the module handle up B.

- Pull firmly on the module handle to remove the lamp module, as shown.

natural_image
Technical line drawing of a mechanical assembly with an upward arrow indicating growth or assembly (no text or symbols present)- Reverse steps 1 through 5 to install the new lamp module.
Resettingthelamp
After replacing the lamp, you should reset the lamp hour counter to zero. Please follow the steps below.
- Press the Menu button to open the On-screen Display.
- Press the left or right cursor button to move to the Information menu.
- Press the up or down cursor to move down to Lamp Hour Reset.
- Press the Enter button. A message displays.
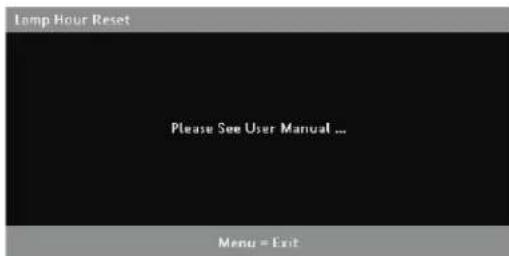
- Press the cursor buttons in this order; Down, Up, Left and Right. The Information menu appears again showing the lamp hours reset to zero.
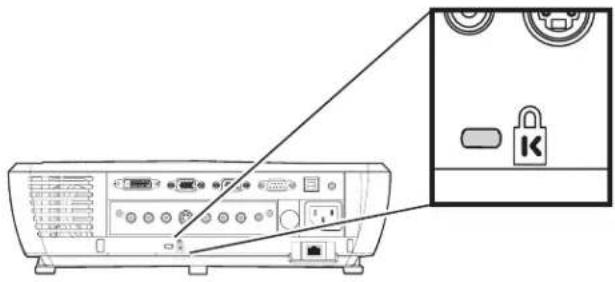
Using the security slot
The projector has a security slot, as shown. Refer to the information that comes with the lock for instructions on how to use it.
natural_image
Line drawing of a projector rear panel with an inset showing a padlock icon (no text or symbols present)AppendixB.Troubleshooting
The following table provides troubleshooting information for the projector. In some cases, more than one possible solution is provided. Try the solutions in the order they are presented. When the problem is solved, you can skip the additional solutions.
| ProblemSolution | |
| No image appears on the screen. | Make sure your computer and projector are turned on.If the Blank screen is shown, press theBlankbutton on the remote control.Verify the settings on your notebook or desktop PC.Turn off all equipment and power up again in the correct order. See"Starting and shutting down the projector" on page 2-1 |
| The image is blurred | Adjust the Focus on the projector. See"Adjusting the image" on page2-4.Press theAutobutton on the remote control or the projector.Ensure the projector-to-screen distance is within the range specified.Check that the lens is clean.Check the image resolution of the notebook or desktop computer.For more information, see"Image resolution" on page 2-5 |
| The image is wider at the top or bottom (trapezoideffect). | Position the projector so it is as perpendicular to the screen as possible.Use theKeystonebutton on the remote control or projector to correct the problem. See"Adjusting the image" on page 2-4 |
| The image is reversed or upside down. | Check the Projection setting on the Setup menu of the On-screen Display. See"Options menu" on page 5-7 |
| The image is streaked. | Set the Frequency and Tracking settings on the Setup menu of the On-screen Display to the default settings. See"Navigating the On-screen Display" on page 5-1To ensure the problem is not caused by a connected PC's video card, connect to another computer. |
| The image is flat with no contrast | Adjust the Contrast setting on the Quality menu of the On-screen Display. See"Navigating the On-screen Display" on page 5-1 |
| The color of the projected image does not match the source image | Adjust the Color Temp. and Gamma settings on the Quality menu of the On-screen Display. See"Quality menu" on page 5-2Adjust the individual colors in the User Color menu of the On-screen Display. See"User color" on page 5-6.Reduce the White Peaking setting in the Advance Feature menu of the On-screen Display. See"Advance Feature menu" on page 5-5 |
| There is no light from the projector | Check that the power cable is securely connected.Ensure the power source is good by testing with another electrical device.Restart the projector in the correct order and check that the Power LEDisgreen.If you have replaced the lamp recently, try resetting the lamp connections. Make sure the lamp cover is flush with the projector casewhenclosed.Replace the lamp module. See "Replacing the projector lamp" on pageA-1.Put the old lamp back in the projector and have the projector serviced. |
| The lamp goes off. | Power surges can cause the lamp to turn off. Press the Power button twice to turn off the projector. When the Lamp Ready LED is on, press the Power button.Replace with a new lamp module. See "Replacing the projector lamp" on page A-1.Put the old lamp back in the projector and have the projector serviced. |
| The projector does not respond to the remotecontrol. | Direct the remote control towards the front or rear remote sensors ontheprojector.Ensure the path between remote and sensor is not obstructed.Turn off any fluorescent lights in the room.Check the battery polarity.Replace the batteries.Turn off other Infrared-enabled devices in the vicinity.Have the remote control serviced. |
| There is no sound. | Adjust the volume on the remote control. See "Adjusting the volume" on page 2-5Adjust the volume of the audio source.Check the audio cable connection.Test the source audio output with other speakers.Have the projector serviced. |
| The sound is distorted. | Check the audio cable connection.Test the source audio output with other speakers.Have the projector serviced. |
ProjectorLEDs
The LEDs on top of the projector indicates the state of the projector and can help you troubleshoot.
| LED | Status/#of FlashesDescription | |
| Ready | Flashing | Lamp not ready - do not press the power button |
| 1 | Blower fan error | |
| 2 | Optical fan error | |
| 3 | Lamp, ballast, power or internal fan error | |
| Power | 4 | System overheating |
| 5 | System interface error | |
| 6Lamperror | ||
| 7 | Fan error (refer ready LED status to determine which fan) | |
| 8 | Lamp cover open | |
| 9 | DLP driver error | |
| 10Colorwheelerror |
Note: If the projector LEDs flash in a manner that is not addressed above, unplug the power cable and contactyourretailer.
Thermalprotector
When the temperature inside the projector becomes abnormally high, the LED indicator flashes red (0.5 seconds on/0.5 seconds off) the Standby indicator is a steady red, and at the same time the temperature protector operates and switches off the power of the projector. If this happens, please follow the steps below:
- Switch off the power and disconnected the power plug from the wall outlet.
- Check the temperature of the room. If the projector is being used in a location with a high ambient temperature, set it up in a cooler location.
- Check the vent openings to make sure that they are all clear. Clean the vent openings if they are obstructed.
- Wait at least 1 hour until the temperature of the projector drops, then plug it in again.
- If you are still having the same problem, please contact your retailer.
AppendixC.Specifications
Following are specifications for the Lenovo C500 projector.
| Power consumption | Normal operation < 350 watts; Eco mode operation < 250 watts |
| Lamp | 250W (Eco mode 200W) |
| Display type | TI DMD 0.7- inch, 12 deg. DDR |
| Resolution | XGA: 1024x768 native |
| Bandwidth | Up to SXGA 1280x1024 @ 60Hz |
| Color | 16.7 million (24-bits/pixel) |
| Weight | 3.55 kg (7.5 lbs) |
| Projection distance | 1.5 to 8 meters (4.9 to 26 feet) |
| Projection screen size | 0.94 to 6.1 meters (37 inches to 240 inches) |
| Projection lens | Manual zoom and focus |
| Zoom ratio | 1.22:1 |
| Vertical keystone correction | +/- 15 |
| Projection methods | Desktop front, rear; ceiling front, rear |
| Data compatibility | IBM PC or compatibles (VGA, SVGA), Mac |
| HDTV | Video |
| Video compatibility | NTSC/NTSC 4.43, PAL (B/G/H/I/M/N), SECAM |
| H-sync | 16.31 - 70 kHz |
| V-sync | 50-85 Hz |
| Operation temperature | 10 ~ 35 degrees |
| Dimensions | 32.8 x 23.8 x 8.8 cm (12.9 x 9.4 x 3.5 inches) |
| Standby | < 20 watts |
| Noise | 36 dB typical |
| Audio speaker | 2W mono speaker |
| Input/Outputconnectors | |
| PC | DVI-I, RGB in; RGB out, USB |
| Video | Composite video (RCAx1), S-video (mini-DIN), Component video Y, Pb/Cb, Pr/Cr(RCAx3) |
| Audio | Mini-jack in, Mini-jack out, Right and left in (RCAx2) |
| Network access | RJ-45 |
| Service/upgrades | RS-232 |
| Security | Kensingtonslot |
Appendix D. Service and Support
The following information describes the technical support that is available for your product, during the warranty period or throughout the life of the product. Refer to your Lenovo Statement of Limited Warranty for a full explanation of Lenovo warranty terms.
Onlinetechnicalsupport
Online technical support is available during the life of your product through the Lenovo Support Web site at http://www.lenovo.com/support.
During the warranty period, assistance for replacement or exchange of defective components is available. In addition, if your option is installed in a Lenovo computer, you might be entitled to service at your location. Your technical support representative can help you determine the best alternative.
Telephonetechnicalsupport
Installation and configuration support through the Customer Support Center will be withdrawn or made available for a fee, at Lenovo's discretion, 90 days after the option has been withdrawn from marketing. Additional support offerings, including step-by-step installation assistance, are available for a nominal fee.
To assist the technical support representative, have available as much of the following information as possible:
- Option name
- Option number
• Proof of purchase
• Computer manufacturer, model, serial number, and manual
• Exact wording of the error message (if any)
• Description of the problem - Hardware and software configuration information for your system
If possible, be at your computer. Your technical support representative might want to walk you through the problem during the call.
For a list of Service and Support phone numbers, see "Telephone technical support." Phone numbers are subject to change without notice. For the most current phone numbers, go to http://www.lenovo.com/support and click Support phone list. If the number for your country or region is not listed, contact your reseller or Lenovo marketing representative.
Appendix E. Lenovo Statement of Limited Warranty
LSOLW-0005/2005
Part 1 - General Terms
This Statement of Limited Warranty includes Part 1 - General Terms, Part 2 - Country-unique Terms, and Part 3 - Warranty Information. The terms of Part 2 replace or modify those of Part 1. The warranties provided by Lenovo Group Limited or one of its subsidiaries (called "Lenovo") in this Statement of Limited Warranty apply only to Machines you purchase for your use, and not for resale. The term "Machine" means a Lenovo machine, its options, features, conversions, upgrades or peripheral products, or any combination of them. The term "Machine" does not include any software programs, whether pre-loaded with the Machine, installed subsequently or otherwise. Nothing in this Statement of Limited Warranty affects any statutory rights of consumers that cannot be waived or limited by contract.
What this Warranty Covers
Lenovo warrants that each Machine 1) is free from defects in materials and workmanship and 2) conforms to Lenovo's Official Published Specifications ("Specifications") which are available on request. The warranty period for the Machine starts on the original date of installation and is specified in Part 3 - Warranty Information. The date on your invoice or sales receipt is the date of installation unless Lenovo or your reseller informs you otherwise. Unless Lenovo specifies otherwise, these warranties apply only in the country or region in which you purchased the Machine.
THESE WARRANTIES ARE YOUR EXCLUSIVE WARRANTIES AND REPLACE ALL OTHER WARRANTIES OR CONDITIONS, EXPRESS OR IMPLIED, INCLUDING, BUT NOT LIMITED TO, THE IMPLIED WARRANTIES OR CONDITIONS OF MERCHANTABILITY AND FITNESS FOR A PARTICULAR PURPOSE. SOME STATES OR JURISDICTIONS DO NOT ALLOW THE EXCLUSION OF EXPRESS OR IMPLIED WARRANTIES, SO THE ABOVE EXCLUSION MAY NOT APPLY TO YOU. IN THAT EVENT, SUCH WARRANTIES ARE LIMITED IN DURATION TO THE WARRANTY PERIOD. NO WARRANTIES APPLY AFTER THAT PERIOD. SOME STATES OR JURISDICTIONS DO NOT ALLOW LIMITATIONS ON HOW LONG AN IMPLIED WARRANTY LASTS, SO THE ABOVE LIMITATION MAY NOT APPLY TO YOU.
What this Warranty Does not Cover
This warranty does not cover the following:
- any software programs, whether pre-loaded or shipped with the Machine, or installed subsequently;
- failure resulting from misuse, accident, modification, unsuitable physical or operating environment, or improper maintenance by you;
- failure caused by a product for which Lenovo is not responsible; and
- any non-Lenovo products, including those that Lenovo may procure and provide with or integrate into a Lenovo Machine at your request.
The warranty is voided by removal or alteration of identification labels on the Machine or its parts.
Lenovo does not warrant uninterrupted or error-free operation of a Machine.
Any technical or other support provided for a Machine under warranty, such as assistance with "how-to" questions and those regarding Machine set-up and installation, is provided WITHOUT WARRANTIES OF ANY KIND.
How to Obtain Warranty Service
Warranty service may be provided by Lenovo, IBM, your reseller if authorized to perform warranty service, or an authorized warranty service provider. Each of them is referred to as a "Service Provider."
If the Machine does not function as warranted during the warranty period, contact a Service Provider. If you do not register the Machine with Lenovo, you may be required to present proof of purchase as evidence of your entitlement to warranty service.
What Lenovo Will Do to Correct Problems
When you contact a Service Provider for service, you must follow the problem determination and resolution procedures that we specify. An initial diagnosis of your problem can be made either by a technician over the telephone or electronically by access to a support website.
The type of warranty service applicable to your Machine is specified in Part 3 - Warranty Information.
You are responsible for downloading and installing designated software updates from a support web site or from other electronic media, and following the instructions that your Service Provider provides. Software updates may include basic input/output system code (called "BIOS"), utility programs, device drivers, and other software updates.
If your problem can be resolved with a Customer Replaceable Unit ("CRU") (e.g., keyboard, mouse, speaker, memory, hard disk drive), your Service Provider will ship the CRU to you for you to install.
If the Machine does not function as warranted during the warranty period and your problem cannot be resolved over the telephone or electronically, through your application of software updates, or with a CRU, your Service Provider, will either, at its discretion, 1) repair it to make it function as warranted, or 2) replace it with one that is at least functionally equivalent. If your Service Provider is unable to do either, you may return the Machine to your place of purchase and your money will be refunded.
As part of the warranty service, your Service Provider may also install selected engineering changes that apply to the Machine.
Exchange of a Machine or Part
When the warranty service involves the exchange of a Machine or part, the item your Service Provider replaces becomes Lenovo's property and the replacement becomes yours. You represent that all removed items are genuine and unaltered. The replacement may not be new, but will be in good working order and at least functionally equivalent to the item replaced. The replacement assumes the warranty service status of the replaced item.
Your Additional Responsibilities
Before your Service Provider exchanges a Machine or part, you agree to remove all features, parts, options, alterations, and attachments not under warranty service.
You also agree to:
- ensure that the Machine is free of any legal obligations or restrictions that prevent its exchange;
- obtain authorization from the owner to have your Service Provider service a Machine that you do not own; and
-
where applicable, before service is provided:
a. follow the service request procedures that your Service Provider provides;
b. backup or secure all programs, data, and funds contained in the Machine; and
c. provide your Service Provider with sufficient, free, and safe access to your facilities to permit Lenovo to fulfill its obligations. -
(a) ensure all information about identified or identifiable individuals (Personal Data) is deleted from the Machine (to the extent technically possible), (b) allow your Service Provider or a supplier to process on your behalf any remaining Personal Data as your Service Provider considers necessary to fulfill its obligations under this Statement of Limited Warranty (which may include shipping the Machine for such processing to other service locations around the world), and (c) ensure that such processing complies with any laws applicable to such Personal Data.
LimitationofLiability
Lenovo is responsible for loss of, or damage to, your Machine only while it is 1) in your Service Provider's possession or 2) in transit in those cases where Lenovo is responsible for the transportation charges.
Neither Lenovo nor your Service Provider are responsible for any of your confidential, proprietary or personal information contained in a Machine which you return for any reason. You should remove all such information from the Machine prior to its return.
Circumstances may arise where, because of a default on Lenovo's part or other liability, you are entitled to recover damages from Lenovo. In each such instance, regardless of the basis on which you are entitled to claim damages from Lenovo (including fundamental breach, negligence, misrepresentation, or other contract or tort claim), except for any liability that cannot be waived or limited by applicable laws, Lenovo is liable for no more than
- damages for bodily injury (including death) and damage to real property and tangible personal property for which Lenovo is legally liable; and
- the amount of any other actual direct damages, up to the charges for the Machine that is subject of the claim.
This limit also applies to Lenovo's suppliers, resellers and your Service Provider. It is the maximum for which Lenovo, its suppliers, resellers, and your Service Provider are collectively responsible.
UNDER NO CIRCUMSTANCES IS LENOVO, ITS SUPPLIERS, RESELLERS OR SERVICE PROVIDERS LIABLE FOR ANY OF THE FOLLOWING EVEN IF INFORMED OF THEIR POSSIBILITY: 1) THIRD PARTY CLAIMS AGAINST YOU FOR DAMAGES (OTHER THAN THOSE UNDER THE FIRST ITEM LISTED ABOVE); 2) LOSS OF, OR DAMAGE TO, DATA; 3) SPECIAL, INCIDENTAL, OR INDIRECT DAMAGES OR FOR ANY ECONOMIC CONSEQUENTIAL DAMAGES; OR 4) LOST PROFITS, BUSINESS REVENUE, GOODWILL OR ANTICIPATED SAVINGS. SOME STATES OR JURISDICTIONS DO NOT ALLOW THE EXCLUSION OR LIMITATION OF INCIDENTAL OR CONSEQUENTIAL DAMAGES, SO THE ABOVE LIMITATION OR EXCLUSION MAY NOT APPLY TO YOU.
GoverningLaw
Both you and Lenovo consent to the application of the laws of the country in which you acquired the Machine to govern, interpret, and enforce all of your and Lenovo's rights, duties, and obligations arising from, or relating in any manner to, the subject matter of this Statement of Limited Warranty, without regard to conflict of law principles.
THESE WARRANTIES GIVE YOU SPECIFIC LEGAL RIGHTS AND YOU MAY ALSO HAVE OTHER RIGHTS WHICH VARY FROM STATE TO STATE OR JURISDICTION TO JURISDICTION.
Jurisdiction
All of our rights, duties, and obligations are subject to the courts of the country in which you acquired the Machine.
Part 2 - Country-unique Terms
AMERICAS
ARGENTINA
Jurisdiction: The following is added after the first sentence:
Any litigation arising from this Statement of Limited Warranty will be settled exclusively by the Ordinary Commercial Court of the city of Buenos Aires.
BOLIVIA
Jurisdiction: The following is added after the first sentence:
Any litigation arising from this Statement of Limited Warranty will be settled exclusively by the courts of the city of La Paz.
BRAZIL
Jurisdiction: The following is added after the first sentence:
Any litigation arising from this Statement of Limited Warranty will be settled exclusively by the court of Rio de Janeiro, RJ.
CHILE
Jurisdiction: The following is added after the first sentence:
Any litigation arising from this Statement of Limited Warranty will be settled exclusively by the Civil Courts of Justice of Santiago.
COLOMBIA
Jurisdiction: The following is added after the first sentence:
Any litigation arising from this Statement of Limited Warranty will be settled exclusively by the Judges of the Republic of Colombia.
ECUADOR
Jurisdiction: The following is added after the first sentence:
Any litigation arising from this Statement of Limited Warranty will be settled exclusively by the Judges of Quito.
MEXICO
Jurisdiction: The following is added after the first sentence:
Any litigation arising from this Statement of Limited Warranty will be settled exclusively by the Federal Courts of Mexico City, Federal District.
PARAGUAY
Jurisdiction: The following is added after the first sentence:
Any litigation arising from this Statement of Limited Warranty will be settled exclusively by the courts of the city of Asuncion.
PERU
Jurisdiction: The following is added after the first sentence:
Any litigation arising from this Statement of Limited Warranty will be settled exclusively by the Judges and Tribunals of the Judicial District of Lima, Cercado.
Limitation of Liability: The following is added at the end of this section:
In accordance with Article 1328 of the Peruvian Civil Code the limitations and exclusions specified in this section will not apply to damages caused by Lenovo's willful misconduct ("dolo") or gross negligence ("culpa inexcusable").
URUGUAY
Jurisdiction: The following is added after the first sentence:
Any litigation arising from this Statement of Limited Warranty will be settled exclusively by the City of Montevideo Court's Jurisdiction.
VENEZUELA
Jurisdiction: The following is added after the first sentence:
Any litigation arising from this Statement of Limited Warranty will be settled exclusively by the Courts of the Metropolitan Area Of the City of Caracas.
NORTHAMERICA
How to Obtain Warranty Service: The following is added to this Section:
To obtain warranty service from IBM service in Canada or the United States, call 1-800-IBM-SERV (426-7378).
CANADA
Limitation of Liability: The following replaces item 1 of this section:
- damages for bodily injury (including death) or physical harm to real property and tangible personal property caused by Lenovo's negligence; and
Governing Law: The following replaces "laws of the country in which you acquired the Machine" in the first sentence:
laws in the Province of Ontario.
UNITEDSTATES
Governing Law: The following replaces "laws of the country in which you acquired the Machine" in the first sentence:
laws of the State of New York.
ASIAPACIFIC
AUSTRALIA
What this Warranty Covers: The following paragraph is added to this section:
The warranties specified in this Section are in addition to any rights you may have under the Trade Practices Act 1974 or other similar legislation and are only limited to the extent permitted by the applicablelegislation.
Limitation of Liability: The following is added to this section:
Where Lenovo is in breach of a condition or warranty implied by the Trade Practices Act 1974 or other similar legislation, Lenovo's liability is limited to the repair or replacement of the goods or the supply of equivalent goods. Where that condition or warranty relates to right to sell, quiet possession or clear title, or the goods are of a kind ordinarily acquired for personal, domestic or household use or consumption, then none of the limitations in this paragraph apply.
Governing Law: The following replaces "laws of the country in which you acquired the Machine" in the first sentence:
laws of the State or Territory.
CAMBODIAANDLAOS
Governing Law: The following replaces "laws of the country in which you acquired the Machine" in the first sentence:
laws of the State of New York, United States of America.
CAMBODIA, INDONESIA, AND LAOS
Arbitration: The following is added under this heading:
Disputes arising out of or in connection with this Statement of Limited Warranty shall be finally settled by arbitration which shall be held in Singapore in accordance with the Arbitration Rules of Singapore International Arbitration Center ("SIAC Rules") then in effect. The arbitration award shall be final and binding for the parties without appeal and shall be in writing and set forth the findings of fact and the conclusionsoflaw.
The number of arbitrators shall be three, with each side to the dispute being entitled to appoint one arbitrator. The two arbitrators appointed by the parties shall appoint a third arbitrator who shall act as chairman of the proceedings. Vacancies in the post of chairman shall be filled by the president of the SIAC. Other vacancies shall be filled by the respective nominating party. Proceedings shall continue from the stage they were at when the vacancy occurred.
If one of the parties refuses or otherwise fails to appoint an arbitrator within 30 days of the date the other party appoints its, the first appointed arbitrator shall be the sole arbitrator, provided that the arbitrator was validly and properly appointed.
All proceedings shall be conducted, including all documents presented in such proceedings, in the English language. The English language version of this Statement of Limited Warranty prevails over any otherlanguageversion.
HONG KONG S.A.R. OF CHINA AND MACAU S.A.R. OF CHINA
Governing Law: The following replaces "laws of the country in which you acquired the Machine" in the first sentence:
laws of Hong Kong Special Administrative Region of China.
INDIA
Limitation of Liability: The following replaces items 1 and 2 of this section:
- liability for bodily injury (including death) or damage to real property and tangible personal property will be limited to that caused by Lenovo's negligence; and
- as to any other actual damage arising in any situation involving nonperformance by Lenovo pursuant to, or in any way related to the subject of this Statement of Limited Warranty, the charge paid by you for the individual Machine that is the subject of the claim.
Arbitration: The following is added under this heading
Disputes arising out of or in connection with this Statement of Limited Warranty shall be finally settled by arbitration which shall be held in Bangalore, India in accordance with the laws of India then in effect. The arbitration award shall be final and binding for the parties without appeal and shall be in writing and set forth the findings of fact and the conclusions of law.
The number of arbitrators shall be three, with each side to the dispute being entitled to appoint one arbitrator. The two arbitrators appointed by the parties shall appoint a third arbitrator who shall act as chairman of the proceedings. Vacancies in the post of chairman shall be filled by the president of the Bar Council of India. Other vacancies shall be filled by the respective nominating party. Proceedings shall continue from the stage they were at when the vacancy occurred.
If one of the parties refuses or otherwise fails to appoint an arbitrator within 30 days of the date the other party appoints its, the first appointed arbitrator shall be the sole arbitrator, provided that the arbitrator was validly and properly appointed.
All proceedings shall be conducted, including all documents presented in such proceedings, in the English language. The English language version of this Statement of Limited Warranty prevails over any otherlanguageversion.
JAPAN
Governing Law: The following sentence is added to this section:
Any doubts concerning this Statement of Limited Warranty will be initially resolved between us in good faith and in accordance with the principle of mutual trust.
MALAYSIA
Limitation of Liability: The word "SPECIAL" in item 3 of the fifth paragraph is deleted.
NEWZEALAND
What this Warranty Covers: The following paragraph is added to this section:
The warranties specified in this section are in addition to any rights you may have under the Consumer Guarantees Act 1993 or other legislation which cannot be excluded or limited. The Consumer Guarantees Act 1993 will not apply in respect of any goods which Lenovo provides, if you require the goods for the purposes of a business as defined in that Act.
Limitation of Liability: The following is added to this section:
Where Machines are not acquired for the purposes of a business as defined in the Consumer Guarantees Act 1993, the limitations in this Section are subject to the limitations in that Act.
PEOPLE'S REPUBLIC OF CHINA (PRC)
Governing Law: The following replaces "laws of the country in which you acquired the Machine" in the first sentence:
laws of the State of New York, United States of America (except when local law requires otherwise).
PHILIPPINES
Limitation of Liability: Item 3 in the fifth paragraph is replaced by the following:
SPECIAL (INCLUDING NOMINAL AND EXEMPLARY DAMAGES), MORAL, INCIDENTAL, OR INDIRECT DAMAGES FOR ANY ECONOMIC CONSEQUENTIAL DAMAGES; OR
Arbitration: The following is added: under this heading
Disputes arising out of or in connection with this Statement of Limited Warranty shall be finally settled by arbitration which shall be held in Metro Manila, Philippines in accordance with the laws of the Philippines then in effect. The arbitration award shall be final and binding for the parties without appeal and shall be in writing and set forth the findings of fact and the conclusions of law.
The number of arbitrators shall be three, with each side to the dispute being entitled to appoint one arbitrator. The two arbitrators appointed by the parties shall appoint a third arbitrator who shall act as chairman of the proceedings. Vacancies in the post of chairman shall be filled by the president of the Philippine Dispute Resolution Center, Inc. Other vacancies shall be filled by the respective nominating party. Proceedings shall continue from the stage they were at when the vacancy occurred.
If one of the parties refuses or otherwise fails to appoint an arbitrator within 30 days of the date the other party appoints its, the first appointed arbitrator shall be the sole arbitrator, provided that the arbitrator was validly and properly appointed.
All proceedings shall be conducted, including all documents presented in such proceedings, in the English language. The English language version of this Statement of Limited Warranty prevails over any otherlanguageversion.
SINGAPORE
Limitation of Liability: The words "SPECIAL" and "ECONOMIC" in item 3 in the fifth paragraph are deleted.
EUROPE, MIDDLE EAST, AFRICA (EMEA)
THE FOLLOWING TERMS APPLY TO ALL EMEA COUNTRIES:
The terms of this Statement of Limited Warranty apply to Machines purchased from Lenovo or a Lenovo reseller.
How to Obtain Warranty Service:
Add the following paragraph in Western Europe (Andorra, Austria, Belgium, Cyprus, Czech Republic, Denmark, Estonia, Finland, France, Germany, Greece, Hungary, Iceland, Ireland, Italy, Latvia, Liechtenstein, Lithuania, Luxembourg, Malta, Monaco, Netherlands, Norway, Poland, Portugal, San Marino, Slovakia, Slovenia, Spain, Sweden, Switzerland, United Kingdom, Vatican State, and any country subsequently added to the European Union, as from the date of accession):
The warranty for Machines acquired in Western Europe shall be valid and applicable in all Western Europe countries provided the Machines have been announced and made available in such countries.
If you purchase a Machine in one of the Western European countries, as defined above, you may obtain warranty service for that Machine in any of those countries from a Service Provider, provided the Machine has been announced and made available by Lenovo in the country in which you wish to obtain service.
If you purchased a Personal Computer Machine in Albania, Armenia, Belarus, Bosnia and Herzegovina, Bulgaria, Croatia, Czech Republic, Georgia, Hungary, Kazakhstan, Kyrgyzstan, Federal Republic of Yugoslavia, Former Yugoslav Republic of Macedonia (FYROM), Moldova, Poland, Romania, Russia, Slovak Republic, Slovenia, or Ukraine, you may obtain warranty service for that Machine in any of those countries from a Service Provider, provided the Machine has been announced and made available by Lenovo in the country in which you wish to obtain service.
If you purchase a Machine in a Middle Eastern or African country, you may obtain warranty service for that Machine from a Service Provider within the country of purchase, provided the Machine has been announced and made available by Lenovo in that country. Warranty service in Africa is available within 50 kilometers of a Service Provider. You are responsible for transportation costs for Machines located outside 50 kilometers of a Service Provider.
GoverningLaw:
The phrase "the laws of the country in which you acquired the Machine" is replaced by:
1) "the laws of Austria" in Albania, Armenia, Azerbaijan, Belarus, Bosnia-Herzegovina, Bulgaria, Croatia, Georgia, Hungary, Kazakhstan, Kyrgyzstan, FYR Macedonia, Moldova, Poland, Romania, Russia, Slovakia, Slovenia, Tajikistan, Turkmenistan, Ukraine, Uzbekistan, and FR Yugoslavia; 2) "the laws of France" in Algeria, Benin, Burkina Faso, Cameroon, Cape Verde, Central African Republic, Chad, Comoros, Congo Republic, Djibouti, Democratic Republic of Congo, Equatorial Guinea, French Guiana, French Polynesia, Gabon, Gambia, Guinea, Guinea-Bissau, Ivory Coast, Lebanon, Madagascar, Mali, Mauritania, Mauritius, Mayotte, Morocco, New Caledonia, Niger, Reunion, Senegal, Seychelles, Togo, Tunisia, Vanuatu, and Wallis & Futuna; 3) "the laws of Finland" in Estonia, Latvia, and Lithuania; 4) "the laws of England" in Angola, Bahrain, Botswana, Burundi, Egypt, Eritrea, Ethiopia, Ghana, Jordan, Kenya, Kuwait, Liberia, Malawi, Malta, Mozambique, Nigeria, Oman, Pakistan, Qatar, Rwanda, Sao Tome, Saudi Arabia, Sierra Leone, Somalia, Tanzania, Uganda, United Arab Emirates, the United Kingdom, West Bank/Gaza, Yemen, Zambia, and Zimbabwe; and 5) "the laws of South Africa" in South Africa, Namibia, Lesotho and Swaziland.
Jurisdiction: The following exceptions are added to this section:
1) In Austria the choice of jurisdiction for all disputes arising out of this Statement of Limited Warranty and relating thereto, including its existence, will be the competent court of law in Vienna, Austria (Inner-City); 2) in Angola, Bahrain, Botswana, Burundi, Egypt, Eritrea, Ethiopia, Ghana, Jordan, Kenya, Kuwait, Liberia, Malawi, Malta, Mozambique, Nigeria, Oman, Pakistan, Qatar, Rwanda, Sao Tome, Saudi Arabia, Sierra Leone, Somalia, Tanzania, Uganda, United Arab Emirates, West Bank/Gaza, Yemen, Zambia, and Zimbabwe all disputes arising out of this Statement of Limited Warranty or related to its execution, including summary proceedings, will be submitted to the exclusive jurisdiction of the English courts; 3) in Belgium and Luxembourg, all disputes arising out of this Statement of Limited Warranty or related to its interpretation or its execution, the law, and the courts of the capital city, of the country of your registered office and/or commercial site location only are competent; 4) in France, Algeria, Benin, Burkina Faso, Cameroon, Cape Verde, Central African Republic, Chad, Comoros, Congo Republic, Djibouti, Democratic Republic of Congo, Equatorial Guinea, French Guiana, French Polynesia, Gabon, Gambia, Guinea, Guinea-Bissau, Ivory Coast, Lebanon, Madagascar, Mali, Mauritania, Mauritius, Mayotte, Morocco, New Caledonia, Niger, Reunion, Senegal, Seychelles, Togo, Tunisia, Vanuatu, and Wallis & Futuna all disputes arising out of this Statement of Limited Warranty or related to its violation or execution, including summary proceedings, will be settled exclusively by the Commercial Court of Paris; 5) in Russia, all disputes arising out of or in relation to the interpretation, the violation, the termination, the nullity of the execution of this Statement of Limited Warranty shall be settled by Arbitration Court of Moscow; 6) in South Africa, Namibia, Lesotho and Swaziland, both of us agree to submit all disputes relating to this Statement of Limited Warranty to the jurisdiction of the High Court in Johannesburg; 7) in Turkey all disputes arising out of or in connection with this Statement of
Limited Warranty shall be resolved by the Istanbul Central (Sultanahmet) Courts and Execution Directorates of Istanbul, the Republic of Turkey; 8) in each of the following specified countries, any legal claim arising out of this Statement of Limited Warranty will be brought before, and settled exclusively by, the competent court of a) Athens for Greece, b) Tel Aviv-Jaffa for Israel, c) Milan for Italy, d) Lisbon for Portugal, and e) Madrid for Spain; and 9) in the United Kingdom, both of us agree to submit all disputes relating to this Statement of Limited Warranty to the jurisdiction of the English courts.
Arbitration: The following is added under this heading:
In Albania, Armenia, Azerbaijan, Belarus, Bosnia-Herzegovina, Bulgaria, Croatia, Georgia, Hungary, Kazakhstan, Kyrgyzstan, FYR Macedonia, Moldova, Poland, Romania, Russia, Slovakia, Slovenia, Tajikistan, Turkmenistan, Ukraine, Uzbekistan, and FR Yugoslavia all disputes arising out of this Statement of Limited Warranty or related to its violation, termination or nullity will be finally settled under the Rules of Arbitration and Conciliation of the International Arbitral Center of the Federal Economic Chamber in Vienna (Vienna Rules) by three arbitrators appointed in accordance with these rules. The arbitration will be held in Vienna, Austria, and the official language of the proceedings will be English. The decision of the arbitrators will be final and binding upon both parties. Therefore, pursuant to paragraph 598 (2) of the Austrian Code of Civil Procedure, the parties expressly waive the application of paragraph 595 (1) figure 7 of the Code. Lenovo may, however, institute proceedings in a competent court in the country of installation.
In Estonia, Latvia and Lithuania all disputes arising in connection with this Statement of Limited Warranty will be finally settled in arbitration that will be held in Helsinki, Finland in accordance with the arbitration laws of Finland then in effect. Each party will appoint one arbitrator. The arbitrators will then jointly appoint the chairman. If arbitrators cannot agree on the chairman, then the Central Chamber of Commerce in Helsinki will appoint the chairman.
EUROPEANUNION(EU)
THE FOLLOWING TERMS APPLY TO ALL EU COUNTRIES:
The warranty for Machines acquired in EU countries is valid and applicable in all EU countries provided the Machines have been announced and made available in such countries.
How to Obtain Warranty Service: The following is added to this section:
To obtain warranty service from IBM service in EU countries, see the telephone listing in Part 3 - WarrantyInformation.
You may contact IBM service at the following address:
IBM Warranty & Service Quality Dept.
POBox30
SpangoValley
Greenock
ScotlandPA160AH
CONSUMERS
Consumers have legal rights under applicable national legislation governing the sale of consumer goods. Such rights are not affected by the warranties provided in this Statement of Limited Warranty.
AUSTRIA, DENMARK, FINLAND, GREECE, ITALY, NETHERLANDS, NORWAY, PORTUGAL, SPAIN, SWEDEN AND SWITZERLAND
Limitation of Liability: The following replaces the terms of this section in its entirety:
Except as otherwise provided by mandatory law:
- Lenovo's liability for any damages and losses that may arise as a consequence of the fulfillment of its obligations under or in connection with this Statement of Limited Warranty or due to any other cause related to this Statement of Limited Warranty is limited to the compensation of only those damages and losses proved and actually arising as an immediate and direct consequence of the non-fulfillment of such obligations (if Lenovo is at fault) or of such cause, for a maximum amount equal to the charges you paid for the Machine.
The above limitation shall not apply to damages for bodily injuries (including death) and damages to real property and tangible personal property for which Lenovo is legally liable.
- UNDER NO CIRCUMSTANCES IS LENOVO, ITS SUPPLIERS, RESELLERS OR SERVICE PROVIDERS LIABLE FOR ANY OF THE FOLLOWING, EVEN IF INFORMED OF THEIR POSSIBILITY: 1) LOSS OF, OR DAMAGE TO, DATA; 2) INCIDENTAL OR INDIRECT DAMAGES, OR FOR ANY ECONOMIC CONSEQUENTIAL DAMAGES; 3) LOST PROFITS, EVEN IF THEY ARISE AS AN IMMEDIATE CONSEQUENCE OF THE EVENT THAT GENERATED THE DAMAGES; OR 4) LOSS OF BUSINESS, REVENUE, GOODWILL, OR ANTICIPATEDSAVINGS.
FRANCEANDBELGIUM
Limitation of Liability: The following replaces the terms of this section in its entirety:
Except as otherwise provided by mandatory law:
-
Lenovo's liability for any damages and losses that may arise as a consequence of the fulfillment of its obligations under or in connection with this Statement of Limited Warranty is limited to the compensation of only those damages and losses proved and actually arising as an immediate and direct consequence of the non-fulfillment of such obligations (if Lenovo is at fault), for a maximum amount equal to the charges you paid for the Machine that has caused the damages. The above limitation shall not apply to damages for bodily injuries (including death) and damages to real property and tangible personal property for which Lenovo is legally liable.
-
UNDER NO CIRCUMSTANCES IS LENOVO, ITS SUPPLIERS, RESELLERS OR SERVICE PROVIDERS LIABLE FOR ANY OF THE FOLLOWING, EVEN IF INFORMED OF THEIR POSSIBILITY: 1) LOSS OF, OR DAMAGE TO, DATA; 2) INCIDENTAL OR INDIRECT DAMAGES, OR FOR ANY ECONOMIC CONSEQUENTIAL DAMAGES; 3) LOST PROFITS, EVEN IF THEY ARISE AS AN IMMEDIATE CONSEQUENCE OF THE EVENT THAT GENERATED THE DAMAGES; OR 4) LOSS OF BUSINESS, REVENUE, GOODWILL, OR ANTICIPATEDSAVINGS.
THE FOLLOWING TERMS APPLY TO THE COUNTRY SPECIFIED:
AUSTRIA
The provisions of this Statement of Limited Warranty replace any applicable statutory warranties. What this Warranty Covers: The following replaces the first sentence of the first paragraph of this section: The warranty for a Lenovo Machine covers the functionality of the Machine for its normal use and the Machine's conformity to its Specifications.
The following paragraphs are added to this section:
The limitation period for consumers in action for breach of warranty is the statutory period as a minimum. In case your Service Provider is unable to repair a Lenovo Machine, you can alternatively ask for a partial refund as far as justified by the reduced value of the unrepaired Machine or ask for a cancellation of the respective agreement for such Machine and get your money refunded.
The second paragraph does not apply.
What Lenovo Will Do to Correct Problems: The following is added to this section:
During the warranty period, Lenovo will reimburse you for the transportation charges for the delivery of the failing Machine to IBM Service.
Limitation of Liability: The following paragraph is added to this section:
The limitations and exclusions specified in the Statement of Limited Warranty will not apply to damages caused by Lenovo with fraud or gross negligence and for express warranty.
The following sentence is added to the end of item 2:
Lenovo's liability under this item is limited to the violation of essential contractual terms in cases of ordinarynegligence.
EGYPT
Limitation of Liability: The following replaces item 2 in this section:
as to any other actual direct damages, Lenovo's liability will be limited to the total amount you paid for the Machine that is the subject of the claim.
Applicability of suppliers, resellers, and Service Providers (unchanged).
FRANCE
Limitation of Liability: The following replaces the second sentence of the first paragraph of this section:
In such instances, regardless of the basis on which you are entitled to claim damages from Lenovo, Lenovo is liable for no more than: (items 1 and 2 unchanged).
GERMANY
What this Warranty Covers: The following replaces the first sentence of the first paragraph of this section:
The warranty for a Lenovo Machine covers the functionality of the Machine for its normal use and the Machine's conformity to its Specifications.
The following paragraphs are added to this section:
The minimum warranty period for Machines is twelve months. In case your Service Provider is unable to repair a Lenovo Machine, you can alternatively ask for a partial refund as far as justified by the reduced value of the unrepaired Machine or ask for a cancellation of the respective agreement for such Machine and get your money refunded.
The second paragraph does not apply.
What Lenovo Will Do to Correct Problems: The following is added to this section:
During the warranty period, transportation for delivery of the failing Machine to Lenovo or IBM service will be at Lenovo's expense.
Limitation of Liability: The following paragraph is added to this section:
The limitations and exclusions specified in the Statement of Limited Warranty will not apply to damages caused by Lenovo with fraud or gross negligence and for express warranty.
The following sentence is added to the end of item 2:
Lenovo's liability under this item is limited to the violation of essential contractual terms in cases of ordinarynegligence.
HUNGARY
Limitation of Liability: The following is added at the end of this section:
The limitation and exclusion specified herein shall not apply to liability for a breach of contract damaging life, physical well-being, or health that has been caused intentionally, by gross negligence, or by a criminalact.
The parties accept the limitations of liability as valid provisions and state that the Section 314.(2) of the Hungarian Civil Code applies as the acquisition price as well as other advantages arising out of the present Statement of Limited Warranty balance this limitation of liability.
IRELAND
What this Warranty Covers: The following is added to this section:
Except as expressly provided in these terms and conditions, all statutory conditions, including all warranties implied, but without prejudice to the generality of the foregoing all warranties implied by the Sale of Goods Act 1893 or the Sale of Goods and Supply of Services Act 1980 are hereby excluded.
Limitation of Liability: The following replaces the terms of section in its entirety:
For the purposes of this section, a “Default” means any act, statement, omission, or negligence on the part of Lenovo in connection with, or in relation to, the subject matter of this Statement of Limited
Warranty in respect of which Lenovo is legally liable to you, whether in contract or tort. A number of Defaults which together result in, or contribute to, substantially the same loss or damage will be treated as one Default occurring on the date of occurrence of the last such Default.
Circumstances may arise where, because of a Default, you are entitled to recover damages from Lenovo.
This section sets out the extent of Lenovo's liability and your sole remedy.
- Lenovo will accept unlimited liability for death or personal injury caused by the negligence of Lenovo.
- Subject always to the Items for Which Lenovo is Not Liable below, Lenovo will accept unlimited liability for physical damage to your tangible property resulting from the negligence of Lenovo.
- Except as provided in items 1 and 2 above, Lenovo's entire liability for actual damages for any one Default will not in any event exceed 125% of the amount you paid for the Machine directly relating to theDefault.
Items for Which Lenovo is Not Liable
Save with respect to any liability referred to in item 1 above, under no circumstances is Lenovo, its suppliers, resellers or Service Providers liable for any of the following, even if Lenovo or they were informed of the possibility of such losses:
- loss of, or damage to, data;
- special, indirect, or consequential loss; or
- loss of profits, business, revenue, goodwill, or anticipated savings.
SLOVAKIA
Limitation of Liability: The following is added to the end of the last paragraph:
The limitations apply to the extent they are not prohibited under §§ 373-386 of the Slovak Commercial Code.
SOUTH AFRICA, NAMIBIA, BOTSWANA, LESOTHO AND SWAZILAND
Limitation of Liability: The following is added to this section:
Lenovo's entire liability to you for actual damages arising in all situations involving nonperformance by Lenovo in respect of the subject matter of this Statement of Warranty will be limited to the charge paid by you for the individual Machine that is the subject of your claim from Lenovo.
UNITEDKINGDOM
Limitation of Liability: The following replaces the terms of this section is in its entirety:
For the purposes of this section, a “Default” means any act, statement, omission, or negligence on the part of Lenovo in connection with, or in relation to, the subject matter of this Statement of Limited Warranty in respect of which Lenovo is legally liable to you, whether in contract or tort. A number of Defaults which together result in, or contribute to, substantially the same loss or damage will be treated asoneDefault.
Circumstances may arise where, because of a Default, you are entitled to recover damages from Lenovo.
This section sets out the extent of Lenovo's liability and your sole remedy.
- Lenovo will accept unlimited liability for:
a. death or personal injury caused by the negligence of Lenovo; and b. any breach of its obligations implied by Section 12 of the Sale of Goods Act 1979 or Section 2 of the Supply of Goods and Services Act 1982, or any statutory modification or re-enactment of either suchSection.
- Lenovo will accept unlimited liability, subject always to the Items for Which Lenovo is Not Liable below, for physical damage to your tangible property resulting from the negligence of Lenovo.
- Lenovo's entire liability for actual damages for any one Default will not in any event, except as provided in items 1 and 2 above, exceed 125% of the total purchase price payable or the charges for the Machine directly relating to the Default.
These limits also apply to Lenovo's suppliers, resellers and Service Providers. They state the maximum for which Lenovo and such suppliers, resellers and Service Providers are collectively responsible.
Items for Which Lenovo is Not Liable
Save with respect to any liability referred to in item 1 above, under no circumstances is Lenovo or any of its suppliers, resellers or Service Providers liable for any of the following, even if Lenovo or they were informed of the possibility of such losses:
- loss of, or damage to, data;
- special, indirect, or consequential loss; or
- loss of profits, business, revenue, goodwill, or anticipated savings.
Part 3 - Warranty Information
This Part 3 provides information regarding the warranty applicable to your Machine, including the warranty period and type of warranty service Lenovo provides.
WarrantyPeriod
The warranty period may vary by country or region and is specified in the table below. NOTE: "Region" means either Hong Kong or Macau Special Administrative Region of China.
A warranty period of 3 years on parts and 3 years on labor means that Lenovo provides warranty service during the three-year warranty period.
| Machine Type | Country or Region of Purchase | Warranty Period | TypeofWarranty Service |
| C500 Projector | Worldwide | 3 years | 7 |
A warranty period of 6 months on parts and 6 months on labor means that Lenovo provides warranty service during the six-month warranty period.
A warranty period of 3 months on parts and 3 months on labor means that Lenovo provides warranty service during the three-month warranty period.
| Machine Type | Country or Region of Purchase | Warranty Period | TypeofWarranty Service |
| C500Projector lamp | China | 6 months | 7 |
| C500Projector lamp | Worldwide3months7 |
Types of Warranty Service
If required, your Service Provider will provide repair or exchange service depending on the type of warranty service specified for your Machine in the above table and as described below. Scheduling of service will depend upon the time of your call and is subject to parts availability. Service levels are response time objectives and are not guaranteed. The specified level of warranty service may not be available in all worldwide locations, additional charges may apply outside your Service Provider's normal service area, contact your local Service Provider representative or your reseller for country and locationspecificinformation.
1. Customer Replaceable Unit ("CRU") Service
Lenovo will ship CRUs to you for you to install, Tier 1 CRUs are easy to install whereas Tier 2 CRUs require some technical skill and tools. CRU information and replacement instructions are shipped with your Machine and are available from Lenovo at any time on your request. You may request that
a Service Provider install CRUs, at no additional charge, under the type of warranty service designated for your Machine. Lenovo specifies in the materials shipped with a replacement CRU whether a defective CRU must be returned. When return is required, 1) return instructions and a container are shipped with the replacement CRU, and 2) you may be charged for the replacement CRU if Lenovo does not receive the defective CRU within 30 days of your receipt of the replacement.
2. On-site Service
Your Service Provider will either repair or exchange the failing Machine at your location and verify its operation. You must provide suitable working area to allow disassembly and reassembly of the Lenovo Machine. The area must be clean, well lit and suitable for the purpose. For some Machines, certain repairs may require sending the Machine to a designated service center.
3. Courier or Depot Service \*
You will disconnect the failing Machine for collection arranged by your Service Provider. A shipping container will be provided to you for you to return your Machine to a designated service center. A courier will pick up your Machine and deliver it to the designated service center. Following its repair or exchange, the service center will arrange the return delivery of the Machine to your location. You are responsible for its installation and verification.
4. Customer Carry-In or Mail-In Service
You will deliver or mail as your Service Provider specifies (prepaid unless specified otherwise) the failing Machine suitably packaged to a designated location. After the Machine has been repaired or exchanged, it will be made available for your collection or, for Mail-in Service, the Machine will be returned to you at Lenovo's expense, unless your Service Provider specifies otherwise. You are responsible for the subsequent installation and verification of the Machine.
5. CRU and On-site Service
This type of Warranty Service is a combination of Type 1 and Type 2 (see above).
6. CRU and Courier or Depot Service
This type of Warranty Service is a combination of Type 1 and Type 3 (see above).
7. CRU and Customer Carry-In or Mail-In Service
This type of Warranty Service is a combination of Type 1 and Type 4 (see above).
When a 5, 6 or 7 type of warranty service is listed, your Service Provider will determine which type of warranty service is appropriate for the repair.
* This type of service is called ThinkPad EasyServ or EasyServ in some countries.
To obtain warranty service contact a Service Provider. In Canada or the United States, call 1-800-IBM-SERV (426-7378). In other countries, see the telephone numbers below.
Worldwidetelephonelist
Phone numbers are subject to change without notice. For the most current phone numbers, go to http://www.lenovo.com/support and click Support phone list.
| Country or Region | Telephone Number |
| Africa | Africa: +44 (0)1475-555-055South Africa: +27-11-3028888 and 0800110756Central Africa: Contact your Lenovo service provider |
| Argentina | 0800-666-0011 (Spanish) |
| Australia131-426(English) | |
| Austria | Up and running support: 01-24592-5901Warranty service and support: 01-211-454-610(German) |
| Belgium | Up and running support: 02-210-9820 (Dutch)Up and running support: 02-210-9800 (French)Warranty service and support: 02-225-3611 (Dutch, French) |
| Bolivia0800-0189(Spanish) | |
| Brazil | Sao Paulo region: (11) 3889-8986Toll free outside Sao Paulo region: 0800-7014-815(BrazilianPortuguese) |
| Canada | 1-800-565-3344 (English, French)In Toronto only call: 416-383-3344 |
| Chile800-224-488(Spanish) | |
| China800-810-1818(Mandarin) | |
| China(HongKong S.A.R.) | HomePC:852-2825-7799CommercialPC:852-8205-0333ThinkPad and WorkPad: 852-2825-6580(Cantonese, English, Putonghua) |
| Colombia | 1-800-912-3021 (Spanish) |
| Costa Rica | 284-3911 (Spanish) |
| Croatia0800-0426 | |
| Cyprus+357-22-841100 | |
| Czech Republic | +420-2-7213-1316 |
| Denmark | Up and running support: 4520-8200Warranty service and support: 7010-5150(Danish) |
| Dominican Republic | 566-4755566-5161ext.8201Toll Free within the Dominican Republic: 1-200-1929(Spanish) |
| Ecuador1-800-426911(Spanish) | |
| El Salvador | 250-5696 (Spanish) |
| Estonia+386-61-1796-699 | |
| Finland | Up and running support: 09-459-6960Warranty service and support: +358-800-1-4260(Finnish) |
| France | Up and running support: 0238-557-450Warranty service and support (hardware): 0810-631-213Warranty service and support (software): 0810-631-020(French) |
| Germany | Up and running support: 07032-15-49201Warranty service and support: 01805-25-35-58(German) |
| Greece | +30-210-680-1700 |
| Guatemala | 335-8490 (Spanish) |
| Honduras | Tegucigalpa & San Pedro Sula: 232-4222San Pedro Sula: 552-2234(Spanish) |
| Hungary | +36-1-382-5720 |
| India1600-44-6666 | Alternate Toll Free: +91-80-2678-8940(English) |
| Indonesia800-140-3555 | +62-21-251-2955(English,BahasaIndonesian) |
| Ireland | Up and running support: 01-815-9202Warranty service and support: 01-881-1444(English) |
| Israel | +972-3-531-3900 (Hebrew)+972-3-531-3900(English)8:30AM - 5:00PM Sunday - Thursday (Local time) |
| Italy | Up and running support: 02-7031-6101Warranty service and support: +39-800-820094(Italian) |
| JapanDesktop: | Tollfree:0120-887-870For International: +81-46-266-4724ThinkPad:Tollfree:0120-887-874For International: +81-46-266-4724Both of the above numbers will be answered with a Japanese language voice prompt. For telephone support in English, please wait for the Japanese voice prompt to end, and an operator will answer. Please ask for "English support please," and your call will be transferred to an English speaking operator.PCSoftware:0120-558-695Overseas calls: +81-44-200-8666(Japanese) |
| Korea1588-5801(Korean) | |
| Latvia+386-61-1796-699 | |
| Lithuania+386-61-1796-699 | |
| Luxembourg | +352-298-977-5063 (French) |
| Malaysia | 1800-88-8558 (English, Bahasa Melayu) |
| Malta | +356-23-4175 |
| Mexico | 001-866-434-2080 (Spanish) |
| Middle East | +44 (0)1475-555-055 |
| Netherlands | +31-20-514-5770 (Dutch) |
| New Zealand | 0800-446-149 (English) |
| Nicaragua | 255-6658 (Spanish) |
| Norway | Up and running support: 6681-1100Warranty service and support: 8152-1550(Norwegian) |
| Panama | 206-6047 (Spanish) |
| Peru | 0-800-50-866 (Spanish) |
| Philippines1800-1888-1 | 426+63-2-995-8420(English,Philipino) |
| Poland+48-22-878-6999 | |
| Portugal | +351-21-892-7147 (Portuguese) |
| Romania+4-021-224-4015 | |
| Russian Federation | +7-095-940-2000 (Russian) |
| Singapore | 1800-3172-888 (English, Bahasa Melayu) |
| Slovakia+421-2-4954-12 | 17 |
| Slovenia+386-1-4796-699 | |
| Spain91-714-7983 | 91-397-6503(Spanish) |
| Sri Lanka | +94-11-2448-442 (English) |
| Sweden | Up and running support: 08-477-4420Warranty service and support: 077-117-1040(Swedish) |
| Switzerland | Up and running support: 058-333-0900Warranty service and support: 0800-55-54-54(German,French,Italian) |
| Taiwan | 886-2-8723-9799 (Mandarin) |
| Thailand1-800-299-229(Thai) | |
| Turkey | 00800-4463-2041(Turkish) |
| United Kingdom | Up and running support: 01475-555-055Warranty service and support (hardware): 08705-500-900Warranty service and support (software): 08457-151-516(English) |
| United States | 1-800-426-7378(English) |
| Uruguay | 000-411-005-6649 (Spanish) |
| Venezuela | 0-800-100-2011 (Spanish) |
| Vietnam | For northern area and Hanoi: 84-4-8436675For southern area and Ho Chi Minh City: 84-8-829-5160(English,Vietnamese) |
Guarantee supplement for Mexico
This supplement is considered part of Lenovo's Statement of Limited Warranty and shall be effective solely and exclusively for products distributed and commercialized within Territory of the Mexican United States. In the event of a conflict, the terms of this supplement shall apply.
All software programs pre-loaded in the equipment shall only have a thirty- (30) day guarantee for installation defects from the date of purchase. Lenovo is not responsible for the information in such software programs and/or any additional software programs installed by you or installed after purchase of the product.
Services not chargeable to the guarantee shall be charged to the final user, prior an authorization.
In the event that warranty repair is required please call the Customer Support Center at 001-866-434-2080, where you will be directed to the nearest Authorized Service Center. Should no Authorized Service Center exist in your city, location or within 70 kilometers of your city or location, the guarantee includes any reasonable delivery charges related to the transportation of the product to our nearest Authorized Service Center. Please call the nearest Authorized Service Center to obtain the necessary approvals or information concerning the shipment of the product and the shipment address.
To obtain a list of Authorized Service Centers, please visit:
Lenovo may not offer the products, services, or features discussed in this document in all countries. Consult your local Lenovo representative for information on the products and services currently available in your area. Any reference to a Lenovo product, program, or service is not intended to state or imply that only that Lenovo product, program, or service may be used. Any functionally equivalent product, program, or service that does not infringe any Lenovo intellectual property right may be used instead. However, it is the user's responsibility to evaluate and verify the operation of any other product, program, or service.
Lenovo may have patents or pending patent applications covering subject matter described in this document. The furnishing of this document does not give you any license to these patents. You can send license inquiries, in writing, to:
Lenovo (United States), Inc.
500 Park Offices Drive, Hwy. 54
Research Triangle Park, NC 27709
U.S.A.
Attention: Lenovo Director of Licensing
LENOVO GROUP LTD. PROVIDES THIS PUBLICATION "AS IS" WITHOUT WARRANTY OF ANY KIND, EITHER EXPRESS OR IMPLIED, INCLUDING, BUT NOT LIMITED TO, THE IMPLIED WARRANTIES OF NON-INFRINGEMENT, MERCHANTABILITY OR FITNESS FOR A PARTICULAR PURPOSE. Some jurisdictions do not allow disclaimer of express or implied warranties in certain transactions, therefore, this statement may not apply to you.
This information could include technical inaccuracies or typographical errors. Changes are periodically made to the information herein; these changes will be incorporated in new editions of the publication. Lenovo may make improvements and/or changes in the product(s) and/or the program(s) described in this publication at any time without notice.
The products described in this document are not intended for use in implantation or other life support applications where malfunction may result in injury or death to persons. The information contained in this document does not affect or change Lenovo product specifications or warranties. Nothing in this document shall operate as an express or implied license or indemnity under the intellectual property rights of Lenovo or third parties. All information contained in this document was obtained in specific environments and is presented as an illustration. The result obtained in other operating environments may vary.
Lenovo may use or distribute any of the information you supply in any way it believes appropriate without incurring any obligation to you.
Any references in this publication to non-Lenovo Web sites are provided for convenience only and do not in any manner serve as an endorsement of those Web sites. The materials at those Web sites are not part of the materials for this Lenovo product, and use of those Web sites is at your own risk.
Any performance data contained herein was determined in a controlled environment. Therefore, the result obtained in other operating environments may vary significantly. Some measurements may have been made on development-level systems and there is no guarantee that these measurements will be the same on generally available systems. Furthermore, some measurements may have been estimated through extrapolation. Actual results may vary. Users of this document should verify the applicable data for their specific environment.
Trademarks
The following terms are trademarks of Lenovo in the United States, other countries, or both:
Lenovo
Lenovologo
ThinkPad
IBM is a trademark of International Business Machines Corporation in the United States, other countries, or both, and is used under license.
Microsoft and Windows are trademarks of Microsoft Corporation in the United States, other countries, or both.
Other company, product, or service names may be trademarks or service marks of others.
Appendix G. Electronic emission notices
The following information refers to the Lenovo C500 Projector.
Federal Communications Commission (FCC) Declaration of Conformity
This equipment has been tested and found to comply with the limits for a Class B digital device, pursuant to Part 15 of the FCC Rules. These limits are designed to provide reasonable protection against harmful interference in a residential installation. This equipment generates, used, and can radiate radio frequency energy and, if not installed and used in accordance with the instructions, may cause harmful interference to radio communications. However, there is no guarantee that interference will not occur in a particular installation. If this equipment does cause harmful interference to radio or television reception, which can be determined by turning the equipment off and on, the user is encouraged to try to correct the interference by one or more of the following measures:
• Reorient or relocate the receiving antenna.
- Increase the separation between the equipment and receiver.
- Connect the equipment into an outlet on a circuit different from that to which the receiver is connected.
- Consult an authorized dealer or service representative for help.
Lenovo is not responsible for any radio or television interference caused by using other than recommended cables or connectors or by unauthorized changes or modifications to this equipment. Unauthorized changes or modifications could void the user's authority to operate the equipment.
This device complies with Part 15 of the FCC Rules. Operation is subject to the following two conditions: (1) this device may not cause harmful interference, and (2) this device must accept any interference received, including interference that may cause undesired operation.
Responsibleparty:
Lenovo (United States) Incorporated
OneManhattanvilleRoad
Purchase, New York 10577
Telephone:(919)254-0532

Tested To Comply
With FCC Standards
FOR HOME OR OFFICE USE
Industry Canada Class B emission compliance statement
This Class B digital apparatus complies with Canadian ICES-003.
EU-EMC Directive (89/336/EEC) as amended by Directive 93/86/EEC EN 55022 class B Statement of Compliance
European Union - Compliance to the Electromagnetic Compatibility Directive
This product is in conformity with the protection requirements of EU Council Directive 89/336/ECC on the approximation of the laws of the Member States relating to electromagnetic compatibility. Lenovo cannot accept responsibility for any failure to satisfy the protection requirements resulting from a non-recommended modification of the product, including the fitting of option cards from other manufacturers.
This product has been tested and found to comply with the limits for Class B Information Technology Equipment according to European Standard EN 55022. The limits for Class B equipment were derived for typical residential environments to provide reasonable protection against interference with licensed communication devices.
Korea Class B Compliance
Japan VCCI Class B Compliance
Japanese statement of compliance for products less than or equal to 20 A per phase
高調波ガイドライン適合品
lenovo.
PartNumber:40Y8187
PrintedinUSA
(1P) P/N:40Y8187


- Lenovo C500 Projector User's Guide
- Contents
- Safety information . . . . . . . . . . v
- General safety guidelines. . . . . . . vii
- Registering your option. . . . . . . xi
- Chapter 1. Product description . . . . 1-1
- Chapter 2. Setting up the projector . . 2-1
- Chapter 3. Connecting devices to the projector 3-1
- Chapter 4. Using the projector features 4-1
- Chapter 5. On-screen Display menu controls . . . . . . . . . . . . . . . . . . . . . 5-1
- Chapter 6. Remote network operation 6-1
- Appendix A. Maintenance ..... A-1
- Appendix B. Troubleshooting ..... B-1
- Appendix C. Specifications ..... C-1
- Appendix D. Service and Support. . . D-1
- Appendix E. Lenovo Statement of Limited Warranty . . . . . . . . . . . E-1
- Appendix F. Notices. . . . . . . . . . F-1
- Appendix G. Electronic emission notices . . . . . . . . . . . . . . . . . . G-1
- Safetyinformation
- Mercurylampinformation
- CAUTION:
- Protection against lamp breakages
- Service
- Power cords and power adapters
- Extension cords and related devices
- Plugsandoutlets
- Batteries
- Heat and product ventilation
- CD and DVD drive safety
- Registeringyouroption
- Chapter 1. Product description
- Packingchecklist
- Important:
- Projectorfeatures
- Chapter 2. Setting up the projector
- Starting and shutting down the projector
- Positioning the projector
- Adjusting the projector level and height
- Adjustingtheimage
- Imageresolution
- Adjustingthevolume
- Chapter 3. Connecting devices to the projector
- Connectingdevices
- Connecting to a USB device
- Chapter 4. Using the projector features
- Using the remote control
- Inserting the remote control batteries
- Note:
- Operatingrange
- Projector and remote control buttons
- Chapter 5. On-screen Display menu controls
- Navigating the On-screen Display
- Qualitymenu
- Properties menu
- Advance Feature menu
- Usercolor
- Optionsmenu
- Setupmenu
- Network Setting
- Languagemenu
- Informationmenu
- Chapter 6. Remote network operation
- Networksetup
- Direct connection (ad hoc) Setup
- C500Ethernetoperation
- Notes:
- UpdatingEthernetfirmware
- AppendixA.Maintenance
- Cleaningthelens
- Replacing the projector lamp
- Resettingthelamp
- Using the security slot
- AppendixB.Troubleshooting
- ProjectorLEDs
- Thermalprotector
- AppendixC.Specifications
- Appendix D. Service and Support
- Onlinetechnicalsupport
- Telephonetechnicalsupport
- Appendix E. Lenovo Statement of Limited Warranty
- Part 1 - General Terms
- What this Warranty Covers
- What this Warranty Does not Cover
- How to Obtain Warranty Service
- What Lenovo Will Do to Correct Problems
- Exchange of a Machine or Part
- Your Additional Responsibilities
- You also agree to:
- LimitationofLiability
- GoverningLaw
- Jurisdiction
- Part 2 - Country-unique Terms
- AMERICAS
- ARGENTINA
- BOLIVIA
- BRAZIL
- CHILE
- COLOMBIA
- ECUADOR
- MEXICO
- PARAGUAY
- PERU
- URUGUAY
- VENEZUELA
- NORTHAMERICA
- CANADA
- UNITEDSTATES
- ASIAPACIFIC
- AUSTRALIA
- CAMBODIAANDLAOS
- CAMBODIA, INDONESIA, AND LAOS
- HONG KONG S.A.R. OF CHINA AND MACAU S.A.R. OF CHINA
- INDIA
- JAPAN
- MALAYSIA
- NEWZEALAND
- PEOPLE'S REPUBLIC OF CHINA (PRC)
- PHILIPPINES
- SINGAPORE
- EUROPE, MIDDLE EAST, AFRICA (EMEA)
- THE FOLLOWING TERMS APPLY TO ALL EMEA COUNTRIES:
- How to Obtain Warranty Service:
- GoverningLaw:
- Jurisdiction: The following exceptions are added to this section:
- EUROPEANUNION(EU)
- THE FOLLOWING TERMS APPLY TO ALL EU COUNTRIES:
- CONSUMERS
- AUSTRIA, DENMARK, FINLAND, GREECE, ITALY, NETHERLANDS, NORWAY, PORTUGAL, SPAIN, SWEDEN AND SWITZERLAND
- FRANCEANDBELGIUM
- THE FOLLOWING TERMS APPLY TO THE COUNTRY SPECIFIED:
- AUSTRIA
- EGYPT
- FRANCE
- GERMANY
- HUNGARY
- IRELAND
- Items for Which Lenovo is Not Liable
- SLOVAKIA
- SOUTH AFRICA, NAMIBIA, BOTSWANA, LESOTHO AND SWAZILAND
- UNITEDKINGDOM
- Part 3 - Warranty Information
- WarrantyPeriod
- Types of Warranty Service
- Customer Replaceable Unit ("CRU") Service
- On-site Service
- Courier or Depot Service \*
- Customer Carry-In or Mail-In Service
- CRU and On-site Service
- CRU and Courier or Depot Service
- CRU and Customer Carry-In or Mail-In Service
- Worldwidetelephonelist
- Guarantee supplement for Mexico
- Trademarks
- Appendix G. Electronic emission notices
- Federal Communications Commission (FCC) Declaration of Conformity
- European Union - Compliance to the Electromagnetic Compatibility Directive
- Korea Class B Compliance
- Japan VCCI Class B Compliance
- 高調波ガイドライン適合品
- lenovo.
Brand : LENOVO
Model : ThinkVision C500
Category : Video projector