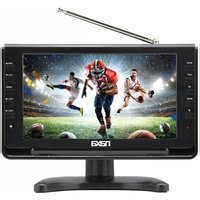
NT-110 - Television Naxa - Free user manual and instructions
Find the device manual for free NT-110 Naxa in PDF.


| Product Type | Portable TV & Digital Multimedia Player |
| Brand | Naxa |
| Model | NT-110 |
| Screen Size | 10.1 inches |
| Screen Resolution | 1024 x 600 pixels |
| Display Type | TFT LCD |
| TV Tuner | ATSC (Over-the-air HD) |
| Power Source | AC 100-240V adapter, DC car adapter, Rechargeable Li-polymer battery (3.7V, 3000mAh) |
| Battery Capacity | 3000 mAh |
| Inputs | AV1 Composite (3.5mm), USB, SD Card Slot |
| Outputs | Headphone jack (3.5mm) |
| Speaker Output | 0.8W x 2 (1.6W total) |
| Media Playback | JPG, MP3, MPEG2, MPEG4, H.264, FLV |
| Removable Memory Support | SD/SDHC card, USB flash drive |
| Wireless | None |
| Remote Control | Included (IR) |
| Stand Included | Yes |
| Antenna | External antenna with extension adapter included |
| Special Features | Sleep timer, Closed Caption, TTS (Text-to-Speech), Parental Lock (V-Chip), Favorite channels, EPG |
| Safety & Compliance | FCC Part 15 Class B, RoHS |
| Operating Temperature | -5°C to 40°C (23°F to 104°F) |
| Storage Temperature | -20°C to 60°C (-4°F to 140°F) |
| Manufacturer | Naxa Electronics (Los Angeles, CA) |
| Origin | Made in China |
Frequently Asked Questions - NT-110 Naxa
User questions about NT-110 Naxa
0 question about this device. Answer the ones you know or ask your own.
Ask a new question about this device
Download the instructions for your Television in PDF format for free! Find your manual NT-110 - Naxa and take your electronic device back in hand. On this page are published all the documents necessary for the use of your device. NT-110 by Naxa.
USER MANUAL NT-110 Naxa
THE NEW GENERATION IN TECHNOLOGY
10.1" Portable TV & Digital Multimedia Player
NT-110

Instruction Manual
Please read carefully before use and keep for future reference.
Table of Contents
Thank You 3
In the Box 3
Before Your Start 4
At a Glance 6
Main Unit 6
Remote Control 9
Basic Operation ....10
Connect the Power Supply 10
Connect the Antenna.... 11
Connect an External A/V player 11
Setting the Input Source 12
Adjusting the Volume 12
Using the Number Keypad 12
TV Menu Operation 12
Channel....13
Picture 13
Sound 14
Time....14
Option 14
Lock 15
Warnings and Precautions.... 16
Specifications 20
Support 20
Thank You
We know you have many choices when it comes to technology; thank you for choosing us here at Naxa Electronics. Established in 2001 in Los Angeles, California, we are dedicated to delivering products that entertain and delight.
We trust that you will be happy with your purchase. Please read this manual carefully and save it for reference. You may also find the latest FAQ, documentation, and other product material at our website. Come visit us on the web at www.naxa.com and see all that we have to offer!
In the Box
Please take a moment to make sure that you have everything in the list below. Although we make every effort to ensure that each Naxa device is securely packed and sealed, we know a lot can happen in between us and you. If anything is missing, check back with your local retailer to get immediate assistance. If they cannot help you, please contact our Naxa Support team at www.naxa.com/naxa_support.
- NT-110 Portable TV
- Stand
- AC power adapter
- DC car power cord
• Antenna extension adapter - External antenna
- A/V cable
- Remote control
- User manual
Before Your Start
Please take note of the following before you start.
WARNING
The operation instructions provided are intended for reference, only. Changes in the manufacturing process may cause the features and designs described herein to change without notice.
WARNING
- To prevent injury, this apparatus must be securely attached to the floor/wall in accordance with the installation instructions.
- The mains plug is used to disconnect the device from power. The mains plug must remain readily accessible and able to disconnect completely from the mains.
- The apparatus should not be exposed to dripping or splashing liquids. No objects filled with liquids, such as vases, shall be placed on the apparatus.
-
No naked flame sources, such as lighted candles, should be placed on the apparatus.
-
Batteries (battery pack or batteries installed) shall not be exposed to excessive heat such as direct sunshine, the interior of a parked car, fire or the like.
- Danger of explosion if battery is incorrectly replaced. Replace only with the same or equivalent type.
Storage
- Keep this product away from extremely hot or cold places. This storage temperature range of this device is 20^ C to 60^ C ( -4^ F to 140^ F); the operating temperature range of this device -5^ C to 40^ C ( 23^ F to 104^ F).
- Do not use this product in a damp environment (e.g., in or near bathtubs, wash basins, kitchens, basements, swimming pools, or similar places).
- Do not expose your TV set to high humidity, dust or smoke (including auto exhaust).
-
Do not throw or drop this product.
-
Do not subject this device to strong vibrations or impact. If using the device in a car, rough roads will shorten the life of your device.
- Do not puncture or abrade the device, or otherwise subject it to strong forces.
Maintenance
- Disconnect power and all cables from this device before cleaning it.
- Use a soft cloth to wipe the screen, enclosure, and keys. If necessary, use a cloth lightly moistened with water to wipe the device. Do not use rough or abrasive materials to wipe the device (e.g., a polishing cloth).
- Do not clean the device with astringents, propellants, or cleaning agents (including alcohol and benzene)
WARNING
- Do not use this device while operating a car or other motorized vehicle. Obey all local and federal regulations when using this device. There may be specific laws in your area to prevent distracted driving.
- For your safety and the safety of other turn the TV on or watch TV programs while driving.
Notice
- The panel used in this television contains millions of thin film transistors that have been manufactured using a high-technology process to deliver a crisp, clear, and detailed picture. Occasionally, a few of these transistors may become stuck or non-active; please note that this does not affect the performance of the television. These light or dark spots are within the normal operating tolerances of the unit; do not attempt to fix the screen.
- This unit is controlled by microcomputer. If it should freeze, please restart it.
- If the TV behaves abnormally, turn it off immediately and please contact us or the retailer. This device contains many finely tuned electronic components but has no user serviceable parts inside. Disassembly or alteration may result in damage or serious injury.
At a Glance
Main Unit

| 1 Telescopic antenna | ||
| 2 | MODE | Change the active source mode. Press to view the Mode menu; press CH+/CH- to browse the list of modes; then press OK to select and change the mode. |
| 3 | OK | Press to confirm a selection in the system menu. |
| 4 | MENU | Access the system menu to adjust the TV's options. |
| 5 | (13+7) | Power/Standby. Press to turn the TV on or to place it in standby mode. Make sure that the Master Power Switch [16] is set to ON. |
| 6 | Charge indicator | Lights red when the TV is connected to power and charging. The indicator will darken when the TV is fully charged. |

| 7 CH+/ Channel up/browse up when navigating a menu | |
| 8 CH-/ ▼ | Channel down/browse down when navigating a menu |
| 9 VOL+/ ▶ | Volume up/browse right when navigating a menu |
| 10 VOL-/ Volume down/browse left when navigating a menu | |
| 11 Remote sensor | Detects IR signals from the included remote control. |

| 15 Antenna input jack | 75 ohm coaxial connector for TV antennas. |
| 16 Master Power Switch | Set to ON to use the TV. If you will not be using the TV for an extended period of time, set the switch to OFF to turn the unit off completely. (The TV will use a little bit of power when the switch is set to ON and the TV is placed in Standby mode.) |
| 17 AV1 In jack Use | with the included A/V cable to connect an external composite video/audio source, then set the active source mode to AV1. |
| 18 Head- phone jack | 3.5 mm stereo audio output. |
| 19 DC input Use | with the included AC power adapter or DC power cord. |
| 21 SD card slot | Load an SD card with compatible media files, then set the active source mode to CARD. |
| 20 USB port Load | a USB memory stick with compatible media files, then set the active source mode to USB. |
Remote Control
| Power Power Switching Key. Turn the TV on or off. | |
| ZOOM Picture modes | |
| FREEZE Temporarily pause the video. | |
| MUTE Enable/disable the sound output. | |
| Channel Keys Use the number keypad to change the channel. | |
| Return Go to the last viewed channel. | |
| SOURCE Change the active input source mode (TV, AV, CARD, USB). | |
| INFO View program information. | |
| Up/Down Browse up/down in menu lists. | |
| Left/Right Browse left/right or adjust an option in menu lists. | |
| CH+/▲ | Change the channel up or down, respectively. |
| CH-/▼ | |
| VOL+/- | Increase/decrease the volume level, respectively. |
| VOL-/- | |
| ENTER | Confirm a selection. |
| MENU View the system menu. | |
| EXIT Exit the system menu. | |
| AUDIO Change the default audio language. | |
| CC | Change the closed-caption display modes. |
| EPG | If available, view program guide information from over-the-air ATSC TV broadcasts. |
| P.MODE | change the picture preset mode. |
| S.MODE | change the sound preset mode. |
| CH.LIST | View all the available channels. |
| FAV.LIST | View the channels in your favorites list. |
| SLEEP | Set a sleep timer (max 240 minutes). |
The following keys only work when playing music/videos in CARD or USB mode.
| REP | Change the repeat mode. |
| ▶II | Start, pause, or resume playback. |
| ■ | Stop playback. |
| I◀◀ | Go to the previous track. |
| ▶▶I | Skip to the next track. |

Scan in reverse quickly.

Scan forward quickly.

To adjust the volume when playing an MP3 or video file, first press the CH-/▼ key on the TV to hide the system menu, then press VOL+/► or VOL-/◄ to adjust the volume. To return to the system menu, press OK.
Basic Operation
Connect the Power Supply
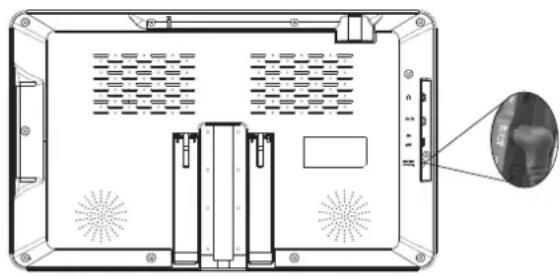
Use the supplied power adapter to connect the DC Input jack [19] on the TV to a power supply. The AC power adapter works with AC 100–240 V outlets; the DC car adapter works with the power socket found in most motor vehicles.
natural_image
Technical diagram of a device rear panel with ventilation grilles and labeled components (no readable text or symbols)Connect the Antenna
Use the supplied external antenna for improved TV reception. Connect one end of the antenna extension adapter to the Antenna Input jack [15] of the TV. Connect the other end of the adapter to the supplied external antenna.

You may also connect a larger or amplified antenna for improved reception.
Connect an External A/V player
The TV can accept composite video and audio signals from external players (e.g., a DVD player). Using the supplied A/V cable, plug the side with the 1/8" jack into the AV1 IN [17] connector of the TV. Connect the yellow RCA plug to the composite video out jack of the external player; connect the white and red RCA plugs to the L/R audio out jacks of the external player, respectively.

Setting the Input Source
Set the input source to choose which connection is active and displayed on the TV screen.
Press MODE [2] to access the input source menu, then press CH- or CH + [8, 7] to change the input source. Press OK [3] to confirm the selection.
Adjusting the Volume
- Use the VOL- and VOL+ keys [10, 11] to decrease or increase the volume level, respectively.
Using the Number Keypad
Use the number keypad (0–9) on the remote to tune directly to a channel or to input a value when prompted on a menu or option screen.
To tune to channel 15-1, for instance:
-
Press the "1" key, then press the "5" key.
-
Press the “--/--” key.
- Press the ENTER key.
To go to track 15, for instance:
- Press the "1" key, then press the "5" key.
- Press the ENTER key.
TV Menu Operation
Press the MENU key to access the menu list and then press the RIGHT arrow key to enter the list. Press the UP/DOWN arrow keys to browse menu options; press the LEFT/RIGHT arrow keys to adjust the selected menu option and then press the OK key to confirm the change.
To exit the menu, press the MENU key to back out of all menu options.
Channel
- Air/Cable: Set to Air if you are using an antenna like the ones provided to receive over-the-air TV broadcasts. Set to cable if you are connecting to a Cable TV system.
- Auto Scan: Automatically finds all TV stations with a signal and saves them to the channel list. Note: use this Auto Scan feature whenever you move the TV to a different geographic location.
- Favorite: Add channels to the Favorites list. Press UP/DOWN and LEFT/RIGHT to browse the channel list, then press OK to mark/unmark a channel as a Favorite.
- Show/Hide: Choose whether a channel will be selectable when tuning with the CH+/CH- keys. Press UP/DOWN and LEFT/RIGHT to browse the channel list, then press OK to mark/unmark a channel as hidden.

You can still tune to a hidden channel directly with the numeric keypad.
-
Software Update (USB) : UPDATE SOFTWARE
-
DTV Signal: Displays the signal quality of the current channel.
Picture
- Picture mode . select a picture preset that looks good (Standard,soft ,user , Vivid)Select user mode :adjust contrast ,Brightness, color, sharpness ,tint of the image .
- Contrast : Adjust the intensity of the dark and light parts of the image Brightness .adjust the overall brightness of the image.
• Color : Adjust the color of the image. - Sharpness :Adjust the sharpness of the image.
- Tint : Adjust the red/green color balance of the image
- color temperature : medium(warm, user, cool). select a color temperature mode
- Aspect Ratio : Auto (4:3, 16:9, zoom1, zoom2, just scan); Adjust how the TV formats different video sources to fit your screen.
- Noise Reduction . : off ( low, middle ,high, default) ; Adjust the strength of a filter that compensates for noise ,grain or artifacts in the video source .
Sound
- Sound mode : standard (music, movie, sports, user) ; set a preset equalizer to match The type of program you are watching .
- Balance : balance mode adjust .
- Auto volume : when set to ON, The TV will attempt to prevent the volume level from getting to loud or too soft.
- Audio only: set to "ON" to listen to a program with the screen off. This will save energy and extend the unit's battery life, Press any key to restore the picture.
Time
- CLOCK : Set the system time .
- Off time: off time setup
- On time: time setup on.
- Sleep timer : Set a timer, the TV will turn off automatically at the end of the timer.
-
Auto sync : set the system time to match the time carried by the antenna signal (cable or air). this option is not adjustable. the TV must be connected to an antenna or cable system for Auto sync to work.
-
Time Zone: Set the time zone adjustment to match your location.
Option
- OSD language : Set the display language of on screen menus.
- Closed caption: When Closed caption is available for a TV program. A synchronized transcript of the program can be displayed on screen.
1) Select off to never display the closed caption information.
2) Select on to always display the closed caption information.
3) Select CC on mute to only display the closed caption information when mute is enabled.
4) Change how closed caption information is displayed (CC1, CC2, CC3. CC4, Text1, Text2, Text3, Text4). - Setup wizard : An on-screen guide that will help you get your TV up and running .Set the menu language time zone , DST ,and time format . Then, it scans all the channels to find all stations within broadcast range .
-
Restore Factory Default : Restore default Return all options to their factory default setting.
-
TTS : TEXT to speech on and off, adjust volume, speed, pitch of the TTS mode.
Lock
- Lock system : set to ON to prevent channels and program types from being viewed. Use the remote control to enter the default password (0000) to access the Lock options.
- Set Password: Set a new password. When you change the password, write down and store it safely. Resetting the factory options will not reset the password.
- Input Block : completely block the TV mode or the AV modes.
- US : Prevent programs from being viewed based on US TV or MPAA rating guidelines.
- Canada: Prevent programs from being viewed based on Canadian English or French guidelines.
- 6.RRT Setting : setup the Rating Region Table if you are having problems with the US or Canada rating guidelines
-
Reset RRT : Refresh the Rating Region Table if you are having problems with the US or Canada rating guidelines.
-
Unrated : Enable or disable the ability to watch un-rated programs.
Warnings and Precautions

CAUTION: TO REDUCE THE RISK OF FIRE AND ELECTRIC SHOCK, DO NOT REMOVE THE COVER (OR BACK) OF THE UNIT. REFER SERVICING ONLY TO QUALIFIED SERVICE PERSONNEL.

The lightning flash with arrowhead symbol within an equilateral triangle is intended to alert the user to the presence of uninsulated “dangerous voltage” within the product’s enclosure that may be of significant magnitude to constitute risk of electric shock
The exclamation point within an equilateral triangle is intended to alert the user to the presence of important operation and servicing instructions in the literature accompanying the appliance.
CAUTION
- Do not block the ventilation openings or holes.
- Do not place any naked flames (such as lighted candles) on the apparatus.
- When discarding batteries, follow all local rules and laws governing the disposal of batteries. Consider the environmental impact of your actions!
- To prevent fire or shock hazard, do not expose this appliance to rain or moisture.
Important Safety Information
- Read Instructions: All the safety and operating instructions should be read before the product is operated.
- Retain Instructions: The safety and operating instruction should be retained for future reference.
- Heed Warnings: All warnings on the product and in the operating instructions should be adhered to.
- Follow Instructions: All operating and usage instructions should followed.
- Cleaning: Unplug this product from the wall outlet before cleaning. Do not use liquid cleaners or aerosol cleaners. Use a damp cloth for cleaning.
- Attachments: Use only attachments recommended by the manufacturer. Use of other attachments may be hazardous.
- Water and Moisture: Do not use this product near water (e.g., near a bathtub, washbowl, kitchen sink, laundry tub, in wet basements, or near a swimming pool and the like).
- Accessories: Do not place this product on an unstable cart, stand, tripod, bracket, or table. Use only with carts, stands, tripods, brackets, or tables recommended by the manufacturer or sold with the product. Any mounting of the product should follow the manufacturer's instructions and should use a mounting accessory recommended by the manufacturer. A product and cart combination should be moved with care. Quick stops, excessive force, and uneven surfaces may cause the product and cart combination to overturn.
- Ventilation: Slots and openings in the cabinet are provided for ventilation to ensure reliable operation of the product and to protect it
from overheating. These openings should never be blocked by placing the product on a bed, sofa, rug, or other similar surface. This product should not be placed in a built-in installation such as a bookcase or rack unless proper ventilation is provided or the manufacturer instructions have been adhered to.
-
Power Sources: This product should be operated only from the type of power source indicated on the rating label. If you are not sure of the type of power supply to your home, consult your product dealer or local power company. For products intended to operate from battery power or other sources, refer to the operating instructions.
-
Grounding or Polarization: This product may be equipped with a polarized alternating-current line plug that has one blade wider than the other. This plug will only fit into the power outlet in one direction. This is a safety feature. If you are unable to insert the plug fully into the outlet, try reversing the direction of the plug. If the plug should still fail to fit, contact an electrician to replace the obsolete outlet. Do not defeat the safety purpose of the polarized plug.
-
Power-Cord Protection: Power supply cords should be routed so that they are not likely to be walked on or pinched by items placed upon or against them, paying particular attention to cords at plugs, convenience receptacles, and at the point which they exit from the product.
-
Protective Attachment Plug: The product may be equipped with an attachment plug with overload protection. This is a safety feature. See the operating instructions for replacement or directions to reset the protective device. If replacement of the plug is required, be sure the service technician has used a replacement plug that has the same overload protection as the original plug as specified by the manufacturer.
-
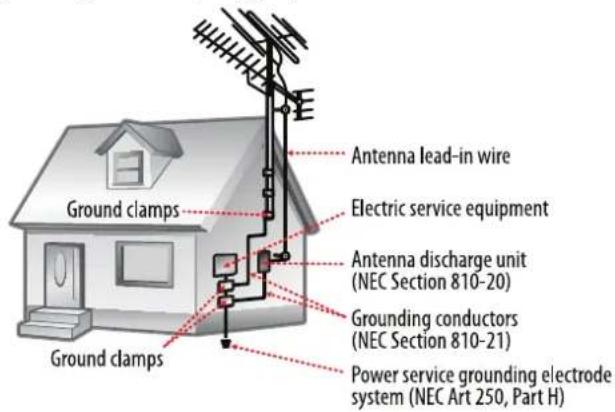
Outdoor Antenna Grounding: If an outside antenna is connected to the product, be sure the antenna system is grounded so as to provide some protection against voltage surges and built-up static charges. Article 810 of the National Electrical Code, ANS/NFPA 70 provides information with regard to proper grounding of the mast and supporting structure, grounding of the lead-in wire to an antenna-discharge unit, size of grounding conductors, location of antenna-discharge unit, connection to grounding electrodes, and requirements for the grounding electrode (see figure).
-
Lightning: For added protection for this product, unplug it from the wall outlet and disconnect the antenna or cable system during a lightning storm or when it is left unattended and unused for long periods of time. This will prevent damage to the product due to lightning or power-line surges.
-
Power Lines: An outside antenna system should not be located in the vicinity of overhead power lines or other electric light or power circuits, or where it can fall into such power lines or circuits. When in-
stalling an outside antenna system, extreme care should be taken to keep from touching such power lines or circuits, as contact with them might be fatal.
- Overloading: Do not overload wall outlets, extension cords, or integral convenience receptacles as this can result in a risk of fire or electric shock.
- Object and Liquid Entry: Never push objects of any kind into this product through openings as they may touch dangerous voltage points or shout-out parts that could result in a fire or electric shock. Never spill liquid of any kind on the product.
- Servicing: Do not attempt to service this product yourself as opening or removing covers may expose you to dangerous voltage or other hard-surfaced all servicing to qualified service personnel.
- Damage Requiring Service: Unplug this product from the wall outlet and refer servicing to qualified service personnel under the following conditionals) when the power-supply or plug is damaged; b) if liquid has been spilled or if objects have fallen into the product; c) if the product has been exposed to rain or water; d) if the product does not operate normally by following the operating instructions. Adjust only those controls that are covered by the operating instructions as improper adjustment of other controls may result in damage and will often require extensive work by a qualified technician to restore the product to its normal operation; e) if the product has been dropped or damaged in any way; f) when the product exhibits a distinct change in performance—this indicates a need for service.
-
Replacement Parts: When replacement parts are required, be sure that your service technician has used replacement parts by the manufacturer or have the same characteristics as the original part. Unauthorized substitutions may result in fire, electric shock, or other hazards.
-
Safety Check: Upon completion of any service or repairs to this product, ask the service technician to perform safety checks to ensure that the product is in proper operating condition.
- Wall or Ceiling Mounting: The product should be mounted to a wall or ceiling only as recommended by the manufacturer.
- Heat: The product should be situated away from heat sources such as radiators, heat registers, stoves, or other products (including amplifiers) that produce heat.
WARNING:
This product contains lead, a chemical known to the State of California to cause cancer and birth defects or other reproductive harm. Wash hands after handling.
FCC NOTICE
This device complies with Part 15 of the FCC Rules. Operation is subject to the following two conditions: (1) this device may not cause harmful interference, and (2) this device must accept any interference received, including interference that may cause undesired operation.
Note: This equipment has been tested and found to comply with the limits for a Class B digital device, pursuant to Part 15 of the FCC Rules. These limits are designed to provide reasonable protection against harmful interference in a residential installation. This equipment generates, uses and can radiate radio frequency energy and, if not installed and used in accordance with the instructions, may cause harmful interference to radio communications. However, there is no guarantee that interference will occur in a particular installation. If this equipment does cause harmful interference to radio or television reception, which can be determined by turning the equipment off and on, the user is encouraged to try to correct the interference by one or more of the following measures:
• Reorient or relocate the receiving antenna.
- Increase the separation between the equipment and receiver.
- Connect the equipment into an outlet on a circuit different from that to which the receiver is connected.
- Consult the dealer or an experienced radio/TV technician for help.
CAUTION ON MODIFICATIONS
Any changes or modifications not expressly approved by the grantee of this device may void the authority granted by the FCC to operate the equipment.
Specifications
| Screen type 10.1” TFT LCD | |
| Screen resolution 1024 x 600 | |
| Removable Memory Support | SD/SDHCUSB |
| Playable Media Formats | JPG, MP3, MPEG2, MPEG2_HD, MPEG4, MPEG4_SD, MPEG4_HD, H.264, FLV |
| HDTV signal support ATSC | |
| Input Connections AV1 Composite audio/video (3.5 mm) | |
| Output Connections Headphone (3.5 mm) | |
| Speaker Output Power 0.8 W x 2 (1.6 W total) | |
| Power Rechargeable lithium polymer battery (3.7 V, 3000 mAh)AC 100–240 V power adapterDC car power cord | |
Note: Products are improved continuously. We reserve the right to modify the product and specifications without prior notice.
Made in China
Support
If you have problems with your device, please consult the instructions in this manual. Please also visit us on the web at www.naxa.com to get up to the minute news, alerts, and documentation for your device. For additional assistance, please contact Naxa Technical Support.
NAXA Technical Support
2320 East 49th St.
Vernon, CA 90058
Tel: 866-411-6292
http://www.naxa.com/naxa_support/
- 10.1" Portable TV & Digital Multimedia Player
- Table of Contents
- Thank You
- In the Box
- Before Your Start
- WARNING
- Storage
- Maintenance
- Notice
- At a Glance
- Main Unit
- Basic Operation
- Connect the Power Supply
- Connect the Antenna
- Connect an External A/V player
- Setting the Input Source
- Adjusting the Volume
- Using the Number Keypad
- To tune to channel 15-1, for instance:
- To go to track 15, for instance:
- TV Menu Operation
- Channel
- Picture
- Sound
- Time
- Option
- Lock
- Warnings and Precautions
- CAUTION
- Important Safety Information
- WARNING:
- FCC NOTICE
- CAUTION ON MODIFICATIONS
- Support
- NAXA Technical Support
Brand : Naxa
Model : NT-110
Category : Television