
F1DN001R - Power Strip BELKIN - Free user manual and instructions
Find the device manual for free F1DN001R BELKIN in PDF.


| Product Type | Secure Desktop Controller Unit (DCU) for Secure KVM Switches |
| Model | F1DN001R |
| Brand | Belkin |
| Number of Channels Supported | Up to 4 (for 2-4 port Secure KVMs) |
| User Interface | 4 illuminated push-buttons for channel selection |
| Display | None (no LCD; models F1DN002R and F1DN003R have 3.5 inch color LCD) |
| Power Requirements | 5V DC, 1A maximum, supplied by connected Secure KVM unit |
| Enclosure Material | Impact-resistant ABS plastic |
| Dimensions | 5.51 x 3.54 x 4.34 inches (140 x 90 x 110 mm) |
| Weight | 0.55 lb (0.25 kg) |
| Operating Temperature | 32° to 104°F (0° to 40°C) |
| Storage Temperature | -4° to 140°F (-20° to 60°C) |
| Humidity | 0-80% RH, non-condensing |
| Security Features | Active always-on anti-tamper system; non-programmable firmware; Common Criteria EAL 4+ listed |
| Tamper Evidence | Holographic tamper-evident label with serial number; tear-away packaging |
| Interfaces | RJ14 DCU port, Mini-USB programming connector (rear panel) |
| Compatible Cables | RJ14, 6P6C, 26AWG, unshielded; supplied 6 ft (1.9 m) cable; optional 50 ft (15 m) cable |
| Configuration | Not configurable (F1DN001R has no setup menu; configuration via KVM only) |
| Installation | Connect to DCU port on compatible Belkin Secure KVM; power cycle KVM after connection |
| Maintenance and Cleaning | Disconnect from power before cleaning; do not expose to excessive humidity; avoid extreme temperatures |
| Warranty | Limited 3-year product warranty |
| Country of Origin | USA |
| Product Life Cycle | 10 years per MIL-HDBK-217E |
Frequently Asked Questions - F1DN001R BELKIN
User questions about F1DN001R BELKIN
0 question about this device. Answer the ones you know or ask your own.
Ask a new question about this device
Download the instructions for your Power Strip in PDF format for free! Find your manual F1DN001R - BELKIN and take your electronic device back in hand. On this page are published all the documents necessary for the use of your device. F1DN001R by BELKIN.
USER MANUAL F1DN001R BELKIN
Secure Desktop Controller Unit (DCU)

User Manual
F1DN001R - 4 Buttons DCU for 2-4 ports
F1DN002R - 4 Buttons DCU for 2-4 ports with LCD
F1DN003R - 3 Buttons DCU for 2-16 ports with LCD
Document Number 8820-01347 Rev. A02
TABLE OF CONTENTS
Table of Contents
SECTIONS
1234567
Introduction....1
Package Contents....1
Safety Precautions 2
Overview....3
Security Features 3
Operational Features 4
Equipment Requirements 5
Unit Display Diagrams 6
Tamper-Evident Label....10
Product Specifications....11
Installation....12
Before Installation....12
Typical Secure KVM System Installation Diagram
with the Belkin Secure DCU 14
Operation 15
Normal Secure DCU Operation 15
Channel selection on F1DN001R and F1DN002R 16
Channel selection on F1DN003R 16
Normal operation with CAC 17
Operation with 8/16 ports....18
Configuration....19
Administrator Configuration (F1DN002R and F1DN003R Only) .... 19
Messages 21
System Information....21
Customize Channels 22
Display Backlight....26
Load Configuration 26
Save Configuration 28
Exit 29
Troubleshooting 30
Operation Troubleshooting....30
General Troubleshooting 32
Information....35
FCC Statement 35
Warranty 35
Reporting Belkin Product Security Vulnerability....37
INTRODUCTION
Table of Contents
SECTIONS
2345671
Thank you for purchasing this Belkin Secure Desktop Controller Unit (DCU). The Belkin Secure DCU is a major enhancement to Belkin's line of Secure KVM products. This product provides an easy and intuitive user interface to control complex Secure KVM systems. The Secure DCU enables textual browsing of the available networks/resources through a color display. It significantly improves user's situational awareness and, therefore, enhances security and productivity for users who operate continuously in multiple-domain secure environments.
This User Manual provides all the details you'll need to install and operate your new DCU, in addition to troubleshoot—in the unlikely event of a problem.
Package Contents
- Belkin Secure DCU
- RJ14 6 ft. DCU Cable
• This User Manual
Important: This product is equipped with an always-on active anti-tamper system. Any attempt to open the enclosure may activate the anti-tamper system and render the unit permanently inoperable. If the unit's enclosure appears disturbed or if all the port LEDs flash continuously, please call Belkin Technical Support at (800) 282-2355.
Table of Contents
SECTIONS
1
234567
Safety Precautions
Carefully read the following safety precautions before using the product:
- Before cleaning, disconnect the product from the attached Secure KVM or KM unit.
- Do not expose the product to excessive humidity.
- Do not store or use for an extensive period of time in extreme thermal conditions—this may shorten the product life.
• Install the product on a clean and secure surface. - Do not place the Secure DCU's cable in the path of foot traffic.
- If the product is not used for an extended period, disconnect the Secure DCU from the KVM or KM.
- If one of the following situations occur, send the product to a qualified Belkin service technician:
– Liquid penetrates the product's case.
– The product is exposed to excessive moisture or water.
- The product does not work well even after carefully following the instructions in this user's manual.
– The product has been dropped or is physically damaged.
- The product shows signs of breakage or loose internal parts.
- The product should be stored and used only in temperature and humidity-controlled environments as defined in the product's environmental specifications.
- The product contains a non-replaceable internal battery. Never attempt to replace battery. Any attempt to open product enclosure will permanently damage the product.
OVERVIEW
Table of Contents
SECTIONS
1345672
Security Features
Belkin's Secure KVM Switches are the most advanced and secure commercially available KVM Switches available today. The Belkin Secure DCU is an accessory that is designed to improve the usability of Belkin's Secure KVMs, providing a similar set of advanced security features.
These are some of its key security features:
Improved User Situational Awareness
The Belkin Secure DCU clearly indicates the selected channel, showing the channel number along with programmable text and color (F1DN002R and F1DN003R models only).
Non-Programmable Firmware
The Belkin Secure DCU's firmware cannot be reprogrammed, preventing a remote attack on the DCU control logic.
Active Always-On Anti-Tamper
The Belkin Secure DCU's enclosure active anti-tamper system prevents access and tampering of its electronic circuitry, permanently disabling the product once tampering is detected.
Holographic Tamper-Evident Label
A serially numbered holographic tamper-evident security label on the Belkin Secure DCU enclosure clearly shows if the enclosure has been opened or compromised.
Secure Packaging
"Tear away" packaging clearly shows if the packaging was opened or tampered during shipping, ensures secure delivery all the way to the end user.
Common Criteria EAL 4+ Listing
The Belkin Secure KVM Switch and the Belkin Secure DCU are listed by the Common Criteria organization. Belkin's Secure DCU is Common Criteria validated to EAL 4+ (Evaluation Assurance Level 4), to assure the highest level of protection.
OVERVIEW
Table of Contents
SECTIONS
134567
2
Operational Features
The Belkin Secure DCU enhances the Belkin Secure KVMs, making them easier to use. These are some of its key operating features:
Textual Display of network/resource name and color
The F1DN002R and F1DN003R color LCD display shows the available networks, along with clear administrator programmable name and color. The F1DN003R displays and controls up to 16 channels.
Clear DCU and KVM error messages
The F1DN002R and F1DN003R show clear error messages and operating problems.
Easy configuration with an SD card
Saving and loading of configuration files to an SD memory card enables easy deployment of multiple systems (F1DN002R and F1DN003R).
Note: The Unlock SD card, USB to Mini-USB cable and API CD are part of the Secure Desktop Controller Administrator Kit, ordered separately.
CAC status indication
The Secure DCU display clearly shows the CAC status of each network or resource.
Multilanguage support
Network/resource names can be customized with special characters in US English, GB English, French, German and Spanish (F1DN002R and F1DN003R).
Administrator Unlock SD Card
Advanced settings are locked to prevent access by unauthorized users. Administrator must use a special Unlock SD card to access these settings.
Table of Contents
SECTIONS
134567
2
Equipment Requirements
Cables
Belkin Secure DCU requires a custom cable with RJ14 connectors. It is supplied with a 6 ft. (1.9 m) cable. An optional 50 ft. (15 m) cable is also available.
DCU Cables:
F1D9026-06
(CABLE, RJ14, 6P6C, 26AWG, UNSHIELDED, DCU CABLE, 6')
• F1D9026-50 (Sold separately)
(CABLE, RJ14, 6P6C, 26AWG, UNSHIELDED, DCU CABLE, 50')
Important: Do not connect the Belkin Secure DCU to PPoE, LAN switches or LAN ports. Connecting to other devices may damage the Secure DCU or the connected equipment.
Secure KVM
Connect the Belkin Secure DCU only to Belkin Secure KVM units that support DCU. For the latest information on product support, go to the Belkin website http://belkinbusiness.com/
F1DN001R and F1DN002R can only be used only with Belkin 2 and 4-port KM/KVM/Windowing KVM switches.
Administrator Setup Equipment
F1DN002R and F1DN003R enable interface with standard keyboards, for easy setup. The following parts are included in the Secure Desktop Controller Administrator Kit (ordered separately):
- An API CD allowing the control of the DCU externally (documentation is supplied in CD).
• USB Type-A to Mini-USB adapter - Unlock SD card with custom file format, sample configurations and Secure DCU Setup Unlock function
Belkin Part Number: F1DR180
Secure Desktop Controller Administrator Kit
In addition to the above kit, the administrator also needs a standard USB keyboard, to manually enter text and select colors.
OVERVIEW
Table of Contents
SECTIONS
134567
2
Front-Panel Features - F1DN001R

1 Channel #1 select illuminated push-button
2 Channel #2 select illuminated push-button
3 Channel #3 select illuminated push-button
4 Channel #4 select illuminated push-button
5 Tamper-Evident Label
OVERVIEW
Table of Contents
SECTIONS
134567
2
Front-Panel Features - F1DN002R

1 Channel #1 select illuminated push-button
2 Channel #2 select illuminated push-button
3 Channel #3 select illuminated push-button
4 Channel #4 select illuminated push-button
5 Graphic LCD display
6 Tamper-Evident Label
OVERVIEW
Table of Contents
SECTIONS
134567
2
Front-Panel Features - F1DN003R

1 Up illuminated push-button
2 Select illuminated push-button
3 Down illuminated push-button
4 Graphic LCD display
5 Tamper-Evident Label
OVERVIEW
Table of Contents
SECTIONS
134567
2
Rear-Panel Features - F1DN001R
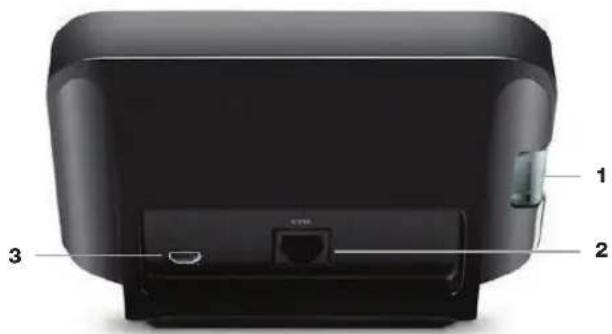
1 Tamper-Evident Label
2 DCU cable RJ14 port
3 Mini-USB programming connector
Rear-Panel Features - F1DN002R and F1DN003R
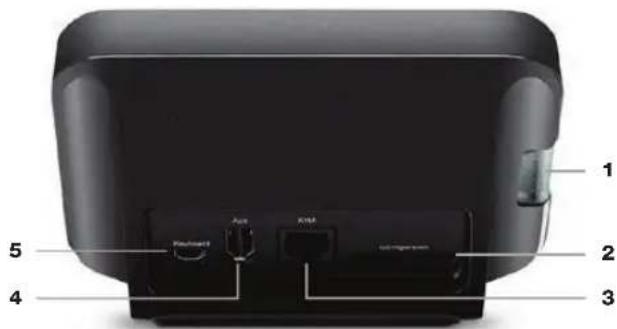
1 Tamper-Evident Label
4 AUX port
2 SD card slot 5 Mini-USB keyboard connector
3 DCU cable RJ14 port
Note: The AUX port is intended to connect to the following devices:
- Belkin Secure USB Switch
(see Belkin Secure USB Switch User Manual)
• External computer running the Secure DCU API
(see Belkin Secure DCU API Programming and Reference Manual)
OVERVIEW
Table of Contents
SECTIONS
134567
2
Tamper-Evident Label
The Belkin Secure DCU uses a holographic tamper-evident label that shows if the enclosure was tampered. The label shows white dots or the text "VOID" when removed. Inspect the tamper-evident label when opening product packaging.
IMPORTANT NOTICE:
Call Belkin Technical Support at (800) 282-2355 if for any reason, the tamper-evident label is missing, torn, disconnected, appears disrupted, or looks different than the example shown here.

Belkin Holographic Tamper-Evident Label
Active Anti-Tampering System
The Belkin Secure DCU is equipped with an always-on active anti-tampering system. If the system detects mechanical intrusion, the DCU displays a message stating the product that has been tampered.
If the product indicates a tampered state, avoid using the product and call Belkin Technical Support.
Table of Contents
SECTIONS
134567
2
Product Specifications
| Part No. F1DN001R | F1DN002RF1DN003R |
| Enclosure Impact-Resistant ABS Plastic | |
| Power Requirements 5V DC, 1A (maximum) from connected Secure KVM unit | |
| No. of Channels Supported 4 maximum for F1DN001/2R16 maximum for F1DN003R | |
| No. of Users Supported 1 | |
| Displays Size 3.5 inch diagonal (F1DN002/3R) | |
| Display Resolution | 240 x 400 RGB (F1DN002/3R) |
| Display Color Depth | 65K (F1DN002/3R) |
| Display Technology a-Si with white LEDs for backlight | |
| KVM Interface RJ14 jack for Belkin Secure DCU bus.Uses the supplied Belkin Secure DCU cable. | |
| Other Interfaces | Mini-USB Type A female connector for administrator keyboard connection (adapter cable must be ordered separately)SD card slotAUX control and monitoring port (available in F1DN002/3R only) |
| User Interface | - Four illuminated channel selection buttons (F1DN001/2R) - One toggle switch with up/down/select buttons (F1DN003R) |
| Languages Supported | English, French, Spanish, German, |
| Operating Temp | 32^ to 104^ F( 0^ to40^ C) |
| Storage Temp -4° to 140° F (-20° to 60°C) | |
| Humidity | 0-80% RH, non-condensing |
| Dimensions | 5.51 (W) x 3.54 (D) x 4.34 (H) inches / 140 (W) x 90 (D) x 110 (H) mm / |
| Weight | 0.55 lb. (0.25 kg) |
| Security Accreditation | Common Criteria EAL 4+ |
| Made in | USA |
| Product Design Life-Cycle | 10 years per MIL-HDBK-217E |
INSTALLATION
Table of Contents
SECTIONS
1245673
Before Installation
Unpacking the Product
Before opening the product packaging, inspect the packaging's seals, to assure that the packaging was not opened or tampered during shipping. If the packaging's seals look suspicious, do not use the product and contact Belkin support.
After opening the packaging, inspect the package contents to verify all required components are included. See packaging contents list on page 1.
After removing the Belkin Secure DCU from its packaging materials, inspect the tamper-evident label, to assure that it is properly sealed and was not tampered. Do not use that product if the label is damaged or missing, and contact Belkin support.
Where to place the Belkin Secure DCU?
The Belkin Secure DCU is designed to be placed on a desktop, near the display, mouse and keyboard that the user will use to control the Secure KVM. Locate the Belkin Secure DCU in the user's primary field of view while working with the display, since Secure KVM channel selection and continuous status monitoring is required from a security standpoint. Typical location is on the user's desktop to the lower right of the display for right-handed users, or to the lower left for left-handed users.
The product may be fixed to a rack or table using Velcro ^® pads, if necessary.
Avoid direct sunlight or strong light source reflections on the Belkin Secure DCU display, to prevent eye fatigue to the user.
The Secure DCU must be located in a secure and well-protected environment, to prevent potential access by attackers.
Consider the following when deciding where to place the Belkin Secure DCU:
- User must have easy access to the push-buttons on the Belkin Secure DCU.
- Distance: Cables from the Secure DCU to the Secure KVM may extend up to 50 feet.
- User's keyboard, mouse and CAC device must connect directly to the Secure KVM
- The Belkin Secure DCU must be in the user's primary field of view.
Note: Connect the DCU directly to the KVM. Do not connect switches or other devices between them.
Note: Use the following cables to connect the Belkin Secure DCU to the Secure KVM:
- Up to 6 ft. (1.9 m): F1D9026-06
- From 6 ft. (1.9 m) to 50 ft. (15 m): F1D9026-50
INSTALLATION
Table of Contents
SECTIONS
124567
3
Step 1 – Connecting the Belkin Secure DCU to the Secure KVM/KM/Windowing KVM Switch
- Complete all Secure KVM installation steps as defined in the Secure KVM User Manual.
- Power up the Secure KVM and verify that it is operating, and then shut it down. Using the supplied DCU cable, connect the RJ14 port on the Secure DCU's back panel to the DCU port in the Secure KVM's back panel Console area. See connection diagram on page 14.
- If computers that connect to the Secure KVM require CAC authentication, connect a CAC card reader to the CAC port in the Console area of the back panel.
Step 2 - Power up
• Power up the user display.
• Power up the Secure KVM.
- Verify that the KVM's front-panel LEDs indicate that channel #1 (default channel) is selected.
• Models F1DN002 and F1DN003R:
– Verify that the Belkin Secure DCU display is illuminated
- Verify that is the DCU indicates that channel #1 is selected.
- No message appears.
- Model F1DN001R:
- Verify that the Belkin Secure DCU push-buttons are illuminated and indicate channel #1.
- The following error message appears if the Belkin Secure DCU was moved from a system having a different configuration, such as a different number of ports:

Note: the Secure KVM front-panel push-buttons become disabled when connected to the Belkin Secure DCU.
Note: F1DN001R: Installation is now complete. Skip the rest of this section.
Note: The Belkin Secure DCU will not operate if it is connected to the KVM after the KVM is powered up. The Secure KVM will continue to work with no interaction with the connected Belkin Secure DCU. To activate the Belkin Secure DCU, restart the KVM after connecting the DCU.
See how to configure the Belkin Secure DCU to be compatible with the Secure KVM on page 19.
INSTALLATION
Table of Contents
SECTIONS
124567
3
Typical Secure KVM System Installation Diagram with the Belkin Secure DCU
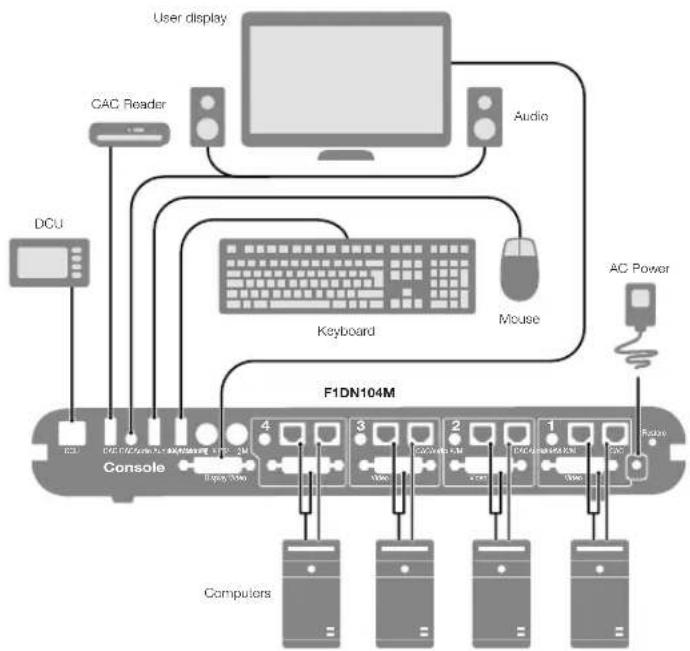
flowchart
graph TD
    A["User display"] --> B["CAC Reader"]
    B --> C["DCU"]
    C --> D["Keyboard"]
    D --> E["Mouse"]
    E --> F["AC Power"]
    F --> G["F1DN104M"]
    G --> H["Console"]
    H --> I["Computers"]
    style A fill:#f9f,stroke:#333
    style B fill:#ccf,stroke:#333
    style C fill:#cfc,stroke:#333
    style D fill:#fcc,stroke:#333
    style E fill:#cff,stroke:#333
    style F fill:#ffc,stroke:#333
    style G fill:#cfc,stroke:#333
    style H fill:#fcc,stroke:#333
    style I fill:#ffc,stroke:#333
    style_J["Audio"] --> A
    K["Computer"] --> H
OPERATION
Table of Contents
SECTIONS
12345674
Normal Secure DCU Operation
If the Belkin Secure DCU has already been configured, or it is operating in its default configuration, you can begin using it.
- Power up the Secure KVM. It should identify the connected Secure DCU and the configured channels appear on the display.
Note:
- F1DN001R: Channel 1 button lights
- F1DN002R: 4 channels appear on the display. Channel 1 appears as the active channel.
-
F1DN003R: The first 4 channels appear on the display. Channel 1 appears as the active channel.
-
On F1DN001R and F1DN002R, press the button of the channel that you want to activate.
- On F1DN003R, press the down button ( √) to scroll down the list of connected channels. Press the Select button to activate the selected channel.
Operation
Once the Secure KVM and the Belkin Secure DCU are properly installed and powered-up, they operate immediately with the factory default configuration. Once a custom configuration is loaded and applied, they restart and operate according to the new configuration. Channel 1 is the default channel after power up for all Belkin Secure KVMs. LED #1 on the Secure KVM's front panel and the Belkin Secure DCU display indicate the active channel.
The following example uses a 4-port Secure KVM to demonstrate the operation of the Belkin Secure DCU.
Note: Operation of F1DN002R model is similar to F1DN003R described here, but instead of the up/down and select push-buttons, use the four illuminated push-buttons to control the cursor location and state.
F1DN001R and F1DN002R are operated by simply pressing the illuminated buttons on the front panel of the Belkin Secure DCU. The illuminated push-buttons are a simple extension of front-panel push-buttons of the KVM and behave exactly the same.
Note: The front panel push-buttons of the Secure KVM switch are disabled when the Belkin Secure DCU is connected it.
Note: The Belkin Secure DCU does not operate if it is connected after the Secure KVM powered up and operating, or if it is momentarily disconnected and reconnected to the Secure KVM. The Secure KVM continues to work without interaction with the Belkin Secure DCU. The user can still operate the secure KVM using keyboard commands.
OPERATION
Table of Contents
SECTIONS
123567
4
Channel selection on F1DN001R and F1DN002R
- The default display after Belkin Secure DCU and KVM power up indicate channel #1 as the active channel.
- On the front panel of the Secure DCU, press the channel button corresponding to the desired computer.
Channel selection on F1DN003R
Select which computer to control using the Belkin Secure DCU:
- The default display after Belkin Secure DCU and KVM power up indicate channel #1 as the active channel.

- Press the up or down push buttons to move the arrow to another channel.

- Press the center (Select) button (☐) to activate the new channel. The new channel is highlighted.

- The user may also use keyboard shortcuts to switch channels. Type Ctrl, Ctrl,
For example: Type Ctrl, Ctrl, 4 to change to channel 4.
OPERATION
Table of Contents
SECTIONS
123567
4
Normal operation with CAC
CAC indication appears on every channel in which CAC is enabled. To enable or disable CAC use the front panel sliders on the Secure KVM, as described in the Secure KVM User Manual.
CAC indication only appears on enabled channels when a CAC device is connected to the CAC port for those channels on the Secure KVM.
The following example uses a 4-Port Secure KVM with CAC enabled on computers 1 and 3.
- Default display after power up shows the active KVM channel is 1. CAC is enabled on channels 1 and 3.

- The CAC indicator next to the channel name flashes and then appears highlighted, showing that CAC is mapped to this channel.
- Selecting channel 2 will move the active channel to 2 but the CAC remains on channel 1, because CAC is not enabled on channel 2.
- Selecting channel 3 will move the active channel to 3 and the CAC to the same channel.

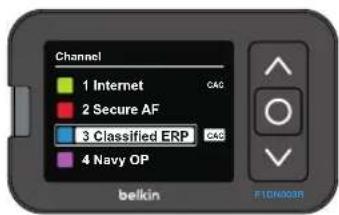
Note: Depending on the CAC configuration on the target computer, changing from a CAC enabled channel to a different channel, the CAC authorization may continue indefinitely, terminate after a timeout period, or terminate immediately.
Note: Leaving and returning to a channel that requires CAC authentication may require re-authorization.
Caution: Terminate all CAC authorized sessions when leaving secure computers unattended. Verify that CAC authorization is inactive and the CAC indicator for each channel is not highlighted.
OPERATION
Table of Contents
SECTIONS
123567
4
Operation with 8/16 ports
The Belkin Secure DCU F1DN003R can connect to a Secure KVM switch with up to 16 ports.
Belkin Secure DCU operation is similar to 4-port operation except for the following:
- The Belkin Secure DCU F1DN003R can list all the channels on the connected Secure KVM Switch, but can only display four channels at a time.
- When scrolling down past channel 4, the list refreshes to list channels 5 through 8, and so on.
For example, the 8-port secure KVM highlights the operational differences.
- Press the Down button to scroll to channel 8. The display shows channels 5 through 8, without showing the currently active channel 1. The channel number and CAC status appear at the top of the CAC column.

- Scrolling down and selecting channel 8 shows it marked and fixed at the bottom of the list.
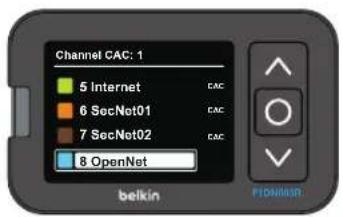
- Since channel 8 is not CAC enabled, CAC authorization freezes automatically and remains active on channel 1.
CONFIGURATION
Table of Contents
SECTIONS
1234675
Administrator Configuration (F1DN002R and F1DN003R Only)
These instructions are intended for administrators. Regular users are not allowed to access the Setup menu and should not modify device settings.
Only the following Setup options are accessible to a regular user:
- Messages
- System Information
- Channel visibility
- Display backlight
Note: The following items are required to perform all configuration options.
- USB keyboard
- Unlock SD card
- USB to Mini-USB adapter cable
The Mini-USB adapter and Unlock SD card are sold separately, as part of the Secure Desktop Controller Administrator Kit.
See To connect keyboard and Unlock SD card on page 21.
Enter setup mode:
Note: When configuring the Secure DCU, the Secure KVM is disabled, including front-panel push-buttons. No display, keyboard, mouse or audio output is available.
Note: F1DN001R cannot be configured.
F1DN002R:
- Press buttons 2 and 3 at the same time for five seconds
- Press 1 to scroll up or 4 to scroll down
- Press 2 to select the item
F1DN003R:
- Push + hold the central button
- Use the up or down buttons and select setup
- Press central button to select

- Scroll with the up or down arrow buttons to the desired option and press the center Select button ( 🔒).
- To exit, scroll down to Exit and press the Select button ( 🔓 ).
CONFIGURATION
Table of Contents
SECTIONS
123467
5
To connect keyboard and Unlock SD card:
Note: The following items are required to customize a specific channel:
- Unlock SD card
- Mini-USB adapter
• Standard USB keyboard
Note: The Secure Desktop Controller Administrator Kit (F1DR180), sold separately, includes a USB to Mini-USB adapter cable, CD with API software, and the Unlock SD card with 2 default configurations.
- Connect the USB keyboard to the Mini-USB adapter.
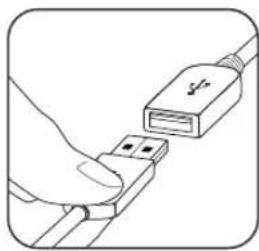
natural_image
Illustration of a hand inserting a USB into a cable (no text or symbols)- Connect the Mini-USB end of the adapter to the Keyboard port in the Secure DCU back panel.

- In the Configuration SD slot in the DCU back panel, hold the Unlock SD card with the label facing up and the narrow edge with the chamfered corner pointing towards the slot.
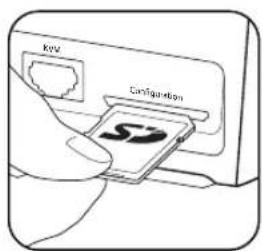
- Insert the Unlock SD card until you hear a snap.
CONFIGURATION
Table of Contents
SECTIONS
123467
5
Messages
To open Messages, see Enter setup mode on page 19.
The Messages screen shows all the accumulated messages and errors. These messages may include information on events, inform you to restart the KVM, make configuration changes, or other tasks.
Informational messages are deleted as soon as you exit the Messages list. Messages resulting from errors or that require an action remain on the list until the error is resolved or the action is implemented.

System Information
To open System Information, see Enter setup mode on page 19.
The System Information screen provides basic information on the Belkin Secure DCU and the connected Secure KVM. This information may be essential before contacting Belkin support.
- DCU Model
- DCU Serial Number
• DCU Firmware Revision - KVM Model

Note: Some fields in the System Information screen may be blank or zero if the function is not supported by the current system setup.
CONFIGURATION
Table of Contents
SECTIONS
123467
5
Customize Channels
Note: The Belkin Secure DCUs can save configuration settings in the Unlock SD card. If you want to use the Secure DCU to create a configuration file for another Secure DCU but want to keep the current configuration, then save the current configuration in the Unlock SD card before making any configuration changes. You can then reload the original configuration. See Save Configuration on page 28 and Load Configuration on page 26.
Inserting the Unlock SD card shows all Setup menu options.
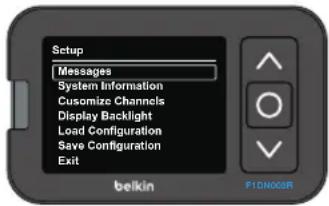
The following configuration commands are available:
-
Messages shows error and status messages
• System Information shows information on the DCU: -
DCU model
- DCU S/N
- DCU firmware version
- KVM model
- Customize Channels activates and deactivates channels, and customizes channel language, name and color:
- Channel Activation – Activates and deactivates a channel (available without Unlock SD card)
- Language sets the language of the channel name to US English (default), GB English, French, Spanish, or German, enabling use of special characters in the selected language.
- Color sets the channel color that appears in the channel selector menu
- Channel Name renames the channel
Note: Only Channel Activation is available when no Unlock SD card is inserted.
- Display Backlight sets the brightness of the display
- Load Configuration loads a configuration file from the Unlock SD card (only with Unlock SD card)
- Save Configuration saves the current configuration to a file in the Unlock SD card (only with Unlock SD card)
- Exit saves configuration changes, closes the Setup menu, and returns to the main channel selector menu.
CONFIGURATION
Table of Contents
SECTIONS
123467
5
The Customize Channels option enables the administrator to activate and customize how the channels of connected computers appear on the Secure DCU display. Except for activate/deactivate channel, all channel customizing options require an Unlock SD card, Mini-USB adapter, and a USB keyboard.
- Activate and deactivate a specific channel (Unlock SD card not required)
- Set language of channel name (Unlock SD card required)
- Set channel color (Unlock SD card required)
- Set channel name (Unlock SD card required)
Upon selecting Customize Channels, the Secure DCU display shows a list of all channels.

To activate/deactivate channels:
Active channels show the channel color and name.
Note: Activating and deactivating channels does not require an Unlock DS card.
- To activate or deactivate a channel, press the up/down ( ^▲ , ▼ ) or 1/4 to scroll to the selected channel
- Press select (☐) or 2 on the Secure DCU front panel to deactivate the channel. The color square turns black and the channel name turns gray.
- Press select (☐) or 2 on the Secure DCU front panel to reactivate the channel.
- Scroll down to Exit and press select ( ☐) or 2 on the Secure DCU front panel to return to Setup menu.
CONFIGURATION
Table of Contents
SECTIONS
123467
5
To customize channels:
- On the Secure DCU, scroll up or down to the desired channel.

- On the keyboard, press the right arrow ( ) to customize the channel.
- Follow the next procedures to change the language, color and name of the selected channel.
- After you customize the channel, scroll down to Exit and press the Select or 2 button on the Secure DCU front panel.
- Repeat this procedure for each channel.
- Scroll down to Exit and press Select or 2 to return to the Setup menu.
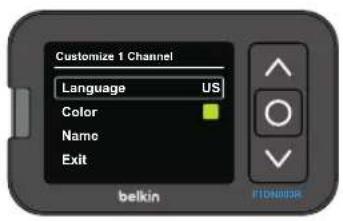
To change the language:
- The default language is US (English – United States). Scroll to language and press Enter.
- The language setting in the upper-right corner of the of the display changes to GB (English – Great Britain).
- Press Enter again to change to FR (French).
- Press Enter repeatedly to change to ES (Spanish) and DE (German) and back to US.
CONFIGURATION
Table of Contents
SECTIONS
123467
5
To change channel color:
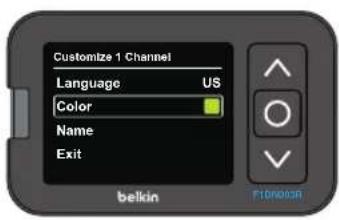
- On the Secure DCU front panel press the down arrow (▼) or 4, or on the keyboard press the down arrow (↓) to scroll to Color.
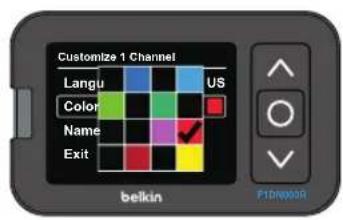
- Press Enter to open a color chart.
- Select a color:
On the Secure DCU front panel press the up ( ▲) or down ( ▼) arrows, or 1 or 4
Or on the keyboard, press the left (←) or right (→) arrows.
- Choose the color:
On the Secure DCU front panel press select or 2 Or on the keyboard, press Enter.
To enter the channel name:
Note: The channel name can have special language-specific characters if that language was selected in steps 7 to 10 above.
- On the Secure DCU front panel press the down arrow (▼) or 4, or on the keyboard press the down arrow (↓) to scroll to Name.
- On the Secure DCU front panel press select, or on the keyboard press Enter. The name field turns green.
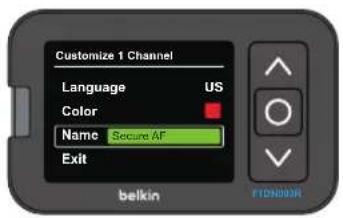
- On the keyboard type the channel name and press Enter. The new channel name appears in field.
- To complete the channel customization, scroll down to Exit and press the select or 2 button.
CONFIGURATION
Table of Contents
SECTIONS
123467
5
Display Backlight
You can adjust the brightness of the Secure DCU's display backlight for optimal visibility and viewing comfort.
Note: Adjusting the display backlight illumination does not require an Unlock SD card.
- In the Setup menu, scroll to Display Backlight and press the select button ( 🔒).

- Press the up and down buttons ( ▲, ▼) or 1 and 4 buttons to adjust the display brightness.
- Press Select or 2 twice to set the brightness level and exit back to the Setup menu.
Load Configuration
The Belkin Secure DCU enables saving the current configuration to the Belkin Unlock SD card, and then loading a saved configuration to another Secure DCU. This function saves time for a system administrator who wants to deploy multiple Secure DCU systems with similar settings.
This procedure requires the following items:
- USB keyboard
- USB to Mini-USB adapter cable (part of Secure Desktop Programming Kit, ordered separately)
- Unlock SD card (part of Secure Desktop Programming Kit, ordered separately)
Caution! Use only the Belkin Secure DCU to change the files stored on the Unlock SD card. Do not use a PC or other devices. Using another device may cause the Unlock SD to become unusable! The Belkin Unlock SD card is formatted in a special binary format.
Note: When inserting an Unlock SD card into a secure DCU, the connected to secure KVM becomes unusable. A secure KVM will behave like a tampered device, and the Secure Windowing KVM will sequence channels automatically.
Note: When saving a configuration file from one Secure DCU and loading to another, verify that they both control a Secure KVM with the same number of channels.
CONFIGURATION
Table of Contents
SECTIONS
123467
5
To load a configuration from the Unlock SD card:
- Connect the Secure DCU to a compatible Secure KVM, as described in steps 1 and 2 on page page 13.
- Insert the Unlock SD card into the Configuration slot in Secure DCU back panel.
See "To connect keyboard and Unlock SD card" on page 20. - On the Secure DCU, press the select button or buttons 2 and 3 together for 5 seconds, until the Setup menu appears.

- Scroll to Load Configuration and press the select or 2 button.

-
Scroll the desired configuration and press the select or 2 button.
-
If the configuration file loads successfully, then a confirmation message appears:
- Completed successfully from file: Default
- If the configuration file is not compatible with the Secure KVM, then an error message appears in red:
- Incompatible configuration file with Your KVM model
- If the configuration file can be updated to be compatible with the connected Secure KVM, then the following message appears:
- DCU is currently not set to work with the available ports in your device.
- Press the
- Press enter key to exit...
- If the configuration file is corrupted, then an error message appears in red:
- File DCUXC000 is corrupt. Try to load another file.
-
Press select or 2 button to return to the main Setup menu.
-
To apply the new configuration, exit the Setup menu and recycle power to the Secure KVM.
-
After the new configuration loads, scroll through all the channels to verify that the configuration is complete with all the required settings.
CONFIGURATION
Table of Contents
SECTIONS
123467
5
Save Configuration
The Belkin Secure DCU allows the system administrator to save the current configuration onto an Unlock SD card. This configuration file can then be copied to other secure DCUs.
Note: This procedure requires a USB keyboard, the Belkin Unlock SD card, and the Mini-USB adapter, all sold separately. The Unlock SD card and Mini-USB adapter are sold as part of the Desktop Programming Kit.
Note: Use only the Belkin Secure DCU to change the files stored on the Unlock SD card. Do not use a PC or other devices. Using another device may cause the Unlock SD to become unusable! The Belkin Unlock SD card is formatted in a special binary format.
Note: When inserting an Unlock SD card into a secure DCU, the connected to secure KVM becomes unusable. A secure KVM will behave like a tampered device, and the Secure Windowing KVM will sequence channels automatically.
- Connect the Secure DCU to a compatible Secure KVM, as described in steps 1 and 2 on page page 13.
- Connect an external USB keyboard and insert the Unlock SD card, as described in To connect keyboard and Unlock SD card on page 20.
- Enter the Setup menu by pressing the Select ( ☐) button twice (F1DN003R) or by pressing the 2 and 3 buttons together for 5 seconds.

- Scroll to Save Configuration and press the select or 2 button.
CONFIGURATION
Table of Contents
SECTIONS
123467
5
- Scroll to Create configuration file and press select button or Enter on the keyboard.

- In the field that opens, type a configuration name up to 18 characters long.

- On the keyboard, press Enter.
- If the configuration file saves successfully, then a confirmation message appears:
- Completed successfully
-
Saved file: 4PortSecure
-
Scroll to Exit... and press the Select (☐) or 2 button to return to the Setup menu.
Note: The saved configuration can be loaded only on Secure KVMs that are compatible and have the same number of ports.
Exit
Exiting the Belkin Secure DCU's Setup menu applies the new settings to the Secure DCU.
Note: If you do not want to apply the new settings, save the new configuration, as described in Save Configuration on page 28.
To exit the Setup menu, scroll down to Exit and press Select or 2.
TROUBLESHOOTING
Table of Contents
SECTIONS
1234576
Important Security Note:
If you are aware of potential security vulnerability while installing or operating this product, please contact Belkin immediately at the following email address: gov_security@belkin.com
Operation Troubleshooting
This section described how to resolve problems that arise when operating the Belkin Secure DCU.
Note: Message blinks at the top of the display when there is a new message that the user has not yet opened.

Unqualified Mouse or Keyboard
- Message blinks at the top of the display if the keyboard or mouse is not connected properly.
- The message remains in the messages screen until the problem is fixed.
- Message blinks on the display to indicate there is a new message, but other KVM functions are still functional.
- To view all messages, on the Secure DCU front panel press the Select key twice (F1DN003R) or push buttons 2 and 3 together (F1DN002R) for five seconds. Scroll to Messages and press Select or 2.

- The message disappears when the problem is fixed.
- Press Select or 2 again to close the message box.
- Scroll to Exit... and press Select or 2.
- Check mouse and keyboard connections to the Secure KVM, making sure each is connected to the correct port.
TROUBLESHOOTING
Table of Contents
SECTIONS
123457
6
Unqualified CAC Device

- When a CAC authorization device, such as a card reader, is not qualified, the MSG key blinks and the following icon appears in the CAC column.
- Check that the CAC authorization device is properly connected to the Secure KVM switch.
- Check the CAC enabling sliders on the front panel of the Secure KVM, verifying which channels should enable CAC.
- Check that the CAC port for each CAC enabled channel are connected to the corresponding computer.
- Replace the CAC authorization device.
Secure KVM or DCU Tampering
- If the anti-tamper system on the Secure KVM is triggered, the following message appears in the Belkin Secure DCU display.

- Replace the Secure KVM. If the Secure DCU has not been tampered, then it can still be used with another compatible Secure KVM.
- If the Belkin Secure DCU anti-tamper system is triggered, the following message appears in the Belkin Secure DCU display, and it is permanently disabled (cannot be used). The Secure KVM may still be used with another Secure DCU or with no Secure DCU.
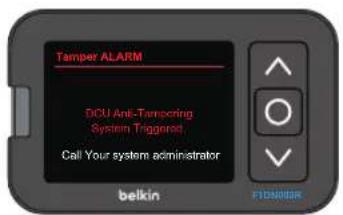
Table of Contents
SECTIONS
123457
6
General Troubleshooting
Belkin Secure DCU is not receiving power or the display backlight is not illuminated.
- Check front panel LEDs on the Secure KVM. If they are not illuminated, check or replace the Secure KVM's power supply and try again.
- Power down the system by disconnecting the Secure KVM DC power and power up again after 10 seconds.
- Verify that the RJ14 cable connecting the Secure DCU to the Secure KVM is securely inserted into the correct port on each device.
- Replace RJ14 cable connecting the Secure DCU to the Secure KVM. Contact Belkin Support at www.belkinbusiness.com/support-resources or call 1-800-282-2355.
- Verify the Secure KVM supports DCU, as indicated in the KVM User Manual.
The cursor does not follow the arrow upon pressing the push-buttons.
Commands from Belkin Secure DCU are not transmitted to the Secure KVM.
- Verify that the RJ14 cable connecting the Secure DCU to the Secure KVM is securely inserted into the correct port on each device.
- Check that all the cables connecting the computers to the Secure KVM are properly connected.
- Power down the system by disconnecting the Secure KVM power and power up again after 10 seconds.
Secure DCU does not work, showing the following message: "DCU-KVM Communication Problem"
- Verify that the RJ14 cable connecting the Secure DCU to the Secure KVM is securely inserted into the correct port on each device.
- Check that a USB keyboard is not connected to the Belkin Secure DCU. If a keyboard is connected, disconnect it.
- Power down the system by disconnecting the Secure KVM DC power and power up again after 10 seconds.
TROUBLESHOOTING
Table of Contents
SECTIONS
123457
6
Belkin Secure DCU display is very dim.
- Go to Setup and change mode to manual. Adjust display brightness to maximum (10).
- Check the length of the Belkin Secure DCU cable. It must be less than 50 ft. (16 m). Change to a short cable for testing.
Belkin Secure DCU failed to save current configuration on inserted Unlock SD card.
- Use only the Unlock SD card supplied with the Secure Desktop Controller Administrator Kit. Contact Belkin Support at www.belkinbusiness.com/support-resources or call 1-800-282-2355.
- What if the SD card goes bad, can they buy a new one separate from the kit from belkin?
Belkin Secure DCU failed to load a configuration file from an Unlock SD card.
- Use only the Unlock SD card supplied with the Secure Desktop Controller Administrator Kit. Contact Belkin Support at www.belkinbusiness.com/support-resources or call 1-800-282-2355.
Video
No video image in user display (all channels/specific channel) Refer to the applicable Secure KVM Troubleshooting Guide in the User Manual. This problem is not related to Belkin Secure DCU.
Keyboard
The Secure KVM rejects the keyboard- see message below.

• This problem is not related to Belkin Secure DCU
- Replace the keyboard
- Follow instructions in the Secure KVM User Manual
TROUBLESHOOTING
Table of Contents
SECTIONS
123457
6
Mouse
The Secure KVM rejects the mouse- (see message below).

• This problem is not related to Belkin Secure DCU
- Replace the mouse
- Follow instructions in the Secure KVM User Manual
CAC
CAC is not working on one channel. A CAC enabled channel does not show CAC on the display.
- Make sure the PC is connected and powered, and the OS has loaded.
- Connect the CAC device directly to the PC and verify it is working properly.
- Verify a CAC USB cable connects to the PC and to the corresponding CAC port on the KVM switch back panel.
- Verify that the CAC enabling slider on the front panel of the Secure KVM is set to enable CAC for that channel.
- Follow the instructions in the Secure KVM User Manual.
INFORMATION
Table of Contents
SECTIONS
1234567
FCC Statement
DECLARATION OF CONFORMITY WITH FCC RULES FOR ELECTROMAGNETIC COMPATIBILITY
We, Belkin International, Inc., of 12045 E. Waterfront Drive, Playa Vista, CA 90094, declare under our sole responsibility that the products: F1DN001R, F1DN002R, F1DN003R, to which this declaration relates:
Comply with Part 15 of the FCC Rules. Operation is subject to the following two conditions: (1) this device may not cause harmful interference, and (2) this device must accept any interference received, including interference that may cause undesired operation.
CE Declaration of Conformity
We, Belkin International, Inc., declare under our sole responsibility that the F1DN001R, F1DN002R, F1DN003R, to which this declaration relates, are in conformity with Emissions Standard EN55022 and with Immunity Standard EN55024, LVP EN61000-3-2, and EN61000-3-3.
ICES
Belkin International, Inc., Limited 3-Year Product Warranty
What this warranty covers.
Belkin International, Inc. ("Belkin") warrants to the original purchaser of this Belkin product that the product shall be free of defects in design, assembly, material, or workmanship.
What the period of coverage is.
Belkin warrants the Belkin product for three years.
What will we do to correct problems?
Product Warranty.
Belkin will repair or replace, at its option, any defective product free of charge (except for shipping charges for the product). Belkin reserves the right to discontinue any of its products without notice, and disclaims any limited warranty to repair or replace any such discontinued products. In the event that Belkin is unable to repair or replace the product (for example, because it has been discontinued), Belkin will offer either a refund or a credit toward the purchase of another product from Belkin.com in an amount equal to the purchase price of the product as evidenced on the original purchase receipt as discounted by its natural use.
INFORMATION
Table of Contents
SECTIONS
123456
7
What is not covered by this warranty?
All above warranties are null and void if the Belkin product is not provided to Belkin for inspection upon Belkin's request at the sole expense of the purchaser, or if Belkin determines that the Belkin product has been improperly installed, altered in any way, or tampered with. The Belkin Product Warranty does not protect against acts of God such as flood, lightning, earthquake, war, vandalism, theft, normal-use wear and tear, erosion, depletion, obsolescence, abuse, damage due to low voltage disturbances (i.e. brownouts or sags), non-authorized program, or system equipment modification or alteration.
How to get service.
To get service for your Belkin product you must take the following steps:
- Contact Belkin International, Inc., at 12045 E. Waterfront Drive, Playa Vista, CA 90094, Attn: Customer Service, or call (800) 282-2355, within 15 days of the Occurrence. Be prepared to provide the following information:
a. The part number of the Belkin product.
b. Where you purchased the product.
c. When you purchased the product.
d. Copy of original receipt.
- Your Belkin Customer Service Representative will then instruct you on how to forward your receipt and Belkin product and how to proceed with your claim.
Belkin reserves the right to review the damaged Belkin product. All costs of shipping the Belkin product to Belkin for inspection shall be borne solely by the purchaser.
If Belkin determines, in its sole discretion, that it is impractical to ship the damaged equipment to Belkin, Belkin may designate, in its sole discretion, an equipment repair facility to inspect and estimate the cost to repair such equipment. The cost, if any, of shipping the equipment to and from such repair facility and of such estimate shall be borne solely by the purchaser. Damaged equipment must remain available for inspection until the claim is finalized. Whenever claims are settled, Belkin reserves the right to be subrogated under any existing insurance policies the purchaser may have.
INFORMATION
Table of Contents
SECTIONS
123456
7
How state law relates to the warranty.
THIS WARRANTY CONTAINS THE SOLE WARRANTY OF BELKIN. THERE ARE NO OTHER WARRANTIES, EXPRESSED OR, EXCEPT AS REQUIRED BY LAW, IMPLIED, INCLUDING THE IMPLIED WARRANTY OR CONDITION OF QUALITY, MERCHANTABILITY OR FITNESS FOR A PARTICULAR PURPOSE, AND SUCH IMPLIED WARRANTIES, IF ANY, ARE LIMITED IN DURATION TO THE TERM OF THIS WARRANTY.
Some states do not allow limitations on how long an implied warranty lasts, so the above limitations may not apply to you.
IN NO EVENT SHALL BELKIN BE LIABLE FOR INCIDENTAL, SPECIAL, DIRECT, INDIRECT, CONSEQUENTIAL OR MULTIPLE DAMAGES SUCH AS, BUT NOT LIMITED TO, LOST BUSINESS OR PROFITS ARISING OUT OF THE SALE OR USE OF ANY BELKIN PRODUCT, EVEN IF ADVISED OF THE POSSIBILITY OF SUCH DAMAGES.
This warranty gives you specific legal rights, and you may also have other rights, which may vary from state to state. Some states do not allow the exclusion or limitation of incidental, consequential, or other damages, so the above limitations may not apply to you.
GS 5/15/2013
Reporting Belkin Product Security Vulnerability
If you are aware of potential security vulnerability with any Belkin Government product, we encourage you to contact us immediately at the following email address: gov_security@belkin.com or our technical support line at: 1-800-282-2355
After your communication is received, Belkin Government personnel will contact you to follow up. To ensure confidentiality, Belkin encourages you to use our PGP encryption key.
The gov_security@belkin.com email address is not intended to reach technical support on Belkin Government products or services.
belkinbusiness.com
© 2014 Belkin International, Inc. All rights reserved. All trade names are registered trademarks of respective manufacturers listed. Windows and Windows Vista are either registered trademarks or trademarks of Microsoft Corporation in the United States and/or other countries. Mac OS is a trademark of Apple Inc., registered in the U.S. and other countries.



- Secure Desktop Controller Unit (DCU)
- User Manual
- TABLE OF CONTENTS
- Introduction....1
- Overview....3
- Installation....12
- Operation 15
- Configuration....19
- Troubleshooting 30
- Information....35
- INTRODUCTION
- Package Contents
- Safety Precautions
- OVERVIEW
- Security Features
- Improved User Situational Awareness
- Non-Programmable Firmware
- Active Always-On Anti-Tamper
- Holographic Tamper-Evident Label
- Secure Packaging
- Common Criteria EAL 4+ Listing
- Operational Features
- Textual Display of network/resource name and color
- Clear DCU and KVM error messages
- Easy configuration with an SD card
- CAC status indication
- Multilanguage support
- Administrator Unlock SD Card
- Equipment Requirements
- Cables
- DCU Cables:
- Secure KVM
- Administrator Setup Equipment
- Front-Panel Features - F1DN002R
- Front-Panel Features - F1DN003R
- Tamper-Evident Label
- IMPORTANT NOTICE:
- Active Anti-Tampering System
- INSTALLATION
- Before Installation
- Unpacking the Product
- Where to place the Belkin Secure DCU?
- Step 1 – Connecting the Belkin Secure DCU to the Secure KVM/KM/Windowing KVM Switch
- Step 2 - Power up
- OPERATION
- Normal Secure DCU Operation
- Note:
- Channel selection on F1DN001R and F1DN002R
- Channel selection on F1DN003R
- Normal operation with CAC
- Operation with 8/16 ports
- CONFIGURATION
- Administrator Configuration (F1DN002R and F1DN003R Only)
- Enter setup mode:
- F1DN002R:
- F1DN003R:
- To connect keyboard and Unlock SD card:
- Messages
- System Information
- Customize Channels
- To activate/deactivate channels:
- To customize channels:
- To change the language:
- To change channel color:
- To enter the channel name:
- Display Backlight
- Load Configuration
- To load a configuration from the Unlock SD card:
- Save Configuration
- Exit
- TROUBLESHOOTING
- Important Security Note:
- Operation Troubleshooting
- Unqualified Mouse or Keyboard
- Unqualified CAC Device
- Secure KVM or DCU Tampering
- General Troubleshooting
- Belkin Secure DCU display is very dim.
- Belkin Secure DCU failed to save current configuration on inserted Unlock SD card.
- Belkin Secure DCU failed to load a configuration file from an Unlock SD card.
- Video
- Keyboard
- Mouse
- CAC
- INFORMATION
- FCC Statement
- DECLARATION OF CONFORMITY WITH FCC RULES FOR ELECTROMAGNETIC COMPATIBILITY
- CE Declaration of Conformity
- ICES
- What this warranty covers.
- What the period of coverage is.
- What will we do to correct problems?
- Product Warranty.
- What is not covered by this warranty?
- How to get service.
- How state law relates to the warranty.
- Reporting Belkin Product Security Vulnerability
- belkinbusiness.com
Brand : BELKIN
Model : F1DN001R
Category : Power Strip