Xtreme XL-652M - Loudspeaker PowerBass - Free user manual and instructions
Find the device manual for free Xtreme XL-652M PowerBass in PDF.


| Product Type | Marine Coaxial Speaker |
| Brand | PowerBass |
| Model | Xtreme XL-652M |
| Size | 6.5 inches |
| Impedance | 4 ohms |
| Frequency Response | 67 Hz – 20 kHz |
| Sensitivity (1W/1M) | 92 dB |
| Power Handling (RMS/Peak) | 80W / 160W |
| Magnet Weight | 15 oz |
| Tweeter Type | 1-inch fluid-cooled semi-dome (MET) |
| Surround Material | TPU (Thermoplastic Polyurethane) |
| Cone Material | Polypropylene with UV inhibitors |
| Frame Material | High strength Polyamide plastic |
| UV Treatment | Yes (frame and cone) |
| Terminals | Gold plated with tinsel lead insulation |
| Crossover Network | 2-way with Poly Switch protection |
| Tweeter Mounting Kit | Flush, surface, and angle cups included |
| Mounting Type | Flush mount with integrated grille |
| Mounting Depth | 2.8 in (71.12 mm) |
| Mounting Hole Diameter | 5.62 in (142.75 mm) |
| Frame Outer Diameter | 6.85 in (174 mm) |
| Hardware | Marine grade stainless steel |
| Warranty | 1 year (3 years if professionally installed) |
Frequently Asked Questions - Xtreme XL-652M PowerBass
User questions about Xtreme XL-652M PowerBass
0 question about this device. Answer the ones you know or ask your own.
Ask a new question about this device
Download the instructions for your Loudspeaker in PDF format for free! Find your manual Xtreme XL-652M - PowerBass and take your electronic device back in hand. On this page are published all the documents necessary for the use of your device. Xtreme XL-652M by PowerBass.
USER MANUAL Xtreme XL-652M PowerBass
powerbass® X T R E M E
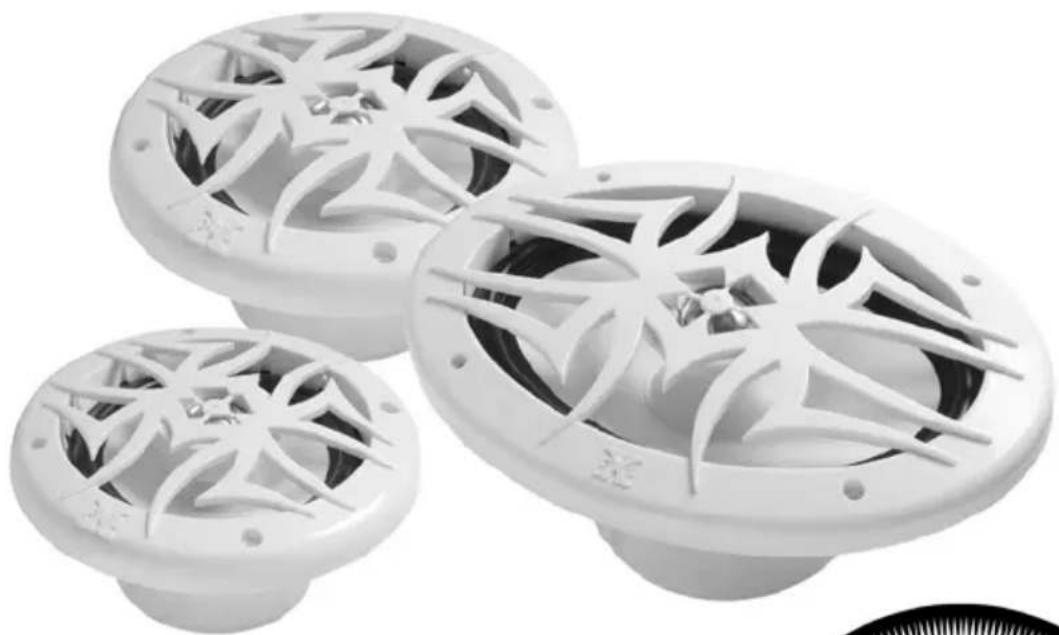
natural_image
Three white plastic speaker dividers with star-shaped cutouts, arranged in a row (no text or symbols visible)
XL Marine Speakers
Application Guide
powerbass® XTREME
Thank you and Congratulations
Congratulations on your decision to purchase PowerBass Xtreme™ marine speakers. You now own a speaker of uncompromising design and engineering philosophy from a factory that truly believes in the relentless pursuit of perfection. Incorporating the highest quality materials and state-of-the-art machinery, these speakers display the ultimate balance between high fidelity, extreme performance and long-lasting reliability.

At PowerBass USA, Inc. we are confident you will have many years of outstanding enjoyment from this great speaker investment. For maximum performance, we recommend that you have your new speakers installed by an Authorized PowerBass Xtreme Dealer. Doing so will also automatically extend your warranty to the full THREE Year Period.
To learn more about PowerBass Xtreme, please visit us on the World Wide Web at www.PowerBassusa.com
△ Warning △
Continuous exposure to sound pressure levels in excess of 100 dB or more can cause permanent hearing loss. PowerBass Xtreme Speakers are capable of producing sound pressure levels well over 160 dB. Please observe all local sound ordinances while listening to your PowerBass Xtreme system. PowerBass USA, Inc. accepts no liability for hearing loss, bodily injury, or property damage due to the result of use or misuse of this product.
XL MARINE CERTIFIED SPEAKER FEATURES
Flush Mount Integrated Design: The custom grill and basket assembly are mated using stainless steel hardware. To further insure longevity, the frame was constructed using high strength Polyamide plastic—a material chosen for its exceptional hardness, high impact and abrasion resistance.
Ultra Violet Treatment: A UV stabilizer has been added to protect the white plastic frame from harmful rays of the sun--even the magnet structure has been covered to protect the motor assembly from the elements.
Polypropylene Injected Cone: Chosen for its strong yet lightweight body this waterproof woofer cone has UV inhibitors to minimize cracking and fading.
TPO Thermoplastic Polyurethane Surround: A synthetic material known for its toughness and flexibility, the black TPU surround rejects water, sun and salt spray while at the same time offering superior cone-edge suspension.
MET (Marine Engineered Technology) Tweeter: Specially developed by our engineers, this fluid cooled Semi-dome full 1-inch water resistant tweeter provides crystal clear highs extending beyond 20Khz.
Crossover Network: The included crossover networks were designed specifically for our speakers to recreate the frequencies within a precise range ensuring the tweeter does not receive low bass notes and the mid bass driver does not receive high frequencies. A Poly Switch current limiter has been added to the crossover circuit to protect the tweeters against overload.
Tweeter Mounting Kit: Flush, surface and angle-mounting cups allows multiple mounting options for custom tailored high frequency dispersion.
Voice Coil Protection: Red and black tinsel lead insulation not only easily identifies positive and negative inputs, but also prevents against corrosion thus increasing the life of the speaker.
Gold Plated Connections: The connection terminals on the speaker frame have been gold plated for protection against corrosion. The speaker wire provided is also terminated with gold plated connectors for improved connectivity. Clear insulated sleeves have been added to provide further protection against the elements.
Additional Features: Moisture sealed basket ring gaskets for snug water tight fit,
marine grade stainless steel hardware, and pre-terminated speaker wires add further value to your investment.
SPECIFICATIONS FOR POWERBASS XTREME XL MARINE SPEAKERS
(Due to Constant Improvements, Specifications and Parameters are subject to change without notice.)
| Model No. | Size | Nominal Impedance | Frequency Response | Sensitivity 1M / 1M | Magnet Weight (oz) | Power RMS/Peak |
| XL-652M | 6.5” | 4 Ohms | 67Hz – 20kHz | 92 dB | 15 oz | 80W / 160W |
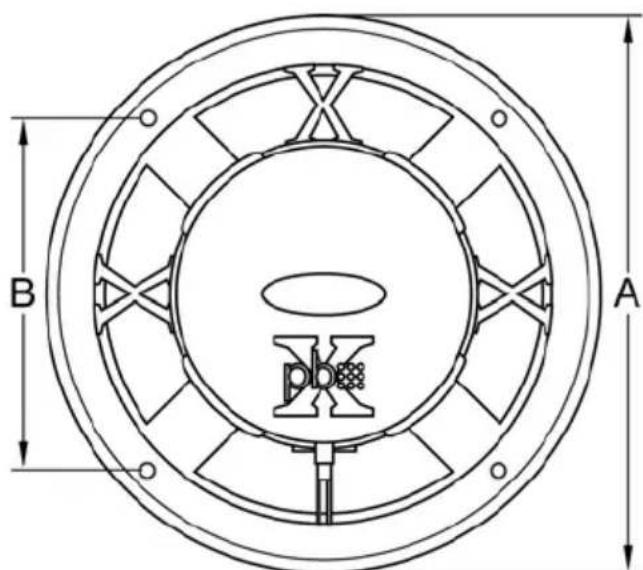
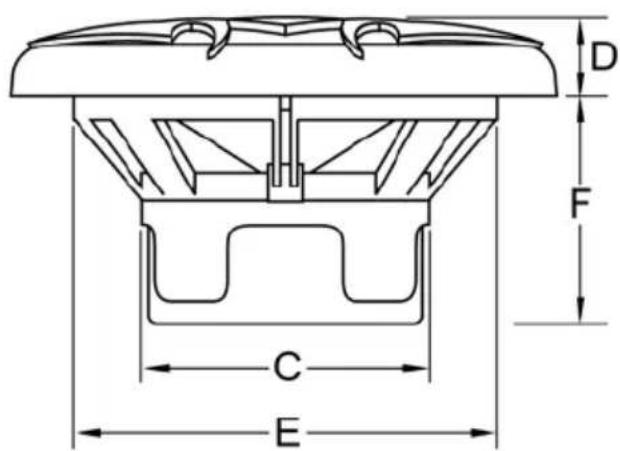
| XL 652M | ||
| Marine Speaker Dimensions | 6.5” | |
| In | mm | |
| Frame Outer Diameter A | 6.85 | 174 |
| Bolt Hole Circle B | 6.1 | 154.94 |
| Motor Overmold Outer Diameter C | 3.89 | 98.8 |
| Front Grille Protrusion D | 0.98 | 24.5 |
| Mounting Hole Diameter E | 5.62 | 142.75 |
| Mounting Depth F | 2.8 | 71.12 |
XL COMPONENT TWEETER SPECIFICATIONS
| DOME SIZE | MOUNTING (DIAMETER) | NOMINAL IMPEDANCE | FREQUENCY RESPONE | SENSITIVITY (1M / 1M) | MOUNTING (DEPTH) | POWER (RMS/PEAK) |
| 3/4" SILK | 1 7/8" | 4Ω | 3K-20Khz | 91 dB | 7/8" | 45/90 |
INSTALLATION EXPERIENCE
Installation of marine audio speakers can require extensive experience with a variety of mechanical and electrical procedures. Although this application guide explains how to install PowerBass Xtreme marine speakers in a general sense, it may not show the exact installation method for your particular situation. If you feel unsure about personally installing the speaker system, don't attempt the installation yourself. Ask your Authorized PowerBass audio or marine dealer about professional installation options.
GENERAL INSTALLATION TIPS
Your PowerBass XL marine coaxials were specially designed for providing high-fidelity sound out in the harsh marine environment. Despite their rugged construction, it is possible to damage your speaker if they are improperly used. Overdriving the system and causing the sound to distort will cause permanent damage to the speaker. Playing loud music in a marine environment can permanently damage your hearing, as well as limit your ability to hear other marine traffic.
- Be sure to carefully read and understand the instructions before attempting to install this product.
- Turn off the audio system. For safety, disconnect the negative lead from the battery prior to beginning installation.
- For easier installation, we recommend that if additional wiring is required, you run all wires prior to mounting your speaker in place.
- The marine environment can quickly accelerate corrosion so always use the highest quality connectors for a reliable installation and minimal signal or power loss.
- Always use caution before you drill or cut! Be careful not to puncture gas tanks, fuel lines, hydraulic lines or electrical wiring when working on any vessel.
- Never run speaker wires underneath the vessel or exposed on the deck, keeping the wiring behind cover provides the best protection from environmental elements.
- Avoid running any speaker wire or signal cables near the vessel's electrical system to prevent noise from “bleeding” into the audio system.
- Correct speaker polarity must be observed. Speakers wired out of phase will have little bass output. Follow the wiring directions carefully observing the color coded speaker wire.
- Leave a little slack in the speaker wire for easier installation, this will prevent pulling or stretching the wire and possibly causing a connection to come loose.
- Always protect your speakers during installation; it is a good idea to keep the speakers in their original package until they are ready to be mounted.
PREPARING for INSTALLATION
NOTE: The tools listed below may be required for proper installation.
- An electric drill with drill bits
• Phillips-head and standard screwdrivers - Wire strippers
• Crimping tool and needle-nose pliers - Silicone sealant or closed cell weather-stripping
- Metal file
• Dust mask (when cutting into fiberglass) - Hole saw or jig saw
- Punch or countersink tool
NOTE: The stainless steel hardware supplied with your PowerBass Xtreme marine speakers has been chosen to resist rust and corrosion. If the particular hardware supplied will not work for your installation purposes, please be sure to use only appropriate marine grade (stainless steel) mounting hardware.
INSTALLATION APPLICATION
Your PowerBass XL marine coaxial speakers are specifically designed for boating and water sport applications. Although the speakers do not require a sealed enclosure, air space behind the speaker from 0.2 – 0.5 cu feet (6 – 15 liters) is recommended for best sound reproduction. To prevent the sound coming off the front of the speaker from radiating back to sound from the rear of the speaker it is recommended to use a factory location or find a spot with a semi-isolated rear chamber (see Fig 1). PowerBass offers several sizes in it's XL marine series designed to make fitting your vessel easier.
CAUTION: These speakers are designed to be water and spray resistant, they are not designed to be submerged or withstand high pressure water spray. Care must be exercised when washing your boat to avoid damaging your speakers.
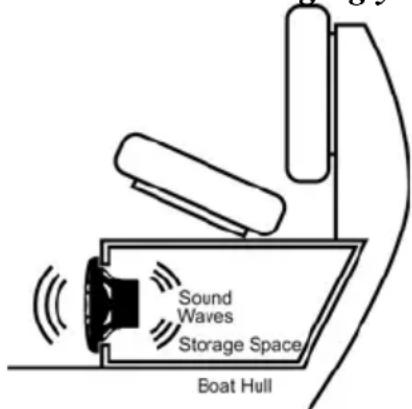
Fig. 1
SPEAKER LOCATION
The sound produced by your PowerBass XL coaxial speakers is directional. Find the best location for stereophonic sound. Adding more PowerBass Xtreme speakers to the system will not only help to balance the sound, but it will increase the power handling of the system enabling it to play louder.
Experiment with the tweeter positioned in several locations to determine the best imaging result before cutting out any panel. Typically tweeters should be mounted on axis and as close to ear level as possible.
After determining the best mounting locations, carefully check the areas where the mounting hardware will be placed (see Fig 2). The installation surface must be level and the installation must be “watertight”. No moisture or dampness should be allowed to get behind the speaker. Use caution to make sure there are no objects behind the installation surface that may become damaged during drilling.
WARNING: These speakers must be installed at least 3 feet (1-meter) away from any electromagnetic nautical equipment (ie., compass, sonar, etc).
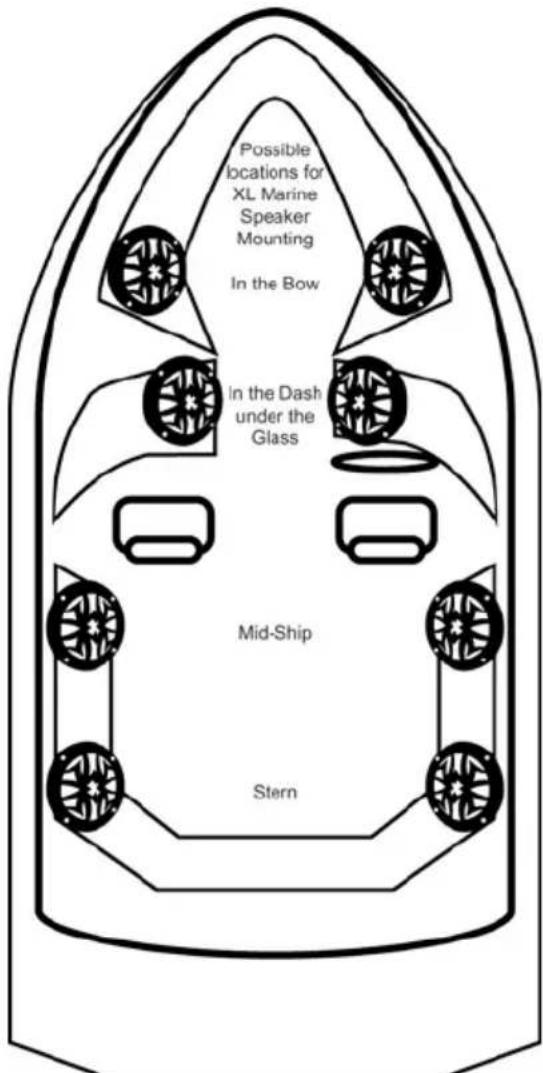
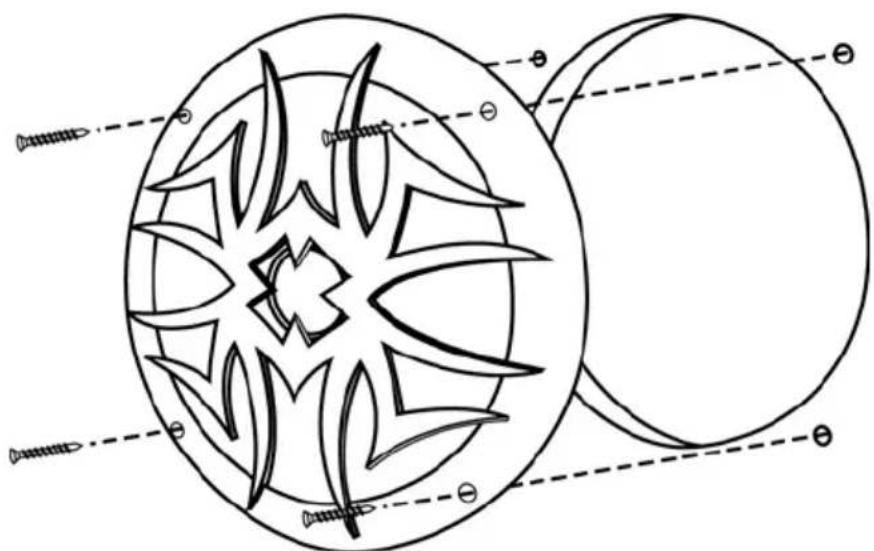
Fig. 2 MOUNTING INSTRUCTIONS
The following drawing shows the typical flush mount installation into a fiberglass panel using the supplied hardware.
natural_image
Technical line drawing of a mechanical component with screw holes and a central star-like feature (no text or symbols)8 SCREW: PILOT HOLE CHART
| Fiberglass Thickness | Recommended Pilot Hole Drill Size |
| 0.125 in. (3.18 mm) or less | 7/64 in. (2.78 mm) pilot hole |
| Foam core / fiberglass sandwich | 7/64 in. (2.78 mm) pilot hole |
| Larger than 0.125 in. (3.18mm) | 1/8 in. (3.18 mm) pilot hole |
Always follow proper safety procedures. Use eye-protection at all times and a dust mask and gloves when cutting. Check both sides of the vessel before cutting any holes.
- Choose a flat mounting surface that has sufficient depth and air space behind it to accept the speaker.
- Make sure the stainless steel mounting screws will not puncture the fuel tank, wiring or interfere with any moving parts underneath the mounting surface.
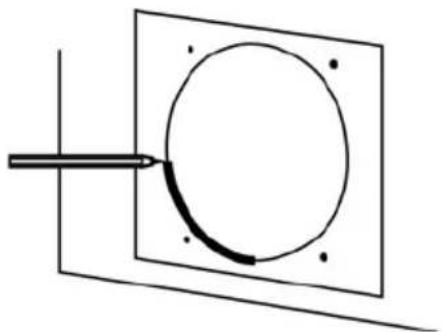
• Use the supplied mounting template to mark the hole (see Fig 3)
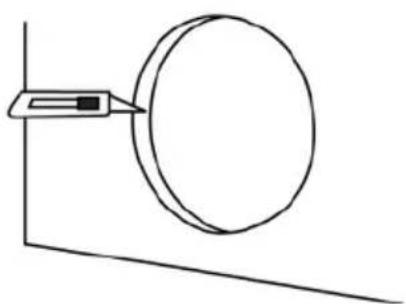
• Cut the appropriate diameter hole using a hole saw or jigsaw (see Fig 4) - Place the speaker in the hole (or use the mounting template) and mark the screw hole locations using a sharp pointed tool.
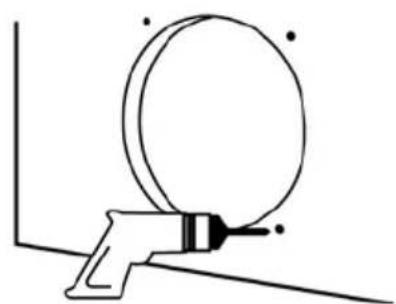
- Remove the speaker and drill a pilot hole (see Pilot Hole Chart Recommendations above) in each of the screw locations. It is advisable to use a hand driven countersink tool on each hole to further inhibit gel-coat cracking of the fiberglass panels (see Fig 5)
- Connect the speaker wire supplied as shown (Fig 6). Read the Wiring Procedures section on Page 9 for further wiring instructions before performing final installation of the speakers.
- Place the speaker into the opening
- While holding the speaker firmly in place, screw in the #8 x 1-3/8-inch (35mm) mounting screws by hand carefully and evenly. Do not over tighten as you fasten the speaker to the boat.
WARNING: Do not attempt to remove the tweeter from the grill or the grill from the speaker! The tweeter is permanently fixed to the grill and its wiring is permanently attached to the speaker frame. Attempting to remove the grill or the tweeter will damage the speaker and void the warranty.
natural_image
Simple line drawing of a circular object with a curved line inside, connected by a rod (no text or symbols)Fig. 3 Use template sheet inside carton to trace onto mounting location hole
natural_image
Simple line drawing of a circular object with a pointer, connected by a horizontal line (no text or symbols)Fig. 4 Cut hole
natural_image
Simple line drawing of a tool applying material to a circular component (no text or symbols)Fig. 5 Drill pilot hole (see chart)
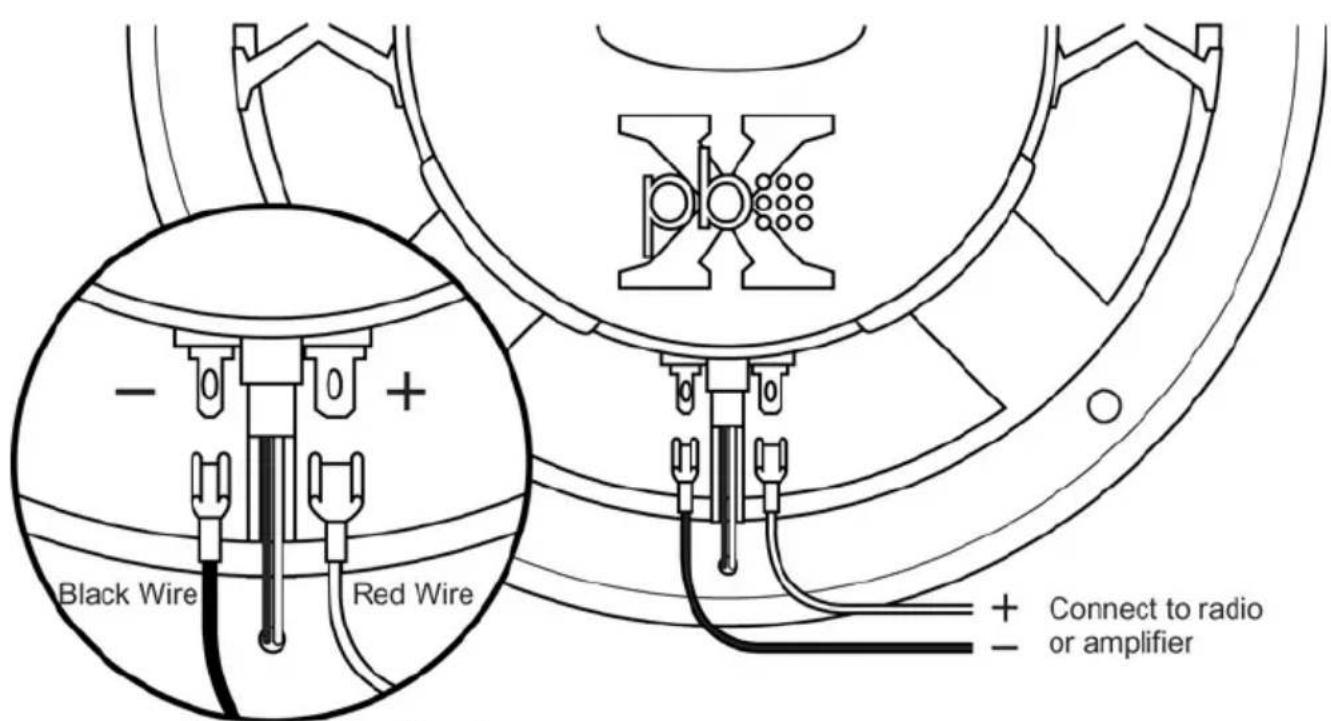
Fig. 6 Push onto correct size speaker terminal
Flush Mounting (Type A)
The best location for the tweeter is usually high up on the door and as far forward as possible without interference from the dashboard. If the desired location is flat and space behind the door panel allows the use of the flush mount housing, follow the drawing as
shown below:
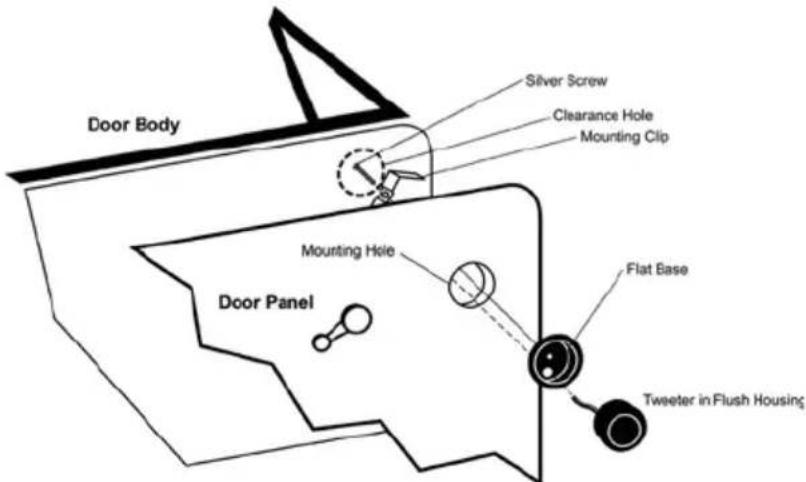
After checking for clearance, cut the mounting hole in the door panel (see Tweeter Specifications for hole size). Mount the Flat Base from the outside with the mounting clip on the inside of the door panel. Secure the mounting clip to the Flat Base with the long silver screw provided.
Surface/Angle Mounting (Type B and C)
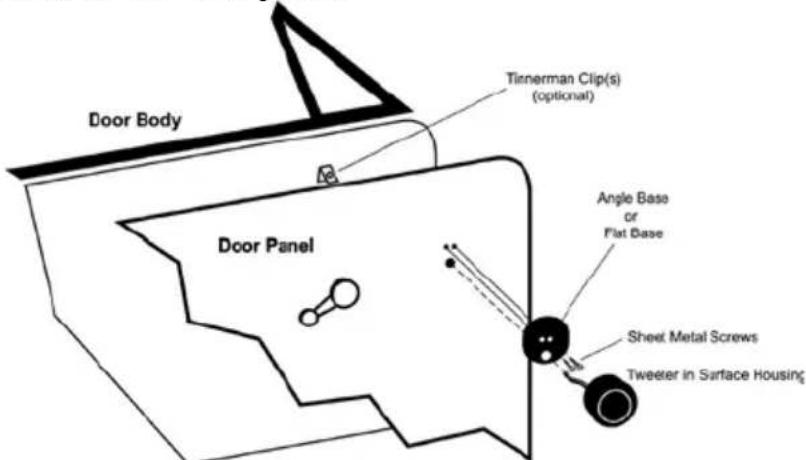
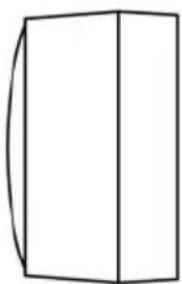
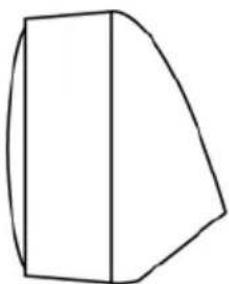
If mounting the tweeter on the surface works out best, refer to the following drawing to see how to best mount the tweeter. Black sheet metal screws have been provided to attach the surface base to the door panel.
AUTOSOUND COMPONENT TWEETERS
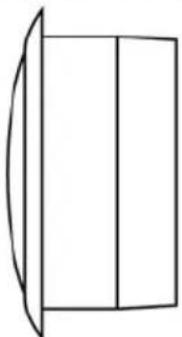
These high quality tweeters come complete with several mounting housings for installation versatility. Typically tweeters should be mounted on axis and as close to ear level as possible. After you have chosen the housing to be used, gently press the tweeter in the proper mounting base. Once the tweeter base is mounted, push and “twist” the housing until it locks to the base. Below are exploded views showing the possible types of tweeter mounting.
Type A
Flush Mount Tweeter
natural_image
Simple line drawing of a vertical panel with a curved top edge (no text or symbols)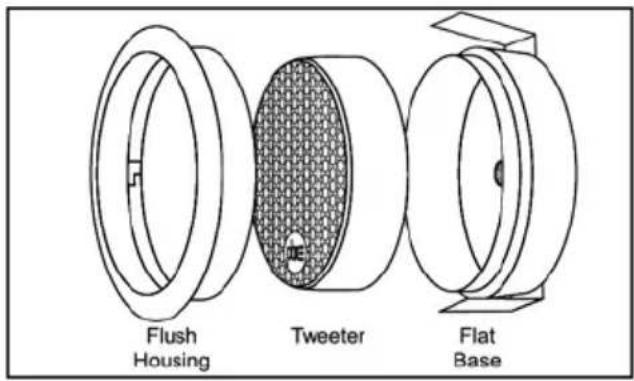
Type B
Surface Mount Tweeter
natural_image
Simple line drawing of a 3D rectangular prism with a curved cutout on the left side (no text or symbols)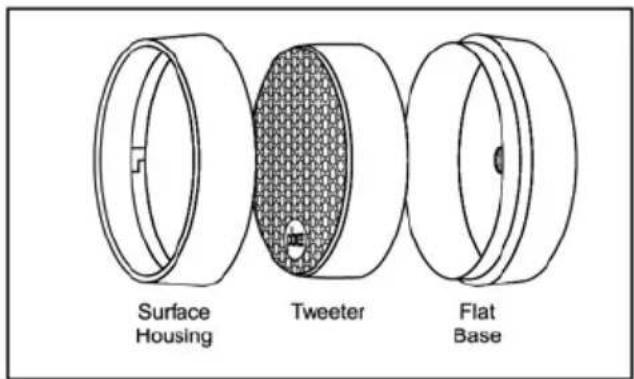
Type C
Angle Mount Tweeter
natural_image
Simple geometric shape resembling a sector or wedge, drawn with straight lines and no text or symbols.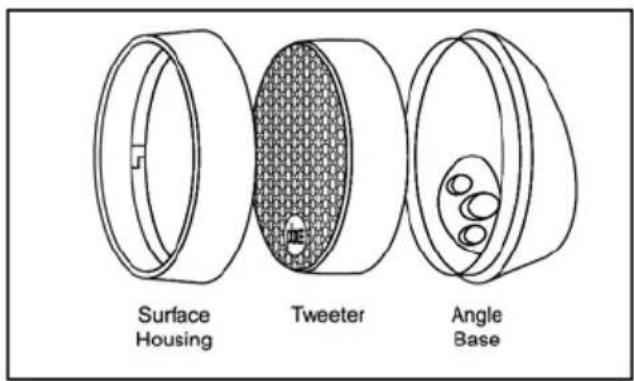
CROSSOVER NETWORK INSTALLATION AND WIRING
Your PowerBass Autosound Component system contains two separate 2-way crossover networks. When choosing a location to mount the crossovers, keep in mind they contain electronic parts which can be damaged by moisture and dirt.
Correct wiring of the crossover is critical to avoid damage to the speakers and ensure true high fidelity sound. Pay close attention to the markings on the
crossover to be certain the correct speakers are in the correct outlets as follows:
1) Connect the amplifier or head unit output to the crossover's input (IN) terminals.
2) Connect the terminals labeled woofer (W) to the component midrange speaker.
3) Connect the terminals labeled tweeter (T) to the component tweeter set.
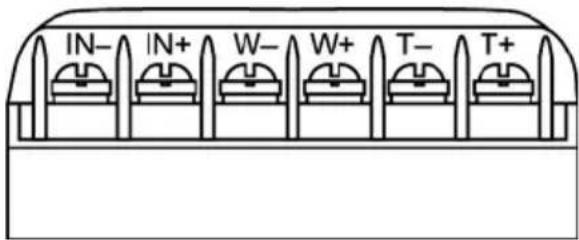
NOTE: BE SURE TO OBSERVE PROPER POLARITY WHEN CONNECTING SPEAKER WIRES TO THE CROSSOVER NETWORK TERMINALS.
WIRING PROCEDURES
Once the mounting holes have been cut, run the speaker wire from the speaker mounting locations back to the radio. If you are running wires through bulkheads, drill holes for the cable and use a marine grade grommet to properly insulate any rough edges from the wire insulation. Make sure the wires will clear any mechanical devices in the boat and secure them with wire ties.
Carefully place the supplied speaker wire in a location that is free of standing water and moving components. For reference the Red wire is Positive and the Black wire is Negative. Connect the gold plated female quick disconnect on the end of the supplied 15 feet (4.5m) of wire to the same color of wire on the gold plated male connector attached to the speaker frame (see Fig 6) Connect the other end of the speaker wire to the radio in accordance with its owner's manual.
After connecting your new PowerBass XL marine speakers to the sound system you are ready to carry out a listening test. Please listen the first time at a low volume setting and check to make sure everything is operating properly.
GENERAL CARE
The grills may be cleaned with a damp cloth. Do not use any cleaners or solvents on the grills or speaker cones, otherwise the UV inhibitors may be affected and/or the plastics may discolor.

natural_image
Simple line drawing of a trash bin with diagonal lines crossing it, no text or symbols present.Product Disposal – Certain international, national and/or local laws and/or regulations may apply regarding the disposal of this product. For further detailed information, please contact the retailer where you purchased this product or the PowerBass Importer/Distributor in your country.
Warranty is void if the product's serial number has been removed or defaced.
This manual is the exclusive property of PowerBass USA, Inc. Any reproduction of this manual, or use other than its intentions is strictly prohibited without the express consent of PowerBass USA, Inc. ©Copyright 2007 PowerBass USA, Inc.
POWERBASS XTREME LIMITED WARRANTY POLICY
PowerBass USA, Inc. offers limited warranty on PowerBass products under normal use on the following terms:
PowerBass Xtreme Speakers are to be free of defects in material and workmanship for a period of one (1) year. The warranty is extended to three (3) years for parts and labor, if an Authorized PowerBass Xtreme Dealer completes the installation.
This warranty applies only to PowerBass products sold to consumers by Authorized PowerBass Dealers in the United States of America. Products purchased by consumers from a PowerBass dealer in another country are covered only by that country's Distributor and not by PowerBass USA.
This warranty covers only the original purchaser of PowerBass product. In order to receive service, the purchaser must provide PowerBass with the receipt stating the consumer name, dealer, product and date of purchase.
Products found to be defective during the warranty period will be repaired or replaced (with a product deemed to be equivalent) at PowerBass's discretion and will not be liable for incidental or consequential damages. PowerBass will not warranty this product under the following situations:
- Speakers received with bent/cracked frames or significant water damage
• Abuse such as holes in the cone, surround or ripped spider
• Voice coil damage due to amplifier clipping or distortion
• Product that has not been installed according to this owners manual
Any implied warranties including warranties of fitness for use and merchantability are limited in duration to the period of the express warranty set forth above. Some states do not allow limitations on the length of an implied warranty, so this limitation may not apply. No person is authorized to assume for PowerBass any other liability in connection with the sale of this product.
Please call (909) 923-3868 for PowerBass Customer Service. You must obtain an RA# (Return Authorization Number) to return any product to PowerBass. The RA number must be prominently marked on the outside of the shipping carton or the delivery will be refused.
Please pack your return carefully; we are not responsible for items damaged in shipping. Return the defective product along with a copy of the original dated retail sales receipt, plus \$9.00 for handling and diagnostic evaluation to:
PowerBass USA, Inc., Attn: Returns (RA#____)
2133 S Green Privado, Ontario, California 91761
Residents of HI, AK and US territories will be charged for return shipping. All inquires regarding service and warranty should be sent to the above address.

PowerBass Xtreme (PBX) – A division of PowerBass USA, Inc.
2133 S. Green Privado – Ontario, CA 91761
Tel. (909) 923-3868 – Fax (909) 923-8048
www.powerbassusa.com
- powerbass® X T R E M E
- Application Guide
- powerbass® XTREME
- Thank you and Congratulations
- △ Warning △
- XL MARINE CERTIFIED SPEAKER FEATURES
- SPECIFICATIONS FOR POWERBASS XTREME XL MARINE SPEAKERS
- INSTALLATION EXPERIENCE
- GENERAL INSTALLATION TIPS
- PREPARING for INSTALLATION
- INSTALLATION APPLICATION
- SPEAKER LOCATION
- SCREW: PILOT HOLE CHART
- Flush Mounting (Type A)
- Surface/Angle Mounting (Type B and C)
- AUTOSOUND COMPONENT TWEETERS
- CROSSOVER NETWORK INSTALLATION AND WIRING
- WIRING PROCEDURES
- GENERAL CARE
- Warranty is void if the product's serial number has been removed or defaced.
- POWERBASS XTREME LIMITED WARRANTY POLICY
Brand : PowerBass
Model : Xtreme XL-652M
Category : Loudspeaker