PMCL417A - Surveillance Pelco - Free user manual and instructions
Find the device manual for free PMCL417A Pelco in PDF.


| Product Type | IP Surveillance Camera |
| Model | PMCL417A |
| Brand | Pelco |
| Resolution | 4 Megapixels (2592 x 1520) |
| Sensor | 1/3-inch Progressive Scan CMOS |
| Lens Type | Fixed focal, 2.8 mm |
| Field of View | Horizontal: 103°, Vertical: 55° |
| Night Vision | Up to 30 meters with IR LEDs |
| Video Compression | H.265, H.264, MJPEG |
| Frame Rate | Up to 30 fps at 4MP |
| Power Supply | PoE (802.3af) or 12V DC |
| Power Consumption | Max 7.5W |
| Dimensions (H x Ø) | 100 mm x 130 mm |
| Weight | Approx. 0.5 kg |
| Ingress Protection | IP67 (weatherproof) |
| Operating Temperature | -40°C to 60°C |
| Storage Temperature | -40°C to 70°C |
| Network Interface | 10/100 Base-T Ethernet (RJ-45) |
| Supported Protocols | TCP/IP, UDP, HTTP, HTTPS, RTSP, ONVIF |
| Motion Detection | Yes, configurable zones |
| Audio | Two-way audio (built-in mic and speaker optional) |
| Mounting | Bracket mount included |
| Certifications | CE, FCC, RoHS |
Frequently Asked Questions - PMCL417A Pelco
User questions about PMCL417A Pelco
0 question about this device. Answer the ones you know or ask your own.
Ask a new question about this device
Download the instructions for your Surveillance in PDF format for free! Find your manual PMCL417A - Pelco and take your electronic device back in hand. On this page are published all the documents necessary for the use of your device. PMCL417A by Pelco.
USER MANUAL PMCL417A Pelco
by Schneider Electric
INSTALLATION/OPERATION
PMCL400 Series TFT LCD Monitor
natural_image
Black-and-white aerial view of a suspension bridge spanning a wide river with a cargo ship docked, no visible text or symbols.C2927M-D (9/09)
Contents
Important Safety Instructions 6
Important Notices 7
Legal Notice 7
Regulatory Notices 7
Description....8
Models 8
Recommended Mounts 8
Package Contents 9
Installation....10
Desk Stand 10
Wall Mounting 10
Rack Mounting 11
Rear Panel Connectors 12
Operation 13
Front Panel Controls 13
Remote Control Functions....14
On-Screen Display Function 15
Video 1, Video 2, S-Video Mode Menu....16
RGB and DVI Mode Menu 18
Troubleshooting....20
Maintenance 20
Specifications 21
Appendix 22
RGB/DVI Mode Supported Frequencies 22
List of Illustrations
1 Package Contents 9
2 Attaching the Mount in a Wall Installation 10
3 Installing the Brackets in a Rack Mount Installation 11
4 Installing the Monitor in the Rack 11
5 Rear Panel Connectors 12
6 Front Panel Controls 13
7 Remote Control 14
8 Input Source Name Display 15
9 Video 1, Video 2, S-Video Mode Menu 16
10 RGB and DVI Mode Menu....18
List of Tables
A Troubleshooting the PMCL400 Series Monitor 20
B RGB and DVI Mode Supported Frequencies 22
Important Safety Instructions
- Read these instructions.
- Keep these instructions.
- Heed all warnings.
-
Follow all instructions.
-
Do not use this apparatus near water.
-
Clean only with dry cloth.
-
Do not block any ventilation openings. Install in accordance with the manufacturer's instructions.
-
Do not install near any heat sources such as radiators, heat registers, stoves, or other apparatus (including amplifiers) that produce heat.
-
Do not defeat the safety purpose of the polarized or grounding-type plug. A polarized plug has two blades with one blade wider than the other. A grounding plug has two blades and a third grounding prong. The wide blade or the third prong are provided for your safety. If the provided plug does not fit into your outlet, consult an electrician for replacement of the obsolete outlet.
-
Protect the power cord from being walked on or pinched particularly at plugs, convenience receptacles, and the points where they exit from the apparatus.
-
Only use attachments/accessories specified by the manufacturer.
-
Only use with the cart, stand, tripod, bracket, or table specified by the manufacturer, or sold with the apparatus. When a cart is used, use caution when moving the cart/apparatus combination to avoid injury from tip-over.
-
Refer all servicing to qualified service personnel. Servicing is required when the apparatus has been damaged in any way, such as power-supply cord or plug is damaged, liquid has been spilled or objects have fallen into the apparatus, the apparatus has been exposed to rain or moisture, does not operate normally, or has been dropped.
-
Unplug the apparatus during lightning storms or when unused for long periods of time.
-
Apparatus shall not be exposed to dripping or splashing and no objects filled with liquids, such as vases shall be placed on the apparatus.
-
WARNING: To reduce the risk of fire or electric shock, do not expose this apparatus to rain or moisture.
-
Installation should be done only by qualified personnel and conform to all local codes.
-
Unless this unit is specifically marked as NEMA Type 3, 3R, 3S, 4, 4X, 6, or 6P enclosure, it is designed for indoor use only and it must not be installed where exposed to rain and moisture.
-
Only use installation methods and materials capable of supporting four times the maximum specified load.
-
Only use replacement parts recommended by Pelco.
-
Avoid touching the screen directly with your fingers as the oils from your skin may be difficult to remove from the LCD.
-
Do not apply direct pressure on the screen.
-
Keep the monitor in a dust-free environment and away from strong electromagnetic fields.
-
Do not use attachments, such as mounts, that are not recommended by Pelco. They may be hazardous.
-
Do not place the monitor on an unstable stand, bracket, or mount. The unit may fall, causing serious damage to the unit or injury to a person. Only use mounts recommended by Pelco.
-
A CCC-approved power cord must be used to power this equipment when used in China.
-
A still image displayed too long may cause permanent damage to the LCD panel. Watching the LCD in 4:3 format for a long time may leave traces of borders displayed on the left, right and center of the screen caused by the difference of light emission on the screen. Using a camera or a system may cause a similar effect to the screen. Damages caused by this effect are not covered by the warranty.
The product and/or manual may bear the following marks:

This symbol indicates that dangerous voltage constituting a risk of electric shock is present within this unit.

This symbol indicates that there are important operating and maintenance instructions in the re accompanying this unit
CAUTION:
RISK OF ELECTRIC SHOCK. DO NOT OPEN.
LEGAL NOTICE
SOME PELCO EQUIPMENT CONTAINS, AND THE SOFTWARE ENABLES, AUDIO/VISUAL AND RECORDING CAPABILITIES, THE IMPROPER USE OF WHICH MAY SUBJECT YOU TO CIVIL AND CRIMINAL PENALTIES. APPLICABLE LAWS REGARDING THE USE OF SUCH CAPABILITIES VARY BETWEEN JURISDICTIONS AND MAY REQUIRE, AMONG OTHER THINGS, EXPRESS WRITTEN CONSENT FROM RECORDED SUBJECTS. YOU ARE SOLELY RESPONSIBLE FOR INSURING STRICT COMPLIANCE WITH SUCH LAWS AND FOR STRICT ADHERENCE TO ANY/ALL RIGHTS OF PRIVACY AND PERSONALTY. USE OF THIS EQUIPMENT AND/OR SOFTWARE FOR ILLEGAL SURVEILLANCE OR MONITORING SHALL BE DEEMED UNAUTHORIZED USE IN VIOLATION OF THE END USER SOFTWARE AGREEMENT AND RESULT IN THE IMMEDIATE TERMINATION OF YOUR LICENSE RIGHTS THEREUNDER.
REGULATORY NOTICES
This device complies with Part 15 of the FCC Rules. Operation is subject to the following two conditions: (1) this device may not cause harmful interference, and (2) this device must accept any interference received, including interference that may cause undesired operation.
RADIO AND TELEVISION INTERFERENCE
This equipment has been tested and found to comply with the limits of a Class B digital device, pursuant to Part 15 of the FCC Rules. These limits are designed to provide reasonable protection against harmful interference in a residential installation. This equipment generates, uses, and can radiate radio frequency energy and, if not installed and used in accordance with the instructions, may cause harmful interference to radio communications. However there is no guarantee that the interference will not occur in a particular installation. If this equipment does cause harmful interference to radio or television reception, which can be determined by turning the equipment off and on, the user is encouraged to try to correct the interference by one or more of the following measures:
- Reorient or relocate the receiving antenna.
- Increase the separation between the equipment and the receiver.
- Connect the equipment into an outlet on a circuit different from that to which the receiver is connected.
- Consult the dealer or an experienced radio/TV technician for help.
You may also find helpful the following booklet, prepared by the FCC: "How to Identify and Resolve Radio-TV Interference Problems." This booklet is available from the U.S. Government Printing Office, Washington D.C. 20402.
Changes and modifications not expressly approved by the manufacturer or registrant of this equipment can void your authority to operate this equipment under Federal Communications Commission's rules.
This Class B digital apparatus complies with Canadian ICES-003.
The PMCL400 Series TFT LCD monitor provides high resolution display of computer signals. These 17-inch and 19-inch monitors use a color, thin film transistor (TFT) active matrix LCD panel (1280 x 1024) that automatically adapts to the appropriate input resolution. The RGB and DVI mode settings allow the monitor to seamlessly accept a variety of native resolutions, making the PMCL400 Series compatible with lower resolution products.
The PMCL400 Series features an ergonomic design, autoranging internal power supply, and low power consumption. These innovations, combined with quick panel response time to minimize ghosting in motion video, make the PMCL400 Series an ideal choice for use with any digital video recorder (DVR) or PC application.
In addition, the PMCL400 Series features a folding picture frame-style desktop stand, optional rack mount kits, and VESA®-compliant mounting holes to easily adapt to the available wall and ceiling mounts.
The on-screen display (OSD) menus and front panel controls provide easy configuration of standard monitor display parameters right on the screen. These settings are then stored in the monitor, which eliminates the need for a computer when adjusting basic monitor functions.
MODELS
PMCL417A 17-inch (432 mm) active TFT LCD monitor PMCL419A 19-inch (483 mm) active TFT LCD monitor
RECOMMENDED MOUNTS
PMCL-WM LCD flat wall mount for TFT monitors
PMCL-WMT LCD tilt wall mount for TFT monitors
PMCL-WM1A/PMCL-WM2A LCD single-arm and dual-arm swing wall mounts for TFT monitors
PMCL-CM LCD swivel ceiling mount for TFT monitors
PMCL-CMP LCD swivel ceiling mount and pole for TFT monitors
PMCL-17ARM LCD rack mount for 17-inch TFT monitors
PMCL-19ARM LCD rack mount for 19-inch TFT monitors
PACKAGE CONTENTS
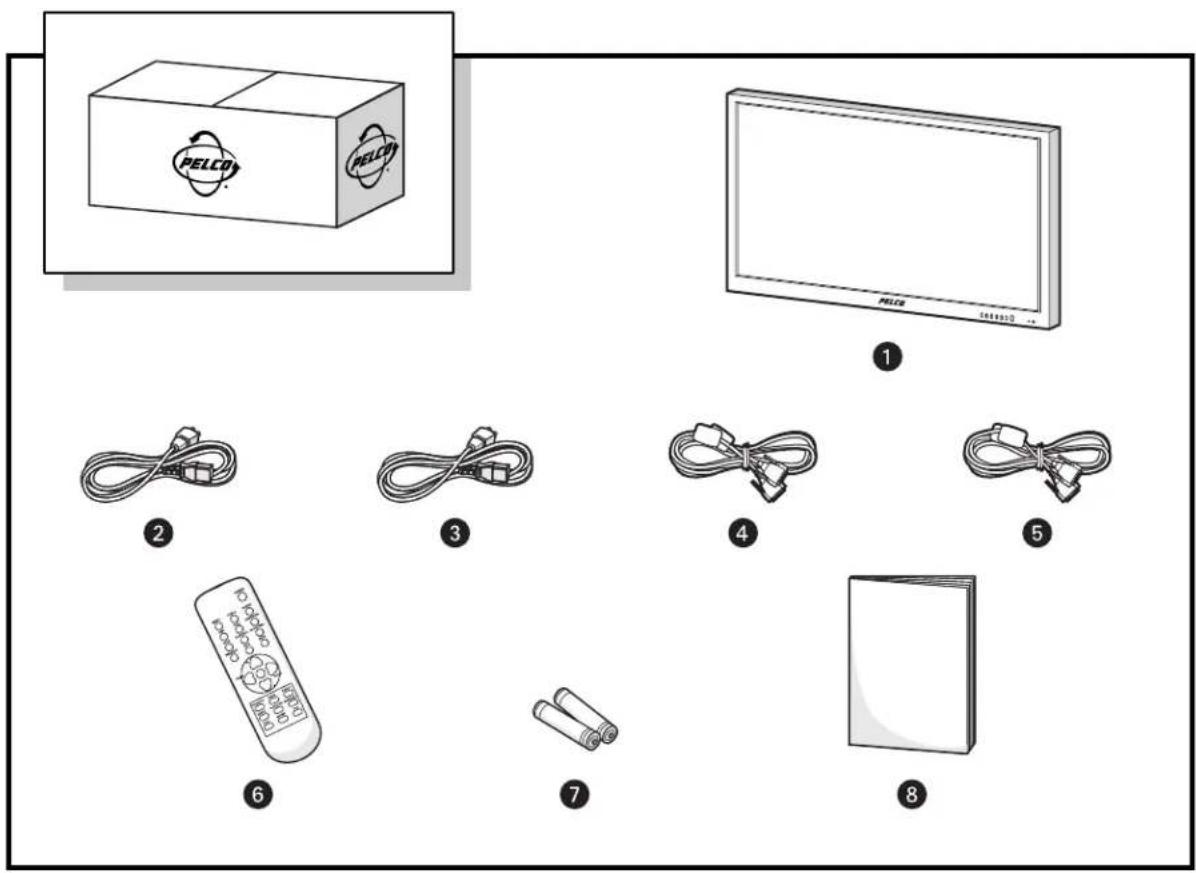
Figure 1. Package Contents
1 17- or 19-inch TFT LCD Monitor (1 ea.)
② USA Standard Power Cord (1 ea.)
③ European Standard Power Cord (1 ea.)
4 DVI Cable (1 ea.)
5 RGB Cable with 15-pin D-Sub Connection (1 ea.)
6 Remote Control Unit (1 ea.)
7 AAA Batteries for Remote Control (2 ea.)
8 Installation/Operation Manual (1 ea.)
The monitor can be installed using any of the following options:
- Desktop Stand
- Flat Wall Mounting
- Rack Mounting
DESK STAND
The monitor comes with a desktop foot stand attached, so that it can be placed on any flat surface (desk or table). You can manually adjust the monitor to the viewing angle you want by repositioning the foot stand on the back of the monitor.
To detach the stand, remove the four mounting screws from the back of the monitor.
WALL MOUNTING
The monitor can be mounted to a wall using one of the following optional mounts: PMCL-WM, PMCL-WMT, PMCL-WM1A, and PMCL-WM2A wall mount kits if you want the monitor attached to the wall.
• The PMCL-WM mount has a maximum load capacity of 68 lb (30.8 kg).
- The PMCL-WMT, PMCL-WM1A, and PMCL-WM2A mounts have a maximum load capacity of 90 lb (40.8 kg).

WARNING: Pelco strongly recommends that a professional installer performs the bracket and LCD monitor installation to ensure the proper installation and attachment.
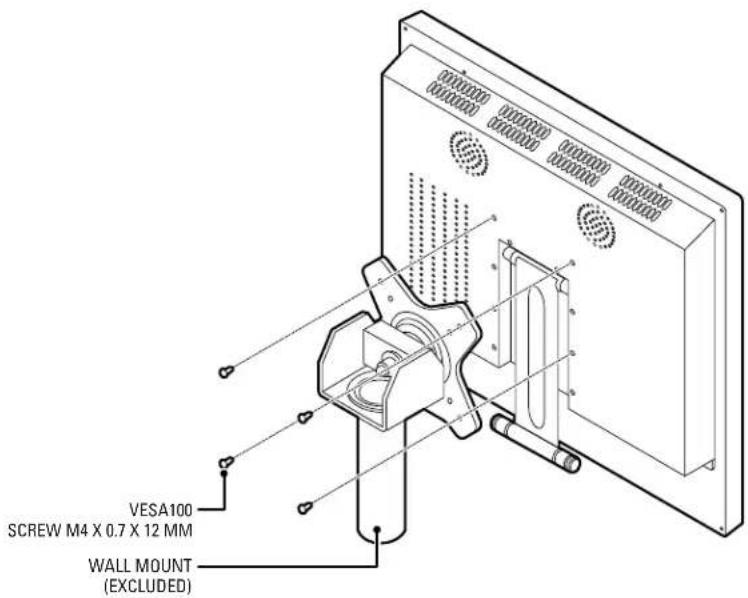
Figure 2. Attaching the Mount in a Wall Installation
To mount the monitor to a wall:
- Align the screw holes in the wall mount with the mounting holes in the back of the monitor.
- Insert and tighten four M4 x 0.7 x 12 mm screws (not supplied).
- Refer to the applicable mount manual for instructions on how to attach the mount to the wall.
RACK MOUNTING
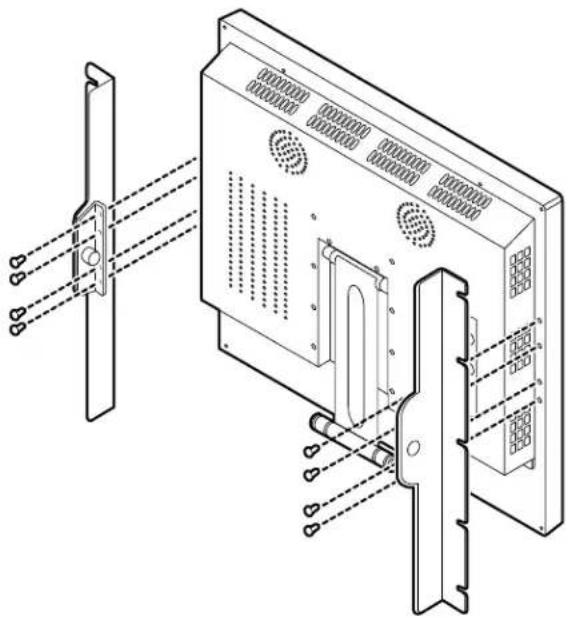
The monitor can be mounted in a rack using the optional PMCL-17ARM or PMCL-19ARM rack mount kit. The weight of the mount is 1.1 lb (0.5 kg) and has a maximum load capacity of 22 lb (10 kg).
To mount the monitor in a rack:
- Attach the left and right brackets to the monitor using the eight M4 x 0.7 screws (supplied) with the rack mount kit.
natural_image
Technical line drawing of an electronic device with ports and wiring, showing internal components and connections (no text or symbols)Figure 3. Installing the Brackets in a Rack Mount Installation
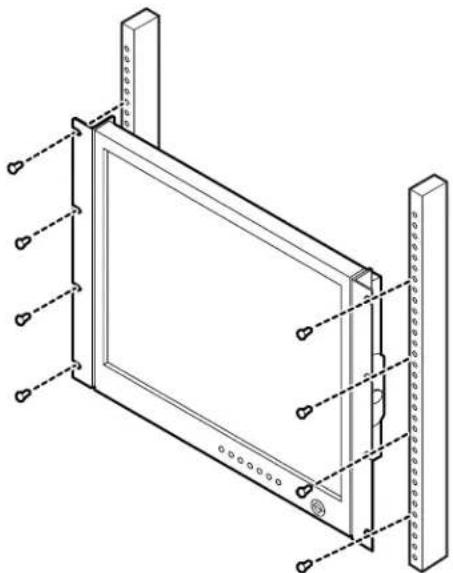
- Attach the monitor to the rack (refer to Figure 4):
a. Position the monitor brackets against the rack. Align the bracket slots with the holes in the rack.
b. Insert eight screws of an appropriate size (not supplied) through the bracket slots and into the holes in the rack.
c. Tighten the screws.
natural_image
Technical line drawing of a rectangular frame mounted on a vertical post, with mounting holes and dashed lines indicating hidden edges (no text or symbols present)Figure 4. Installing the Monitor in the Rack
REAR PANEL CONNECTORS
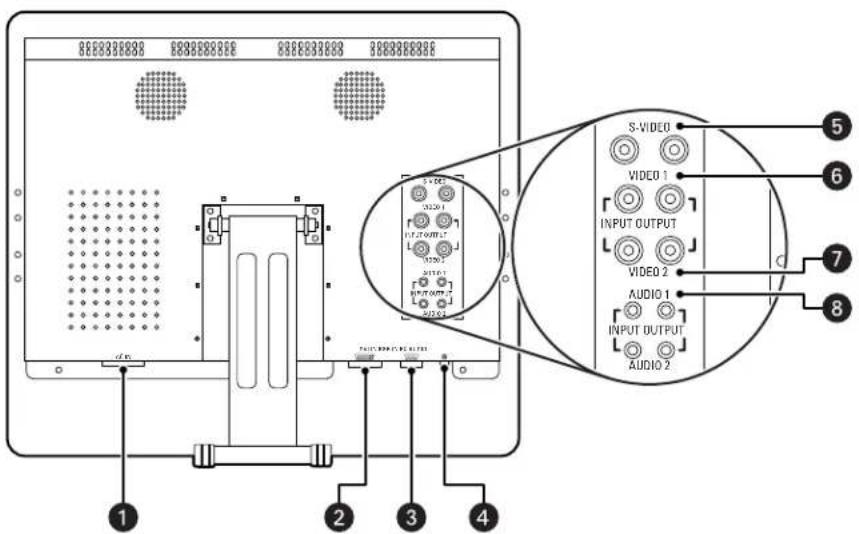
Figure 5. Rear Panel Connectors
1 AC IN: Connects power to the unit from a 100 VAC to 240, 50/60 Hz source.
2 DVI IN: Provides connection to digital signals from a computer or any Pelco device with DVI output..
3 RGB IN: Provides connection to RGB output of a computer or any Pelco device with RGB output.
4 PC AUDIO: Provides audio connection from a PC or recording device. The stereo mini jack is to be used in conjunction with the RGB input.
5 S-Video (loop through): Connection of S-Video signals from external sources. The video loops through the four-pin DIN S-Video output.
6 Video 1 (loop through): Input connections from DVD players or time-lapse VCRs. The video loops through the BNC video output.
⑦ Video 2 (loop through): Input connections from DVD players or time-lapse VCRs. The video loops through the BNC video output.
8 Audio 1 (loop through): Mono RCA audio inputs.
FRONT PANEL CONTROLS
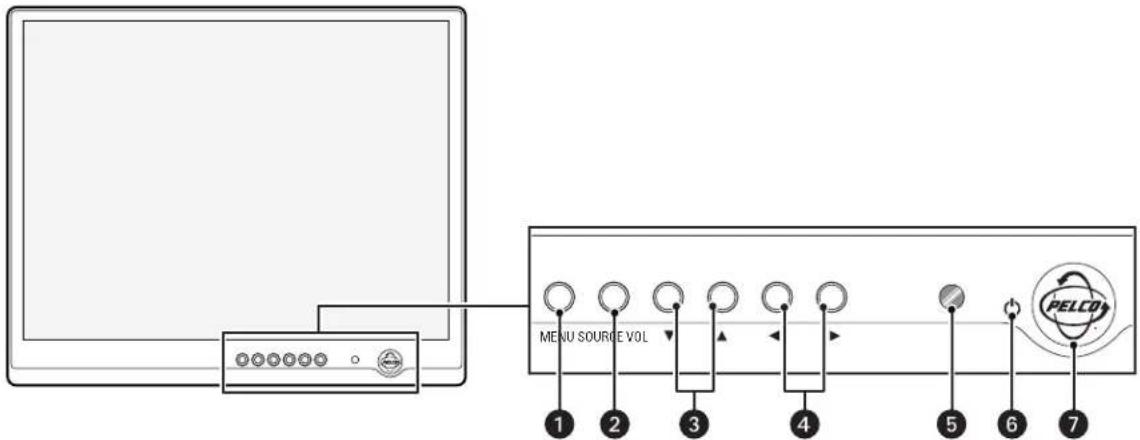
Figure 6. Front Panel Controls
① Menu: Displays the main on-screen menu.
② Source: Selects the input source and confirms your choice.
3 ▼ and ▲: Navigates through the on-screen menu. Also, ▲ is "Auto" in RGB mode
4 VOL (◀ and ▶): Increases or decreases the volume. Also selects or adjusts items in the on-screen menu.
5 (remote control signal receiver): Receives remote control signals.
6 (power label)
⑦ (power button and power indicator): Turns the monitor on and off. Also indicates the power status. Red indicates that the power is off; blue/green indicates that the power is on.
REMOTE CONTROL FUNCTIONS
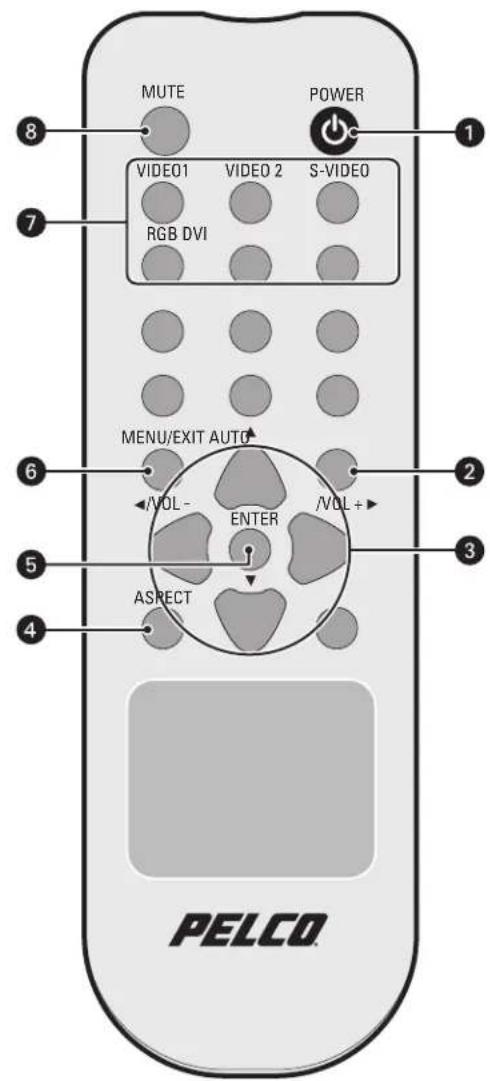
Figure 7. Remote Control
1 POWER: Turns the monitor on and off.
2 AUTO: Selects auto adjustment of the screen in RGB mode.
3 (◄/VOL- and /VOL+►, ▲,▼): Increases and decreases the volume. The up and down arrows let you move the cursor up and down in the on-screen menu.
4 ASPECT: (PMCL319W only.) Changes the screen's scan mode (4:3, 16:9).
5 ENTER: Confirms (store or enter) your choice in the on-screen menu.
6 MENU/EXIT: Displays/exits the on-screen menu.
⑦ (input source): Displays all the available input sources. Press the button to select the desired input source.
8 MUTE: Temporarily silences the sound. To return the sound, press MUTE again.
ON-SCREEN DISPLAY FUNCTION
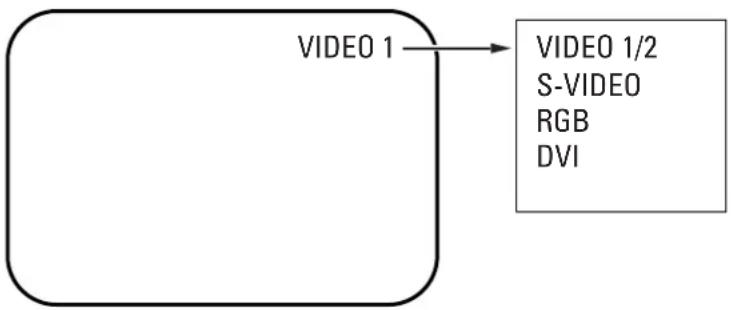
The PMCL400 Series on-screen display (OSD) lets you easily change the basic functions of the monitor from the front panel or the remote control. Figure 8 shows how to change the input source by accessing the menu using the OSD function. The input source name appears in the upper-right corner of the menu screen any time the input source is changed or when you press ENTER on the remote control.
flowchart
graph TD
    A["VIDEO 1"] --> B["VIDEO 1/2\nS-VIDEO\nRGB\nDVI"]
Figure 8. Input Source Name Display
To access the menus:
- Press the MENU button to access the main menu.
- Use the up and down arrow buttons (▲,▼) to highlight a selection.
- Use the left and right arrow buttons (◀, ▶) to adjust the setting on a selected item.
The Video 1, Video 2, S-Video Mode menu contains the following features:
Input: Changes the video input option. Select VIDEO 1, VIDEO 2, or S-VIDEO.
Contrast: Adjusts the black level of the image (0 to 100).
Brightness: Adjusts the white level of the image (0 to 100).
Color: Adjusts the color saturation of the video signal (0 to 100).
Sharpness: Adjusts the picture softer or sharper (0 to 100).
Tint: Adjusts the range of color: green to red (0 to 100).
3-D Noise Reduction: Reduces the video signal's background noise (NORMAL, STRONG, or OFF). NORMAL is the regular level of noise reduction while STRONG increases the level of noise reduction.
Language: Changes the language selection. Select English, Italian, French, Spanish, German, Portuguese-Brazilian, Russian, or Chinese for the OSD display.
OSD Setting: Select SETUP for the on-screen display. Then select one of the following:
- OSD H. POSITION: Adjusts the OSD horizontal position (0 to 100).
- OSD V. POSITION: Adjusts the OSD vertical position (0 to 100).
- OSD DISPLAY TIME: Adjusts the display time (OFF or 5 to 30 seconds). Selecting 5 or 30 determines how many seconds the display remains on the screen when you press a button. Selecting OFF means that there is no delay.
Color Temperature: Select NORMAL, COOL, or USER. If you select USER, then select from the following:
• R-Gain: Adjusts gain for red (0 to 100).
• G-Gain: Adjusts gain for green (0 to 100).
• B-Gain: Adjusts gain for blue (0 to 100).
- Reset: Select RESTORE to return to the original color temperature settings.
ISM: (Image sticking minimization) Sets the recovery time of an LCD panel display when screen burn-in occurs (when a fixed image has been displayed for a long time). The ISM function starts working after the power is off for 10 minutes. Select ON, OFF, or from 1 to 8 hours for the operation period.
Edge Enhancement: Improves the edge characteristic. The default setting is OFF.
Dynamic Contrast: Improves the contrast characteristic. The default setting is ON.
Default Setting: Select RESTORE to reset the monitor to the default settings.
Information: Select INFORMATION to access Pelco headquarters information.
RGB AND DVI MODE MENU
flowchart
graph TD
    A["MAIN MENU"] --> B["Input Menu"]
    B --> C["VIDEO 1"]
    B --> D["VIDEO 2"]
    B --> E["S-VIDEO"]
    B --> F["RGB"]
    B --> G["DVI"]
    A --> H["Contrast Menu"]
    H --> I["0 100"]
    I --> J["Brightness Menu"]
    J --> K["0 100"]
    K --> L["H. Position Menu"]
    L --> M["0 100"]
    M --> N["V. Position Menu"]
    N --> O["0 100"]
    O --> P["Frequency Menu"]
    P --> Q["0 100"]
    Q --> R["Phase Menu"]
    R --> S["0 100"]
    S --> T["Auto Position Menu"]
    T --> U["DISABLE 1024 X 768"]
    T --> V["1280 X 768"]
    T --> W["1360 X 768"]
    T --> X["1366 X 768"]
    A --> Y["Language Menu"]
    Y --> Z["ENGLISH ITALIAN FRENCH SPANISH GERMAN PORTUGUESE RUSSIAN CHINESE"]
    Y --> AA["OSD Setting Menu"]
    AA --> AB["SETUP"]
    AB --> AC["Color Temperature Menu"]
    AC --> AD["NORMAL COOL USER"]
    AC --> AE["ISM Menu"]
    AE --> AF["ON OFF 1 8"]
    AE --> AG["Edge Enhancement Menu"]
    AG --> AH["OFF ON"]
    A --> AI["Information"]
    AI --> AJ["Dynamic Contrast Menu"]
    AJ --> AK["OFF ON"]
    A --> AL["OSD H Position OSD V. POSITION OSD DISPLAY TIME"]
    AL --> AM["User Menu"]
    AM --> AN["R-GAIN G-GAIN B-GAIN RESET"]
    AN --> AO["R-Gain Menu"]
    AO --> AP["G-Gain Menu"]
    AO --> AQ["B-Gain Menu"]
    AO --> AR["Reset Setting RESTORE"]
Figure 10. RGB and DVI Mode Menu
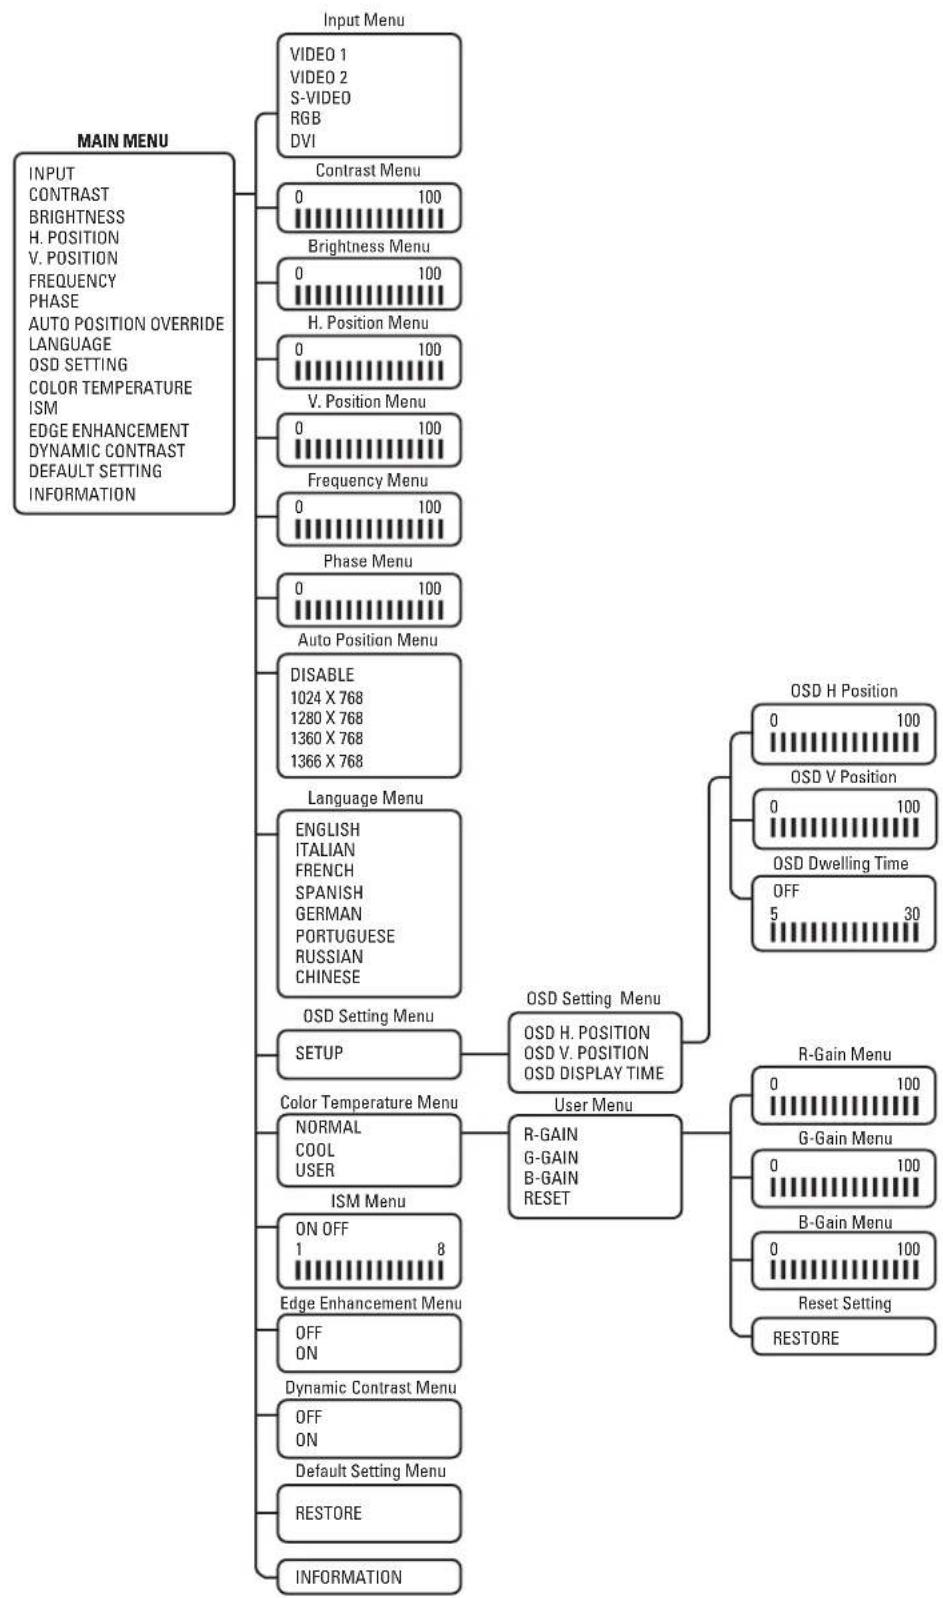
Not all menus are available for both RGB and DVI. Menus that are unavailable do not appear dimmed, while some menus that do not apply are not shown.
The RGB and DVI mode menu contains the following features:
Input: Changes the video input option. Select RGB or DVI.
Contrast: Adjusts the black level of the image (0 to 100).
Brightness: Adjusts the white level of the image (0 to 100).
H-Position: (RGB only; dimmed in DVI mode.) Adjusts the horizontal position (0 to 100).
V-Position: (RGB only; dimmed in DVI mode.) Adjusts the vertical position (0 to 100).
Frequency: (RGB only; dimmed in DVI mode.) Adjusts the horizontal size of the screen image (0 to 100).
Phase: (RGB only; dimmed in DVI mode.) Adjusts image distortion appearing as horizontal noise on the screen (0 to 100).
Auto Position Override: Changes the display resolution. Select DISABLE, 1024 x 768, 1280 x 768, 1360 x 768, or 1366 x 768.
- This menu is enabled only when one of the listed resolution settings is selected.
- If an input signal causes problems on the screen, select a different setting.
- The Auto Position menu has no effect on resolution inputs that are not listed.
Language: Changes the language selection. Select English, Italian, French, Spanish, German, Portuguese-Brazilian, Russian, or Chinese for the OSD display.
OSD Setting: Select SETUP for the on-screen display. Then select one of the following:
• OSD H. POSITION: Adjusts the OSD horizontal position (0 to 100).
- OSD V. POSITION: Adjusts the OSD vertical position (0 to 100).
- OSD DISPLAY TIME: Adjusts the display time (OFF or 5 to 30 seconds). Selecting 5 or 30 determines how many seconds the display remains on the screen after you press a button. Selecting OFF means no delay.
Color Temperature: Select NORMAL, COOL, or USER. NORMAL is the regular color level while COOL decreases the color level. If you select USER, then select from the following:
• R-Gain: Adjusts gain for red (0 to 100).
• G-Gain: Adjusts gain for green (0 to 100).
• B-Gain: Adjusts gain for blue (0 to 100).
- Reset: Select RESTORE to return to the original color temperature settings.
(Image sticking minimization): Sets the recovery time of an LCD panel display when screen burn-in occurs (when a fixed image has been displayed for a long time). The ISM function starts working after the power is off for 10 minutes. Select ON, OFF, or from 1 to 8 hours for the operation period.
Edge Enhancement: Improves the edge characteristic. The default setting is OFF.
Dynamic Contrast: Improves the contrast characteristic. The default setting is ON.
Default Setting: Select RESTORE to reset the monitor to the default settings.
Information: Select INFORMATION to access Pelco headquarters information.
If the following instructions fail to solve your problem, contact Pelco Product Support at 1-800-289-9100 (USA and Canada) or +1-559-292-1981 (international) for assistance. Be sure to have the serial number available when calling.
Do not try to repair the unit yourself. Opening it immediately voids the warranty. Leave maintenance and repairs to qualified technical personnel only. Refer to the Product Warranty and Return Information located on the inside back page of this document.

WARNING: To reduce the risk of electrical shock, do not remove the cover or back of the monitor. There are no user-serviceable parts are inside.
Table A. Troubleshooting the PMCL400 Series Monitor
| Problem Possible Cause Suggested Resolution | ||
| Poor picture quality Faulty system or cable connections. Make adjustments on the front panel control. | ||
| Inspect all system connections and cables. | ||
Maintenance
Periodically, you might need to clean the PMCL400 Series monitor to maintain optimum viewing performance. Be sure to observe the following cleaning instructions to avoid damage to the monitor:
- Gently wipe your screen with a clean camel-hair brush or a soft, clean, lint-free cloth.
- Gently apply pressure to the screen surface to clean the display.
- Do not spray any liquid directly on the screen or the LCD monitor casing. Chemical cleaners can damage the screen and the LCD monitor casing.
GENERAL
Viewing Area
PMCL417A 338 x 270 mm
PMCL419A 376 x 301 mm
Pixel Pitch
Backlight Type 4 CCFL
Viewing Angle (H/V) 160°/160°
Response Time 5 ms
Native Resolution 1280 x 1024 SXGA
Panel Aspect Ratio 5:4
Panel Life 50,000 hours
Display Colors 16.7 million
Front Panel Controls Power, source/enter, menu/exit, up/down, vol +/-
Indicators LED, power on/off
ELECTRICAL
Power Consumption 50 W
Input Voltage 100 to 240 VAC, 50/60 Hz
Input Interfaces
| Video | 2 BNC, looping; 1 S-Video |
| Audio | 2 RCA jack, looping; 1 PC |
Horizontal Frequency 31 kHz to 80 kHz
Vertical Frequency 56 Hz to 75 Hz
Sync Format NTSC/PAL
ENVIRONMENTAL
Operating Temperature 32° to 104°F (0° to 40°C)
Storage Temperature -4° to 140°F (° to 60°C)
Operating Humidity 20% to 80%, noncondensing
Storage Humidity 10% to 90%, noncondensing
PHYSICAL
Dimensions
PMCL417A 2.4" D x 14.9" W x 13.4" H (6.1 x 37.8 x 34.1 cm)
PMCL419A 2.4" D x 16.4" W x 14.5" (6.1 x 41.5 x 36.9 cm)
Unit Weight
PMCL417A 10.8 lb (4.9 kg)
PMCL419A 12.6 lb (5.7 kg)
Shipping Weight
PMCL417A 16 lb (7 kg)
PMCL419A 18 lb (8 kg)
(Design and product specifications subject to change without notice.)
RGB/DVI MODE SUPPORTED FREQUENCIES
Table B describes the resolution supported under different frequencies.
NOTE: Not all resolutions generated by your video source are available on the monitor.
Table B. RGB and DVI Mode Supported Frequencies
| Mode | Resolution | Vertical Frequency (Hz) |
| VGA | 720 x 400 70 | |
| 640 x 480 60/72/75 | ||
| SVGA 8 | 00 x 600 56/60/72/75 | |
| XGA 10 | 24 x 768 60/70/75 | |
| SXGA 11 | 280 x 1024 60/75 | |
| WXGA 12 | 280 x 720 60 | |
| WXGA 13 | 140 x 900 60 | |
PRODUCT WARRANTY AND RETURN INFORMATION
WARRANTY
Pelco will repair or replace, without charge, any merchandise proved defective in material or workmanship for a period of one year after the date of shipment.
Exceptions to this warranty are as noted below:
- Five years:
– Fiber optic products
– TW3000 Series unshielded twisted pair (UTP) transmission products
- CC3701H-2, CC3701H-2X, CC3751H-2, CC3651H-2X, MC3651H-2, and MC3651H-2X camera models
- Three years:
- Pelco-branded fixed camera models (CCC1390H Series, C10DN Series, C10CH Series, IP3701H Series, and IX Series)
– EH1500 Series enclosures
– Spectra ^® IV products (including Spectra IV IP) - Camclosure ^® Series (IS, ICS, IP) integrated camera systems
- DX Series digital video recorders, DVR5100 Series digital video recorders, Digital Sentry® Series hardware products, DVX Series digital video recorders, and NVR300 Series network video recorders
- Endura ^® Series distributed network-based video products
- Genex ^ Series products (multiplexers, server, and keyboard)
- PMCL200/300/400 Series LCD monitors
- Two years:
– Standard varifocal, fixed focal, and motorized zoom lenses
- DF5/DF8 Series fixed dome products
– Legacy ^® Series integrated positioning systems
- Spectra III ^™ , Spectra Mini, Spectra Mini IP, Esprit ^® , ExSite ^® , and PS20 scanners, including when used in continuous motion applications.
– Esprit Ti and TI2500 Series thermal imaging products
- Esprit and WW5700 Series window wiper (excluding wiper blades).
- CM6700/CM6800/CM9700 Series matrix
- Digital Light Processing (DLP ^ ) displays (except lamp and color wheel). The lamp and color wheel will be covered for a period of 90 days. The air filter is not covered under warranty.
- Intelli-M ^® eIDC controllers
- PMCL542F, PMCL547F, and PMCL552F FHD monitors
• One year:
– Video cassette recorders (VCRs), except video heads. Video heads will be covered for a period of six months.
- Six months
- All pan and tilts, scanners, or preset lenses used in continuous motion applications (preset scan, tour, and auto scan modes).
Pelco will warrant all replacement parts and repairs for 90 days from the date of Pelco shipment. All goods requiring warranty repair shall be sent freight prepaid to a Pelco designated location. Repairs made necessary by reason of misuse, alteration, normal wear, or accident are not covered under this warranty.
Pelco assumes no risk and shall be subject to no liability for damages or loss resulting from the specific use or application made of the Products. Pelco's liability for any claim, whether based on breach of contract, negligence, infringement of any rights of any party or product liability, relating to the Products shall not exceed the price paid by the Dealer to Pelco for such Products. In no event will Pelco be liable for any special, incidental, or consequential damages (including loss of use, loss of profit, and claims of third parties) however caused, whether by the negligence of Pelco or otherwise.
The above warranty provides the Dealer with specific legal rights. The Dealer may also have additional rights, which are subject to variation from state to state.
If a warranty repair is required, the Dealer must contact Pelco at (800) 289-9100 or (559) 292-1981 to obtain a Repair Authorization number (RA), and provide the following information:
- Model and serial number
- Date of shipment, P.O. number, sales order number, or Pelco invoice number
- Details of the defect or problem
If there is a dispute regarding the warranty of a product that does not fall under the warranty conditions stated above, please include a written explanation with the product when returned.
Method of return shipment shall be the same or equal to the method by which the item was received by Pelco.
RETURNS
To expedite parts returned for repair or credit, please call Pelco at (800) 289-9100 or (559) 292-1981 to obtain an authorization number (CA number if returned for credit, and RA number if returned for repair) and designated return location.
All merchandise returned for credit may be subject to a 20 percent restocking and refurbishing charge.
Goods returned for repair or credit should be clearly identified with the assigned CA or RA number and freight should be prepaid.
8-13-09
Green
The materials used in the manufacture of this document and its components are compliant to the requirements of Directive 2002/95/EC.

This equipment contains electrical or electronic components that must be recycled properly to comply with Directive 2002/96/EC of the European Union regarding the disposal of waste electrical and electronic equipment (WEEE). Contact your local dealer for procedures for recycling this equipment.
REVISION HISTORY
Manual # Date Comments
C2927M 01/06 Original version.
C2927M-A 01/06
Changed diagonal screen size to 381 mm for the PMCL415 and to 432 mm for the PMCL417. Changed the backlight type to 4 CCFL for the PMCL419. Changed the power consumption to <60W for the PMCL417 and PMCL419. Removed the standby mode specification. Also, removed the second occurrence of the tilt angle specification.
C2927M-B 8/06 In the Specifications section, changed the PMCL419 response time to 8 ms.
C2927M-C 12/06 Changed PMCL417 response time to 8 ms.
C2927M-D 9/09 Revised manual to include information for all new models: PMCL417A and PMCL419A.
Pelco, the Pelco logo, Camclosure, Digital Sentry, Endura, Esprit, ExSite, Genex, Intelli-M, Legacy, and Spectra are registered trademarks of Pelco, Inc.
Spectra III is a trademark of Pelco, Inc.
DLP is a registered trademark of Texas Instruments Incorporated.
All product names and services identified throughout this document are trademarks or registered trademarks of their respective companies
The absence of a trademark or registered trademark from this document does not constitute a waiver of intellectual property rights.
© Copyright 2009, Pelco, Inc. All rights reserved.

by Schneider Electric
www.pelco.com
- PMCL400 Series TFT LCD Monitor
- Contents
- List of Illustrations
- List of Tables
- Important Safety Instructions
- CAUTION:
- LEGAL NOTICE
- REGULATORY NOTICES
- RADIO AND TELEVISION INTERFERENCE
- MODELS
- RECOMMENDED MOUNTS
- DESK STAND
- WALL MOUNTING
- RACK MOUNTING
- REAR PANEL CONNECTORS
- FRONT PANEL CONTROLS
- REMOTE CONTROL FUNCTIONS
- ON-SCREEN DISPLAY FUNCTION
- Maintenance
- GENERAL
- ELECTRICAL
- ENVIRONMENTAL
- PHYSICAL
- RGB/DVI MODE SUPPORTED FREQUENCIES
- PRODUCT WARRANTY AND RETURN INFORMATION
- WARRANTY
- RETURNS
- REVISION HISTORY
- Manual # Date Comments
Brand : Pelco
Model : PMCL417A
Category : Surveillance