
LPI-GC - Camera MEADE - Free user manual and instructions
Find the device manual for free LPI-GC MEADE in PDF.


| Product Type | Astronomical CMOS Camera |
| Model | LPI-GC |
| Brand | Meade |
| Image Sensor | CMOS (specific type not specified) |
| Connection Interface | USB 2.0 |
| Autoguider Port | ST-4 (compatible) |
| Software Included | Meade SkyCapture, DirectShow drivers, ASCOM Platform & camera drivers |
| Main Functions | Planetary imaging, deep-sky imaging, autoguiding |
| Third-Party Software Compatibility | PHD Guiding, Maxim DL, SharpCap, FireCapture (via ASCOM/DirectShow) |
| File Format Support | RAW (via ASCOM), video (via DirectShow) |
| Frame Rate | Higher with DirectShow drivers (for video) |
| Power Supply | USB powered (no external power required) |
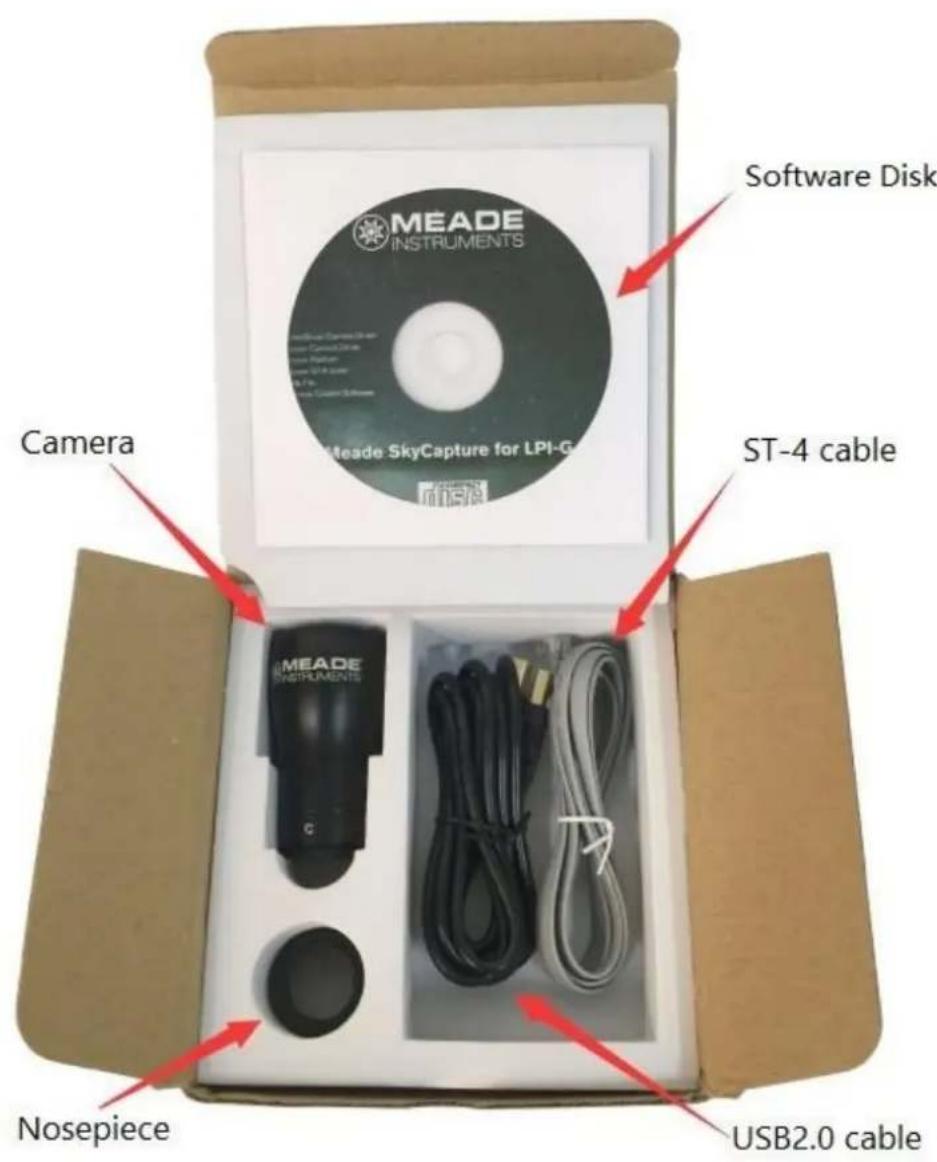
| Accessories Included | Nosepiece, USB 2.0 cable, ST-4 cable, Meade SkyCapture CD-ROM |
| Dimensions | Approximately 50 mm x 50 mm x 30 mm (estimated) |
| Weight | Approximately 100 g (estimated) |
| Maintenance | Keep lens clean; avoid dust and moisture; store in protective case when not in use |
| Safety | Avoid looking directly at the sun; use appropriate solar filters; do not point at lasers |
| Spare Parts / Repairability | Replaceable nosepiece; user-replaceable lens filters; no internal user-serviceable parts |
| General Notes | Requires computer with CD-ROM drive for software installation; ASCOM Platform required for autoguiding and RAW mode |
Frequently Asked Questions - LPI-GC MEADE
User questions about LPI-GC MEADE
0 question about this device. Answer the ones you know or ask your own.
Ask a new question about this device
Download the instructions for your Camera in PDF format for free! Find your manual LPI-GC - MEADE and take your electronic device back in hand. On this page are published all the documents necessary for the use of your device. LPI-GC by MEADE.
USER MANUAL LPI-GC MEADE
Meade's LPI-G Quick Start Guide
1. What's in the box.
Quick Start Summary
- Install Meade's SkyCapture soware, camera Directshow drivers, and ASCOM Plaorm & camera drivers onto the computer using the included Meade SkyCapture CD-ROM.
- If you will be using a special camera Iter, each the included nosepiece to the front of the camera. Then thread on the special camera Iter to the front of the nosepiece.
- Connect the Meade LPI-G to the computer using the included USB 2.0 cable.
- If using the camera as an autoguider, connect one end of the included ST-4 cable into the camera and the other end into the telescope guider port. See your telescope mount instrucons on how to do this.
2. Soware Installaon
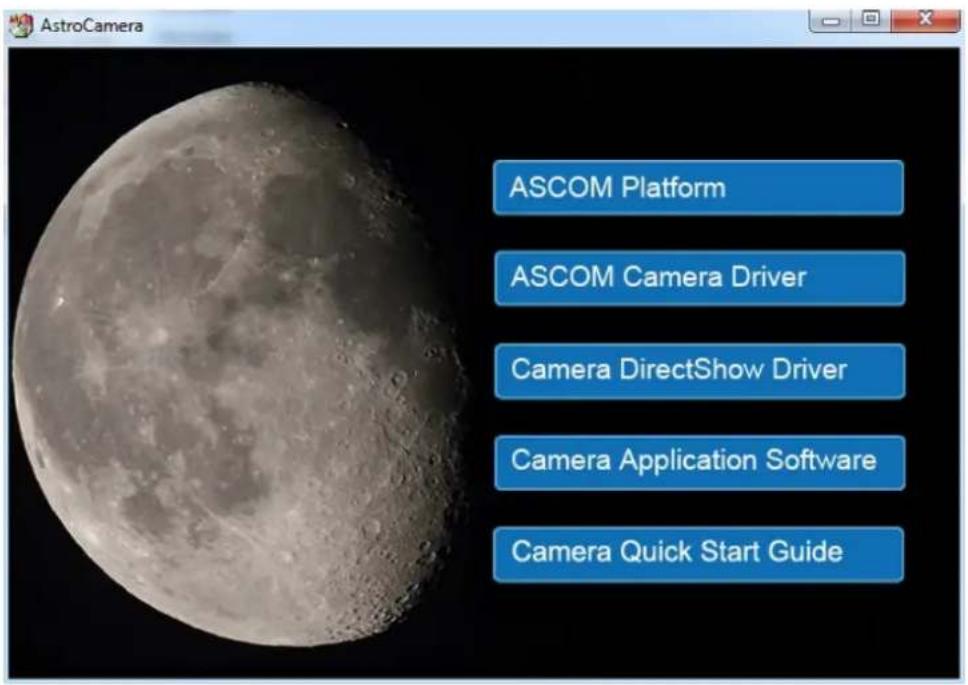
Insert the CD-ROM into the computer and wait for the below screen to appear. If it doesn't appear, go to "My Computer" and double-click on the CD-ROM drive where the Meade SkyCapture was placed. Then, double click on the autorun.exe icon to bring up the below screen.
✨ Installing Meade's SkyCapture
Select the "Camera Applicaon Soware" to install Meade's SkyCapture soware. The SkyCapture soware allows for both basic image capture and image processing funcons suitable for both planetary and deep-sky imaging.
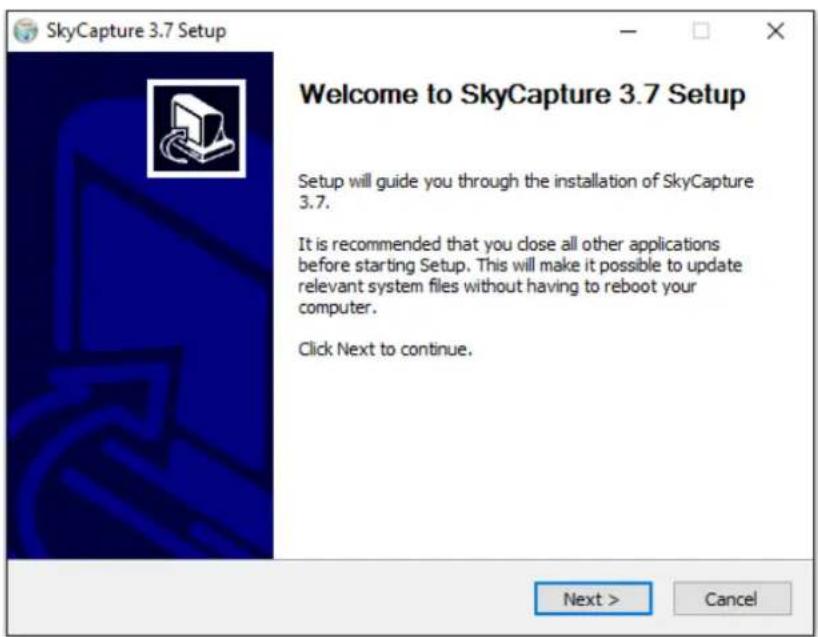
Aer the SkyCapture soware installaon completes, double-click on the SkyCapture icon placed on the desktop to open
Meade's SkyCapture soware.
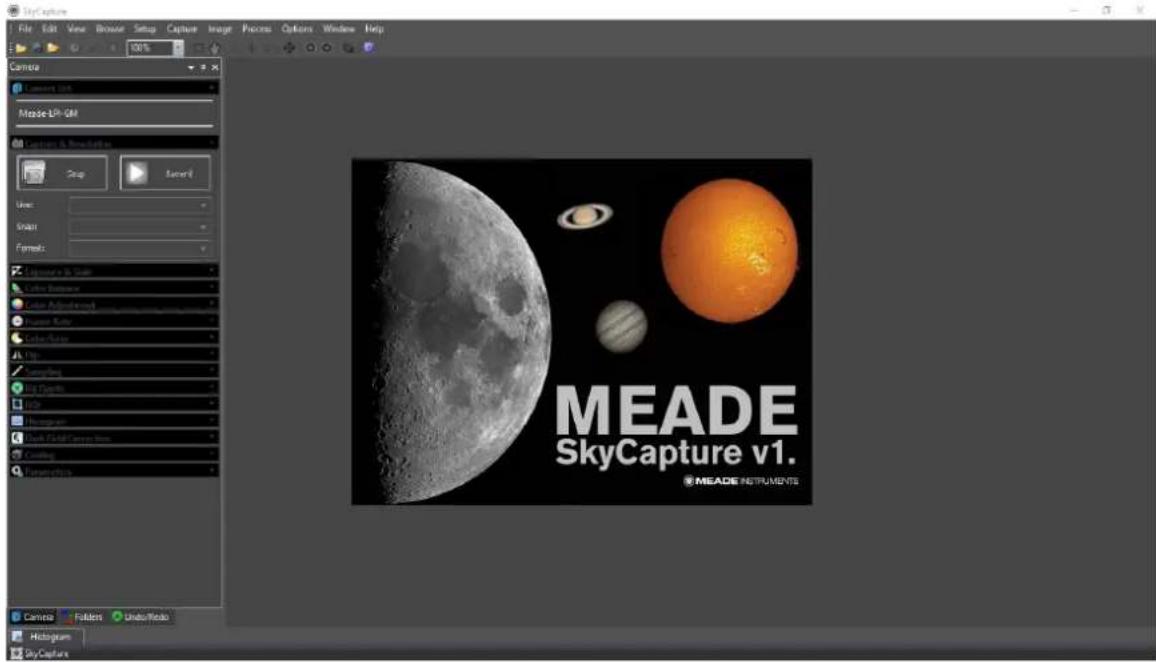
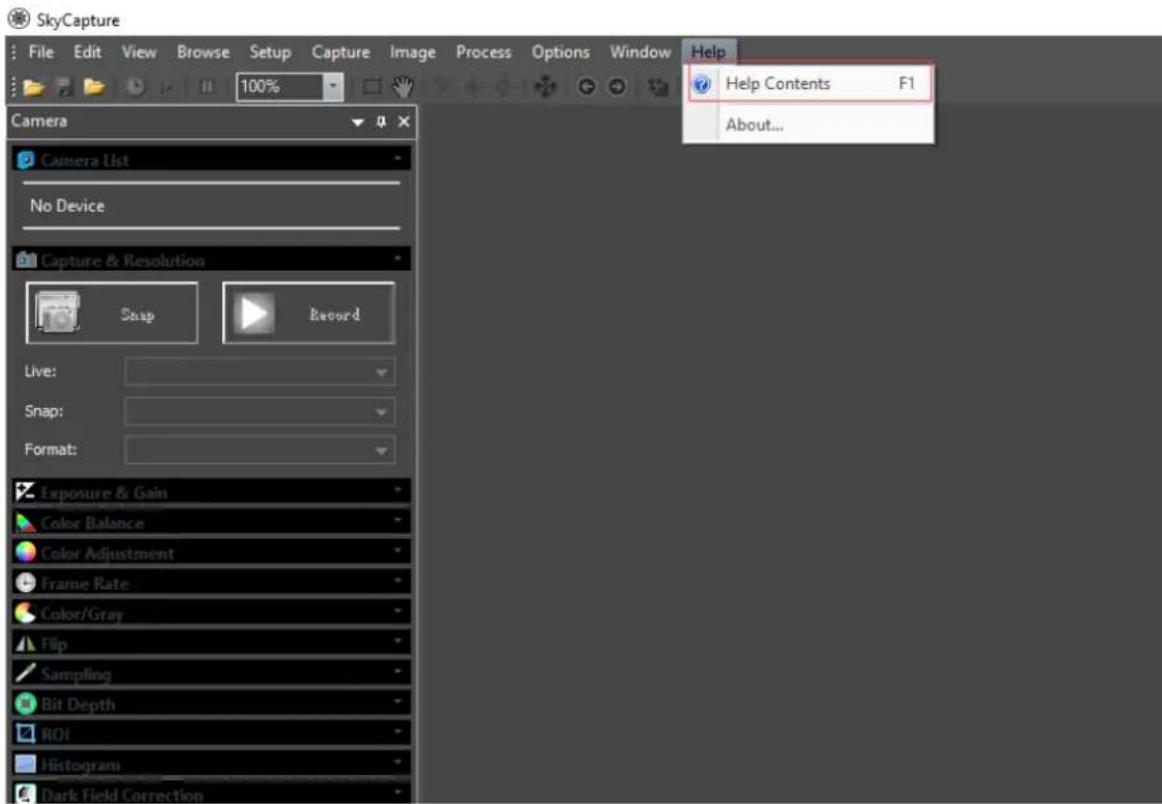
For detailed instrucons on using the numerous SkyCapture features, go to the Help menu for more details.
✨ Installing the DirectShow Drivers
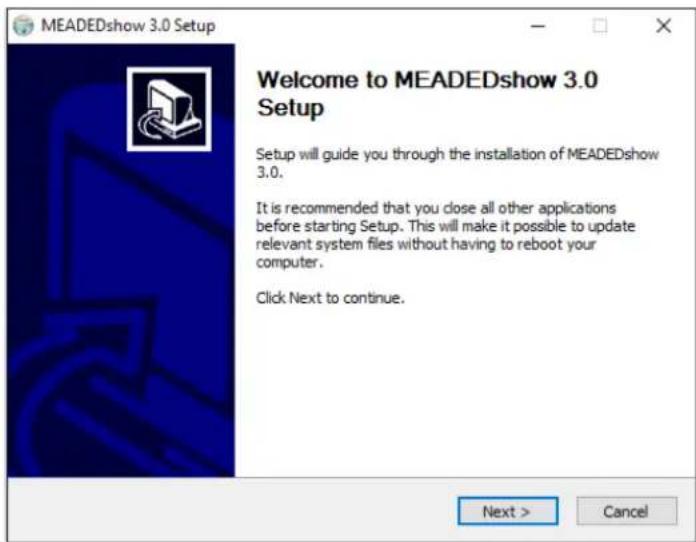
It's recommended you install the DirectShow drivers before using the Meade LPI-G camera. DirectShow drivers allow you to use 3rd party programs that use the DirectShow interface. Additionally, the DirectShow drivers allow the camera to image at a higher frame-rate than ASCOM drivers and is ideal for taking video. The DirectShow drivers also oers additional features such as auto-exposure. However, the RAW format is not supported by DirectShow.
To install the DirectShow drivers, click on "Camera DirectShow Driver" button found on the CD-ROM startup screen. Follow the on-screen instrucons to complete the installaon.
✨ Installing the ASCOM drivers
Many 3rd party soware uses the ASCOM plaorm to interface with cameras and telescope equipment. If auto-guiding, imaging in RAW format, or waning plug and play compatibility with 3rd party soware, it's necessary to install the ASCOM & DirectShow drivers. Third party soware such as Maxim DL, FireCapture, SharpCap, and PHD Guiding will also require the ASCOM and/or DirectShow drivers for LPI-G funconality.
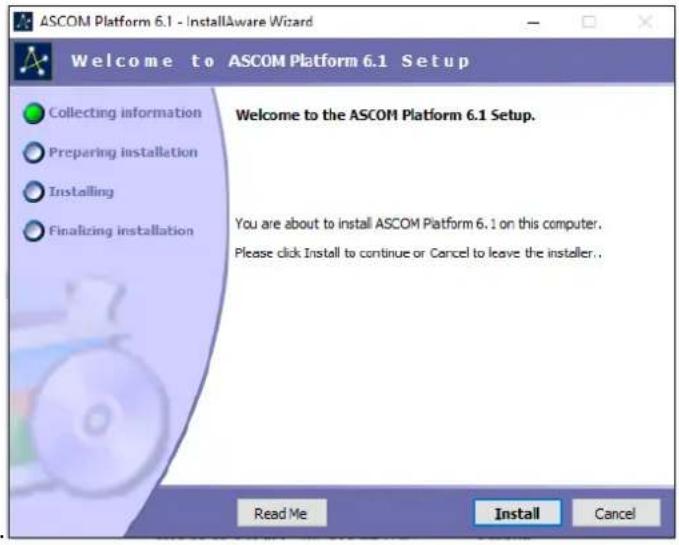
To install the ASCOM drivers, rst install the "ASCOM Plaorm" by clicking on the "ASCOM Plaorm" buon found on the CD-ROM startup screen and follow the on-screen instrucons.
Aer the ASCOM plaorm is installed, install the ASCOM Camera Drivers by clicking on the "ASCOM Camera Driver" button found on the CD-ROM startup screen. Follow the on-screen instrucons to complete the installaon
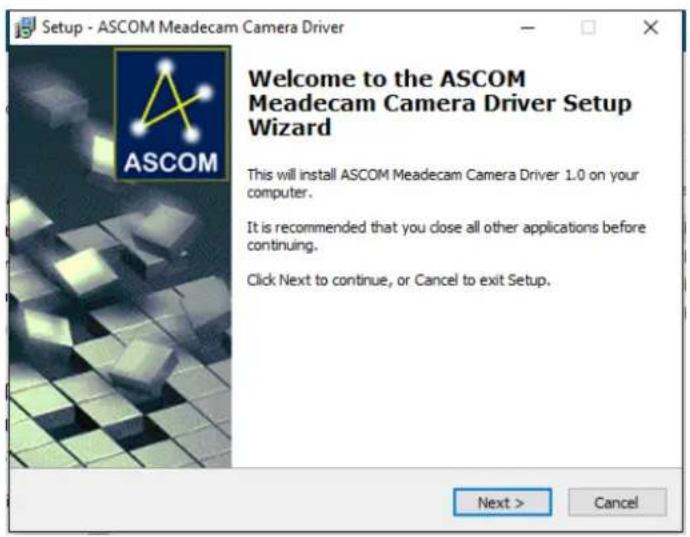
Autoguiding with the LPI-G
The Meade SkyCapture soware does not contain autoguiding soware. If you want to autoguide with the LPI-G, it's recommended you download 3rd party guiding soware such as PHD Guiding to control your autoguider. PHD Guiding soware is freeware and can be downloaded from the Stark-Labs website. In addition, the LPI-G ASCOM drivers need to be installed for proper communicaon with the LPI-G.
3. Using 3rd Party Soware with the LPI-G
✨ Using the ASCOM driver in PHD Guiding
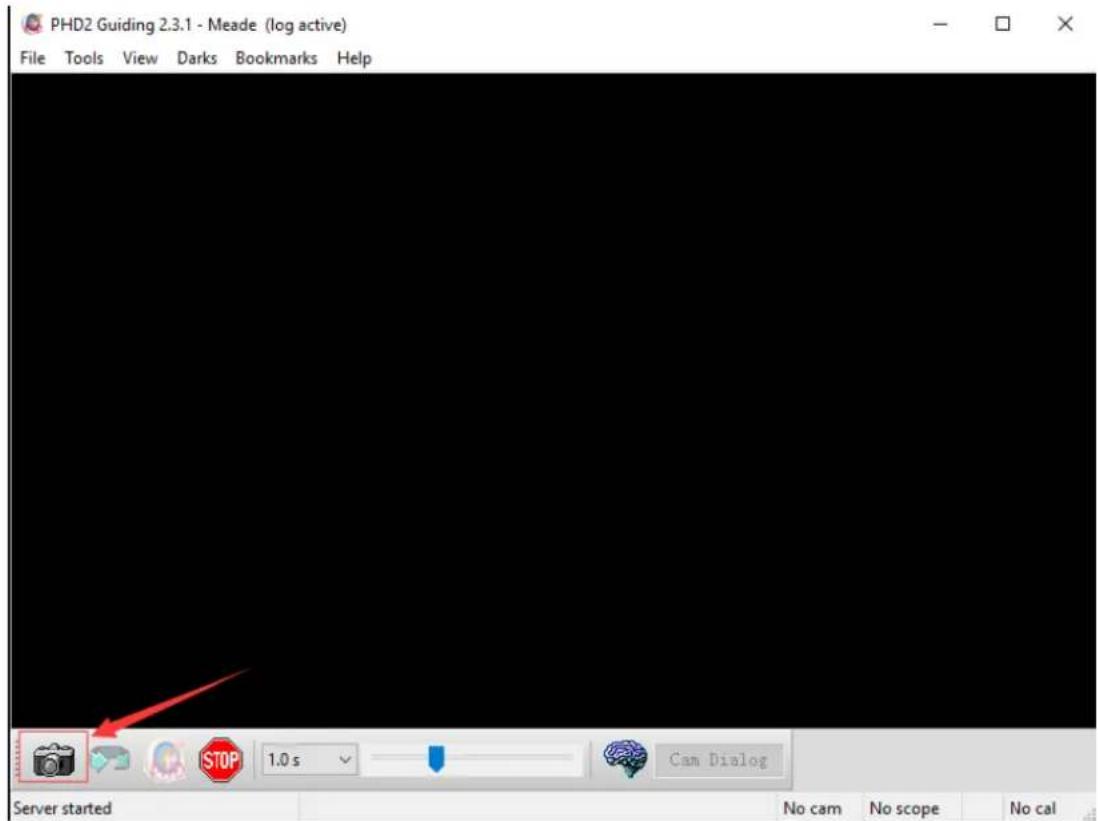
Run PHD Guiding soware rst and click the camera buon on the le boom of the applicaon
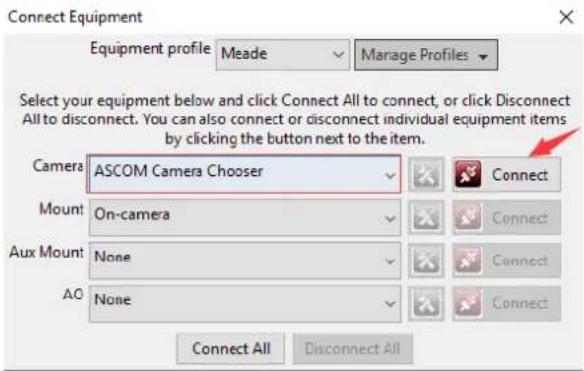
Select the "ASCOM Camera Chooser" in the Camera selecon drop list box and then click the "Connect" button.
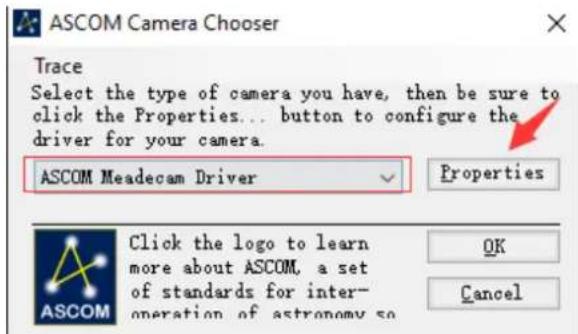
Select "ASCOM Meadecam Driver" in the drop list box and click "Properes".
Change the seeing in the following dialog and then click the "OK" button
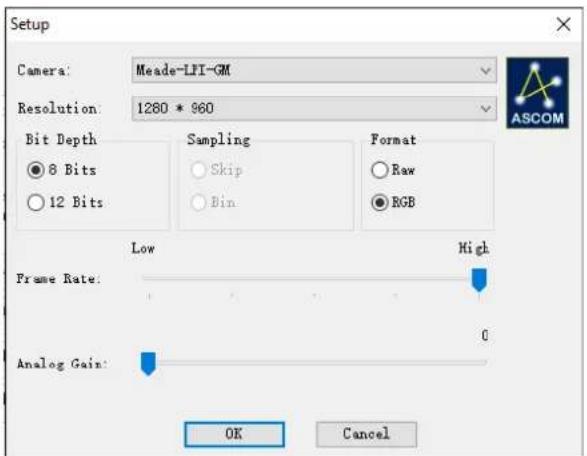
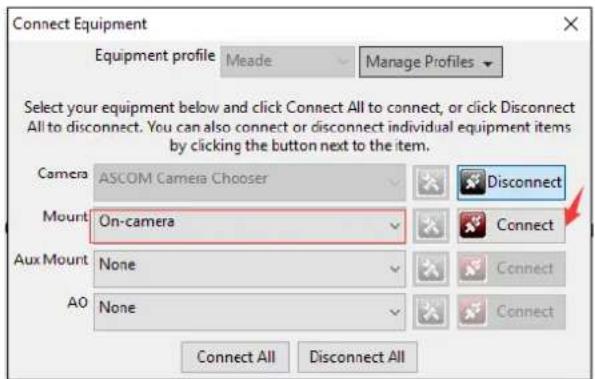
Select the "On-Camera" in the Mount drop list box and click "Connect"
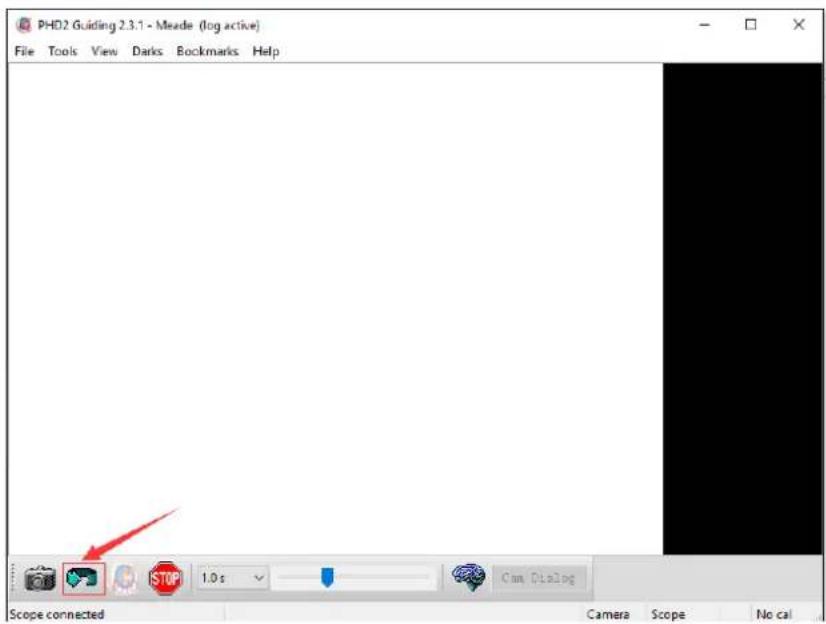
Close the Connect Equipment dialog to go back to PHD Guiding main interface. Then click the loop buon to start the exposure.
✨ Using the DirectShow driver in PHD Guiding
Select "Windows WDM-style webcam camera" in the camera selecon drop list box and click "Connect" buon.
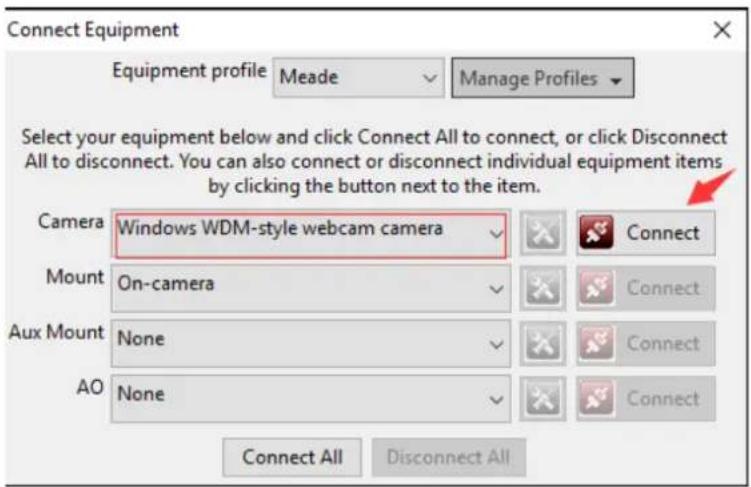
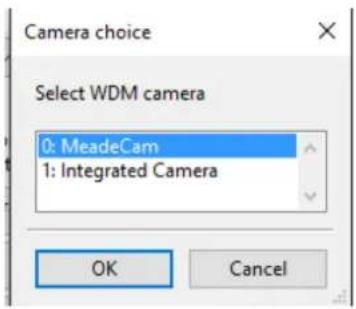
Choose "MeadeCam" in the pop up Camera choice box.
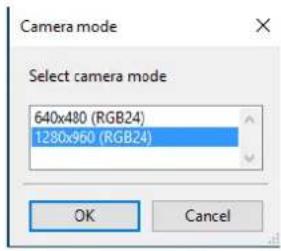
Choose the resoluon in the Camera mode box.
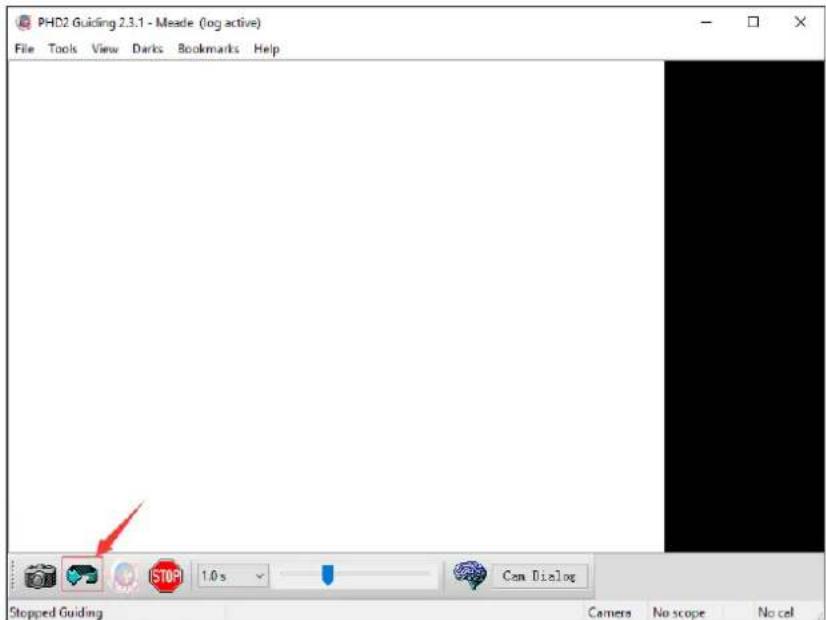
Go back to the main interface and click the loop buon to start the exposure as the following.
✨ Using the ASCOM driver in Maxim DL
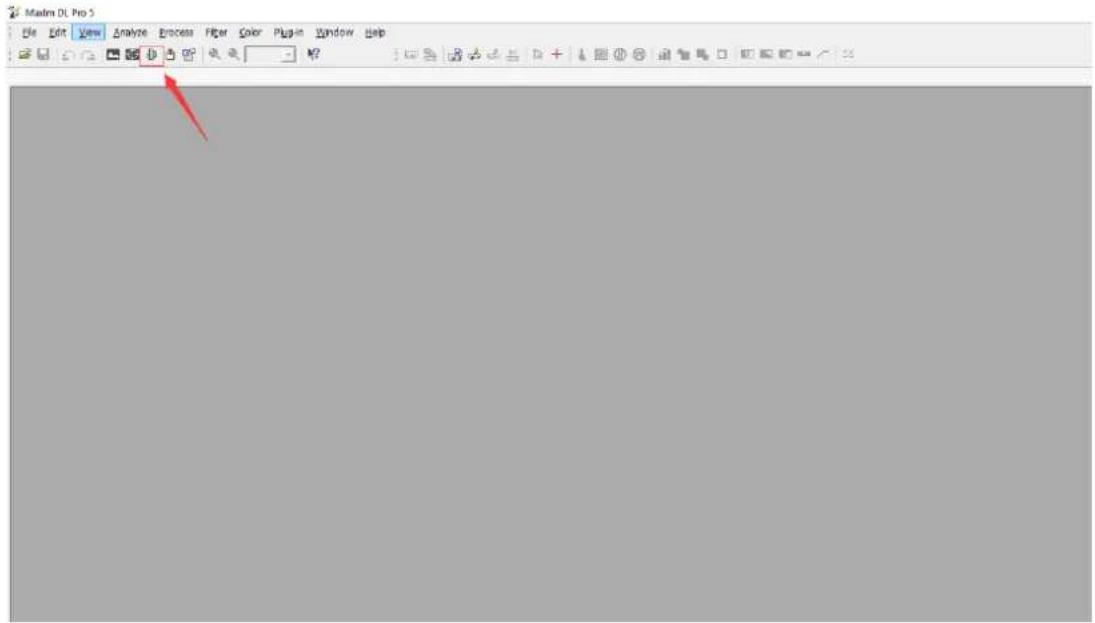
Click the camera buon in the tool bar.
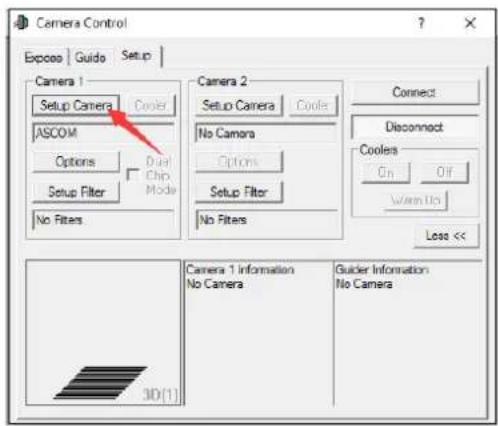
Click the "Setup Camera" buon in the pop up Camera Control dialog box.
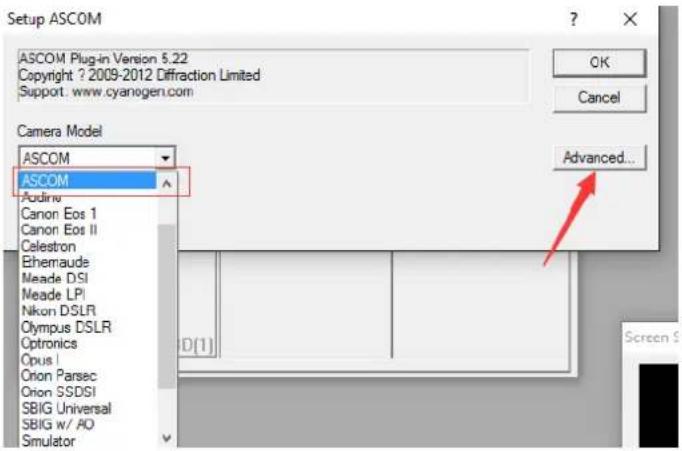
Select "ASCOM" and click the "Advanced..." button.
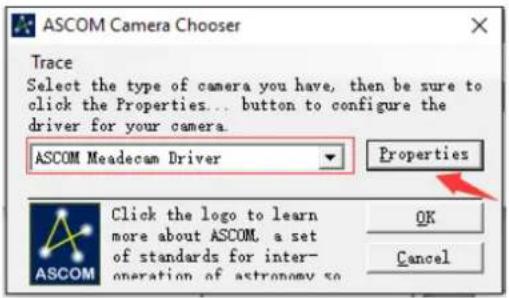
Select "ASCOM Meadecam Driver" in the drop list box and click the "Properes" button.
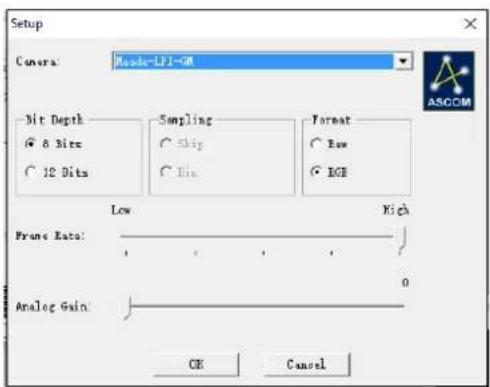
Adjust the camera sengs as appropriate, or use the default sengs, then click "OK"
Click the "Connect" buon to accomplish the conneccon.
![Camera Control Expose | Guide | Setup | Camera 1 Setup Camera ASCOM Options Setup Filter No Filters Camera 2 Setup Camera No Camera Setup Filter No Filters Connect Disconnect Coolers On Off Warr Up Less << Camera 1 Information No Camera Guidler Information No Camera 3D[1]](/content/2026/06/1195714/images/cfadad724643c269631c9a126b6e0029c57811dc8244826a3f97bfe6f45e436d.jpg)
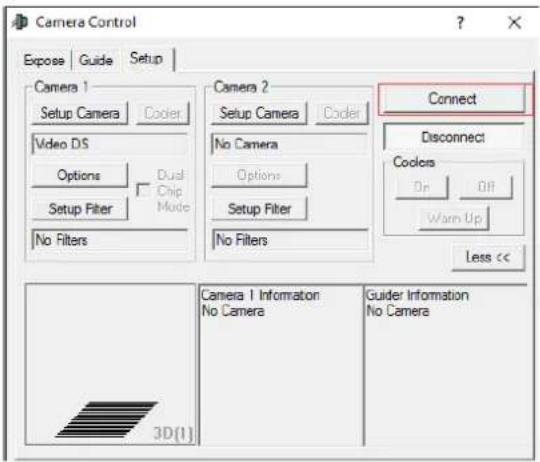
✨ Using the DirectShow driver in Maxim DL.
Click the camera buon in the tool bar.
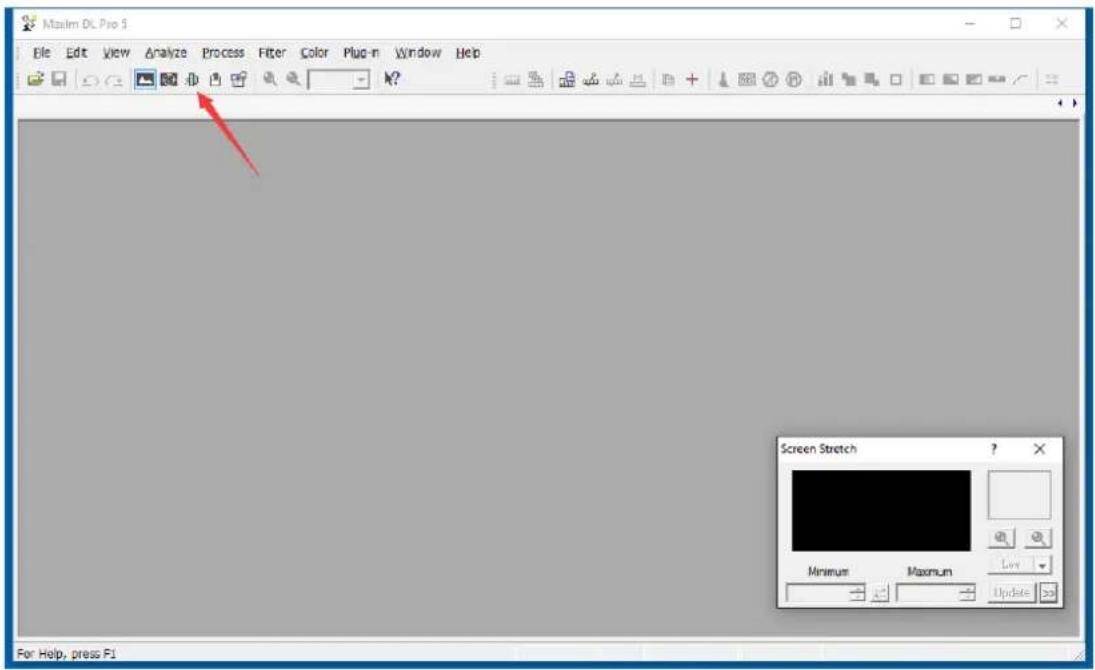
Click the "Setup Camera" buon as the following.
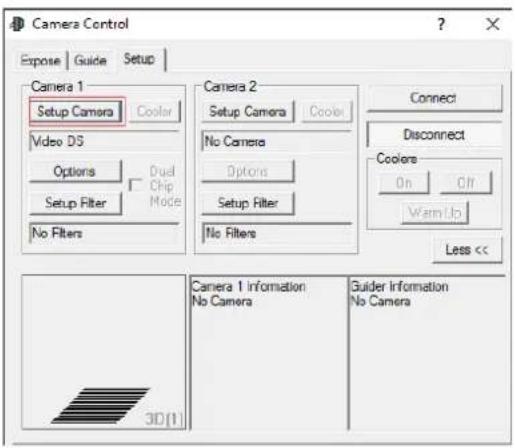
Select the "Video DS" in the pop up dialog and click "OK".
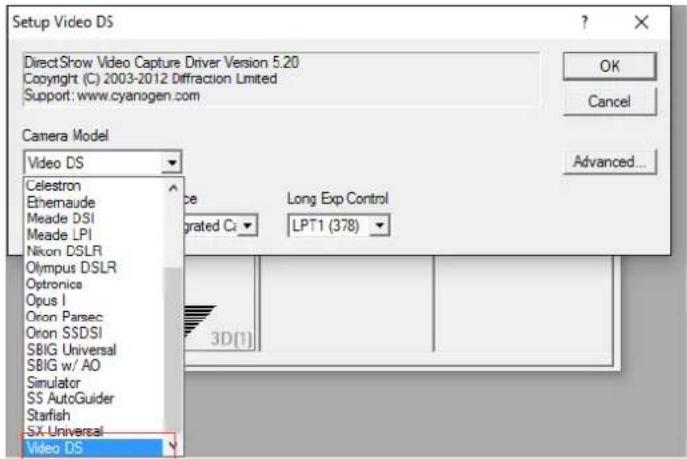
Click "Connect" to start the video.
✨ Using the ASCOM driver in SharpCap
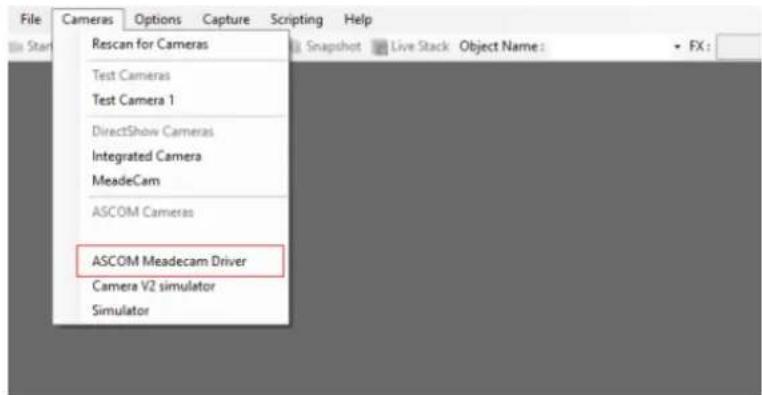
Select "ASCOM Meadecam" item in the ASCOM cameras section of the Cameras menu.
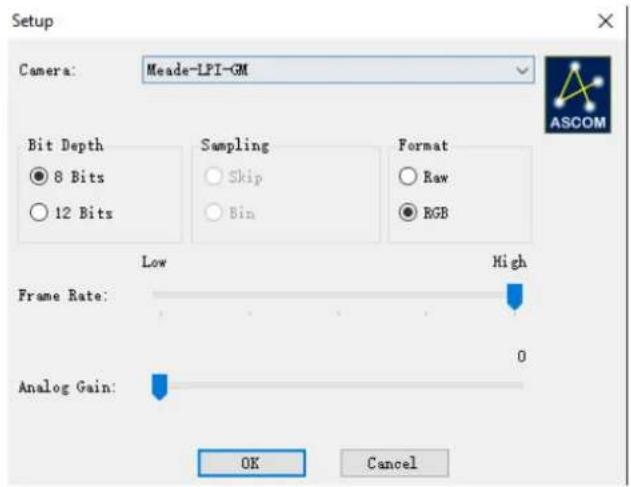
Change sengs (or not) and click "OK" to start the video.
✨ Using the DirectShow driver in SharpCap
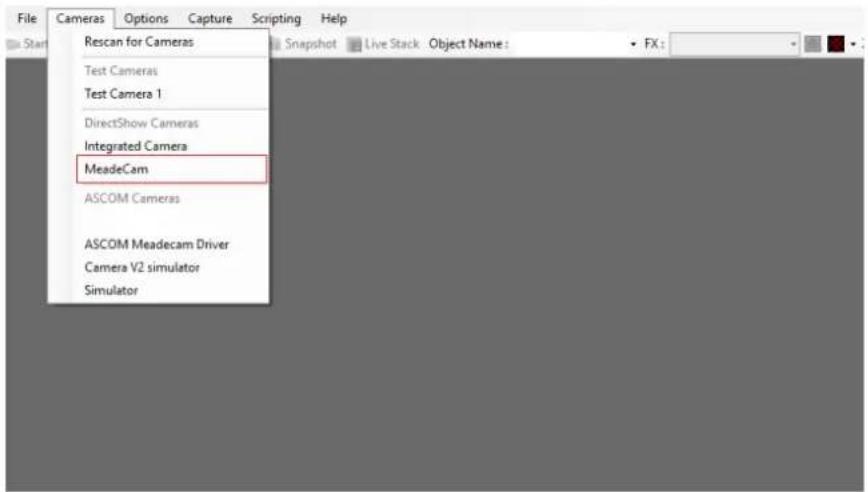
Select "MeadeCam" item in the DirectShow cameras section of the Cameras menu to start the video.
REV 1 20160531

- MEADE'S LPI-G QUICK START GUIDE
- WHAT'S IN THE BOX
- QUICK START SUMMARY
- SOWARE INSTALLAON
- ✨ INSTALLING MEADE'S SKYCAPTURE
- ✨ INSTALLING THE DIRECTSHOW DRIVERS
- ✨ INSTALLING THE ASCOM DRIVERS
- AUTOGUIDING WITH THE LPI-G
- USING 3RD PARTY SOWARE WITH THE LPI-G
- ✨ USING THE DIRECTSHOW DRIVER IN PHD GUIDING
- ✨ USING THE ASCOM DRIVER IN MAXIM DL
- ✨ USING THE ASCOM DRIVER IN SHARPCAP
- ✨ USING THE DIRECTSHOW DRIVER IN SHARPCAP
Brand : MEADE
Model : LPI-GC
Category : Camera