
VP900 - Paint sprayer BLACK & DECKER - Free user manual and instructions
Find the device manual for free VP900 BLACK & DECKER in PDF.


| Product Type | Cordless Paint Sprayer |
| Brand | Black & Decker |
| Model | VP900 |
| Power Source | VersaPak rechargeable battery or 3x C (LR14) alkaline batteries |
| Paint Compatibility | Dulux Handypack paint refills only |
| Painting Tools Included | Roller, brush, paint flow guide, roller holder |
| Paint Delivery | Air pressure from bellows; trigger controlled flow |
| Noise Level | A weighted sound pressure <70 dB(A) |
| Cleaning Method | Water flush via tap adaptor; no solvents |
| Safety Features | Auto shutoff when not in use, lock on trigger for cleaning only |
| Accessories Included | Tap adaptor, cleaning clip, straps for back mounting |
| Dimensions (approx.) | 30 x 20 x 15 cm |
| Weight (approx.) | 1.5 kg (without batteries) |
| Warranty | 24 months (UK, Australia, New Zealand only) |
| Repairability | Authorized service centers only; use genuine parts |
| Storage | Dry, high or locked place, out of reach of children |
| Environmental Note | Return old product to authorized agent for safe disposal |
Frequently Asked Questions - VP900 BLACK & DECKER
User questions about VP900 BLACK & DECKER
0 question about this device. Answer the ones you know or ask your own.
Ask a new question about this device
Download the instructions for your Paint sprayer in PDF format for free! Find your manual VP900 - BLACK & DECKER and take your electronic device back in hand. On this page are published all the documents necessary for the use of your device. VP900 by BLACK & DECKER.
USER MANUAL VP900 BLACK & DECKER
natural_image
Line drawing of two paint meters with hoses and connectors, one labeled 'Paintmate' (no text or symbols on the devices themselves)Congratulations!
On the purchase of your Black & Decker Paintmate.
To ensure the best results from your Paintmate please read these safety and usage instructions carefully. If you have any questions or queries after reading this manual concerning the Paintmate or the paint, please do not hesitate to call either Black & Decker or Dulux using the numbers shown towards the back of this manual.
Contents
Page 4 Safety instructions
Additional Paintmate safety instructions
Unwanted tools and the environment
Page 5 The Black & Decker guarantee
After sales service for your Black & Decker product
Our after sales service policy
Accessories
Features
Page 6 Preparing your Paintmate
Page 7 Operating your Paintmate
Handy hints
Page 8 Cleaning after use
Page 9 Trouble shooting guide
Page 10 EC declaration of conformity
Black & Decker and Dulux phone numbers and addresses
Guarantee card
Paintmate user manual
SAFETY INSTRUCTIONS
Warning! When using electric tools, the following basic safety precautions should always be taken to reduce the risk of fire, electric shock and personal injury. Read all these instructions before attempting to operate the product and save this booklet.
FOR SAFE OPERATION:
- Keep the work area clean. Cluttered areas and benches invite injuries.
- Consider the work area environment. Do not expose your Paintmate to rain and do not use in damp or wet locations. Keep the work area well lit. Do not use in the presence of flammable liquids or gases.
- Keep children away. Do not let visitors touch your Paintmate. All visitors should be kept away from the work area.
- Store idle tools. When not in use, your Paintmate should be stored in a dry, high or locked place, out of reach of children.
- Do not force your Paintmate. It will do the job better and more safely at the rate for which it was intended.
- Use the right tool. Do not force small tools or attachments to do the job of a heavy duty tool.
- Dress properly. Do not wear loose clothing or jewellery as they can be caught in moving parts. Rubber gloves and non-skid footwear are recommended when working outdoors. Wear protective hair covering to contain long hair.
- Use safety glasses. Use a face or dust mask as well, if working overhead.
- Do not overreach. Keep proper footing and balance at all times.
- Maintain the tool with care. Keep your Paintmate clean for better and safer performance. Follow the instructions for cleaning and changing accessories. Keep the handles dry, clean and free from oil and grease.
- Remove batteries when not in use.
- Avoid unintentional starting. Ensure the switch is off when inserting batteries.
- Stay alert. Watch what you are doing, use common sense and do not operate your Paintmate when tired.
- Check damaged parts. Before further use of your Paintmate, any part that is damaged should be carefully checked to determine whether it will operate properly and perform its intended function. Check for alignment of moving parts, free running of moving parts, breakage of parts, mounting and any other conditions that may affect its operation. A guard or other part that is damaged should be properly repaired or replaced by an authorised service agent unless otherwise indicated in this use
manual. Have defective switches replaced by an authorised service agent. Do not use your Paintmate if the switch does not turn it on and off.
- Warning! The use of any accessory or attachment, other than recommended in this user manual, may present a risk of personal injury.
- Have your Paintmate repaired by a qualified person. The electrical tool is in accordance with the relevant safety requirements. Repairs should only be carried out by qualified persons using original spare parts, otherwise, this may result in considerable danger to the user.
- Your Paintmate complies with legal requirements in force relating to radio and television suppression.
ADDITIONAL PAINTMATE SAFETY INSTRUCTIONS
Important! On delivery, your Paintmate cordless painting product requires battery power in order to operate. This may be supplied in one or two ways:
- By use of a single Black & Decker Versapak rechargeable battery. Always ensure your Versapak rechargeable battery is fully charged using a Versapak battery charger before use.
- By use of three size C (L14) Alkaline batteries.
Safety
- Never use solvents to clean any part of your Paintmate. Only use water and mild soap if necessary.
- Do not place any sharp or abrasive objects in your Paintmate.
- Wipe any paint spills from the unit with a damp cloth, do not immerse the main unit"fö water.
- Only use recommended Dulux Handypack paint refills.
- Do not re-use empty Handypacks.
- If the Handypack appears to be damaged or torn, it should not be used.
- Ensure all connections are correctly made before turning the unit on.
- Do not angle the brush towards your face when pressing the trigger.
- Do not place your Paintmate near a heat source, such as an open fire.
- Do not lean forward excessively when your Paintmate is mounted on your back, as it may slip forward and hit your head.
- Do not lift or drag your Paintmate with the handset and tube.
Save these instructions!
UNWANTED TOOLS AND THE ENVIRONMENT
Should you find one day that your Paintmate needs replacement or is of no further use, think
ENGLISH
of the protection of the environment. Black & Decker authorised service agents will accept old products and will dispose of them in an environmentally safe way.
THE BLACK & DECKER GUARANTEE (UK, AUSTRALIA AND NEW ZEALAND ONLY)
If your Paintmate becomes defective due to faulty materials and workmanship, within 24 months from the date of purchase, we guarantee to either replace all defective parts or at our discretion, replace the unit free of charge provided that:
- Your Paintmate is returned to us or our authorised repairers with evidence of date of purchase.
- Your Paintmate has not been used for trade, professional or hire purposes.
- Your Paintmate has not been subjected to misuse or neglect.
- Your Paintmate has not sustained any damage through foreign objects, substances or accidents.
• Repairs have not been attempted by anyone other than our authorised repair agents.
This guarantee is offered as an extra benefit and is additional to the customers statutory rights.
AFTER SALES SERVICE FOR YOUR BLACK & DECKER PRODUCT (UK, AUSTRALIA AND NEW ZEALAND ONLY)
Black & Decker offers a nationwide network of authorised service agents. The use of other than genuine Black & Decker accessories and parts may damage or reduce the performance of your Paintmate and may also endanger the user. The terms and conditions of the warranty may also be effected.
THE AFTER SALES SERVICE POLICY (UK, AUSTRALIA AND NEW ZEALAND ONLY)
It is our aim that all Black & Decker customers should be totally satisfied with their Black & Decker product and after sales service, but if help or advice is needed please contact a local Black & Decker authorised repair agent manager who will be happy to help. Full details of our unique after sales service can be obtained from any of our Black & Decker authorised repair agents.
ACCESSORIES
The performance of any power tool is dependant upon the accessory used. Black & Decker accessories are engineered to high quality standards and are designed to enhance the performance of your Paintmate. Buying a Black & Decker accessory will ensure that you get the very best from your Black & Decker Paintmate.
FEATURES

ENGLISH
- Main body
- Handle
- Lid
- Latch
- VersaPak battery holder
- On/off switch
- Sleeve nut
- Handset
- Trigger
- Roller holder
- Paint flow guide
- Roller
- Brush
- Cleaning lock-on clip
- Tap adaptor
- Straps
- Parking position
- Paint tube
Important! For convenience, the roller and other parts can be found inside your Paintmate. Please depress the handle latch, pull the handle forward, open the inside lid and remove and identify all the parts.
PREPARING YOUR PAINTMATE

Push the roller (12) or paintbrush unit (13) onto the end of the handset with moderate force.
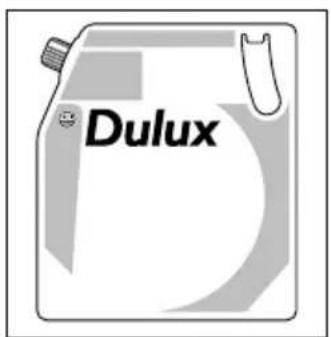
Your Paintmate can only be used with paint from Dulux Handypacks.
Place your Paintmate on a stable flat surface.
To place the Dulux Handypack within your Paintmate, proceed as follows:

Lightly depress the latch (4), pull the handle forward and open the inside lid (3).
natural_image
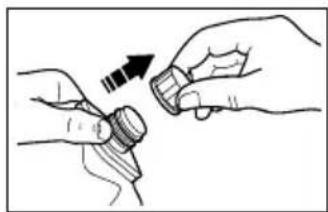
Illustration of hands holding a small object with an arrow indicating motion (no text or symbols)Shake the Dulux Handypack gently before removing the cap. Unscrew the Handypack cap and retain it for future use.
Gently squeeze any air from the top of the Handypack.

Now attach the paint tube (18) to the Handypack. Push the connector onto the spout, twist clockwise to lock in position. Push the Handypack firmly into the cavity, keeping the paint tube to the right (as you face the unit). Always ensure the bellows are completely deflated before adding a new paint bag. This can be done by squeezing the bellows with your hand.

natural_image
Illustration of a hand using a tool to clean or inspect a mechanical component (no text or symbols visible)ENGLISH

To hold the tube and connector in position, fit the side lugs in the two slots provided in the main body (1). Close the lid to hold the tube and raise the handle, to the locked position.
Your Paintmate will accept two types of battery, either:
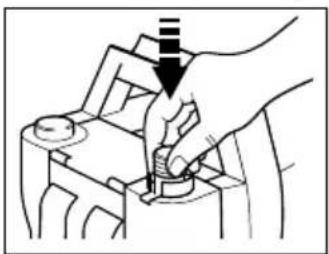
natural_image
Hand inserting a component into a battery (no text or symbols visible)Black & Decker Versapak battery fitted into the top of the unit.

natural_image
Line drawing of a hand inserting a component into a device (no text or symbols)3 size C (L14) alkaline batteries into the special side compartment.
Ensure batteries are fully charged before fitting.
Warning! Never try to insert Versapak and C-cell batteries together. Your Paintmate will not operate with ordinary zinc chloride batteries.
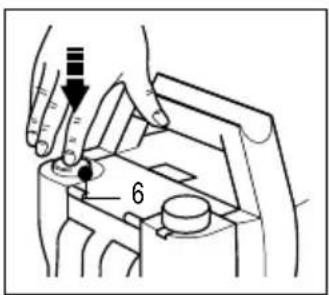
Switch the unit on or off by depressing the orange button (6). Switching off the unit releases the pressure from the Dulux Handypack. Only do this when changing paint
bags, for long breaks or at the end of the job. Paint is squeezed from the bag by air pressure inside the bellows of the main unit. There will be a short delay between first switching on, and paint arriving at the handset. This may take 2 or 3 minutes or longer if using a partially filled paint Handypack.
If an airlock occurs when your Paintmate is switched on it may prevent the paint reaching all the way up to the handset. Squeezing the trigger in the handset will release the airlock.
The motor and pump automatically switch on and off to maintain correct paint supply pressure. The unit can be left on during short breaks in operation, but should be switched off if not intending to use for more than 1 hour.
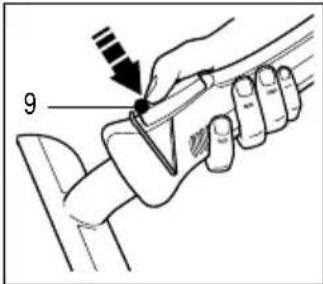
The flow of paint to the roller or brush can be controlled by squeezing the trigger (9) on the handset.
To remove the roller or brush from the handset simply twist and pull.
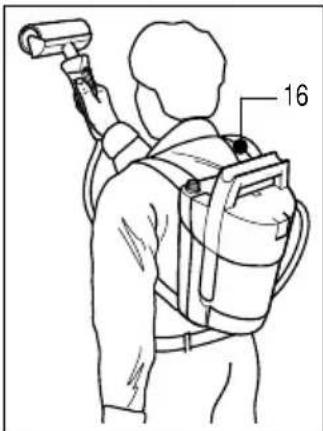
Your Paintmate is fitted with straps (16) so it may be worn on the back.
Firstly loosen both straps before placing your arms through. Then pull the adjustable straps tight for a comfortable and secure fit.
Warning! Do not lean forward excessively when the unit is mounted
natural_image
Line drawing of a person wearing a backpack and holding a device, with no visible text or symbolson your back, as it may slip forward and hit your head.
HANDY HINTS
• After preparing your Paintmate for use it is easier to switch the unit on before placing it on your back.

natural_image
Illustration of two hands holding a medical or surgical tool, no text or symbols presentThe roller and paint brush may be rotated on the handset so that the trigger can be conveniently positioned for operation by your thumb or fingers.
Do not use the clip to lock-on the trigger. This is for cleaning only.
- For a good even finish, it is best to paint edges, corners and areas where the roller won't go, using the Paintmate brush supplied. This should be done first before rolling the main areas.
• After use, immediately immerse the brush in water until ready for cleaning.
- When using the roller, squeeze the trigger in the handset whilst moving the roller up and down the wall. Depending on the area to be covered, you may not need to keep pressure on the trigger, as too
ENGLISH
much paint will reach the roller. If this happens, release the trigger and use the paint on the roller until more is required.
- Immediately paint reaches the roller, start rolling on the wall/ceiling. It will take a few moments for the roller to become fully saturated with paint, after which you will be able to paint quickly and evenly.
- With the roller fitted, choose an area of about 1m^2 and apply the paint with long steady strokes at a speed that gives a good covering of paint. At this stage the appearance will be somewhat uneven. Now release the trigger so no more paint is flowing, and blend to an even finish using long vertical strokes. For a one coat finish it is important not to try to spread the paint too far.

natural_image
Technical line drawing of a portable gas pump device with attached tubing and a labeled component (no text or symbols present)For convenience, the channel in your Paintmate handle (17) can be used as a rest for the handset. The roller can be stopped from drying out for up to 24 hours by sealing
within a polythene bag. Never leave the unit more than one hour without either cleaning or sealing.
CLEANING AFTER USE
Never use solvents to clean any part of your Paintmate. Only use water and mild soap if necessary. When you have finished painting, switch the unit off by depressing the orange button on your Paintmate.

natural_image
Two-step diagram showing hands operating a battery and connecting a component to a motor (no text or symbols present)Now release the latch, lower the handle, raise the lid and remove the paint bag. Remove the tube from the Handypack by carefully twisting the connector anti-clockwise. Keep the roller and tube assembly together for the first part of the cleaning process. Never attempt to clean the brush until the main tube is clean.

The tube and roller may now be flushed with water by attaching to the tap connector (15) provided with your Paintmate.

Use the wire clip (14) to lock-on the handset trigger during the cleaning operation.

natural_image
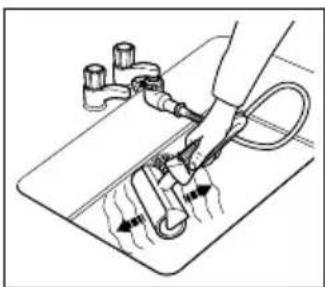
Illustration of a hand using a tool to adjust or install a component, no text or symbols presentAttach the tap connector very securely to a mains cold water tap and slowly turn on the tap.
natural_image
Illustration of a hand using a tool to interact with a surface, showing fluid flow direction (no text or symbols)To flush the paint from the roller, gently roll it forwards and backwards in the bottom of the sink.
Ensure the tube is completely clean before storing. The handset
should be wiped to remove any paint spills.

The roller assembly may now be dismantled into its three component parts; the roller (12), paint flow guide (11) and holder (10).
The roller can be fully cleaned by rotating it under running water. The paint flow guide and holder can be cleaned in warm water to remove any paint residue.
ENGLISH
Flush out the brush by fitting to the handset in place of the roller holder, before removing from the tube and washing the bristles under flowing water.
After cleaning allow all parts to become completely dry. They may then be stored inside the body of your Paintmate. Never put wet items inside the body. Do not remove the flexible seal located between the roller holder and the paint flow guide.
TROUBLE SHOOTING GUIDE Fault Possible cause Remedy
| Can't open Orange button Press orange handle. is down (on) button to turn off and unit and release pressurised. pressure. | ||
| Paint leaks 'O' ring Check that the 'O' from the missing from ring is in place and Handypack. connector or is free from contaminated. connector debris (dried paint). | ||
| Connector not fitted properly. | Ensure that the mating surfaces are free from debris (dried paint). Make sure connector is pushed in fully and screwed on (1/4 turn) to a positive stop. | |
| Paint leaks Tube not fitted Firstly switch off. from the correctly. Undo threaded nut connector at the handset. | ||
| Paint leaks 'O' ring Check that 'O' ring from top of the handset. | missing or contaminated. is free from debris (dried paint). | |
| Debris on taper fitting. | Make sure both male and female taper fittings are free from debris (dried paint). | |
| Paint leaks Handypack Return to retailer. from Handypack. damaged. | ||
Fault Possible cause Remedy
| Paint drips from roller. | Excessively worn roller. | Replace roller. |
| Paint flow guide damage. | Replace paint flow guide. | |
| Flexible connector in connector is in holder is incorrectly fitted. | Make sure the connector is in place and fitted correctly. | |
| Handset trigger held on without using roller. | Make sure that you are painting surface when holding trigger open. | |
| Paint spurts from brush on startup. | Air pocket in Prior to connecting Handypack. | tube to the Handypack, squeeze the Handypack to expel the air contained inside. |
| No paint appearing at roller or brush. | Trigger not depressed. | Make sure you are holding down trigger. |
| Tube kinked. | Check for kinks in tube: either straighten or replace. | |
| Handypack empty. | Replace Handypack. | |
| Pump runs continuously. (Contact authorised service agent). | Air bag damaged | |
| Pump not operating. | Check correct batteries are fitted and are charged. (If no response contact authorised service agent.) | |
| Handset/roller messy to clean. | Not using tap adapter. | Follow cleaning instructions. |
| Not kept unit assembled during cleaning. | Follow cleaning instructions. | |
| Handset/brush tube will not flush. | Trigger not depressed instructions. during cleaning. | Follow cleaning instructions. |
Fault Possible cause Remedy
| Handset/brush Water pressure Follow cleaning tube will not very low. instructions.flush. |
| Tap not Follow cleaning turned on. instructions. |
| Item has been Soak in warm left to dry with soapy water for a paint on/in it. couple of hours, then follow cleaning instructions. (If item still fails to flush, replace it.) |
EC DECLARATION OF CONFORMITY
We declare that unit: VP900 conforms to 89/392/EEC
The level of sound pressure of the tool is in accordance with EEC legislation.
A weighted sound pressure <70dB (A)

Brian Cooke - Director of Engineering
Black & Decker Ltd, Spennymoor, County Durham
DL16 6JG United Kingdom
The Black & Decker policy is one of continuous improvement to our product and as such we reserve the right to change the product specification without prior notice.
Dulux and Dulux Handypack are trade marks of ICI.
| Australia Black & Decker (A'asia) Pty Ltd Tel: 03 9213 8200 | ||
| 286-288 Maroondah HighwayNorth Croydon, Victoria 3136 | Fax: 03 9726 7150 | |
| New Zealand | Black & Decker483 Great South Road, Penrose, Auckland | Tel: 09 579 7600Fax: 09 579 8200 |
| South Africa | Black & Decker South Africa (Pty) LtdSuite no 107, PostNet X65, Halfway House 1685 | Tel: 011 314 4431Fax: 011 314 4435 |
| United Kingdom | Black & Decker210 Bath Road, SloughBerkshire SL1 3YD | Tel: 01753 574277Tlx: 848317 BAND MHFax: 01753 551155 |
| Dulux Advice Centre | Tel: 01753 550555 | |

| Date of your purchase: |
| Address of the dealer where your Paintmate was purchased: |
| Name: | Yes | No | |
| House number or name and street: | Was your Paintmate a gift? | ||
| Was your Paintmate your first purchase? | |||
| Town: | Was your Paintmate bought as a replacement? | ||
| County or state: | What was the price of your Paintmate? | ||
| Postcode: | |||
| Country: | Address of the dealer where your Paintmate was purchased: | ||
| Product catalogue number: VP900 | |||
| □ Data protection act: Tick this box if you prefer not to receive information from Black & Decker or other companies. | |||
GUARANTEE CARD
Australia: Call 1900 937766 (the maximum call charge is \$2.00 excluding tax)
New Zealand: Call 0900 97766 (the maximum call charge is \$2.00 excluding tax)
South Africa: Black & Decker South Africa (Pty) Ltd, Suite no 107, PostNet X65, Halfway House 1685
United Kingdom & Ireland: PO Box 821, Slough, Berkshire, SL1 3AR
Please complete this section immediately after the purchase of your Paintmate
and post it to the Black & Decker address in your country (above).
If you live in Australia or New Zealand, please register your purchase by phone.
- Congratulations!
- On the purchase of your Black & Decker Paintmate.
- Contents
- Paintmate user manual
- SAFETY INSTRUCTIONS
- FOR SAFE OPERATION:
- ADDITIONAL PAINTMATE SAFETY INSTRUCTIONS
- Safety
- Save these instructions!
- UNWANTED TOOLS AND THE ENVIRONMENT
- ENGLISH
- THE BLACK & DECKER GUARANTEE (UK, AUSTRALIA AND NEW ZEALAND ONLY)
- AFTER SALES SERVICE FOR YOUR BLACK & DECKER PRODUCT (UK, AUSTRALIA AND NEW ZEALAND ONLY)
- THE AFTER SALES SERVICE POLICY (UK, AUSTRALIA AND NEW ZEALAND ONLY)
- ACCESSORIES
- HANDY HINTS
- CLEANING AFTER USE
- EC DECLARATION OF CONFORMITY
- GUARANTEE CARD
Brand : BLACK & DECKER
Model : VP900
Category : Paint sprayer