
Evo V 4G - Smartphone HTC - Free user manual and instructions
Find the device manual for free Evo V 4G HTC in PDF.


| Product Type | Smartphone |
| Brand | HTC |
| Model | Evo V 4G |
| Display | Touch screen with parallax barrier for 3D viewing |
| Camera (Rear) | Dual cameras; 5 MP max for 2D, 2 MP for 3D photos; 720p HD video at 30 fps |
| Camera (Front) | Front camera for video calls |
| Storage | Internal storage (not specified) + preinstalled microSD card |
| Battery | Rechargeable Li-ion, removable |
| Charging | Via USB cable and power adapter (included) |
| Connectivity | 4G (EvDO), Wi-Fi 802.11 b/g/n, Bluetooth 3.0, GPS |
| Audio | 3.5mm headset jack, built-in speaker |
| Sensors | Proximity sensor, G-sensor (accelerometer) |
| Special Features | 3D photo/video capture and display, Smart dial, HTC Sense UI, Friend Stream |
| Operating System | Android (version not specified) |
| Care and Cleaning | Do not block proximity sensor; secure back cover for antenna performance; use only original battery |
| Safety Precautions | Avoid prolonged 3D viewing; keep away from children under 7; do not use 3D if experiencing discomfort |
| Spare Parts | Battery, back cover, microSD card |
| Repairability | User-removable battery and back cover; storage card accessible |
| Manual | User guide available in PDF format (152 pages, English) |
| Warranty | Refer to safety and regulatory guide included in box |
Frequently Asked Questions - Evo V 4G HTC
User questions about Evo V 4G HTC
0 question about this device. Answer the ones you know or ask your own.
Ask a new question about this device
Download the instructions for your Smartphone in PDF format for free! Find your manual Evo V 4G - HTC and take your electronic device back in hand. On this page are published all the documents necessary for the use of your device. Evo V 4G by HTC.
USER MANUAL Evo V 4G HTC
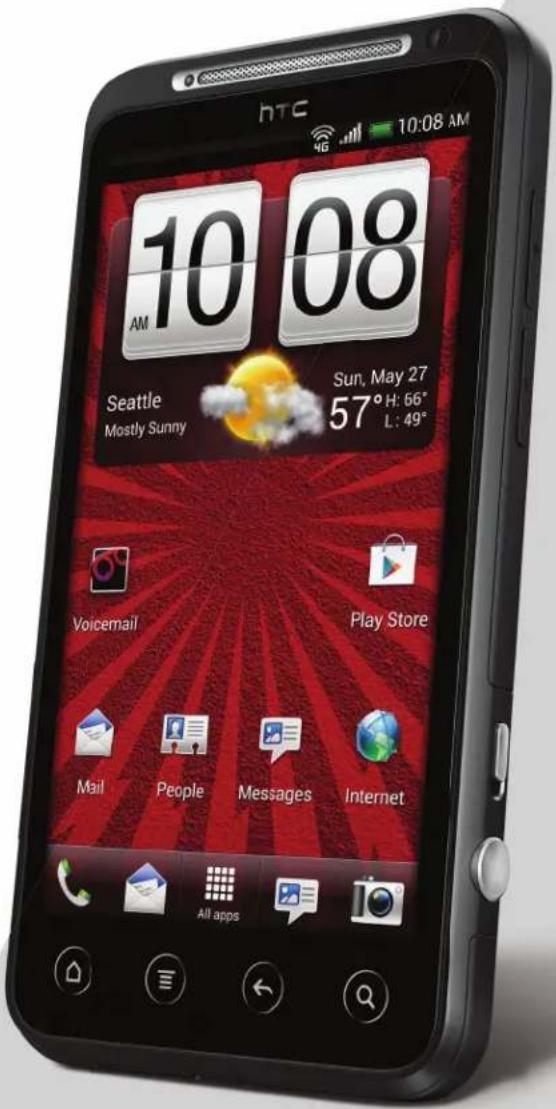
htc EVO™ V 4G
User Guide
Contents
Getting started
Inside the box 8
HTC EVO V 4G 8
Back cover 10
Storage card 11
Battery 12
Getting the battery to last longer 13
Switching the power on or off 14
What are Wireless Emergency Alerts/CMAS? 14
Touch gestures 14
Setting up HTC EVO V 4G for the first time 15
Ways of getting contacts into HTC EVO V 4G 15
Home screen 16
Basics
Adjusting the volume 17
Sleep mode 17
Status icons 19
Notifications 20
Switching between recently opened apps 22
Using Quick Settings 22
Where apps, data, and files are stored 23
Connecting your phone to a computer 24
Copying files to or from the storage card 24
Transferring contacts from your old phone 25
Copying and sharing text 25
Printing 26
Personalizing
Making HTC EVO V 4G truly yours 28
Personalizing HTC EVO V 4G with scenes 28
Changing your wallpaper 29
Applying a new skin 30
Personalizing your Home screen with widgets 30
Adding apps and other shortcuts on your Home screen 31
Rearranging or removing widgets and icons on your Home screen 32
Personalizing the launch bar 32
Grouping apps into a folder 33
Rearranging the Home screen 34
Personalizing with sound sets 35
Rearranging application tabs 36
Customizing the lock screen style 36
Phone calls
Making a call with Smart dial 38
Using Speed dial 38
Calling a phone number in a text message 39
Calling a phone number in an email 39
Making an emergency call 39
Receiving calls 39
What can I do during a call 40
Internet calls 42
Call history 42
Call services 43
Messages
About the Messages app 44
Sending a text message (SMS) 44
Sending a multimedia message (MMS) 45
Resuming a draft message 46
Checking your messages 46
Replying to a message 47
Forwarding a message 47
WAP push messages 48
Managing message conversations 48
Backing up your text messages 49
Setting message options 50
Search and Web browser
Searching HTC EVO V 4G and the Web 51
Browsing the Web 51
Downloading files and apps 53
Viewing bookmarks and previously visited pages 54
Syncing your bookmarks with Google Chrome 55
Setting browser options 56
Camera
Switching between 3D and 2D 57
Camera basics 57
Before capturing 58
Taking a photo 59
Recording video 59
Camera scenes 60
Improving people shots 60
Changing camera settings 60
Top questions on 3D camera 61
Photos, videos, and music
Gallery 63
Music 69
Connected Media 74
HTC services
HTC Watch 75
Accounts and sync
Adding a social network account 79
Adding more Google Accounts 79
Managing your online accounts 80
People
About the People app 81
Your contacts list 81
Setting up your profile 82
Adding a new contact 82
Importing a contact from an Exchange ActiveSync account 82
Merging contact information 83
Backing up your contacts to the storage card 83
Contact information and conversations 84
Sending contact information 85
Contact groups 86
Social
Facebook for HTC Sense 88
About Friend Stream 88
Updating your status in Friend Stream 88
Enjoying Facebook in Friend Stream 89
Using Facebook chat 90
Chatting in Google Talk 90
Using Google+ 90
Gmail 91
Mail 92
Calendar
About Calendar 99
Creating an event 99
Calendar views 100
Managing Calendar events 100
Accepting or declining a meeting invitation 101
Setting reminders for your events 101
Dismissing or snoozing event reminders 102
Showing or hiding calendars 102
Changing Calendar settings 102
Maps and location
Location settings 103
Google Maps 103
Google Play and other apps
Getting apps from Google Play 107
Using the Clock 108
Checking Weather 109
Reading news feeds 110
Watching videos on YouTube 112
Sharing games and apps 113
Productivity
Working on documents 114
Recording your voice 115
Completing tasks 115
HTC Sync
About HTC Sync 118
Setting up HTC Sync to recognize HTC EVO V 4G 119
Syncing songs and playlists 119
Syncing photos and videos 120
Syncing your calendar events 120
Syncing your contacts 121
Syncing your web bookmarks 121
Syncing documents and email attachments 122
Installing an app from your computer to HTC EVO V 4G 122
Syncing another device with your computer 123
Keyboard
Using the onscreen keyboard 124
Entering words with predictive text 125
Entering text by speaking 127
Entering text by tracing 127
Adjusting input settings 128
Internet connections
Data connection 129
Wi-Fi 129
Connecting to a virtual private network (VPN) 130
Bluetooth
Bluetooth basics 133
Connecting a Bluetooth headset or car kit 133
Disconnecting or unpairing from a Bluetooth device 134
Sending information using Bluetooth 135
Receiving information using Bluetooth 136
Settings
Turning Airplane mode on or off 138
6 Contents
Changing display settings 138
Changing sound settings 139
Changing the display language 140
Checking the power usage of applications 140
Managing memory 141
Backing up settings to Google 142
Accessibility settings 142
Protecting HTC EVO V 4G with a screen lock 142
Encrypting data on HTC EVO V 4G 143
Checking information about HTC EVO V 4G 144
Choosing which app opens when you tap a data item 144
Update and reset
Updating the HTC EVO V 4G software 145
Restarting HTC EVO V 4G 146
Resetting HTC EVO V 4G 146
Trademarks and copyrights
Index
Conventions used in this guide
In this user guide, we use the following symbols to indicate useful and important information:

This is a note. A note often gives additional information, such as what happens when you choose to do or not to do a certain action. A note also provides information that may only be applicable to some situations.

This is a tip. A tip gives you an alternative way to do a particular step or procedure, or lets you know of an option that you may find helpful.

This indicates important information that you need in order to accomplish a certain task or to get a feature to work properly.

This provides safety precaution information, that is, information that you need to be careful about to prevent potential problems.
Getting started
Inside the box
You will find the following inside the box:
- HTC EVO V 4G
Battery - microSD™ card (preinstalled)
USB cable
Power adapter - Quick start guide
■ Safety and regulatory guide
HTC EVO V 4G
Front panel
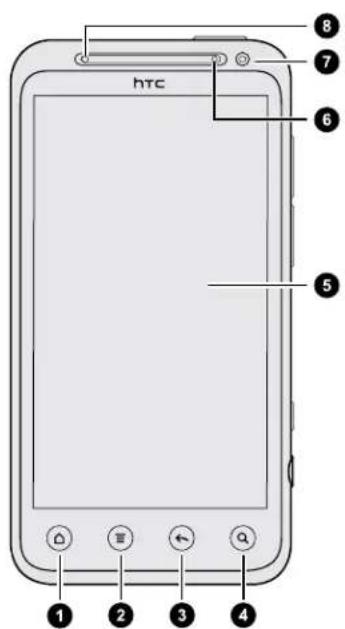
- Home
- Menu
- Back
- Search
- Touch screen
- Notification LED
- Front camera
- Proximity sensor

If you want to use a screen protector, please don't cover and block the proximity sensor. You can purchase the dedicated screen protector for HTC EVO V 4G that already has a small opening for the sensor.
Top panel
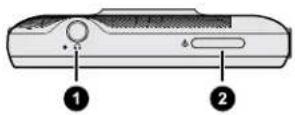
- 3.5mm headset jack
- Power
Left and right panels
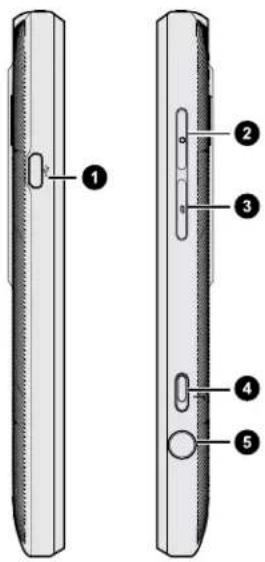
- USB connector
- Volume up
- Volume down
- 2D/3D mode switch
- Camera
Back panel
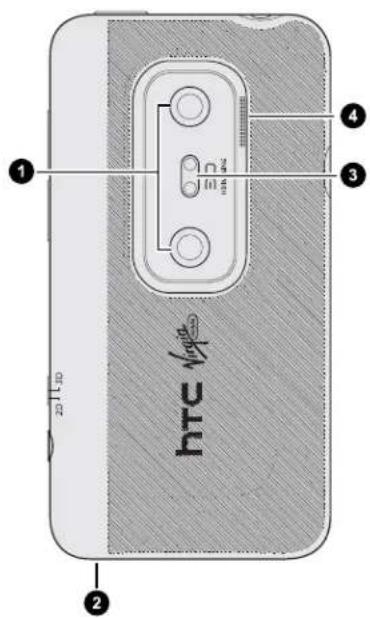
- Dual cameras
- Microphone
- Dual LED flash
- Speaker
10 Getting started
Back cover
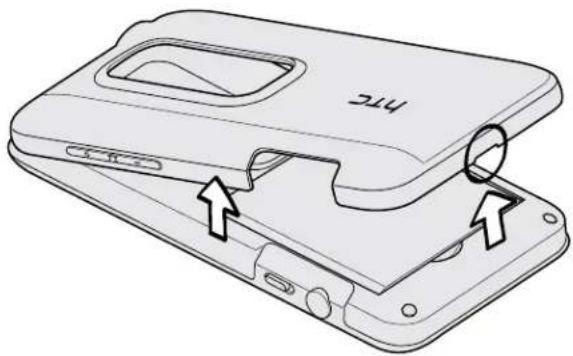
Removing the back cover
Remove the back cover to access the battery compartment and storage card slot.
-
With HTC EVO V 4G switched off, hold your phone securely with the front facing down.
-
Lift the back cover up gently, starting from the small opening at the bottom of the phone and then from the two sides.
natural_image
Diagram of a flip phone showing internal components and an open base (no text or symbols)Replacing the back cover

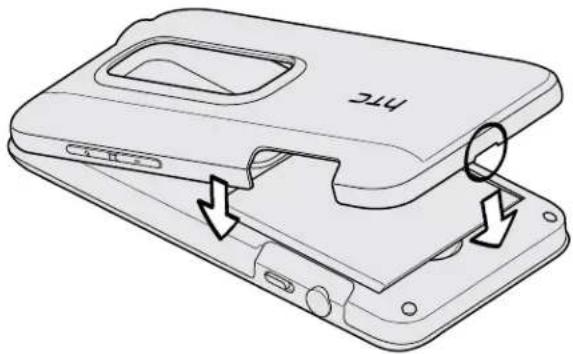
Please handle the back cover with care since your phone's antennas are placed underneath it. Avoid twisting or bending the back cover. To get the best signal for calls, data connection, or GPS navigation, be sure to secure the back cover tightly to the phone.
- Align the back cover onto the top panel of HTC EVO V 4G.
natural_image
Line drawing of a flip phone case with internal components and arrows indicating movement (no text or symbols)- Press the sides and the top part of the back cover down to lock the cover into place. You'll hear clicks when the small tabs underneath the back cover are locked in place.
11 Getting started
Storage card
Use the storage card to store your photos, videos, and music. You'll find the storage card already inserted in HTC EVO V 4G.
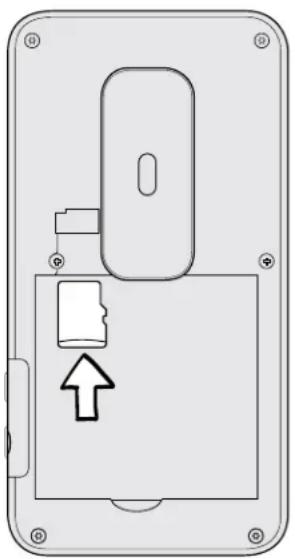
Inserting the storage card
- Take the back cover off.
- Remove the battery.
- Insert the microSD card into the storage card slot with its gold contacts facing down and push it into place.
natural_image
Diagram of a device panel with an arrow pointing to a component, no text or symbols presentRemoving the storage card

If HTC EVO V 4G is on, you must first "unmount" the storage card before removing it to prevent corrupting or damaging the files in the storage card.
- Take the back cover off.
- Open the battery compartment door.
- Slide the storage card out from its slot.
Unmounting the storage card
When you need to remove the storage card while HTC EVO V 4G is on, unmount the storage card first to prevent corrupting or damaging the files in the storage card.
- From the Home screen, press, and then tap Settings.
- Tap Storage > Unmount SD card.
12 Getting started
Battery
HTC EVO V 4G uses a rechargeable battery. How long the battery can last before it needs recharging depends on how you use HTC EVO V 4G. The features and accessories you use can affect battery life. For example, leaving your Bluetooth ^® connection always on uses more power. Long phone calls and frequent web browsing use up a lot of battery power. Also, consider your location: poor signal strength from your mobile network and extreme temperature make the battery work harder.
Removing the battery
-
Take the back cover off.
-
With your thumb or finger, lift the battery from the battery compartment.
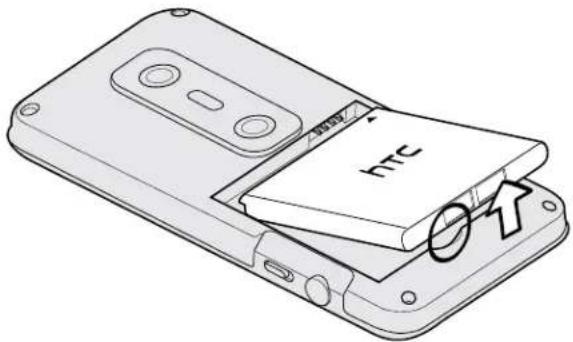
Inserting the battery

Please use only original batteries that came in the box or replacements that we recommend.
-
Take the back cover off.
-
Insert the battery (with its exposed copper contacts first) into the battery compartment.
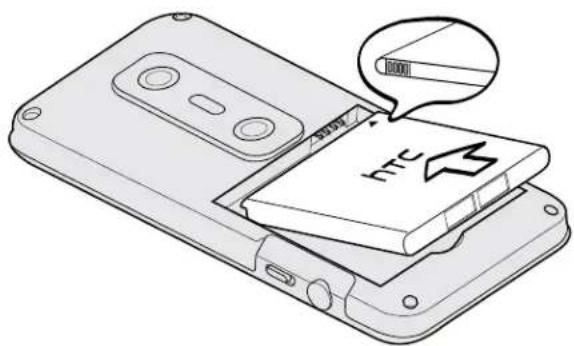
Charging the battery
Before you turn on and start using HTC EVO V 4G, it is recommended that you charge the battery.

- Only the power adapter and USB cable provided in the box must be used to charge the battery.
-
Do not remove the battery from HTC EVO V 4G while you are charging it using the power or car adapter.
-
Insert the small end of the USB cable into the USB connector.
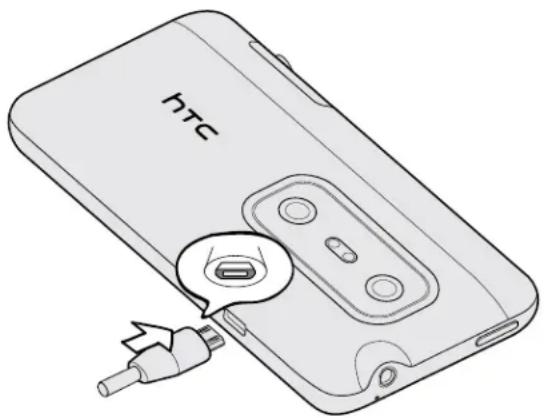
- Insert the other end of the USB cable into the power adapter.
- Plug in the power adapter to an electrical outlet to start charging the battery.

As a safety precaution, the battery stops charging if it overheats.
Getting the battery to last longer
How long the battery can last before it needs recharging depends on how you use HTC EVO V 4G. The features and accessories you use can affect battery life.
You can get the battery to last longer by following a few simple tips:
- Turn off the display when you're not using it
■ Lower the volume - Close battery-intensive programs, such as the Camera, when you're done using them
■ Make sure apps are closed and not continuously running in the background
■ Use the power adapter whenever possible
Switching the power on or off
Switching the power on
Press the Power button. Easy.

When you turn on HTC EVO V 4G for the first time, you'll need to set it up.
Switching the power off
- If the display is off, press the Power button to turn it back on, then unlock the screen.
- Press and hold the Power button for a few seconds.
- When the Power options menu appears, tap Power off.
What are Wireless Emergency Alerts/CMAS?
Wireless Emergency Alerts (WEA), also known as CMAS, is a part of a national alerting system called IPAWS (Integrated Public Alert and Warning System) that enables emergency management officials to rapidly disseminate the warnings and safety information via text alerts to wireless phones based on the phones' geographic location. The Federal Emergency Management Agency or FEMA is responsible for receiving the alerting information and forwarding the alerts to participating wireless carriers such as Sprint. Such alerts may come from the President of the United States; the National Weather Service, state or county public safety officials. This system is integrated into the same national alerting services that serve television and radio today. For more information regarding WEA/CMAS please go to FEMA website.
Touch gestures
| Tap When you want to type using the keyboard, select items onscreen such as application and settings icons, or press onscreen buttons, simply tap them with your finger. | |
| Press and hold | To open the available options for an item (for example, a contact or link in a webpage), simply press and hold the item. |
| Swipe or slide | To swipe or slide means to quickly drag your finger vertically or horizontally across the screen. |
| Drag Press and hold your finger with some pressure before you start to drag.While dragging, do not release your finger until you have reached the target position. | |
| Flick Flicking the screen is similar to swiping, except that you need to swipe your finger in light, quicker strokes. This finger gesture is always in a vertical direction, such as when flicking the contacts or message list. | |
| Rotate For most screens, you can automatically change the screen orientation from portrait to landscape by turning HTC EVO V 4G sideways. When entering text, you can turn HTC EVO V 4G sideways to bring up a bigger keyboard. | |
| Pinch In some apps, like Gallery or the web browser, you can “pinch” the screen using two fingers (for example, thumb and index finger) to zoom in or zoom out when viewing a picture or a webpage. | |
| Two-finger scrolling | In some apps that have sorting, like Mail or People, you can use two fingers to scroll the screen. The screen displays the sorting order, and you can easily scroll to the information you want. |
Setting up HTC EVO V 4G for the first time
When you switch on HTC EVO V 4G for the first time, you'll be asked to set it up. Just follow the onscreen instructions and you'll be up and running in no time.

Some features that need to connect to the Internet such as location-based services and auto-sync of your online accounts may incur extra data fees. Don't worry. You can enable or disable them in settings later on.
Ways of getting contacts into HTC EVO V 4G
There are several ways you can add contacts to HTC EVO V 4G. You can sync HTC EVO V 4G with contacts from your Google® Account, computer, Facebook®, and more.
| HTC SyncTM | Sync the contacts from your old phone to your computer, and then use HTC Sync to sync HTC EVO V 4G with your computer's Microsoft® Outlook®, Outlook Express or Windows® Contacts. |
| GmailTM | Google contacts are imported to HTC EVO V 4G after you sign in to your Google Account. You can also create more Google contacts right from HTC EVO V 4G. |
| Facebook Log in to your Facebook account to import your Facebook friends' contact information. | |
| Phone contacts You can choose to create and store contacts directly in HTC EVO V 4G or transfer existing ones from your old phone. | |
| Microsoft Exchange ActiveSync* | HTC EVO V 4G syncs your work contacts from the Microsoft Exchange ActiveSync Server in your workplace. |
| Transfer Use the Transfer app to transfer not only your contacts, but also calendar events and text messages from your old phone to HTC EVO V 4G. |
Home screen
Your Home screen is where you make HTC EVO V 4G your own. You can add your favorite applications, shortcuts, folders and widgets so they're always just a tap away. To find out how, see Personalizing on page 28.
Extended Home screen
As you start to do more things with HTC EVO V 4G, you might find that one Home screen is not enough. No problem.
Slide your finger horizontally to the left or right on the screen and you'll discover more space for adding icons, widgets, and more.
Press to return to the main Home screen.
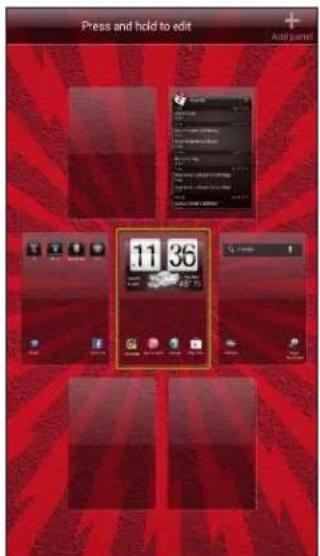
Using Leap view
- To jump straight to the screen that you want, press or pinch the screen to show the Leap view. It reveals all Home screens as thumbnails. Just tap the one you want and you'll leap right there.
- In Leap view, if there's space to add a new screen, you can tap Add panel to do so. An empty Home screen appears and you can start customizing from there.
Basics
Adjusting the volume
Adjusting the ringer volume
- Press the Volume buttons to adjust the ringer. The Ringer volume window appears on the screen to display the volume levels.
- While in the lowest ringer volume level (Silent mode), press Volume down once to switch to Vibrate mode. The vibrate mode icon appears in the status bar.
- While in Vibrate mode, press Volume up once to switch to silent mode. The speaker mute icon 📋 displays in the status bar.
Adjusting the earpiece volume for calls
During a call, press the Volume buttons.
Adjusting the media volume
When playing music or watching video, press the Volume buttons to adjust the volume. The Media volume window appears on the screen to display the volume level.
Sleep mode
Sleep mode saves battery power by putting HTC EVO V 4G into a low power state while the display is off. It also stops accidental button presses when HTC EVO V 4G is in your bag. You'll still receive messages and calls though, and missed calls and messages appear on the lock screen.

To prevent missed calls or messages from appearing on the lock screen, press and then tap Settings > Privacy.
Switching to Sleep mode
Briefly press the Power button to turn off the display and switch to Sleep mode. HTC EVO V 4G also automatically goes into Sleep mode when it's idle for a while.
Waking up from Sleep mode
To wake HTC EVO V 4G up manually, press the Power button. You'll need to unlock the screen.

HTC EVO V 4G automatically wakes up when you have an incoming call.
Unlocking the screen
Pull the ring up to unlock the screen.
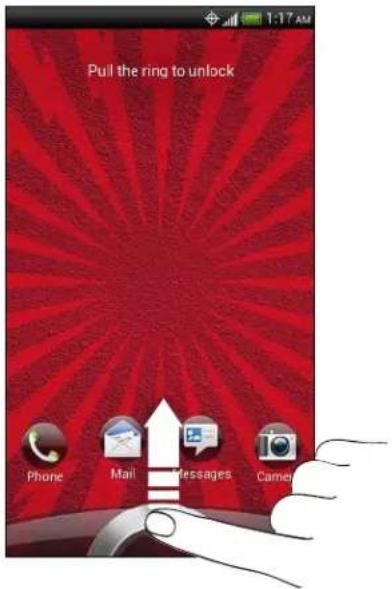

If you've set up a screen lock, you'll be asked to provide your credentials before HTC EVO V 4G unlocks.
If you've set an event reminder or an alarm, you can drag or to the ring to snooze or dismiss the event or alarm.
Opening an app from the lock screen
On the lock screen, drag an app icon to the ring to unlock the screen and directly go to the app.

The shortcuts on the lock screen are the same apps as the ones on your Home screen's launch bar. To change the lock screen shortcuts, replace the apps on the launch bar.
Status icons

Here's what each icon means:

Signal strength Battery is very low (8% remaining)

EvDO connected Silent mode

EvDO in use Vibrate mode

1xRTT connected Microphone is mute

1xRTT in use Speakerphone is on

No signal

Connected to a Wi-Fi network Wired

Connected to a 4G network Bluetooth

Data synchronizing Connected to a B

Network sharing is on Airplane mode

Battery is full Location setting is on

Battery is charging Alarm is set

Battery is low (20% remaining)

maining)


Wired microphone headset connected

dset connected


both device


Notifications
Notification LED
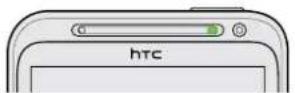
The notification LED shows a:
- Solid green light when HTC EVO V 4G is connected to the power adapter or a computer and the battery is fully charged.
- Flashing green light when you have a pending notification.
- Solid orange light when the battery is being charged.
- Flashing orange light when the battery level reaches very low.
Notification icons
Notification icons on the status bar make it easy for you to keep on top of your messages, calendar events, and alarms.

Notifications panel
When you get a new notification, you can open the Notifications panel to see what event notification or new information you've received. The Notifications panel lets you quickly switch between recently-opened apps, and also lets you easily turn on settings such as Wi-Fi* and Bluetooth.
- To open the Notifications panel, press and hold the status bar, then slide your finger downward.
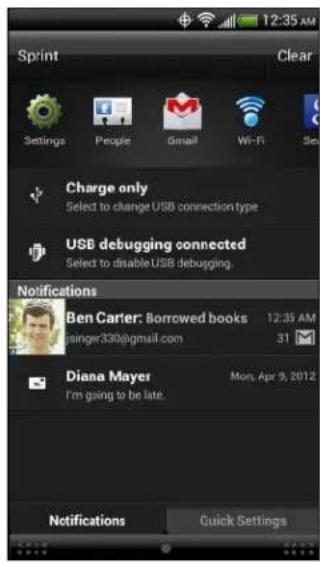
If you have several notifications, you can scroll down the screen to see them all.
- To close the Notifications panel, press and hold the bottom bar of the panel, then slide your finger up the screen. Or just press
Switching between recently opened apps
You can easily access apps you've just recently opened.
-
Press and hold .
-
Slide your finger up or down to see recently-opened apps.
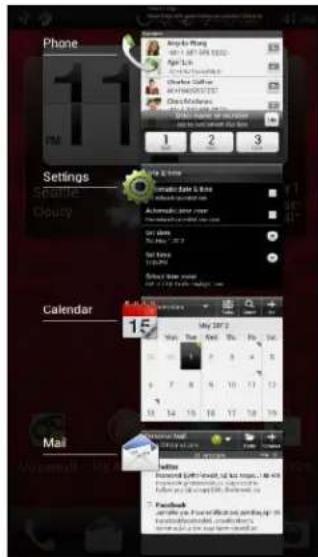
- Tap an app to open it.
Using Quick Settings
The Quick Settings tab lets you easily turn on Wi-Fi, Bluetooth, and more, and also provides a quick shortcut to all HTC EVO V 4G settings.
-
Press and hold the status bar, then slide your finger downward to open the Notifications panel.
-
Tap the Quick Settings tab.
-
Tap the On/Off switch next to an item to turn it off or on.
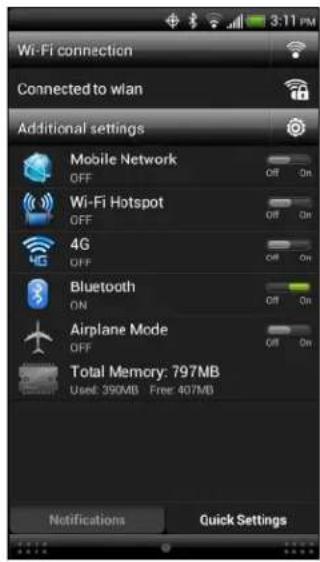
- To access Wi-Fi settings, tap next to Wi-Fi connection.
- To access all HTC EVO V 4G settings, tap next to Additional settings.
Where apps, data, and files are stored
HTC EVO V 4G uses these storage types:
| Apps and data storage | Apps are installed to this storage, labeled as Internal storage in your phone settings. It also stores data such as your text messages, contacts you created or synchronized to your phone, account settings, and more.This storage is managed and carefully guarded by your phone since it contains your private information. When you connect your phone to your computer, this storage is not accessible from your computer.Storage contents will be erased when you do a factory reset. Make sure to back up your data before starting a factory reset. Some apps allow you to back up to your storage card, such as People. |
| Storage card | Your phone comes with a microSD card already installed.You can store your files such as photos, music, and videos to this removable storage.When you connect your phone to your computer, this storage is accessible and you can copy files between them. |
Connecting your phone to a computer
Whenever you connect HTC EVO V 4G to a computer using the USB cable, the Choose a connection type screen opens and lets you choose the type of USB connection.
Select one of the following choices, and then tap Done:
Charge only Select this option if you only want to charge the battery while connected to your computer.
HTC Sync Select this option to synchronize contacts, calendar, and other information between your computer and HTC EVO V 4G.
Disk drive Select this mode when you want to copy files between HTC EVO V 4G and your computer.
When on Disk drive mode, you will not be able to use apps on HTC EVO V 4G that access the storage such as Camera.
Copying files to or from the storage card
You can copy your music, photos, and other files to the storage card.
- Connect HTC EVO V 4G to your computer using the supplied USB cable.
- On the Choose a connection type screen, select Disk drive, and then tap Done. On your computer, the storage card is recognized as a removable disk.
- Navigate to the removable disk and open it.
-
Do one of the following:
-
Copy the files from the computer to the storage card's root folder.
-
Copy the files from the storage card to a folder in your computer.
-
After copying the files, unmount the removable disk (that is, the connected HTC EVO V 4G) as required by your computer's operating system to safely remove HTC EVO V 4G.
-
Do one of the following:
-
Disconnect HTC EVO V 4G from the computer.
- If you want to keep HTC EVO V 4G connected to the computer but want it to be able to access the storage card, open the Notifications panel, tap Disk drive, select an option except Disk drive, and then tap Done.
Transferring contacts from your old phone
Easily transfer contacts from your old phone to HTC EVO V 4G through Bluetooth. Depending on your old phone's model, you may also transfer other types of data such as calendar events and text messages to HTC EVO V 4G.
- From the Home screen, tap Transfer.
- Tap Next to begin.
- Choose your old phone's name and model.
- On your old phone, turn Bluetooth on, set it to discoverable mode, and then follow the instructions on the screen.
Copying and sharing text
In apps such as the web browser and Mail, you can select and copy text, and then paste or share it.
Selecting text
- Press and hold on a word.
- Drag the start and end markers to highlight the surrounding text you want to select.


To copy the address of a linked webpage, press and hold the link, and then tap Copy link URL.
Copying and pasting text
- After you have selected the text you want to copy, tap Copy.
The selected text is then copied to the clipboard. - In a text entry field (for example while composing an email), press and hold at the point where you want to paste the text.
- Tap Paste.
Sharing text
- After you have selected the text you want to share, tap Share.
- Choose where to paste and share the selected text, such as in an email message or social network status update.
Printing
Connect HTC EVO V 4G to a supported printer and print out documents, email, meeting invitations, photos, and more.

-
Both printer and HTC EVO V 4G must be turned on and connected to the same local network. Connect HTC EVO V 4G to the local network using Wi-Fi. To learn how to connect the printer to a local network, refer to your printer user guide.
■ The local network must not be behind a firewall. -
While in an app such as Internet, Mail, Calendar, or Polaris Office, open the item you want to print.
- Press ☐, and then tap Print (or More > Print).
- On the Print screen, tap the printer you want to use.
- If there's more than one page to print, set the page range that you want.

Tap Advanced to set the page size, print layout, and page orientation, and choose if you want to print in color or black and white.
5. Tap Print.
You can check the printing details by opening the Notifications panel, and then tapping the item you're printing.
Printing a photo
- While in Gallery, open the photo you want to print.
- Tap the photo. A menu appears.
- Tap More > Print, and then tap the printer you want to use.
- Tap Print.
You can check the printing details by opening the Notifications panel, and then tapping the item you're printing.
Adding a printer
If your printer does not show up in the list, you must add it.

The printer must be in the same Wi-Fi network that you are using.
- From the Print screen, tap Add printer.
- Enter the IP address of the printer that you want to add and choose a port. If you do not know the IP address of the printer, ask for help from your network administrator.
- Tap Next, and then select the manufacturer and model of the printer.
- Tap Save.
The printer appears on the list and you can tap it to print your photo or document.
Personalizing
Making HTC EVO V 4G truly yours
Make HTC EVO V 4G look and sound just the way you want it. Personalize it with a different wallpaper, skin, ringtone, and notification sound for events such as incoming text, email, and calendar reminders.
Press and hold on an empty space on your Home screen, and then choose what you want to customize.
Personalizing HTC EVO V 4G with scenes
HTC EVO V 4G becomes multiple phones in one when you use scenes. Scenes are personalized Home screen layouts that you can quickly apply. By switching between scenes, you instantly turn HTC EVO V 4G into your perfect weekend phone, travel phone, work phone, or pure play phone.

Everytime you add or modify something on the Home screen, HTC EVO V 4G automatically saves your changes to the current scene selected.
Using a preset scene
HTC EVO V 4G features preset scenes, each preconfigured with a different wallpaper and collection of widgets that reflect different moments in your life. You can choose a scene that is suitable for work, play, travel, or your social life.
- Press and hold on an empty space on your Home screen to open the Personalize screen.
- On the Display tab, tap Scene.
- Slide your finger on the screen from right to left to select the scene you want.
- Tap Apply.
Creating a new scene
You'll start with an empty Home screen when you create a new scene.
- Press and hold on an empty space on your Home screen to open the Personalize screen.
- On the Display tab, tap Scene.
-
Press, and then tap New.
-
Enter a new scene name, then tap Done.
- Personalize the scene by adding widgets and other elements, arranging the Home screen layout, and changing the skin or wallpaper. All of your changes will be automatically saved to this scene.
Renaming a scene
- Press and hold on an empty space on your Home screen to open the Personalize screen.
- On the Display tab, tap Scene.
- Slide your finger on the screen from right to left to select the scene you want to rename.
- Press and hold a scene thumbnail, and then tap Rename.
- Enter a new scene name.
- Tap Done.
Deleting scenes
- Press and hold on an empty space on your Home screen to open the Personalize screen.
- On the Display tab, tap Scene.
- Press, and then tap Delete.
- Slide your finger on the screen from right to left to browse through scenes, then tap one or more scenes you want to delete.
- Tap Delete.
Changing your wallpaper
Pick your favorite photo as your Home wallpaper. Choose from the available wallpapers, or use any photo you've taken with the camera.
- Press and hold on an empty space on your Home screen to open the Personalize screen.
- On the Display tab, tap Wallpaper.
- Tap one of the following:
Gallery Choose an existing photo and crop it.
HTC wallpapers Choose a preset wallpaper, and then tap Preview.
Live wallpapers Choose a preset animated wallpaper, and then tap Preview. If the animated wallpaper you chose can be customized, tap Settings.
- Tap Save or Apply.
Applying a new skin
Personalize beyond the Home screen by applying a new skin. Skins give a different look and feel to most onscreen buttons, application screens, option menus, and other items.
- Press and hold on an empty space on your Home screen to open the Personalize screen.
- On the Display tab, tap Skin.
- Slide your finger on the screen from right to left to select the skin you want.
- Tap Apply.
Personalizing your Home screen with widgets
Widgets put at-a-glance important information and media content up front on your Home screen. Some widgets are already added to your Home screen for your convenience. You can add more from the available selections of widgets.
Adding a widget to your Home screen
- Press and hold on an empty space on your Home screen to open the Personalize screen.
- On the Add to home tab, tap Widget.
- Select a widget that you want.
- Most HTC widgets are available in a variety of designs and sizes to suit your needs. Slide your finger on the screen from right to left to view the different styles, and then tap Select to choose one.
You can also add widgets that allow you to quickly switch on or off certain settings such as Wi-Fi and Bluetooth. Scroll down the widgets list, tap Settings, and then tap the widget that you want.
Changing the settings of a widget
You can modify basic settings of some widgets (for example, the People and Mail widgets) from the Home screen.
- Press and hold a widget on your Home screen, and then drag it to

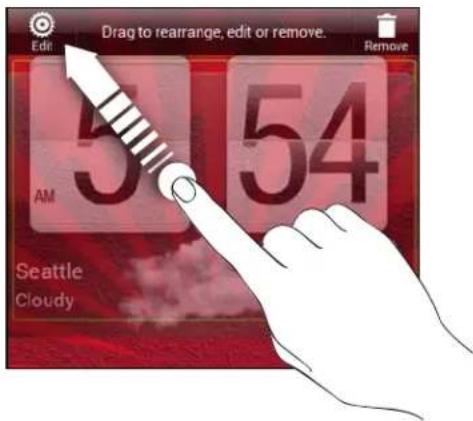
The relevant screen where you can change some settings for this widget then opens.
- Customize the widget settings.
Adding apps and other shortcuts on your Home screen
Place apps you often use on your Home screen. You can also add shortcuts to frequently used settings, bookmarked webpages, and more.
- Press and hold on an empty space on your Home screen to open the Personalize screen.
- On the Add to home tab, choose whether to add an app or a shortcut.

To add an app, you can also tap express and hold an app, and then drag it to an empty area on your Home screen.
Rearranging or removing widgets and icons on your Home screen
Moving a widget or icon
- Press and hold the widget or icon you want to move.
- Drag the widget or icon to a new location on the screen.

- You can pause at the left or right edge of the screen to drag the widget or icon onto another Home screen panel.
- When you drag a widget to a spot that's already occupied by another widget or icon, the occupant automatically moves away to give room.
- When the widget or icon is where you want it, lift your finger.
Removing a widget or icon
- Press and hold the widget or icon you want to remove, and then drag it to

- When the widget or icon turns red, lift your finger.
Personalizing the launch bar
The launch bar on your Home screen gives you one-touch access to commonly used apps. You can replace the apps on the launch bar with other apps you often use.
- Press and hold the app you want to replace, and then drag it out of the launch bar.
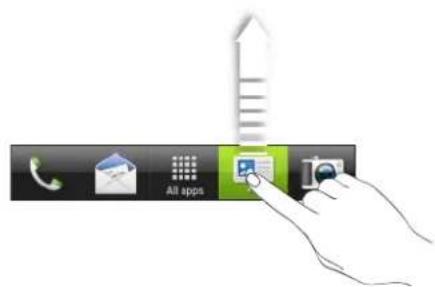
- Tap to go to the All apps screen.
- Press and hold an app, and then drag it to the empty slot on the launch bar.

- You can also place shortcuts to settings or information on the launch bar. Add a shortcut first to the Home screen, and then drag it to the launch bar.
- The apps or shortcuts you see on the lock screen are the same as the ones on the launch bar.
Grouping apps into a folder
Use folders to group apps on the launch bar or your Home screen to free up space so you can add more apps.
- Press and hold an app, and then drag it over to another app to automatically create a folder.
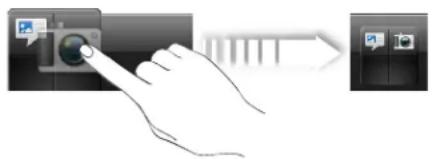
- To add another app, press and hold and then drag it over to the folder. Repeat this process to add more apps.

You can also add shortcuts to settings or information. Add a shortcut first to the Home screen, and then drag it over to the folder.
Renaming a folder
- Tap the folder to open it.
- Tap the folder window's title bar.
- Enter a new folder name.
- Tap outside the folder to close it.
Removing items from a folder
- Tap the folder to open it.
- Press and hold an app or shortcut, and then drag it to the Home screen, or drag it out to to remove. Repeat this process to remove more items from the folder.
If there's only one item left in the folder, the folder ungroups the last item and removes itself automatically.
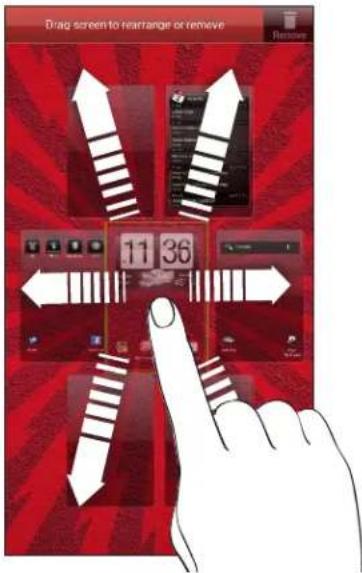
Rearranging the Home screen
Reorder your Home screen panels in any way that fits how you use them. For example, move the panels with frequently-used widgets, shortcuts, and folders closer to the main Home screen.

The main Home screen is the panel that is bordered by a thin line in Leap view.
- Pinch the Home screen to show the Leap view.
- Press and hold the thumbnail of the home screen you want to move. HTC EVO V 4G then vibrates. Don't lift your finger just yet.
- Drag the thumbnail to its new position, and then lift your finger.
Removing a Home screen panel
If you feel you need fewer Home screens, you can remove some.
-
On the Home screen, pinch the touch screen or press to go to Leap view.
-
Press and hold the panel you want to remove. Don't lift your finger just yet.
-
Drag the panel to .
Adding back a Home screen panel
Add back a Home screen if you have more widgets, apps, and shortcuts that you want to access right away.
-
On the Home screen, pinch the touch screen or press to go to Leap view.
-
Tap . A new Home screen appears. You can start adding widgets, apps, and shortcuts.
Personalizing with sound sets
Each sound set gives you a different combination of sounds for your ringtone and notifications such as incoming messages, email, calendar event reminders, and more. By switching between sound sets, you can instantly make HTC EVO V 4G ring or alert you with fun sounds when you're out with friends or change to subtle sounds while you're at work.
Creating a sound set
- Press and hold on an empty space on your Home screen to open the Personalize screen.
- On the Sound tab, tap Sound set.
- On the Sound sets screen, tap . +
- Enter a new sound set name, and then tap Done.
The newly created sound set is then added to the list of sound sets. You can assign different tones to the sound set to your preference.
Changing your ringtone, notifications, and sounds
- Press and hold on an empty space on your Home screen to open the Personalize screen.
- On the Sound tab, tap Sound set.
- Choose a sound set you want to customize, or create a new one, and then tap Apply.
- Change the ringtone, notification sound, and alarm from the Personalize screen. Go to the Messages, Mail, and Calendar apps to choose sounds for new messages, email, and calendar reminders respectively.
HTC EVO V 4G automatically saves your choices to the current sound set.
Deleting sound sets
- Press and hold on an empty space on your Home screen to open the Personalize screen.
- On the Sound tab, tap Sound set.
- Press, and then tap Delete.
- Select one or more sound sets you want to delete.
- Tap Delete.
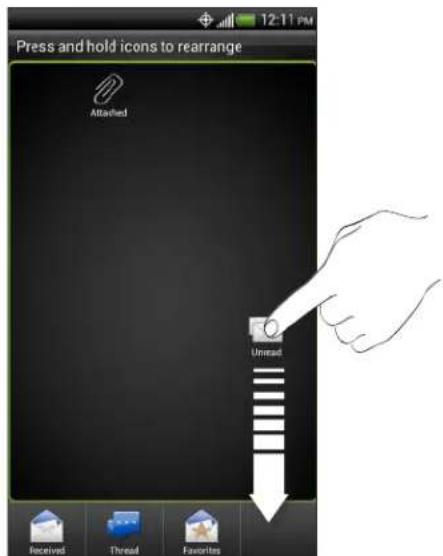
Rearranging application tabs
You can rearrange the tabs at the bottom of some apps to prioritize the types of information you frequently use. You can also add or remove tabs.
-
Open an app that has the usual tabs at the bottom of its screen.
-
Press and hold the current tab until the screen changes and shows a message about rearranging tabs.
-
You can:
-
Change the order of the tabs. Press and hold a tab, and then drag it to its new position.
- Drag a tab into or out of the bottom row to add or remove it.
- When you're done, press .
Customizing the lock screen style
Choose from a selection of lock screen backgrounds.
- Press and hold on an empty space on your Home screen to open the Personalize screen.
- On the Display tab, tap Lock screen style.
- Slide your finger left or right to choose a lock screen style.
37 Personalizing
- Tap the lock screen style to see a preview. If you want to further customize it, tap Settings.
- Tap Apply.

The shortcuts on the lock screen are the same apps as the ones on your Home screen's launch bar. To change them, you'll have to replace the apps on the launch bar.
38 Phone calls
Phone calls
Making a call with Smart dial
You can either dial a number directly, or use Smart dial to quickly place a call. Smart dial searches and calls a stored/synced contact or a number from your call history.
- On the Home screen, tap
- Enter the phone number or first few letters of the contact's name.
- From the list, tap a contact to call.

To check other phone numbers associated with the contact, tap beside the contact name.
- To hang up, tap End Call.
What is Smart dial?
The phone dialer's Smart dial feature makes it quick and easy for you to place a call.
Simply enter the phone number or first few letters of the person's name you want to call. Smart dial automatically searches and filters your stored contacts and the phone numbers from the call history.
Using Speed dial
Use Speed dial to call a phone number with a single tap. For example, if you assign a contact's number to the number 2 key, you can just press and hold 2 to dial the number.

The number 1 key is generally reserved for your voicemail. Press and hold this key to call voicemail and retrieve your voicemail messages.
Assigning a speed dial key
- On the Home screen, tap .
- Press, and then tap Speed dial > . +
- Select a contact from the list.
39 Phone calls
- On the Speed dial screen, choose the phone number of the contact to use, and a speed dial key to assign.
- Tap Save.

You can also set a speed dial key in People. Tap a contact, press and then select Set speed dial (or More > Set speed dial).
Calling a phone number in a text message
- Tap the phone number within the message.
- Tap Call.

To call the message sender, tap the received message, and then tap Call on the options menu.
Calling a phone number in an email
- Tap the phone number in the email body.
- Tap Call.
Making an emergency call
- On the Home screen, tap
- Dial the emergency number for your locale, and then tap Call.
Receiving calls
When you receive a phone call from a contact, the Incoming call screen appears.

You can use the polite ringer and pocket mode features for receiving calls. To find out how, see Changing sound settings on page 139.
Answering a call
Do one of the following:
- If the display is locked when you get a call, drag to the Lock screen ring.
- If the display is on when you get a call, tap Answer.
Rejecting a call
Do one of the following:
- If the display is locked when you get a call, drag to the Lock screen ring.
- If the display is on when you get a call, tap Decline.
- Press the Power button twice to reject a call.
Muting the ringing sound without rejecting the call
Do one of the following:
- Press the Volume down or Volume up button.
- Press the Power button.
- Place HTC EVO V 4G face down on a level surface.

If HTC EVO V 4G is already facing down, it will still ring when there are subsequent incoming calls.
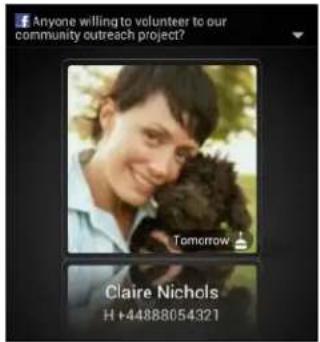
Look who's calling
Every time you make a call or your friend gives you a ring, you get to see your friend's latest social network status update right on the call screen. You'll also see a birthday reminder, if your friend's birthday will happen within one week.
What can I do during a call
When a call is in progress, use the buttons onscreen to mute or unmute the microphone or to turn the speakerphone on or off.
Switching between calls
If you're already on a call and accept another call, you can choose to switch between the two calls.
-
When you receive another call, tap Answer to accept the second call and put the first call on hold.
-
To switch between the calls, tap the person you want to talk to on the screen.
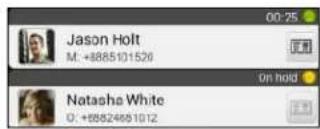
- To end the current call and return to the other call, tap End call.
Turning the speakerphone on during a call

To decrease potential damage to your hearing, do not hold HTC EVO V 4G to your ear when the speakerphone is on.
Do one of the following:
- Flip HTC EVO V 4G over during a call (be sure that Flip for speaker is selected in △ > ≡ Settings > Sound).
- On the call screen, tap
The speakerphone icon appears in the status bar when the speakerphone is on.
To turn the speakerphone off, just flip HTC EVO V 4G over again, facing it up. Or tap again.
Muting the microphone during a call
On the call screen, tap 120 to toggle between turning the microphone on or off. When the microphone is turned off, the mute icon appears in the status bar.
Ending a call
Do one of the following to end the call:
- On the call screen, tap End Call.
- Slide open the Notifications panel, then tap
If the phone number of the person who called is not in your contacts list, you can choose to save the number to your contacts list after you hang up.
Internet calls
When you're connected to a Wi-Fi network, you can make and receive calls through an Internet calling account.

Before you add an Internet calling account, make sure that you've registered with an Internet calling service that supports voice calls over Session Initiation Protocol (SIP). Internet calls to phone numbers may incur additional fees.
Adding an Internet calling account
- From the Home screen, press ☐, and then tap Settings > Call.
- Under Internet call settings, tap Accounts.
- Tap Add account.
- Enter your account details.
- Press to save your account.
- To set HTC EVO V 4G to receive Internet calls on your added account, tap the Receive incoming calls check box.
Making an Internet call
Make an Internet call to either your contact's Internet calling account or phone number.
Call any of the following:
| Internet calling account | In People, tap a contact who has an Internet calling account, and then tap Internet call.In Call History, tap an Internet call log. |
| Phone number | First, enable Internet calling for your outgoing calls. From the Home screen, press , and then tap Settings >Call. Tap Use Internet calling, and then select either For all calls when data network is available or Ask for each call. |
Call history
Use Call History to check missed calls, your dialed numbers, and received calls.
Returning a missed call
You'll see the missed call icon 📂 the status bar when you miss a call.
- Slide open the Notifications panel to check who the caller is.
- To return the call, tap the missed call notification.
- Tap the caller's name or number on the Call History screen.
Checking calls in the Call History
- On the Home screen, tap .
- Tap the Call History tab.
-
On the Call History screen, you can:
-
Tap a name or number in the list to call.
- Press and hold a name or number in the list to display the options menu.
- Tap to check only the call history of a particular contact.
- Press ☐, then tap View to display just a particular type of calls such as missed calls or outgoing calls.
Adding a new phone number to your contacts from Call History
- On the Call History screen, press and hold the phone number, and then tap Save to People.
- Choose whether to create a new contact or save the number to an existing contact.
Clearing the Call History list
On the Call History screen, do one of the following:
| Remove one name or number | Press and hold the name or number, and then tap Delete from call history. |
| Clear the entire list | Press ≡, and then tap Remove call history. Tap Select all > Delete. |
Call services
You can change the settings of various phone services. Call services may include call forwarding, call waiting, voicemail, and more. Contact your mobile operator to find out about the availability of call services.
To open call services, press from the Home screen, and then tap Settings > Call.
Messages
About the Messages app
Keep in touch with important people in your life. Use the Messages app to compose and send text and multimedia messages. On the All messages screen, your sent and received messages are neatly grouped into conversations, by contact name or phone number.
Sending a text message (SMS)
- From the Home screen, tap >Messages.
- Tap . +
- Enter a contact name or mobile number in the To field.

Sending the message to a group of friends? Tap and then select the contacts to whom you want to send the message.
- Tap the box that says Add text, and then enter your message.
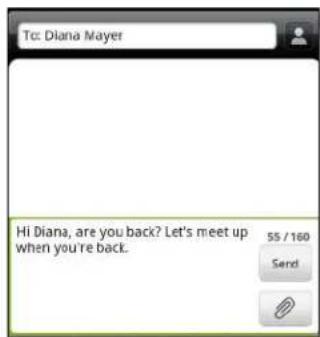
- Tap Send, or press to save the message as a draft.

- There is a limit on the number of characters for a single text message (displayed above the Send button). If you exceed the limit, your text message will be delivered as one but will be billed as more than one message.
- Your text message automatically becomes a multimedia message if you enter an email address as the recipient, add a message subject, attach an item, or compose a very long message.
Sending a multimedia message (MMS)
-
From the Home screen, tap >Messages.
-
Tap . +
-
Enter a contact name, mobile number, or email address in the To field.

Sending the message to a group of friends? Tap 📷 and then select the contacts to whom you want to send the message.
-
To add a subject line, press, and then tap Add subject.
-
Tap the box that says Add text, and then enter your message.
-
Tap, and then choose an attachment type.
-
Select or browse for the item to attach.
-
After adding an attachment, tap to see options for replacing, viewing or removing your attachment.
-
Tap Send, or press ← to save the message as a draft.
Can't find your contacts' email addresses in Messages?
If only phone numbers are showing up when you're entering a contact name, go to the Messages settings to enable displaying email addresses.
-
If you've created a new message, press ← first to return to the All messages screen.
-
Press ≡, and then tap Settings > General.
-
Select the Show email address check box.
Creating a slideshow
-
After you've added either a photo, video, or audio in the multimedia message you're composing, tap 📋 Slideshow.
-
Choose where you want to insert the next slide.
-
Right after adding a slide, do one of the following:
-
Tap, and then choose to add a photo or a video.
- Tap ➕ Audio to add music or a voice recording to a slide.
- Tap Add text, and then enter your caption.
-
Tap ▼ to see options for replacing, viewing or removing your attachment.
-
Press ☐, and then tap Preview. Tap once on the preview screen to see playback controls.
-
When finished, tap Send, or press to save the message as a draft.
Resuming a draft message
- On the All messages screen, press, and then tap Drafts.
- Tap the message and then resume editing it.
- Tap Send.
Checking your messages
Depending on your notification settings, HTC EVO V 4G plays a sound, vibrates, or displays the message briefly in the status bar when you receive a new message. A new message icon is also displayed in the status bar.
To open and read the message, you can:
- Open the Notifications panel, and then tap the new message notification.
- Go to the Messages app and open the message.
Viewing and saving an attachment from a multimedia message
If you are concerned about the size of your data downloads, check the multimedia message size first before you download it.

When Auto-retrieve in MMS settings is disabled, only the message header is downloaded. To download the entire message, tap the Download button.
- If there's a media attachment such as a photo or video in a received message, tap it to view the content.
- If the attachment is a contact (vCard), tap it to view the contact information, then tap Save to add to your contacts.
- If the attachment is an appointment or event (vCalendar), tap it to choose the calendar where to save it, and then tap Import.
- To save the attachment, press and hold the multimedia message, and then choose to save the type of attachment from the options menu.
Saving a text message in the Tasks app
Save a text message in your Tasks list so you can remind yourself when to reply.
- On the All messages screen, tap a contact (or phone number) to display the exchange of messages with that contact.
- Tap the message you want to save, and then tap Save as task.
- Enter a task title and other details.
- Tap Save.
Replying to a message
- On the All messages screen, tap a contact (or phone number) to display the exchange of messages with that contact.
- Tap the box that says Add text, and then enter your message.
- Tap Send.
Replying to another phone number of the contact
When a contact has multiple phone numbers stored on HTC EVO V 4G, you'll see the particular phone number used below the contact's name.
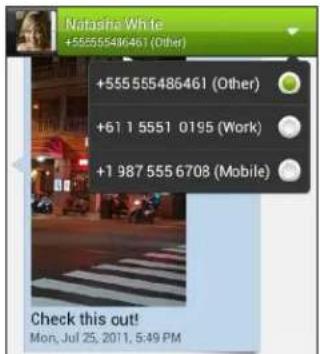
Keep in mind that your response will be sent to the phone number of the latest message you've received from this contact.
- On the All messages screen, tap a contact (or phone number) to display the exchange of messages with that contact.
- Tap, and then select another phone number of this contact.
- Tap the box that says Add text, then enter your reply message.
- Tap Send.
Forwarding a message
- On the All messages screen, tap a contact (or phone number) to view the exchange of messages with that contact.
- Tap a message, and then tap Forward.
- In the To field, fill in one or more recipients.
- Tap Send.
WAP push messages
WAP push messages contain a web link. Often, the link will be to download a file that you have requested from a service provider.
When you receive a WAP push message, a notification icon 📁 displayed in the status bar.
Opening and reading a new WAP push message
- Open the Notifications panel, and then tap the push message notification.
- Tap Visit website.
Viewing all your WAP push messages
- From the Home screen, tap >Messages.
- Press, and then tap Push messages.

You can only see this option if you've previously received WAP push messages.
Managing message conversations
Locking a message
You can lock a message so that it will not be deleted even if you delete the other messages in the conversation.
- On the All messages screen, tap a contact (or phone number) to display the exchange of messages with that contact.
- Tap the message that you want to lock.
- Tap Lock message on the options menu. A lock icon is displayed.
Deleting a single message
- On the All messages screen, tap a contact (or phone number) to display the exchange of messages with that contact.
- Tap the message that you want to delete.
- If the message is locked, tap Unlock message on the options menu, and then tap the message to display the options menu again.
- Tap Delete message, and then tap OK.
Deleting several messages within a conversation
- On the All messages screen, tap a contact (or phone number) to display the exchange of messages with that contact.
- Press ☐, and then tap Delete (or More > Delete).
- Tap Delete by selection or Delete by phone number (if the contact used multiple phone numbers throughout the conversation).
- Select the messages you want to delete, and then tap Delete.

In the Messages settings, tap General > Delete old messages to auto delete old messages per conversation.
Deleting a conversation
- On the All messages screen, press and hold a contact (or phone number) whose messages you want to delete, and then tap Delete.
- Tap OK to delete the entire thread.

Any locked messages in the conversation thread will not be deleted unless you select the Delete locked messages check box.
Deleting several conversations
- On the All messages screen, press and then tap Delete.
- Select the conversation threads you want to delete.
- Tap Delete. Any locked messages will not be deleted.
Backing up your text messages
- From the Home screen, tap > Messages.
- Press ☐, and then tap Back up SMS > Back up SMS.
- Enter a name for your backup file, and then tap OK.
Importing text messages
You can only import text messages that were exported using the Back up SMS feature.
- From the Home screen, tap > Messages
- Press ☐, and then tap Back up SMS > Restore SMS.
- Tap the backup file to import.
- Tap OK.
50 Messages
Setting message options
Access and change the settings of the Messages app. You can enable pop-up message notifications, add a signature to your messages, edit your MMS options, and more.
On the All messages screen, press and then tap Settings.
Search and Web browser
Searching HTC EVO V 4G and the Web
You can search for information on HTC EVO V 4G and on the Web by using Search. Some apps, such as People or Mail, have their own search function, which you can use to search only within those apps.
Setting search options

- From the Home screen, press
- Press, and then tap Settings.
- Tap Google Search, and then customize your search settings.
- When done, press .
- Tap Searchable items, and then select the items you want included when doing a search.
Performing searches on the Web and HTC EVO V 4G

- From the Home screen, press
- In the search box, enter the words you want to search for. As you type, matching items on HTC EVO V 4G and suggestions from Google web search are shown as a list.
- If what you're searching for is in the list of suggestions, tap the item to open it in its compatible app.

Tap to enter it in the search box. New suggestions appear and you can enter more text or tap beside a subsequent suggestion to quickly refine your search.
Browsing the Web
- From the Home screen, tap

- Tap the URL box on top of the screen.
52 Search and Web browser
- Enter your search keywords or a webpage address.
-
On the webpage, you can:
-
Tap a link to open it, or press and hold a link to see more options.
- Tap an email address to send a message to the email address.

While browsing the Web, press → to quickly show the URL box and status bar.
Opening a new browser window
Open multiple browser windows to make it easier for you to switch from one website to another.
- While viewing a webpage, press and then tap Windows.
- Tap . + new browser window opens.

Tap ☒ if you want to open an incognito window.
Switching between browser windows
- While viewing a webpage, press, and then tap Windows.
- Slide your finger until the webpage you want to view appears.
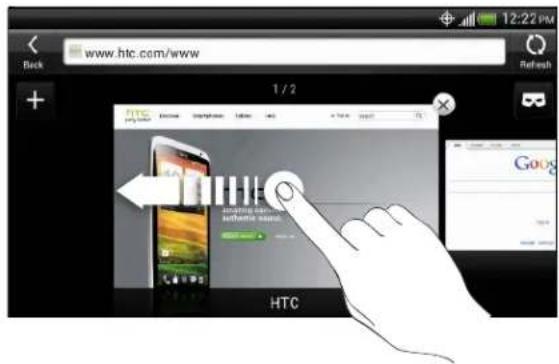
- Tap a webpage to display it in full screen.

Tap ✗ to close a webpage.
Viewing the full version of a website
While viewing a webpage, press and then select the View desktop site check box.
Private browsing
You can use incognito windows to browse the Web with more privacy than in normal browser windows. When you're browsing incognito, your regular browser cookies are not shared but deleted when you close all incognito windows. Pages you view in incognito also won't appear in your browser history except for files you download.
From the browser screen, press and then tap Windows > . A screw window opens with some information about going incognito.
Downloading files and apps
You can download file and apps directly from your favorite websites.

Files and apps downloaded from the Web can be from unknown sources. To protect HTC EVO V 4G and your personal data, we strongly recommend that you download and open only the files you trust.
- Open your web browser, then go to the website where you can download the file you want.
- Follow the website's download instructions.
Before you can install the downloaded app, you need to set HTC EVO V 4G to allow installation of third-party apps. From the Home screen, press 📄 then tap Settings > Security > Unknown sources.
Viewing your downloads
- From the Home screen, tap >Downloads.
- Tap the file to open it.
Viewing bookmarks and previously visited pages
You can store as many bookmarks as you want on HTC EVO V 4G. You can also access a convenient list of the sites you have visited, or quickly view the pages that you access most often.
Bookmarking a webpage
- While viewing a webpage, press , and then tap Add to > Bookmark.

You cannot create bookmarks while you're on an incognito browser screen.
- Edit the bookmark name if needed, and then tap Done.
Opening a bookmark
-
While viewing a webpage, press, and then tap Bookmarks.
-
On the Bookmarks tab, navigate to the bookmark you want to open, and then tap it.

If you have set up Google Chrome™ sync on your Google Account, press and then tap Accounts list to view your synced bookmarks.
Editing a bookmark
-
While viewing a webpage, press, and then tap Bookmarks.
-
On the Bookmarks tab, press and then tap Edit.
-
Tap at the right of the bookmark you want to edit.
-
Enter your changes, and then tap Done.
Viewing a previously visited page
-
While viewing a webpage, press, and then tap Bookmarks.
-
On the History tab, navigate to the page you want to view and then tap the page.

You can also press and hold to quickly see your web history.
Clearing the list of previously visited pages
-
While viewing a webpage, press, and then tap Bookmarks.
-
On the History tab, press, and then tap Clear all.
Viewing a page that you often visit
- While viewing a webpage, press, and then tap Bookmarks.
- On the Most visited tab, navigate to the page you want to view, and then tap the page.
Clearing the list of most visited pages
- While viewing a webpage, press, and then tap Bookmarks.
- On the Most visited tab, press, and then tap Clear all.
Changing the view of bookmarks or most visited pages
- While viewing a webpage, press, and then tap Bookmarks.
- On the Bookmarks tab or the Most visited tab, press.
- Toggle between Thumbnails and List views.
Syncing your bookmarks with Google Chrome
Create bookmarks from your computer's Google Chrome browser and sync them on HTC EVO V 4G. For more information about Google Chrome, visit http://support.google.com/chrome.
- Using your Google Chrome desktop browser, you need to sign in to your Google Account and set up Google Chrome sync.
-
Be sure that you are logged in to your Google Account every time you save Google Chrome bookmarks on your computer.
-
From the Home screen, press , and then tap Settings > Account & sync.
- Tap your Google Account.
- Select the Sync Internet check box.
- Tap Sync now.
Setting browser options
Customize the web browser to suit your browsing style. Set display, privacy, and security options when using the web browser.
From the browser screen, press and then tap Settings.
Setting your homepage
- From the browser screen, press ☐, and then tap Settings > General > Set homepage.
- Select the homepage you want to use.
Choosing when to show Adobe Flash content
Choose which Adobe ^® Flash ^® content you want to see on a webpage, and when you want to view it.
- From the browser screen, press ☐, and then tap Settings > Advanced > Enable Flash and plug-ins.
- Tap On demand.
After selecting On demand, you can show the Adobe Flash content by tapping on the webpage.
Camera
Switching between 3D and 2D
Shoot in 3D or 2D. You can even view your photos and videos in 3D without the glasses. HTC EVO V 4G uses the two rear cameras to take photos and videos in 3D and uses one of these cameras when capturing in 2D. To best enjoy the camera:
- Switch between capturing 2D and 3D images by sliding the 2D/3D mode switch.
- Hold HTC EVO V 4G in landscape orientation for best 3D effects.
- When viewing photos and videos in Gallery, tap 2D view or 3D view to switch between viewing your images in 2D and 3D.
- To know more about capturing images in 3D, read the Top questions on 3D camera on page 61.
Camera basics
Whether traveling for business or fun, enjoy taking photos and videos of your trip and encounters with HTC EVO V 4G.
To open the camera, tap from the Home screen, and then tap Camera. Or, press the Camera button.
You'll find the following onscreen controls and indicators on the Viewfinder screen:

natural_image
Close-up portrait of a smiling woman outdoors with blurred greenery and a blurred person in the background (no text or symbols visible)- The auto focus indicator tells you where the focus is on the shot.
- Use the onscreen controls to switch between photo and video modes, add effects, zoom in or out of your subject, and more.
Before capturing
Zooming
Before taking a photo or video, you can first use the onscreen zoom bar to zoom in or out of your subject.
Simply slide your finger on the zoom bar to zoom in or out.
When you're recording video, the zoom bar is always onscreen. You can freely zoom in or out while recording.
Auto focusing
Whenever you point the camera at a different subject or location, the Viewfinder screen displays the auto focus indicator.
Let the camera auto focus on the center of the screen. Or you can tap another area on the screen that you want to focus on.
Switching between the front and rear camera
- On the Viewfinder screen, tap

- Tap the Front/Main slider to switch between the two cameras.

Some camera features are not available when you're using the front camera, such as auto focusing, zooming, and face detection.
Choosing an effect
Use the available camera effects to make your photos look like they've been taken through special lenses or filters. You can also apply certain effects to videos.
- Tap

- Scroll through the available effects and tap one that you like.
Setting the resolution

You can set the resolution only when shooting 2D photos or videos.
- In photo mode, tap ⚙ Resolution, and then choose a size you want.
- In video mode, tap 📋 and then choose a resolution.
Choosing a flash mode
Tap the flash button repeatedly to choose a flash mode depending on your lighting conditions.
Taking a photo
-
From the Home screen, tap >Camera.
-
Point the camera and focus on your subject.
If you're taking a photo of a group of people, the camera will automatically recognize faces and adjust the focus. You'll see boxes on people's faces.

natural_image
Group photo of four smiling young people outdoors under a clear sky (no text or symbols visible)
Make sure the Auto focus and Face detection check boxes are selected in the camera settings. These options are only available if taking 2D photos.
-
When you're ready to take the photo, tap . 📷r, press the Camera button.
-
Choose what to do with the photo, such as share, set as wallpaper, and more.
Recording video
-
From the Home screen, tap > Camera.
-
On the Viewfinder screen, tap Mode and then tap the Photo/Video slider to select Video.
-
Frame your subject on the Viewfinder screen.
-
Tap to start recording.
-
While recording, you can:
■ Freely zoom in or out.
- Change focus to a different subject or area by just tapping it on the Viewfinder screen.
- Tap the flash button to switch the camera light on or off.
-
To stop recording, tap again.
-
Choose what to do with the video, such as share, trim, play, and more.
Camera scenes
Scenes provide an easy way to override your camera's normal settings to suit your current lighting and environment. Use Auto and let the camera automatically determine optimal settings, or choose from a wide selection of scenes before you start taking photos.
Improving people shots
If you'd like your family or friends to look their best in your photos, make sure to use the portrait scene. It even smoothens the skin in your shots.
While on the Viewfinder screen, just tap Scenes > Portrait.
Changing camera settings
- To open the camera settings, tap

-
As well as changing basic camera settings, you can also:
-
Set the ISO level. Higher ISO numbers are better for taking pictures in low light conditions (photo mode only).
- Change the review duration to set how long a captured photo or video will be displayed on the Review screen before the camera changes back to the Viewfinder screen.
- Geo-tag photos to store GPS location in your captured photos (photo mode only).
- Auto enhance photos to reduce noise when using a high ISO setting and to automatically adjust photo brightness (photo mode only).
- Automatically upload photos to a social network (photo mode only). You can set the upload frequency, select the album to upload to, and set the privacy level.
Top questions on 3D camera
How does the phone display in 3D?
Your phone has an extra layer (a parallax barrier) on top of the display that simulates 3D depth. This allows your eyes to each see a different image through this layer, simulating a sense of depth. When you move or tilt your phone at a different angle, you may see the 3D image misalign and align again.

- Viewing 3D images may cause symptoms such as eye strain, dizziness and nausea in some people. If you experience such symptoms or discomfort, immediately stop using the 3D function and seek medical advice.
- You should take periodic breaks when using the 3D function to prevent these symptoms and/or impairment of vision. You should avoid viewing the 3D images continuously for a prolonged period of time.
- Children under the age of 7 should not use the 3D function as this may affect or damage developing eyes.
- Discuss specific concerns with your optometrist, ophthalmologist, or physician.
What's the maximum resolution for 3D and 2D photos?
The maximum capture resolution is different for 3D and 2D photos.
- Your phone captures 3D photos at 2 megapixel resolution. This is fixed and cannot be changed in the camera settings.
- In the camera settings, you can choose the resolution you want to use for 2D photos. The maximum resolution is 5 megapixels.
What's the maximum resolution for 3D and 2D videos?
The maximum capture resolution is 720p (HD) at 30fps.
- The resolution for 3D videos is fixed and cannot be changed in the camera settings.
- In the camera settings, you can choose the resolution you want to use for 2D videos.
What's the best distance for capturing 3D photos and videos?
Ideally, the minimum distance from your subject is at least 50 cm (1.6 ft). As for the maximum distance, try not to go beyond 3.5 meters (11 ft).
What capture file formats are available for 3D photos?
Capture 3D photos in jps (JPEG stereo) or mpo (Multiple-picture object format) file format. Switch the camera to 3D mode and then choose which format you want to use from the camera settings.
How can I view 3D photos on my computer?
If you don't have a 3D panel and 3D photo viewer software on your computer, you can save 3D photos as normal jpeg images in the Gallery app first before copying and viewing them on your computer.
Photos, videos, and music
Gallery
About the Gallery app
Reminisce on good times. Use Gallery to view all your photos and videos that are on HTC EVO V 4G or your online albums.
You can even:
- Add photo frames and apply effects.
- Trim your videos.
- Share to your social networks, photo sharing sites, and more.
- View your photos and videos on a big screen TV.
Viewing photos and videos
- From the Home screen, tap ✕ Gallery.
- Tap a photo or video album.
- Tap a photo or video to view it in full screen.

- If viewing an image that you've captured using HTC EVO V 4G, tap 2D View or 3D View to switch between viewing in 2D and 3D.
- While viewing a photo in full screen, tap anywhere on the screen, and then tap More > Show on map to see the location where you took the photo. (Show on map is available when you've enabled Geo-tag photos in Camera.)
Starting a photo slideshow
- Tap a photo album.
- Tap Slideshow.
During the slideshow, tap the screen to show the controls. Tap 📋 to set slideshow preferences.
64 Photos, videos, and music
Adjusting a 3D photo
When you take a 3D photo, the rear camera captures a left and right image to give a three-dimensional look. In Gallery, you can adjust the two images in the photo to get the best 3D image.
- Browse to the 3D photo that you want to adjust.
- Tap the screen to display the onscreen controls, then tap Edit > Adjust 3D alignment.
-
Adjust the image to get the best 3D view:
-
Tap to shift the left or right image incrementally.
-
Press and hold 📄 to keep moving the left or right image.
-
Tap Save.
Watching a video
- Tap a video album and then tap a video.
- Tap the onscreen controls to control the video playback, adjust the volume, and more.

Tap 📋 to share the video on your home network.

natural_image
Two people sitting by the seaside watching a scenic view, with ocean and camera UI elements visible (no text or symbols on main subjects)Editing your photos
Do basic editing tasks on your photos such as rotate and crop. You can also enhance your photos by applying effects such as high contrast, vintage, and more.

Photo editing is not available for 3D photos. They will be converted to 2D (jpeg) photos when you edit them.
Rotating a photo
- On the Gallery app's Albums screen, tap an album.
- Press and hold a photo, and then tap Edit > Rotate left or Rotate right
65 Photos, videos, and music
Cropping a photo
-
On the Gallery app's Albums screen, tap an album.
-
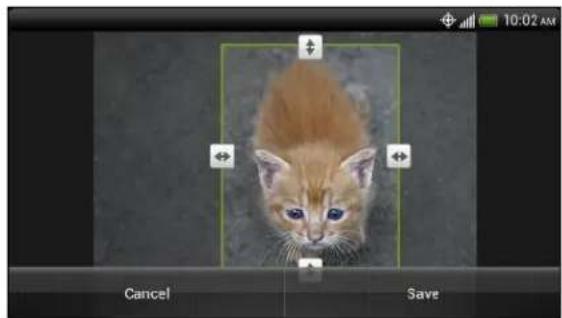
Press and hold a photo, and then tap Edit > Crop. You'll see a crop box around the photo.
-
You can:
- Drag the crop box over the part of the photo you want to crop.
- Press and hold the edge of the crop box. When directional arrows appear, drag your finger inward or outward to resize the crop box.
natural_image
Close-up photo of a fluffy kitten with blue eyes, shown in a mobile app interface (no text or symbols on the image itself)- Tap Save.
The cropped photo is saved as a copy. The original photo remains unedited.
Adding photo effects
-
On the Gallery app's Albums screen, tap an album.
-
Press and hold on a photo, and then tap Edit > Effects.
-
Tap an effect to apply to the photo, or tap to add a frame to your photo.
-
Tap Save.
The enhanced photo is saved as a copy. The original photo remains unedited.
Saving a 3D photo as 2D
If your computer is not capable of displaying 3D photos, you can save them as 2D (jpeg) photos before transferring them to your computer.
-
On the Gallery app's Albums screen, tap an album.
-
Press and hold on a 3D photo, and then tap Edit > Save as 2D.
The 2D photo is saved as a copy. The original photo remains unedited.
Trimming a video
Remove unwanted scenes from a video you recorded on HTC EVO V 4G.
-
On the Gallery app's Albums screen, tap an album.
-
Press and hold the video you want to edit, and then tap Trim.
66 Photos, videos, and music
- Drag the two trim sliders to the part where you want the video to begin and end.
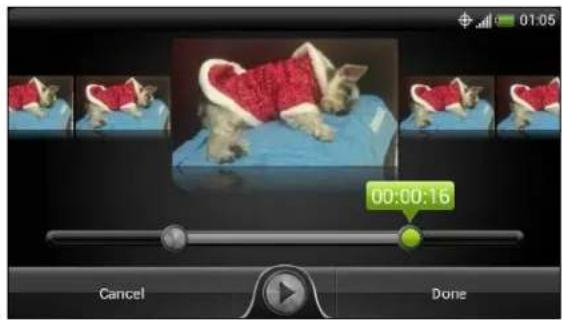
As you drag a slider, you'll see time markers and video frames. The one in the middle is your start or end frame.
-
Tap to preview your video.
-
Tap Done.
The trimmed video is saved as a new file. The original video remains unedited.
Viewing photos in your social networks
Right in the Gallery app, check what you and your friends have uploaded to your social networks or photo sharing sites.

Log on to your accounts before you start viewing online photos.
- From the Home screen, tap ✗ Gallery.
- On the top bar, tap, and then tap a social network or photo sharing site.
- Tap an account to start viewing photos in that account.

To comment on a photo, press and hold a photo thumbnail and then tap Add comment.
Sending your photos and videos
Send photos and videos to your computer or to another device via email, MMS, or Bluetooth.
Sending photos or videos by email
You can send several photos, videos, or both in an email message. They are added as file attachments in your email.
- From the Home screen, tap ✗ Gallery.
- Tap the album that has the photos or videos you want to share.
- Tap Share, and then tap Gmail or Mail.
67 Photos, videos, and music
- Select the photos or videos you want to share and then tap Next.
- Compose your message and then tap (Gmail) or Send (Mail).

If you selected Mail and you have multiple email accounts, the default email account will be used.
Sending a photo or video by MMS
- From the Home screen, tap 📄 > Gallery.
- Tap the album that has the photos or videos you want to share.
- Tap Share > Messages.
- Tap the photo or video you want to send. The photo or video is automatically added into the MMS message.
- To add another photo or video to your slideshow attachment, tap and then tap Picture or Video.
- Compose your message and then tap Send.
Sending photos or videos using Bluetooth
Use Bluetooth to send photos and videos to another device or to your computer.
- From the Home screen, tap 📄 > Gallery.
- Tap the album that has the photos or videos you want to share.
- Tap Share > Bluetooth.
- Select the photos or videos you want to share and then tap Next.
You'll be asked to turn on Bluetooth and connect to the receiving Bluetooth device so the files can be sent.
Sharing your photos and videos on the Web
Use the Gallery app to share photos and videos straight to your social networks. And you can post videos on YouTube".

You can also share a photo or video right after you've captured it.
Sharing photos or videos on Facebook

Log in to your Facebook account before you upload photos or videos.
- From the Home screen, tap ✕ Gallery.
- Tap the album that has the photos or videos you want to share.
- Tap Share > Facebook for HTC Sense.
- Select the photos or videos you want to share and then tap Next.
68 Photos, videos, and music
- Select which album to upload to and set privacy settings for the uploaded photos or videos.

Tap Add tag and description to enter a caption on each photo or video or tag friends on your photos. If you're sharing several photos or videos, slide to the left to go to the next one. Remember to tap Save after you're done.
- Tap Done.
Sharing photos and videos on Flickr

Log in to your Flickr® account before you upload photos or videos.
- From the Home screen, tap 📄 Gallery.
- Tap the album that has the photos or videos you want to share.
- Tap Share > Flickr.
- Select the photos or videos you want to share and then tap Next.
- Select which album to upload to and set privacy settings for the uploaded photos or videos.

Tap Add tag and description to enter a caption on each photo or video or tag friends on your photos. If you're sharing several photos or videos, slide to the left to go to the next one. Remember to tap Save after you're done.
- Tap Done.
Sharing photos on Picasa

Sign in to your Google Account before you upload photos to Picasa™.
- From the Home screen, tap ✕ Gallery.
- Tap the album that has the photos you want to share.
- Tap Share > Picasa.
- Select the photos you want to share and then tap Next.
- Enter a caption for the photos you're uploading.
- Select the online album where you want to upload the photos, or tap create a new album.
- Tap Upload.

Sharing videos on YouTube
Upload your videos to YouTube and become an instant sensation.
- From the Home screen, tap ✕ Gallery.
- Tap a video album, and then tap Share > YouTube.
- Select the videos you want to share and then tap Next.
- Tap the Google Account that you want to use, accept the Terms of Service, and then select which data connection to use to upload the videos.
- Enter a title and description for the videos you're uploading.
- Select a privacy option for the videos or tag them for easy searching.
- Tap Upload.
Music
Browsing music in the library

You need to copy music files to HTC EVO V 4G first to use the Music app to play music.
- From the Home screen, tap >Music.
- Tap 📂 to browse a category, such as Artists or Albums.
Listening to music
Enjoy listening to songs and music on HTC EVO V 4G using the Music app.
-
While browsing your music collection, tap a song to play it.
-
Tap the onscreen icons to control music playback, repeat songs, and more.

 | Adjust the media volume. |
 | Go to the library. |
 | Switch between the player mode or the queue list. You can rearrange songs while in the queue list. |
 | Press and drag your finger across the progress bar to jump to any part of the song. |
 | Show options for adding the song to a playlist, sharing the song, and more. |
 | Turn shuffle on or off. (Shuffle is off when button is gray.) |
 | Cycle through the repeat modes: repeat all songs, repeat current song, and don't repeat. |
Finding music videos on YouTube
It's easy to find music videos of the song you're listening to on YouTube. On the Now playing screen, press and then tap Find videos.
Updating album covers
-
On the playback screen, press , and then tap Update album art.
-
Choose whether to update all album covers or just the current song on the playback screen.
Playing music from the Lock screen
When you're listening to music and the screen turns off, press Power to turn the screen back on and control the music playback directly on the Lock screen.
If you don't see the playback controls on the Lock screen, swipe your finger from left to right on the box onscreen.
71 Photos, videos, and music
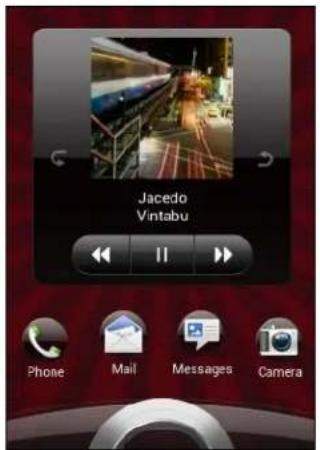

You can also pause music playback right from the Notifications panel.
Creating a playlist
Personalize your music experience by creating music playlists. Make a playlist containing just your favorite songs or create one to match your mood for the day. You can make as many playlists as you like.
- From the Home screen, tap
Music.
-
Tap Playlists.
-
Tap . +
-
Enter a playlist name.
-
To add songs, tap . +
-
Tap ☐ choose a category, and then browse for songs.
-
Select the check boxes of songs you want to add to the playlist and then tap Add.
-
Tap Save.
Playing the songs in a playlist
- From the Home screen, tap
Music.
-
Tap Playlists.
-
Tap a playlist, and then tap the song you want to play first.
When you tap a song in the list to play it, the Now playing screen is updated with the songs from your playlist.
Managing playlists
After creating a playlist, you can add more songs to it, rearrange their order, and more.
-
From the Home screen, tap ✦Music.
-
Tap Playlists, and then tap the playlist you want to edit.
-
Press, and then tap Edit playlist.
| Add songs 1. Tap . +2. Tap [IMAGE] choose a category, and then browse for songs.3. Select the check boxes of songs you want to add to the playlist and then tap Add. | |
| Rearrange songs | Press and hold at the end of the song title you want to move. When the row is highlighted, drag it to its new position, then release. |
| Delete songs Select the check boxes of songs you want to remove from the playlist. | |
| Change playlist name | Type the new name of the playlist in the title text box. |
- Tap Save.
Deleting playlists
-
From the Home screen, tap ✗Music.
-
Tap Playlists.
-
Press and then tap Delete playlists.
-
Select the playlists to delete and then tap Delete.
Setting a song as a ringtone
Pick a song from your Music library and set it as your ringtone or as ringtone for a favorite contact.
-
From the Home screen, tap >Music.
-
Select and play the song that you want to set as a ringtone.
-
On the Now playing screen, press ≡ and then tap Set as ringtone (or More > Set as ringtone).
-
Tap Phone ringtone or Contact ringtone. If you select Contact ringtone, choose the contacts you want to associate the ringtone with.
Trimming an MP3 ringtone
Use the Music app's ringtone trimmer if you want to set only a part of the song as ringtone.
-
On the Now playing screen, press ≡ and then tap Set as ringtone > Trim the ringtone.
-
Drag the trim sliders to the part where you want the ringtone to begin and end.
For a more precise trimming, tap the left or right arrow buttons < > markers indicate where you are on the song.
-
When you're done trimming, tap Set as.
-
Choose whether to set your trimmed song as your Phone ringtone or Contact ringtone.

From the Home screen, when you press ≡ and then tap Settings > Sound > Phone ringtone, you'll see your trimmed song in the ringtone list.
Sharing music using Bluetooth
Choose a song from the Music app's library and use Bluetooth to send it to another device or your computer.
- From the Home screen, tap >Music.
- Select and play the song that you want to send.
- On the Now playing screen, press ≡ and then tap Share > Share file > Bluetooth.
You'll be asked to turn on Bluetooth on HTC EVO V 4G and connect to the receiving Bluetooth device so the music can be sent.
Connected Media
Sharing media on your home network
Share photos, videos, and music with a bigger circle of friends on your home network. Simply connect your phone to the network and instantly show your captured photos and videos on a big TV, or start streaming your favorite music tracks on a hi-fi audio system — all via DLNA ^4 . For more information about DLNA, visit www.dlna.org.

Before you share media on your home network:
- Connect your phone to the network via Wi-Fi.
- Connect the TV or audio system to the network. Consult your TV or audio system manual on how to do this.
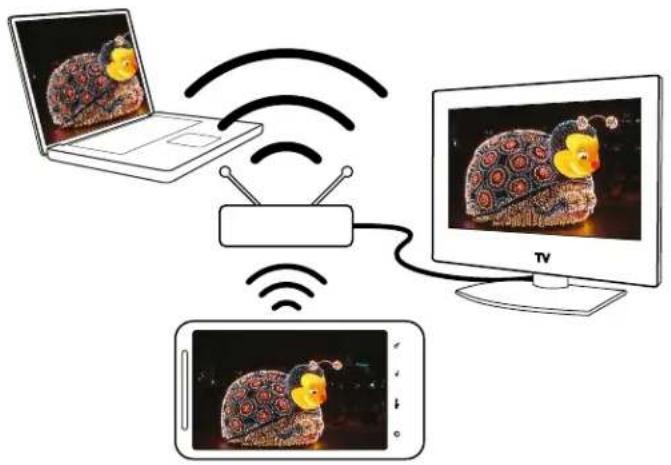
- Open the Gallery or Music app.
- Locate the media that you want to share, and then tap it.
- While viewing the photo or playing the video, tap the screen to show the controls, and then tap Or if you're playing music, press and then tap Output.
- Choose the device on your network where you want to play the media.
- Once connected to the other device, tap the onscreen controls to control playback, adjust the volume, and more.
- To stop sharing media and disconnect from the other device, tap .

While playing media on another device, you can press and do other things on HTC EVO V 4G.
HTC services
HTC Watch
About HTC Watch
With the HTC Watch™ online video service, get a glimpse of the latest movie trailers and enjoy watching Hollywood blockbusters or TV shows.
Create your HTC Watch account so you can:
- Rent or purchase videos such as movies and TV shows online.
- Recommend videos instantly to your family and friends.
- Watch your purchased videos on up to five HTC devices that have access to HTC Watch using your same account.

Initially, you may be able to watch movie trailers only. Rental and purchasing services will gradually be available worldwide. Please stay tuned.
Creating or signing in to your HTC Watch account
- From the Home screen, press ☐, and then tap Settings > Account & sync.
- Tap Add account > HTC Sense.
- Create a new HTC Watch account, or directly sign in if you already have your account.
Watching movies and TV shows
Using the Watch app, you can watch the preloaded content and movies or TV shows you've downloaded from the HTC Watch store.
- From the Home screen, tap Watch.
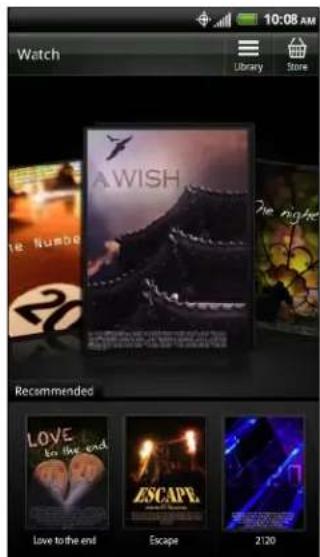
- Swipe left or right across the screen to browse through the videos, and then tap one to watch it.

Tap Recommended to check what recent releases or TV shows are available in the store.
Renting or purchasing a video

Make sure to use a credit card that's registered in the same region as the one associated to your HTC Watch account.
- From the Home screen, tap

- Tap

- Browse the video store, or press
and search for a title.
-
Tap a video to view its synopsis.
-
While viewing the synopsis of a video, you can:
-
Watch the trailer, if available. Tap play it.
-
Recommend the video by sharing its link. Tap 📋 and then choose how you want to share.
-
Tap rent or to purchase the video.
-
If this is your first time to rent or purchase, add your credit card details and billing information.
77 HTC services
- Confirm your rental or purchase.
- Tap Download.
You can go to your library to check your downloads.
Managing your downloads
Use the library to manage your downloads and see all of your purchases. You can also start watching a video as it's being downloaded.
- From the Watch main screen, tap access your library.
-
You can:
-
Tap the Progress tab, and then tap a video to start watching it.
- Tap the All videos tab to check what videos you've rented or purchased.
You can also pause a download, resume it, or redraw a video.
Changing settings
In the Watch app, press and then tap Settings. You can modify your account settings, edit or remove your credit card info, and more.
Checking what's linked to your HTC Watch account
When you download movies or TV shows from the video store, your HTC device will automatically be added to your HTC Watch account. If you own more than one HTC device that has access to HTC Watch, you can download and watch videos on up to five devices. You can check what HTC devices are linked to your HTC Watch account.
- In the Watch app, press, and then tap Settings.
- Tap Device management.

Tap Remove device if you want to unlink and remove an HTC device from your account.
Deleting your HTC Watch account
- In the Watch app, press, and then tap Settings.
- Tap Account > Remove account.
Top questions on HTC Watch
Why am I asked to sign in again to my account?
Whenever a time interval (about 20 minutes) has passed, you'll be asked again to sign in to your HTC Watch account before you can continue to rent or purchase videos or access some settings. This is a safety precaution to check your identity and to ensure that you acknowledge that it is your account.
How long is the rental period of a video?
Depending on the studio's terms and the country where you downloaded the video, the rental period is either 24 or 48 hours, starting from the first viewing.
If you're not immediately watching the video, you have up to 30 days before the rental expires.
Why won't HTC Watch allow me to remove a device and add a new one?
You can only remove an HTC device once every 120 days.
Accounts and sync
Adding a social network account
- From the Home screen, press ☐, and then tap Settings > Account & sync.
- Tap Add account.
- Tap the account type you want to add.
- Follow the onscreen instructions to enter the account information.
Adding more Google Accounts
You can add more than one Google Account. However, you can only back up the phone settings of one Google Account you sign in to to Google servers. Also, most Google apps and services use the first Google Account you signed in to but may give you the option to use the other Google Accounts you added.
- From the Home screen, press ☐, and then tap Settings > Account & sync.
- Tap Add account > Google.
- Follow the onscreen instructions to sign in to an account or create a new account.
Forgot your Google Account password?
If you have forgotten your Google Account password, you can try to recover it by going to the Google website.
- On HTC EVO V 4G or on your computer, open your web browser
- Go to www.google.com/accounts/recovery.
- Enter the email address or username that you use to sign in to your Google Account.
- Click Submit.
- Follow the instructions on the screen to reset your password.
Managing your online accounts
Changing sync settings
- From the Home screen, press ☐, and then tap Settings > Account & sync.
- On top of the screen, drag the slider to turn on or off automatic sync.
Syncing an account manually
- From the Home screen, press ☐, and then tap Settings > Account & sync.
- Tap the account you want to sync.
- Tap Sync now.
Managing synced account settings
- From the Home screen, press ☐, and then tap Settings > Account & sync.
- Tap the account that you want to update.
- Tap the item you want to sync or edit.
Removing an account
You can remove an account to delete all information associated with it from HTC EVO V 4G. Removing an account does not delete information from the online service itself.
- From the Home screen, press ☐, and then tap Settings > Account & sync.
- Tap the account that you want to remove.
- Tap Remove account.
People
About the People app
With the People app, easily manage your communications with your contacts via phone, messaging, email, and social networks.
And, if you have the same contacts from different sources, you can merge their contact information so you won't have duplicate entries.
To open People, from the Home screen, tap > People.
Your contacts list
The People app lists all contacts stored on HTC EVO V 4G and from the online accounts you're logged in to.
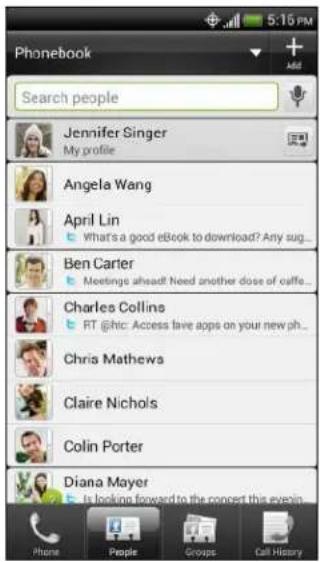
You can:
- View your profile and edit your contact information.
■ Create, edit, or find contacts. - See status updates.
- Tap a name to see that contact's stored information.
- See a notification icon when a contact has sent you new messages or when it's the contact's birthday.
- Check out who's online in Google Talk™. Online status icons are displayed if you're signed in to Google Talk.
Filtering your contacts list
Choose which account contacts to show.
- On the People tab, tap on the top bar.
- Choose the online accounts that contain the contacts you want to display.
- Press

To set more contact sorting options, press ≡ and then tap Settings.
Setting up your profile
Store your personal contact information to easily send it to other people.
- On the People tab, tap Me, and then choose whether to link your profile to an existing contact entry that already contains your personal information or edit your profile.

If you've already logged in to your online accounts, tap your name or email address, and then tap Edit my contact card.
- Enter or edit your name and contact details.
- Tap (or the current picture) to change your picture.
- Tap Save.
Adding a new contact
- On the People tab, tap +.
- Tap the Name field, and then enter the contact name.

Tap ☐ if you want to separately enter the contact's first, middle, and last name. Depending on the contact type, you may also be able to add a name prefix (such as Dr.) or a name suffix (such as Ph.D).
- Select the Contact type. This determines which account the contact will sync with.
- Enter the contact information in the fields provided.
- Tap Save.
Importing a contact from an Exchange ActiveSync account
- On the People tab, enter the contact's name or email address in the search box.
- Tap .
- Tap the name of the contact you want copied to HTC EVO V 4G.
- Tap Save to People.
Merging contact information
Avoid duplicate entries by merging contact information from different sources, such as your social network accounts, into one contact.
Accepting matched contacts suggestions
When HTC EVO V 4G finds contacts that can be merged, you'll see a link icon the notifications area of the status bar.
- Slide the Notifications panel down, and then tap Matched contacts suggestion. You'll see a list of suggested contacts to merge.
- Choose the contacts you want to merge.
- Tap OK.
Manually merging contact information
- On the People tab, tap the name of the contact (not the icon or photo) you want to link.
- Tap or (if there are suggested links).
- You can:
■ Under Suggest links, tap to link the contact to an account.
■ Under Add contact, tap one of the options to link to another contact.
Breaking the link
- On the People tab, tap the name of the contact (not the icon or photo) whose link you want to break.
- Tap .
- Under the Linked contacts section, tap 📄 beside an account to break the link.
Backing up your contacts to the storage card
- On the People tab, press ≡.
- Tap Import/Export > Export to SD card (or More > Import/Export > Export to SD card).
- Select an account or type of contacts to export.
- Tap OK.
Importing contacts from the storage card
You can only import contacts that were exported to the storage card using the Export to SD card feature.
- On the People tab, press
- Tap Import/Export > Import from SD card (or More > Import/Export > Import from SD card).
- If you have more than one account set up, tap the type for the imported contacts.

Contact information and conversations
When you tap a contact on the People screen, the contact details screen opens.
The contact details screen has the following tabs:

Details
Shows the information you've stored for the contact. Get in touch with the contact by tapping an option.

Thread
Shows SMS messages and emails you've received from the contact. It also lists all your incoming, outgoing, and missed calls to and from the contact.
From this tab, you can reply to a message, send an email, or call the contact.

Updates
Shows the contact's updates and events from social network accounts.
If you see a notification of the contact's birthday under the Events section, you can tap the notification and choose how you want to greet your contact.

Gallery
Shows the linked contact's albums and photos.
Editing a contact's information

Social network contacts cannot be edited.
- On the People tab, press and hold the contact, and then tap Edit contact.
- Enter the new information.
- Tap Save.
Deleting contacts
- On the People tab, press .
- Tap Delete.
- Select the contacts you want to remove.
- Tap Delete.
Sending contact information
- On the People tab, do one of the following:
| To send Do this | |
| Someone's contact information | Press and hold the name of the contact (not the icon or photo), and then tap Send contact as vCard. |
| Your contact information | Press and hold My profile, and then tap Send my profile. |
- Choose how you want to send the vCard.
- Select the type of information you want to send.
- Tap Send.
Sending multiple contact cards
- On the People tab, press .
- Tap Send contacts.
- Select the contacts whose contact information you want to share
- Tap Send.

If you can't see the Send while the onscreen keyboard is open, press to close the keyboard.
- Choose how you want to send the contact cards.
Contact groups
Assign contacts to groups so you can easily send a message or email to a whole group. You can also sync groups on HTC EVO V 4G with the groups in your Google Account, accessible via your computer's web browser. We've also added the Frequent group as a special group type that automatically stores the contacts you dial or get calls from the most.
Creating a group
- On the Groups tab, tap . +
- Enter a name for the group.
- Tap . +
- Select the contacts you want to add.

If your contacts list is long, use the search bar to search for contacts quickly, or press ←to hide the onscreen keyboard.
- Tap Save.
- Tap to select a photo for the group.
- Tap Save.
Editing a contact group
- On the Groups tab, press and hold the group, and then tap Edit group.
-
You can:
-
Tap the group name to change the name. You can only change the name for groups that you have created.
- Tap the icon to the left of the group name to change or remove the group photo.
- Tap + to add contacts to the group.
- Tap the box beside a contact to remove from the group.
3. Tap Save.
Sending a message or email to a group

You will be charged for each text message sent. For example, if you send a message to a group of five people, you will be charged for five messages.
- On the Groups tab, tap the group you want to send a message or email to.
- Go to the Group action tab.
- Choose if you want to send a text message or email.
Rearranging your contact groups
- On the Groups tab, press
- Tap Edit groups.
- Press and hold at the end of the group you want to move, and then drag it to its new position.
- Tap Save.

Rearranging the members of a contact group
- On the Groups tab, tap the group to see its members.
- Press .
- Tap Edit group.
- Press and hold at the end of the contact's name you want to move, and then drag it to its new position.
- Tap Save.
Deleting groups

You can only delete groups that you have created.
On the Groups tab, you can:
- Press and hold a group you want to delete, and then tap Delete group.
- Press ≡ and then tap Edit groups to choose several contact groups to remove.
Social
Facebook for HTC Sense
Signing in to your Facebook account from the Accounts & sync settings or the Facebook app (preinstalled or downloaded) automatically signs you in to Facebook for HTC Sense. Also, you may need to authorize Facebook for HTC Sense to connect to your Facebook account.
With Facebook for HTC Sense, you can:
- See your Facebook contacts and their status updates in People.
■ See Facebook photos in Gallery. - Check your friends' Facebook status updates in Friend Stream ^TM .
- View Facebook events and friends' birthdays in Calendar.
About Friend Stream
With Friend Stream, you can share and get updates from friends in popular social networks in a single feed.
From the Home screen, tap □ > Friend Stream.
When you tap someone's status update, you can:
- Write a comment.
- Look at someone's album photos.
When you tap someone's photo or name, you can:
Check the person's profile details.
Tap to display posts from a particular social network.
Slide to the other tabs to see more options. You can press and then tap Settings > Edit tabs to customize the Friend Stream tabs.
Checking notifications from your social networks
Slide to the Notifications tab to easily see a single feed of your notifications from different social networks.
Updating your status in Friend Stream
- On the All or Notifications tab, tap . +
-
Enter your status update.
-
If you do not want to send the status update to all your social network accounts, tap and clear the check boxes of the social networks to exclude.
- Tap Done.
- Tap
- Choose what you want to attach to your tweet or status update.
- Tap Post.
Enjoying Facebook in Friend Stream
Post your status updates, write messages on walls, or check in to a place.
Posting a message on a friend's Facebook wall
- In Friend Stream, tap ▶Facebook.
- Tap ➕ My wall.
- Tap a friend from the list.
- Enter your message.
- Tap to attach a photo.
- Tap Post.
Commenting on and liking Facebook posts
Tap someone's status update on the All tab, and do any of the following:
- Tap a photo or the album name shown in the status update to view and comment on the album photos using the Gallery app.
- Tap Like to like the person's status update.
- Tap the text box, and then enter what you think about the person's status update.
Checking in to a place
Let your Facebook friends know where you are by checking in to a place.

In order to find your location, you need to enable location sources in Settings > Location.
- Go to the Locations tab, and then tap
- Tap a place from the list.
- Tap Check in.
- Add your status message and even tag the friends you're with.
- Tap Check in.

Using Facebook chat
- From the Home screen, tap ➕b Chat.
-
Do any of the following:
-
Tap the name of a friend to continue the conversation.
- Tap the photo of a friend to view the person's Facebook profile, wall, and uploads.
- Tap the History tab to view a list of previous conversations. The number on the tab icon shows how many messages are unread.
- Press ☐, and then tap Settings to choose to hide offline friends and select notification settings.
Chatting in Google Talk
Google Talk is Google's instant messaging program. It lets you communicate with other people that also use Google Talk.
To open Google Talk, on the Home screen tap □>Talk.

To learn what you can do and get help in Google Talk, press , and then tap Help.
Using Google+
With Google+, you can check your friends' updates, post updates of your own, and chat with friends in your Google+ circles.
To open Google+, on the Home screen, tap 📄 > Google+

To learn what you can do and get help in Google+, press , and then tap Help.
Gmail
Viewing your Gmail Inbox
All your received email messages are delivered to your Inbox.
From the Home screen, tap 📋 Gmail.
![Inbox jsinger130@gmail.com 32 Ben Carter Borrowed books — Jen. Doing an inventory of my books. Are you finished reading the ones Alisa Pritts Poker night — hey jen, poker night at ben's this friday. be there? Facebook Jennifer, you have notifications pending - facebook Hi Jennifer. Here's some activity you Facebook You have I friend with a birthday this week — facebook Hi Jennifer. You have I friend with a Ben Carter Community benefit this Friday night — Hi Jen, we need some banners for the community Twitter Andraweek (@androweek) has requested to follow you on Twitter! — [image: Twitter] Facebook Jennifer, you have notifications pending - facebook Hi Jennifer. Here's some activity you Ben Carter Apr 1](/content/2026/06/1195128/images/a04c18244e5847c912700afe75d16492250f1fbfd220515060c20e5baeacd8eb.jpg)
| Archive, delete or label multiple conversations | Tap the check box before the email message or conversation. Then tap the onscreen buttons at the bottom to choose what to do with the selected messages or conversations. |
| Display drafts, sent messages, and other labels | Tap Inbox at the top bar and then tap another label (such as Sent, Drafts, or your created label) to view its messages and conversations. |
| Switch to your other Gmail account | Tap Inbox at the top bar, and then tap the account you want to switch to. |
Sending an email message in Gmail
- In the Gmail inbox, tap


If you've set up multiple Google Accounts on HTC EVO V 4G, choose which account to use.
- Fill in one or more recipients.

Want to loop in more recipients in a carbon copy (Cc) or blind carbon copy (Bcc) of the email message? Press Add Cc/Bcc.
- Enter the email subject, and then compose your message.
- If you want to attach a photo or video, press ≡, and then tap Attach file.
- Tap to send.
Replying to or forwarding email messages in Gmail
- In the Gmail inbox, tap the email message or conversation.
- To reply to the sender, tap ↩. Or, tap ☐ and choose whether to Reply all or Forward.
-
Do one of the following:
-
If you selected Reply or Reply all, enter your reply message.
- If you selected Forward, specify the message recipients.

Tap Respond inline if you want to interleave your new message with the received email. But this removes any attachments or formatting in the original email message.
- Tap to send.
Getting help
To find out more about using Gmail, press and then tap Help.
Adding a POP3/IMAP email account
- From the Home screen, tap ✗Mail.
-
Do one of the following:
-
If this is your first time to add an email account in Mail, tap Other (POP3/IMAP) on the Choose a mail provider screen.
-
If you've already added an email account in Mail, press and then tap New account. If the Choose a mail provider screen is displayed, tap Other (POP3/IMAP).
-
Enter the email address and password for your email account and then tap Next.

If the account type you want to set up is not in the internal database, you'll be asked to enter more details.
- Enter the account name and your name and then tap Finish setup.
Adding a Microsoft Exchange ActiveSync account
You can sync with Microsoft Exchange Server 2003 Service Pack (SP2) or later.

Add up to 15 Exchange ActiveSync accounts on HTC EVO V 4G.
-
From the Home screen, tap Mail.
-
Do one of the following:
-
If this is your first time to add an email account in Mail, tap Microsoft Exchange ActiveSync on the Choose a mail provider screen.
-
If you've already added an email account in Mail, press and then tap New account. If the Choose a mail provider screen is displayed, tap Microsoft Exchange ActiveSync.
-
Enter the Exchange ActiveSync account details, and then tap Next.

If your corporate Exchange Server does not support auto-detect, you'll need to enter your Exchange Server settings. Ask your Exchange Server administrator for details.
-
Choose the sync options that you want, then tap Next.
-
Enter the account name, then tap Finish setup.
Checking your Mail inbox
When you open the Mail app, it displays the inbox of one of your email accounts that you've set up on HTC EVO V 4G.
To switch between email accounts, tap the bar that shows the current email account, and then tap another account.
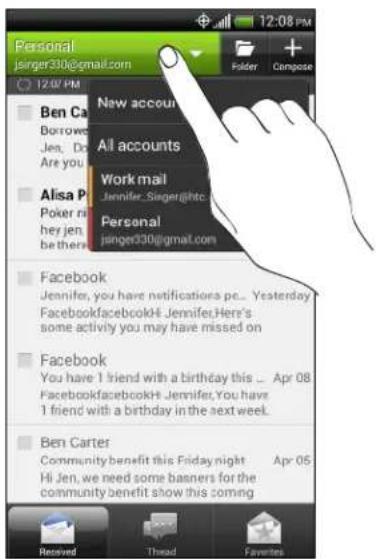
Viewing the unified inbox of all your email accounts
You can view email messages from all your accounts just in one place without having to switch to different accounts.
Just tap the bar that shows the current email account, and then tap All accounts. Email messages are color coded so you can easily distinguish which email accounts they belong to.

Up to 15 email accounts can be shown in the unified inbox.
Switching between different views of your inbox
Do you have lots of email messages? There are more ways than one to view your inbox.
Tap one of the following tabs:

Received
Displays email messages as individual items.

Thread
Displays email messages as conversations, grouped according to the subject line. Tap a subject in the list to show the email conversation.

Favorites
Displays all email messages from a contact group. To choose which contact group to display, press 3ap View, and then select a group.

Unread
Displays unread messages.

Marked (Exchange ActiveSync only)
Displays all flagged messages.

Invites or Meeting invitations (Exchange ActiveSync only)
Displays meeting invitations which you have not yet accepted or declined.

Attached
Displays all messages that have attachments.
Manually refreshing an email account
Whatever your sync settings are, you can also sync your sent and received email messages manually at any time.
- While viewing an email account, press and then tap Refresh.
- If you have several email accounts, you can refresh them all at the same time. Go to the All accounts inbox first. Then press and tap Refresh.
Sorting email messages
You can sort email messages by date received, priority, subject, sender, or size.
On the inbox, press 3ap Sort, and select from the sorting options.

To quickly scroll through the message list, press and hold two fingers on any email message, and then drag upward or downward.
Sending an email message
- From the Home screen, tap ✗Mail.
- Switch to the email account that you want to use.
- Tap . +
- Fill in one or more recipients.

Want to loop in more recipients in a carbon copy (Cc) or blind carbon copy (Bcc) of the email message? Press ☐ Show Cc/Bcc.
- Enter the subject, and then compose your message.
- To add an attachment, tap Attach and then choose what you want.

Writing a high priority email message? Press > Set priority.
- Tap Send, or to send it later, tap Save as draft.
Resuming a draft email message
- In the email account inbox, tap Drafts.
- Tap the message.
- When you finish editing the message, tap Send.
Reading and replying to an email message
- From the Home screen, tap ✦Mail.
- Switch to the email account you want to use.
- On the email account inbox, tap the email message you want to read.
- Choose an action on the bottom of the screen for your email.

Press ≡ to see other options.
Where are my unread email messages?
The Unread tab contains all your unread email messages. Add it if it does not appear on your screen.
- Press and hold a tab. When the screen changes and shows you the area where you can rearrange icons, lift your finger.
- Press and hold the Unread tab, and then drag it to its new position.
- Press, and then tap the Unread tab.
Saving an email message in the Tasks app
Save an email message in your Tasks list so you can remind yourself when to reply.
- Press and hold the email message, and then tap Save as task.
- On the New Task screen, enter a name for the task.
- Enter other task details, and then tap Save.
Searching and filtering email messages
- Press .
- If you want to refine or filter your search, tap and then check the options that apply. For example, you can focus the search on a part of an email or filter email messages that have attachments or tagged as high priority.
- In the search box, enter the words you want to search for.
Tap a result to open the email message.
Searching for emails from a contact
Do you remember the sender, but can't find a particular email from him or her?
- Switch to the email account you want to use.
- Press and hold an email message from a contact.
- Tap Search the mail from the sender. A list of email messages from that contact appears.
Working with Exchange ActiveSync email
Flagging an email
While viewing the inbox, tap the flag icon that appears beside an email message. You can also tap the flag icon while reading an email message.
Setting your Out of the office status
- Switch to your Exchange ActiveSync account.
- Press, and then tap Out of the office.
- Tap the box, and then select Out of the office.
- Set the dates and times.
- Enter the auto-reply message.
- Tap Save.
Sending a meeting request
- Switch to your Exchange ActiveSync account.
- Go to the Invites tab, and then tap . +
- Enter the meeting details.
- Tap Save.
Managing email messages
Moving email messages to another folder
- Switch to the email account you want to use.
- Tap the check boxes of email messages you want to move.
- Tap Move to, and then select a folder.
Deleting email messages
- Tap the check box of email messages you want to delete.

To select all email messages, press ☐, and then tap Select all.
- Tap Delete.
Switching to other mail folders
-
Tap .
-
Tap the mail folder which contains the messages you want to view.
Changing email account settings
You can change your email notification settings, add an email signature, delete an account and more.
- Switch to the email account whose settings you want to change.
- Press, and then tap Settings.
Calendar
About Calendar
Never miss an important date again. Use the Calendar app to schedule your events, meetings, and appointments.
You can set up HTC EVO V 4G to stay in sync with calendars such as Google Calendar, Outlook Calendar, and Microsoft Exchange ActiveSync Calendar.
If you've signed into your social network accounts, related calendar events will appear in Calendar.
Creating an event
You can create events that sync with your Google or Exchange ActiveSync calendars, as well as events on HTC EVO V 4G.

Not signed in to your accounts yet? Your calendar events will be created under PC Sync, which you can later sync with your computer's Outlook Calendar through HTC Sync.
- From the Home screen, tap ✕ Calendar.
- On any Calendar view, tap . +
- Tap the calendar name to select the calendar to which you will add the event.
- To invite people, tap and choose who you want to invite.
- Enter the details of the event such as name, date, etc.
- Tap Save.
Calendar views
Easily switch between different calendar views by tapping any of the tabs. In any Calendar view, you can return to the current date by pressing and then tapping Today.

Events in Day, Week, and Agenda views are color coded to indicate which account or type of calendar they belong to. To find out what each color represents, tap ▼
Month view
In month view, you will see markers on days that have events.
Do any of the following in month view:
- Tap a day to view the events for that day.
- Press and hold a day to open an options menu from which you can also choose to create an event or switch to either day or agenda view.
- Slide your finger up or down the screen to view earlier or later months.
Day and agenda views
Day view shows your events per day, whereas agenda view displays all your events in chronological order.
When in day view, you can:
- Press and hold on a time slot to create a new event at that time.
- Slide left or right across the screen to view earlier or later days.
- You can also see the day's weather, but only if it's within the seven-day forecast.
Week view
Week view displays a chart of the events of one week.
When in week view, you can:
- Press and hold on a time slot to create a new event at that time.
- Tap an event (shown as colored blocks) to view its details.
- Slide left or right across the screen to view earlier or later weeks.
Managing Calendar events
Editing an event
You can only edit events that you have created.
- While viewing an event, tap .
- Make your changes to the event.
- Tap Save.
Deleting an event
Do any of the following:
■ While viewing an event, press and then tap Delete event.
- In day, agenda or week view, press and hold an event and then tap Delete.
If the event repeats, you'll be asked whether you want to delete just that occurrence or all occurrences from Calendar.
Sharing an event
You can share a calendar event as a vCalendar using Bluetooth or by sending it as a file attachment with your email or message.
- While viewing an event, press, and then tap Forward.
- Choose whether to send through Bluetooth, Mail, or Messages.
Accepting or declining a meeting invitation
- If you're using an Exchange ActiveSync account, tap the Invites tab in Calendar to see meeting invitations which you have not yet accepted or declined.
-
Tap a meeting invitation, and then do one of the following:
-
Accept, decline, or tentatively accept the invitation or propose a new time.
- Press to see options for replying, moving the invitation to a folder, and more.
Setting reminders for your events
Have an important event that you must remember? Calendar makes it easy to remind yourself of important events.
- While viewing a calendar event, tap Reminder.
-
Choose how far in advance you want to be reminded of the event.
-
You can have up to five reminders for a single event.
- You can change how an event reminder behaves through the Calendar settings.

Dismissing or snoozing event reminders
If you have set at least one reminder for an event, the upcoming event icon will appear in the notifications area of the status bar to remind you.
- Open the Notifications panel.
- Tap the event reminder notification.
-
Do one of the following:
-
Choose to snooze or dismiss all event reminders.
- Press to keep the reminders pending in the notifications area of the status bar.
Showing or hiding calendars
In any Calendar view, tap ▼, and then select or clear a calendar to show or hide it.

Calendars are kept synchronized on HTC EVO V 4G, even if they hidden.
Changing Calendar settings
You can change Calendar settings to specify how it displays events and how it notifies you of upcoming events.
In any Calendar view, press ≡ and then tap Settings (or More > Settings) to choose how you want the calendar to behave and what the calendar will look like.
Maps and location
Location settings
Turning on location services
In order to find your location on HTC EVO V 4G, you need to enable location sources.
- From the Home screen, press ≡ and then tap Settings > Location.
- Select one or both of the following:
Use wireless networks
Uses Wi-Fi or your mobile data connection to find your approximate location.
Use GPS satellites Finds your exact GPS location. This requires a clear view of the sky and more battery power.
Google Maps
About Google Maps
Google Maps ^™ lets you track your current location, view real-time traffic situations, and receive detailed directions to your destination.
It also provides a search tool where you can locate places of interest or an address on a map, or view locations at street level.

- To find your location with Google Maps, you need to enable location sources.
■ The Google Maps app does not cover every country or city.
Getting around maps
When you open Google Maps, you can easily find your location on the map or check out nearby places by panning and zooming in and out on the map.

To find your location with Google Maps, you need to enable location sources.
- From the Home screen, tap ➕ Maps.
- Tap to show your current location. The blue marker shows your current location on the map.
- Tap to switch to Compass mode. In Compass mode, the map changes to an angled view and automatically orients itself depending on the direction you're facing.
Searching for a location
In Google Maps, you can search for a location, such as an address or a type of business or establishment (for example, museums).
- In Maps, tap .
- Enter the place you want to search for in the search box.
- Tap the Enter key on the keyboard to search for the location you entered or tap a suggested search item. The search results are displayed as markers on the map.
- Do any of the following:
- Tap a marker 🎨 A balloon then opens, showing the location's name. If that's what you're looking for, tap the balloon.
- Tap Results list to show the search results as a list, and then tap the location.
Details about the selected location displays on the screen.
- Tap the onscreen buttons to view the location on a map, get directions, view the location in Street View (if available), and more. Scroll down the screen to view more options.
Clearing the map
After searching on a map, you can clear away the various markers drawn on it.
Press 3 and then tap Clear Map.
Checking the details of a location
- Press and hold a location on the map. A balloon opens over the location, with the name of the location, a part of the address, and a thumbnail from Street View (if available).
- Tap the balloon to see more information. You can get directions to the location, check for nearby places of interest, and more.
Searching for a place of interest near you
Use Places to find places of interest near your current location. Places uses Google Maps to search common places that you would want to find, such as the nearest gas station or ATM kiosk.

Before using Places, you need to enable location sources.
- From the Home screen, tap ✦Places.
- Tap the type of place you want to search, or tap to enter what you're looking for. When several places are found, the search results appear as a list.
-
You can:
-
Tap Map view to see where these places are on the map.
- From the search results list, tap a place to view more information.
Getting directions
Get detailed directions to your destination. Google Maps can provide directions for travel by foot, public transportation, or car.
- While viewing a map, press, and then tap Directions.
-
Do any of the following:
-
Use your current location as the starting point, or enter a location from where to start in the first text box. Then enter your destination in the second text box.
-
Tap to select an address from your contacts or a point that you tap on a map.
-
Choose how you want to get to your destination.
-
Tap Get directions. The next screen displays the directions to your destination in a list.

If the place you've set as your destination has several locations available, choose which one to go to.
- Tap an item to view the directions on the map.
- Tap the arrow buttons on the map to follow the directions.
When you're finished viewing or following the directions, press and then tap Clear Map to reset the map. Your destination is automatically saved in the Google Maps history.
Finding your friends with Google Latitude (available by country)
Google Latitude ^® user location service lets you and your friends share locations and status messages with each other. It also lets you get directions to your friends' locations, send your location details by email, and more.
Your location is not shared automatically. You must join Latitude, and then invite your friends to view your location or accept their invitations. Only friends that you have explicitly invited or accepted can see your location.
Opening and joining Latitude
- From the Home screen, tap

- While viewing a map, press

- After you've joined Latitude and closed the application, you can do any of the following to open it from the Home screen:
Tap > Latitude.
- Open Maps, press and then tap Latitude.
Getting help
Get help and more information about Maps.
To open the help, press ☐, and then tap More > Help. The web browser opens and takes you to the Google Maps Help site.
Google Play and other apps
Getting apps from Google Play
Google Play is the place to go to find new apps for HTC EVO V 4G. Choose from a wide variety of free and paid apps ranging from productivity apps, entertainment, to games.

- A Google Wallet ^1 payment service is required to purchase a paid app. You will be asked to confirm method of payment when you purchase an app.
- The name of the Play Store app may differ depending on your region.
Finding and installing an app
When you install apps and use them on HTC EVO V 4G, they may require access to your personal information or access to certain functions or settings. Download and install only apps that you trust.

Be cautious when downloading apps that have access to functions or a significant amount of your data on HTC EVO V 4G. You're responsible for the results of using downloaded apps.
- From the Home screen, tap Play Store.
- Browse or search for an app.
- When you find the app that you like, tap it and read its description and user reviews.
- To download or purchase the app, tap Download (for free apps) or the price button (for paid apps).
- Tap Accept & download or Accept & buy.
To open the app, tap on the Home screen. On the All apps screen, tap the app.
Uninstalling an app

You can uninstall an app for a refund within a limited time after your purchase. To know more about the refund policy for paid apps, please visit the Google Play Help site (http://support.google.com/googleplay/).
- From the Home screen, tap Play Store.
- Press and then tap My apps.
- Tap the app you want to uninstall, and then tap Uninstall.
Getting help
If you need help or have questions about Google Play, press and then tap Help.
Using the Clock
About the HTC Clock widget
Use the HTC Clock widget to see your current date, time, and location. You can also use the Clock to show the time in another city.

Changing the location on the Clock widget
By default, the Clock widget displays your current weather. You can customize the Clock widget on your Home screen to show the weather of another location.
-
Press and hold the Clock widget and then drag it to the Edit button.
-
Choose a city.
If you don't see the city that you want, tap + to search for it and add it.
- Tap Done.

You can add more than one Clock widget to the extended Home screen.
About the Clock app
Get more from the Clock app than just the regular date and time. Use HTC EVO V 4G as a desk clock complete with weather information or as a world clock so you can see what time it is in cities across the globe. You can also use it as an alarm clock, stopwatch, and countdown timer.
To open the Clock app, tap from the Home screen, and then tap Clock. Tap the tabs on the bottom row or slide your finger across the tabs to switch between the different functions.
World Clock settings
Setting your home city
- On the World Clock tab, press and then tap Home settings.
- Enter your home city's name.
- Scroll through the list and tap your home city.
Setting the date and time manually
- On the World Clock tab, press and then tap Local time settings.
- Clear the Automatic date & time and Automatic time zone check boxes, and then set the time zone, date, and time as required.
Adding a city to the World Clock screen
- On the World Clock tab, tap . +
- Enter the city name you want to add.
- Scroll through the list and tap the city that you want to add.
Setting an alarm
You can set up one or more alarms.
- On the Alarms tab, select the check box of an alarm and then tap that alarm.
- Under Set alarm, drag your finger up or down to roll the time scroll wheels and set the alarm time.
- If you want the alarm to recur, tap Repeat and set when you want the alarm to go off.
- Tap Done.

- To turn off an alarm, clear the check box of that alarm.
- If you need to set more than three alarms, tap+
Deleting an alarm
- On the Alarms tab, press and then tap Delete.
- Select the alarms you want to delete and then tap Delete.
Checking Weather
Use the Weather app and widget to check the current weather and weather forecasts for the next few days. In addition to your current location, you can view weather forecasts for other cities around the globe.
- From the Home screen, tap > Weather.
-
Swipe your finger up or down the screen to check the weather in other cities.
-
Tap to see the current weather information such as the temperature, approximate time of sunset, and more.
-
While viewing forecasts, you can:
-
Swipe your finger up or down the screen to check the weather in other cities.
- Tap 📄 update the weather information at any time.
Your settings in the Weather app also control the weather information that is shown in the Clock and Calendar.
Adding a city to the Weather screen
Add more cities to the Weather screen so you can instantly check the weather forecasts in these cities. In addition to your current location, the Weather screen can display up to fifteen cities.
- On the Weather screen, tap . or press and then tap Add.
- Enter the location you want to add.
- Tap the city that you want.
Changing the order of cities on the Weather screen
- On the Weather screen, press and then tap Edit.
- Press and hold at the end of the item you want to move, and then drag it to its new position.
- Tap Done.
Deleting cities from the Weather screen
- On the Weather screen, press and then tap Edit.
- Select the cities you want to remove, and then tap Done.
Reading news feeds
Don't get left behind with yesterday's stories. Use the News app to subscribe to news feeds that cover breaking news, sports, top blogs, and more. You can also get updates based on specific keywords.
Subscribing to news channels
- From the Home screen, tap >News.
-
Tap ▼, and then tap Subscriptions > Add feeds.
-
Select a channel to subscribe to:
-
Tap a category such as Blogs or Entertainment to choose from popular news feeds.
-
Tap Search more (or Search > Search more) to search for a specific keyword or feed URL.
-
Tap Add.

To unsubscribe from a channel, press and then tap Unsubscribe. Choose the feeds you want to unsubscribe from, and then tap Delete.
Adding a keyword
Easily find stories that interest you by entering a search keyword.
- From the Home screen, tap ➕News.
- Tap ▼, and then tap My items > Keywords > Add keywords.
- Enter the keyword, and then tap Add. The new keyword is added to the Keywords list.
Tap the new keyword to see the stories that contain it.
Reading a story
- From the Home screen, tap News.
- On the All items screen, tap a story that you want to read.
Press → to see other options such as tagging the story or changing the font size.
Changing update schedule and content settings
- While on the News app, press ☐, and then tap Settings (or More > Settings).
- Manage sync options, choose the default view for news stories, and more.
Watching videos on YouTube
Use the YouTube app to check out what's popular on the online video-sharing website.
- From the Home screen, tap
YouTube.
- Scroll through the list of videos, and then tap a video to watch it.
-
While watching a video, you can:
-
Tap the video screen to pause, resume playback, or drag the slider to jump to a different part of the video.
- Tap a tab to learn more about the video, see related videos, or check out what other viewers think. You can also slide your finger across the tabs to see if there are more items available.
Tap the YouTube icon to return to the main screen.
Searching for videos
- On the YouTube main screen, tap

- Enter a search keyword, and then tap

- Scroll through the results and tap a video to watch it.

You also have the option to show results that were just recently posted. Tap All time, and then select a time period you want.
Clearing the search history
- On the YouTube main screen, press, and then tap Settings.
- Tap Search > Clear search history.
Sharing a video link
- On the video's watch screen, tap

- Choose how you want to share the video link from the available options.
Capturing and sharing videos on YouTube

- On the YouTube main screen, tap
- Tap to start capturing video.
- When you're finished capturing, tap 🙏 again, and then tap Done.
- Enter a title and description for your video, set the privacy level, and add tags or location information.
- Tap Upload.
113 Google Play and other apps
Sharing games and apps
Having fun with a game or app that you found from Google Play? Share your favorite games and apps instantly with your circle of friends.

For your friends to link to the app and download it from Google Play, they must be using an Android device.
- From the Home screen, tap .
- Press, and then tap Share.
- Tap an app, and then choose how to share it.
Productivity
Working on documents
Use Polaris Office to easily edit Microsoft Office Word (.doc and .docx), Microsoft Office Excel (.xls and .xlsx), Microsoft Office PowerPoint (.ppt and .pptx), and plain text (.txt) files while on the go.

You can also view Microsoft Office PowerPoint Shows (.pps).
From the Home screen, tap ▶Polaris Office.
Viewing a document
- From the Home screen, tap ✦Polaris Office.
- On the Polaris Office main screen, tap the file you want to open.
Press ☐ to see options for saving or sharing the file, and more.
Creating a document
- On the Polaris Office main screen, press, and then tap New.
- Choose a file type to create.
- Start entering text.
- When done, press ≡, and then tap Save (or More > Save as).
Editing a document
- On the Polaris Office main screen, tap the file you want to edit.
- Do any of the following:
- If your file is a Microsoft Office Word, a Microsoft Office PowerPoint, or a plain text document, press Edit.
- If your file is a Microsoft Office Excel document, tap a cell and then enter your changes in the text box. To choose a different worksheet, press → Worksheet.
- When done making your changes, press ← and then tap either Save or Save as.
Recording your voice
Use Voice Recorder to quickly capture your thoughts and record your voice.
- From the Home screen, tap ✕ Voice Recorder.
- Hold the microphone near your mouth.
- Tap to start recording a voice clip.

Voice Recorder can run in the background while you do other things on HTC EVO V 4G, except when you open other apps that also use audio functions.
- Tap to stop recording.
- Type a name for the voice clip and tap Save.
To play back the voice clip, tap

To show options for sharing, deleting, or renaming the voice clip, press ≡.
Setting a voice clip as a ringtone
- On the Voice Recorder screen, tap .
- Press and hold the voice clip you want to set as a ringtone, and then tap Set as ringtone.
Completing tasks
Use the Tasks app to organize and track to dos and task lists.
To open the Tasks app, tap ➞ Tasks.
Viewing the unified task list
You can view and update a unified list of tasks. Tasks are color coded so you can easily distinguish which accounts they belong to.
In the Tasks app, press and then tap Accounts > All accounts.

You can also select a specific account. If you want to view only tasks that you entered using HTC EVO V 4G, tap My tasks.
Filtering tasks
- Go to the list that contains the tasks that you want to filter.
- Press, and then tap Filter.
- From the list, choose how you want to filter the tasks, and then tap OK.
Creating a task list
- In the Tasks app, press and then tap Lists.
- Tap, and then choose an account for the list.
- Enter a name for the list, and then tap OK.
Managing task lists
- In the Tasks app, press and then tap Lists.
- From here, you can:
Show or hide a list Tap All lists to show all the lists in all your accounts, or tap a specific account and then tap the list that you want to show.
Rename a list 1. Tap an account, and then press and hold the list that you want to rename.
- Tap Rename, and then enter a new name for it.
Delete a list 1. Tap an account, and then press and hold the list that you want to delete.
- Tap Delete.
Creating a task
- In the Tasks app, enter the task name in the New task text box.

If you want to create a task and enter the details later, tap after you've entered the task name.
- Tap and then enter the task details.
- Tap Save.
Managing tasks
- In the Tasks app, press and then tap Lists.
- Tap the account and then tap the list where the tasks you want to manage are listed.
- In the list of tasks, you can:
Mark a task complete Tap the check box next to the task. To view completed tasks, press and then tap Completed.
Sort tasks 1. Press, and the tap Sort.
- Select how you want to sort the tasks.
| Edit a task 1. Press and hold the task that you want to edit, and then tap Edit.2. Edit the task details, and then tap Save. | |
| Delete a task Press and hold the task that you want to delete, and then tap Delete. | |
| Postpone a task Press and hold an overdue task, and then tap Postpone.When you postpone a task, its due date is automatically set to the day after its original due date. | |
| Move a task to another list | 1. Press and hold the task that you want to move, and then tap Move to.2. Tap the task list where you want the task to appear. |
Changing Tasks settings
- Switch to the account that you want to change.
- Press ≡ and then tap Settings (or More > Settings).
- Change the settings and press to save your changes..
HTC Sync
About HTC Sync
With HTC Sync, you can sync the following data between your computer and HTC EVO V 4G:
- Your stored contacts on Microsoft Outlook, Outlook Express, or Windows Contacts
- Appointments and events in Outlook or Windows Calendar
■ Photos, videos, music, and playlists
■ Bookmarked webpages - Documents and email attachments
You need to manually turn these types of data on or off to start or stop syncing them.
Installing HTC Sync

- HTC Sync requires USB 2.0 on your computer to connect and sync with HTC EVO V 4G.
- For trouble-free installation, first quit all running programs and temporarily exit from your anti-virus program before you start installing HTC Sync.
- Check and copy the HTC Sync installer from the storage card (if available), and then install it on your computer.
- Download the HTC Sync software for HTC EVO V 4G from our support website (www.htc.com/support/) and install it on your computer.
From time to time, software updates for HTC Sync may be available. In HTC Sync, click the dropdown arrow button beside Help, and then click Check update.
119 HTC Sync
Setting up HTC Sync to recognize HTC EVO V 4G
- Connect HTC EVO V 4G to your computer using the USB cable that came in the box.
- When HTC EVO V 4G prompts you to choose a type of USB connection, tap HTC Sync, and then tap Done. Wait for HTC Sync to recognize HTC EVO V 4G.
- On the Device setup screen, enter a name for HTC EVO V 4G.
- Click Save.

To change the name of HTC EVO V 4G later, click Overview > Device setup.
Syncing songs and playlists
Bring the music tracks and songs you play on your computer to HTC EVO V 4G. If you have playlists created in iTunes ^® or Windows Media ^® Player, you can sync these too and enjoy them on the go.

You can sync audio files in these formats: *.aac, *.amr, *.m4a, *.mid, *.midi, *.mp3, *.wav, *.wma
- On the Device panel, click Music, and then click On.
- Select Sync music files from, and then click Add.
- Choose a folder that contains your audio files, and then click OK.
- Select Sync music files from iTunes and Windows Media Player if you're using either of these applications on your computer, and then choose the playlists you want to sync on HTC EVO V 4G.
- Click Sync now.
HTC Sync remembers your sync settings the next time you connect it to HTC EVO V 4G.
Syncing photos and videos

You can sync photos and videos in these formats:
-
Photos: *.bmp, *.gif, *.jpeg, *.jpg, *.png
■ Videos: *.3gp, *.3g2, *.mp4, *.wmv -
On the Device panel, click Gallery, and then click On.
- To automatically import your camera shots to your computer, select Copy device Camera Shots to PC.
- Select Sync PC photos & videos from, and then click Add.
- Choose a folder that contains your multimedia files, and then click OK. All supported image and video files added to this folder will be copied to HTC EVO V 4G.
- Click Sync now.
HTC Sync remembers your sync settings the next time you connect it to HTC EVO V 4G.
Syncing your calendar events
HTC EVO V 4G can sync appointments and events with your calendar in Outlook (Outlook XP, Outlook 2003, Outlook 2007, or Outlook 2010) or Windows Calendar.
- On the Device panel, click Calendar, and then click On.
- Select the application you want to sync calendar events with.
- Choose from which point you want to start syncing your calendar events.
- Click Option to choose an account folder to sync.
- In cases when conflicting information is found on both HTC EVO V 4G and the computer, choose which information you want to keep.
- Click Sync now.
HTC Sync remembers your sync settings the next time you connect it to HTC EVO V 4G.

Only the calendar fields supported on HTC EVO V 4G are synced.
121 HTC Sync
Syncing your contacts
Sync HTC EVO V 4G contacts with your Outlook (Outlook XP, Outlook 2003, Outlook 2007, or Outlook 2010), Outlook Express, or Windows Contacts.
- On the Device panel, click People, and then click On.
- Choose the application you want to sync your contacts with.
- Click Option to choose an account folder to sync.
- In cases when conflicting information is found on both HTC EVO V 4G and the computer, choose which information you want to keep.
- Click Sync now.
HTC Sync remembers your sync settings the next time you connect it to HTC EVO V 4G.

Only the contact fields supported on HTC EVO V 4G are synced.
Syncing your web bookmarks

- To avoid sync problems, be sure to close all browser windows before you start syncing.
-
When conflicting information is found on both HTC EVO V 4G and computer, HTC Sync keeps the information from your computer.
-
Using your favorite web browser on your computer, create a favorites folder named HTC bookmarks. Make sure to save your favorite bookmarks in this folder to be able to sync them with HTC EVO V 4G.
-
On the Device panel, click Bookmarks, and then click On.
-
Choose the web browser that stores the bookmarks to sync with HTC EVO V 4G.
-
Click Sync now.
HTC Sync remembers your sync settings the next time you connect it to HTC EVO V 4G.
Syncing documents and email attachments

To sync email attachments stored on HTC EVO V 4G to your computer, you must set up an Exchange ActiveSync or POP3/IMAP email account from the Mail app on HTC EVO V 4G.
- On the Device panel, click Documents, and then click On.
- To sync email attachments that you've stored on HTC EVO V 4G, select Copy all download Mail documents to PC.
- Select Sync PC documents from, and then click Add.
- Choose a folder that contains the documents you want to sync on HTC EVO V 4G, and then click OK.
- Click Sync now.
HTC Sync remembers your sync settings the next time you connect it to HTC EVO V 4G.
Installing an app from your computer to HTC EVO V 4G
If you have application files (*.apk) on your computer, you can use HTC Sync to install them to HTC EVO V 4G. We strongly recommend you install only applications that you trust.

Be sure that HTC EVO V 4G is set to allow app installation from different sources. To do this, press ☐ while on the Home screen, tap Settings > Security, and then select the Unknown sources check box.
- On the Device panel, click Overview.
- Click Application installer.
- Browse for the application file on your computer, and then click Open. The installation process starts on HTC EVO V 4G.
- Check the screen on HTC EVO V 4G to see if there are additional instructions to complete the installation.
- When installation is complete, click Disconnect.
- Safely remove HTC EVO V 4G as required by your computer's operating system.
123 HTC Sync
Syncing another device with your computer
- Connect another device to your computer, then set up HTC Sync to recognize it.
- Click the device you want to set up. The Device panel then opens, where you can separately customize your sync settings for this device.
To switch to another device to sync, click Devices, and then click the device's name or image.
Keyboard
Using the onscreen keyboard
When you start an app or select a field that requires text or numbers, the onscreen keyboard becomes available. After entering your text, you can tap 📋 or press ← to close the onscreen keyboard.
Selecting a keyboard layout
You can choose from three different keyboard layouts to suit your typing style.
- From the Home screen, press ☐, and then tap Settings > Language & keyboard.
- Tap next to Touch Input.
- Tap Keyboard types, and then select the keyboard layout that you want to use.
Standard This layout is similar to a desktop computer keyboard. This is the default keyboard layout.
Phone This layout resembles the traditional mobile phone keypad.
Compact This layout features two letters on each key. The key size is slightly bigger than on the Standard layout.
Entering text
Simply tap the keys on the onscreen keyboard to enter letters and numbers, as well as punctuation marks and symbols.
- Tap to enter an uppercase letter. Tap twice to turn on caps lock.
- Press and hold keys with gray characters at the top to enter numbers, symbols, or accented letters. The gray character displayed on the key is the character that will be inserted when you press and hold that key. Some keys have multiple characters or accents associated with them.
Choosing multiple keyboard languages
If multiple keyboard languages are available on HTC EVO V 4G, you can choose which languages to enable in the onscreen keyboard.
- From the Home screen, press ☐, and then tap Settings > Language & keyboard.
- Tap Next to Touch Input.
125 Keyboard
- Tap International keyboard.
- Choose the languages you want.

Available languages depend on the region where you purchased HTC EVO V 4G.
Changing the keyboard language
- While the onscreen keyboard is open, tap
- Choose the language you want to use for typing.


If there are only two languages selected for use with the onscreen keyboard, tapping directly switches between the two languages.
Entering words with predictive text
Predictive text input is enabled by default, and word suggestions are displayed as you type.


Tap to switch between Multitap and XT9 predictive modes when using the Compact or Phone keyboard layout.
To enter a word in predictive mode, do any of the following:
- If the word you want is highlighted in green or orange in the suggestion list, just tap the space bar to insert the word into your text.
- If the word you want shows up in the suggestion list before you finish typing the entire word, tap the word to insert it into your text.
- If there's an arrow to the right of the suggestion list, tap the arrow to see more choices.
Setting a second language for the keyboard
You can set the predictive text to be bilingual. As you type, you'll get word suggestions in the languages that you've selected.
- From the Home screen, press ☐, and then tap Settings > Language & keyboard.
- Tap Next to Touch Input.
- Tap Bilingual prediction, and then choose the language you want.
Adding a word to the predictive text dictionary
While you're entering text using the Standard keyboard layout, any word you tap on the suggestion list is automatically added.
You can also add a word to the list manually.
- From the Home screen, press ☐, and then tap Settings > Language & keyboard.
- Tap Next to Touch Input.
- Tap Personal dictionary > Edit personal dictionary > +
- Enter the word you want to add, and then tap OK.
Editing or deleting a word in the predictive text dictionary
- From the Home screen, press ☐, and then tap Settings > Language & keyboard.
- Tap Next to Touch Input.
- Tap Personal dictionary > Edit personal dictionary.
■ To edit a word, tap the word.
- To delete words from the dictionary, press ≡ and tap Delete. Then choose the words to remove and tap Delete.
Backing up your personal dictionary to your storage card
If you have a storage card installed, you can back up the new words you've added to the predictive text dictionary.
- From the Home screen, press ☐, and then tap Settings > Language & keyboard.
- Tap Next to Touch Input.
- Tap Personal dictionary > Sync personal dictionary > Copy to storage card.
Importing your personal dictionary from your storage card
- From the Home screen, press ≡, and then tap Settings > Language & keyboard.
- Tap Next to Touch Input.
- Tap Personal dictionary > Sync personal dictionary > Restore from storage card.
Entering text by speaking
No time to type? Try speaking the words to enter them.

Since HTC EVO V 4G uses Google's speech-recognition service, you need to be connected to the Internet to enter text by speaking.
- Tap an area where you want to enter text.
- On the onscreen keyboard, press and hold
- When you see the microphone image, speak out the words you want to type.


To set the voice input language, tap the language bar below the microphone image. You can choose one or more languages. Available languages depend on the voice input languages supported by Google.
- If a word doesn't match what you've spoken and it's underlined, tap the underlined word to delete it or to see more choices.
- Enter punctuation marks by saying comma, period, question mark, exclamation mark, or exclamation point.
Entering text by tracing
Instead of tapping the keys on the onscreen keyboard, you can "trace" to type words.
- Slide your finger from one letter to the next to enter a word.
- Lift your finger when the word is completed. The suggestion list will show possible matches.
- You can:
- Tap the space bar to insert a highlighted word.
- Tap a word from the suggestion list.
- Tap the arrow next to the suggestion list to see more choices.
Turning on trace input
- From the Home screen, press ☐, and then tap Settings > Language & keyboard.
- Tap next to Touch Input.
- Tap Trace keyboard > Trace keyboard.
Adjusting input settings
Open the Touch Input settings by doing one of the following:
- From the Home screen, press ☐, and then tap Settings > Language & keyboard > Touch Input.
- On the onscreen keyboard, tap the language key (for example, tap if you're currently using the English onscreen keyboard). Then on the International keyboard options menu, tap Settings.

You must have more than two keyboard languages selected before you can access Touch Input settings using the language key.
| Keyboard types Select the keyboard layout to use. | |
| International keyboard | Add or remove languages from the onscreen keyboard language list. |
| Bilingual prediction Select a secondary keyboard language to use. | |
| Text input | Turn on or off predictive text, spell correction, and word completion.Enable audible or vibration feedback when typing.Calibrate the touch keyboard accuracy. |
| Tutorial Learn how to use the onscreen keyboard with this interactive tutorial. | |
| Trace keyboard Turn on Trace keyboard and set options when tracing to enter text. | |
| Personal dictionary Add, edit, or remove words in the predictive text dictionary. | |
Internet connections
Data connection
When you turn on HTC EVO V 4G for the first time, it will be automatically set up to use the Virgin Mobile data network.
Wi-Fi
To use Wi-Fi, you need access to a wireless access point or "hotspot".

The availability and strength of a Wi-Fi signal varies depending on objects the Wi-Fi signal has to pass through (such as buildings or a wall between rooms).
Turning Wi-Fi on and connecting to a wireless network
-
From the Home screen, press, and then tap Settings.
-
Tap the Wi-Fi On/Off switch to turn Wi-Fi on.
-
Tap Wi-Fi.
Detected Wi-Fi networks will be listed.

If the wireless network that you want is not listed, tap ≧ Add network to manually add it.
- Tap the Wi-Fi network you want to connect to.

If you selected a secured network, you'll be asked to enter the network key or password.
5. Tap Connect.
When HTC EVO V 4G is connected to the wireless network, the Wi-Fi icon appears in the status bar and tells you the approximate signal strength.

The next time HTC EVO V 4G connects to a previously accessed secured wireless network, you won't be asked to enter the key or other security information again, unless you reset HTC EVO V 4G to its factory default settings.
Checking the wireless network status
- From the Home screen, press, and then tap Settings.
- Tap Wi-Fi, and then tap the wireless network that HTC EVO V 4G is connected to.
A message box is then displayed showing the Wi-Fi status, speed, signal strength, and more.

If you want to remove the settings for this network, tap Forget.
Connecting to a different Wi-Fi network
- From the Home screen, press, and then tap Settings.
- Tap Wi-Fi. Detected Wi-Fi networks are displayed.

To manually scan for available Wi-Fi networks, press ☐, and then tap Scan.
- Tap a Wi-Fi network to connect to it.
Connecting to a Wi-Fi network using enhanced security

You may need to install a network certificate (*.p12) to HTC EVO V 4G before you can connect to a Wi-Fi network with EAP-TLS authentication protocol.
- Save the certificate file to the root folder of the storage card.
- From the Home screen, press ☐, and then tap Settings > Security.
- Tap Install from SD card.
- Select the network certificate needed to connect to the EAP-TLS network.
- Turn on Wi-Fi and connect to a wireless network.
Connecting to a virtual private network (VPN)
Add virtual private networks (VPNs) so you can connect and access resources inside a secured local network, such as your corporate network.
Depending on the type of VPN you're using at work, you may be asked to enter your login credentials and install security certificates before you can connect to your company's local network. You can get this information from your network administrator.
Also, HTC EVO V 4G must first establish a Wi-Fi or data connection before you can start a VPN connection.
Setting up secure credential storage
If your network administrator tells you to download and install security certificates, you must first set up secure credential storage on HTC EVO V 4G.
- From the Home screen, press ☐, and then tap Settings > Security.
- Tap Set password.
- Enter a new password for the credential storage.
- Scroll down and confirm the password, and then tap OK.
- Select the Use secure credentials check box.
You can then download and install the certificates needed to access your local network. Your network administrator can tell you how to do this.
Adding a VPN connection

You must first set a lock screen PIN or password before you can set up the VPN.
- From the Home screen, press and then tap Settings.
- Under Wireless & Networks, tap More.
- Tap VPN > Add VPN network.
- Enter the VPN settings and set them up according to the security details your network administrator gave you.
- Tap Save.
The VPN is then added to the VPNs section of the VPN settings screen.
Connecting to a VPN
- From the Home screen, press, and then tap Settings.
- Under Wireless & Networks, tap More.
- Tap VPN.
- Tap the VPN that you want to connect to.
- Enter your log in credentials, and then tap Connect. When you're connected, the VPN connected icon appears in the notification area of the title bar.
You can then open the web browser to access resources such as your corporate network intranet.
Disconnecting from a VPN
- Press and hold the title bar, and then slide down your finger to open the Notifications panel.
- Tap the VPN connection to return to the VPN settings screen, and then tap the VPN connection to disconnect from it.
Bluetooth
Bluetooth basics
Turning Bluetooth on or off
- From the Home screen, press, and then tap Settings.
- Tap the Bluetooth On/Off switch to turn it on and off.

Turn off Bluetooth when not in use to save battery power, or in places where using a wireless device is prohibited, such as on board an aircraft and in hospitals.
Changing the device name
The device name identifies HTC EVO V 4G to other devices.
- From the Home screen, press, and then tap Settings.
- If Bluetooth is off, tap the Bluetooth On/Off switch to turn it on.
- Tap Bluetooth. The Bluetooth screen opens.
- Press, and then tap Rename phone.
- Enter the new name for HTC EVO V 4G in the dialog box, and then tap Rename.
Connecting a Bluetooth headset or car kit
You can listen to music over a Bluetooth stereo headset, or have hands-free conversations using a compatible Bluetooth headset or car kit.

-
To listen to music with your headset or car kit, the headset or car kit must support the A2DP Bluetooth profile.
■ Before you connect your headset, make it discoverable so HTC EVO V 4G can find it. Refer to your headset manual for details. -
From the Home screen, press, and then tap Settings.
- If Bluetooth is off, tap the Bluetooth On/Off switch to turn it on.
- Tap Bluetooth. The Bluetooth screen opens.
- If you don't see your headset listed, press , and then tap Search for devices to refresh the list.
134 Bluetooth
- When you see the name of your headset in the Available Devices section, tap the name.
- HTC EVO V 4G automatically tries to pair with the headset.
- If automatic pairing fails, enter the passcode supplied with your headset.
The pairing and connection status is displayed below the hands-free headset or car kit name in the Bluetooth devices section. When the Bluetooth headset or car kit is connected to HTC EVO V 4G, the Bluetooth connected icon 🧙️ displayed in the status bar.
Reconnecting a headset or car kit
Normally, you can easily reconnect your headset by switching on Bluetooth on HTC EVO V 4G, and then turning on the headset. However, you might have to connect manually if your headset has been used with another Bluetooth device.

Make sure that the headset is discoverable. Refer to the headset manual for details.
- From the Home screen, press, and then tap Settings.
- If Bluetooth is off, tap the Bluetooth On/Off switch to turn it on.
- Tap Bluetooth. The Bluetooth screen opens.
- Tap the headset's name in the Paired devices section.
- If prompted to enter a passcode, try 0000 or 1234, or consult the headset/car kit documentation to find the passcode.
If you still cannot reconnect to the headset or car kit, follow the instructions in Unpairing from a Bluetooth device on page 135, and then follow the steps under Connecting a Bluetooth headset or car kit on page 133.
Disconnecting or unpairing from a Bluetooth device
Disconnecting a Bluetooth device
- From the Home screen, press, and then tap Settings.
- Tap Bluetooth. The Bluetooth screen opens.
- In the Paired devices section, tap name of the device to disconnect.
- Tap OK.

Tap the name of the device to reconnect it.
Unpairing from a Bluetooth device
- From the Home screen, press, and then tap Settings.
- Tap Bluetooth. The Bluetooth screen opens.
- In the Paired devices section, tap next to the device to unpair.
- Tap Unpair.
Sending information using Bluetooth

Before you begin, set the receiving device to discoverable mode. You may also need to set it to "Receive Beams" or "Receive Files". Refer to the device's documentation for instructions on receiving information over Bluetooth.
- On HTC EVO V 4G, open the app that contains the information or file you want to send.
- Follow the steps for the type of item you want to send:
| Captured photo or video | After capturing, on the Camera preview screen, tap Share > Bluetooth. |
| Photos or videos 1. | On the Gallery app, choose an album. |
| 2. Tap Share > Bluetooth. | |
| 3. Choose the photos and videos you want to share, and then tap Next. | |
| Contact 1. On the People app, tap a contact to view the contact's details. | |
| Calendar appointment or event | In Day view, Agenda view, or Week view, press and hold the event, and then tap Forward > Bluetooth. |
| Music track 1. With the track displayed on the Music app's Now playing screen, tap ▼ Share > Share file. | |
| Voice recording On the main Voice Recorder screen, tap Share > Bluetooth. | |
- Turn Bluetooth on and pair with the receiving device, if you're asked to do so.
- On the receiving device, accept the file.
Where sent information is saved
When you send information using Bluetooth, the location where it's saved depends on the type of information and the receiving device.
If you send a calendar event or contact, it is normally added directly to the corresponding application on the receiving device.
If you send another file type to a Windows computer, it is normally saved in the Bluetooth Exchange folder within your personal document folders.
- On Windows XP, the path may be: C:\Documents and Settings[your username]\My Documents\Bluetooth Exchange
- On Windows Vista, the path may be: C:\Users[your username]\Documents
- On Windows 7, the path may be: C:\Users[your username]\Documents\Bluetooth Exchange Folder
If you send a file to another device, the saved location may depend on the file type. For example, if you send an image file to another mobile phone, it may be saved in a folder named "Images".
Receiving information using Bluetooth
HTC EVO V 4G lets you receive various files with Bluetooth, including photos, music tracks, contact info, calendar events, and documents such as PDFs.

Refer to the device's documentation for instructions on sending information over Bluetooth.
- From the Home screen, press, and then tap Settings.
- If Bluetooth is off, tap the Bluetooth On/Off switch to turn it on.
- Tap Bluetooth. The Bluetooth screen opens.
- Tap the HTC EVO V 4G Bluetooth name near the top of the screen to make HTC EVO V 4G visible to nearby Bluetooth devices.
- On the sending device, send one or more files to HTC EVO V 4G.
-
If asked, accept the pairing request on HTC EVO V 4G and on the receiving device. Also, you may be prompted to enter the same passcode or confirm the auto-generated passcode on both devices.
You'll then get a Bluetooth authorization request. -
Tap Pair.
-
When HTC EVO V 4G receives a file transfer request notification, slide the Notifications panel down, tap the incoming file notification, and then tap Accept.
- When a file is transferred, a notification is displayed. Slide the Notifications panel down, and then tap the relevant notification.
When you open a received file, what happens next depends on the file type:
■ Media files and documents are usually opened directly in a compatible app. For example, if you open a music track, it starts playing in the Music app.
- For a vCalendar file, choose the calendar where you want to save the event, and then tap Import. The vCalendar is added to your Calendar events.
- For a vCard contact file, you can choose to import one, several, or all of those contacts to your contacts list.
Settings
Turning Airplane mode on or off
In many countries, you are required by law to turn off wireless devices while on board an aircraft. A way to turn off wireless functions quickly is to switch HTC EVO V 4G to Airplane mode.
When you enable Airplane mode, all wireless radios on HTC EVO V 4G are turned off, including the call function, data services, Bluetooth, and Wi-Fi. When you disable Airplane mode, the call function is turned back on and the previous state of Bluetooth and Wi-Fi is restored.
To turn Airplane mode on or off, press and hold Power, and then tap Airplane mode.
When enabled, the Airplane mode icon 🙏 is displayed in the status bar.
Changing display settings
Adjusting the screen brightness manually
- From the Home screen, press, and then tap Settings.
- Tap Display > Brightness.
- Clear the Automatic brightness check box.
- Drag the brightness slider to the left to decrease or to the right to increase the screen brightness.
Adjusting the time before the screen turns off
After a period of inactivity, the screen turns off to conserve battery power. You can set the idle time before the screen turns off.
- From the Home screen, press ☐, and then tap Settings.
- Tap Display > Sleep.
- Tap the time before the screen turns off.
Turning automatic screen rotation off

Automatic rotation is not supported in all applications.
- From the Home screen, press, and then tap Settings.
- Tap Display.
- Clear the Auto-rotate screen check box.
Recalibrating the G-sensor
Recalibrate the screen if you feel that the screen orientation does not respond properly to the way you hold HTC EVO V 4G.
- From the Home screen, press, and then tap Settings.
- Tap Display > G-Sensor calibration.
- Place HTC EVO V 4G on a flat and level surface, and then tap Calibrate.
- After the recalibration process, tap OK.
Keeping the screen on while charging
- From the Home screen, press, and then tap Settings.
- Tap Develop option.
- Select the Stay awake check box.
Switching animation effects on or off
You can turn off the animation or enable only some animations when switching between screens.
- From the Home screen, press, and then tap Settings.
- Tap Display > Animation.
- On the options menu, select the animation setting you want.
Changing sound settings
Switching between silent, vibration, and normal modes
Do one of the following:
- To change from silent to normal mode, press the Volume up button.
- To change from vibration to normal mode, press the Volume up button twice.
- From the Home screen, press ☐, and then tap Settings > Sound > Sound profile.
Playing a sound when selecting onscreen items
- From the Home screen, press, and then tap Settings.
- Tap Sound.
- Select or clear the Touch sounds check box.
Lowering the ring volume automatically
HTC EVO V 4G has a quiet ring feature that automatically lowers the ring volume when you move it.
- From the Home screen, press, and then tap Settings.
- Tap Sound.
- Select or clear the Quiet ring on pickup check box.
Making HTC EVO V 4G ring louder in your pocket or bag
To help avoid missing incoming calls when HTC EVO V 4G is in your pocket or bag, the pocket mode feature gradually increases the ring volume and vibrates when you receive a call.
- From the Home screen, press, and then tap Settings.
- Tap Sound.
- Select or clear the Pocket mode check box.
Switching to speakerphone automatically
When you're in a call, you can switch to speakerphone by simply flipping HTC EVO V 4G over.
- From the Home screen, press, and then tap Settings.
- Tap Sound.
- Select or clear the Flip for speaker check box.
Changing the display language
Changing the language adjusts the keyboard layout, date and time formatting, and more.

The languages available to choose from may depend on the version of HTC EVO V 4G you have.
- From the Home screen, press, and then tap Settings.
- Tap Language & keyboard > Language.
- Tap the language you want to use.
Checking the power usage of applications
- From the Home screen, press , and then tap Settings.
- Tap Power > Battery.
Managing memory
Checking how much phone memory is available for use
- From the Home screen, press, and then tap Settings.
- Tap Storage. The available phone memory is displayed in the Internal storage section.
Checking the available storage card space
- From the Home screen, press, and then tap Settings.
- Tap Storage. The total and available storage card space is displayed in the SD card section.
Making more storage space (internal storage)
Easily free up space in internal storage by cleaning up the application cache, moving or uninstalling apps, and deleting old mails and messages all in one go.

You cannot move or uninstall preinstalled apps.
- From the Home screen, press, and then tap Settings.
- Tap Storage, and under Internal storage tap Make more space.
- On the Clear caches screen, choose whether to clear the cache of rarely used apps only or all apps, and then tap Next.
-
On the Application storage screen:
-
Tap Move apps to SD card if there are apps that you can transfer to the storage card.
-
Tap Uninstall apps if there are apps you'd like to remove.
-
Tap Next.
-
On the Mail & message storage screen:
-
Set fewer days of mails to download so that older mails will be removed from the storage automatically.
-
Lower the number of text and multimedia messages per conversation.
-
Tap Finish.
Stopping running applications using Task Manager
Use Task Manager to free up memory by stopping running applications that you're not currently using.
- From the Home screen, tap ✕Task Manager.
- In the All applications list, tap to the right of the application name to stop it.
Backing up settings to Google
You can choose to automatically back up some settings such as Wi-Fi and bookmarks to Google servers using your Google Account so you can restore them when needed.
- From the Home screen, press, and then tap Settings.
- Tap Privacy and select the Back up my settings check box.
Accessibility settings
Use these settings when you've downloaded and installed an accessibility tool, such as a screen reader that provides voice feedback. You can turn accessibility functions or services on or off.
- From the Home screen, press ☐, and then tap Settings
- Tap Accessibility and choose the settings you want.
Protecting HTC EVO V 4G with a screen lock
Protect your personal information and prevent others from using HTC EVO V 4G without your permission by setting a screen lock pattern, face unlock, PIN, or password.
You'll be asked to unlock the screen every time HTC EVO V 4G is turned on or when it's idle for a certain period of time.
- From the Home screen, press ☐, and then tap Settings > Security.
- Tap Screen lock.
- Select a screen lock option and set up the screen lock.
- Tap Lock phone after, then specify the idle time before the screen is locked.

You can also clear the Make pattern visible or Make passwords visible if you don't want your screen lock to display as you enter it onscreen.
Forgot your screen lock pattern?
If you've forgotten your screen lock pattern, you have up to five attempts to try and unlock HTC EVO V 4G.
If this fails, you can unlock HTC EVO V 4G by entering your Google Account user name and password.
- On the unlock screen, enter your lock pattern.
- After the fifth attempt, when you're asked to wait for 30 seconds, tap OK.
- If the display goes off, press the Power button to turn the display back on, and then unlock the screen.
-
Tap the Forgot pattern? button when it appears.
-
Enter your Google Account name and password, and then tap Sign in. You'll then be asked to create a new screen lock pattern. If you no longer want to do so, tap Cancel.
Encrypting data on HTC EVO V 4G
You can encrypt data such as your online accounts, settings, music files and other media. After encryption, you will need to enter the screen lock PIN or password to turn on your phone and access the data.

- Set a lock screen PIN or password before encrypting your data.
- Fully charge the battery and keep HTC EVO V 4G connected to the power adapter during encryption. The encryption process takes about an hour.
-
You cannot undo encryption. If you want to return to an unencrypted phone, you must perform a factory reset.
-
From the Home screen, press, and then tap Settings.
- Tap Storage.
- Tap Storage encryption to encrypt the phone storage or SD card encryption to encrypt the storage card.
- Tap Encrypt.
- Enter the lock screen PIN or password.
144 Settings
- Tap Continue.
- Tap Encrypt again.
Encryption starts and the progress is displayed. The phone may restart a few times.
When the encryption process is complete, enter your PIN or password.
Checking information about HTC EVO V 4G
- From the Home screen, press ☐, and then tap Settings.
- Tap About phone to enable error reporting, view network and hardware information, and more.
Choosing which app opens when you tap a data item
You can set which app opens when you tap an item such as a phone number or email address while reading a message, viewing a webpage, and more.
- From the Home screen, press ☐, and then tap Settings.
- Tap App associations.
- For each type of item, choose the app you want to open.
Update and reset
Updating the HTC EVO V 4G software
HTC EVO V 4G can check and notify you if there's a new software update available. You can then download and install the software update using the Wi-Fi or data connection. You can also manually check if there's an available software update.
Depending on the type of update, the update may erase all your personal data and customized settings, and also remove any applications you've installed. Make sure that you've backed up the information and files you want to keep.

You might want to use Wi-Fi to download software updates to avoid extra data fees.
Installing an update
When the Internet connection is on and there's a new update available, the system update dialog box appears and guides you through the process. If you don't see the dialog box, check for the update notification icon 📄 the status bar.
- Slide open the Notifications panel, and then tap the update notification.
- In the system update dialog box, choose what type of connection to use for downloading the update.
- Follow the onscreen prompts to start the download.
- After the download is complete, tap Install now and then tap OK in the Install system software update dialog box.
Wait for the update to finish. HTC EVO V 4G will then restart automatically.
Checking for updates manually
- From the Home screen, press, and then tap Settings.
- Tap System updates > HTC software update.
- Tap Check now.
Restarting HTC EVO V 4G
If HTC EVO V 4G is running slower than normal, an application is not performing properly, or HTC EVO V 4G becomes unresponsive, try restarting HTC EVO V 4G and see if that helps solve the problem.
- If the display is off, press the Power button to turn it back on.
- Unlock the display.
- Press and hold the Power button, and then tap Restart.
- When asked to confirm, tap Restart.

If these steps don't work, you can remove and reinstall the battery, and then turn HTC EVO V 4G on to restart it.
Resetting HTC EVO V 4G
If you're passing HTC EVO V 4G on to someone else or HTC EVO V 4G has a persistent problem that cannot be solved, you can perform a factory reset (also called a hard reset).

Factory reset will permanently delete all your data and customized settings, and will remove any applications you've downloaded and installed. Be sure to back up any data and files you want to keep before you do a factory reset.
Performing a factory reset from settings
- From the Home screen, press, and then tap Settings.
- Tap Storage > Factory data reset.
- Tap Reset phone, and then tap Erase everything.
Performing a factory reset using hardware buttons
If you can't turn HTC EVO V 4G on or access settings, you can still perform a factory reset by using the hardware buttons on HTC EVO V 4G.
- Remove the battery, wait for a few seconds, then reinsert the battery.
- Press and hold the Volume down button, and then press and hold the Power button.
- Wait for the screen with the three Android images to appear, and then release the Power and Volume down buttons.
- Press Volume down to select FACTORY RESET, and then press the Power button.
Trademarks and copyrights
©2012 HTC Corporation. All Rights Reserved.
HTC, the HTC logo, the HTC quietly brilliant logo, HTC EVO V 4G, Friend Stream, HTC Sense, HTC Sync, and HTC Watch are trademarks or service marks of HTC Corporation.
Google, the Google logo, Android, the Android logo, Android Market, Google Apps, Google Calendar, Google Checkout, Google Earth, Google Latitude, Google Maps, Google Play, Google Talk, Google Wallet, Gmail, Picasa, and YouTube are trademarks of Google Inc.
Microsoft, Windows, ActiveSync, Excel, Outlook, PowerPoint, Windows Media, and Windows Vista are either registered trademarks or trademarks of Microsoft Corporation in the United States and/or other countries.
The Bluetooth® word mark and logos are registered trademarks by Bluetooth SIG, Inc.
This device contains Adobe ^® Flash ^® Player software under license from Adobe Systems Incorporated. Copyright ©1995-2012 Adobe Systems Incorporated. All rights reserved. Adobe is a trademark of Adobe Systems Incorporated.
Wi-Fi ^® is a registered trademark of the Wireless Fidelity Alliance, Inc.
microSD is a trademark of SD-3C LLC.
Facebook is a trademark of Facebook, Inc.
Twitter is a trademark of Twitter, Inc., and is used under license.
FLICKR and the FLICKR Dots logo are the trademarks and/or registered trademarks of Yahoo! Inc.
DLNA, DLNA Certified, and the DLNA disc logo are trademarks or registered trademarks of Digital Living Network Alliance. All rights reserved. Unauthorized use is strictly prohibited.
iTunes is a registered trademark of Apple Inc., registered in the U.S. and other countries.
Polaris Office is a trademark of Infraware, Inc.
All other company, product and service names mentioned herein are trademarks, registered trademarks or service marks of their respective owners.
Screen images contained herein are simulated. HTC shall not be liable for technical or editorial errors or omissions contained herein, nor for incidental or consequential damages resulting from furnishing this material. The information is provided “as is” without warranty of any kind and is subject to change without notice. HTC also reserves the right to revise the content of this document at any time without prior notice.
148 Trademarks and copyrights
No part of this document may be reproduced or transmitted in any form or by any means, electronic or mechanical, including photocopying, recording or storing in a retrieval system, or translated into any language in any form without prior written permission of HTC.
Index
A
Airplane mode 138
Alarm 109
Android Market See Google Play
Apps
- deleting 107
- installing 107, 122
- sharing 113
Auto sync 80
B
Back up contacts 83
Backup
- messages 49
- settings 142
Battery
- checking usage 140
- installing 12
- removing 12
Bluetooth
- connecting a Bluetooth headset or car kit 133
- disconnecting or unpairing 134
- receiving Calendar event information (vCalendar) 136
- receiving Contact information (vCard) 136
- sending information 135
- sharing music 73
- turning on or off 133
Browser
- bookmarks 54
- opening a new window 52
- opening an incognito tab 53
- options 56
- using 51
C
Calendar
- creating an event 99
- managing events 100
- reminders 102
- settings 102
- views 100
Call history 42
Camera
- basics 57
- effects 58
- recording a video 59
- scenes 60
- settings 60
- taking a photo 59
- using the front camera 58
- zooming 58
Change phone language 140
Clock 108
Contacts
- deleting 85
Copying text 25
D
Delete apps 107
Delete contacts 85
Display
- adjusting screen brightness 138
- changing the time before the screen turns off 138
- recalibrating G-sensor 139
- turning off screen rotation 138
DLNA 74
Downloading
- viewing downloads 53
E
Exchange ActiveSync
- Out of office 97
- sending a meeting request 97
- working with Exchange ActiveSync email 97
150 Index
F
- checking in to a place 89
Facebook chat 90
Facebook for HTC Sense 88
Factory reset 146
Firmware
See Software update
Folder
- grouping apps 33
- removing items 33
- renaming 33
FOTA
See Software update
Friend Stream 88
G
Gallery
- about 63
- editing photos 64
- sending photos and videos 66
- sharing photos and videos 67
- viewing photos 63
- watching video 64
Geotag 60
Getting started 8
Google Chrome 55
Google Maps 103
Google Play 107
Google+ 90
H
Hands free 133
Hard reset 146
Headphones 133
Home screen
- about 16
- adding a panel 34
- adding widgets 30
- extended 16
- launch bar 32
- rearranging home panels 34
- rearranging items 32
- removing a panel 34
HTC Clock
- setting an alarm 109
- World Clock 108
HTC Sync 118
HTC Watch 75
Internet calling 42
Internet connection
- VPN 130
- Wi-Fi 129
K
Keyboard
- dictionary 126
- entering text 124
- entering text by speaking 127
- predictive text 125
L
Language 140
Leap view 16
Locations
- turning on location services 103
M
- adding a POP3/IMAP account 92
- adding an Exchange account 93
- managing email messages 97
- sending 95
- sorting email messages 95
- unified inbox 94
- working with Exchange ActiveSync email 97
Making a call 38
Market
See Google Play
Master reset
See Factory reset
Meeting request 97
Messages
- deleting 48
- deleting a conversation 49
- forwarding 47
- protecting from deletion 48
- viewing 46
microSD card 17
MMS 45
Multimedia message 45
151 Index
Music
- browsing the library 69
- listening 70
- playing music from Lock screen 70
- playlist 71
- setting a song as ringtone 72
- sharing music using Bluetooth 73
N
News
- reading stories 111
- subscribing to channels 110
Notifications
- panel 21
O
Online accounts
- managing 80
- what can you sync with 79
Onscreen keyboard
- settings 128
See also Keyboard
P
Pair a Bluetooth device 133
People
- deleting contacts 85
- editing a contact 84
- groups 86
- merging contact information 83
Phone calls
- calling a number in a message 39
- calling a number in an email 39
- calling using Wi-Fi 42
- making an emergency call 39
- receiving 39
Phone information 144
Phone settings
- About 144
- Display 138
- Language & keyboard 140
- Sound 139
Phone updates
See Software update
Photos
-editing 64
- sharing 67
- viewing 63
- checking battery usage 140
Playing music from the Lock screen 70
Power
Q
Quick Settings 22
R
Record your voice 115
Restart 146
Ring volume
- lowering ring volume automatically 140
- making your phone ring louder 140
Ringtone
- setting 72
- trimming 73
RSS 110
S
Scenes 28
Screen
- adjusting screen brightness 138
- changing the time before the screen turns off 138
- recalibrating G-sensor 139
- turning off screen rotation 138
Screen lock 142
SD card 17
Search 51
Security 142
Settings
- About 144
- Language & keyboard 140
- Sound 139
Sharing
- games and apps 113
Slideshow 63
Smart dial 38
SMS 44
Software update 145
Sound
- ringtone, notifications, and alarms 35
- audible selection 139
152 Index
- lowering ring volume automatically 140
- Pocket mode 140
- sound set 35
- switching profiles 139
- switching to speakerphone 140
Speakerphone 41
Speed dial 38
Sync
- HTC Sync 118
- online accounts 80
T
Tasks
- creating a list 116
- creating a task 116
- filtering tasks 115
- managing lists 116
- to do 116
Text message 44
U
Upgrade
See Software update
V
Videos
- recording 59
- sharing 67
- trimming 65
- watching 64
Voice input 127
Voice Recorder 115
VPN
- adding a connection 131
- connecting 131
W
Wallpaper
- changing 29
Weather
- adding cities 110
- checking weather 109
Wi-Fi
- calling 42
- turning on 129
Widgets
- adding 30
- changing settings 31
- removing 32
Y
YouTube
- sharing videos 69
- htc EVO™ V 4G
- User Guide
- Contents
- Getting started
- Basics
- Personalizing
- Phone calls
- Messages
- Search and Web browser
- Camera
- Photos, videos, and music
- HTC services
- Accounts and sync
- People
- Social
- Calendar
- Maps and location
- Google Play and other apps
- Productivity
- HTC Sync
- Keyboard
- Internet connections
- Bluetooth
- Settings
- Update and reset
- Trademarks and copyrights
- Index
- Conventions used in this guide
- Inside the box
- HTC EVO V 4G
- Top panel
- Left and right panels
- Back panel
- Back cover
- Removing the back cover
- Replacing the back cover
- Storage card
- Inserting the storage card
- Removing the storage card
- Unmounting the storage card
- Battery
- Removing the battery
- Inserting the battery
- Charging the battery
- Getting the battery to last longer
- Switching the power on or off
- Switching the power on
- Switching the power off
- What are Wireless Emergency Alerts/CMAS?
- Touch gestures
- Setting up HTC EVO V 4G for the first time
- Ways of getting contacts into HTC EVO V 4G
- Home screen
- Extended Home screen
- Using Leap view
- Adjusting the volume
- Adjusting the ringer volume
- Adjusting the earpiece volume for calls
- Adjusting the media volume
- Sleep mode
- Switching to Sleep mode
- Waking up from Sleep mode
- Unlocking the screen
- Opening an app from the lock screen
- Status icons
- Notifications
- Notification LED
- Notification icons
- Notifications panel
- Switching between recently opened apps
- Using Quick Settings
- Where apps, data, and files are stored
- Connecting your phone to a computer
- Copying files to or from the storage card
- Transferring contacts from your old phone
- Copying and sharing text
- Selecting text
- Copying and pasting text
- Sharing text
- Printing
- Tap Print.
- Printing a photo
- Adding a printer
- Making HTC EVO V 4G truly yours
- Personalizing HTC EVO V 4G with scenes
- Using a preset scene
- Creating a new scene
- Renaming a scene
- Deleting scenes
- Changing your wallpaper
- Applying a new skin
- Personalizing your Home screen with widgets
- Adding a widget to your Home screen
- Changing the settings of a widget
- Adding apps and other shortcuts on your Home screen
- Rearranging or removing widgets and icons on your Home screen
- Moving a widget or icon
- Removing a widget or icon
- Personalizing the launch bar
- Grouping apps into a folder
- Renaming a folder
- Removing items from a folder
- Rearranging the Home screen
- Removing a Home screen panel
- Adding back a Home screen panel
- Personalizing with sound sets
- Creating a sound set
- Changing your ringtone, notifications, and sounds
- Deleting sound sets
- Rearranging application tabs
- Customizing the lock screen style
- Making a call with Smart dial
- What is Smart dial?
- Using Speed dial
- Assigning a speed dial key
- Calling a phone number in a text message
- Calling a phone number in an email
- Making an emergency call
- Receiving calls
- Answering a call
- Rejecting a call
- Muting the ringing sound without rejecting the call
- Look who's calling
- What can I do during a call
- Switching between calls
- Turning the speakerphone on during a call
- Muting the microphone during a call
- Ending a call
- Internet calls
- Adding an Internet calling account
- Making an Internet call
- Call history
- Returning a missed call
- Checking calls in the Call History
- Adding a new phone number to your contacts from Call History
- Clearing the Call History list
- Call services
- About the Messages app
- Sending a text message (SMS)
- Sending a multimedia message (MMS)
- Can't find your contacts' email addresses in Messages?
- Creating a slideshow
- Resuming a draft message
- Checking your messages
- Viewing and saving an attachment from a multimedia message
- Saving a text message in the Tasks app
- Replying to a message
- Replying to another phone number of the contact
- Forwarding a message
- WAP push messages
- Opening and reading a new WAP push message
- Viewing all your WAP push messages
- Managing message conversations
- Locking a message
- Deleting a single message
- Deleting several messages within a conversation
- Deleting a conversation
- Deleting several conversations
- Backing up your text messages
- Importing text messages
- Setting message options
- Searching HTC EVO V 4G and the Web
- Setting search options
- Performing searches on the Web and HTC EVO V 4G
- Browsing the Web
- Opening a new browser window
- Switching between browser windows
- Viewing the full version of a website
- Private browsing
- Downloading files and apps
- Viewing your downloads
- Viewing bookmarks and previously visited pages
- Bookmarking a webpage
- Opening a bookmark
- Editing a bookmark
- Viewing a previously visited page
- Clearing the list of previously visited pages
- Viewing a page that you often visit
- Clearing the list of most visited pages
- Changing the view of bookmarks or most visited pages
- Syncing your bookmarks with Google Chrome
- Setting browser options
- Setting your homepage
- Choosing when to show Adobe Flash content
- Switching between 3D and 2D
- Camera basics
- Before capturing
- Zooming
- Auto focusing
- Switching between the front and rear camera
- Choosing an effect
- Setting the resolution
- Choosing a flash mode
- Taking a photo
- Recording video
- Camera scenes
- Improving people shots
- Changing camera settings
- Top questions on 3D camera
- How does the phone display in 3D?
- What's the maximum resolution for 3D and 2D photos?
- What's the maximum resolution for 3D and 2D videos?
- Gallery
- About the Gallery app
- Viewing photos and videos
- Starting a photo slideshow
- Adjusting a 3D photo
- Watching a video
- Editing your photos
- Rotating a photo
- Cropping a photo
- Adding photo effects
- Saving a 3D photo as 2D
- Trimming a video
- Viewing photos in your social networks
- Sending your photos and videos
- Sending photos or videos by email
- Sending a photo or video by MMS
- Sending photos or videos using Bluetooth
- Sharing your photos and videos on the Web
- Sharing photos or videos on Facebook
- Sharing videos on YouTube
- Music
- Browsing music in the library
- Listening to music
- Finding music videos on YouTube
- Updating album covers
- Playing music from the Lock screen
- Creating a playlist
- Managing playlists
- Deleting playlists
- Setting a song as a ringtone
- Trimming an MP3 ringtone
- Sharing music using Bluetooth
- Connected Media
- Sharing media on your home network
- HTC Watch
- About HTC Watch
- Creating or signing in to your HTC Watch account
- Watching movies and TV shows
- Renting or purchasing a video
- Managing your downloads
- Changing settings
- Checking what's linked to your HTC Watch account
- Deleting your HTC Watch account
- Top questions on HTC Watch
- Adding a social network account
- Adding more Google Accounts
- Forgot your Google Account password?
- Managing your online accounts
- Changing sync settings
- Syncing an account manually
- Managing synced account settings
- Removing an account
- About the People app
- Your contacts list
- You can:
- Filtering your contacts list
- Setting up your profile
- Adding a new contact
- Importing a contact from an Exchange ActiveSync account
- Merging contact information
- Accepting matched contacts suggestions
- Manually merging contact information
- Breaking the link
- Backing up your contacts to the storage card
- Importing contacts from the storage card
- Contact information and conversations
- Details
- Thread
- Updates
- Editing a contact's information
- Deleting contacts
- Sending contact information
- Sending multiple contact cards
- Contact groups
- Creating a group
- Editing a contact group
- Tap Save.
- Sending a message or email to a group
- Rearranging your contact groups
- Rearranging the members of a contact group
- Deleting groups
- Facebook for HTC Sense
- About Friend Stream
- Checking notifications from your social networks
- Updating your status in Friend Stream
- Enjoying Facebook in Friend Stream
- Posting a message on a friend's Facebook wall
- Commenting on and liking Facebook posts
- Checking in to a place
- Using Facebook chat
- Chatting in Google Talk
- Using Google+
- Gmail
- Viewing your Gmail Inbox
- Sending an email message in Gmail
- Replying to or forwarding email messages in Gmail
- Getting help
- Adding a POP3/IMAP email account
- Adding a Microsoft Exchange ActiveSync account
- Checking your Mail inbox
- Viewing the unified inbox of all your email accounts
- Switching between different views of your inbox
- Received
- Favorites
- Unread
- Marked (Exchange ActiveSync only)
- Invites or Meeting invitations (Exchange ActiveSync only)
- Attached
- Manually refreshing an email account
- Sorting email messages
- Sending an email message
- Resuming a draft email message
- Reading and replying to an email message
- Where are my unread email messages?
- Saving an email message in the Tasks app
- Searching and filtering email messages
- Searching for emails from a contact
- Working with Exchange ActiveSync email
- Flagging an email
- Setting your Out of the office status
- Sending a meeting request
- Managing email messages
- Moving email messages to another folder
- Deleting email messages
- Switching to other mail folders
- Changing email account settings
- About Calendar
- Creating an event
- Calendar views
- Month view
- Day and agenda views
- Week view
- Managing Calendar events
- Editing an event
- Deleting an event
- Sharing an event
- Accepting or declining a meeting invitation
- Setting reminders for your events
- Dismissing or snoozing event reminders
- Showing or hiding calendars
- Changing Calendar settings
- Location settings
- Turning on location services
- Google Maps
- About Google Maps
- Getting around maps
- Searching for a location
- Clearing the map
- Checking the details of a location
- Searching for a place of interest near you
- Getting directions
- Finding your friends with Google Latitude (available by country)
- Opening and joining Latitude
- Getting apps from Google Play
- Finding and installing an app
- Uninstalling an app
- Using the Clock
- About the HTC Clock widget
- Changing the location on the Clock widget
- About the Clock app
- World Clock settings
- Setting your home city
- Setting the date and time manually
- Adding a city to the World Clock screen
- Setting an alarm
- Deleting an alarm
- Checking Weather
- Adding a city to the Weather screen
- Changing the order of cities on the Weather screen
- Deleting cities from the Weather screen
- Reading news feeds
- Subscribing to news channels
- Adding a keyword
- Reading a story
- Changing update schedule and content settings
- Watching videos on YouTube
- Searching for videos
- Clearing the search history
- Sharing a video link
- Capturing and sharing videos on YouTube
- Sharing games and apps
- Working on documents
- Viewing a document
- Creating a document
- Editing a document
- Recording your voice
- Setting a voice clip as a ringtone
- Completing tasks
- Viewing the unified task list
- Filtering tasks
- Creating a task list
- Managing task lists
- Creating a task
- Managing tasks
- Changing Tasks settings
- About HTC Sync
- Installing HTC Sync
- Setting up HTC Sync to recognize HTC EVO V 4G
- Syncing songs and playlists
- Syncing photos and videos
- Syncing your calendar events
- Syncing your contacts
- Syncing your web bookmarks
- Syncing documents and email attachments
- Installing an app from your computer to HTC EVO V 4G
- Syncing another device with your computer
- Using the onscreen keyboard
- Selecting a keyboard layout
- Entering text
- Choosing multiple keyboard languages
- Changing the keyboard language
- Entering words with predictive text
- Setting a second language for the keyboard
- Adding a word to the predictive text dictionary
- Editing or deleting a word in the predictive text dictionary
- Backing up your personal dictionary to your storage card
- Importing your personal dictionary from your storage card
- Entering text by speaking
- Entering text by tracing
- Turning on trace input
- Adjusting input settings
- Data connection
- Wi-Fi
- Turning Wi-Fi on and connecting to a wireless network
- Tap Connect.
- Checking the wireless network status
- Connecting to a different Wi-Fi network
- Connecting to a Wi-Fi network using enhanced security
- Connecting to a virtual private network (VPN)
- Setting up secure credential storage
- Adding a VPN connection
- Connecting to a VPN
- Disconnecting from a VPN
- Bluetooth basics
- Turning Bluetooth on or off
- Changing the device name
- Connecting a Bluetooth headset or car kit
- Reconnecting a headset or car kit
- Disconnecting or unpairing from a Bluetooth device
- Disconnecting a Bluetooth device
- Unpairing from a Bluetooth device
- Sending information using Bluetooth
- Where sent information is saved
- Receiving information using Bluetooth
- Turning Airplane mode on or off
- Changing display settings
- Adjusting the screen brightness manually
- Adjusting the time before the screen turns off
- Turning automatic screen rotation off
- Recalibrating the G-sensor
- Keeping the screen on while charging
- Switching animation effects on or off
- Changing sound settings
- Switching between silent, vibration, and normal modes
- Playing a sound when selecting onscreen items
- Lowering the ring volume automatically
- Making HTC EVO V 4G ring louder in your pocket or bag
- Switching to speakerphone automatically
- Changing the display language
- Checking the power usage of applications
- Managing memory
- Checking how much phone memory is available for use
- Checking the available storage card space
- Making more storage space (internal storage)
- Stopping running applications using Task Manager
- Backing up settings to Google
- Accessibility settings
- Protecting HTC EVO V 4G with a screen lock
- Forgot your screen lock pattern?
- Encrypting data on HTC EVO V 4G
- Checking information about HTC EVO V 4G
- Choosing which app opens when you tap a data item
- Updating the HTC EVO V 4G software
- Installing an update
- Checking for updates manually
- Restarting HTC EVO V 4G
- Resetting HTC EVO V 4G
- Performing a factory reset from settings
- Performing a factory reset using hardware buttons
- A
- B
- C
- D
- E
- F
- G
- H
- K
- L
- M
- N
- News
- O
- Online accounts
- Onscreen keyboard
- P
- Pair a Bluetooth device 133
- Phone information 144
- Phone settings
- Phone updates
- Photos
- Playing music from the Lock screen 70
- Power
- Q
- Quick Settings 22
- R
- Record your voice 115
- Restart 146
- Ring volume
- Ringtone
- RSS 110
- S
- Scenes 28
- Screen
- Screen lock 142
- SD card 17
- Search 51
- Security 142
- Sharing
- Slideshow 63
- Smart dial 38
- SMS 44
- Software update 145
- Sound
- T
- U
- V
- W
- Y
Brand : HTC
Model : Evo V 4G
Category : Smartphone