
Spark Nex 1 - Smartphone LAVA - Free user manual and instructions
Find the device manual for free Spark Nex 1 LAVA in PDF.


| Product Type | Smartphone |
| Brand | Lava |
| Model | Spark Nex 1 |
| Display Size | 5.5 inches |
| Resolution | 720 x 1440 pixels |
| Processor | Quad-core 1.3 GHz |
| RAM | 2 GB |
| Internal Storage | 16 GB |
| Expandable Storage | Up to 128 GB via microSD |
| Operating System | Android 10 (Go edition) |
| Battery Capacity | 3000 mAh |
| Charging | microUSB, 5W |
| Rear Camera | 8 MP with LED flash |
| Front Camera | 5 MP |
| Dimensions | 147.5 x 71.5 x 9.1 mm |
| Weight | 158 g |
| Connectivity | 4G LTE, Wi-Fi 802.11 b/g/n, Bluetooth 4.2, GPS |
| Sensors | Accelerometer, proximity, light |
| SIM Card | Dual SIM (Nano-SIM, dual stand-by) |
| Maintenance | Clean with dry cloth; avoid liquids |
| Safety | Do not expose to extreme temperatures; use original charger |
| Repairability | Battery and SIM tray user-replaceable; other parts require professional service |
| Spare Parts | Available from authorized service centers |
| Warranty | 1 year from date of purchase |
Frequently Asked Questions - Spark Nex 1 LAVA
User questions about Spark Nex 1 LAVA
0 question about this device. Answer the ones you know or ask your own.
Ask a new question about this device
Download the instructions for your Smartphone in PDF format for free! Find your manual Spark Nex 1 - LAVA and take your electronic device back in hand. On this page are published all the documents necessary for the use of your device. Spark Nex 1 by LAVA.
USER MANUAL Spark Nex 1 LAVA
SPARK NEX1 User Manual
1 Welcome
Thank you for purchasing Lava SPARK NEX1. Your SPARK NEX1 is packaged with the following state of the art features:
2.0Mp Camera
Full touch
2.8 Inch screen
Audio Player
FM Radio
■ Video and FM Recording
Dual SIM (GSM + GSM)
■ T-Flash Card support (up to 16GB)
Hindi Language Support
Important:
- Please read the contents of this manual to fully ulize the features of this phone.
- Please read the Guidelines secon provided with this Reference guide.
Table of Contents
1 Welcome....2
2 Know Your Phone 6
2.1 Keys and Parts....6
2.2 Insert SIM Card....7
2.3 Insert Memory Card....7
3 Basic Operaons....7
3.1 Switch Phone ON/OFF....7
3.2 Unlock the phone 8
3.3 Make a call....8
3.4 Receive/Reject a call 8
4 Notable Features....9
4.1 Secure your Phone....9
5 Call logs 9
5.1 View Call logs....9
6 Contacts....10
6.1 Add New Contact....10
6.2 Send Message......Error! Bookmark not dened.
6.3 Call a Contact ....Error! Bookmark not dened.
6.4 Delete a Contact ....10
6.5 Delete mulple contacts ....10
6.6 Copy Contacts....10
6.7 Import/Export Contacts 11
6.8 Send vCard....11
6.9 Others 11
User Manual
6.10 Groups....11
7 Music....12
8 Camera 12
9 Messages....12
9.1 Write message....12
9.2 Use message Templates....13
9.3 Broadcast message 13
9.4 Message Seings 13
9.5 Message capacity....13
10 Fun & Games....14
10.1 Lava Zone....14
10.2 Smash N Win 14
10.3 Link game ....14
10.4 Sokoban....14
11 Sengs....14
11.1 Call sengs .... 15
11.2 Phone seings .... 15
11.3 Display setngs....15
11.4 Security setngs.... 15
11.5 Connecons....15
11.6 Dual SIM setngs 16
11.7 Restore factory seng....16
12 My Files 16
13 Calendar 16
14 Internet 16
15 Calculator .... 17
User Manual
16 Video Player 17
17 Bluetooth 17
18 Clock....17
18.1 World clock 17
18.2 Alarm 18
18.3 Stopwatch....18
18.4 Timer....18
19 Cine Player.... 18
20 FM radio 18
21 Ebook 19
22 Video Recorder....19
23 Gallery....20
24 Torch....20
25 Proles 20
26 SIM tool kit....20
27 Sound Recorder 20
28 Facebook....21
29 Health and Safety Precauons 21
30 Taking Care of Your Device 23
31 LAVA WARRANTY CERTIFICATE....26
2 Know Your Phone
2.1 Keys and Parts
Important keys and parts are listed here for you to use the phone beer.
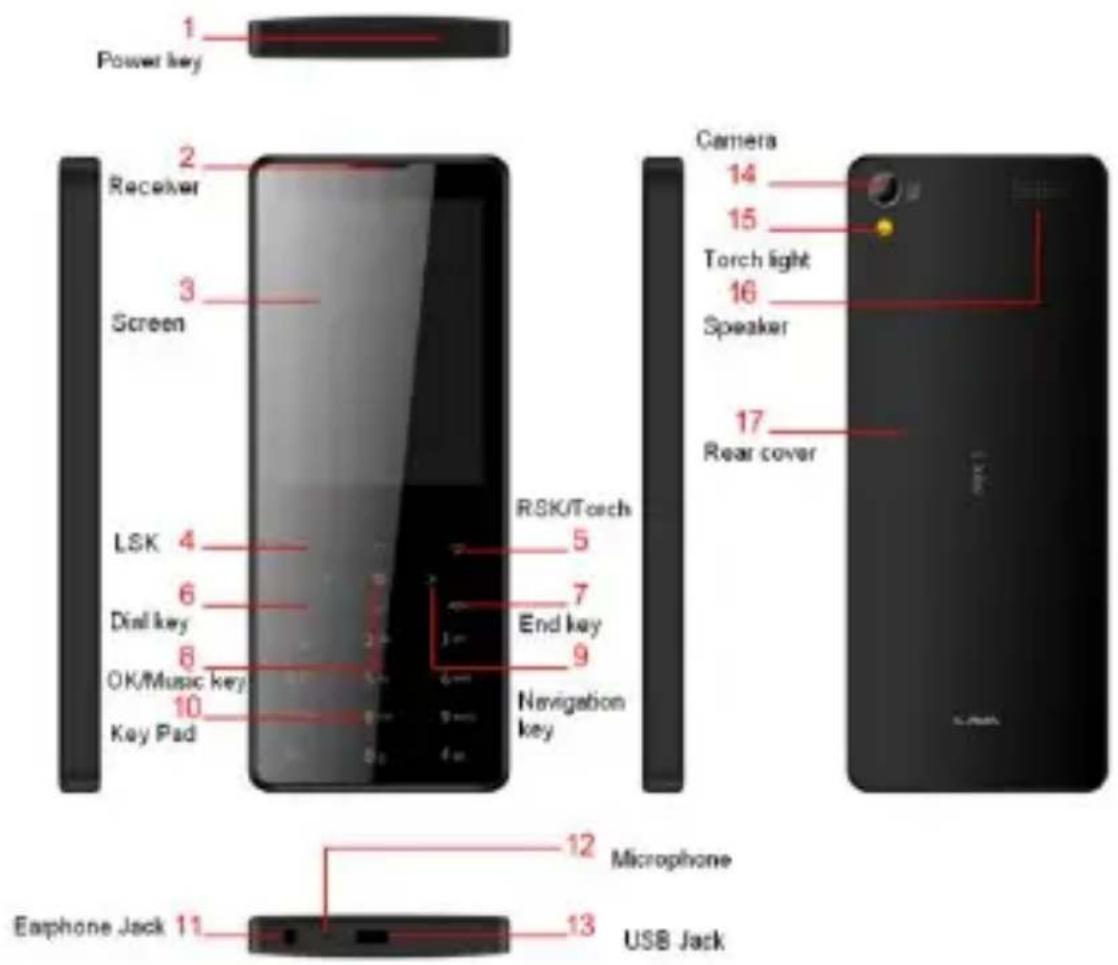
2.2 Insert SIM Card
The SPARK NEX1 is a Dual SIM mobile phone allowing you to use two SIM Cards.
- Switch o the mobile phone and remove the rear cover and baery.
- Insert the SIM card correctly in the SIM slot(s).
- Finally, insert the baery and place the rear cover of the mobile phone.
2.3 Insert Memory Card
- Switch o the phone and remove the rear cover and the baery.
- Insert the memory card into the slot.
- Finally, insert the baery and the rear cover of the mobile phone.
Note: Use only compatible memory cards approved for SPARK NEX1. Incompatible cards may damage the slot or corrupt the data stored in the card.
3 Basic Operaons
3.1 Switch Phone ON/OFF
To switch ON/OFF your phone, press and hold the Power key for a few seconds.
3.2 Unlock the phone
If you do not use the phone for a while, the screen is replaced with a locked screen.
- Press Power key to acvate the screen.
2.Slide down to unlock or Double the circle to unlock
3.3 Make a call
You can make a call in the following ways:
Enter the desired number in standby mode and press the Call key/torch the Call icon to make the call.
- Go to Menu >Contacts and then select and dial the desired number.
- Just press the Call key to dial the contacts listed in Call logs.
- You can also dial a contact from the messages.
3.4 Receive/Reject a call
- When there is a incoming call, you can touch "Answer" or press the Dial call key to receive
If you do not want to receive the incoming call, you can touch "End call" or press the End key
4 Notable Features
4.1 Secure your Phone
Menu > Sengs > Security sengs > Phone Lock
Let you lock/unlock your phone via a security password which you can change anymore.
The default security code to unlock the phone is 4321.
Note: Aer you acvate the phone lock, you would be asked for a password when you power on your phone next me.
5 Call logs
5.1 View Call logs
Menu > Call logs
Tip: Directly access the call logs of by pressing the Call key in idle mode.
- The Call log lists the calls you have all calls, recently dialed, received, missed for SIM1 and SIM 2.
Press the Le/right navigaon keys to access various call logs and work on the call logs.
- you can highlight a record slide to right to dial the number or slide to let to send sms
6 Contacts
Your phonebook stores all your saved contacts for anytime use. Your phonebook data can be stored in your SIM card or your phone memory. You can manage your contacts from here.
Menu > Contacts
6.1 Add New Contact
Menu > Contacts > Le Key > New
You can choose the storage locaon Phone/SIM, the Phone can store 1000 records, SIM card store records related to its capacity
6.2 Delete a Contact
Menu > Contacts > Delete mulple>Select one>ok You can delete it which you selected the contact.
6.3 Delete mulple contacts
Menu > Contacts > Delete mulple>Select contacts>opons>ok In the Contacts list, select the entries you want to delete.
6.4 Copy Contacts
Menu > Contacts > Le Key > Import/Export>Copy
You can copy the records from SIM card to Phone or from Phone to SIM card
6.5 Import/Export Contacts
Menu > Contacts > Le Key > Import/Export>Import contacts/Export contacts
You can import the vcards stored in the SD card to Phone and you can export the contacts to the SD card
6.6 Send vCard
Menu > Contacts > Le Key > Send vCard
Allow you to send vCard through MMS or Bluetooth.
6.7 Others
Speed dial
Menu > Contacts > Le Key > Others > Speed dial
You can set speed dial from the Contacts or edit new number. On the dial interface you can long press the number-key to call the contact which you set.
Memory status
Menu > Contacts > Le Key > Others > Memory status
Check the memory status of SIM, and Phone.
6.8 Groups
Menu>Contacts > Groups
Press the Right navigaon key to access the Group tab. You can build
new group or mass texng.
7 Music
Menu>Music
The phone comes with an inbuilt audio player that plays all your favorite songs stored in the phone memory or memory card.
■ While in music mode, press the Le key to choose various music opons
■ Press Up and Down keys to adjust volume.
■ Press CSK to Start or pause.
8 Camera
Menu>Camera
Press the navigaon up key in camera mode or from menu enter into camera, you can press LSK to choose the dierence funcons.
9 Messages
9.1 Write message
Menu > Messages > Write message > New SMS
You can compose and send SMS. Pressing the Le Key during/aer
composing the message gives you a host of messaging features.
Menu>Messages>Write message>New MMS
You can add text/picture/music/video/aachment to compose a mms content and send it. The mms content maximum 300k, if exceed 300k will not be insert in mms.
9.2 Use message Templates
Menu > Messages > Templates
Enter into preset message templates and use them. These preset templates can save you me if the theme of your message is the same as those existing in the template.
9.3 Broadcast message
Menu > Messages > Broadcast message
To receive public messages on all dierent subjects from your network operator, you can forward, delete and delete all.
9.4 Message Sengs
Menu > Messages > Opons>Sengs
You can set your desired parameters for SMS, MMS and Others.
9.5 Message capacity
Menu > Messages >Opons> Message capacity
View the memory status of your SMS,MMS,WAP Push and OTA.
10 Fun & Games
10.1 Lava Zone
Menu >Fun & Games>Lava Zone
We can use this to download MP3, Video, Wallpaper and other content.
10.2 Smash N Win
Menu > Fun & Games>Smash N Win
We can play this game 3 free trials.
10.3 Link game
Menu >Fun & Games>Link game
We can play the Link game freely.
10.4 Sokoban
Menu >Fun & Games>Sokoban
We can play the Sokoban game freely.
11 Sengs
Choose various preferences to customize your handset according to your requirements. You can set:
11.1 Call sengs
Menu > Sengs>Call sengs
To perform the Call divert, Call waiing, Call barring, Fixed dialing, Others.
11.2 Phone sengs
Menu > Sengs>Phone sengs
To perform the Date & me, Language sengs, Preferred input method, Dedicated keys, Schedule power on/o ,Baery status and Shortcuts.
11.3 Display sengs
Menu > Sengs>Display sengs
Performance related Sengs shown as Wallpaper sengs, Main menu style, Idle display sengs, Screen lock, Brightness, Backlight and Key pad light me seng.
11.4 Security sengs
Menu > Sengs>Security sengs
Execute related the SIM1/2 security, mobile security, automac screen lock, an-the tracking and privacy protecon.
11.5 Connecons
Menu > Sengs> Connecons
You can set Network account, GPRS Service, Network selecon, GPRS counter. If the GPRS Service not be selected, you can not open any webpage.
11.6 Dual SIM sengs
Menu>Sengs>Dual SIM sengs
To perform Standy mode, Reply by master SIM, Set SIM name, Set SIM color.
11.7 Restore factory seng
Menu>Sengs> Restore factory seng
Input correct password, then you restore sengs and restar the phone
12 My Files
Menu >My Files
You can check Phone/ memory card les from my les.
13 Calendar
Menu > Calendar
You can check the date and can reminder you aer seng an event.
14 Internet
Menu >Internet
To access this menu, enter the Main Menu in the standby mode and then select Internet. You can use the network-related services with this funcon.
15 Calculator
Menu >Calculator
To provide a calculator with 4 basic funcons to facilitate simple calculaons.
16 Video Player
Menu > Video Player
Let you play videos stored in your phone or memory card.
Press 2 key while playing a video to change the display mode.
Press 5 key while playing a video to decrease or increase the brightness.
Press * key to cancel mute/mute
17 Bluetooth
Menu > Bluetooth
Open the Bluetooth, for le transfer and acceptance
18 Clock
Menu>Clock
You can set World clock,Alarm,Stopwatch,Timer
18.1 World clock
Menu>Clock>World clock
You can add new city, delete city, set local city and set daylight saving system
18.2 Alarm
Menu >Clock>Alarm
To use the alarm service available with your mobile phone.
18.3 Stopwatch
Menu >Clock>Stopwatch
You can count the me mulple.
18.4 Timer
Menu >Clock>Timer
You can set a me then countdown.
19 Cine Player
Menu>Cine Player
This player only support KMV format, you can perform the les delete, play, etc.
Press 2 key while playing a video to change the display mode.
Press 5 key while playing a video to decrease or increase the brightness.
Press * key to cancel mute/mute
20 FM radio
Menu > FM radio
Your phone comes with an FM radio to let you listen to FM channels.
- Go to Opons> Search Channels> Auto Search to ll up the channels.
- Press the number keys on your keypad in accordance to the channel list.
■ Press OK key to start/stop the radio.
■ Press the Up or Down key to increase/decrease the volume.
■ Press the Le key for various radio opons.
21 Ebook
Menu>Ebook
You can choose a txt format le to open and press the Le key for varios opons
22 Video Recorder
Menu >Video Recorder
Press the OK Key to start recording.
- You can press Opons switch to Camera and vice versa.
■ You can also press Opons key to choose memory
■ Press Le key to choose various sengs
23 Gallery
Menu>Gallery
You can manage the images which saved in phone memory or TF-card.
24 Torch
Menu > Torch
You can turn on/o Torch
25 Proles
Menu > Proles
Acvaon and customize the required prole is General, Silent, Meeng, Indoor, Outdoor, Earphones, Bluetooth.
26 SIM tool kit
Menu>SIM tool kit
STK is the operator to provide value-added service for you, if you use a SIM card to provide the value-add service, such as news, sports and entertainment services, you can enter into this menu, it eecve service may vary with the service provider's plan.
27 Sound Recorder
Menu >Sound recorder
You can record surrounding sounds using this feature.
28 Facebook
Menu >Facebook
You can open the facebook webpage.
29 Health and Safety Precauons
Please read these simple guidelines. Not following them may be dangerous or illegal.
SAR Compliance
- Your phone is designed not to exceed the limits of emission of radio waves recommended by internaonal guidelines.
■ SAR (specific absorpon rate) is the measurement of body-absorbed RF quantity when the phone is in use. SAR value is ascertained according to the highest RF level generated during laboratory tests.
■ The SAR value of the phone may depend on factors such as proximity to the network tower, use of accessories or other accessories.
The highest SAR value of the device at the head and body are below 1.6W/kg respectively averaged over 1 gm. of human issue.
SAR Recommendaons
■ Use a wireless hands-free system (headphone, headset) with a low power Bluetooth emier.
- Please keep your calls short and use SMS whenever more convenient.
This advice applies especially to children, adolescents and pregnant women
■ Prefer to use your cell phone when the signal quality is good.
■ People having acve medical implants should preferably keep the cell phone at least 15 cm away from the implant.
- Maintain a preferable distance of 15 mm from the device.
Safe Driving
- Do not use the phone while driving. When you have to use the phone, please use the personal hands-free kit.
- Please do not put the phone onto any passenger seat or any place from which it may fall down in case of vehicular collision or emergency braking.
During Flight
- Flight is inuenced by interference caused by the phone. It is illegal to use a phone on the airplane. Please turn o your phone during a ight.
In Hospitals
- Your Phone’s radio waves may interfere with the funconing of inadequately shielded medical devices. Consult a physician or the manufacturer of the medical device to determine whether they are adequately shielded from external Radio Frequency. Switch o your device when regulaons posted instruct you to do so.
■ To avoid potential interference with implanted medical devices such as a
pacemaker or cardioverter debrillator:
■ Always keep your phone at least 15.3 cenmeters (6 inches) from the medical device.
- Do not carry the wireless device in chest pocket.
- Turn o the phone if there is any reason to suspect that interference is taking place.
■ Follow the manufacturer direcons for the implanted medical device.
- If you have any quesons about using your wireless device with an implanted medical device, consult your health care provider.
Unsafe Areas
- Please turn o your phone when you are close to a gas staon or in the vicinity of any place where fuel and chemical preparaons, or any other dangerous goods are stored.
30 Taking Care of Your Device
Your device is a product of superior design and crasmanship and should be handled with care: The following suggestions will help you protect your phone:
- Keep the device dry. Precipitaon, humidity, and all types of liquids or moisture can contain minerals that will rust electronic circuits. If your device does get wet, remove the baery without turning on the device, wipe it with a dry cloth and take it the service center.
- Do not store the device in high or cold temperature. High temperatures can shorten the life of electronic devices and damage baeries.
- Do not use or store the device in dusty, dirty areas. Its moving parts and electronic components can be damaged.
- Do not attempt to open the device other than as instructed in this guide. Repairing this phone by yourself other than our authorized service agents/centers goes against the warranty rules.
- Do not drop, knock, or shake the device. Rough handling can break internal circuit boards and ne mechanics.
- Do not use harsh chemicals, cleaning solvents, or strong detergents to clean the device. Only use a so, clean, dry cloth to clean the surface of the device.
- Do not store your device near magnec elds or allow your device to come in contact with magnec elds for extended period of me.
Baery Recommendaons:
- Please put the baery in a cool and well-venlated place out of direct sunlight. We recommend you to charge the baery at room temperature range.
■ Baeries have life cycles. If the me that the baery powers equipment becomes much shorter than usual, the baery life is at an end. Replace the baery with a new baery of the same make and specicaon. - Do not discard the baery with household trash. Please dispose of used baery according to your local environmental laws and guidelines.
User Manual
- Use manufacturer approved batteries, chargers, accessories and supplies. SPARK NEX1 will not be held responsible for user's safety when using unapproved accessories or supplies.
Recycle Your Handset

natural_image
Simple line drawing of a trash bin with two crossed lines indicating no waste or prohibition (no text or symbols)The WEEE logo (shown at the le) appears on the product (baery, handset, and charger) to indicate that this product must not be disposed of or dumped with your other household wastes. You are liable to dispose of all your electronic or electrical waste equipment by relocang over to the specied collecon point for recycling of such hazardous waste.
Specied collecon points for recycling of such hazardous waste. Collecon and proper recovery of your electronic waste equipment at the me of disposal will allow us to help preserve the environment. Recycling of the electronic waste equipment will ensure safety of human health and environment. For more informaon on best pracces for disposal of electronic and electrical waste, please visit to our web site: www.Lavamobiles.com
Disclaimers
- The colors and specicaons shown/menoned in the user manual may
dier from the actual product. Images shown are for representaon purpose only. Other product logos and company names menoned herein may be trademarks or trade names of their respective owners.
- SPARK NEX1 keeps the right to make modicaons to any of the content in this user guide without public announcement in advance. The content of this manual may vary from the actual content displayed in the mobile phone. In such a case, the laer shall govern.
Copyrights
All rights reserved. Reproducon, transfer, distribuon or storage of part of all of the contents in this document in any form without the prior written permission of Lava Internaonal is strictly prohibited.
31 LAVA WARRANTY CERTIFICATE
Limited warranty:
LAVA international Ltd. (LAVA) provides limited warranty for your mobile phone and original accessories delivered with your mobile phone (hereinafter referred to as “product”)
The warranty period for the transceiver is one (1) year and for battery, charger and headset is six (6) months from the date of purchase.
LAVA Warranty
Subject to the conditions of this Limited Warranty, LAVA warrants a product to be free from defects in design, material and workmanship at the time of its original purchase by you, and for a subsequent period of one (1) year for transceiver and six (6) months for battery & charger.
You shall have to coverage or benefits under this warranty in the event that any of the following conditions are applicable:
- The product has been subjected to abnormal use or conditions, improper storage, exposure to excessive moisture or dampness, exposure to excessive temperature, unauthorized modification, unauthorized repair (including but not limited to use of unauthorized spare parts in repairs), abuse, accidents, Acts of God, spills of food or liquids, improper installation.
- You have not notified Lava of the defect in the product during the applicable warranty period.
- The product serial no. code or the accessories date code has been removed, defaced or altered.
- The product has been used with or connected to an accessory (i) Not supplied by Lava or its affiliates, (ii) Not fit for use with the product or (iii) Used otherwise than in manner intended.
- The seals of the product's battery enclosure have been broken or shown evidence of tempering or the product's battery has been used in equipment other than that for which it has been specified usable
by LAVA.
- All plastic surfaces and all other externally exposed part that is scratched or damaged due to normal use.
To get maximum of your new product, we recommend you to:
- Read the guidelines for safe and efficient use as mentioned in the manual.
- Read the terms and conditions of your Lava warranty in the manual.
- Keep your original receipt; you will need it for warranty services if asked to produce.
■ Present this Lava Warranty Certificate along with original proof of purchase whenever you require any warranty services.
In case Lava product needs service, please visit the nearest Lava service centers given in the service guide. Please visit our Website www.lavamobiles.com for updated list of Authorized Service Centers near to your location.
Important note: for your warranty to be valid, all information on the warranty certificate has to be completed including the stamp from the authorized distributor/retailer.
All warranty information, product features and specifications are subject to change without notice.
IMEI No.
Dealers Stamp ....
Date of purchase ....
Model No.
- SPARK NEX1 User Manual
- Welcome
- Important:
- Table of Contents
- Welcome....2
- Know Your Phone 6
- Basic Operaons....7
- Notable Features....9
- Call logs 9
- Contacts....10
- User Manual
- Know Your Phone
- Keys and Parts
- Insert SIM Card
- Insert Memory Card
- Basic Operaons
- Switch Phone ON/OFF
- Unlock the phone
- Make a call
- Receive/Reject a call
- Notable Features
- Secure your Phone
- Call logs
- View Call logs
- Contacts
- Add New Contact
- Delete a Contact
- Delete mulple contacts
- Copy Contacts
- Import/Export Contacts
- Send vCard
- Others
- Groups
- Music
- Menu>Music
- Camera
- Menu>Camera
- Messages
- Write message
- Menu>Messages>Write message>New MMS
- Use message Templates
- Broadcast message
- Message Sengs
- Message capacity
- Fun & Games
- Lava Zone
- Smash N Win
- Link game
- Sokoban
- Sengs
- Call sengs
- Phone sengs
- Display sengs
- Security sengs
- Connecons
- Dual SIM sengs
- Restore factory seng
- My Files
- Calendar
- Internet
- Calculator
- Video Player
- Bluetooth
- Clock
- World clock
- Alarm
- Stopwatch
- Timer
- Cine Player
- FM radio
- Ebook
- Menu>Ebook
- Video Recorder
- Menu >Video Recorder
- Gallery
- Torch
- Proles
- SIM tool kit
- Sound Recorder
- Health and Safety Precauons
- SAR Compliance
- SAR Recommendaons
- Safe Driving
- During Flight
- In Hospitals
- Unsafe Areas
- Taking Care of Your Device
- Baery Recommendaons:
- Recycle Your Handset
- Disclaimers
- Copyrights
- LAVA WARRANTY CERTIFICATE
- Limited warranty:
- LAVA Warranty
Brand : LAVA
Model : Spark Nex 1
Category : Smartphone