
Discover 132 - Smartphone LAVA - Free user manual and instructions
Find the device manual for free Discover 132 LAVA in PDF.


| Product Type | Smartphone |
| Brand | Lava |
| Model | Discover 132 |
| Network Support | GSM dual SIM |
| Display | Color screen, size not specified |
| Camera | Rear camera for photo and video |
| Audio | 3.5mm earphone jack, loudspeaker |
| Connectivity | Bluetooth, USB charging/data |
| Internet | GPRS/WAP/MMS with manual configuration |
| Messaging | SMS, MMS with text and multimedia |
| Multimedia | FM radio, video player, music player, eBook reader |
| Tools | Calculator, calendar, alarm, world clock, notes |
| Games | Built-in: Angry Bird, Fruit Ninja, Talk Cat; downloadable |
| Social Apps | Facebook, Face Talk (network dependent) |
| Battery | Rechargeable lithium-ion, user-replaceable |
| Charging | AC charger, ambient temperature 0°C–50°C |
| Memory Card | Supports microSD for storage expansion |
| SAR Value | < 1.6 W/kg (head) per ICNIRP guidelines |
| Security | PIN/PUK lock, screen auto-lock, password protection |
| Languages | English, Hindi and more |
| Care & Maintenance | Clean with damp cloth; avoid chemicals; keep away from magnets |
| Warranty | Valid only with approved accessories; unauthorized modifications void warranty |
Frequently Asked Questions - Discover 132 LAVA
User questions about Discover 132 LAVA
0 question about this device. Answer the ones you know or ask your own.
Ask a new question about this device
Download the instructions for your Smartphone in PDF format for free! Find your manual Discover 132 - LAVA and take your electronic device back in hand. On this page are published all the documents necessary for the use of your device. Discover 132 by LAVA.
USER MANUAL Discover 132 LAVA
Thank you for using our mobile phone Discover 132. This user guide provides general informaon and operaon instrucons.
Note:
Use only accessories approved by the phone manufacturer to ensure safety. Failing to comply with this will violate the terms and conditions of the warranty.
The phone set has been manufactured in strict compliance with various naonal standards and requirements set by the authorities. If the contents and displays described in this user guide do not match the actual operaon of the phone set, please follow the contents and displays of your phone set. We reserve the rights to change any mechanisms of the phone without noce.
Step 4: Aer that enter the data sengs as given on under Table1 on page 4-10 taking care of following:
Homepage: Check from detailed menu according to operator
Connecon Type: Check from detailed menu according to operator
Proxy: Check from detailed menu according to operator
Port: Check from detailed menu according to operator
DNS: Primary DNS as menoned in detail menu
In case NA or Null in detailed menu- No need to enter any data
EXAMPLE
Changing Sengs for Airtel Live
Step 1: Menu→Sengs→Network & Connecvity→Cellular network sengs→Data Accounts
Step 2: Select Airtel Live or in case Airtel Live doesn't exist Click Add
Step 3: Enter the details
Account Name: Airtel Live
APN: airtelfun.com
Username: Leave Blank
Username: Check from detailed menu according to operator
Password: Check from detailed menu according to operator
Authencaon Type: Normal (in case of NA in detailed manual)
Advanced Sengs: Edit required sengs
Step 4: Aer that enter the data sengs as given on under Table1 on page 4-10 taking care of following:
Homepage: Check from the row tled MMSC in table 1 according to operator
Connecon Type: Check from detailed menu according to operator
Proxy: Check from detailed menu according to operator
Port: Check from detailed menu according to operator
DNS: Primary DNS as menoned in detail menu
In case NA or Null in detailed menu— No need to enter any data
EXAMPLE
Changing Sengs for Airtel MMS
Step 1: Menu→Sengs→Network & Connecvity→Cellular network
sengs→Data Accounts
Step 2: Select Airtel MMS or in case Airtel MMS doesn't exist Click Add
Step 3: Enter the details
Table1: Detailed Manual for GPRS-WAP-MMS-Internet Seings common for all models
| Operator details | AIRCEL | AIRTEL | IDEA | Reliance | ||||||||
| Pro name | PocketWAP | AIRCEL MMS | Aircel Internet | AIRTEL MMS | AIRTEL LIVE | AIRTEL Internet | IDEA WAP | IDEA MMS | Idea Internet | R WORLD | RELIANCE MMS | Netconnect |
| Applica on type | WAP-GPRS | MMS-GPRS | Internet GPRS | MMS-GPRS | WAP-GPRS | Internet GPRS | WAP-GPRS | MMS-GPRS | Internet -GPRS | WAP-GPRS | MMS-GPRS | Internet -GPRS |
| APN | aircelwap | aircel mms | aircel gprs | airtelm ms.com | airtelf un.com | airte1 gprs.com | Imis | mms c | internet | rcomwap | rcommms | rcomnet |
| Authencao n | NONE | NONE | NONE | NONE | NONE | NONE | NONE | NONE | NONE | NONE | NONE | NONE |
| User | ||||||||||||
| Proxy address | 17.083.069 | 172.017.083.069 | 000.0.000.000 | 100.001.201.172 | 100.001.200.099 | 000.000.000.000 | 010.004.042.015 | 010.004.042.015 | 000.000.000.00 | 010.239.221.005 | 010.239.221.005 | NA |
| Proxy port | 8080 | 8080 | 8799 | 8080 | 0 | 8080 | 8080 | 0 | 8080 | 8080 | NA | |
| User name | NA | NA | NA | NA | NA | NA | NA | NA | NA | NA | NA | NA |
| Pass-word | NA | NA | NA | NA | NA | NA | NA | NA | NA | NA | NA | NA |
| Primary DNS | null | null | null | null | null | null | null | null | null | 000.000.000.000 | null | null |
| Secondary DNS | null | null | null | null | null | null | null | null | null | 000.000.000.000 | null | null |
| IP Address | null | null | null | null | null | null | null | null | null | 000.000.000.000 | null | null |
| Authencaon | NONE | NONE | NONE | NONE | NONE | NONE | NONE | NONE | NONE | NONE | NONE | NONE |
| User name | NA | NA | NA | NA | NA | NA | mtnl | NA | NA | NA | mtnl | nA |
| Pass word | NA | NA | NA | NA | NA | NA | mtnl123 | NA | NA | NA | mtnl123 | NA |
| Line Type | NA | NA | NA | NA | NA | NA | NA | NA | NA | NA | NA | NA |
| Speed | NA | NA | NA | NA | NA | NA | NA | NA | NA | NA | NA | NA |
| Home page | hp://google.com | hp://wap.world.co.in | hp://10.239.221.47/mms/ | hp://ive.vodatone.in/ | hp://mms1.live.vodatone.in/mms/ | hp://google.com | hp://wap.mtnlmumbai.in | hp://mtnlmms/ | hp://wap.google.com | hp://mtnlmms/ | hp://localhost/home.wml | hp://wap.google.com |
| Connection type | HTTP | HTTP | HTTP | HTTP | HTTP | HTTP | HTTP | HTTP | HTTP | HTTP | HTTP | HTTP |
| Proxy | ... | ... | ... | ... | ... | ... | ... | ... | ... | ... | ... | ... |
| IP Address | null | null | null | null | null | null | null | null | null | null | null | null | null |
| Sub net | null | null | null | null | null | null | null | null | null | null | null | null | null |
| Operator details | CELLONE-North | CELLONE-North | CELLONE-North | CELLONE-East | CELLONE-East | CELLONE-East | CELLONE-West | CELLONE-West | CELLONE-West | CELLONE-South | CELLONE-South | CELLONE-South |
| Profile name | BSNL MMS | BSNL LIVE | BSNL GPRS | BSNL MMS | BSNL LIVE | BSNL NET | BSNL MMS | BSNL LIVE | BSNL NET | BSNL LIVE | BSNL NET | BSNL MMS |
| Appli-ca on type | MMS | BSNL LIVE | INTERNET | MMS | BSNL LIVE | INTERNET | MMS | BSNL LIVE | INTERNET | BSNL LIVE | Inter-net | MMS |
| APN | bsnlmms | bsnllive | bsnInet | bsnlmms | bsnllive | bsnInet | bsnl mms | bsnllive | bsnInet | bsnllive | bsnInet | bsnlmms |
| Authentica | None | None | None | None | None | None | NONE | NONE | NONE | NONE | NONE | NONE |
| Proxy enable | Yes | Yes | NO | Yes | Yes | NA | Yes | Yes | NA | Yes | NA | Yes |
| Proxy address | 010.210.010.011 | 010.220.067.131 | NA | 010.210.010.011 | 010.220.067.131 | NA | 010.210.010.011 | 010.220.067.131 | NA | 010.220.067.131 | NA | 010.210.010.011 |
| Proxy port | 8080 | 8080 | NA | 8080 | 8080 | NA | 8080 | 8080 | NA | 8080 | NA | 8080 |
| User name | NA | NA | NA | NA | NA | NA | NA | NA | NA | NA | NA | NA |
| Pass-word | NA | NA | NA | NA | NA | NA | NA | NA | NA | NA | NA | NA |
| Primary DNS | null | null | null | null | null | null | null | null | null | null | null | null |
| Secondary DNS | null | null | null | null | null | null | null | null | null | null | null | Null |
| IP Add | null | null | null | null | null | null | null | null | null | null | null | null |
| APN | vgprs.com | vinternet.com | vgprs.com | TATA.DOCOMODIVE.IN | TATA.DOCOMO.MMS | TATA.DO COMO.I NTERNET | uninor | unin or | unino r | mizone | mizone | www |
| Authentica on | NONE | NONE | NONE | NONE | NONE | NONE | NONE | NONE | NONE | PAP | PAP | PAP |
| User name | NA | NA | NA | NA | NA | NA | NA | NA | NA | 91MDN | 91MDN | 91MDN |
| Pass word | NA | NA | NA | NA | NA | NA | NA | NA | NA | mmsc | mmsc | loop |
| Line Type | NA | NA | NA | NA | NA | NA | NA | NA | NA | NA | NA | NA |
| Speed | NA | NA | NA | NA | NA | NA | NA | NA | NA | NA | NA | NA |
| Homepage | hp://10.202.4.119:10021/mmsc/ | hp:/wap.google.com | hp://wap.vlive.in | hp://divein.tatadocomo.com | hp://mmsc/ | hp://divein.tatadocomo.com | hp://wap.m/unino.r.in | hp:/10.58.2.120 | hp:/www.unin or.in | hp://mms.loopmobile.in :8080 | hp://a tcafe.lo opmobile.in | hp://wap.google.com |
| Seco n- dary DNS | null | null | Null | null | null | null | null | null | null | null | null | null |
| IP Add ress | null | null | Null | null | null | null | null | null | null | null | null | null |
| Sub net | null | null | null | null | null | null | null | null | null | null | null | null |
All the conguraons menoned in this user manual is only for reference, please refer to the actual phone.
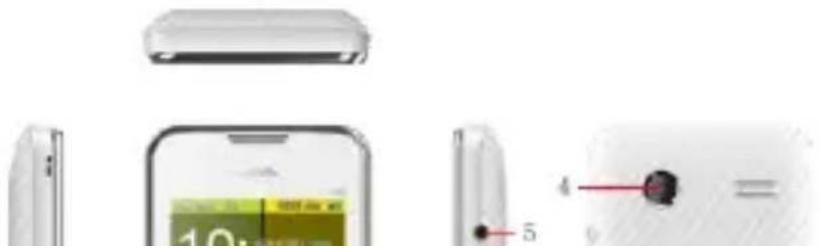
Your phone & Key parts
natural_image
Diagram showing front, side, and close-up views of a smartphone with a screen and camera (no text or symbols)| Label | Key | Descripon |
| 1 | Call Send Key | Make a call/ special funcon |
| 2 | Home Key | Return Home screen |
| 3 | Power Key/Back key | Press and hold to turn on/o phonePress to back previous screen |
| 4 | Camera | Camera shoot |
| 5 | 3.5mm Earphone Jack | Earphone jack |
| 6 | Charging/USB port | Charging up/transfer les with PC. |
Standby Screen & Icons

Airtel/Airtel
Alarm
Background playing / pausing
Memory card installed
Bluetooth on
Modem connecng
Network carrier of Card 1/ Card 2
Comment [NJ1]: Symbol fo added
Text Input Method
This phone provides various text input methods that allow you to use less key strokes to input and search for text:
English input method
Hindi input method
devices can aect the medical treatment and cause interference in aircra.
- Some medical devices such as hearing aids and pacemaker may be sensitive to external radio frequency emissions. Consult the device manufacturers or your doctor before using the phone around the medical devices.
- Pay special attenon to the ring tone volume and vibraon setngs if you have a heart problem.
• In areas with potentially explosive atmosphere, such as gas staons, fuel or chemical transfer or storage facilities, obey all signs and instrucons. - Your phone will emit radio frequency even in the standby mode. Turn off your phone when so instructed.
- Always obey all the local laws and regulaons. Do not use your phone while driving. Use Hands-free operaon, if available, and give full aenon to driving and to the road. Pull o the road and park before making or answering a call if driving condions so require.
- If your phone is lost or stolen, nofy your service provider immediately to stop the SIM card from being used.
- When you contact your service provider, they will need your IMEI number. It is printed on the back of your phone set (you can nd it when you remove your
- Do not paint the phone.
- Do not drop the phone or violently crush or shake the phone.
- Do not keep the phone near magcards and other object with magnesm. The phone's magnesm may clear the informaon stored on oppy disk, pre-paid phone card and credit card.
- Keep the phone away from hot places where the temperature may exceed 60°C, such as dashboard, windowsill, or areas exposed to direct sunlight.
- Do not disassemble or modify your phone. This can damage the phone, cause leakage and break the internal circuit.
• Use only damp cloth or non-stac cloth to clean your phone.
- Do not use alcohol, thinner, benzene or other chemicals or abrasive cleaner to clean your phone.
• The phone will become warm under normal use and while in baery charging.
- Do not leave the phone with baery uninstalled or with the baery empty for a long period of me. This may cause data loss.
- The metal parts of the phone may irritate your skin depending on your health condition.
• Do not put the phone in the back pocket. Sing on it may damage the phone.
- Keep metal objects (such as coins or key rings) away from the battery to avoid short circuit.
- Do not remove the baery without turning o the phone.
• Do not hold the baery in your mouth. The liquid of the baery can be toxic. - Embedded baery shall be replaced by authorized dealers. Use only baeries approved by the phone manufacturer; otherwise, it may cause explosion.
- Damage resulting from using un-authorized baeries and chargers will not be covered by the warranty.
- Avoid contact with any leaked liquid of the baery. If it touches your skin, wash your skin with fresh water and go to the hospital immediately.
SAR
- The highest SAR value for this mobile phone is < 1.6 W/Kg, in accordance with the requirements of the ICNIRP, which recommended the limit for exposure to radio waves is 1.6 was/kilogram(W/kg) averaged over 1 gram of issue. For more informaon, please visit (website) to query
Safety precautions:
• Use cell phone when the signal quality is good
• People having acve medical implants should preferably keep the cell phone
Collecon Center.
- Separate the packaging material according to responsible waste disposal opons and sorng for recycling.
• Always remove the baery from the product, when you do not intend to use the product anymore it in future.
Don'ts:
- Do not Dismantle your Lava Product on your own
• Do not give your e-waste to Kabbadi Wala / Scrap Dealer/ Rag Pickers.
• Do not dispose-o the e-waste in landlls - Never dump E-waste in garbage bins.
- Do not dispose of your product at municipal waste bins or rooms.
• Do not throw used baeries into household waste.
Consequences of improper handling and disposal of E-Waste
• Improper disposal of waste prevents natural resources from being re-used.
- Some waste contains hazardous chemicals and if not disposed of properly may release toxins into the soil and water, and also releases greenhouse gases into the environment
• If e-waste is not properly disposed of, it can threat to the health and
Installing and uninstalling baery
To install the baery, remove the back cover from the phone by pressing rmly on the cover and slide it down. Align the golden contacts of the baery to the contacts in the phone, and then gently snap down the baery into place. Re-assemble the back cover.
To uninstall the baery, ip the baery out from the boom of the baery.
Charging baery
Plug the charger into the socket on the side of your phone. Connect the charger to an AC wall socket. The blinking of the baery level icon indicates the baery is being charged. When the blinking stops, it indicates the charging is nished.
During charging, the phone and charger will feel warm to the touch. This is normal.
Warning:
The operang ambient temperature range of the charger is 0 C-50 C. Do not use the charger when the temperature exceeds this limit.
Use only chargers approved by the phone manufacturer to ensure safety. Failing to comply with this will violate the terms and conditions of the warranty.
Using baery
The waiing me and calling me capacities specied by the phone manufacturer
store on the SIM. You can take out the SIM card from the phone and insert it into another GSM phone to use it. Most new phones will recognize the SIM card automacally.
Do not touch the golden contacts of the SIM card; place it away from electricity and magnesm to avoid damage. You will not be able to use the phone if the SIM card is damaged.
Note:
Before inserng and taking out the SIM card, always make sure that the phone is switched o and disconnected from any external power source; otherwise both the phone and the SIM card may be damaged.
Installing and uninstalling SIM Card
The SIM card usually comes aached to a special card. The metal contacts of SIM card can be easily damaged by scratching, so take it out carefully before assembling it into the phone.
Switch o the phone, remove the back cover, battery and other external power source. Fit the SIM card into the SIM card slot. Align the angled corner of the SIM card with the slot. Slide in the SIM card, make sure it is in place, install the baery, and restore the back cover.
cards, the two network carriers will both appear on the screen.
To make phone calls, you may dial the number from the Dial screen or from your phonebook.
Direct dial
Press the funcon key with respect to the dial icon on the Home screen.
Dialing from Contacts
Enter Phonebook from the Main Menu. You may use alphabet for quick search of the names.
Unanswered call
If you have set up Auto Re-dial, your phone will automatically re-dial the last unanswered number that you called.
Answering a call
When there is an incoming call, the phone will nofy you through vibraon, ringing, vibraon plus ringing, etc, according to your seng. The name and phone number of the caller is shown on the screen if the network supports the service. You may answer or reject the call.
If call waing is on when you are on the phone and there is another incoming call, your phone will nofy you with a short tone. You may answer or reject that second
Create and delete a contact entry
- On the dial screen, tap the Dialpad item, and then input the number and tap the Add contacts to create a new entry.
- On the dial screen, tap the Contacts item, and then press the Call Send Key to create a new entry.
Note:
On the Contacts item, press Call Send Key for more operaon. Such as: Add contact, Groups, Share, Delete, Message, Sengs.
Phonebook of SIM Card and your phone
There are two separate phonebooks, one stored on the SIM card and the other in the phone.
Each entry in your SIM card's phonebook consists of a phone number and a name. When you change to another phone, the contact informaon can be transferred to your new phone with the SIM card. The total number of entries allowed in a SIM card varies with dierent SIM cards.
The contacts stored in the phone can include name, phone number, group, photo, ring tone. This informaon will not be transferred with the SIM card to your new phone.
Message
This chapter introduces the messaging services provided by the network. Some services may not be supported by the local network
Write messages
SMS
Press 🤨 to enter the message screen, and then tap 📋 or press Call Send Key to access the message editor screen. You may use virtual keypad or screen handwriting to input English, Hindi, digits and punctuaon marks.
MMS
The MMS funcon allows you to send text and mulmedia such as pictures, voice and video to the other phone. Additionally, you can send the MMS message using CC and BCC funcons by pressing Call Send Key.
Note:
On the message screen, Press Call Send Key for more operaons. Such as: New msg., Delete, Sengs, Backup SMS.
On the message editor screen, Press Call Send Key for more operaons. Such as: Send, Save, Insert, Add Subject, Cc/Bcc.
will be saved in AVI format to your memory card.
Aer entering the Camcorder funcon, the Camcorder Preview screen will appear with status icons. Tap 🔒 to start recording videos.
Recorded videos will be saved automatically. You can preview or delete them via the related operaons
FM radio
Make sure the headset, which is used as the antenna, is plugged in before using the FM radio.
Play: Select it and then tap 🔒 to play it.
Record: Select and then play it, Tap to record the channel.
Note:
Before recording, make sure you have inserted a memory card.
The following funcons are available by taping :
Auto search: Auto search channels.
Favorite: You can set up favorite channels. In Favorite menu, you have the following opons: Add, Play, Edit, Delete, and Delete all.
Movie
Before using Movie, make sure you have inserted a memory card.
The Tools includes the following funcons: Calendar, Alarm, and so on. Any others tools, you can download them by yourself.
Calendar
In addition to the western calendar, an India calendar is also provided. You can add, edit and look up events on dierent dates.
Alarm
You can set up to 6 alarm clocks. The Alarm Clock sengs include: Title, Time, Status, Frequency and Ringtone. The frequency sengs are: Once, Daily, Monday, Tuesday, Wednesday, Thursday, Friday, Saturday and Sunday.
Alarm Dialog will be displayed when the alarm goes o. You can stop the alarm or snooze for 5 minutes.
Notes
You can Add new Notes, and also edit or remove the stored notes.
EBook
The eBook funcon lists the eBooks in TXT format stored in your memory card.
Calculator
A basic calculator is provided
World Clock
You can login the facebook, this funcon is network dependent.
Face Talk
You can login the face talk, this funcon is network dependent.
Games
There are in-built games: Angry Bird, Fruit Ninja, Talk Cat. And also you can download from mSpace/Game zone.
Sengs
Enter Sengs from the Main Menu. There are Network & connecvity, Personalizaon, System and Applicaons Sengs.
Network & connecvity
Flight mode
You can set on/o.
Connectivity sengs
Bluetooth
You may do funcons for your Bluetooth sengs such as: Turn on/off, Paired devices, Search devices, Sengs.
Cellular network sengs
Comment [NJ3]: Game Zo games like asaphalt etc wh
The default is 4321.
SIM lock: Allow you to check the SIM card lock status and change password.
System
Display sengs
Brightness: Set the brightness of the backlight.
Screen auto-lock: You can lock your phone manually, or select auto lock for the phone to lock its screen automatically aer some idle me in the Standby mode.
Date & Time sengs
You can set the me, date, me zone, me format, date, date format and daylight saving me. Also you can turn on/o the auto-update network me.
Language & input
Set Display language & Smart input and So keyboard.
This phone provides several languages including English, Hindi and more.
Advance sengs
SIM Usage: you can check the GPRS usage of the SIM card.
Restore factory sengs: Restore your phone to the factory or default seings through this opon. You need to input your phone password (default is 4321) for this operaon. All data will be deleted when your phone is restored to its factory
User group: Turn on/o.
Contacts sengs
You can set the storage, backup, restore, import, export feature for the contacts.
Also you can set Speed dial list.
Messaging sengs
Please refer to the Message chapter.
Extra Special Feature
Launcher
You can launch the launcher which you have set.
Lock
You can set the dierent lock screen style.
Home FX
You can set switching mode for the Home screen.
Downloads
You can look up downloading or completed apps, and also you can make the related operaons.
Appendix
If you are in an area not covered by your network, or if a physical obstacle is present, such as in an enclosed area, the message "No service" will be displayed on your Standby screen and you will not be able to make or receive calls. You can try move closer to a window for beer recepon.
For emergency only
When you are outside your network but inside other network, you can only make emergency call.
No Valid SIM card
Your SIM card is locked or it has an error. Please insert the right SIM card or contact your service provider.
Enter PUK code
Aer three consecuve incorrect PIN code entries, the code is blocked, and you need the PUK code to unblock it. Contact your service provider to secure the 8-digit PUK code. Aer ten consecuve incorrect PUK code entries, the SIM card cannot be used any more. Please contact your service provider to buy a new SIM card
Care & Maintenance
Thank you for choosing our phone. Should you encounter any problem with the phone, please contact our dealer or qualified service provider.
- Do not drop, crush or shake the phone to avoid damaging the internal circuit board.
- Do not use harsh chemicals, cleaning solvents or strong detergents to clean the phone.
- Do not paint the phone or the paint may obstruct the removable parts and aect operaon.
Use only the supplied or an approved replacement antenna. Unauthorized antennas, modicaons, or aachments could damage the phone. In addition, use of unauthorized antennas may result in non-compliance with the local regulatory requirements in your country.
The above instrucons apply to your phone, baery, charger and other accessories. If any of them does not work properly, please send it to a qualified service provider.
Service center number
No: +919560394002
Kindly note please send area code of place through SMS to this No. and in return you will get address of service center nearest to you by SMS.
- Note:
- EXAMPLE
- Your phone & Key parts
- Text Input Method
- SAR
- Safety precautions:
- Don'ts:
- Consequences of improper handling and disposal of E-Waste
- Installing and uninstalling baery
- Charging baery
- Warning:
- Using baery
- Installing and uninstalling SIM Card
- Direct dial
- Dialing from Contacts
- Unanswered call
- Answering a call
- Create and delete a contact entry
- Phonebook of SIM Card and your phone
- Message
- Write messages
- SMS
- MMS
- FM radio
- Movie
- Calendar
- Alarm
- Notes
- EBook
- Calculator
- World Clock
- Face Talk
- Games
- Sengs
- Network & connecvity
- Flight mode
- Connectivity sengs
- Bluetooth
- Cellular network sengs
- System
- Display sengs
- Date & Time sengs
- Language & input
- Advance sengs
- Contacts sengs
- Messaging sengs
- Extra Special Feature
- Launcher
- Lock
- Home FX
- Downloads
- Appendix
- For emergency only
- No Valid SIM card
- Enter PUK code
- Care & Maintenance
- Service center number
Brand : LAVA
Model : Discover 132
Category : Smartphone