Kids-Flix - Camera Hamilton Buhl - Free user manual and instructions
Find the device manual for free Kids-Flix Hamilton Buhl in PDF.

User questions about Kids-Flix Hamilton Buhl
0 question about this device. Answer the ones you know or ask your own.
Ask a new question about this device
Download the instructions for your Camera in PDF format for free! Find your manual Kids-Flix - Hamilton Buhl and take your electronic device back in hand. On this page are published all the documents necessary for the use of your device. Kids-Flix by Hamilton Buhl.
USER MANUAL Kids-Flix Hamilton Buhl
text_image
kids-flix™Kids-Flix™ Digital Camera for Early Learners
Model CAM18-KID Instruction Manual
natural_image
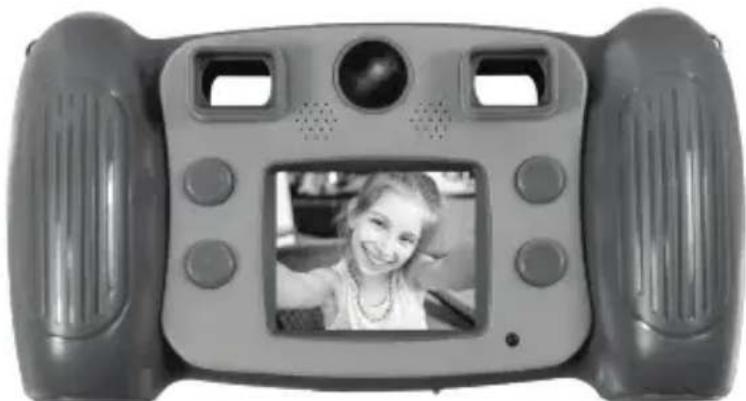
Black-and-white photo of a handheld game controller with a smiling child's face on screen (no text or symbols visible)Read this manual carefully and retain for future reference.
13 Hamilton Buhl
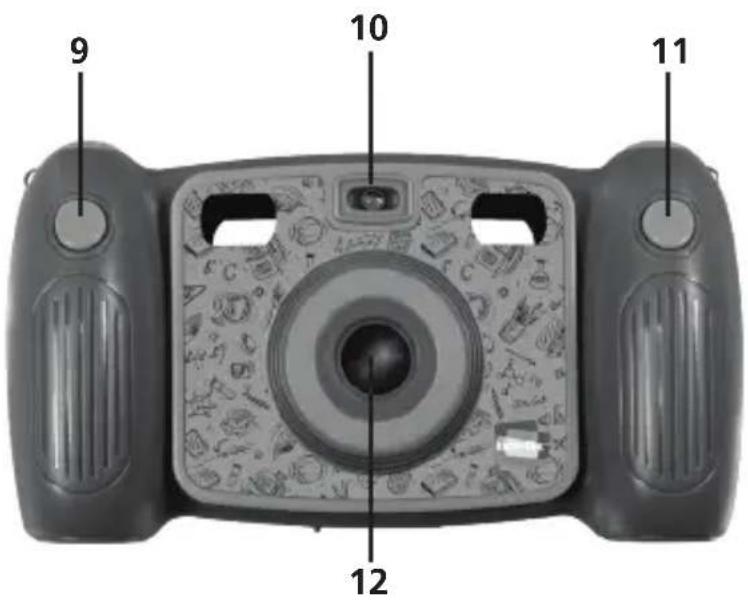
Camera Functions

text_image
1 2 3 4 5 6 7 82

- Power Button
- Page Up Button
- LCD Screen
- Active Indicator Light
- Page Down Button
- Mode Button
- Speaker
- Rear Lens
Camera Functions
text_image
9 10 11 12
- Photo Shoot Button
- Flash Light
- Video Record Button
- Front Lens
Camera Functions
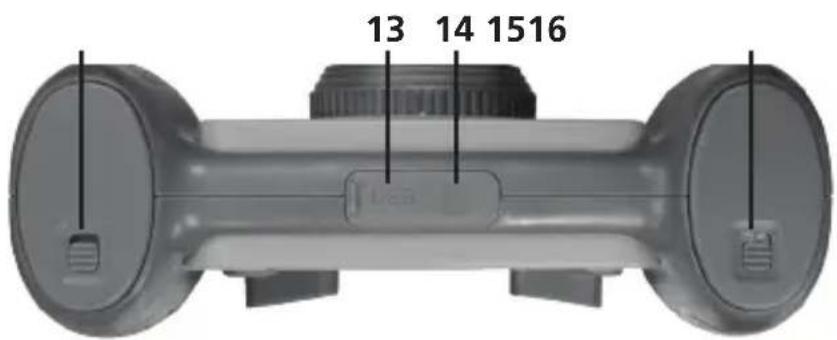
text_image
13 14 1516
natural_image
Mechanical component diagram with labeled dimension (17), no readable text or symbols beyond the number and number4

- Micro USB
- Micro SD or TF Card
- Battery Cover Lock Switch - A
- Battery Cover Lock Switch - B
- Microphone
How to Use
1. Insert Batteries
a. Open the spring-loaded battery compartment door; it will pop open. There are 2 battery compartments requiring a total of 4 batteries.
b. Insert 2 "AA" batteries in each compartment, making sure they are at correct polarities.

natural_image
Mechanical component with two circular ends and a central hub, shown with directional arrows indicating motion (no text or symbols)2. Memory Card
a. Insert a TF card into card slot at the bottom of the camera by pushing the card in firmly. Make sure the direction of the card is inserted correctly as it shows on rubber cover.
b. To remove the TF card, press the tip of the memory card firmly until the card is ejected.

natural_image
Top-down view of a gray cylindrical device with two circular ends and a small inset showing a card slot (no text or symbols visible)How to Use
Note: The camera is not equipped with built-in memory.
Please insert an external memory card before using.
3. Power On/Off
a. To Power On, press and hold down the Power button ⏻. The LCD screen will turn on.
b. To Power Off, press and hold down the Power button ⏻ for 3 seconds.

text_image
Diagram showing a pointing hand next to a digital camera and a digital display labeled 'kids-flix'c. Auto Screen Off: The screen will turn off automatically to save power.
d. Low Battery: When the battery is low, an icon will appear and start blinking, just before the camera powers off automatically.

4. Recording, Shooting Photos, Playback and System Settings
a. Recording
- When you turn on the camera, short-press the Video Record button 😊 to enter video recording mode. Short-press the Video Record button 😊 to START and short-press again to STOP recording.
- By default, the Zoom function is not active. When not active, press the Page Up or Page Down button to choose different image filters: Normal, B/W, Retro, Negative, Red, Green and Blue.
- If the Zoom function is active, press the Page Up button to zoom in and the Page Down button to zoom out. (To activate the Zoom function, see page 10.)
b. Shooting Photos
- Once the power is on, the camera will be in photo shooting mode. Short-press the Photo Shoot button again to capture your photo.
- To activate the self-timer function, long-press the Mode button Ⓜ.

How to Use
- In a low light area, turn on the flash by long-pressing the Record button.
- By default, the zoom feature is off. You can select different decorative picture frames to add to your photo by pressing the Page Up or Down button.
- When the zoom function is on, you can zoom in and zoom out by using the Page Up or Down buttons. (To activate the Zoom function, see page 10.)
c. Accessing Saved Files
- Press the Mode button Ⓜ to enter the Menu screen.
- Use Page Up or Page Down buttons to highlight the Playback option and press Mode button to select it.
- Once selected, you are in file view mode.
- Press the Page Up or Page Down button to select the desired file.
- To play a video, press the Mode button.
Then, press the Mode button again to stop playing the video and go back to the previous menu.


natural_image
Gray-scale icon set with five distinct play and game controller icons (no text or symbols)To Delete Files:
- Press the Page Up or Page Down button to select the desired file.
- Press the Record button 📁 to enter the delete menu option.
- Press the Mode button to select one or all files to delete.
- Use Page Up or Page Down to make your selection, then press Mode button to confirm.
- Select "Yes" or "No" to delete.
To exit to previous menu, short-press the Power button.
To View on Computer:
- Connect your camera to a computer using the supplied USB cable to view your captured videos and photos.

d. System Settings
Access system settings by pressing the Page Up or Page Down button. Then press the Mode button Ⓜ to confirm, then short-press the Power button to exit.
Settings:
• Resolution: 1M (1280x960), 3M (2048x1536), 5M (2592x1944)
• Movie Size: FHD (1920x1080), HD (1280x720), 640 (640x480)
- Zoom Switch: On/Off
- Beep: On/Off
• Power Frequency: 50Hz, 60Hz Power
• Power Save: 1 min., 3 mins., 5 mins., OFF
- Date Stamp: Off, Date, Date and Time
• Date and Time: Sets the Date and Time
• Language: Sets another language
- FW Version: Shows the current firmware version information
- Format: Erases all data on the SD Card
- Reset All: Resets settings of the camera to factory default

5. Connect to PC
Connect the powered-on camera to a computer with the USB cable and it will automatically switch to the removable hard disk. A removable disk icon will appear in the "My Computer" window. Pictures and video files are stored on the removable disk drive.
Note: During file downloading, DO NOT disconnect the USB or remove the memory card to avoid loss of data.
Specifications:
• Image sensor: 1.3 MP CMOS image sensor
• Function modes: Recording, Photo Shoot and Playback
• LCD screen: 2.0" LCD Screen
• Picture resolution: 1M (1280x960), 3M (2048x1536), 5M (2592x1944)
• Video resolution: FHD (1920x1080), HD (1280x720), 640 (640x480)
- Micro SD/TF card: maximum capacity 32GB
- USB Port: USB 2.0

Product Registration Instructions

text_image
1 YEAR WARRANTYVisit: www.HamiltonBuhl.com
- Click on Customer Care
- Click on Product Registration Icon
- Please fill out all fields marked with * to register
Warranty:
Warranty begins the date item ships from our warehouse. All products have a one year warranty from original date of shipment, unless otherwise noted.

text_image
13 Hamilton Buhl® Never-Ending Learning Innovation80 Little Falls Road
Fairfield, NJ 07004
1-800-631-0868
www.HamiltonBuhl.com