Little Brother - Unspecified Xcellon - Free user manual and instructions
Find the device manual for free Little Brother Xcellon in PDF.

User questions about Little Brother Xcellon
0 question about this device. Answer the ones you know or ask your own.
Ask a new question about this device
Download the instructions for your Unspecified in PDF format for free! Find your manual Little Brother - Xcellon and take your electronic device back in hand. On this page are published all the documents necessary for the use of your device. Little Brother by Xcellon.
USER MANUAL Little Brother Xcellon
ECT3-PCIE THUNDERBOLT™3 LITTLE BROTHER
Thunderbolt™ 3 PCIe Expansion Chassis
User Manual

natural_image
Exterior view of a gray rectangular electronic device with a perforated grille (no text or symbols visible)Thank you for choosing Xcellon.
The Xcellon Little Brother PCIe expansion chassis harnesses the power of Thunderbolt™ 3 to improve your workflow with data transfer speeds up to 40 Gb/s. It's an indispensable addition that gives your Thunderbolt-equipped computer extra muscle for data-intensive operations like video and photo editing, graphics, audio production, or other applications that require an additional PCIe card. In addition to delivering extra PCIe power, it supplies you with an additional Thunderbolt 3 port to daisy-chain five additional Thunderbolt devices or even add a second monitor to your setup.
Thunderbolt 3 Technology
Thunderbolt™ 3 brings Thunderbolt to USB-C at speeds up to 40 Gb/s, creating one compact port that does it all—delivering the fastest, most versatile connection to any dock, display, or data device. For the first time, one computer port connects to Thunderbolt devices, every display, and billions of USB devices. A single cable now provides four times the data and twice the video bandwidth of any other cable, while also supplying power. It's unrivaled for new uses, such as 4K video, single-cable docks with charging, external graphics, and faster-than-10 GbE networking. Simply put, Thunderbolt 3 delivers the best USB-C.
Precautions
» Please read and follow these instructions, and keep this manual in a safe place.
» Back up your data before using this product in order to prevent loss of important data. Xcellon will not be responsible for any data loss.
» Speed and performance may vary based on configuration and setup.
» Do not attempt to modify or repair the unit. Doing so will void the warranty, and Xcellon will not be responsible for any damage.
» If smoke or an unusual odor emanate from this device, immediately unplug it from the electrical outlet.
» Keep this product away from liquids. If liquid enters the device, immediately unplug it from the electrical outlet.
»Use only the correct, recommended voltage.
»Clean this product with only a soft, dry cloth.
» Do not store this product in direct sunlight or in extreme high or low temperatures.
»All images are for illustrative purposes only.
Overview
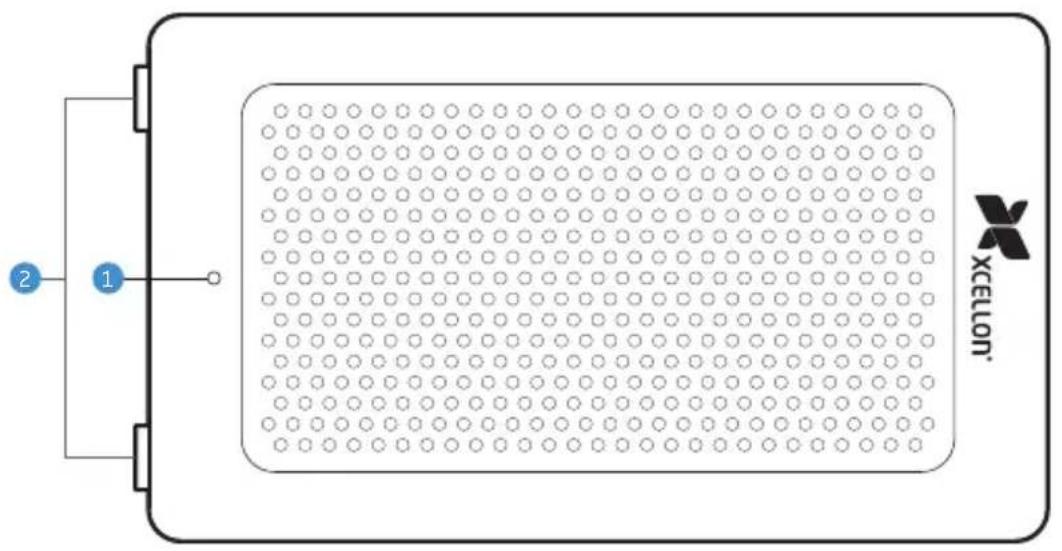
Front
1 Power LED
2 Rubber feet
text_image
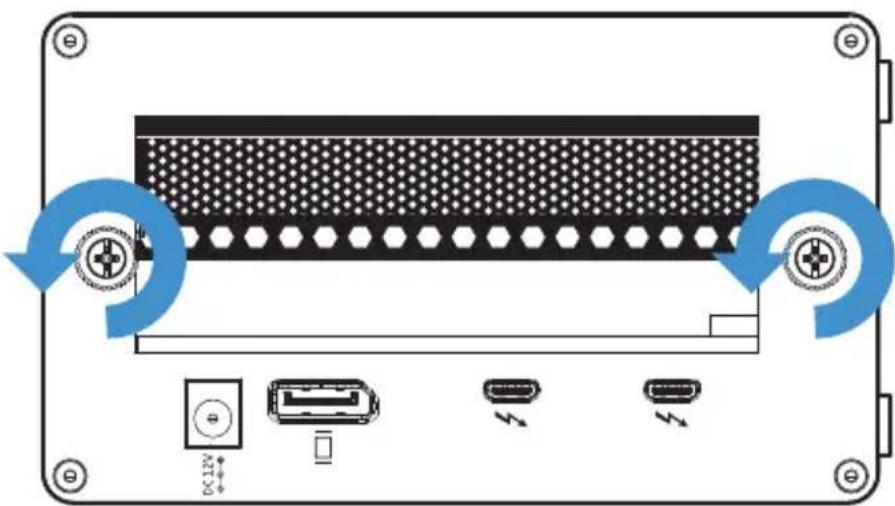
2 1 XCELLONBack
3 PCIe slot cover
4 Chassis thumbscrews
5 DC power input
6 DisplayPort
7 Thunderbolt 3 ports

text_image
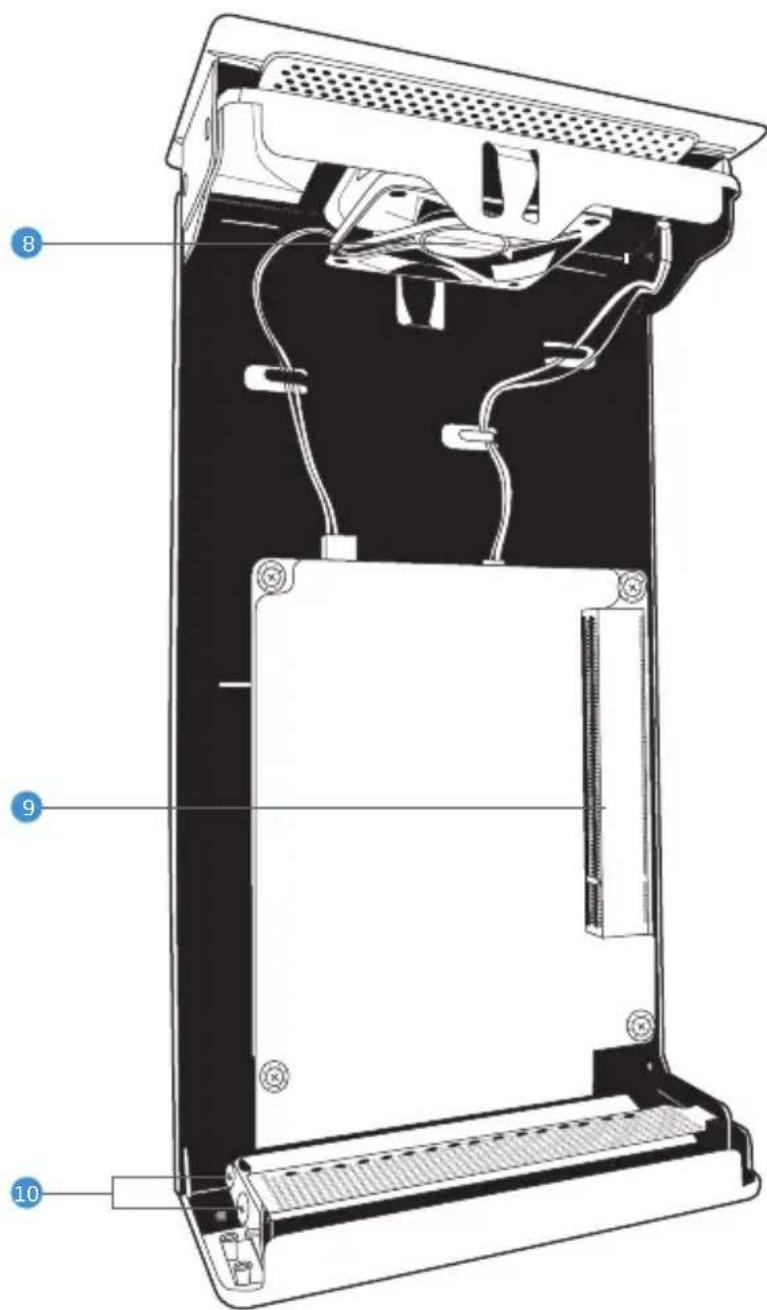
3 4 5Inside
8 Fan
9 PCIe 3.0 card slot
10 Securing screws
text_image
Technical diagram of an electronic device with numbered parts labeled 8, 9, and 10Additional Contents
»Rubber feet for horizontal setup (×4)
»Power adapter
»Power cord
»Thunderbolt 3 cable
Installing a PCIe Card
The Little Brother supports half-length, full-height, and double-width PCIe cards with a maximum length of 220 mm.
Before You Begin
! Static electricity discharge can damage the Little Brother and other electronic components. Always wear an antistatic wrist strap when working inside the unit.
Important! Handle PCIe cards by their edges, and do not touch the connector pins.
Preparing Your Computer
The Little Brother doesn't need its own drivers. Not all PCIe cards require drivers to be operable.
For cards that require drivers, the drivers you install must be Thunderbolt aware.
Mac Computers
The necessary drivers that support the Little Brother are included as part of macOS. Make sure you have upgraded to the latest version of the operating system (10.12 or higher).
PC Computers
Windows computers may require the latest BIOS and Thunderbolt drivers to support this product. Go to your computer manufacturer's website for information on downloading and installing the necessary drivers.
Installing the Card
! PCIe cards are not hot-pluggable. To avoid damaging your card, the chassis, and your computer, do not install a PCIe card into the Little Brother, or swap cards, while the Little Brother is connected to your computer or a power outlet.
The Little Brother is not designed for use with graphics cards.
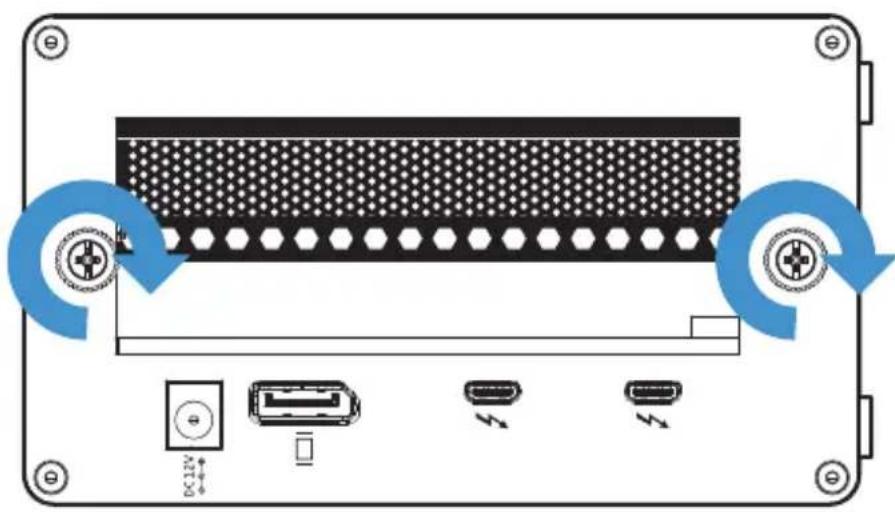
1 Loosen the thumbscrews until they pop out. Note that the thumbscrews cannot be removed from the chassis.
natural_image
Diagram of a computer RAM module with ports and connectors, showing no text or symbols2 Remove the chassis from the housing by pulling the front panel and sliding the chassis out of the housing.
- Important! Do not remove the plastic layer that protects the internal board.

natural_image
Diagram of a microwave oven with a ventilation grille and internal circuit breakers (no text or symbols)3 Place the chassis on its side so the PCIe card slot is facing up.
4 Remove the securing screw. (For double-width cards, remove the second securing screw and the slot cover.

natural_image
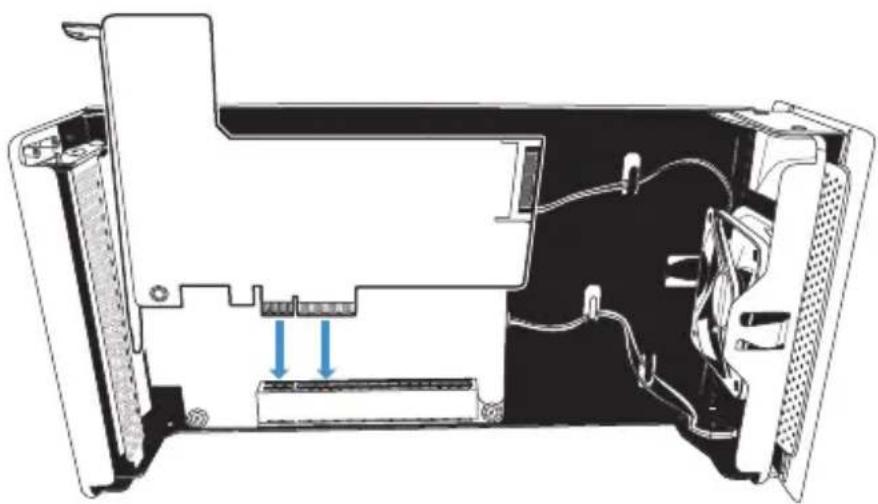
Cross-sectional diagram of a computer monitor case showing internal components and wiring (no text or labels)5 Align the connectors on the card with the card slot. Press the card down until it's fully seated.
- Important! The PCIe card should fit easily into the card slot. Don't use excessive force to press the card down into the slot.
natural_image
Cross-sectional diagram of a computer chassis showing internal components and ventilation ducts (no text or labels)6 Align the metal tab with the securing screw hole, and replace the screw. The PCIe card is now installed.
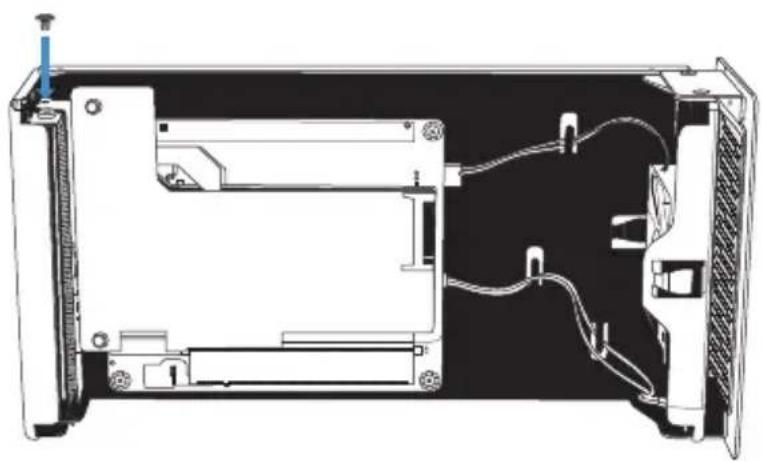
natural_image
Technical line drawing of an open computer case with internal components and ventilation duct (no text or symbols)7 Slide the chassis back into the housing. Press in the thumbscrews, and tighten until secure.
natural_image
Diagram of an electronic device rear panel with ports and connectors, showing no text or symbolsConnecting the Little Brother to a Computer
Use the included Thunderbolt 3 cable to connect one of the Little Brother's Thunderbolt 3 ports to a Thunderbolt port on your computer.
! Important! The Little Brother is equipped with a full-featured 4-lane Thunderbolt 3 interface. Some computers use a 2-lane, 20 Gbps connection for their Thunderbolt 3 ports. Check your computer's documentation to determine the capability of its ports.
Thunderbolt 3 Cables
To ensure full performance of 40 Gb/s max data transfer speeds, a full-performance Thunderbolt 3 cable is included with the Little Brother.
A full-performance Thunderbolt 3 cable is identified by the Thunderbolt icon and the numeral 3 on the connector.
A Thunderbolt 3 cable without the number 3 will support speeds up to 20 Gb/s and is not recommended for PCIe cards with high-bandwidth requirements.
Connecting and Daisy-Chaining Devices
The second Thunderbolt 3 port can connect to a diverse array of Thunderbolt 3, USB, and DisplayPort devices.
Up to 6 Thunderbolt devices (5 in addition to the Little Brother) can be daisy-chained to the Thunderbolt 3 port.
Note: Some devices' performance will be affected by where they are placed in the chain. If a device toward the end of the chain is affected, moving it up to the first position may solve the problem.
Connecting Monitors
The Little Brother can be used to connect one or two displays to your computer.
In the following examples, the highest supported resolution is listed for each configuration. However, max resolutions supported are still subject to the capabilities of your computer's GPU. Additionally, the Thunderbolt 3 connection has a finite amount of bandwidth, and using displays at higher resolutions may severely limit how much of that bandwidth is available for the PCIe card. If this is a concern in your setup, we recommend limiting display resolutions to 4K @ 60Hz or lower.
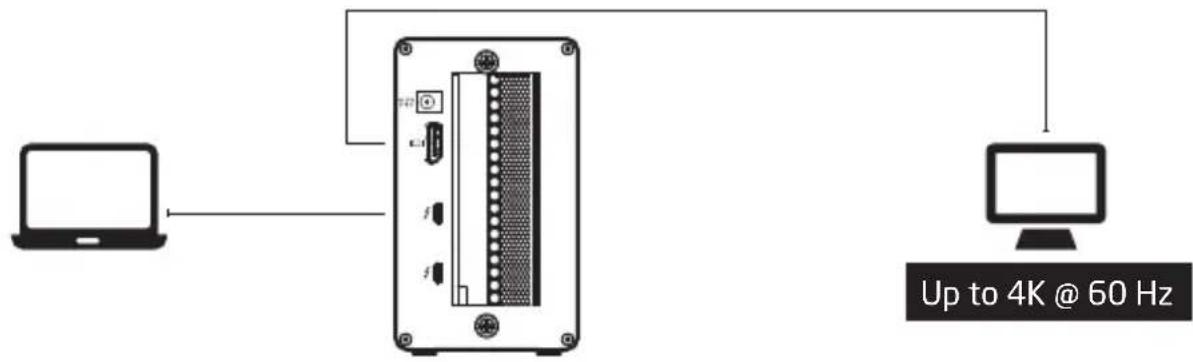
Figure A
A single display can be connected through the dedicated DisplayPort.
flowchart
graph TD
    A["Laptop"] --> B["USB Port"]
    B --> C["Up to 4K @ 60 Hz"]
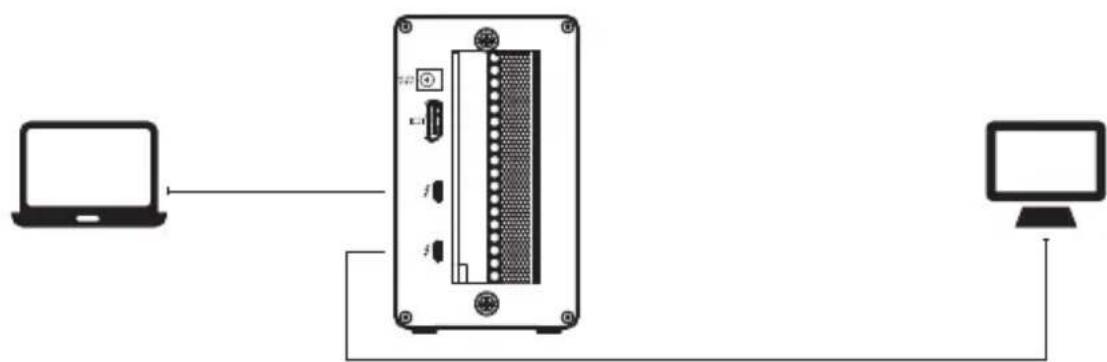
Figure B
A single display can be connected through the 2nd Thunderbolt 3 port.
flowchart
graph TD
    A["Laptop"] --> B["Device with I/O ports"]
    B --> C["Computer"]
Monitors with dual DisplayPort inputs: A Thunderbolt 3 to dual-display adapter is required for maximum resolution.
Figure C
Two displays can be connected through a combination of the dedicated DisplayPort and the 2nd Thunderbolt 3 port.

flowchart
graph LR
    A["Laptop"] --> B["Device"]
    B --> C["Up to 4K @ 60 Hz"]
    B --> D["Up to 4K @ 60 Hz"]
    C --> E["Computer"]
    D --> F["Computer"]
Figure D
Two displays can be connected to the 2nd Thunderbolt 3 port with a Thunderbolt 3 to dual-display adapter.
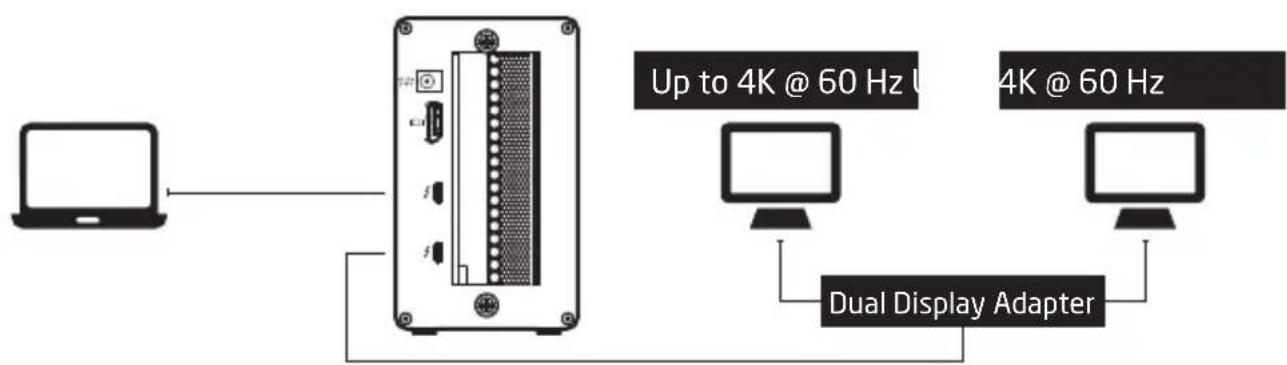
flowchart
graph LR
    A["Laptop"] --> B["Server"]
    B --> C["Dual Display Adapter"]
    C --> D["Monitor 1"]
    C --> E["Monitor 2"]
    B --> F["Up to 4K @ 60 Hz U"]
    B --> G["4K @ 60 Hz"]
Specifications
| Design | Can be used in vertical or horizontal orientation |
| Interface | DisplayPort 1.2 ^1 PCIe 3.0 (Internal) |
| PCIe Slot | Supports half-length, full-height, double-width cards (max length: 220 mm)Supplies up to 25 W of power ^2 |
| Data Transfer Rate | |
| AC Power Adapter | -60 HzOutput: 12 V DC / 5.417 A (65 W) |
| Power Delivery | |
| Display Output (Maximum of 2 Displays) | to 4K @ 60 Hz ^3 |
| Cooling Fan Size | |
| Cooling Fan Noise Level (Maximum) | dB(A) |
| System Requirements | macOS 10.12 or laterWindows 7 or later ^4 |
| Cable Length | |
| Environment | Operating Temperature: 5°C to 35°C (41°F to 95°F)Operating Humidity: 20%RH to 80%RHSstorage Temperature: -20°C to 50°C (-4°F to 122°F)Storage Humidity: 20%RH to 80%RH |
| Dimensions(L × W × H) | 11.14 × 5.51 × 3.23 in.(28.3 × 14 × 8.2 cm) |
| Weight | (1.6 kg) |
^1 DisplayPort connection does not support DP++. If converting from DP to HDMI, an active adapter is needed.
^2 Not intended for use with graphics cards.
^3 Higher resolutions are supported but may limit PCIe card performance.
^4 Windows computers require the latest BIOS and Thunderbolt drivers to support this product.
One-Year Limited Warranty
This XCELLON product is warranted to the original purchaser to be free from defects in materials and workmanship under normal consumer use for a period of one (1) year from the original purchase date or thirty (30) days after replacement, whichever occurs later. The warranty provider's responsibility with respect to this limited warranty shall be limited solely to repair or replacement, at the provider's discretion, of any product that fails during normal use of this product in its intended manner and in its intended environment. Inoperability of the product or part(s) shall be determined by the warranty provider. If the product has been discontinued, the warranty provider reserves the right to replace it with a model of equivalent quality and function.
This warranty does not cover damage or defect caused by misuse, neglect, accident, alteration, abuse, improper installation or maintenance. EXCEPT AS PROVIDED HEREIN, THE WARRANTY PROVIDER MAKES NEITHER ANY EXPRESS WARRANTIES NOR ANY IMPLIED WARRANTIES, INCLUDING BUT NOT LIMITED TO ANY IMPLIED WARRANTY OF MERCHANTABILITY OR FITNESS FOR A PARTICULAR PURPOSE. This warranty provides you with specific legal rights, and you may also have additional rights that vary from state to state.
To obtain warranty coverage, contact the Xcellon Customer Service Department to obtain a return merchandise authorization ("RMA") number, and return the defective product to Xcellon along with the RMA number and proof of purchase. Shipment of the defective product is at the purchaser's own risk and expense.
For more information or to arrange service, visit www.xcellongear.com or call Customer Service at 212-594-2353.
Product warranty provided by the Gradus Group.
www.gradusgroup.com
Xcellon is a registered trademark of the Gradus Group.
© 2018 Gradus Group LLC. All Rights Reserved.
Thunderbolt and the Thunderbolt logo are trademarks of Intel Corporation in the U.S. and/or other countries.