
LTH02 - Camera Lorex - Free user manual and instructions
Find the device manual for free LTH02 Lorex in PDF.

| Product Type | Security Camera |
| Model | LTH02 |
| Brand | Lorex |
| Image Sensor | 2 MP CMOS |
| Resolution | 1920 x 1080 (Full HD) |
| Night Vision | Up to 30 m (IR LEDs) |
| Field of View | 90° (H) x 50° (V) |
| Dimensions (L x W x H) | 70 x 70 x 120 mm |
| Weight | 350 g |
| Power Supply | DC 12V / PoE (802.3af) |
| Power Consumption | Max 6 W |
| Weather Rating | IP67 (Outdoor use) |
| Motion Detection | Yes, configurable zones |
| Audio | Two-way audio (built-in mic & speaker) |
| Storage | MicroSD card (up to 128 GB) & NVR |
| Connectivity | Ethernet (RJ-45) / Wi-Fi (2.4 GHz) |
| Operating Temperature | -30°C to 50°C |
| Maintenance | Clean lens with microfiber cloth; keep housing dry |
| Safety | Use supplied power adapter; avoid exposure to liquids unless rated |
| Spare Parts / Repairability | Contact Lorex support for replacement parts; not user-serviceable |
Frequently Asked Questions - LTH02 Lorex
User questions about LTH02 Lorex
0 question about this device. Answer the ones you know or ask your own.
Ask a new question about this device
Download the instructions for your Camera in PDF format for free! Find your manual LTH02 - Lorex and take your electronic device back in hand. On this page are published all the documents necessary for the use of your device. LTH02 by Lorex.
USER MANUAL LTH02 Lorex
Handheld Thermal Temperature Monitoring Camera
Manual LTH02 Series
lorex.com
EN
Foreword
General
This manual introduces the appearance and basic operations of the handheld thermal temperature monitoring camera (hereinafter referred to as "the Camera").
Safety Instructions
The following categorized signal words with defined meaning might appear in the manual.
| Signal Words | Meaning | |
 | DANGER | Indicates a high potential hazard which, if not avoided, will result in death or serious injury. |
 | WARNING | Indicates a medium or low potential hazard which, if not avoided, could result in slight or moderate injury. |
 | CAUTION | Indicates a potential risk which, if not avoided, could result in property damage, data loss, lower performance, or unpredictable result. |
 | TIPS | Provides methods to help you solve a problem or save you time. |
 | NOTE | Provides additional information as the emphasis and supplement to the text. |
Revision History
| Version | Revision Content | Release Time |
| V1.0.0 | First release. | July 2020 |
About the Manual
- The manual is for reference only. If there is inconsistency between the manual and the actual product, the actual product shall prevail.
- We are not liable for any loss caused by the operations that do not comply with the manual.
- The manual would be updated according to the latest laws and regulations of related jurisdictions. For detailed information, refer to the paper manual, CD-ROM, QR code or our official website. If there is inconsistency between paper manual and the electronic version, the electronic version shall prevail.
- All the designs and software are subject to change without prior written notice. The product updates might cause some differences between the actual product and the manual. Please contact the customer service for the latest program and supplementary documentation.
- There still might be deviation in technical data, functions and operations description, or errors in print. If there is any doubt or dispute, we reserve the right of final explanation.
- Upgrade the reader software or try other mainstream reader software if the manual (in PDF format) cannot be opened.
- All trademarks, registered trademarks and the company names in the manual are the properties of their respective owners.
- Please visit our website, contact the supplier or customer service if there is any problem occurring when using the device.
- If there is any uncertainty or controversy, we reserve the right of final explanation.
Important Safeguards and Warnings
This chapter describes the contents covering proper handling of the Camera, hazard prevention, and prevention of property damage. Read these contents carefully before using the Camera, comply with them when using, and keep it well for future reference.
Power Requirements
- All installation and operation should conform to your local electrical safety code.
- Check whether the power supply is correct before operating the Camera.
- The power source shall conform to the requirement of the Safety Extra Low Voltage (SELV) standard, and supply power with rated voltage which conforms to Limited power Source requirement according to IEC60950-1. Note that the power supply requirement is subject to the Camera label.
- Install easy-to-use devices for power off before installing wiring, which is for emergent power off when necessary.
- Prevent the line cord from being trampled or pressed, especially the plug, power socket and the junction from the Camera.

- Risk of explosion if the battery is replaced by an incorrect type.
- Replacement of a battery with an incorrect type that can defeat a safeguard (for example, in the case of some lithium battery types).
- Disposal of a battery into fire or a hot oven, or mechanically crushing or cutting of a battery can result in an explosion.
-
High or low extreme temperatures that a battery can be subjected to during use, storage or transportation; and low air pressure at high altitude.
-
Leaving a battery in an extremely high temperature surrounding environment that can result in an explosion or the leakage of flammable liquid or gas.
A battery subjected to extremely low air pressure that may result in an explosion or the leakage of flammable liquid or gas.
Application Environment Requirements
- Use the Camera within the allowed humidity and altitude.
- Do not use the Camera in the strong vibration environment such as in boats and vehicles.

If you still want to use thermal cameras in the two conditions mentioned above, please contact our sales staff to buy cameras of special model or cameras that are customized. If you use cameras in improper environments, we shall not take the costs of camera damage.
- There is a default temperature monitoring range of targets for the Camera. Use the Camera within the range.
- Use the Camera within the required working temperature and humidity.
- Do not place the Camera in the humid, dusty, extremely hot and cold site with strong electromagnetic radiation or unstable illumination.
- Do not block the ventilation of the Camera to avoid heat accumulation.
-
Do not install the Camera near the heat source such as radiator, heater, and stove to avoid fire.
-
Do not aim the lenses at intense radiation source (such as sun, laser, and molten steel) to avoid damage to thermal detector and visible lens.
- Prevent liquid from flowing into the Camera to avoid damage to the internal components. In case the liquid entering the Camera, immediately stop using the Camera, cut off the power, and disconnect all the cables. Then contact the local customer service center.
- Do not stuff foreign materials into the Camera to prevent short circuit which could cause Camera damage or injury.
- Use the factory default package or material with equal quality to pack the Camera when transporting the Camera.
- Do not press, vibrate or soak the Camera during transportation, storage and installation.
Operation and Maintenance Requirements
- Do not touch the heat dissipation component of the Camera in case you might get burnt.
- Do not dismantle the Camera; there is no part which can be repaired by users themselves. It may cause water leakage or bad image for the Camera if it is dismantled unprofessionally.
- It is recommended to use the Camera together with a lightning arrester, which is to improve the effect of lightning protection. It needs to conform to the lightning protection regulation for outdoor application.
- Do not touch the photosensitive Camera with your hands. Use an air blower to clean the dust on the lens. For further cleaning, pour a little alcohol into a piece of dry cloth with which you can softly wipe the dirt away.
- Clean Camera body with a piece of soft dry cloth. For any dirt hard to remove, pick up a piece of clean and soft cloth, dip it with a little neutral detergent and gently wipe the dust away—after that, wipe all the liquids on the Camera away with another dry cloth. Never use any volatile solvent such as alcohol, benzene and thinner, or any cleaner that is strong and abrasive. Otherwise, the Camera's surface coating will be hurt and its working performance will be encumbered.
WARNING
- Use the accessories regulated by the manufacturer. The Camera should be installed and maintained by professionals.
- Contact the local dealer or the nearest service center if the Camera fails to work normally. Do not dismantle or modify the Camera.
Table of Contents
Foreword ....
Important Safeguards and Warnings....II
1 Checking the Package.... 1
2 Structure.... 2
2.1 Dimensions.... 2
2.2 Appearance.... 2
3 Basic Operations....5
3.1 Live Interface....5
3.2 Installing SD Card....6
3.3 Capturing Images....6
3.4 Recording Videos....6
3.5 Viewing Images....6
3.6 Viewing Recorded Videos....6
3.7 Exporting Images and Recorded Videos....7
3.8 Upgrade....7
3.9 Auto Maintenance....8
4 Temperature Monitoring Configuration....9
4.1 Temperature Settings....9
4.2 Temperature Monitoring Settings.... 10
5 System Settings....11
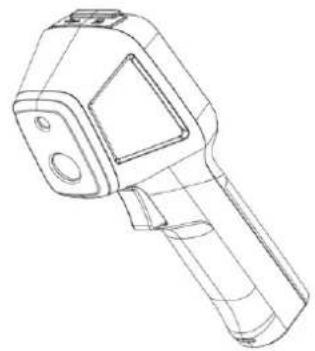
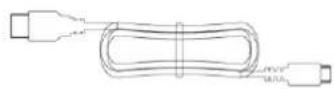
1 Checking the Package
Check the package according to the following checklist. If you find device damage or any loss, contact the after-sales service.
Figure 1-1 Package items
natural_image
Line drawing of a handheld electronic device (no text or symbols)1

2
3

4

5
Table 1-1 Package items
| No. | Name | No. | Name |
| 1 | The Camera | 2 | Adapter Five plugs are provided for Chinese, American, European, Australian, and British standards. Five plugs are provided for Chinese, American, European, Australian, and British standards. |
| 3 | USB cable | 4 | Quick start guide |
| 5 | Wrist rope | — | — |
2 Structure
2.1 Dimensions
Figure 2-1 Dimensions (mm [inch])
![62.5[2.46] 192.4[7.58] 73.4[2.89]](/content/2026/06/1194532/images/77e32b1b324eb85526561f1ed849280f1735959ed324d902b791d962eb5eb2f8.jpg)
2.2 Appearance
Front Panel
Figure 2-2 Front panel
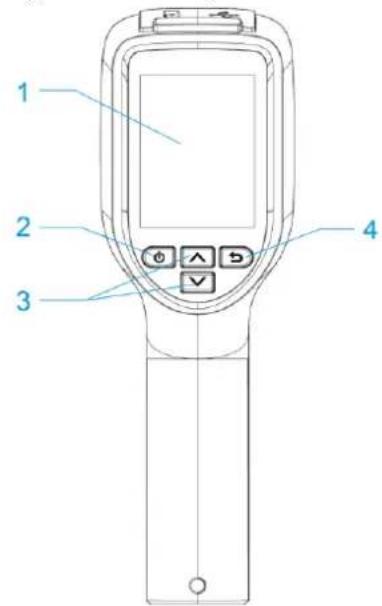
Table 2-1 Front panel description
| No. | Component | Description |
| 1 | Display screen | Displays live interface and menu interface. |
| 2 | Power button | Press and hold the power button to power on or off the Camera.On the live interface, press the power button, and the Camera goes to the standby state; under standby state, press any button to wake up the Camera.On the menu interface, press the power button to go to the submenu interface. |
| 3 | Up/Down buttons | On the live interface, press the up button to go to the menu interface.On the menu interface, press the up or down buttons to select parameters. |
| 4 | Back button | Exit or return to the previous menu. |
Side Panel
Figure 2-3 Side panel
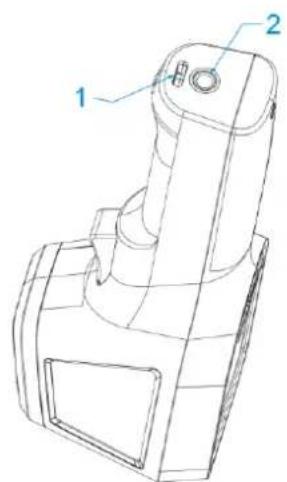
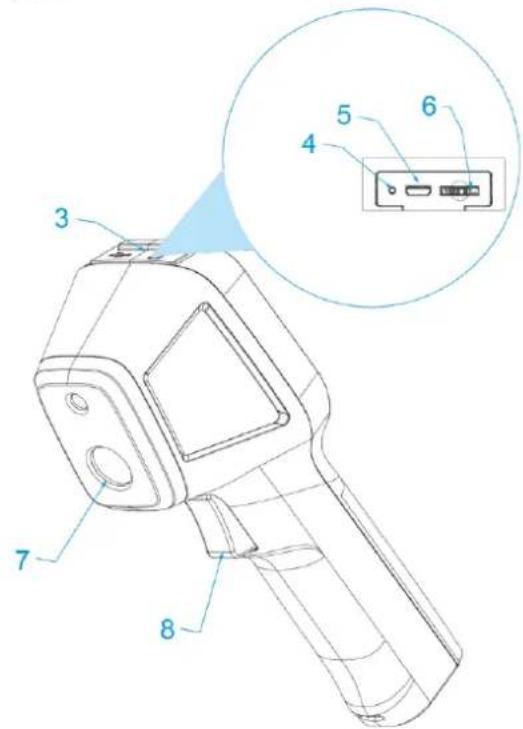
Table 2-2 Side panel description
| No. | Component | Description |
| 1 | Wrist rope hole | Used for threading wrist rope. |
| 2 | Tripod port | Used for installing a tripod. |
| 3 | Silicon plug | — |
| 4 | Charging indicator light | Charging: Red light on.Full charging: Green light on.The battery can be recharged repeatedly, but it is a wearable product. If the standby time of the Camera has been greatly reduced, please contact the after-sales support to replace the battery. |
| 5 | USB port | Used for connecting the USB cable. |
| 6 | SD card slot | Used for installing a SD card. |
| 7 | Thermal lens | Used for monitoring. |
| 8 | Trigger button | On the live interface, press the button twice to capture images.On the live interface, press the button 3 times to start recording, and then press 3 times to stop recording.On the menu interface, press the button to return to the live interface.Under standby state, press the button to wake up the Camera. |
3 Basic Operations

Interfaces might vary with models and the actual interface shall prevail.
3.1 Live Interface
Figure 3-1 Live interface
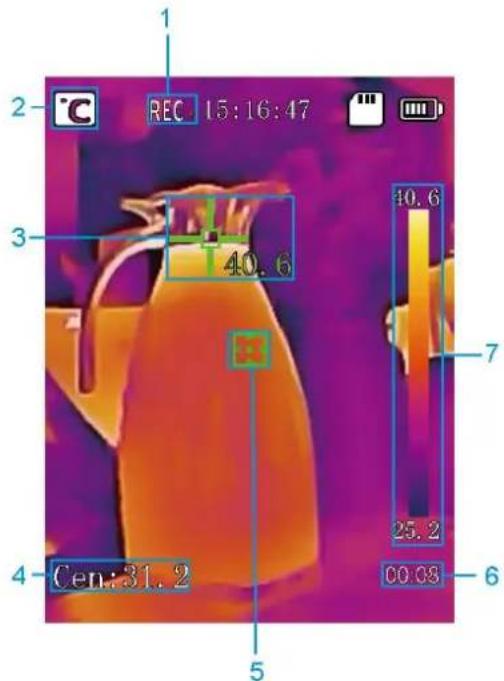
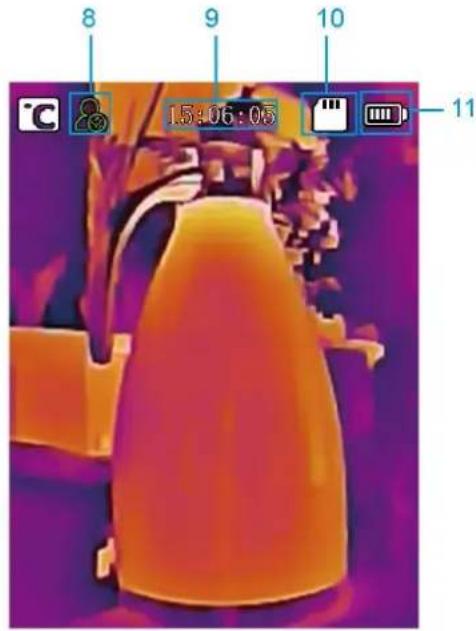
Table 3-1 Live interface
| No. | Name |
| 1 | Recording videos. |
| 2 | Temperature unit. |
| 3 | Highest temperature spot. |
| 4 | Center spot temperature monitoring. |
| 5 | Center spot cursor. |
| 6 | Recording duration. |
| 7 | Color bar. |
| 8 | Head detection mode. |
| 9 | Time display. |
| 10 | SD card status. |
| 11 | Battery status. |
3.2 Installing SD Card
If you want to store images and recorded videos, you need to purchase and install an SD card first.
Step 1 Open the silicone plug on the top of the Camera.
Step 2 Face the label side of the SD card to the camera screen, and then insert the SD card slowly until you hear a click sound.
Step 3 Cover the silicone plug.

The SD card does not support hot swapping during image capturing or recording.
3.3 Capturing Images
You can capture images manually and record temperature monitoring information.
In the live interface, press the trigger button twice to capture an image, and the image will be automatically saved to the SD card.

If no SD card is installed, a prompt is displayed indicating that there is no SD card after the capturing operation.
3.4 Recording Videos
You can record videos manually.
In the live interface, press the trigger button 3 times to start recording, and then press 3 times to stop recording. The recorded videos will be automatically saved to the SD card.

If no SD card is installed, a prompt is displayed indicating that there is no SD card after the recording operation.
3.5 Viewing Images
On the live interface, press to go to the view images.
Picture Search interface, and then press to
- On the View Picture interface, press /to switch images.
- Press to delete the selected images.
3.6 Viewing Recorded Videos
On the live interface, press twice to go to the
Video Search interface, and then press
to view recorded videos.
- On the View Video interface, press /to switch videos.
- Press to delete the selected videos.

Video playback on the Camera is not supported. To play back the recorded videos, you can copy them to your PC.
3.7 Exporting Images and Recorded Videos
You can export images and recorded videos locally.
Step 1 On the live interface, press, and the Menu interface is displayed.
Step 2 Press to select System Settings, and then press and the System Settings interface is displayed.
Step 3 Select USB Option, and then press and the USB Option interface is displayed.
Step 4 Press to select USB Flash Drive Mode, and then press to confirm.
Step 5 Open the silicone plug on the top of the Camera.
Step 6 Connect the Camera to your PC with the USB cable.
Step 7 Go to the folder where the images and recorded videos are stored, and then copy the images and recorded videos to your PC.
Step 8 Disconnect the USB cable from your PC after copy.
3.8 Upgrade
You can upgrade the Camera through SD card.
Prerequisites
- The upgrade program named "update.img" has been obtained and saved in the root directory of the SD card.
- The SD card is installed on the Camera. See "3.2 Installing SD Card".
- Ensure that the battery capacity exceeds 50% during the upgrade. You can charge the Camera by connecting to a computer or charger.
Procedure
Step 1 Turn off the Camera.
Step 2 Press and hold and buttons at the same time to start upgrade.

- Be patient and do not perform other operations during the upgrade.
- Do not disconnect the power supply during the upgrade; otherwise the device might not be able to start.
After the upgrade, the Camera will restart automatically, and then go to the live interface.
Step 3 (Optional) To back up the new program, turn off and then restart the Camera again. The Camera will back up the program automatically during the restart. Wait until the Camera goes to the live interface.

- Do not perform any operation during the backup.
- The Camera will be automatically restored to the backup program if the upgrade is failed.
3.9 Auto Maintenance
Step 1 On the live interface, press to go to the Menu interface.
Step 2 Select System Settings > Auto Maintain, and the Auto Maintain interface is displayed.
You can set auto standby time and auto shutdown time of the Camera.
- Auto Standby
Press to switch and select time. You can set the auto standby time to 1 minute, 2 minutes, 5 minutes, 10 minutes, or off.
- Auto Shutdown
Press to select Auto Shutdown, and then press to switch and select time. You can set the auto shutdown time to 5 minutes, 10 minutes, 15 minutes, 30 minutes, or off.
4 Temperature Monitoring Configuration

- Interfaces might vary with models and the actual interface shall prevail.
- The following cases will reduce battery life: Enabling head temperature monitoring, sound alarm linkage, snapshot linkage, and video recording.
4.1 Temperature Settings
The Camera supports monitoring the real-time temperature of target objects in different scenarios. Temperature monitoring parameters affect the accuracy of monitoring results. You need to configure temperature monitoring parameters before temperature monitoring.
Step 1 On the live interface, press , and the Menu interface is displayed.
Step 2 Select Temp Settings, and then press and the Temp Settings interface is displayed.
Step 3 (Optional) Select Centre Spot, and then press to enable or disable the function.
When the Centre Spot is enabled, the centre spot cursor will be displayed at the center of the live interface. And the monitored temperature of the center spot will be displayed at the lower-left corner of the live interface.
Step 4 (Optional) Press to select Color Bar, and then press to enable or disable the function.
When the Color Bar is enabled, the color bar will be displayed at the right side of the live interface.
Step 5 Configure temperature monitoring parameters.
- Press /to select parameters.
- Press to confirm.
- On the parameter configuration interface, press to increase or decrease the parameter value.
Table 4-1 Temperature parameter description
| Parameter | Description |
| Pseudo Color | Press to switch to pseudo color mode. |
| Emissivity | Set emissivity for different monitoring targets as needed. The default value is 0.98. |
| Distance | The distance between the monitoring target and the Camera.Ensure that the actual distance is consistent with this value, otherwise it will affect the temperature monitoring accuracy. |
| Unit | Temperature unit. Supports° C,° F and K. |
Step 6 Press to save the configuration and quit.
4.2 Temperature Monitoring Settings
The Camera supports temperature monitoring. An alarm will be triggered when the temperature of the monitoring target exceeds the alarm threshold.
Monitoring method includes Max Temp Point and Head Detection.
Step 1 On the live interface, press, and the Menu interface is displayed.
Step 2 Press to select Temp Settings, and then press and the Temp Monitor interface is displayed.
Step 3 Select Skin Temp Monitor, and then press
Step 4 Press / to select a monitoring method, and then press to confirm.
Step 5 Configure temperature monitoring parameters.
- Press / to select parameters.
- Press to confirm.
- On the parameter configuration interface, press to increase or decrease the parameter value.
Table 4-2 Parameter description of temperature monitoring
| Parameter | Description |
| Alarm Settings | Alarm Threshold: Set the alarm threshold value. An alarm will be triggered when the temperature of the monitoring target exceeds the alarm threshold. On the live interface, the temperature that exceeds the alarm threshold flashes and is displayed in red.Snapshot: Set whether to enable snapshot when an alarm is triggered.Buzzer: Set whether to beep when an alarm is triggered.Enabling snapshot or buzzer will reduce the battery life of the Camera. |
| EnvTemp Mode | Set ambient temperature mode.Self-adaptive Mode: The Camera calculates the ambient temperature automatically. SelectSelf-adaptive Mode, and then press to set the current ambient temperature as the reference temperature.Manual Mode: Set the current ambient temperature manually. |
| Temp Correction | The difference of the temperature monitoring environment might cause the temperature deviation between the monitored temperature and the actual temperature. You can select multiple monitored samples for testing, and then correct the temperature deviation by this parameter according to the comparison between the monitored temperature and the actual temperature. For example, if the monitored temperature is 0.5°C lower than the actual temperature, the correction value is set to 0.5°C; if the monitored temperature is 0.5°C higher than the actual temperature, the correction value is set to -0.5°C. |
Step 6 Press to save the configuration and quit.
5 System Settings
On the live interface, press to go to the Menu interface. Press /to select System Settings, and then press and the System Settings interface is displayed. You can configure USB options, time and date, screen brightness, auto maintenance, restore defaults and restart the Camera. For details, see the user's manual.
- Handheld Thermal Temperature Monitoring Camera
- Foreword
- General
- Safety Instructions
- Revision History
- About the Manual
- Important Safeguards and Warnings
- Power Requirements
- Application Environment Requirements
- Operation and Maintenance Requirements
- WARNING
- Table of Contents
- Foreword ....
- Important Safeguards and Warnings....II
- Checking the Package.... 1
- Structure.... 2
- Basic Operations....5
- Temperature Monitoring Configuration....9
- System Settings....11
- Checking the Package
- Structure
- Dimensions
- Appearance
- Side Panel
- Basic Operations
- Live Interface
- Installing SD Card
- Capturing Images
- Recording Videos
- Viewing Images
- Viewing Recorded Videos
- Exporting Images and Recorded Videos
- Upgrade
- Prerequisites
- Procedure
- Auto Maintenance
- Temperature Monitoring Configuration
- Temperature Settings
- Temperature Monitoring Settings
- System Settings
Brand : Lorex
Model : LTH02
Category : Camera