CST1162 - Steam cleaner Salton - Free user manual and instructions
Find the device manual for free CST1162 Salton in PDF.

User questions about CST1162 Salton
0 question about this device. Answer the ones you know or ask your own.
Ask a new question about this device
Download the instructions for your Steam cleaner in PDF format for free! Find your manual CST1162 - Salton and take your electronic device back in hand. On this page are published all the documents necessary for the use of your device. CST1162 by Salton.
USER MANUAL CST1162 Salton
professional steamer

natural_image
Black-and-white photo of a salton vacuum cleaner with attached hose and control lever (no text or symbols visible)Instruction Booklet
Model: SF-407
IMPORTANT SAFEGUARDS
When using electrical appliances, basic safety precautions should always be followed including the following:
- Read all instructions.
- Do not touch hot surfaces. Use handles or knobs.
- To protect against electrical hazards, do not immerse cord, plugs, or the appliance in water or other liquid.
- Close supervision is necessary when any appliance is used by or near children.
- Unplug from outlet when not in use and before cleaning. Allow to cool before putting on or taking off parts, and before cleaning the appliance.
- Do not operate any appliance with a damaged cord or plug or after the appliance malfunctions, or has been damaged in any manner. Return appliance to Salton for examination, repair or adjustment. See Warranty.
- The use of accessories or attachments not recommended by Salton may cause hazards.
- Do not use outdoors.
- Do not let cord touch hot surfaces.
- Always attach plug to appliance first, then plug into the wall outlet. To disconnect, turn any control to Off, then remove plug from wall outlet.
- Do not place on or near a hot gas or electric burner, or in a heated oven.
- Extreme caution must be used when moving an appliance containing hot liquids
- Do not use appliance for other than its intended use.
- Do not leave unit unattended while in use.
- Avoid contact with hot parts. Keep hands, hair, and clothing away from these parts to prevent risk of injury to persons and or burns that could occur.
- Do not operate Steamer without properly filling the Water Container.
- Always keep the Hose and Nozzle elevated above the Water Container. Do not lay the Hose on the floor.
- Burns can occur by touching hot parts, hot water or steam.
SAVE THESE INSTRUCTIONS
HOUSEHOLD USE ONLY
GROUNDED PLUG
To reduce the risk of electric shock this appliance has a grounded plug. (2 blades and 1 pin) If the plug does not fit fully into the electrical outlet contact a qualified electrician. Do not modify the plug in any way or use an adaptor.
BEFORE FIRST USE
Carefully inspect the packing material as some parts are shipped inside the Styrofoam packaging. Please check the Description of Parts below to be sure that you have all the parts before destroying the packaging.
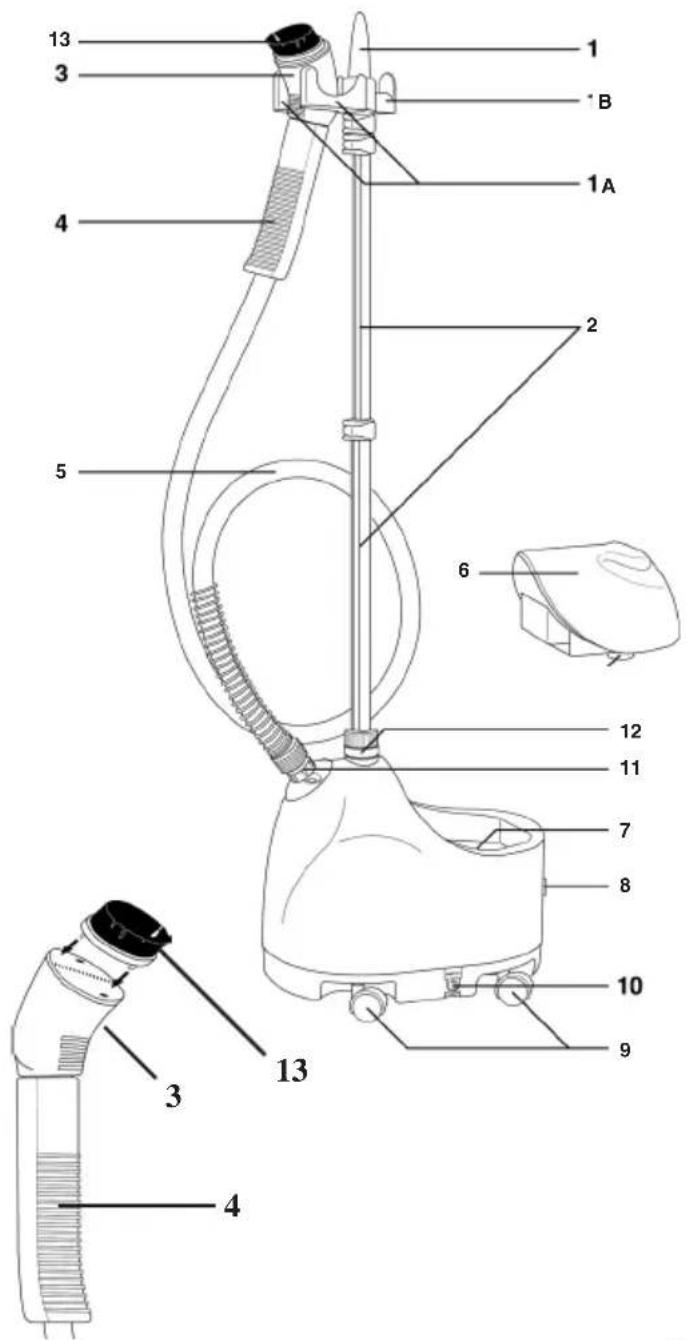
DESCRIPTION OF PARTS
- Pole Top
a) Steam Nozzle Holder
b) Clothes Hanger Hook
- Telescopic Pole
- Steam Nozzle
- Handle
- Hose
- Water Tank
- Water Reservoir
- Lighted On/Off Switch
- Casters
- Drain Plug
- Hose Base
- Pole Base
- Fabric Brush
text_image
Labeled diagram of a medical or laboratory device with numbered parts for identification- The Pole Top (1) is comprised of the Steam Nozzle Holder (1a) and the Clothes Hanger Hook (1b). The Steam Nozzle Holder provides a safe and convenient place to hang the Steam Nozzle. The Clothes Hanger Hook allows you to steam garments that are hanging from a clean, rust-free hanger.
- The Telescopie Pole (2) connects the Pole Top to the steamer and provides quick, compact storage of the unit.
- The Steam Nozzle (3) spreads the steam over a wide area providing hot, penetrating steam.
- The Handle (4) is permanently attached to the Steam Nozzle. It is designed to stay relatively cool and is safe to grasp. Use the Handle to safely direct the steam onto the desired fabric.
- The Hose (5) directs the steam from the boiler to the Handle and Steam Nozzle.
- The Water Tank (6) is filled through the removable Valve Cap (see figure 10) located on its bottom of the Water Tank. Once filled, it is placed on the Water Reservoir (7).
- The Lighted On/Off Switch (8) provides a visual indication that the Steamer is in use.
- 4 Easy Roll Casters (9) allow for ease of movement.
- The Drain Plug (10) is located on the side of the unit for convenient drainage of the Water Reservoir.
- The Hose Base (11) is a threaded plastic pipe to attach the Hose to the Steamer.
- The Pole Base (12) ensures a stable mount for the Telescopic Pole.
- The Fabric Brush (13) attaches to the Steam Nozzle and can be used to gently brush fabric with a nap such as corduroy or velvet.
- The Power Cord (not shown) plugs into a standard three-prong outlet.
ASSEMBLY INSTRUCTIONS
Assembling and Mounting the Telescopic Pole
The Telescopic Pole is made up of 4 sections.
TOP (Section 1)
MIDDLE-TOP (Section 2)
MIDDLE-BOTTOM (Section 3)
BOTTOM (Section 4)
Sections 1, 2 and 3 are adjustable in length. By using the three extension locks, these sections may be expanded or collapsed in order to achieve the desired length. See the 'Adjusting the Telescopic Pole' section below.

text_image
SECTION 1 (TOP) SECTION 2 (MIDDLE-TOP) SECTION 3 (MIDDLE-BOTTOM) SECTION 4 (BOTTOM) COUPLINGAdjusting the Telescopic Pole
- Release the extension lock directly below Section 1 by swinging the hinge outward as shown. Section 1 can now be extended or retracted.
- Close the hinge.
- Repeat the same steps for Sections 2 and 3 of the Telescopic Pole.
NOTE: It is recommended to extend the Telescopic Pole to its full height during steamer operation so there is a free flow of steam through the Hose.

natural_image
Diagram of a mechanical clamp or connector with bidirectional arrows indicating rotation (no text or symbols)Connecting the Telescopic Pole
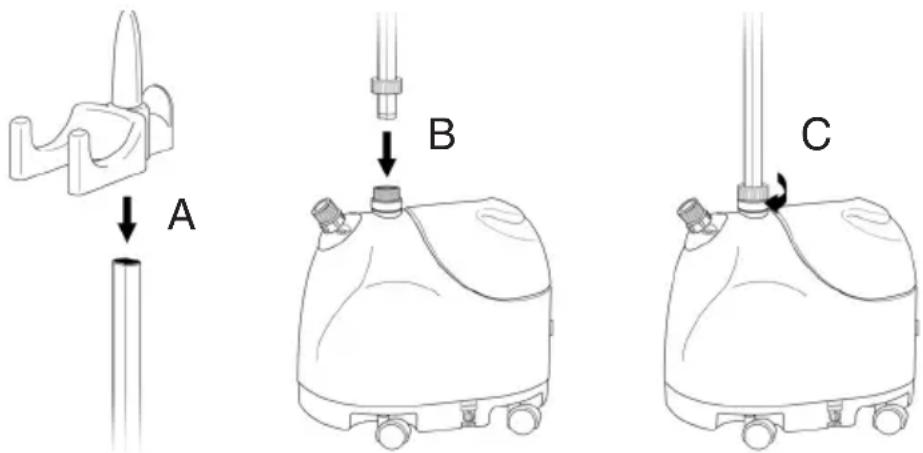
- Connect the Pole Top by sliding it onto the top of the Telescopic Pole.
NOTE: The Pole Top must align correctly with the 2 grooves that run the length of the Pole. - Line up the grooves of the Bottom section of the Telescopic Pole with the 2 tabs inside the Pole Base hole.
- Tighten coupling by turning it in a clockwise direction until tight
Fabric Brush Attachment
The Fabric Brush attachment is used in conjunction with the Steam Nozzle. To attach this accessory:
- Turn the Steamer off and wait until steam is no longer emitted from the Steam Nozzle. CAUTION: To avoid burns, do not try to install the Fabric Brush while steam is coming out of the Steam Nozzle.
- Align the pegs along the back of the Fabric Brush with the holes on the Steam Nozzle.
- Push the brush firmly in place.
HOW TO USE
Filling the Water Tank
- Unplug the Power Cord and turn the Lighted On/Off Switch to the 'Off' position.
- Remove the Water Tank, turn it upside down and unscrew the Valve Cap (III. 7)
- Fill the Water Tank with cool water and replace the Valve Cap. NOTE: To prolong the life of your steamer, we recommend using distilled or de-mineralized water. Do not substitute another water tank for the one designed for this unit.

natural_image
Simple line drawing of a mechanical component with an upward arrow and rotation arrow (no text or symbols)III.7
III.8

natural_image
Line drawing of a cleaning or cleaning device with a hose and lid, showing a downward arrow indicating a process (no text or symbols present)- Place the Water Tank on the Water Reservoir (III. 8). You should hear water flowing into the Water Reservoir for a short time.
CAUTION: Do not let the steamer operate with a dry Water Tank or damage to the unit could result.
Starting the Steamer
- Plug the Steamer into a properly grounded three pronged outlet.
- Turn the Lighted On/Off Switch to 'On'. Verify that the light on the switch is illuminated.
- Steam should start flowing from the Nozzle in approximately 45 seconds.
- When finished using the Steamer, turn the Lighted On/Off Switch to the 'Off' position.
Pressing with Steam
- To steam a garment, place it on a clean, rust-free clothes hanger and place the hanger on the Clothes Hanger Hook. Caution: Be careful when handling garments on the Clothes Hanger Hook. Pulling on the garment with too much force may cause the unit to tip.
- Grasp the Handle and place the Steam Nozzle at the bottom of the garment. Steam will rise along the inside and outside of the fabric, removing wrinkles. Slowly slide the nozzle vertically, from the bottom to the top of the garment. Note: Do not allow kinks to form in the hose at any time. Do not pull on the Hose with excessive force. This will damage the Hose and may result in steam leaks.
- Remove the Nozzle from the garment and smooth the fabric with your free hand.
- Repeat steps 2 and 3 as necessary until the fabric is wrinkle free.
- Curtains and draperies can be steamed while hanging.
- To remove wrinkles from towels, handkerchiefs and napkins, drape them over a rod or towel rack and gently steam.
- Heavier fabrics may require repeated steaming.
- To remove stubborn wrinkles, steam both sides of the fabric.
- The Fabric Brush may also be used to remove tough wrinkles.
CLEANING AND STORAGE
Quick Storage
- Turn the Lighted On/Off Switch to 'Off'.
- Unplug the Power Cord.
- Wrap the Hose around the Telescopic Pole one time.
- Hang the Steam Nozzle from the Steam Nozzle Holder.
- Loosen the two ridged knobs on the Telescopic Pole by turning them counter-clockwise.
- Push down on the Pole Top and the pole will collapse to a compact height.
- Roll the unit to a convenient storage location.
Long Term Storage
We recommend you follow this procedure at least once per week. Use of distilled or de-mineralized water reduces the need for cleaning and prolongs the life of your steamer.
- Turn the Lighted On/Off Switch to 'Off'.
- Unplug the unit from the power outlet.
- Wait for the unit to cool completely (at least 30 minutes).
- Remove the Hose and the Telescopic Pole and set them aside.
- Carry the unit to a sink or tub.
- Remove and drain the Water Tank. Rinse the Water Tank with fresh water and drain completely.
- Drain the Steamer by removing the Drain Plug and emptying the contents into the sink or tub. Tilt the unit towards the Drain Plug to facilitate removal of the water.
- Flush the unit by filling the Water Reservoir and the Hose Base with fresh water and draining completely. Replace the Drain Plug.
- Place the Water Tank back on the Water Reservoir.
- Reattach the Telescopic Pole and Hose.
- Follow steps 3-7 of the Quick Storage procedure above.
Removing Mineral Build-Up
Mineral build-up is caused by a high mineral content in many municipal water supplies. Mineral residue inside of the internal pipes and heater can cause intermittent steaming or, in some cases, no steaming at all.
NOTE: To reduce of eliminate the occurrence of mineral build-up, we recommend the use of de-mineralized or distilled water in the unit.
The procedure below can be used to reduce mineral build-up. If you are unable to use de-mineralized or distilled water, we recommend you follow this procedure monthly.
- Turn the unit off and unplug the power cord.
- Remove the Hose and Pole from the unit.
- Drain the Water Reservoir by following steps 1 – 7 of the Long Term Storage procedure. Leave the Water Tank off the unit.
- Mix a solution of 1 cup of vinegar and 1 cup of water.
- Slowly pour the water-vinegar solution into the Hose Base connector.
- If standing water-vinegar solution becomes visible in the Water Reservoir's inlet hole, continue to pour the solution into the Hose Base until the Water Reservoir is about half-full.
- If standing water-vinegar solution does not become visible in the Water Reservoir's inlet hole, continue pouring the solution into the Hose Base until standing solution appears near the top of the Hose Base. Pour additional solution into the Water Reservoir until it is about half full.
- Allow to stand for 40 minutes.
- Drain the solution out of the Water Reservoir by removing the Drain Plug and allowing the liquid to drain into a sink or tub.
- Drain the solution out of the Hose Base by tilting the unit over a sink or tub and pouring the water out of the Hose Base.
- Pour clean water in the Hose Base and Water Reservoir inlet and drain. Repeat this step until the vinegar odour dissipates.
- Reassemble the unit and operate normally.
TROUBLESHOOTING GUIDE
| Problem | Cause | Solution |
| The unit fails to steam or the light on the On/Off Switch does not illuminate. | The steamer is not plugged in or the household circuit breaker is tripped or the fuse in blown. | Plug into the electrical outlet, reset the circuit breaker or replace the fuse. If you need assistance contact a qualified electrician. |
| Indicator light is illuminated but the Steamer fails to steam. | Mineral build-up in the unit or the Water Tank is empty. | Follow the ‘Removing the Mineral Build-up’ procedure in the Care and Cleaning section or refill the Water Tank |
| Water drips from Nozzle | Condensation in Hose | Extend the Hose vertically and allow water to drain back to Water Reservoir. |
| Excessive gurgling of Hose and Steam Nozzle | Condensation in Hose | Some gurgling is a natural effect of the steaming process. For excessive gurgling extend the Hose vertically to allow water to drain back into the Water Reservoir. |
| Steam is intermittent | Mineral build-up in the unit. | It is normal for the unit to periodically stop steaming for a few seconds. If the steam stays off for longer periods, follow the Removing Mineral Build-up procedure in the Care and Cleaning section. |
A short supply cord is provided to reduce the hazards of becoming entangled in or tripping over a long cord. Extension cords may be used if care is exercised in their use. If an extension cord is used, the marked electrical rating of the detachable power-supply cord or extension cord should be at least as great as the electrical rating of the appliance. If the appliance is of the grounded type, the extension cord should be a grounded 3-wire cord. The extension cord should be arranged so that it will not drape over the counter top or table top, where it can be pulled on by children or tripped over.
LIMITED WARRANTY
Salton Canada warrants that this appliance shall be free from defects in material and workmanship for a period of one year from the date of purchase. During this 'in-warranty' period, defective products will be repaired or replaced at the discretion of the retailer and/or Salton Canada. This warranty covers normal domestic usage and does not cover damage which occurs in shipment or failure which results from alteration, accident, misuse, abuse, glass breakage, neglect, commercial use or improper maintenance.
A defective product should be returned to the original place of purchase within the retailer's stipulated return/exchange period*. If you are unable to have a defective product replaced under warranty by the retailer, please check our website at "www.salton.com" for the service centre nearest you. You may also contact us for assistance by mail, e-mail, fax or telephone as listed below.
To ensure prompt 'in-warranty' service securely package and return the product to us prepaid. Be sure to include the original proof of purchase and a description of the defect along with your address and postal code.
For repairs not covered by the warranty, please contact us for assistance.
SALTON CANADA
Customer Service Department
81A Brunswick,
Dollard-des-Ormeaux,
Quebec, Canada H9B 2J5
website: www.salton.com
E-mail: service@salton.com
Fax: 514-685-8300
Tel: 514-685-3660