ARC-12D - Air conditioner Snö - Free user manual and instructions
Find the device manual for free ARC-12D Snö in PDF.


| Product Type | Portable Air Conditioner |
| Brand | Snö |
| Model | ARC-12D |
| Cooling Capacity | 12000 BTU/h |
| Power Consumption (Cooling) | 1150 W |
| Voltage / Frequency | 115 V / 60 Hz |
| Dimensions (W x D x H) | 18.5 x 15.4 x 28.7 inches |
| Weight | 68.3 lbs |
| Airflow (High) | 250 CFM |
| Noise Level (High) | 56 dB |
| Functions | Cool, Fan, Dehumidify, Auto Mode |
| Timer | 24-hour programmable timer |
| Remote Control | Yes (included) |
| Filter Type | Washable mesh filter |
| Filter Maintenance | Clean every 2 weeks |
| Drainage | Self-evaporative (no bucket needed) |
| Exhaust Hose | 5.9 ft (included) |
| Window Kit | Yes, adjustable |
| Refrigerant | R-410A |
| Safety Features | Overheat protection, auto shut-off |
| Certification | ETL, Energy Star |
| Warranty | 1 year |
Frequently Asked Questions - ARC-12D Snö
User questions about ARC-12D Snö
0 question about this device. Answer the ones you know or ask your own.
Ask a new question about this device
Download the instructions for your Air conditioner in PDF format for free! Find your manual ARC-12D - Snö and take your electronic device back in hand. On this page are published all the documents necessary for the use of your device. ARC-12D by Snö.
USER MANUAL ARC-12D Snö
ONE YEAR LIMITED WARRANTY & FIVE YEAR WARRANTY ON COMPRESSOR
This WHYNTER SNO portable air conditioner is warranted, to the original owner within the 48 continental states, for one year from the date of purchase against defects in material and workmanship under normal use and service. Should your SNO portable air conditioner prove defective within one year from the date of purchase, return the defective part or unit, freight prepaid (within two months of purchase; after two months to one year, customer will be responsible for freight cost to Whynter's service department), along with an explanation. Please ship the SNO portable air conditioner in its original packaging material to avoid damage in transit. Please retain original box and packaging material. Under this warranty, Whynter will repair or replace any parts found defective. This warranty is not transferable. After the expiration of the warranty, the cost of labor and parts will be the responsibility of the original owner of the unit.
THIS WARRANTY DOES NOT COVER:
- Acts of God, such as fire, flood, hurricanes, earthquakes and tornadoes.
- Damage, accidental or other wise, to the portable air conditioner while in the possession of a consumer not caused by a defect in material or workmanship;
- Damage caused by consumer misuse, tampering, or failure to follow the care and special handling provisions in the instructions.
- Damage to the finish of the case, or other appearance parts caused by wear.
1) Filter.
2) Damage caused by repairs or alterations of the unit by anyone other than authorized by the manufacturer.
3) Freight and Insurance cost for the warranty service.
To obtain service or information, contact Whynter Innovations Group via Email at service@whynter.com or call 866-WHYNTER.
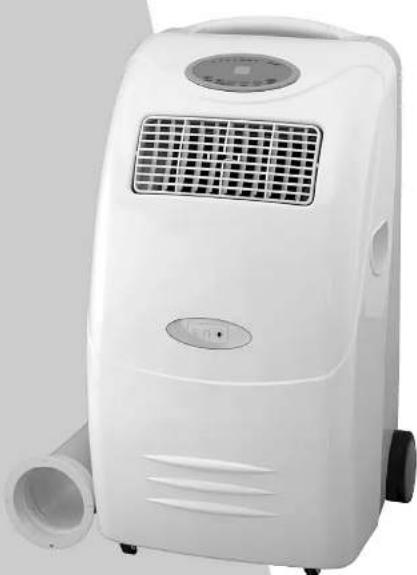
PORTABLE Air Conditioner
Owner's Manual
For models ARC-12D & ARC-12H
natural_image
White industrial air conditioner unit with ventilation grille and side pipes (no visible text or symbols)It is important that you read these instructions before using your new purchase and we strongly recommend that you keep them in a safe place for future reference.
Thank You!
Thank you for choosing the portable air conditioner from Whynter. We would like you to enjoy the many benefits this unit offers, so please read this manual carefully and take full advantage of the many advanced features that your Air Conditioner offers you.
We wish you many years of enjoyable use.
After reading this manual, please keep it in a safe place for future reference.
Energy Saving Tips
- Please use the unit in the recommended room size (refer to SPECIFICATIONS).
- Do not locate the air conditioner where furniture or other objects can obstruct the airflow.
- Keep blinds/curtains closed during the sunniest part of the day.
- Close the fireplace damper and floor or wall grills so that cool air does not escape through the chimney or ductwork.
- Keep the filters clean.
Set the unit to maximum cooling and high speed fan initially, then adjust the unit to a comfortable setting.
NOTE: It is recommended to turn on the air conditioner when the room
temperature is around 75°F. Do not wait until the room is excessively hot.
Maintenance
Always unplug the unit from the wall outlet before beginning the cleaning.
Cleaning the Housing
Use a soft, damp cloth to wipe the body clean.
Never use strong chemicals, oil-based products, detergents, chemically treated cloths or other cleaning solutions. These could possibly damage the cabinet.
Cleaning the Filter
Use a vacuum cleaner or tap the filter lightly to remove loose dust and dirt from the filters and then rinse them thoroughly under running water (no hotter than 104^ F).
Dry thoroughly before replacing.
Do not wet the activated carbon filter, remove from frame before rinsing.
IMPORTANT! Never operate the unit without the filters.
End of Season Storage
Unplug the unit.
Drain the condensed water COMPLETELY (please refer to page 9).
Clean or change the filter.
On a warm day, turn the unit to fan mode for a couple of hours so that the inside can dry out completely.
It is recommended that the unit be put back into its original carton for storage.
Do not stack heavy objects on top of the unit.
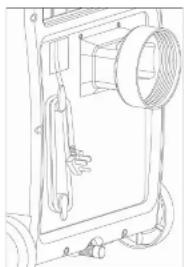
Storing The Power Cord
When the unit is not in use, please store the power cord away as shown in Figure 3.
natural_image
Technical line drawing of a mechanical device with no visible text or symbolsFigure 3
Before Use
Important!
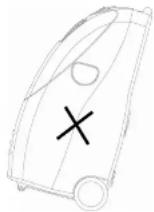
- Transport the unit in an upright position only, or leave it in an upright position for at least 2 hours before first use.
• Always place the unit on an even surface (Figure 1). - The power cord is UL listed. It has a built-in L.C.D.I. (Leakage, Current, Detection, Interruption) circuit breaker for added safety. If the power supply is interrupted, press the reset button to reconnect the unit to the power source.
- Make sure the unit is connected to a correctly grounded power supply (refer to the rating label located at the back of the unit).
- An opening in a window or wall is required to accommodate the exhaust hose (kit supplied) to expel the warm air.
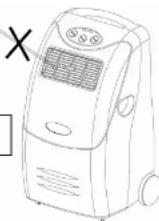
- Do not cover or obstruct the appliance inlet or outlet grilles (Figure 2).
• To avoid the risk of shock, the product should never be used in bathrooms, shower rooms or in any other steamy or wet areas. - The unit will cool when the room temperature is between 64^ and 110^ depending on the thermostat setting.
- Do not sit or place objects on the unit.
- Do not touch the unit with wet/damp hands or when standing barefoot.
- Avoid all contact with chemical based materials.
- The filter must be used with the product at all times. When removing for cleaning, always disconnect the unit from the mains first.
- Turn off the appliance when not in use.
- At the end of each season all water must be drained and the unit and filters cleaned before storage.
- Drainage of the water container is required before moving the unit or putting it into storage.
- If the electric socket is different from the plug provided, have a professionally qualified electrician replace the plug with a suitable one. Avoid the use of adaptor plugs, multiple sockets and/or extension leads; if their use is necessary, ensure that they conform to the current safety regulations.
- Do not pull the supply cable or place it near a source of heat; always unroll it completely to avoid the possibility of dangerous overheating.
- If the supply cord is damaged, it must be replaced by the service agent or a similarly qualified person.
THE MANUFACTURER DISCLAIMS ANY RESPONSIBILITY IF THE ABOVE INSTRUCTIONS ARE NOT FOLLOWED.
Operation
Setting The Fan Speed
Press the SPEED button to choose the fan speed you require, high or low. The indicator of high or low fan will light up at the same time.
If the unit is in AUTO mode, it will select the fan speed automatically according to the ambient temperature (the related indicators, cool, fan or heat will light up), at this time the fan speed switch is invalid.
Setting the Timer
Press the TIMER button to set the operating hours you desire (1 to 12 hours, the timer indicator will light up). When the set time has elapsed, the machine will turn off
automatically. The display window will show the hour(s) you set as you press the TIMER button. If the timer button is not pressed, the unit will work continuously.
By pressing the timer button but without turning on the unit, you can PRE-SET the time for the machine to work. For example, if you press the timer to '2', the unit will come on automatically after 2 hours.
All the above functions can also be performed with the supplied remote control. This remote control requires 2 AAA batteries to operate.

Regulating the airflow direction
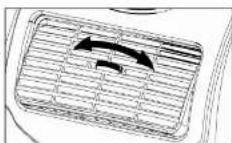
Turn the roller on the air vent to control the airflow direction from the vertical louvres.
IMPORTANT!
- The compressor will start approximately 3 minutes after the unit is turned on (this will help prolong the life of the compressor). After switching the unit off, please wait at least 3 minutes before turning the unit back on.
- The cooling system will switch off if the room temperature is lower than set. The fan, however, keeps working at the set level. If the ambient temperature rises above the chosen temperature +5^ , the cooling will resume.
- In heating mode, the compressor will switch off if the room temperature is HIGHER than the one set (the fan keeps working at the set level). When the room temperature drops 5^ below the chosen temperature, heating will resume.
- This machine is equipped with an ANTI-FROST function. Sometimes, while using the heating function during low temperatures, the heating will stop for a while to melt the internal frost. When this occurs, wait for heating to resume.
- As you switch on the heating, the fan will stop for 15-20 seconds prior to the unit starting.
Installation
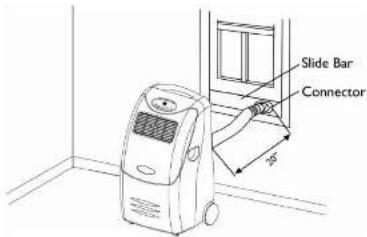
Window Kit Installation
In order for this unit to function properly, it must be vented to the outside.
Fitting the Exhaust Hose through the window is easy. Please see below.
-
Extend Hose at least 6" and insert it into back of the unit, tightening into place by turning it clockwise.
-
Attach Slide Bar Connector, (Round Connector) to the other end of the Hose by extending hose at least 6". Then tighten Hose by turing the (Round Connector) clockwise.
-
Place Adjustable Slide Bar in the window and expand so it fits tightly.
-
Lower the windwo.
-
Make sure the Hose has no kinks.
Slide Bar has 3 sections which allows installation in windows up to 48" in width.
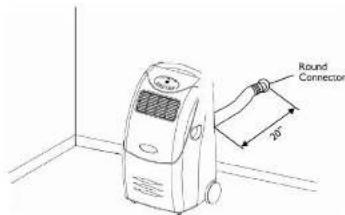
Wall Connection
- Make a hole (5.1" in diameter) in the wall.
-
Insert the Round Connector (part #14) into the hole and hold in place by using 4 small screws (not supplied).
-
Extend one end of the exhaust pipe (part #11) and screw into the Round Connector by turning clockwise.
-
Extend other end of exhaust pipe and screw in Adaptor (part #10) by turning clockwise.
-
Push Adaptor to fit firmly over the opening on the back of the unit.
** When not in use, cover the Round Connector and hole with Cap (part #15).
Installation
Mounting the exhaust pipe
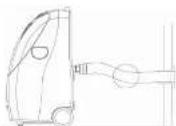
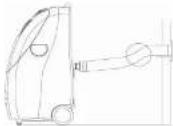
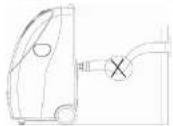
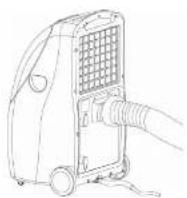
- The supplied exhaust hose can be extended from 1 foot to 5 feet for mounting. It is recommended that you use the shortest possible length of hose.
• Take care to prevent any kink or bend in the middle of the exhaust hose, as this will trap hot exhaust air, which will radiate back into the room.
WARNING!
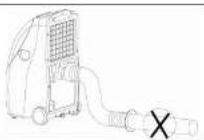
The length of the exhaust pipe is specially designed according to the specification of this product.
Do not replace or extend it with your own hose as this could cause the unit to malfunction.
Installation of the Carbon Filter
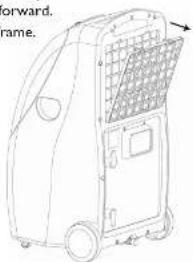
- Remove the filter frame from the unit by pressing down on tabs and pulling forward.
- Separate the filter from the filter frame.
- Remove the active carbon filter from its plastic bag.
- Insert the active carbon filter into the filter frame.
- Fix the filter by reassembling the fixer onto the filter frame.
- Re-fit the filter frame inside the unit.
- It is recommended to replace the carbon filter every 3 to 6 months.
natural_image
Line drawing of a portable industrial machine with wheels and a grid-patterned panel (no text or symbols)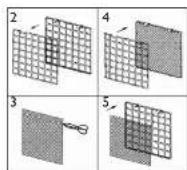
Operation
Control Panel
- Set temperature indicator
- Room temperature indicato
- Low fan speed indicator
- High fan speed indicator
- Automatic mode indicator
- Cooling mode indicator
- Fan mode indicator
- Heating mode indicator (for models with heating options)
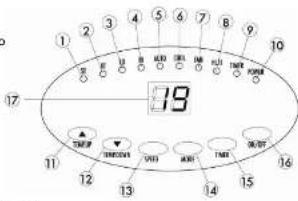
- Timer operation indicator
- Compressor Indicator
II. Temperature up selector - Temperature down selector
- Fan speed selector
- Mode (function) option selector
- Timer selector
- ON/OFF (power) selector
- Display window
Setting Mode/Function
Press the MODE button to select the required working mode: Automatic, Cooling, Fan or Heating (Heating is only available for ARC-12H). The green indicator illustrating your selected mode lights up. It is recommended to select Cooling or Heating mode and set your desired temperature, as the Auto mode has a preset temperature (please see below) that cannot be changed.
The indicators of the functions in progress come on at the same time, e.g. Cool and Lo = Cooling mode with Low fan speed.
Auto Mode
When this mode is selected, the unit is preset to the following temperature settings and unit will only start to:
- Cool when room temperature is higher than 75°F - Heat when room temperature is lower than 68°F (ARC-12H only)
If room temperature is between 68°F and 75°F, unit will stay in Fan mode. Again, when in Auto Mode, the temperature settings cannot be changed.
Setting the Temperature in Cooling or Heating Mode
The display window's default is to display the ambient room temperature. The green indicator light under RT is on. (RT = Room Temperature)
To set your desired temperature, press the Temperature up or down buttons (ranging from 62°F to 90°F). Each press will increase or decrease your set temperature by 1°F. When pressing the temperature up or down buttons, the window will change to display your set temperature. At this time, the green indicator will light under ST (Set Temperature). Once the temperature up or down buttons is released, the window will return to displaying the ambient temperature after a second.
Note: When unit is in the following modes: Auto, Cool, or Heat - the compressor will cool/heat the room to reach the set temperature. Once the ambient temperature has reached the set temperature, the compressor will stop and unit will run in Fan mode. To conserve energy, the compressor will not start immediately after a couple degrees increase or decrease, but will wait for a 5°F allowance. For example:
In Cooling Mode with a set temperature of 70°F
When compressor first stops after reaching 70°F, unit will auto-switch to Fan.
Compressor will start cooling again when ambient temperature increases to 75°F or above.
In Hearing Mode with a set temperature of 72°F
When compressor first stops after reaching 72°F, unit will auto-switch to Fan.
Compressor will start heating again when ambient temperature drops to 67°F or below.
In Auto Mode (with preset temperature of 68^ F for heat and 75^ F for cool)
Compressor will start cooling again when ambient temperature reaches above 80^ F or will start heating when ambient temperature drops below 63^ F.
Parts
Front Back
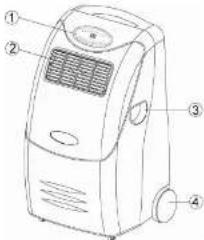
- Control Panel
- Cooling Air Outlet
- Handle
- Castors
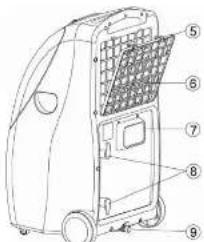
- Air Inlet
- Air Filter
- Exhaust Air Outlet
- Cord Hanger
- Water Stopper (Rubber Plug Inside)
Accessories
- Adaptor - for insertion over the hose and into the back of the air conditioner
II. Exhaust Hose - Adjustable Slide Bar
- Round Connector
- Cap for Round Connector
- Remote Control
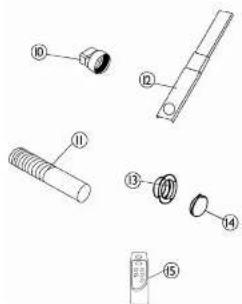
Drainage
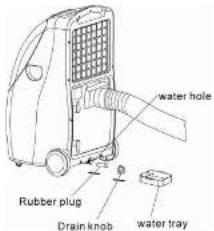
During the process of cooling, some water will be extracted from the air into the unit. Most of this water is used to cool the unit and make it run more efficiently. This is a feature not found in most Portable Air Conditioners. If the unit is operated in VERY HUMID air, water will collect in the container inside the unit. If the water container is full, the compressor will stop, but the fan will continue to circulate the air. The POWER indicator will blink to inform you to empty the internal container. To make the cooling function work again, please empty the water by one of the following methods:
By the Draining into a Container
Use a Shallow Container or Dish
- Turn off the unit
- Position a flat container or dish under the drain hole. Do not allow the water to drip continuously into the container, as it might easily overflow.
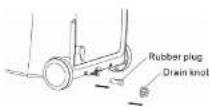
- Remove the drain knob & rubber plug from the drain hole. The condensed water will drain out automatically.
- When the container is almost full, replace the rubber plug into the drain hole to stop the water. Empty the container.
- Repeat steps 2, 3 & 4 until all the condensed water is emptied.
- Once all the condensed water has been removed, replace the rubber plug into the drain hole firmly. The Full Water indicator should be off now.
- Replace the drain knob.
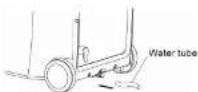
By Water Tube (Continuous Drainage)
- Remove the drain knob and rubber plug and keep them for future use.
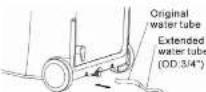
- Connect a suitable water tube (of 3/4" internal diameter - supplied) to the water hole. The condensed water will drain out automatically.
- If you want to extend the water tube you can connect it with another tube (outside diameter 3/4").
Special Caution for Heating Function!
While using the heating function, please note:
1. Install the exhaust pipe securely in order to exhaust the cool air to the outside (please see page 6).
2. Use the continuous drainage option as described above.
3. The warmer the outside air the more heat will be pumped into the room. Working range for heat pump function is 41^ F to 81^ F. When used in room temperatures outside this range, the unit may not function properly.
4. While using the heating function during low temperatures, sometimes the heating will stop for a while in order to melt the internal frost. When this occurs, just wait for heating to resume. This is normal for compressor operated devices.
Specifications
| Model Number ARC-12D ARC-12H | ||
| Cooling Capacity 12,000 BTU/hr | 12,000 BTU/hr | |
| Heating Capacity (1)(2) N/A 12,000 BTU/hr | ||
| Power Consumption 950W / 8.4A | 950W / 8.4A | |
| Humidity Removal Capacity 65 Pts. / Day 65 Pts. / Day | ||
| Recommended room size* 400 sq. ft. 400 sq. ft. | ||
| Power Supply 115V / 60Hz / I Phase 115V / 60Hz / I Phase | ||
| Compressor | Rotary | Rotary |
| Refrigerant | R-22 | R-22 |
| Fan Speed | 2 | 2 |
| Timer | 1-12 hours | 1-12 hours |
| Thermostat | 62°F - 90°F | 62°F - 90°F |
| Net Weight | 65 lbs. | 68 lbs. |
| Dimensions | 16"W x 17"D x 30"H | 16"W x 17"D x 30"H |
| Working Temperature | Cooling: 62°F to 110°F | Cooling: 62°F to 110°F Heating: 41°F to 81°F |
| REMARKS:1. The data may vary, please refer to the rating label on the back of the unit.2. The above conditions are measured at:Cooling - Indoor: RT 81°F, RH 60%Heating - Indoor: RT 68°F, RH 60%aUninsulated rooms such as sunrooms, garages, or attics should be less than 400 sq. ft. | ||
Troubleshooting
| Problem | Possible Causes | Solutions |
| The portable air conditioner does not turn on | * There was a power failure* The plug is not correctly inserted into the socket* The automatic switch, line fuse, or breaker has been tripped* The power supply voltage is too low* The power cord is damaged* The LCDI plug for the unit is tripped | * Restore the power supply* Insert the plug correctly into the socket* Flip the switch, change the fuse, or turn the breaker back on. Also note that you may have too many appliances drawing power on one circuit, so you may need to move some onto another circuit* Move the unit onto another circuit with the correct voltage* Call for service. Only authorized servicers should replace damaged plugs* Press the Reset button on the portable air conditioner's plug |
| The unit turns on, but the compressor does not turn on-the fan runs, but there is no cooling | * The room temperature is outside of the operational tolerances of the unit* The Cooling mode is not on* The compressor has not turned on yet because of its time delay* The set temperature is too high* The internal water reservoir is full | * This unit is designed to work in ambient temperatures of 64°F to 100°F* Press the Mode button until the Cooling icon is shown on the control panel* Give the compressor 3 minutes to turn on after the Cooling mode has been selected* Reset the temperature lower* Check the water level indicator on the control panel. If it is lit, either manually drain the water or allow the unit to exhaust the water itself. Then cooling will resume |
| The air coming out of the unit is not very cold, or the airflow volume is weak | * The filter is dirty or obstructed* The air intake is obstructed* The exhaust duct is too long* The exhaust is obstructed* The unit is set in dehumidifying mode* The unit is set to low fan speed | * Clean the filter* Make sure there is at least 20" of clearance from the air intake* Make the exhaust duct as short as possible* Check the exhaust duct. Remove any obstructions* Set the unit in cooling mode* Set the unit to high fan speed |
| The unit has worked for a long time, but the room is not cold enough | * Windows or doors are open* There are too many people in the room* There is direct sunshine into the room* The room is a kitchen, with many heat-producing appliances* There is a server in the room* The room is too large* There are many electrical appliances in the room | * Close all windows and doors into the room when the unit is cooling* You may need additional cooling or another air conditioner* Close curtains and blinds. Try to minimize the amount of direct sunlight into the room* You may need additional cooling or another air conditioner* You may need additional cooling or another air conditioner* You may need additional cooling or another air conditioner |
| The unit is very noisy | * The unit is not level* The floor underneath the unit is uneven | * Make sure the unit is level* Move the unit to a location with a level, even floor |
| The unit is leaking water onto the floor | * The drain stoppers are not installed* The unit was tilted, or is not level | * Install the rubber drain stoppers* Make use the unit remains level |
Table of Contents
THANK YOU....I
Energy Saving Tips....I
SPECIFICATIONS 2
BEFORE USE....3
PARTS 4
Front 4
Accessories....4
INSTALLATION 5
Mounting the Unit 5
Mounting the Exhaust Pipe....6....
Installation of the Carbon Filter....6....
OPERATION 7
Control Panel 7
Turning On/Off 7
Setting Mode / Function....7
Auto Mode 7
Setting the Temperature....7...
Setting Fan Speed....8
Setting the Timer....8....
Regulating Airflow Direction....8....
DRAINAGE....9
By Draining into a Container....9....
By Water Tube (continuous drainage)....9....
MAINTENANCE....10
Cleaning the Housing 10
Cleaning the Filter....10....
End of Season Storage....1.0....
Storing the Power Cord....10....
TROUBLESHOOTING......I
WARRANTY....14
- ONE YEAR LIMITED WARRANTY & FIVE YEAR WARRANTY ON COMPRESSOR
- THIS WARRANTY DOES NOT COVER:
- PORTABLE Air Conditioner
- Thank You!
- Energy Saving Tips
- Maintenance
- Cleaning the Housing
- Cleaning the Filter
- End of Season Storage
- Storing The Power Cord
- Before Use
- Important!
- Operation
- Setting The Fan Speed
- Setting the Timer
- Regulating the airflow direction
- Installation
- Window Kit Installation
- Wall Connection
- Mounting the exhaust pipe
- WARNING!
- Installation of the Carbon Filter
- Control Panel
- Setting Mode/Function
- Auto Mode
- Setting the Temperature in Cooling or Heating Mode
- Parts
- Accessories
- Drainage
- By the Draining into a Container
- By Water Tube (Continuous Drainage)
- Special Caution for Heating Function!
- Table of Contents
Brand : Snö
Model : ARC-12D
Category : Air conditioner