RM/457 - Fan Ramtons - Free user manual and instructions
Find the device manual for free RM/457 Ramtons in PDF.

User questions about RM/457 Ramtons
0 question about this device. Answer the ones you know or ask your own.
Ask a new question about this device
Download the instructions for your Fan in PDF format for free! Find your manual RM/457 - Ramtons and take your electronic device back in hand. On this page are published all the documents necessary for the use of your device. RM/457 by Ramtons.
USER MANUAL RM/457 Ramtons
natural_image
Line drawing of a modern air fryer with handlebars and front panel (no text or symbols)MODEL: RM/457
Read this manual thoroughly before using and save it for future reference
IMPORTANT SAFEGUARDS
When using electrical appliances, basic safety precautions should always be followed, including the followings:
- Read all instructions.
- Do not touch hot surface. Use handles or knobs.
- To protect against electric shock do not immerse cord, plugs, or housing in water or other liquid.
- Close supervision is necessary when any appliance is used by or near children.
- Unplug from outlet when not in use and before cleaning. Allow to cool down before putting on or taking off parts, and before cleaning the appliance.
- Do not put the appliance on a soft working surface or a desktop covered with table cloth and make sure the appliance is working on a rigid surface.
- Do not operate any appliance with a damaged cord or plug or after the appliance malfunctions, or has been damaged in any manner, return appliance to the nearest authorized service facility for examination, repair or adjustment.
- The use of attachments not recommended by the appliance manufacturer may cause injuries.
- Do not let cord hang over edge of table or counter, or touch hot surfaces.
- Do not use this appliance when missing oil tank, oil and any other materials, or the oil is not enough.
- Do not place on or near a hot gas or electric burner, or in a heated oven.
-
Extreme caution must be used when moving fryer containing hot oil.
-
To disconnect, turn any control to "off", then remove plug from wall outlet.
- Make sure handles are properly assembled to basket and locked in place. See detailed assembly instructions.
- Before use, always ensure that the oil tank is positioned correctly.
- Never connect the fryer to the power supply without pouring oil in the oil tank first.
- The oil in the oil tank will be still hot after it is switched off, never attempt to move your fryer until it is completely cool down. Use the handles to lift the oil tank.
- Though the detachable oil tank can be completely immersed in water and clean, it must be thoroughly dried before next use to prevent electric shock.
- This appliance is not intended for used by persons (including children) with reduced physical, sensory or mental capabilities, or lack of experience and knowledge, unless they have been given supervision or instruction concerning use of the appliances by a person responsible for their safety.
- Children should be supervised to ensure that they do not play with the appliance.
- On completion of frying and before opening the lid, always raise the basket and wait a few seconds to allow steam pressure to subside.
- Do not use appliance for other than intended use.
- Do not use outdoors.
- Save these instructions.
- If the supply cord is damaged, it must be replaced by the manufacturer or its service agent or a similarly qualified person in order to avoid a hazard.
HOUSEHOLD USE ONLY
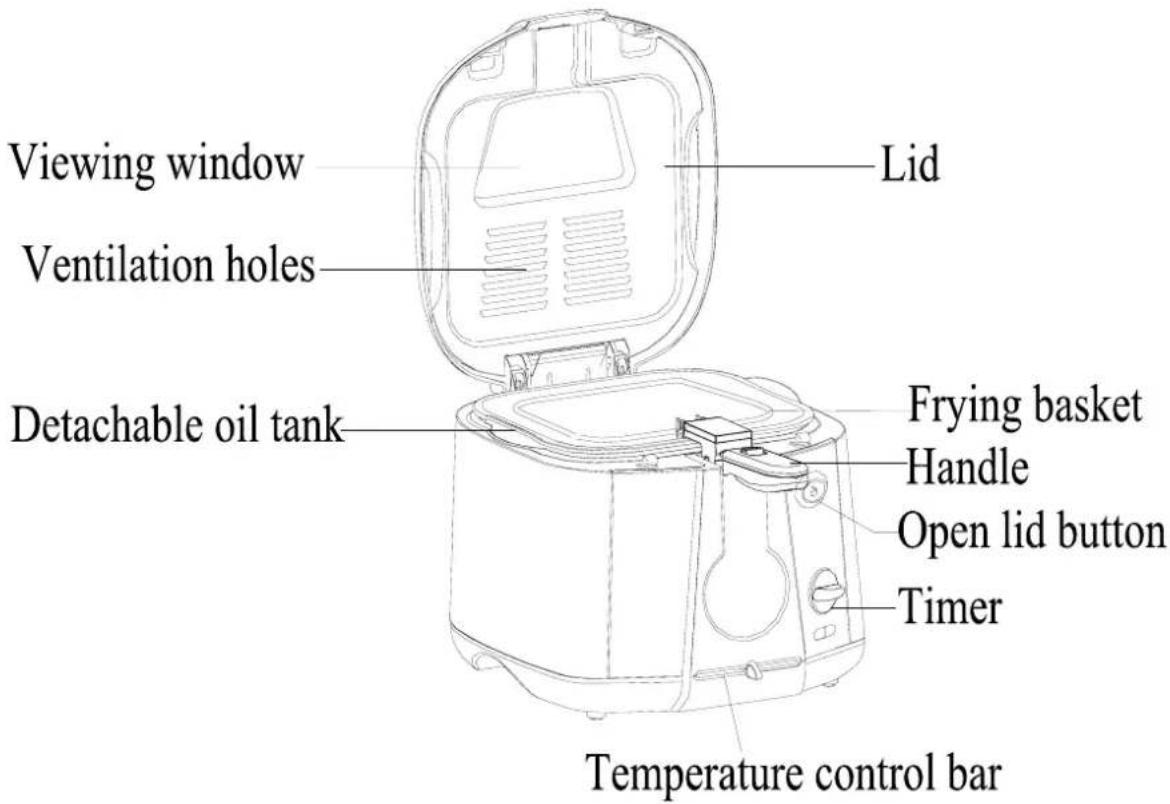
KNOW YOUR DEEP FRYER
HOW TO USE YOUR DEEP FRYER
For the first use the oil tank and basket may emit odor, it is normal and will not occur again after several uses. It is suggested remove the odor according to the following instructions: fill water to the MAX mark heat it for about 10 minutes at the lowest temperature, let it cool down completely then clean all parts thoroughly.
WARNING: wipe the water droplets on oil tank and frying basket completely before fill oil! Before use, always ensure that the oil tank is positioned correctly.
- Press open lid button, the lid of deep fryer will open automatically.
- Lift handle to horizontal position then take out the frying basket.
- Fill oil into oil tank, it is suggested to use fresh peanut, groundnut, vegetable or rapeseed oil, if prefer, you may use a good quality solid fat but remember never put the solid fat into oil tank directly. Alternatively melt solid fat gently in a separate pan before transferring to the tank.
Note: oil level should between MIN and MAX level.
-
Lightly smear the inside of viewing window with either cold oil or fat, whichever can prevent condensation, so that you can view the cooking procedure.
-
Replace the frying basket, close the lid of the fryer by pressing both sides of the lid, this prevents steam from bursting and oil droplet from splashing.
-
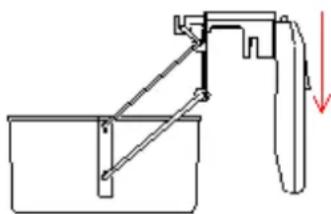
Push the release button backward on the handle, then fold the handle. Lower the basket into the oil by returning the
natural_image
Mechanical diagram showing a lever mechanism with a downward arrow indicating motion (no text or symbols present)Push the release button backward
Fig.1
handle to the recessed position.
Note: The handle can be folded down only by pushing the release button backward on the handle (see Fig.1). Put down the handle and the frying basket will be lowered. If you want to lift the frying basket to horizontal position, just raise the handle (see Fig.2). When the frying basket is locked to horizontal position, a click will be heard. It is recommended to repeat to raise and lower the basket for several times before first use.
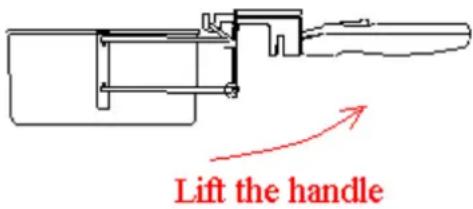
Fig.2
-
Plug the appliance to proper power supply, turn the timer to set preheating time and the power indicator will illuminate, then set your desired temperature by sliding temperature control bar.
-
When the ready indicator has illuminated, it means that it has reached the preset temperature. Raise the frying basket and lock it into position, open the lid and place the food to be cooked, which should be as dry as possible or freezing, into the raised frying basket. The frying basket should always be in the raised position when filling food.
-
Alternatively you do not need replace the frying basket, follow the below steps as a choice instead of step 5, step 6, step 7, step 8:
(1) Close the lid of the fryer by pressing both sides of the lid, this prevents steam from bursting and oil droplet from splashing.
(2) Plug the appliance to proper power supply, turn the timer to set preheating
time and the power indicator will illuminate, then set your desired temperature by sliding temperature control bar.
(3) Place food into frying basket, and the food should be as dry as possible or freezing.
(4) After the ready indicator has illuminated, open the lid, replace the frying basket with food into the appliance.
Note: It is strongly recommended that the food to be added into the frying basket should not more than 2/3 volume of the frying basket. (For chips, it should not exceed 600g.)
Note: For home-battered foods, pack the raw food well and allow to drain slightly to get rid of excess water, lower the food packed slowly into the frying basket using a suitable implement or tongs, this allows the batter to become a whole one and prevents to slip out the mesh of the basket.
Warning: operate carefully as small oil droplets may splash out!
- To avoid scald, you should cover the lid, and then lower frying basket into oil.
- Set the frying time and frying temperature again. And it will begin to fry.
Note: When frying chips, because there is much water in it, so when lowering the frying basket into oil, the oil droplets may splash out. To avoid injury, raise the frying basket above the oil surface after lowering it for a few seconds, then lower it again, repeat this step for about 4 or 5 times until the water has been reduced obviously, place the frying basket into the tank completely.
- There would be lots of steam come out when frying, so be careful, do not touch
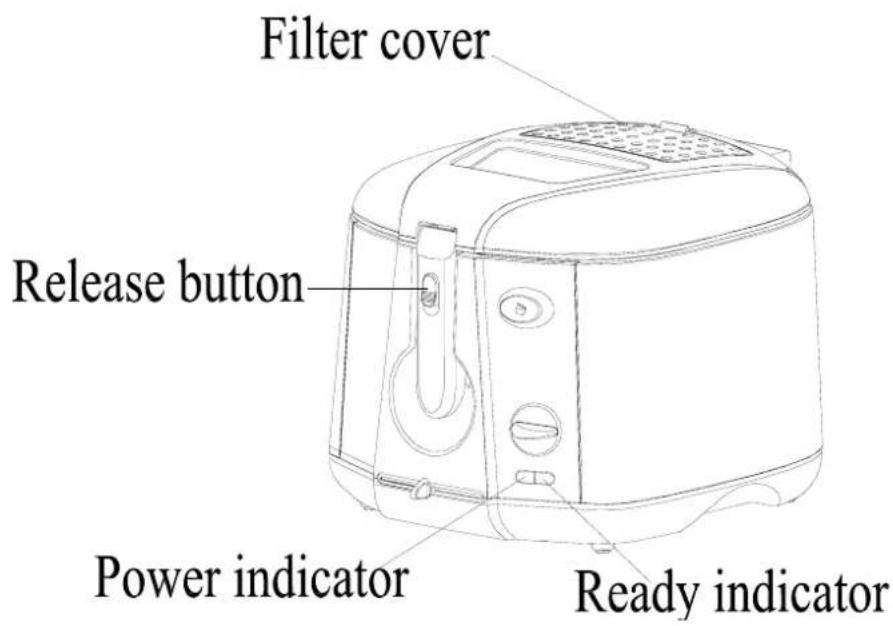
the filter cover. You can check the progress during cooking by raise the handle to horizontal position, and view through the viewing window. If food has been fried well, you can turn the timer to off position to end the cooking procedure. It is suggested that not open the lid when frying to avoid hurt by steam.
- Once your food has been cooked, there will be a ring for prompt, raise the basket and wait a few seconds before opening the lid, this allows the steam pressure to subside, but you should still be carefully when opening the lid, as some steam may still be released.
- Take out the food, and add some dressing according to your taste, now you can serve.
OPERATING DRY PROTECTION
The appliance has a operating dry protection feature. If you forget to place oil in oil tank and operate it, the temperature of tank will rise rapidly and the switch of operating dry protection will work to cut off power source automatically, so the fire hazard caused by further heating can be avoid. Under this circumstance, please keep calm, unplug the power source, and let the appliance cool down completely, the appliance can work normally now. This will do damage to appliance if it happens often, it is recommended to check first if there is oil in the deep fryer.
FRY GUIDE
These frying times are intended as a guide only and should be adjusted to suit quantity or thickness of food and your own taste.
| Food kind | temperature | weight | |
| Fresh chips | 190°C | 600g | 10-15min. |
| Frozen chips | 190°C | 600g | 10-15min. |
| Fish fillet | 150°C | 450g | 8-12min. |
| Fresh cod or haddock in batter | 190°C | 450g | 10-15min. |
| Frozen cod or haddock in batter | 170°C | 450g | 12-18min. |
| Frozen plaice | 190°C | 450g | 12-18min. |
| Meat | 150°C | 500g | 8-10min |
| Frozen hamburgers | 150°C | 500g | 8-15min. |
| Chicken portions in crumbs small/medium size | 170°C | 500g | 12-15min. |
| Chicken portions in crumbs large size | 170°C | 500g | 12-18min. |
| Fresh chicken drumsticks | 170°C | 500g | 12-15min. |
HINTS FOR USING YOUR FRYER
- Always ensure that you use a good quality lard or oil for deep fryer. Peanut, groundnut, Vegetable or rapeseed oil are ideal, do not use margarine, butter.
- Select the frying temperature according to the food to be cooked, generally, precooked foods need a higher cooking temperature than raw foods.
- Do not use the fryer under wall-mounted cupboards, which may prevent opening the lid fully.
- Cook food thoroughly. Remember that the food may begin to turn golden brown before it is finished.
CLEANING AND MAINTENANCE
Cleaning should only be carried out after the fryer has been switched off, the plug has been removed from the socket, and the fryer completely cooled down.
1) Empty all the oil in oil tank.
2) Take off oil tank, basket, filter cover etc. Then put them in soapy warm water.
3) The detachable oil tank can be removed and completely immersed in water and clean, it must be thoroughly dried before next use to prevent electric shock.
Note: take off the tank with both of your hands, pour all oil into another container, and then clean it.
4) You can detach the lid as followings: open the lid, hold both sides of the lid, make the toggle align to the slots, then pull out the lid. You can assemble it according to followings: hold both sides of the lid with your hands, make the toggle align to the slots on the main body, then insert the toggle into the slots, and the lid can be assembled.
5) Clean them thoroughly then rinse under running water.
6) Wipe the surfaces of all parts and the appliance with warm wet towel then dry them with dry towel.
7) Be sure that handles are assembled and fastened properly. The screws or nuts accessible to secure handle will be periodically checked for looseness.
Caution: over tightening can result in stripping of screws or nuts or cracking of handle.
8) Replace all parts for next use.
WARNING: Never immerse the body of the fryer in water or any other liquids.
Correct Disposal of this product
natural_image
Symbol of a trash bin crossed with no text or numbers, representing environmental restriction (no text present)This marking indicates that this product should not be disposed with other household wastes throughout the EU. To prevent possible harm to the environment or human health from uncontrolled waste disposal, recycle it responsibly to promote the sustainable reuse of material resources. To return your used device, please use the return and collection systems or contact the retailer where the product was purchased. They can take this product for environmental safe recycling.
This appliance is intended to be used in household and similar applications such as:
-staff kitchen areas in shops, offices and other working environments
- farm houses
- by clients in hotels, motels and other residential type environments
- bed and breakfast type environments
The appliances are not intended to be operated by means of an external timer or separate remote-control system.