
RC8536XTW2 - Hot plate WHIRLPOOL - Free user manual and instructions
Find the device manual for free RC8536XTW2 WHIRLPOOL in PDF.


| Product Type | Electric Cooktop |
| Brand | Whirlpool |
| Model | RC8536XTW2 |
| Number of Surface Units | 4 |
| Surface Unit Type | Coil (Electric) |
| Griddle | Included (Non-stick with heating element) |
| Control Type | Push-to-turn rotary knobs |
| Surface Unit Indicators | Yes (dot indicates active unit) |
| Signal Lights | Yes (glow when surface unit is on) |
| Lift-Up Cooktop | Yes (for cleaning underneath) |
| Cooktop Material | Porcelain enamel with chrome trim |
| Reflector Bowls | Chrome, removable |
| Cleaning Method | Manual cleaning; no self-clean |
| Safety Features | Child safety warnings, push-to-turn knobs, signal lights |
| Warranty | 1 year full (parts and labor) |
| Service Contact | Whirlpool COOL-LINE 1-800-253-1301 |
| Replacement Parts | FSP (Factory Specification Parts) |
Frequently Asked Questions - RC8536XTW2 WHIRLPOOL
User questions about RC8536XTW2 WHIRLPOOL
0 question about this device. Answer the ones you know or ask your own.
Ask a new question about this device
Download the instructions for your Hot plate in PDF format for free! Find your manual RC8536XTW2 - WHIRLPOOL and take your electronic device back in hand. On this page are published all the documents necessary for the use of your device. RC8536XTW2 by WHIRLPOOL.
USER MANUAL RC8536XTW2 WHIRLPOOL
lers, Clothes Dryers, Freezers, Refrigerator-Freezers, Ice Makers, Dishwashers, Built-In Ovens and Surface Units, Ranges, Microwave Ovens, Trash Compac

natural_image
Illustration of various server racks arranged in a grid (no text or symbols)Contents
Page
BEFORE YOU USE YOUR COOKTOP 2
IMPORTANT SAFETY INSTRUCTIONS 3
PARTS AND FEATURES 4
USING YOUR COOKTOP 5
Using the Control Knobs 5
Surface Unit Indicators 5
Signal Lights 5
Using the Surface Units 5
Cookware 6
Using the Griddle/Griddle Chart 6
CARING FOR YOUR COOKTOP 8
Control Panel 8
Surface Units and Reflector Bowls 8
Lift Up Cooktop 9
Cleaning Chart 10
IF YOU NEED SERVICE OR ASSISTANCE 10
WHIRLPOOL COOKTOP WARRANTY 12
©1987 Whirlpool Corporation
Before you use your cooktop
Read this Use & Care Guide and the Cooking Guide for important use and safety information.
You are personally responsible for making sure that your cooktop...
• is installed by a qualified installer.
- is properly installed and leveled in a countertop and cabinet that can support the weight.
- is installed in an area protected from the weather.
- is properly connected to the correct electric supply and properly grounded. (See "Installation Instructions.")
• is properly maintained
• is used only for jobs expected of home cooktops.
- is not used by children or anyone unable to operate it properly.
- See "Installation Instructions" for complete information.
See "Cooking Guide" for important safety and use information.
IMPORTANT SAFETY INSTRUCTIONS

WARNING – When using your range, follow basic precautions, including the following:
- DO NOT allow children to use or play with any part of the cooktop, or leave them unattended near it. They could be burned or injured.
- DO NOT store things children might want above the cooktop. Children could be burned or injured while climbing on it.
- DO NOT allow anyone to touch hot surface units. Dark colored units can still be hot enough to burn severely.
- KEEP children away from the cooktop when it is on. The cooktop and surrounding area can get hot enough to cause burns.
-
DO NOT use the cooktop to heat a room. Persons in the room could be burned or injured or a fire could start.
-
KEEP pan handles turned in, but not over another surface unit to avoid burns, injury and to prevent the utensil from being pushed off the cooktop.
- DO NOT use water on grease fires. The fire will spread. Cover fire with large lid or smother with baking soda or salt.
- DO NOT wear loose or hanging garments when using the cook-top. They could ignite if they touch a hot surface unit and you could be burned.
- DO NOT heat unopened containers. They could explode. The hot contents could burn you and container particles could cause injury.
- MAKE SURE control knobs are in the off position when you are finished cooking or when you are not watching to prevent burns.
• FOR YOUR SAFETY •
DO NOT STORE OR USE GASOLINE OR OTHER FLAMMABLE VAPORS AND LIQUIDS IN THE VICINITY OF THIS OR ANY OTHER APPLIANCE. THEY COULD IGNITE CAUSING EXPLOSION AND/OR FIRE.
- SAVE THESE INSTRUCTIONS -
Parts and features
Model RC8536XT
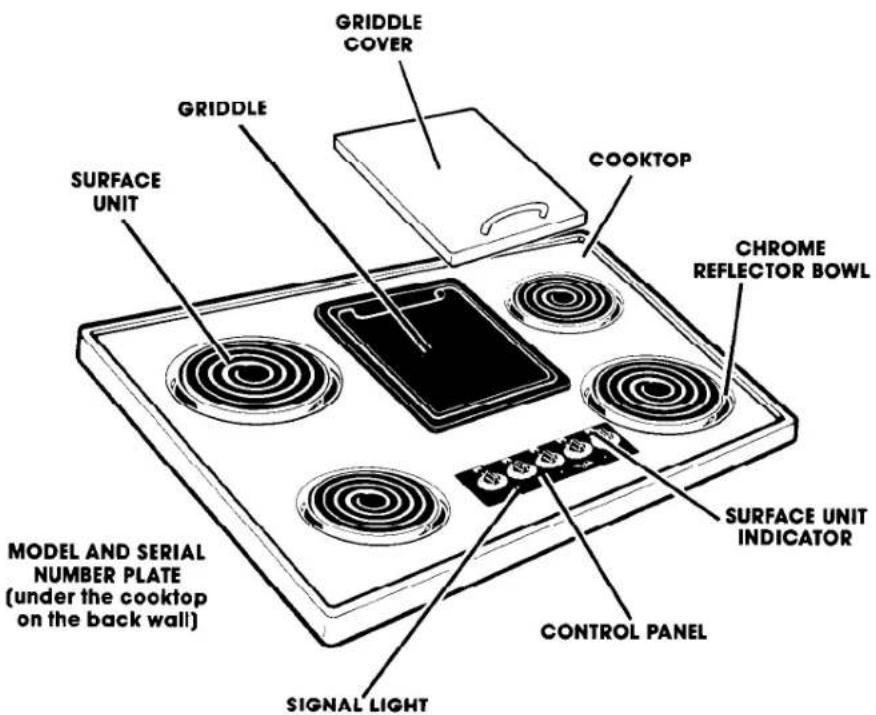
Copy your Model and Serial Numbers here...
If you need service, or call with a question, have this information ready:
-
Complete Model and Serial Numbers (from the plate located as shown).
-
Purchase date from sales slip. Copy this information in these spaces. Keep this book, your warranty and sales slip together in a handy place.
Please complete and mail the Owner Registration Card furnished with this product.
Model Number
Serial Number
Purchase Date
Service Company Phone Number
Using your cooktop
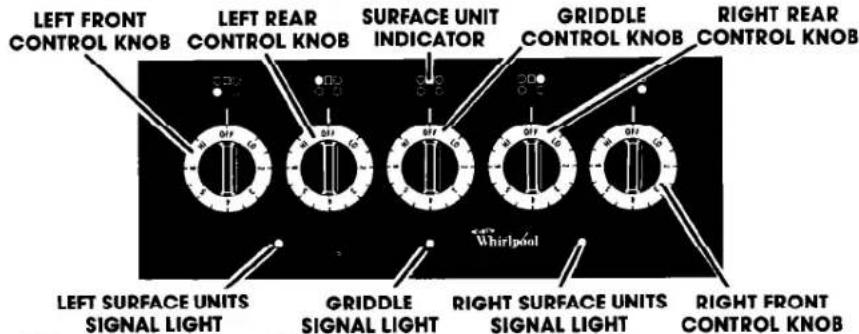
Using the Control Knobs

natural_image
Illustration of a hand pressing down on a rotary knob with mechanical components nearby (no text or symbols)Control knobs must be pushed in before turning them to a setting. They can be set anywhere between HI and OFF.
Surface Unit Indicators
The solid dot in the surface unit indicator shows which surface unit is turned on by that knob.
Signal Lights
A signal light will glow when a surface unit is on. NOTE: When the lights are off the surface units may still be hot. Do not leave or store plastic, pans or other items on surface units.

WARNING: Be sure the signal lights are OFF when you are not cooking.
Someone could be burned or a fire could start if a surface unit is accidentally left ON.
Using the Surface Units
Until you get used to the settings, use the following as a guide.
Use HI to start foods cooking or to bring liquids to a boil. Surface units will not turn red if good contact is made with bottom of pan.
Use 5 or 6 to hold a rapid boil or to fry chicken or pancakes.
Use 4 for gravy, puddings, and icings or to cook large amounts of vegetables.
Use 2 or 3 to keep food cooking after starting it on a higher setting.
Use LO to keep food warm until ready to serve. Set the heat higher or lower to keep food at the temperature you want.
CAUTION: The use of HI heat settings for long periods of time can damage surface units and discolor reflector bowls.
Cookware

natural_image
Simple line drawing of a cup with a handle, no text or symbols present
natural_image
Illustration of hands using a tool to adjust or install a mechanical component (no text or symbols visible)Pans should be the same size or larger than the surface unit to prevent bollovers and hot handles.
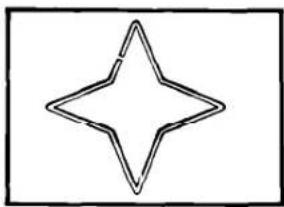
Only use pans with flat bottoms. Flat bottoms allow maximum contact between the pans and the surface units for fast, even cooking. Pans with uneven bottoms or raised pattern on the bottom are not suitable. Flatness of a pan can be checked by placing an edge of a ruler across it. There should not be space between the ruler and the bottom of the pan.
natural_image
Simple geometric star shape outline with no text or symbols
natural_image
Simple line drawing of a traditional incense burner with two handles and a central lid (no text or symbols)
natural_image
Simple line drawing of a cooking pot (no text or symbols)Do not use trivets, woks with skirts, or canners with concave or ridged bottoms.
Using the Griddle

WARNING: To avoid burns and possible electric shock, be sure the griddle is OFF and COOL.
Before Using the Griddle for the First Time:
-
Wash, rinse and dry the griddle. See cleaning instructions on page 10.
-
Lightly wipe with cooking oil to season. You don't have to grease the griddle every time you use it.
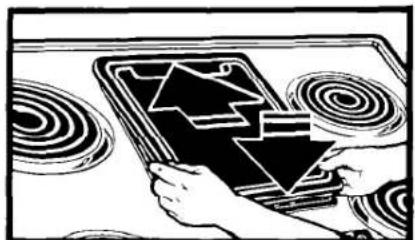
TO INSTALL:
natural_image
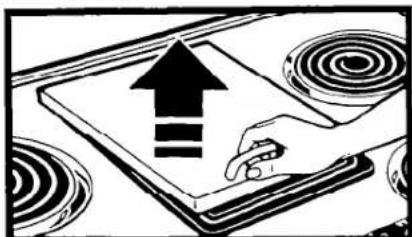
Illustration of a hand holding a tablet with an upward arrow and three horizontal lines, placed on a stovetop with circular patterns nearby (no text or symbols)- Lift and remove the griddle cover.
natural_image
Illustration of hands interacting with a tablet displaying a large arrow and downward arrow, surrounded by spiral patterns (no text or symbols)- Make sure the drip pan and heating element are in place. Insert the griddle with drain slot at rear.
TO COOK:

natural_image
Illustration of a pitcher pouring liquid into a black pot on a stovetop (no text or symbols)- Preheat the griddle, then add food. NOTE: Use only plastic cooking utensils. Metal can scratch the non-stick finish.

- When cooking is finished, turn the griddle OFF.
TO REMOVE:

natural_image
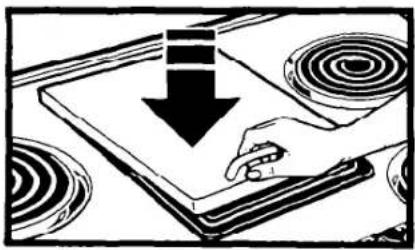
Illustration of hands holding a tablet with abstract geometric shapes around it (no text or symbols)- Lift griddle slightly by both front corners and set aside. NOTE: Make sure griddle is COOL before removing.
natural_image
Illustration of a hand pressing down on a laptop with a downward arrow and spiral patterns (no text or symbols)- Replace the griddle cover.
Griddle Chart
Preheat griddle for 10 minutes on HIGH.
| FOOD | CONTROL SETTING | APPROXIMATE COOKING TIMES (minutes) | |
| Side 1 | Side 2 | ||
| Sausage patties | 5 | 9 | 5 |
| Bacon slices | High | 6 | 2 |
| Ham slice ( 34 ") | 6 | 6 | 6 |
| Hamburgers | 6 | 8 | 8 |
| Hot dogs | 6 | 8 | (turn often) |
| French toast | 6 | 3 | 2 |
| Grilled sandwich | 6 | 312 | 3 |
| Pancakes* | 6 | 2 | 2 |
| Fried eggs* | High | 34 to 1 | 12 |
*Brush hot griddle with 14 teaspoon of cooking oil.
Caring for your cooktop
Control Panel
natural_image
Illustration of a hand cleaning a kitchen sink with multiple kitchen controls and tools (no text or symbols)1.
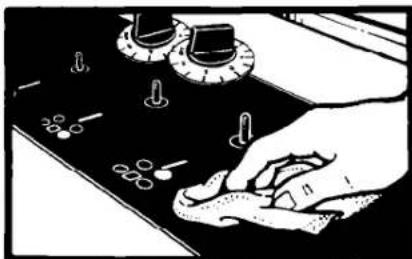
- Pull knobs straight off.
- Use warm soapy water and a soft cloth to wipe the control panel. Rinse and dry well.
Surface Units and Reflector Bowls

WARNING: DO NOT LINE THE REFLECTOR BOWLS WITH FOIL. Shock or fire hazard could result.
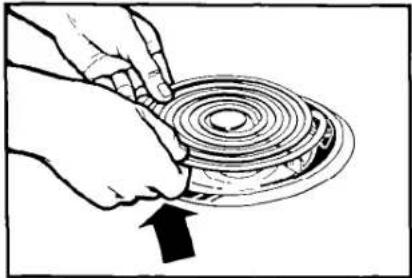
Removing
natural_image
Illustration of hands holding a circular object with an arrow pointing to it (no text or symbols present)1.
- Lift the edge of the unit, opposite the receptacle, just enough to clear the reflector bowl.
natural_image
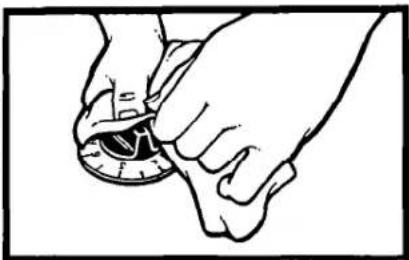
Illustration of two hands adjusting a circular dial with a black arrow (no text or symbols)- Wash knobs in warm soapy water. Rinse well and dry.
- Push the knobs straight back on. Make sure they point to OFF.
natural_image
Illustration of hands holding a circular mechanical component with a rotating knob (no text or symbols)- Pull the surface unit straight away from the receptacle.
- Lift out the reflector bowl. See Cleaning Chart on page 10 for cleaning instructions.
Replacing

natural_image
Line drawing of a hand pressing down on a metal bowl (no text or symbols)
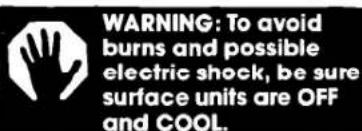
WARNING: To avoid burns and possible electric shock, be sure surface units are OFF.
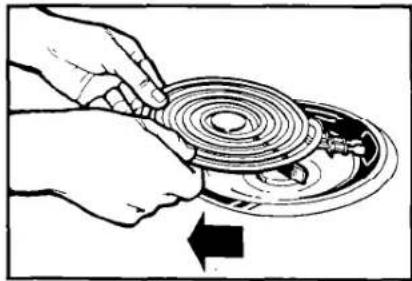
- Line up opening in the reflector bowl with the surface unit receptacle.

natural_image
Illustration of a hand holding a circular mechanical component with an arrow indicating rotation (no text or symbols)- Hold the surface unit as level as possible with the terminal just started into the receptacle.
- Push the surface unit terminal into the receptacle. When the terminal is pushed into the receptacle as far as it will go, the surface unit will fit into the reflector bowl.
CAUTION: Reflector bowls reflect heat back to the utensils on the surface units. They also help catch spills. When they are kept clean, they reflect heat better and look new longer.
If a reflector bowl gets discolored, some of the utensils may not be flat enough, or some may be too large for the surface unit. In either case, some of the heat that's meant to go into or around a utensil goes down and heats the reflector bowl. This extra heat can discolor it. See "Cooking Guide" for further information.
Lift-Up Cooktop
- Make sure all controls are OFF.
- Remove griddle cover, griddle and a front surface unit.
- Lift front of cooktop at surface unit opening.
- Carefully lower the cooktop onto the support rod.

WARNING: Be sure the support rod is positioned all the way to the front. The cooktop could accidentally fall and injure you.
- Wipe up any spills under the cooktop with warm soapy water. Use soapy steel wool pad on stubborn spots.

natural_image
Line drawing of a mechanical device with three circular components mounted on a base frame (no text or symbols)Cleaning Chart
| PART | WHAT TO USE | HOW TO CLEAN |
| Control knob | Warm soapy water and a soft cloth. | Wash, rinse and dry well.Do not soak. |
| Control panel | Warm soapy water or spray glass cleaner. | Wash, rinse and dry well.Follow directions provided with cleaner. |
| Cooktop surfaces (chrome finish and griddle cover) | *Non-abrasive chrome cleaner or Cook Top Polishing Creme, (PN 814009).NOTE: Some yellowing of cooktop is normal from heat of the surface units and pans. | |
| (porcelain finish) | Warm soapy water and a soft cloth or plastic scrubbing pad for stubborn spots. | Make sure cooktop is COOL.Wipe off regularly.Use plastic scrubbing pad for stubborn areas.Do not allow food containing acids (such as vinegar, tomato, lemon juice or milk) to remain on surface. Acids will remove the glossy finish.Do not use abrasive or harsh cleansers. |
| Surface units and griddle heating element | No cleaning required. | Spatters or spills will burn off.Do not immerse in water. |
| Chrome reflector bowls | Warm soapy water and plastic scrubbing pad for stubborn spots. | Clean frequently.Do not use abrasive or harsh cleansers. |
| Griddle | Warm soapy water and a soft cloth or plastic scrubbing pad. | Clean after each use.Wash, rinse and dry well.Use plastic scouring pad for stubborn areas.Do not use metal scouring pads or harsh cleansers. |
*To obtain order information for Cook Top Polishing Creme. write to: Whirlpool Corporation Attention: Customer Service Dept. 1900 Whirlpool Drive LaPorte, IN 46350
If you need service or assistance, we suggest you follow these five steps:
1. Before calling for assistance...
Performance problems often result from little things you can find and fix yourself without tools of any kind.
If nothing operates:
- Is the cooktop wired correctly to a live circuit with the proper voltage? (See "Installation Instructions.")
• Have you checked your home's main fuses or circuit breaker box?
If surface units will not operate or seem to cook too slow:
- Have you checked your home's main fuses or circuit breaker box?
- Is the surface unit control knob turned to a setting other than OFF?
- Are you using the proper cookware? See page 6.
- Do the control knobs turn?
If surface unit control knob(s) will not turn:
• Did you push in before trying to turn? If cooking results aren't what you expected:
• Is the cooktop level?
- Are the pans the size called for in the recipe?
- Are you following a tested recipe from a reliable source?
- Do the cooking utensils have smooth, flat bottoms and fit the surface units being used?
See the Cooking Guide for more information on cooking problems and how to solve them.
2. If you need assistance\*...
Call Whirlpool COOL-LINE® service assistance telephone number. Dial free from anywhere in the U.S.: 1-800-253-1301
and talk with one of our trained consultants. The consultants can instruct you in how to obtain satisfactory operation from your appliance or, if service is necessary, recommend a qualified service company in your area.
3. If you need service\*...

Whirlpool has a nationwide network of franchised TECH-CARE® Service Companies. TECH-CARE service technicians are trained to fulfill the product warranty and provide after-warranty
service, anywhere in the United States. To locate TECH-CARE service in your area, call our COOL-LINE service telephone number (see Step 2) or look in your telephone directory Yellow Pages under:
| APPLIANCES-HOUSEHOLD-MAJOR- SERVICE & REPAIR | OR | ELECTRICAL APPLIANCES-MAJOR- REPAIRING & PARTS | |
| WHIRLPOOL APPLIANCESSFRANCHISED TECH CARE SERVICE | WHIRLPOOL APPLIANCESSFRANCHISED TECH CARE SERVICE | ||
| SERVICE COMPANIES | SERVICE COMPANIES | ||
| XYZ SERVICE CO123 Maple......999-9999 | XYZ SERVICE CO123 Maple......999-9999 | ||
WASHING MACHINES, DRYERS & IRONERS - SERVICING
WHIRI PODI APPLIANCES FRANCHISED TECH-CARE SERVICE
SERVICE COMPANIES XYZ SERVICE CO 123 Maple 904-9099
4. If you have a problem\*...
Call our COOL-LINE service assistance telephone number (see Step 2) and talk with one of our Consultants, or if you prefer, write to:
Mr. Robert Stanley
Division Vice President
Whirlpool Corporation
2000 M-63
Benton Harbor, MI 49022
5. If you need FSP® replacement parts\*...
FSP is a registered trademark of Whirlpool Corporation for quality parts. Look for this symbol of quality whenever you need a replacement part for your Whirlpool appliance. FSP replacement parts will fit right and work right, because they are made to the same exacting specifications used to build every new Whirlpool appliance.
To locate FSP replacement parts in your area, refer to Step 3 or call the Whirlpool COOL-LINE service assistance number in Step 2.
* If you must call or write, please provide: model number, serial number, date of purchase, and a complete description of the problem. This information is needed in order to better respond to your request for assistance.
WHIRLPOOL® MICROWAVE OVEN/ RANGE PRODUCT WARRANTY
ER001
| LENGTH OF WARRANTY | WHIRLPOOL WILL PAY FOR |
| FULL ONE-YEARWARRANTYFrom Date of Purchase | FSP® replacement parts and repair labor to correct defects in materials or workmanship. Service must be provided by a franchised TECH-CARE® service company. |
| LIMITED FOUR-YEARWARRANTYSecond Through Fifth YearFrom Date of Purchase | FSP® replacement magnetron tube on microwave ovens if defective in materials or workmanship. |
| WHIRLPOOL WILL NOT PAY FOR | |
| A. Service calls to:1. Correct the installation of the range product.2. Instruct you how to use the range product.3. Replace house fuses or correct house wiring or plumbing.4. Replace owner accessible light bulbs.B. Repairs when range product is used in other than normal, single-family household use.C. Pick up and delivery. This product is designed to be repaired in the home.D. Damage to range product caused by accident, misuse, fire, flood, acts of God or use of products not approved by Whirlpool.E. Any labor costs during the limited warranty. | |
WHIRLPOOL CORPORATION SHALL NOT BE LIABLE FOR INCIDENTAL OR CONSEQUENTIAL DAMAGES. Some states do not allow the exclusion or limitation of incidental or consequential damages so this limitation or exclusion may not apply to you. This warranty gives you specific legal rights, and you may also have other rights which vary from state to state.
Outside the United States, a different warranty may apply. For details, please contact your franchised Whirlpool distributor or military exchange.

Part No. 3177084
©1987 Whirlpool Corporation
Printed in U.S.A.
: Makers, Dishwashers, Built-In Ovens and Surface Units, Ranges, Microwave Ovens, Trash Compactors, Room Air Conditioners, Dehumidifiers, Automatic
natural_image
Illustration of various server and computer units arranged in a grid (no text or symbols visible)- Contents
- Before you use your cooktop
- IMPORTANT SAFETY INSTRUCTIONS
- Parts and features
- Copy your Model and Serial Numbers here...
- Surface Unit Indicators
- Signal Lights
- Using the Surface Units
- Cookware
- Using the Griddle
- Before Using the Griddle for the First Time:
- TO INSTALL:
- Griddle Chart
- Caring for your cooktop
- Control Panel
- 1.
- Surface Units and Reflector Bowls
- Removing
- Replacing
- Lift-Up Cooktop
- If you need service or assistance, we suggest you follow these five steps:
- Before calling for assistance...
- If nothing operates:
- If surface units will not operate or seem to cook too slow:
- If surface unit control knob(s) will not turn:
- If you need assistance\*...
- Call Whirlpool COOL-LINE® service assistance telephone number. Dial free from anywhere in the U.S.: 1-800-253-1301
- If you need service\*...
- If you have a problem\*...
- If you need FSP® replacement parts\*...
- WHIRLPOOL® MICROWAVE OVEN/ RANGE PRODUCT WARRANTY
Brand : WHIRLPOOL
Model : RC8536XTW2
Category : Hot plate