
RC8850XRH2 - Hot plate WHIRLPOOL - Free user manual and instructions
Find the device manual for free RC8850XRH2 WHIRLPOOL in PDF.


| Product Type | Modular Electric Cooktop |
| Model Number | RC8850XRH2 |
| Brand | Whirlpool |
| Number of Modules | 3 (RC8850XRH model) |
| Standard Module | Grill Module |
| Optional Modules | Coil Element, Solid Element, Griddle, Rotisserie |
| Control Type | Push-to-turn knobs with surface unit indicators |
| Signal Lights | Glow when any surface unit or module is ON |
| Power Supply | Electric, proper voltage required (see installation instructions) |
| Installation | Must be installed by a qualified installer; requires proper ventilation and leveling |
| Grill Module Features | Ceramic rocks, preheat 5 minutes, use front/rear controls |
| Griddle Module Features | Non-stick coating, preheat 10 minutes on HI, use only nylon/plastic utensils |
| Rotisserie Features | Spit with forks, motor plugs in, high/low spit positions |
| Cookware Requirements | Flat-bottomed utensils, same size or larger than element |
| Cleaning Instructions | Do not immerse modules in water; clean grill after each use; solid elements wipe with damp cloth |
| Safety Warnings | Do not use water on grease fires; keep pan handles turned in; do not heat unopened containers |
| Spare Parts | Use FSP (Factory Specification Parts) for replacements |
| Service Assistance | Call Whirlpool COOL-LINE service at 1-800-253-1301 (continental US) |
| Model/Serial Number Location | Under the right module on the inside right wall |
Frequently Asked Questions - RC8850XRH2 WHIRLPOOL
User questions about RC8850XRH2 WHIRLPOOL
0 question about this device. Answer the ones you know or ask your own.
Ask a new question about this device
Download the instructions for your Hot plate in PDF format for free! Find your manual RC8850XRH2 - WHIRLPOOL and take your electronic device back in hand. On this page are published all the documents necessary for the use of your device. RC8850XRH2 by WHIRLPOOL.
USER MANUAL RC8850XRH2 WHIRLPOOL
natural_image
Line drawing of a portable stove with four circular fans and a grid-patterned front panel (no text or symbols)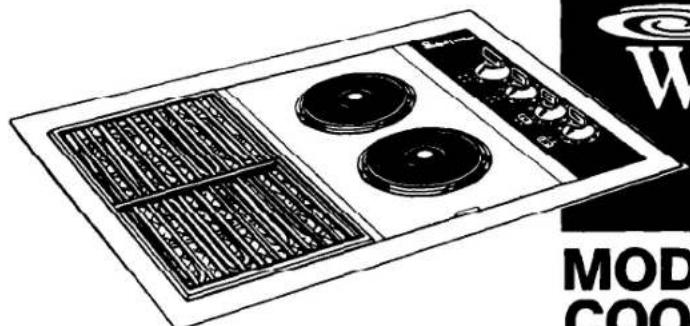
natural_image
Line drawing of a portable electric stove with two circular fans and a side panel (no text or symbols)Whirlpool
MODULAR COOKTOPS
Model RC8850XRH
Model RC8350XRH
Freezers, Refrigerator-Freezers, Ice Makers, Dishwashers, Built-In Ovens and Surface Units. Ranges, Microwave Ovens, Trash Compactors, Room Air Conditioners, Dehumil

natural_image
Black-and-white line drawing of various server racks and appliances (no text or symbols)| Contents Page | Page | |
| BEFORE YOU USE YOUR COOKTOP.... | 2 | Coil Element and Solid ElementModules....12 |
| IMPORTANT SAFETY INSTRUCTIONS.... | 2 | |
| PARTS AND FEATURES.... | 4 | Grill Module....12 |
| USING YOUR COOKTOP.... | 5 | Optional Griddle Module....13 |
| 1. Using the Control Knobs.... | 7 | Optional Rotisserie....13 |
| 2. Using the Coil Element Module.... | 7 | CLEANING AND CARING FOR YOURCOOKTOP....15 |
| 3. Using the Grill Module.... | 7 | |
| 4. Using the Solid Element Module.... | 9 | IF YOU NEED SERVICE OR ASSISTANCE....18 |
| 5. Using the Optional GriddleModule.... | 10 | 1. Before Calling for Assistance....18 |
| 6. Using the Optional Rotisserie.... | 10 | 2. If You Need Assistance....18 |
| 7. Cookware.... | 11 | 3. If You Need Service....19 |
| CHANGING COOKTOP MODULES.... | 12 | 4. If You Have a Problem....19 |
©1985 Whirlpool Corporation
Before you use your cooktop
Read this "Use and Care Guide" carefully for important use and safety information.
You are personally responsible for making sure that your cooktop...
• is installed by a qualified installer.
- is properly installed and leveled in a countertop and cabinet that can support the weight.
- is installed in an area protected from the weather.
- is properly connected to the correct electric supply and properly grounded (See "Installation Instructions.")
- is vented according to manufacturer's instructions, with no restrictions.
• is properly maintained.
• is used only for jobs expected of home cooktops.
- is not used by children or anyone unable to operate it properly.
- See the "Installation Instructions" for complete information.
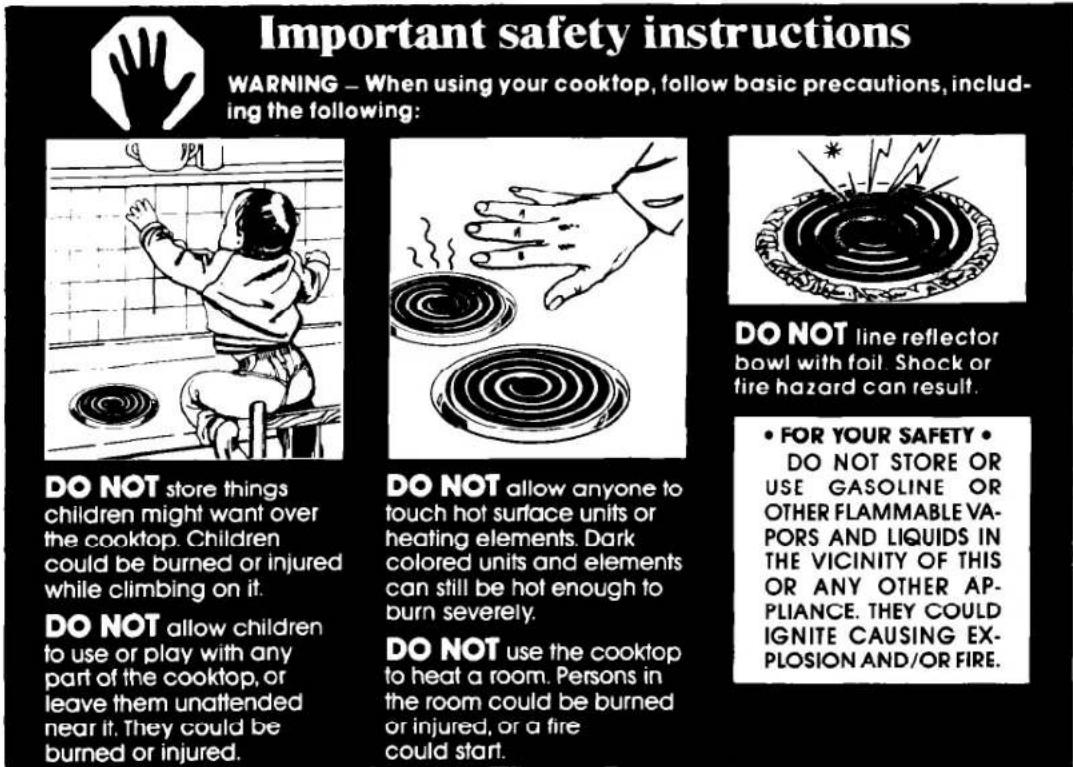
— SAVE THESE INSTRUCTIONS —
DO NOT use water on grease fires. The fire will spread. Cover fire with large lid or smoother with baking soda or salt.
See the Cooking Guide for other important Safety Instructions

natural_image
Illustration of a hand pouring liquid into a container with a lid above (no text or symbols)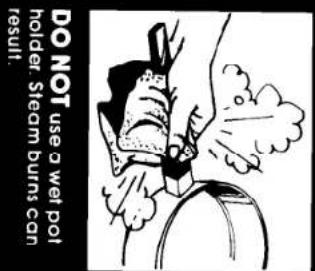
KEEP PAN HANDLES TURDED IN, but not over another surface unit to avoid burns, injury and to help prevent the utensils from being pushed off the surface units
DO NOT heat unopened containers. They could explode. The hot contents could burn and container particles could cause injury

natural_image
Illustration of a keyboard, a magnifying glass, and a spiral-patterned object (no text or symbols)
natural_image
Simple line drawing of a cylindrical object with concentric rings and smoke clouds around it (no text or symbols)DO NOT wear loose or hanging garments when using the cooktop. They could ignite if they touch a hot surface unit or heating element and you needing to burn up.
DO NOT use a towel or other bulky cloth as a pot holder: the bulky cloth could ignite and cause burns.

natural_image
Illustration of a person holding a spiral-patterned object, possibly a mechanical or scientific device (no text or symbols present)
natural_image
Illustration of a hand holding a small object with swirling patterns above (no text or symbols)DO NOT book or im- mesre removable surface units or heading elements. This prevents damage to the elements and possible electrical shock.

natural_image
Hand holding a CD or DVD disc with visible circuitry and components (no text or symbols)MAKE SURF surface units are off when you are finished, and when you often watching.

Parts and features
Model RC8850XRH
OPTIONAL COIL
ELEMENT MODULE (6" and 8" Unit) (Available on all cooktops)

Model RC8350XRH

BOTH THESE MODELS COME STANDARD WITH A GRILL MODULE AND CHOICE OF OPTIONAL SURFACE UNIT MODULES.
Copy your Model and Serial Numbers here...
When you need service or call with a question, have this information ready:
- Complete Model and Serial Number (under the right module on the inside right wall).
- Purchase date from sales slip.
Copy this information in these spaces. Keep this book, your warranty and sales slip together in a handy place. There is no warranty registration to return. Proof-of-purchase is all that is required for in-warranty service.
Model Number
Serial Number
Purchase Date
Service Company Phone Number
Using your cooktop
Control panels
Model RC8850XRH (3 MODULES)
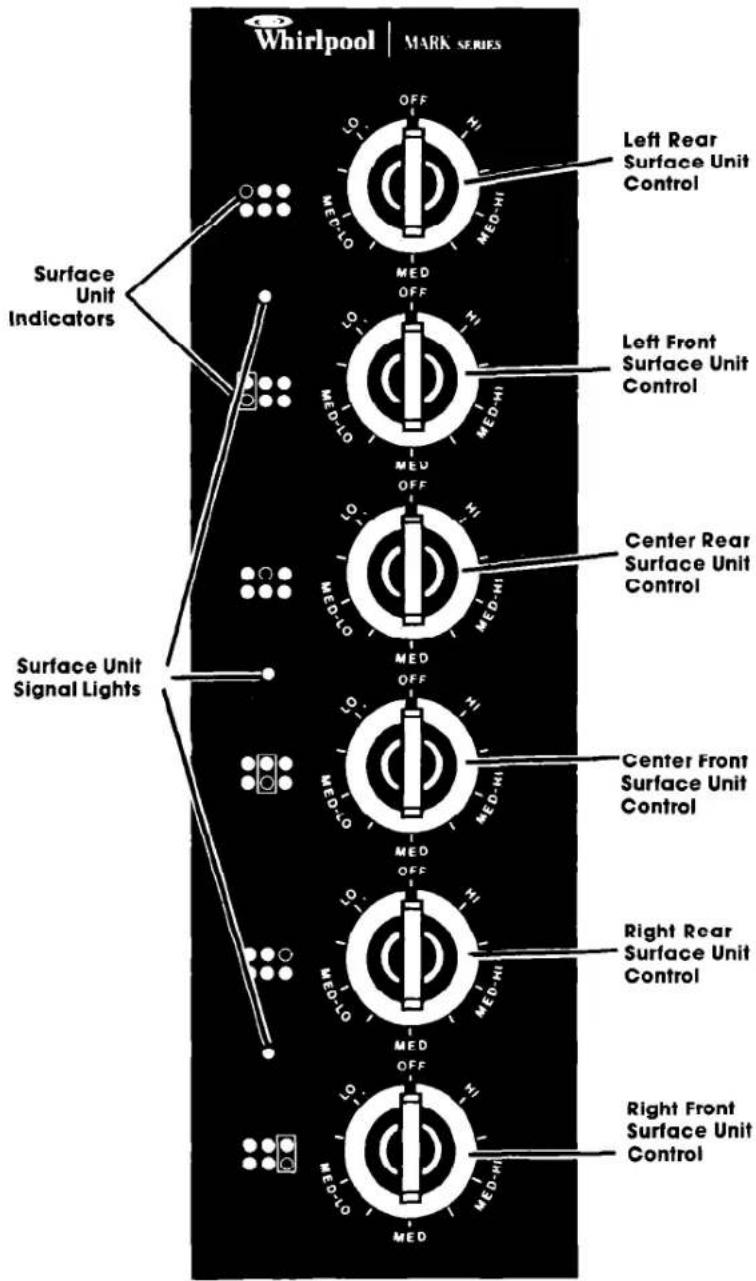
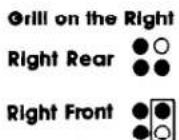
NOTE: The griddle is only operated with the front control knob in the section that it is used. The griddle and grill will only fit in the left or center section in the cooktop. The grill is operated with both control knobs in that section. Use the front and rear control knobs to heat the whole grill. Use only one control knob when heating only half the grill.

NOTE: The griddle is operated with only the front control knob in the section that it is used. The griddle and grill can be used in either side. The grill is operated with both control knobs. Use the front and rear control knobs to heat the whole grill. Use only one control knob when heating only half the grill.
1. Using the control knobs
Surface unit Indicators:
Surface unit indicators show the surface unit or module operated by that control knob.

- The open dot shows the surface unit that is controlled by that knob.

- The box shows that a module, such as a grill, can be controlled by that knob.
- The open dot inside the box shows the surface unit controlled if a surface unit module is installed.
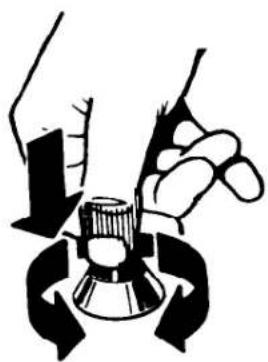
PUSH IN
Turn to
setting.
natural_image
Illustration of hands holding a mechanical component with directional arrows indicating motion (no text or symbols)Control knobs must be pushed in before turning them to a setting. They can be set anywhere between HI and OFF.
One of the signal lights will glow when any surface unit or module is ON. Be sure all lights are OFF when you are not cooking.
2. Using the coil element module
Use only flat-bottomed utensils for best results and to prevent damage to the cooktop. Specialty items with rounded or ridged bottoms (woks, ridged bottom canners or tea kettles) are not recommended.
Until you get used to the settings, use the following as a guide.

Use HI to start foods cooking or to bring liquids to a boil. Surface units will not turn red if good contact is made with bottom of pan.
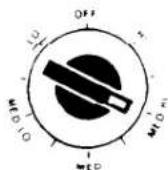
Use MED-HI to hold a rapid boil or to fry chicken or pancakes

Use MED for gravy, puddings, and icings or to cook large amounts of vegetables.
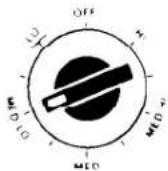
Use MED-LO to keep food cooking after starting it on a higher setting.

Use LO to keep food warm until ready to serve. Set the heat higher or lower within the LO band to keep food at the temperature you want.
CAUTION: The use of HI heat settings for long periods of time can damage surface units and discolor reflector bowls.
3. Using the grill module

natural_image
Front view of a vintage air conditioner unit with ventilation grilles and two circular fans (no text or symbols visible)Before using the grill for the first time:
A. Wash, rinse and dry grill.
• Use warm sudsy water.
B. Lightly wipe with cooking oil to prevent meats from sticking.
For the grill module, use front and rear controls as you would for surface units. Use both controls if you want both the front and back halves of the grill to heat.

natural_image
Four identical diagrams of a solar panel with heat sinks and ventilation grilles, shown from different angles (no text or symbols)

NOTE: A range hood should be used to help get rid of smoke while using the Grill Module (Whirlpool Model RH8330 or RH8336 is recommended for the RC8350XRH Cooktop; Model RH8348 is recommended for the RC8850XRH Cooktop.)
Approximate grill module cooking times
Preheat grill for 5 minutes at suggested setting.
| FOOD | CONTROL SETTING | APPROXIMATE COOKING TIME | COMMENTS | |
| Side 1 | Side 2 | |||
| BEEF | ||||
| Steak - 1" (2.5 cm) | To test steak for doneness, cut near center with sharp knife. | |||
| Rare | HI | 8 Min. | 9 Min. | |
| Medium | HI | 11 Min. | 12 Min. | |
| Well-done | HI | 12 Min. | 13 Min. | |
| Steak - 11⁄2" (3.18 cm) | ||||
| Rare | HI | 10 Min. | 7 Min. | |
| Medium | HI | 13 Min. | 13 Min. | |
| Well-done | HI | 16 Min. | 16 Min. | |
| Hamburgers - 1" (2.5 cm) | ||||
| Rare | HI | 8 Min. | 10 Min. | |
| Medium | HI | 9 Min. | 12 Min. | |
| Well-done | HI | 10 Min. | 13 Min. | |
| FISH | ||||
| Whole - 21⁄2 lbs. (1 kg) | HI | 15 Min. | 15 Min. | When fish flakes easily it is done. Cook all fish on aluminum foil. |
| Fillets - 1 lb. (.5 kg) | HI | 4 Min. | 4 Min. | |
| Lobster Tails | HI | 5 Min. | 5 Min. | |
| CHICKEN | ||||
| Quarters or Pieces - 21⁄2 lbs (1 kg.) | HI | 55 Min. Total | ||
| PORK | ||||
| Loin or Rib Chops - 1⁄4" (1.9 cm) | HI | 15 Min. | 12 Min. | Turn every few minutes. |
| Sparerlbs - 21⁄2 lbs. (1 kg) | HI | 10 Min. | 10 Min. | |
| Ham Slice, fully cooked 1 lb. (.5 kg) | HI | 6 Min | 7 Min. | |
| Sausage | ||||
| Pattles - 1⁄2" (1.3 cm) | HI | 8 Min. | 12 Min. | |
| Links - 10 oz. (.3 kg) | MED-HI | 6 Min. Total | ||
| OTHER | ||||
| Hot Dogs | HI | 8 Min. Total | Turn frequently. | |
| Sandwiches, foil wrapped | HI | 18 Min. Total | ||
| Potatoes, In foil or cut into pieces | HI | 45 Min. Total | Wrap tightly. | |
| Corn on the Cob, foil wrapped | HI | 30 Min. Total | ||
| French Bread, foil wrapped | HI | 10 Min. Total | ||
- Foods cooked on the grill can spatter. It is important to clean all parts after each use. See page 17.
- The ceramic rocks will darken with use.
- Take the grill apart to clean and to remove and store. Do not stack when storing.
- Most utensils safe for use on an outdoor grill can be used with your Grill Module.
- The heating element for the grill cleans itself. Do not put in water.
-
Trim fats from meat before grilling to prevent excessive smoke and flare-up. Meats which normally have a high fat content will produce more smoke and flare-up. Fat meats cook faster than lean meats.
-
If meat begins to cook too quickly, turn the grill control knob to a lower setting.
WARNING -
If grease causes excessive flare-ups:
- Remove food from grill.
- Turn the grill control knob(s) to OFF
- Cover the grill with the griddle or a large metal pan.
- Do not put water on grease fires.
4. Using the solid element module
Use only flat-bottomed utensils for best results and to prevent damage to the cooktop. Specialty items with rounded or ridged bottoms (woks, ridged bottom canners or tea kettles) are not recommended. Solid elements are made of heavy cast-iron to provide even cooking. These elements hold heat longer than conventional type surface units. For best cooking results, use a HIGH setting for a very short period; then use a LOW setting to complete the cooking. Turn the element OFF a few minutes before you are finished cooking.
CAUTION: Elements stay hot for a long time. Do not leave pans on hot elements when cooking is done. Burned food and damage to the cookware could result.
NOTE: A protective limiter is built into each solid element. If pan bottoms are not flat, it will sense uneven cooking temperatures and automatically reduce the heat setting. This will result in longer cooking times. See Cookware, page 11.
Until you get used to the settings, use the following as a guide.
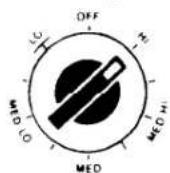
Use HI to start cooking or to bring liquids to a boil. When cooking foods, turn to a LO or MED-LO setting when sizzle starts.
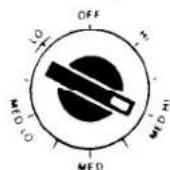
Use MED-HI to hold a rapid boil or to start frying chicken or pancakes. Turn to a LO or MED-LO setting when sizzle starts.
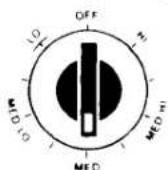
Use MED for gravy, puddings and icings or to cook large amounts of vegetables. Turn to a LO setting to finish cooking.

Use MED-LO to continue cooking after starting at a higher setting.

Use LO to continue cooking after starting at a higher setting, to keep food warm or to melt chocolate or shortening.
5. Using the optional griddle module
The surface unit controls with the box indicator show which control should be used. (Model RC8850XRH: The griddle module will only fit on the left side or center of the cooktop).

Before using the griddle for the first time:
-
Wash, rinse and dry griddle.
-
Use warm sudsy water.
• DO NOT put griddle-in water.
• DO NOT use metal scouring pads or abrasive cleansers. They will damage the non-stick coating on the griddle. -
Lightly wipe with cooking oil to season. You don't have to grease the griddle every time you use it. However, oil or butter adds flavoring and aids browning.
- Preheat on HI, then switch to desired setting.
-
Add food. Use only nylon or plastic utensils. Metal can scratch the non-stick coating.
-
Turn OFF the element when cooking is finished. Leaving it ON can damage the griddle.
Approximate griddle cooking times
| Preheat the griddle for 10 minutes on HI. | |||
| FOOD | CONTROL SETTING | APPROXIMATE COOKING TIME | |
| Side 1 | Side 2 | ||
| Sausage Patties | HI | 8 Min. | 4 Min. |
| Bacon | HI | 3 Min. | 1-2 Min. |
| Ham Slide | MED-HI | 6 Min. | 5-6 Min. |
| Hamburger | HI | 6 Min. | 5 Min. |
| Fish Sticks | MED | 5 Min. | 3-4 Min. |
| Hot Dogs | MED-HI | 5 Min. | 5 Min. |
| Buns | MED-HI | 3 Min. | Total |
| French Toast | MED | 3 Min. | 2-3 Min. |
| Grilled Sandwiches | MED-HI | 3 Min. | 3 Min. |
| Pancakes | MED-HI | 112 -2 Min. | 1-2 Min. |
| Eggs | MED-LO | 3 Min. | 1 Min. |
6. Using the optional rotisserie


- Put one fork on the spill pointing away from the handle.
- Push spit through meat so weight is balanced around the center.
- Put the second fork on the spit pointing toward the meat.
-
Push both forks into the meat and tighten the thumbscrews.
-
Push the pointed end of the split all the way into the motor socket.
- Put the handle end of the spit into the high or low slot (to match the motor socket position) of the Front Support.
- Plug in the rotisserie motor and turn on the Grill Module. See chart below for suggested cooking times.
Approximate rotisserie cooking times:
| FOOD | CONTROL SETTING | SPIT POSITION | COOKING TIME | COMMENTS |
| BEEF | ||||
| Rolled Rib Roast – 31⁄2 lbs. (1.5 kg) Rare | HI | High | 1 hr.55 min. | Meat with an outer layer of fat may take longer to cook. |
| Rolled Rump Roast – 31⁄4 lbs (1.5 kg) | HI | High | 2 hrs. | |
| PORK | ||||
| Rolled Loin Roast – 5 lbs. (2 kg) | HI | High | 3 hrs.15 min. | |
| Spareribs – 11⁄4 lbs. (1 kg) | HI | High | 50 min. | |
| Canadian Bacon – 2 lbs. (1 kg) | HI | High | 1 hr.10 min. | |
| LAMB | ||||
| Rolled Leg – 5 lbs. (2 kg) | HI | High | 2 hrs.30 min. | |
| POULTRY | ||||
| Chicken – 21⁄4 lbs. (1 kg) | HI | High | 1 hr.45 min. | Truss poultry tightly.Run spit in at base on the tail and diagonally through the cavity of the fork of the wishbone. If wing tips brown too rapidly, cover them with foil. |
| Turkey – 61⁄4 lbs. (2.5 kg) | HI | High | 2 hrs.45 min. | |
| Duck – 33⁄4 lbs. (1.5 kg) | HI | High | 2 hrs.15 min. | |
| Cornish Hen – 2-1 lb. (1 kg) | HI | High | 2 hrs. | |
NOTE:
- Use the high spit position for anything over two inches (5 cm) in diameter.
• Turkeys bigger than 8 to 10 pounds should not be put on the rotisserie. Roast them in the oven.
7. Cookware

natural_image
Simple line drawing of a cup with a handle, no text or symbols present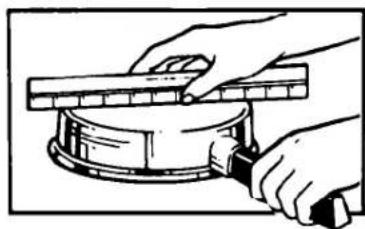
natural_image
Illustration of hands using a tool to press a circular object (no text or symbols visible)Pans should be the same size or larger than the elements to prevent boilovers and hot handles. Only use pans with flat bottoms. Flat bottoms allow maximum contact between the pans and the elements for fast, even cooking. Pans with uneven bottoms or with raised patterns on the bottom are not suitable. Flatness of a pan can be checked by placing an edge of a ruler across it. There should not be space between the ruler edge and the bottom of the pan. DO NOT USE trivets, woks with skirts, or canners with concave bottoms. See illustrations below.

natural_image
Simple geometric star shape outline inside a rectangle (no text or symbols)
natural_image
Simple line drawing of a cooking pot with two handles and a base (no text or symbols)
natural_image
Simple line drawing of a cooking pot (no text or symbols)Changing cooktop modules
The Cooktop Modules will work on either side or the center of the cooktops. NOTE: The grill and griddle module will fit only in the left side or center of the RC8850XRH cooktop.

WARNING: To avoid burns and possible electric shock, first make sure all controls are OFF and the modules are COOL before removing or replacing them.
Coil elements and solid element modules

natural_image
Hand holding a circular object on an induction cooktop, with an upward arrow indicating motion (no text or symbols)- To remove, lift slightly by the handle.
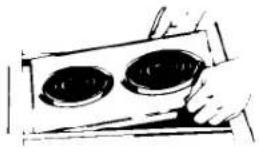
- With both hands, pull module toward you to unplug it.

- Lift out and set aside.

- To replace, use both hands to line up the terminal with the receptacle.

- Push terminal into place until it's plugged in.
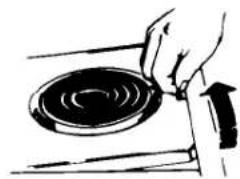
natural_image
Simple line drawing of a hand holding a circular object on a dark surface, with no text or symbols present.- Lower the front with the handle.
Grill module (Model RC8850XRH: The grill module will only fit on the left side or center of the cooktop.)

WARNING: To avoid burns and possible electric shock, be sure all modules are OFF and COOL.

- To remove, lift off the grill.

- Lift front of heating element and pull toward you.

- Lift out basket of ceramic rocks.

- Lift and remove the grease well, being careful not to spill fat drippings.

- To replace, lower the grease well into opening.
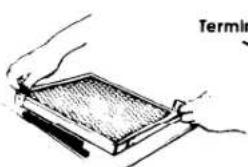
- Put in basket with ceramic rocks.

- Plug heating element terminal into receptacle.

- Place grills over the heating element.
All grill parts must be cleaned after each use to avoid excessive smoke, flare-ups, fat spoilage and odors. See page 17.
Optional griddle module
(The griddle module will only fit in the left side or center of the RC8850XRH cooktop.)

WARNING: To avoid burns and possible electric shock, be sure all modules are OFF and COOL.

natural_image
Simple line drawing of a hand holding a pen over a tablet screen (no text or symbols)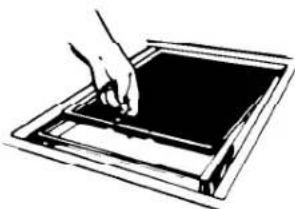
natural_image
Line drawing of a hand pressing down on a digital tablet device (no text or symbols)
natural_image
Simple line drawing of a hand holding a rectangular object with a white arrow, no text or symbols present.-
To remove, lift and remove griddle cover.
-
Lift front slightly by the handle.
-
With both hands, pull griddle toward you to unplug it.
-
Lift out and set aside.


natural_image
Line drawing of a hand holding a pen over a tablet device (no text or symbols)-
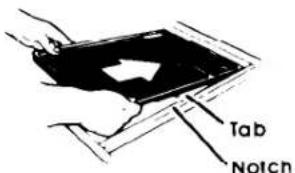
To replace, use both hands to line up the terminal with the receptacle.
-
Push griddle into place until it's plugged in.
-
Slide so tabs on the griddle fit into the notches on each side.
-
Replace cover only over clean, cool griddle.
Optional rotisserie
The optional rotisserie has 4 parts. It is used with the Grill Module.

WARNING: To avoid burns and possible electric shock, be sure all modules are OFF and COOL.


5. Slide back to lock. Tilt top to level.
Cleaning and caring for your cooktop
Control panel and knobs

- First make sure knobs are set on OFF then pull knob straight off.

natural_image
Illustration of a hand using a tool to press or adjust a small object, with no visible text or symbols.- Wash knobs in warm soapy water. Rinse well and dry.

natural_image
Hand holding a knob on a surface with small circular elements, no text or symbols visible- Use warm soapy water and a soft cloth to wipe the panel. Rinse and wipe dry.

- Push the knobs straight back on. Make sure they point to OFF.
Coil elements and reflector bowls
Removing

- Be sure controls are OFF and elements are COOL.

natural_image
Illustration of hands performing a mechanical operation on a circular component (no text or symbols visible)- Pull the coil element straight away from the receptacle

natural_image
Illustration of hands holding a circular object with a pointer, no text or symbols present- Lift the edge of the coil element opposite the receptacle just enough to clear the reflector bowl.

natural_image
Line drawing of a hand holding a bowl with a lid, no text or symbols present- Lift out the reflector bowl.
Replacing
1. Be sure coil elements are OFF.

natural_image
Line drawing of a hand holding a circular component with a central hole (no text or symbols)- Line up opening in the reflector bowl with the coil element receptacle.

natural_image
Hand holding a circular object with concentric rings and a pointer, no visible text or symbols- Hold the coil element as level as possible with the terminal just started into the receptacle.
Reflector bowls reflect heat back to the utensils on the coil elements. They also help catch spills. When they are kept clean, they reflect heat better and look new longer.
If a reflector bowl gets discolored, some of the utensils used may not be flat enough. Or some may be too large for the coil element. In either case, some of the heat that is meant to go into or around a utensil goes down and heats the reflector bowl. This extra heat can discolor it.
natural_image
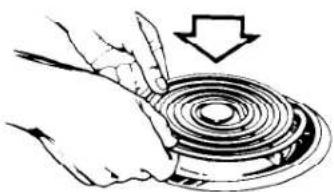
Illustration of a hand holding a circular mechanical component with a downward arrow indicating rotation (no text or symbols)- While pushing the coil element terminal into the receptacle, lift a little on the edge of the unit nearest the receptacle.
- When the terminal is pushed into the receptacle as far as it will go, the coil element will fit into the reflector bowl.
WARNING – DO NOT LINE THE REFLECTOR BOWLS WITH FOIL. Use of foil can cause shock or fire hazard.
Solid elements

WARNING: Elements will not glow red when hot. To avoid burns and possible electric shock, make sure all controls are OFF And the elements are COOL before cleaning.
natural_image
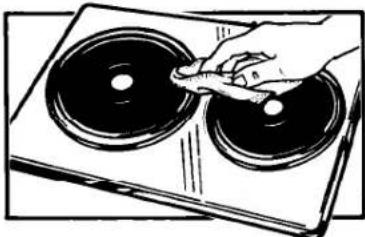
Hand placing a small object onto two circular dark discs on a flat surface (no text or symbols visible)Solid elements are not removable. After each use, wipe off the elements with a damp, soft cloth and soapy water. Burned-on food may be removed with a soapy scouring pad. The red spot in the center of the elements will gradually wash off. This is normal and will not affect the operation of the elements.
IMPORTANT: AFTER EACH CLEANING, HEAT ELEMENTS UNTIL DRY.
To darken elements or to remove rust spots caused by improper drying, apply a thin coat of salt-free oil to the COOL elements, then heat for 3-5 minutes. If elements have dark spots, the oil treatment will improve their appearance but will not eliminate the spots.
The stainless steel spillrings will gradually yellow from the heat of the elements and pans. This is normal. The yellowing can be removed by using stainless steel cleaner on the spillrings.
Cleaning cooktop

WARNING: To avoid burns and possible electric shock, make sure all controls are OFF and the modules are COOL before removing and cleaning. DO NOT PUT MODULES IN WATER.
| PART | WHAT TO USE | HOW TO CLEAN |
| Coll Element Module | Heating ElementDo not clean. | Soil burns off.Do not put in water. |
| Reflector BowlsWarm soapy water and plastic scouring pad or dishwasher. | Wash, rinse and dry well.Do not use metal scouring pads or harsh cleansers. | |
| Grill Module | GrillWarm soapy water and plastic scouring pad. | Wash, rinse and dry well.Do not use metal scouring pads or harsh cleansers. |
| Heating ElementDo not clean. | Soil burns off.Do not put in water. | |
| Splatter ShieldWarm soapy water and a soft cloth. | Wash, rinse and dry well.Use plastic scouring pad for stubborn areas. | |
| Grease Well and FrameWarm soapy water and plastic scouring pad. | Wash, rinse and dry well.Clean after each use.Dishwasher safe. | |
| Solid Element | Heat ElementWarm soapy water and a soft cloth.Soapy scouring pad.Damp, soft cloth and salt-free oil. | Clean after each use.Scrub off burned on food. After each cleaning, heat elements until dry.To darken elements or to remove rust spots, apply thin coat of oil to the COOL elements.Heat for 3-5 minutes.Oil treatment will improve appearance of dark spots, but not eliminate them. |
| SpillringsDamp, soft cloth and stainless steel cleaner. | Scrub stainless steel spillrings with cleaner to remove yellowing. | |
| Griddle Module | Warm soapy water and a soft cloth; plastic scouring pad. | Do not put in water.Clean after each use.Wash, rinse and dry well.Do not use metal scouring pads or harsh cleansers.Use plastic scouring pads if needed.To season, apply thin coat of oil to COOL griddle. Preheat on HI, then turn to desired setting. |
| Rotisserie | Rack and SpitWarm soapy water and plastic scouring pad.MotorWarm soapy water and a soft cloth. | Wash, rinse and dry well.Clean after each use.Do not put in water.Unplug before cleaning.Wipe clean after each use. |
| Area Under Modules | Warm soapy water and a soft cloth. | Wash, rinse and dry well.Do not pour water into the area.Do not drip water into receptacles. |
| Control Panel | Warm soapy water or spray glass cleaner. | Wash, rinse and dry well.Follow directions provided with cleaner. |
| Control Knobs | Warm soapy water and a soft bristle brush. | Wash, rinse and dry well.Do not soak. |
If you need service or assistance, we suggest you follow these four steps:
1. Before calling for assistance...
Performance problems often result from little things you can find and fix yourself without tools of any kind.
If nothing operates:
- Is the cooktop wired correctly to a live circuit with the proper voltage? (See Installation Instructions.)
- Have you checked your home's main fuses or circuit breaker box?
If surface units will not operate:
- Have you checked your home's main fuses or circuit breaker box?
- Are surface units plugged in all the way?
- Do the control knobs turn?
If surface unit control knob or knobs will not turn:
• Did you push in before trying to turn?
If cooking results aren't what you expected:
Surface Units
• Is the cooktop level?
- Are you using pans recommended on page 11?
- Are the pans the size called for in the recipe?
- Do the cooking utensils have smooth, flat bottoms?
- Do the cooking utensils sit the surface unit being used?
Grill
• Did you leave space between the food items?
- Was the grill preheated for the proper amount of time?
- Was food partially frozen or very cold before grilling? Cooking time will be longer.
Solid Elements
- Did you use the HIGH setting for a very short time, then use a LOW setting to complete cooking?
- Are you using heavy metal pans?
- Are you using pans with flat bottoms?
If dark spots or rust appear on elements:
- Apply a thin coating of salt-free oil and heat for 3-5 minutes. (See "Cleaning and Caring for Your Cooktop," pages 15 – 17.)
If stainless steel spillrings are yellowing:
- Use stainless steel cleaner to remove yellowing.
2. If you need assistance\*...
Call Whirlpool COOL-LINE® service assistance telephone number. Dial free from:
Continental U.S. ..... (800) 253-1301
Michigan ..... (800) 632-2243
Alaska & Hawaii ..... (800) 253-1424
and talk with one of our trained Consultants. The Consultant can instruct you on how to obtain satisfactory operation from your appliance or, if service is necessary, recommend a qualified service company in your area.
3. If you need service\*...

Whirlpool has a nationwide network of franchised TECH-CARE® service Companies. TECH-CARE service technicians are trained to fulfill the product warranty and provide after-warranty
service, anywhere in the United States. To locate TECH-CARE service in your area, call our COOL-LINE service assistance telephone number (see Step 2) or look in your telephone directory Yellow Pages under:
APPLIANCES - HOUSEHOLD MAJOR - SERVICE & REPAIR
WHIRLPOOL APPLIANCES FRANCHISED TECH-CARE SERVICE
SERVICE COMPANIES XYZ SERVICE CO 123 Maple 999-9999
ELECTRICAL APPLIANCES- MAJOR - REPAIRING & PARTS
WHIRLPOOL APPLIANCES FRANCHISED TECH CARE SERVICE
SERVICE COMPANIES XYZ SERVICE CO 123 Maple 999-9999
OR
WASHING MACHINES, DRYERS & IRONERS - SERVICING
WHIRLPOOL APPLIANCES FRANCHISED TECH-CARE SERVICE
SERVICE COMPANIES XYZ SERVICE CO 123 Maple 999-9999
4. If you have a problem\*...
Call our COOL-LINE service assistance telephone number (see Step 2) and talk with one of our Consultants, or if you prefer, write to:
Mr. Stephen E. Upton Senior Vice President Whirlpool Corporation Administrative Center 2000 US-33 North Benton Harbor, MI 49022
*If you must call or write, please provide: model number, serial number, date of purchase, and a complete description of the problem. This information is needed in order to better respond to your request for assistance.

FSP is a registered trademark of Whirlpool Corporation for quality parts. Look for this symbol of quality whenever you need a replacement part for your Whirlpool appliance. FSP replacement parts
will fit right and work right, because they are made to the same exacting specifications used to build every new Whirlpool appliance.

Making your world a little easier
Part No. 5040212/816019
©1985 Whirlpool Corporation
Printed in U.S.A.
: Makers, Dishwashers, Built-In Ovens and Surface Units, Ranges, Microwave Ovens, Trash Compactors, Room Air Conditioners, Dehumidifiers, Automatic Washers, Clothe

natural_image
Illustration of various kitchen appliances including washing machines, refrigerators, and washing machines (no text or symbols)- Before you use your cooktop
- — SAVE THESE INSTRUCTIONS —
- Copy your Model and Serial Numbers here...
- Using your cooktop
- Control panels
- Using the control knobs
- Surface unit Indicators:
- Using the coil element module
- Using the grill module
- Approximate grill module cooking times
- Using the solid element module
- Using the optional griddle module
- Before using the griddle for the first time:
- Using the optional rotisserie
- Cookware
- Changing cooktop modules
- Coil elements and solid element modules
- Grill module (Model RC8850XRH: The grill module will only fit on the left side or center of the cooktop.)
- Optional griddle module
- Optional rotisserie
- Cleaning and caring for your cooktop
- Control panel and knobs
- Coil elements and reflector bowls
- Removing
- Replacing
- Be sure coil elements are OFF.
- Solid elements
- IMPORTANT: AFTER EACH CLEANING, HEAT ELEMENTS UNTIL DRY.
- If you need service or assistance, we suggest you follow these four steps:
- Before calling for assistance...
- If nothing operates:
- If surface units will not operate:
- If surface unit control knob or knobs will not turn:
- If cooking results aren't what you expected:
- Surface Units
- Grill
- If dark spots or rust appear on elements:
- If stainless steel spillrings are yellowing:
- If you need assistance\*...
- Call Whirlpool COOL-LINE® service assistance telephone number. Dial free from:
- If you need service\*...
- If you have a problem\*...
Brand : WHIRLPOOL
Model : RC8850XRH2
Category : Hot plate