AW 660 - Washing machine Tricity Bendix - Free user manual and instructions
Find the device manual for free AW 660 Tricity Bendix in PDF.


| Product Type | Freestanding Washing Machine |
| Model | AW 660 |
| Height | 85 cm (33.5") |
| Width | 60 cm (23.6") |
| Depth | 57 cm (22.4") |
| Power Supply Voltage | 220-240 V / 50 Hz |
| Total Power Absorbed | 2550 W (13A) |
| Water Pressure (Min Cold) | 7 psi (4.8 N/cm²) |
| Water Pressure (Min Hot) | 5 psi (3.5 N/cm²) |
| Water Pressure (Max) | 110 psi (76 N/cm²) |
| Maximum Load (Cotton/Linen) | 4.5 kg (10 lb) |
| Maximum Load (Synthetics/Delicates) | 2 kg (4.5 lb) |
| Maximum Load (Wool) | 1 kg (2.2 lb) |
| Maximum Spin Speed | 1200 rpm |
| Number of Programmes | 14 (including prewash, boilwash, hot wash, warm wash, synthetics, delicates, wool, quick wash, rinses, spin, drain) |
| Special Features | Half Load button, Quick Wash button, Mains-on light, adjustable feet, filter indicator |
| Installation Type | Permanent plumbing, hot and cold water inlet, drain hose |
| Energy Efficiency | Not specified, but complies with EEC Directives |
| Noise Level | Not specified |
| Maintenance | Clean filter after each wash, descale periodically, clean dispenser drawer, check inlet filters |
| Safety Features | Door lock (2-minute delay), child lock (not specified), overfill protection (not specified) |
| Warranty | 12 months parts and labour |
Frequently Asked Questions - AW 660 Tricity Bendix
User questions about AW 660 Tricity Bendix
0 question about this device. Answer the ones you know or ask your own.
Ask a new question about this device
Download the instructions for your Washing machine in PDF format for free! Find your manual AW 660 - Tricity Bendix and take your electronic device back in hand. On this page are published all the documents necessary for the use of your device. AW 660 by Tricity Bendix.
USER MANUAL AW 660 Tricity Bendix
Better Products. Better Value.

natural_image
Illustration of various kitchen appliances including refrigerator, washing machines, and microwave (no text or symbols)Operating and Installation Instructions
Model No.
AW 660
CONTENTS
| Important information | Page | 3 | |
| Installation | Page | 4 | |
| Unpacking | Page | 4 | |
| Positioning | Page | 4 | |
| Water inlet | Page | 4 | |
| Water drainage | Page | 5 | |
| Levelling | Page | 5 | |
| Electrical connection | Page | 6 | |
| Getting to know your machine | Page | 7 | |
| Control panel | Page | 7 | |
| Washing hints | Page | 8 | |
| Wash care symbols | Page | 9 | |
| Programmes for cotton and linen | Page | 10 | |
| Programmes for synthetics, delicates and wool | Page | 11 | |
| Use of detergent and additives | Page | 12 | |
| Using your machine | Page | 13 | |
| Washing 4.5 kg of white cotton at 95°C | Page | 13 | |
| Washing 2 kg of synthetic fabrics at 40°C | Page | 14 | |
| Maintenance and cleaning | Page | 15 | |
| Descaling, after each wash, external cleaning | Page | 15 | |
| Cleaning the dispenser drawer, cleaning the drawer recess, the dangers of freezing | Page | 15 | |
| Cleaning the filter | Page | 16 | |
| The water inlet filters | Page | 16 | |
| Servicing | Page | 17 | |
| Tricity Bendix guarantee conditions | Page | 18 | |
| Tricity Bendix service centres | Page | 19 |
TECHNICAL SPECIFICATIONS
| DIMENSIONS | Height | 85 cm (33.5") |
| Width | 60 cm (23.6") | |
| Depth | 57 cm (22.4") | |
| POWER SUPPLY VOLTAGE | 220-240 V/50 Hz | |
| TOTAL POWER ABSORBED | 2550 W (13A) | |
| WATER PRESSURE | Minimum (hot) | 5 psi (3.5 N/cm2) |
| Minimum (cold) | 7 psi (4.8 N/cm2) | |
| Maximum | 110 psi (76 N/cm2) | |
| MAXIMUM RECOMMENDED LOAD | Cotton, linen | 4.5 kg (10 lb) |
| Synthetics, delicate fabrics | 2 kg (4.5 lb) | |
| Wool | 1 kg (2.2 lb) | |
| SPIN SPEED | Maximum | 1200 rpm |

This appliance complies with the following E.E.C. Directives:
- 73/23 EEC of 19.2.73 (Low Voltage Directive) and subsequent modifications;
- 89/336 EEC of 3.5.89 (Electromagnetic Compatibility Directive) and subsequent modifications.
It is most important that this instruction book should be retained with the appliance for future reference. Should the appliance be sold or transferred to another owner, or should you move house and leave the appliance, always ensure that the book is supplied with the appliance in order that the new owner can get to know the functioning of the appliance and the relevant warnings.
These warnings have been provided in the interest of safety. You MUST read them carefully before installing or using the appliance.
INSTALLATION
- This appliance is heavy. Care should be taken when moving it.
- All packing and transit bolts must be removed before use. Serious damage can occur to the product and to property if this is not adhered to. See relevant section in instructions.
- Any plumbing work required to install this appliance should be carried out by a qualified plumber or competent person.
- Any electrical work required to install this appliance should be carried out by a qualified electrician or competent person.
- Care must be taken to ensure that the appliance does not stand on the electrical supply cable.
- If the machine is situated on a carpeted floor, please adjust the feet in order to allow air to circulate freely.
USE
- Always unplug the appliance and turn off the water after use.
- Do not overload the appliance. See relevant section in instruction book.
- Only wash fabrics which are designed to be machine washed. If in doubt, consult the care label on the clothes.
- Before washing, ensure that all pockets are empty and buttons and zips are fastened. Avoid washing frayed or torn articles and treat stains such as paint, ink, rust, and grass before washing. Underwired bras must NOT be machine washed.
- Any objects such as coins, safety pins, nails, screws, stones or any other hard, sharp material can cause extensive damage and must not be placed into the machine.
- Garments which have been in contact with volatile petroleum products should not be machine washed. If volatile cleaning fluids are used, care should be taken to ensure that the fluid is removed from the garment before placing in the machine.
-
Wash small items such as socks, laces, washable belts etc in a washing bag or pillow case as it is possible for such items to slip down between the tub and the inner drum.
-
Only use the advised quantities of fabric softener. Damage to the fabric can ensue if you over-fill. Refer to the manufacturer's recommendations of quantities.
- As some duvets and eiderdowns should be washed in large commercial machines because of their bulk, please check with the manufacturer of the item before washing in a domestic machine.
- The users should always check that they have not left their gas lighters (disposable or otherwise) in their clothing.
- Leave the porthole door slightly ajar between washes to preserve the door seal.
SERVICE/REPAIR
- Under no circumstances should you attempt to repair the machine yourself. Repairs carried out by inexperienced persons may cause injury or serious malfunctioning. Contact your local Tricity Bendix Service Centre. Always insist on genuine Tricity Bendix spare parts.
GENERAL SAFETY
- It is dangerous to alter the specifications or attempt to modify this product in any way.
- This appliance is designed to be operated by adults. Children should not be allowed to tamper with the controls or play with the product.
- Pets and children have been known to climb into washing machines. Please check your drum before use.
- The glass door becomes very hot during the washing cycle. Keep children away from the vicinity of the appliance whilst it is in operation.
- When disposing of your old washing machine, the electric cable must be cut off and the door catch must be made unusable.
Unpacking
Before starting the machine up, the packing must be removed as follows.
You are advised to keep all the packaging for re-use in case the machine is to be transported again.

natural_image
Illustration of a hand using a tool to install or install an open door panel (no text or symbols visible)Using a spanner unscrew and remove the rear right bolt. Lay the machine gently on its back, making sure that the hoses are not squashed.

natural_image
Technical diagram of an electrical connector with internal socket and mounting base (no text or symbols)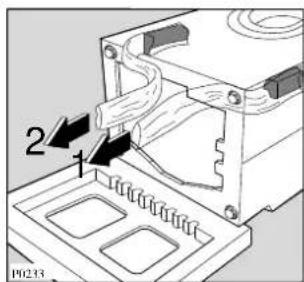
Remove the polystyrene block from the bottom of the machine.
Carefully slide out the right polythene bag (1), removing it toward the centre of the machine.
Repeat the operation for the left polythene bag (2), removing it toward the centre of the machine.

natural_image
Illustration of a hand using a screwdriver to adjust or install a mechanical component (no text or symbols visible)Remove the polystyrene base, set the machine upright and unscrew the two remaining rear bolts.

natural_image
Hand holding a cylindrical component with a black arrow indicating direction (no text or symbols)
Slide out the 3 plastic spacers and plug the 3 holes with the 3 plastic plugs which you can find at the back of the machine.
Positioning
Your new washing machine has been designed to be permanently plumbed in to your home's water supply and drainage system. However, if this is not possible, it may be connected to suitable existing taps with the drain hose discharging into a sink.
The appliance has two inlet hoses, hot and cold, with female 3/4" BSP thread connectors. If this connection is not compatible with the plumbing of the existing installation, a variety of connectors are available from good hardware stores and plumbers merchants to suit most domestic plumbing. Any alteration to your existing plumbing must be carried out by a competent person, or qualified plumber.
Water inlet
The inlets on the back of the appliance are colour coded, blue for cold and red for hot.
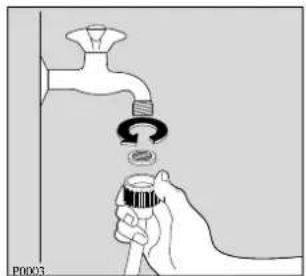
Before connecting the hoses be sure to fit the mesh filters supplied as per diagram.
If only a cold water supply is available, connect the two hoses to a cold water outlet by means of a «Y» connection piece.
Installation should comply with local water authority and building regulations' requirements.
The appliance must be given a separate cold water supply and not be connected to a mixer tap, a single outlet water heater or a booster pump. A minimum water pressure of 7 psi is required for safe operation of the appliance.
If you cannot make the cold water connection direct from the rising mains, you may be able to operate the appliance from your cold water storage system.
There should be a minimum distance of 5.02m (16 ^1/2 ft) between the appliance's inlet and the bottom of the tank.
There will be sufficient pressure for the hot water supply from the hot water cylinder if the height between the appliance's inlet and the bottom of the cold water storage cistern (not between the appliance and hot water cylinder) is at least 2.74m (9ft).

natural_image
Diagram of a pipe fitting with a curved arrow indicating direction (no text or symbols)Set the hoses correctly by loosening the ring nuts. After positioning the inlet hoses, be sure to tighten the ring nuts again to prevent leaks.
Water drainage
If you intend the drain hose from the machine to empty into a sink, make sure that the sink is empty and that the plug hole is not blocked.
If the machine is permanently plumbed in, hook the end of the hose into a standpipe installed for the purpose. The standpipe must have an internal diameter of at least 40 mm (1 ^1/2 ) in order that there is an air gap between the drain hose and the standpipe. Make sure, that it is designed in such a way, that the end of the drain hose cannot be covered with water.
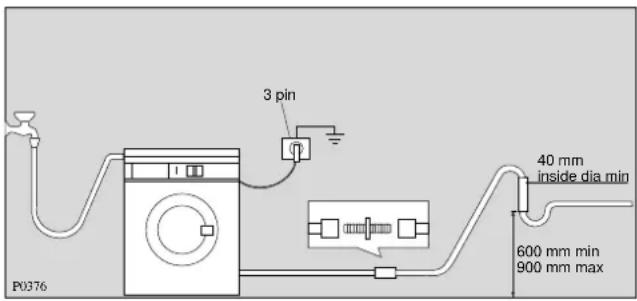
Important
Before connecting up the machine to new pipework or to pipework that has not been used for some time, run off a reasonable amount of water to flush out any debris that may have collected in the pipes.
Whether discharging into a sink or a standpipe check that the end of the drain hose is neither too high nor too low. The top of the curve in the hose's end should be no more than 90 cm (35.4"), and no less than 60cm (23.6") above floor level.
Levelling

natural_image
Illustration of hands holding a hexagonal nut with directional arrows indicating rotation (no text or symbols)Level the washing machine by raising or lowering the feet. The feet may be tight to adjust as they incorporate a self locking nut, but the machine MUST be level.
Any necessary adjustment can be made with a spanner. Accurate levelling
prevents vibration, noise and displacement of the machine during operation.
Some vibration is inevitable, especially if mounted on a wooden floor.
Sprung wooden floors are particularly susceptible to vibration. For advice, consult a builder. If possible, always place the machine on a solid floor.
Special conditions
If the floor is carpeted with a deep-pile carpet or covered with crumbly or soft material, insert a rigid support base under the feet to prevent noise, vibration or displacement. The base should protrude a few centimetres beyond the edges of the machine.
Warning
The machine should NOT be placed on deep pile carpeting.
Note
Please ensure that when the appliance is installed it is easily accessible for the engineer in the event of a breakdown.
All plumbing and electrical work required to install this appliance must be carried out by competent persons or qualified plumbers or electricians.
In the interest of the environment
Washing machines and dishwashers should be connected to the FOUL drainage system, the water will then be taken to a sewage works for treatment before being discharged safely into a river.
It is essential that these appliances are not connected to the surface water drainage system as this water is discharged directly into a river or stream and may cause pollution.
If you require any further advice please contact your local authority drainage department.

flowchart
graph TD
    A["Rainwater Run-Off"] --> B["SIHOWER"]
    B --> C["BATH"]
    C --> D["SINK TOILET"]
    D --> E["RIDET"]
    E --> F["WASHING MACHINE"]
    F --> G["DISIWASHER"]
    G --> H["FOUL DRAIN"]
    H --> I["FOUL SEWERS"]
    I --> J["SEWAGE TREATMENT WORKS"]
    J --> K["TREATED DISCHARGE"]
    K --> L["RIVER"]
    M["Surface Water Drains & Sewers"] --> N["UNTREATED DISCHARGE"]
    O["RIVER"] --> P["P0987"]
Electrical connections
WARNING: THIS APPLIANCE MUST BE EARTHED.
The manufacturer declines any liability should this safety measure not be observed.
If the plug that is fitted to your appliance is not suitable for your socket outlet, it must be cut off and the appropriate plug fitted.
Remove the fuse from the cut off plug.
The cut off plug should then be disposed of to prevent the hazard of shocks in case it should be plugged into a 13 Amp socket in another part of your home.
IMPORTANT
The wires in the mains lead are coloured in accordance with the following code:
Green and Yellow - Earth
| Blue | - | Neutral |
| Brown | - | Live |
If you fit your own plug, the colours of the wires in the mains lead of your appliance may not correspond with the markings identifying the terminals in your plug, proceed as follows:
GREEN & YELLOW 13 AMP FUSE
13 AMP
Connect the green and yellow (earth) wire to the terminal in the plug which is marked with the letter «E» or the earth symbol or coloured green and yellow.
Connect the blue (neutral) wire to the terminal in the plug which is marked with the letter «N» or coloured black.
Connect the brown (live) wire to the terminal in the plug which is marked with the letter «L» or coloured red.
The plug moulded on to the lead incorporates a fuse. For replacement, use a 13 Amp BS1362 fuse. Only ASTA or BSI approved fuses should be used.
The plug must not be used if the fuse cover/carrier is lost. The cover/carrier is indicated by the coloured insert at the base of the plug.
A replacement cover/carrier must be obtained from your local Tricity Bendix Service Centre.
There is a list of these at the end of this instruction book.
Control panel

1 Detergent dispenser drawer

Symbols
Prewash
Wash
Fabric softener
2 ON/OFF button ①
By depressing this button the machine starts operating. When depressing it again, the machine stops.
3 Half load button
Select this button to reduce water consumption on the rinse cycle when washing a smaller load of cottons or linens (maximum load size = 2.25 kg).
4 Quick wash button
By depressing this button on programmes 2-3-4 and 6 the wash time will be reduced by approx. 20 mins. This is suitable only for garments which are lightly soiled.
5 Mains-on light
This light illuminates when the machine starts working and goes out when the ON/OFF button is released.
6 Programme selector knob
With the programme selector knob you choose the desired washing programme. Turn it clockwise.
Before setting the knob to any position the machine must be switched off by depressing the ON/OFF button.
Washing hints
Do NOT overload the machine. Weigh the laundry the first few times you use the appliance.
The average weights of the most common items are listed below as a guide:
1000g = 1 kg
| Sheet | 700-1000 |
| Pillow case 100-200 g | |
| Tablecloth | 400-500 |
| Serviette | 50-100 |
| Tea towel 70-120 g | |
| Linen hand towel 100-150 g | |
| Towelling hand towel 150-250 g | |
| Towelling bath towel 700-1000 g | |
| Bath robe 1000-1500 g | |
| Man's shirt 200-300 g | |
| Apron | 150-200 |
- Load the laundry loosely alternating large items with small ones.
- Sort the laundry according to the type of fabric, colour-fastness and how dirty it is.
- Avoid washing unhemmed or torn items as they may unravel.
- Before washing, empty all pockets of small objects which may have been left inside (coins, keys, screws etc). as these could damage the drain pump.
- When washing curtains, remove the hooks.
- Close poppers and zips and fasten loose buttons.
- It is essential to wash new coloured items separately when washing for the first time.
- When washing fabrics requiring different wash temperatures together, always select the lowest temperature.
- White items should not be washed with coloured items.
- Very small items (handkerchiefs, ribbons, socks etc) should be washed in a washing bag or a pillow case.
- Use a good quality detergent suitable for automatic washing machines.
- Use the correct quantities of detergent.
- For wool, use gentle detergent only in small quantities.
-
Bleach is very corrosive; it should be used with care and kept out of reach of children.
-
Some stains such as fruit, wine, grass, rust etc. are difficult to remove and should be treated before washing with specific products, which can be found in most household shops. In some cases it may help to soak the stain before washing with a special pre-soak product or biological detergent.
- Only wool marked «Pure New Wool - washable, pre-shrunk» can be washed in the machine using the wool programme; other types of wool should be washed by hand or dry cleaned.
- If you have used the machine to wash, rinse or spin only non-colour fast garments, there may be dye left in the sump. To ensure any subsequent wash is not contaminated with the dye, select and carry out a rinse and spin programme, without any garments, to ensure that any dye is removed from the sump.
- Once you have finished using the machine, you are advised to unplug it and turn off the water taps.
WASH CARE SYMBOLS
Wash care labels inside garments recommend how to launder your clothes with the best results. The care labelling code is in line with care labelling used in the rest of Europe. The symbols used make it easy to select the correct programme on your washing machine.
WASHING SYMBOL
WASH ACTION FABRIC
 | Normal (Maximum) | White Cotton or Linen without Special Finishes |
 | Normal (Maximum) | Cotton, Linen or Viscose without Special Finishes Colourfast at 60°C. |
 | Reduced (Medium) | Nylon, Polyester/Cotton, Viscose with Special Finishes, Cotton/Acrylic Mix. |
 | Normal (Maximum) | Cotton, Linen or Viscose Colourfast at 40°C but not 60°C. |
 | Reduced (Medium) | Acrylics, Acetate, Triacetate, Wool mixes, Polyester/wool blends. |
 | Much Reduced (Minimum) | Wool, wool mixtures, Silks |
 | Hand wash only | Do not machine wash |
| BLEACHING | ||
 | Chlorine bleach may be used | |
| IRONING | ||
 | Hot iron | Cotten, Linen, Viscose |
 | Warm iron | Polyester mixtures, Wool |
 | Cool iron | Acrylic, Nylon, Polyester |
| DRY CLEANING | ||
 | May be dry cleaned. Other letters and/or a bar beneath the circle will indicate the required process to the dry cleaner. | |
| TUMBLE DRYING | ||
 | May be tumble dried | |
 | with high heat setting | |
 | with low heat setting | |
| [76W] | A cross through any symbol means «DO NOT» | |
IMPORTANT NOTES
For best results, always use the dispenser drawer for dispensing detergents and liquid additives.
Once the dispenser has been filled, close it by pushing it in gently. This is particularly important if you are using fabric conditioner to avoid the conditioner entering the machine prematurely.
When using liquid detergent and a prewash programme, place the detergent into the correct compartment in the dispenser drawer, after the prewash has finished.
Programmes for cotton and linen
Recommended load: max. 4.5 kg (10 lb)
| Programmes | Degree of soil | Compartments to use (if required) | Programme dial position | Description | |
| 95 | PREWASH & BOILWASH | Heavy |  | 1 | Prewash at 40°C Wash at 95 °C 4 rinses Spin |
| 95 | BOILWASH Normal |  | 2 | Wash at 95 °C 4 rinses Spin | |
| 60 | HOT WASH Normal |  | 3 | Wash at 60 °C 4 rinses Spin | |
| 40 | WARM WASH Light |  | 4 | Wash at 40 °C 4 rinses Spin | |
| SPIN 1200 | 5 | Spin at 1200 rpm |
Water filling: 30°/40°/50° programmes: cold water filling
60° programmes: hot and cold filling
95° programmes: hot filling
Programmes for synthetics, delicates and wool
Recommended load: max. 2 kg (4.5 lb); wool max. 1 kg (2.2 lb)
| Programmes | Degree of soil | Compartments to use ( if required) | Programme dial position | Description | |
| NORMAL WASH | Normal | 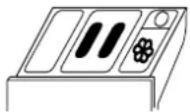 | [X005] | Wash at 50 °C3 rinsesStop with water left in the tub | |
| DELICATE WASH | Normal |  | [X0X5] | Wash at 40 °C3 rinsesStop with water left in the tub | |
| WOOL WASH | Normal |  |  | Wash at 40 °C3 rinsesStop with water left in the tub | |
| 30 QUICK & COOL | Light | 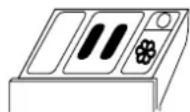 |  | Wash at 30 °C3 rinsesStop with water left in the tub | |
| RINSES | 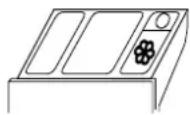 |  | 3 rinses, with fabric softener, if requiredStop with water left in the tub | ||
| CONDITIONER RINSE |  | [933Y] | 1 rinse, with fabric softener, if requiredStop with water left in the tub | ||
| SPIN 650 | [28ZZ] | Draining of water and short spin at 650 rpm | |||
| DRAIN |  | Draining of water |
Important! At the end of the last rinse, the washing machine stops without draining the water so that the garments do not crease. To drain the water, select programme 12 (short spin) or 13 (draining).
WHICH DETERGENT TO USE?....
For most clothes and household textiles, CONVENTIONAL DETERGENTS will give good washing results. Conventional detergents are available in either a biological, such as Ariel, or a non-biological form, such as Fairy, and are particularly suitable for whites. Biological detergents provide improved stain removal, especially at lower temperatures.
For coloured clothes and household textiles, you should use COLOUR DETERGENTS, like Ariel Color, which are designed to maintain the original colour of these items, as well as providing excellent cleaning performance. These are all biological detergents. They are particularly suitable for matching and co-ordinated sets of lingerie, bedding or towels.
For washing wool and silk, COLOUR DETERGENTS ARE NOT SUITABLE.
For wool items, you should use a GENTLE/FINE WASH DETERGENT, such as Dreft, which has been tested and approved by the International Wool Secretariat and carries the 'Woolmark'. A similar detergent should also be used for silk.
To maintain the appearance of your clothes and household textiles and to make them last longer, you should use different types of detergent for different washes, whether for whites, colours or delicates. Although this may require buying two or three different products, you do not need to use any more powder, or liquid, than if you were buying just one.
AND IN WHICH FORM?
Not only are there different types of detergent, but they are also available in different forms.
POWDERS OR LIQUIDS
Powders and their liquid equivalent provide similar cleaning properties, although liquids dissolve faster when hand washing and at lower temperature washes.
BIOLOGICAL OR NON-BIOLOGICAL
All Biological detergents contain enzymes.
Different types of enzymes assist with the removal of protein, starch and fat-based stains, such as blood, egg, chocolate and gravy. However, some people prefer non-biological detergents which do not contain enzymes.
LOW SUDS
In a front loading automatic washing machine, you should only use a low suds detergent. The majority of detergents are now low suds products.
«BIG BOX» OR COMPACT
Compared to their traditional «Big Box» equivalents, compacts (or concentrates as they are also known) have an improved performance and environmental profile, as well as requiring a smaller dosage level.
FABRIC CONDITIONERS
These are ideal for improving 'softness'. They also reduce static cling on synthetics and make ironing easier. Fabric Conditioners come in three forms:
Liquids (regular or concentrated) which work in the final rinse.
Sheets for use in the tumble dryer, and
Combined Detergent and Fabric Softener
USE OF DETERGENT AND ADDITIVES
Choosing the Right Detergent
Always use a low lather powder or liquid. This is important as too much lather prevents the articles from being properly cleansed and may damage the machine.
Use of Powder Detergent
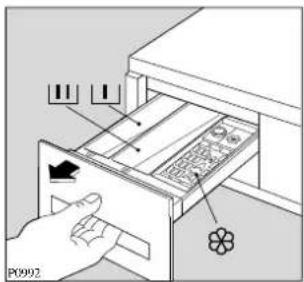
The washing powder should be placed in the appropriate compartments in the detergent dispenser drawer before starting the programme.
Use of Liquid Detergent
A liquid detergent can be used in the middle compartment of the dispenser drawer. Start the machine immediately upon placing the liquid in the dispenser drawer.
Use of Fabric Conditioners
Any liquid additives for softening or dressing the laundry must be poured into the appropriate compartment of the detergent dispenser drawer before starting the programme.
The compartment with the symbol ⚙ for softeners and dressing agents; never exceed the MAX. level.
When using super concentrated fabric conditioners, please follow the manufacturer's instructions carefully.
WASHING 4.5 KG OF WHITE COTTON AT 95°C
Suppose you have 4.5 kg of normally dirty laundry to wash. It is white cotton and is suitable for high temperature washing.
1 Load the laundry

natural_image
Illustration of hands cleaning a circular object with a cloth (no text or symbols)Open the door by pulling the catch outward. Load the items one at a time and close the door.
2 Measure out the detergent
natural_image
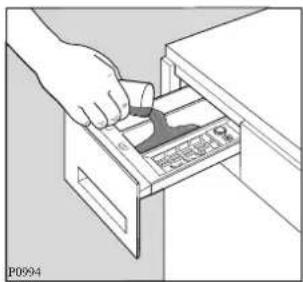
Illustration of a hand inserting a device into a drawer (no text or symbols visible)Pull out the detergent dispenser drawer from the control panel. Measure out the amount of detergent required and pour into the main wash compartment.
If you wish to carry out a programme with prewash, pour the amount of detergent required into the «prewash» compartment.
3 Add the fabric softener if required

natural_image
Line drawing of a hand inserting a component into a file drawer (no text or symbols visible)Pour the fabric softener, if required, into the compartment marked ✿.
Do not exceed the MAX level and then close the drawer gently.
4 Select the required options
Depress Half load button and/or Quick wash, if desired.
5 Select the required wash programme

Turn the programme selector dial clockwise to the required programme (2).
6 Start the machine
Before starting up the machine check that:
- the appliance is plugged in
- the water supply taps are turned on
- the drain hose is correctly and securely positioned
- the door and the detergent dispenser drawer are closed.

natural_image
Simple line drawing of a finger pressing down on a button (no text or symbols)Depress the ON/OFF button: the mains-on light illuminates and the machine starts operating.
7 At the end of the programme
The machine stops automatically.
The door is controlled by a safety device which releases 2 minutes after the end of the programme.
Switch the machine off by depressing the ON/OFF button again. The mains-on light goes out.
When the programme has finished you are advised to unplug the appliance and turn off the water taps.
WASHING 2 KG OF SYNTHETIC FABRICS AT 40°C
Suppose you have 2 kg of synthetic fabric laundry to wash. They are rather delicate fabrics and should not be washed at a high temperature.
1 Load the laundry

natural_image
Illustration of hands cleaning a circular object with cloth (no text or symbols)Open the door by pulling the catch outward.
Load the items one at a time and close the door.
2 Measure out the detergent


natural_image
Illustration of a hand inserting a component into a drawer with a label (no text or symbols on the diagram itself)Pull out the detergent dispenser drawer from the control panel. Measure out the amount of detergent required and pour into the main wash compartment.
3 Add the fabric softener if required
natural_image
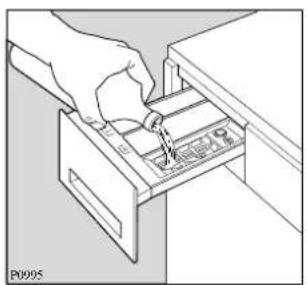
Illustration of a hand inserting a file into a drawer with a tool (no text or symbols visible)Pour the fabric softener, if required, into the compartment marked ✿.
Do not exceed the MAX level and then close the drawer gently.
4 Select the required wash programme
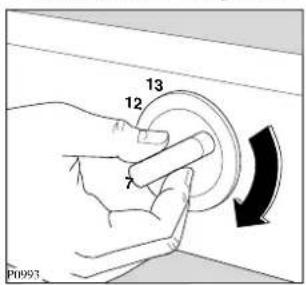
Turn the programme selector dial clockwise to the required programme (7).
5 Start the machine
Before starting up the machine check that:
- the appliance is plugged in
■ the water supply taps are turned on - the drain hose is correctly and securely positioned
- the door and the detergent dispenser drawer are closed.

Depress the ON/OFF button: the mains-on light illuminates and the machine starts operating.
6 At the end of the programme
The machine will stop after the last rinse with the water left in the wash tub, to prevent the fabric from creasing. To drain the water select programme 12 or 13.
The door is controlled by a safety device which releases 2 minutes after the end of the programme.
Switch the machine off by depressing the ON/OFF button again. The mains-on light goes out.
When the programme has finished you are advised to unplug the appliance and turn off the water taps.
Before any maintenance or cleaning is carried out you must DISCONNECT the appliance from the electricity supply.
Descaling
The water we normally use contains lime. It is a good idea to periodically use a water softening powder in the machine. Do this separately from any laundry washing, and according to the softening powder manufacturer's instructions. This will help to prevent the formation of lime deposits.
After each wash
Leave the door open for a while. This helps to prevent mould and stagnant smells forming inside the appliance. Keeping the door open after a wash will also help to preserve the door seal.
External cleaning
Clean the exterior cabinet of the appliance with soap and water only, and then dry thoroughly.
Cleaning the dispenser drawer
From time to time the washing powder and additive dispenser drawer should be cleaned.
Remove the drawer by pressing the catch downwards and by pulling it out. Flush it out under a tap, to remove any traces of accumulated powder.

natural_image
Illustration of hands inserting a card into a drawer with arrows indicating direction (no text or symbols)
Cleaning the drawer recess

natural_image
Illustration of a hand using a tool to cut or remove a component, no text or symbols presentHaving removed the drawer, use a small brush to clean the recess, ensuring that all washing powder residue is removed from the upper and lower part of the recess.
Replace the drawer and run the rinse programme for a few minutes without any clothes in the drum.
The dangers of freezing
If the machine is exposed to temperatures below 0^ C, certain precautions should be taken.
- Turn off the water taps.
- Select a wash programme and run for a few seconds.
- Unscrew the inlet hoses.
- Unhook the drain hose from the rear support and position the end in a bowl. Run the draining programme for a few seconds.
- When you intend to start the machine up again, make sure that the room temperature is above 0°C.
Cleaning the filter
The water drain filter
A clean filter is important for the correct functioning of the machine, and should therefore be cleaned after every wash.

natural_image
Hand holding a small rectangular object with an arrow pointing to it, against a plain background (no text or symbols)Open the filter door and place a container underneath to catch any spillage. If the filter is blocked and the machine is unable to drain you will need to drain the water manually from the machine at this stage. To do this, unhook the drain hose from the
standpipe or sink and hold the end of the hose over a bowl on the floor. The water should drain by gravity into the bowl. When the bowl is full, hook the hose back up and empty the bowl. Repeat the procedure until water stops flowing out.
Unscrew and remove the filter.

natural_image
Illustration of a hand pressing a button into a device with an arrow indicating rotation (no text or symbols)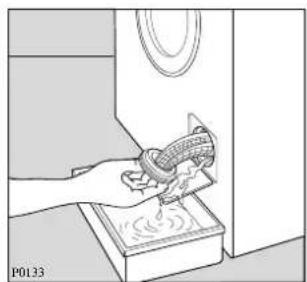
natural_image
Illustration of a hand using a tool to clean or store items on a counter (no text or symbols visible)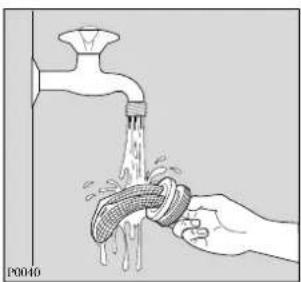
natural_image
Illustration of a hand washing a faucet with water splashing from the sink (no text or symbols)Clean carefully under a fast running tap.
Warning
When the appliance is in use and depending on the programme selected there can be hot water in the filter. Never remove the filter during a wash cycle, always wait until the appliance has finished the cycle, and is empty. When replacing the filter, ensure it is securely retightened so as to stop leaks and young children being able to remove it.
The water inlet filters
If your water is very hard or contains traces of lime deposit, the water inlet filters may become clogged.
It is therefore a good idea to clean them from time to time.
Turn off the water taps. Unscrew the water inlet hoses.

Remove and clean the filters using a hard bristle brush. Replace the filters and tighten up the inlet hoses.
Before contacting your local Tricity Bendix Service Centre, please make the following checks:
The machine does not start up
- The ON/OFF button has not been depressed
- The door is not closed properly
- No water is entering the machine (see: the machine does not fill)
■ The selector dial is not correctly positioned
The machine does not fill
■ The water taps are not turned on
- The water supply has been disconnected
■ The inlet hoses are kinked
■ The water pressure is too low
- The water inlet filters are clogged
■ The door is not closed properly
The machine empties as it fills
- The end of the drain hose is too low
■ The end of the drain hose is submerged in water - Drain pipe has no vent-hole
The machine does not drain or spin
- You have selected a gentle wash cycle
■ The drain filter is clogged
■ The drain hose is kinked - The drainage system pipes are blocked
- The drain hose extension is incorrect
- The wash load is unbalanced: redistribute the clothes inside the drum to allow the machine to spin
The machine leaks or overflows
- Too much detergent
- Unsuitable detergent
■ The inlet hose(s) is (are) loose - The detergent dispenser drawer or recess is clogged
- The end of the drain hose is not securely positioned
- The drainage system pipes are blocked
The machine vibrates or is noisy
- The internal packing has not been removed
■ The machine is not level - The machine is in contact with the wall or furniture
■ The washing load is badly distributed - The machine is overloaded
The door does not open
■ The safety device has locked it
- Water in the tub: the door cannot be opened if water is present in the tub
If, after the above checks, there is still a fault, call your local Tricity Bendix Service Centre.
Please make sure you give the model and serial number of the appliance.

This information can be found on the rating plate (see picture) or on the guarantee card.
Original spare parts can be purchased from Tricity Bendix Service Centres.
In-guarantee customers should ensure that the above checks have been made as the engineer will make a charge if the fault is not a mechanical or electrical breakdown.
Please note that proof of purchase is required for any in-guarantee service calls.
We, Tricity Bendix, undertake that if within 12 months of the date of the purchase this TRICITY BENDIX appliance or any part thereof is proved to be defective by reason only of faulty workmanship or materials, we will, at our option repair or replace the same FREE OF ANY CHARGE for labour, materials or carriage on condition that:
- The appliance has been installed correctly and used only on the electricity supply stated on the rating plate.
- The appliance has been used for normal domestic purposes only, and in accordance with the manufacturer's operating and maintenance instructions.
- The appliance has not been serviced, maintained, repaired, taken apart or tampered with, by any person not authorised by us.
All service work under this guarantee must be undertaken by a Tricity Bendix service representative or authorised agent.
Any appliance or defective part replaced shall become our property.
This guarantee is in addition to your statutory and other legal rights.
Home visits are made between 8.30 am and 5.30 pm Monday to Friday. Visits may be available outside these hours in which case a charge will be made.
Exclusions
This guarantee does not cover:
- Damage or calls resulting from transportation, improper use or neglect, the replacement of any light bulbs or removable parts of glass or plastic, or vacuum cleaner drive belts, brushes or dust bags.
- Costs incurred for calls to put right an appliance which is improperly installed or calls to appliances outside the United Kingdom.
- Appliances found to be in use within a commercial environment, plus those which are subject to rental agreements.
- Products of Tricity Bendix manufacture which are not marketed by Tricity Bendix Ltd.
- EEC Countries. The standard guarantee is applicable but subject to the owner's responsibility and cost to ensure the appliance meets the standards set by the country to which the product is taken.
Proof of purchase may be required. Electrolux Aftersales Service in the country concerned, with whom Tricity Bendix have an arrangement, will be pleased to advise further.
TRICITY BENDIX SERVICE CENTRES
| CENTRE | POSTAL DISTRICTS | SERVICE APPOINTMENTS | ADDRESS |
| ABERDEEN | AB | 01224-696569 | Tricity Bendix After Sales ServiceNortheast Appliance Service8 Cornhill ArcadeCornhill DriveAberdeenAB2 5UT |
| ARGYLL | PA 24-61 | 01369-703161 | Tricity Bendix After Sales ServiceT.D.C. RefrigerationBriar Hill7 Hill StreetDunoonArgyllPA 23 7AL |
| BARNSTAPLE | EX 18-2331-39 | 01271-328826 | Tricity Bendix After Sales ServiceMcBain RefrigerationUnit 4 Upcott AvenuePottington Industrial EstateBarnstapleNorth DevonEX31 1HN |
| BORDERS | TD | 01573-224411 | Tricity Bendix After Sales ServiceJames Stewart & Son2-8 Wood MarketKelsoBordersTD 5 7AX |
| BRISTOL | BA BS SP TA | 0117-9211876 | Tricity Bendix After Sales ServiceUnit BE46PO Box 37BristolBS 99 1UD |
| CANVEY | E E C E N N N W W CAL CB HA HP LU MK SG UB WDCM CO IG RM SSIP NR PE 14-19,30-38or | 0181-443-34640181-965-96990181-965-969901268-69414401603-66701701266-694144 | Tricity Bendix After Sales Service2-4 SandhurstKings RoadCanvey IslandSS8 OQY |
| CARDIFF | CF, NP 1-4, 6, 9-44SA 1-18 SA 21-32 | 01222-460131 | Tricity Bendix After Sales ServiceGuardian Industrial EstateClydesmuir RoadTremorfaCardiffCF2 2QS |
| CUMBRIA | CA | 01228-594747 | Tricity Bendix After Sales ServiceE.T.B. ServicesCarlisle Enterprise CentreJames StreetCarlisleCA2 5AP |
| DUMFRIES & GALLOWAY | DG 1-14 | 01387-265166 | Tricity Bendix After Sales ServiceAllan Crossan (Service)93 Irish StreetDumfriesScotlandDG1 2PQ |
TRICITY BENDIX SERVICE CENTRES
| CENTRE | POSTAL DISTRICTS | SERVICE APPOINTMENTS | ADDRESS |
| DUNDEE | DD1-14PH8-18 | 01250-876285 | Tricity Bendix After Sales ServiceI Brogan Domestics41 Lesley StreetBlairgowriePerthshirePH 10 6AT |
| GLASGOW | EH FK G KA KY1-16 MLPA 1-23, PH 1-7 | 0141-6474381 | Tricity Bendix After Sales Service20 Cunningham RoadClyde EstateRutherglenGlasgowG73 1PP |
| GUERNSEY | All Codes | 01481-46931 | Guernsey ElectricityPO Box 4ValeGuernseyChannel Island |
| HAVERFORDWEST | SA33-39,SA41-44,SA61-73 | 01437-710914 | Tricity Bendix After Sales ServiceC Butherway1 Church RoadRochHaverfordwestDyfed/WalesSA 62 6AG |
| HEREFORD | HR1-9LD1-8SY7,18NP5,NP7,NP8 | 01432-340334 | Tricity Bendix After Sales ServiceDomestic Repair CentreUnit 3 Bank BuildingsCattle MarketHerefordHR4 9HX |
| HULL | YO4YO11-18YO25HU1-19DN14 | 01482-58567 | Tricity Bendix After Sales ServiceJohn SizerUnit 1, Boulevard UnitFactory EstateHulHU3 4AY |
| INVERNESS | IV1-28, 30-36, 52-56PH19-26, 42-44KW1-14 | 01463-792952 | Tricity Bendix After Sales ServiceHighland AppliancesUnit 3B3 Smithton IndustrialEstateSmithtonInvernessIV 1 2PD |
| INVERNESS | PH30-41 IV40-51 | 01855-821315 | Tricity Bendix After Sales ServiceGeorge Ross ElectricalForrestry WorkshopInchreeOnichInvernesshirePH33 6SE |
| ISLE OF WIGHT | PO30-41 | 01983-872552 | Tricity Bendix After Sales ServiceWyatts Electrical Service4 Forelands RoadBembridgeIsle of WightPO35 5XW |
TRICITY BENDIX SERVICE CENTRES
| CENTRE | POSTAL DISTRICTS | SERVICE APPOINT-MENTS | ADDRESS |
| ISLE OF ARRAN | KA27 | 01770-302909 | Tricity Bendix After Sales Service Arran DomesticsUnit 4 The Douglas CentreBrodickIsle of ArranKA27 8AJ |
| ISLE OF LEWIS | PA83-87 | 01851-705555 | Tricity Bendix After Sales Service N D MacleodChurchhouse16 James StreetStornowayIsle of LewisPA87 2QW |
| ISLE OF MAN | IM | 01624-687794 | Tricity Bendix After Sales Service Manx ElectricityService WorkshopNorth QuayDouglasIsle of Man |
| ISLE OF MULL | PA62-75 | 01688-302262 | Tricity Bendix After Sales Service B HoggBraesideRaeric RoadTobermoryIsle of MullPA75 6PU |
| JERSEY | All Codes | 01534-505050 | Jersey Electricity CompanyPO Box 45Queens RoadSt HelierJersey, Channel IslandsJE4 8NY |
| LAMPETER | SA19, 20SA 40SA45-48SY23-25 | 01570-423020 | Tricity Bendix After Sales Service Lampeter Domestic Appliance ServiceUnit 16 Lampeter Industrial Estate Lampeter, DyfedSA48 7DY |
| LANCASTER | LA1-23 | 01772-316175 | Tricity Bendix After Sales Service NL ServicesUnit 333 Ranglet RoadWalton SummitBamber BridgePreston, Lancashire, PR5 8AR |
| LEEDS | BD DN1-7, 10-12 HD HG HXLS S WF YO1-3, 5-8 DENG1-22 & 25 | 0113-2608511 | Tricity Bendix After Sales Service 64-66 Cross Gates RoadLeeds, LS15 7NN |
| LINCOLN | DN21 subcd. 1, 2 & 5 onlyLN1, 2, 4-6LN3 subcodes 4 & 5 onlyLN8-10NG23, 24 31-34PE 1-13, 20-25 | 01522-514603 | Tricity Bendix After Sales Service Brian HudsonUnit 8 Stonefield ParkClifton StreetLincoln, LN 5 8AA |
| LIVERPOOL | FY PR L WN CH CW WA(Not WA14-15) | 0151-254 1724 | Tricity Bendix After Sales Service Unit 1 Honeys Green PrecinctHoneys Green LaneWest DerbyLiverpool, L12 9JH |
TRICITY BENDIX SERVICE CENTRES
| CENTRE | POSTAL DISTRICTS | SERVICE APPOINTMENTS | ADDRESS |
| MANCHESTER | BB BL OL M SKWA14 & 15 only | 0161-477 7758 | Tricity Bendix After Sales ServiceUnit 30 Oakhill Trading EstateDevonshire RoadWorsleyManchester, M28 3PT |
| NEWTON ABBOTT | EX1-17PL1-9, 16, 19-21TQ | 01626-65909 | Tricity Bendix After Sales ServiceSouth West Domestic ServiceUnit 2 Zealley Industrial EstateKingsteigntonNewton AbbottSouth Devon, TQ12 3SJ |
| NORTH WALES | LL | 01745-59161601745-590096 | Tricity Bendix After Sales ServiceGMS (Cymru)Unit 2 Coed - ParcAbergele RoadRhuddlanClwyd, Wales, LL18 5UG |
| NORTHERN | DL TS DH YO21,22DH NE SR | 01325-3014000191-493-2025 | Tricity Bendix After Sales ServicePO Box 40Preston RoadAycliffe Industrial EstateNewton Aycliffe, Co DurhamDL5 6XA |
| NORTHERN IRELAND EAST | BT1-30,36-57,63-67 | 01232-746591 | Tricity Bendix After Sales ServiceUnit C3Edenderry Industrial Estate326 Crumlin RoadBelfast, BT14 7EE |
| NORTHERN IRELAND WEST | BT31-35, 60-62BT68-82, 92-94 | 01861-510400 | Tricity Bendix After Sales ServiceG & O (Armagh) ServiceOwenmore HouseKilwee Business ParkUpper Dunmurray LaneBelfast, BT17 0HD |
| NUNEATON | B1-48, 62-79, 90-94 DY STWR15 WS WVNN CV LE | 0121-358-70760121-358-70760121-358-505101203-354424 | Tricity Bendix After Sales ServiceUnit 23-24 Alliance BusinessParkTownsend DriveNuneatonWarwickshire, CV11 6RX |
| ORKNEY | KW15-17 | 01856-875457 | Tricity Bendix After Sales ServiceRefrigeration Sales and ServiceHatson Ind. EstateKirkwallOrkney |
| REDDITCH | GL OX WR (Not WR15) SNB49, 50, 60, 61, 80, 95-98 | 01527 51291901993 704411 | Tricity Bendix After Sales ServiceHeming RoadWashfordRedditchWorcestershire, B98 ODH |
| REDRUTH | TR1-20, 26, 27PL10-15, 17, 18, 22-35 | 01209-314407 | Tricity Bendix After Sales ServiceCornwall Domestic ServiceUnit 7D Pool Industrial EstateWilson WayRedruth, CornwallTR15 3QW |
| ROTHESAY | PA20 01700-504777 | Tricity Bendix After Sales ServiceD McGlashanWalker EngineeringGlenmhorUpper SerpentineRothesay, PA20 |
TRICITY BENDIX SERVICE CENTRES
| CENTRE | POSTAL DISTRICTS | SERVICE APPOINTMENTS | ADDRESS |
| SHETLAND | Own Sales | 01595-692915 | Tricity Bendix After Sales ServiceG. Robertson Ltd.3/4 Carlton PlaceLerwickShetlandZE1 OED |
| SHETLAND | Own Sales | 01595-692225 | Tricity Bendix After Sales ServiceTait Electronic Systems LtdHolmsgarth RoadLerwickShetlandZE1 OPW |
| SHETLAND | Own Sales | 01595-692855 | Tricity Bendix After Sales ServiceBolts Shetland Ltd26 North RoadLerwickShetlandZE1 OPE |
| SHETLAND | ZE2 | 01806-566546 | Tricity Bendix After Sales ServiceLeask ElectricalHarsdaleSymbisterShetlandZE2 9AA |
| SHREWSBURY | SY1-6SY8-17SY19-22TF | 01743-450279 | Tricity Bendix After Sales ServiceBLI Service6 Harlescott BarnHarlescott LaneShrewsbury, ShropshireSY1 3SY |
| SOUTH COAST | BH DT PO1-22 SOTR 21-25 | 01705-6674110117-9211876 | Tricity Bendix After Sales ServiceLimberline RoadHilseaPortsmouthHampshirePO3 5JJ |
| SOUTH HUMBERSIDE | DN8, 9DN15-20DN21 subcodes 3, 4 onlyDN31-40LN3 subcode 6 onlyLN7, 11-13 | 01472-267978 | Tricity Bendix After Sales ServiceJohn Robinson (Electrical)81 Pasture StreetGrimsbyDN32 9EP |
| TONBRIDGE | GU1-35 RG SLCT DA ME TNBN1-18 20-27 RHTW BR CR SE SW SM KT | 01252-2450501732-35772201273-6943410181-658-9069 | Tricity Bendix After Sales ServiceUnit 30Deacon Trading EstateMorley RoadTonbridgeKentTN9 1RA |
| WESTERN ISLES | HS9 01871-890206 | Tricity Bendix After Sales ServiceMr. J. Zerfahs244 BruernishIsle of BarraWestern IslandsHS9 5QY |
TRICITY BENDIX
Better Products. Better Value.
Tricity Bendix, 99 Oakley Road, Luton, Beds LU 4 9QQ
Model No.
AW 660
A DIVISION OF EMACO LIMITED.
REGISTERED IN ENGLAND NO. 176547
Part No.
124986480
- Better Products. Better Value.
- Operating and Installation Instructions
- CONTENTS
- INSTALLATION
- USE
- SERVICE/REPAIR
- GENERAL SAFETY
- Unpacking
- Positioning
- Water inlet
- Water drainage
- Important
- Special conditions
- Warning
- Note
- In the interest of the environment
- Electrical connections
- WARNING: THIS APPLIANCE MUST BE EARTHED.
- Detergent dispenser drawer
- ON/OFF button ①
- Half load button
- Quick wash button
- Mains-on light
- Programme selector knob
- Washing hints
- WASH CARE SYMBOLS
- IMPORTANT NOTES
- Programmes for synthetics, delicates and wool
- WHICH DETERGENT TO USE?....
- AND IN WHICH FORM?
- POWDERS OR LIQUIDS
- BIOLOGICAL OR NON-BIOLOGICAL
- LOW SUDS
- FABRIC CONDITIONERS
- USE OF DETERGENT AND ADDITIVES
- Choosing the Right Detergent
- Use of Powder Detergent
- Use of Liquid Detergent
- Use of Fabric Conditioners
- WASHING 4.5 KG OF WHITE COTTON AT 95°C
- Load the laundry
- Measure out the detergent
- Add the fabric softener if required
- Select the required options
- Select the required wash programme
- Start the machine
- At the end of the programme
- WASHING 2 KG OF SYNTHETIC FABRICS AT 40°C
- Select the required wash programme
- Start the machine
- At the end of the programme
- Descaling
- After each wash
- External cleaning
- Cleaning the dispenser drawer
- Cleaning the drawer recess
- The dangers of freezing
- Cleaning the filter
- The water drain filter
- The water inlet filters
- Before contacting your local Tricity Bendix Service Centre, please make the following checks:
- The machine does not start up
- The machine does not fill
- The machine empties as it fills
- The machine does not drain or spin
- The machine leaks or overflows
- The machine vibrates or is noisy
- The door does not open
- Exclusions
- This guarantee does not cover:
- TRICITY BENDIX
Brand : Tricity Bendix
Model : AW 660
Category : Washing machine