TB89L - Washing machine Tricity Bendix - Free user manual and instructions
Find the device manual for free TB89L Tricity Bendix in PDF.


| Product Type | Refrigerator (Larder Fridge) |
| Brand | Tricity Bendix |
| Model | TB89L |
| Gross Capacity (Fresh Food) | 253 liters |
| Net Capacity (Fresh Food) | 236 liters |
| Dimensions (W x H x D) | 550 x 1250 x 600 mm |
| Weight | 45 kg |
| Energy Consumption | 0.65 kWh/day (237 kWh/year) |
| Energy Class | C (EU Standard) |
| Rated Power | 90 W |
| Climate Classification | N (16 °C to 32 °C) |
| Temperature Control | Thermostat with settings 1 (Cold) to 5 (Coldest), plus Off (0) |
| Defrosting | Automatic defrost for fridge compartment |
| Interior Light | Yes, 15W / 230V bulb with E14 thread |
| Shelves | Adjustable wire shelves and glass shelf |
| Door Shelves | Adjustable, including bottle shelf |
| Salad Drawer | Yes |
| Butter Compartment | Yes |
| Egg Tray | Yes |
| Door Reversal | Reversible door (instructions provided) |
| Adjustable Feet | Yes, two at front for levelling |
| Power Supply | 230 V, 13 A fuse, earthed |
| Installation Requirements | Allow 2 hours settling time; adequate ventilation required |
| Maintenance | Clean with bicarbonate of soda; do not use abrasive cleaners |
| Spare Parts Availability | Contact local Service Force Centre |
Frequently Asked Questions - TB89L Tricity Bendix
User questions about TB89L Tricity Bendix
0 question about this device. Answer the ones you know or ask your own.
Ask a new question about this device
Download the instructions for your Washing machine in PDF format for free! Find your manual TB89L - Tricity Bendix and take your electronic device back in hand. On this page are published all the documents necessary for the use of your device. TB89L by Tricity Bendix.
USER MANUAL TB89L Tricity Bendix
natural_image
Abstract grayscale graphic with a stylized letter 'i' and dot, no text or symbols present.REFRIGERATOR
TB 89 L
This instruction book contains safety precautions, information on use and helpful hints and tips. To ensure you use this appliance effectively and safely, please read this instruction book carefully before installing or using this appliance and retain for future reference.
The symbols below help you to find things more easily:

Safety precautions Warnings and Safety information

Hints, useful information

Environmental information
IMPORTANT SAFETY INSTRUCTIONS
These warnings are provided in the interests of your safety. Ensure that you understand them all before installing or using this appliance. Your safety is of paramount importance. If you are unsure about any of the meanings or these warnings contact the Customer Care Department.
Prior to installation
- Check the appliance for transport damage. Under no circumstances should a damaged appliance be installed. In the event of damage please contact your retailer.
Installation
- This appliance is heavy. Care should be taken when moving it.
- It is dangerous to alter the specifications or attempt to modify this product in any way.
- Ensure that the appliance does not stand on the electrical supply cable. If the supply cable is damaged, it must be replaced by a cable available from your local Service Force Centre.
- Any electrical work required to install this appliance should be carried out by a qualified electrician or competent person.
- Parts which heat up should not be exposed. Whenever possible, the back of the appliance should be close to a wall, but leaving the required distance for ventilation, as stated in the installation instructions.
- The appliance should be left for 2 hours after installation before it is turned on, in order to allow the refrigerant to settle.
Child Safety
- Do not allow children to tamper with the controls or play with the product.
- There is a risk of suffocation! Keep packaging material away from children!
During Use
- This appliance is designed for domestic use only, specifically for the storage of edible foodstuffs. It is not intended for commercial or industrial use.
Maintenance and Cleaning
- Before cleaning, always switch off the appliance and disconnect from the electrical supply.
- When unplugging always pull the plug from the mains socket, do not pull on the cable.
Servicing
- This product should be serviced by an authorised engineer and only genuine spare parts should be used.
- Under no circumstances should you attempt to repair the appliance yourself. Repairs carried out by inexperienced persons may cause injury or serious malfunctioning. Contact your local Service Force Centre.
At the end of the Appliance Life
- When disposing of your appliance use an authorised disposal site.
- Remove the plug and ensure that any locks or catches are removed, to prevent young children being trapped inside.

The Appliance and the Environment
This appliance does not contain gasses which could damage the ozone layer.
Avoid damaging the cooling unit.
The packaging used on this appliance marked with the symbol is recyclable.

Keep this instruction book for future reference and ensure it is passed on to any new owner.
CONTENTS
Instructions for the User
Guide to use the instruction book 2
Important Safety Instructions 3
Instructions for the User 5
General Information 5
Description of the Appliance, main parts 5
Using the Appliance 6
Before Use 6
To Start the Appliance 6
Thermostat Control 6
Hints for storage 6
Storage Shelves 7
Hints and Tips 7
Food Storage 7
Energy Saving Advice 7
Maintenance and Cleaning 7
Internal cleaning 7
External cleaning 8
Changing the Light Bulb 8
Defrosting Your Appliance 8
When the appliance is not in use 8
Something not Working 9
Service and Spare Parts 10
Customer Care Department 10
Guarantee Conditions 11
Instructions for the Installer
Technical data 14
Installing the Appliance 14
Transportation, Unpacking 14
Cleaning 14
Location 14
Ventilation Requirements 15
Levelling 15
Door Reversal 15
Electrical Connection 17
Storage Chart 18
INSTRUCTIONS FOR THE USER
General information
This appliance is designed for the refrigeration of food in a domestic home.
To ensure correct operation, the appliance should be located where the ambient temperature is between 16-32 °C.
Description of the appliance, main parts
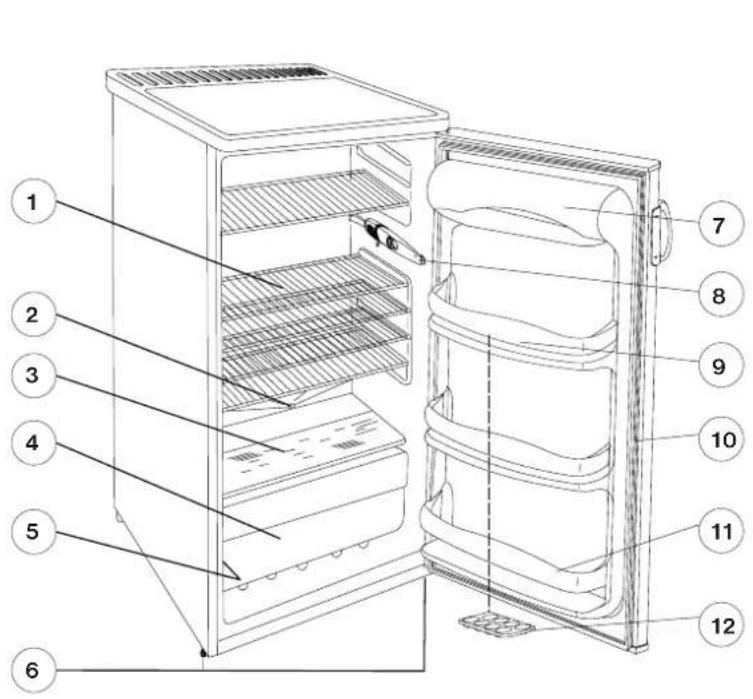

- Wire shelf
- Defrost water drain
- Glass shelf
- Salad drawer
- Rating Plate
- Adjustable feet
- Butter compartment
- Interior Light/Thermostat control
-
Door shelf
-
Door gasket
- Bottle shelf
- Egg tray
- Air circulation
- Air vent
- Condenser
- Evaporator tray
- Compressor
Using the Appliance
Before Use
Remove all securing tapes.
Wash the inside of the appliance with lukewarm water with a little bicarbonate of soda added (5 ml to 0,5 litre of water). Do not use soap or detergent as the smell may linger. Dry the appliance thoroughly.

Do not use detergents, abrasive powders, highly perfumed cleaning products, wax polishes or products containing alcohol.

To Start the Appliance
- Allow the appliance to stand for 2 hrs after installation.
- Plug in the appliance and switch on at the mains supply.
- Turn the thermostat control to the required setting. A setting of 3 is usually suitable for normal operation (see thermostat control).
- Leave the appliance for approximately 4 hours for the correct temperature to be reached before placing food inside.
Thermostat Control
The thermostat control situated inside the refrigerator regulates the temperature of the larder compartment. Thermostat control is marked from 1-5 the higher the number, the colder the setting.
Position 0 - Off
Position 1 - Cold
Position 5 - Coldest
Hints for storage
Below is the recommended storage positions for various food types:
- Ready-cooked foods, convenience foods, fresh meat, cold cuts
- Milk, dairy products, foods in dishes
- Fruits, vegetables, salads
- Cheese, butter
- Eggs
- Yoghurt, sour cream
- Small bottles, soft drinks
- Large bottles, drinks

natural_image
Technical line drawing of a mechanical component with numbered parts and an arrow indicating rotation (no text or symbols)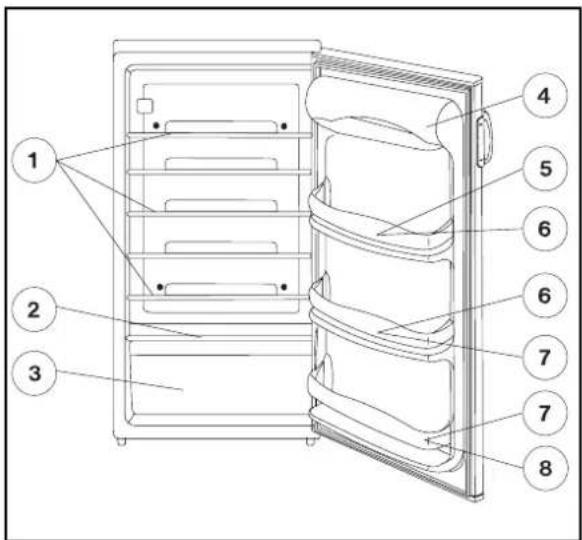
Storage Shelves
The variable shelves increase the usefulness of the fresh food compartment. The shelves can be rearranged by opening the door to 90°.
The door shelves can also be rearranged to your requirements.
i Hints & Tips
Food Storage
- To obtain the best results from your appliance neither hot foods nor liquids which may evaporate, should be placed in the larder compartment.
- Keep the time between buying chilled food and placing it in your fridge as short as possible.
- Do not push food together too much, try to allow air to circulate around each item.
- Do not store food uncovered.
- Remove suspect food from your refrigerator and clean, refer to cleaning and maintenance.
Energy Saving Advice
- Do not install the cabinet close to sources of heat, such as a cooker, dishwasher or radiator.
- Locate the appliance in a cool well ventilated room and make sure that the air openings of the cabinet are not obstructed.
- Always leave warm food to cool down to room temperature before placing in the fridge.
- Try to avoid keeping the door open for long periods, or opening the door too frequently as warm air will enter the cabinet, and cause the compressor to switch on unnecessarily often.
- Ensure there are no obstructions preventing the door from closing properly.
- It is advisable to periodically clean the refrigeration system at the back of the appliance with a duster or vacuum cleaner.
Maintenance & Cleaning

Before any maintenance of cleaning work is carried out DISCONNECT the appliance from the ELECTRICITY SUPPLY.
Internal Cleaning
Clean the inside and accessories with warm water and bicarbonate of soda (5 ml to 0.5 litre of water). Rinse and dry thoroughly.

Do not use detergents, abrasive powders, highly perfumed cleaning products, wax polishes or cleaning products containing bleach or alcohol.
Clean the drain hole of the water trough at regular intervals and ensure that the drain hole is clear at all times. If blocked carefully clear using a piece of flexible curtain wire inserted into the drain outlet to remove the blockage.
Regularly check the door seals and wipe clean to ensure they are clean and free from debris.

natural_image
Line drawing of a hand holding a tool near a window, with an inset showing the tool interacting with a surface (no text or symbols)External Cleaning
Wash the outer cabinet with warm soapy water.

Do NOT use abrasive products.
There are sharp edges on the underside of the product so care should be taken when cleaning.
Once or twice a year dust the condenser (black grille) and the compressor at the back of the appliance with a brush or vacuum cleaner, as an accumulation of dust will affect the performance of the appliance and cause excessive electricity consumption.
Changing the Light Bulb
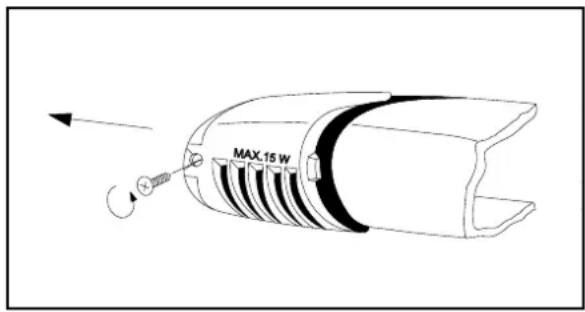
Should the light fail to work you can change it as below:
Disconnect the appliance from the electricity supply.
Remove the lamp cover retaining screws, then take the lamp cover off in the direction of arrow and the bulb can be changed. (Type of the bulb: 230 V, 15 W, E 14 thread)
After changing bulb replace the lamp cover, and retaining screws and reconnect the appliance to the electricity supply.
Defrosting Your Appliance
The fridge compartment is defrosted automatically, when the motor stops. Defrost water from the cooling plate runs out of the drain and onto a tray on the motor compressor where it evaporates. Droplets of water on the cooling plate during defrosting are quite normal and will freeze on the plate afterwards.
When the appliance is not in use
When the appliance is not in use for long periods disconnect from the electricity supply, empty all of the food and clean the appliance, leaving the door ajar to prevent unpleasant smells.
Something Not Working
If the appliance is not working correctly, please carry out the following checks before contacting your local Tricity Bendix Service Force Centre.
| Problem | Possible Cause | Solution |
| No power to the appliance | No power at the socket.There is a power cut.The fuse has blown.Thermostat control is set at „0“. | Check there is power at the socket.Check there is not a power cut by checking the household lights.Check the fuse has not blown.Check the thermostat setting. |
| The temperature in the appliance is too high | The appliance is located in an unsuitable position.The thermostat control is set too low. | Check the ambient temperature is within the appliances operating limits of 16 °C to 32 °C.Check that the thermostat control knob is turned to the correct setting relative to ambient conditions. |
| The temperature in the appliance is too low | The thermostat control is set too high. | Set the thermostat control knob to a warmer position. |
| Excessive frost and ice has built up | The door has been left open.Something is obstructing the door.The door gasket is dirty. | Check the door has not been left open.Check nothing is preventing the door from closing.Check the door gasket is intact and clean. |
| The appliance is noisy. | The appliance is not level. | Check if the appliance stands stable (all four feet should be on the floor). |
| Water under the salad drawer. | The drain hole is blocked. | Check the drain hole is not blocked (see 'Maintenance and Cleaning'). |
If after the above checks your appliance still does not operate correctly, contact your local Tricity Bendix Service Force Centre.
Please note that it will be necessary to provide proof of purchase for any in-guarantee service calls.
In-guarantee customers should ensure that the above checks have been made, as the engineer will make a charge if the fault is not a mechanical or electrical breakdown.
Service and Spare Parts
In the event of your appliance requiring service, or if you wish to purchase spare parts please contact your local Tricity Bendix Service Force Centre by telephoning:
0870 5 929929
Your call will be routed the Service Force Centre covering your post code area.
For service in the Republic of Ireland contact Tricity Bendix
Long Mile Road
Dublin 12
Telephone: 01 4090752.
Before calling out an engineer, please ensure you have read the details under the heading 'Something Not Working?'.
When you contact the Service Centre you will need to give the following details:
- Your name, address and post code
- Your telephone number
- Clear and concise details of the fault
- The model and serial number of the appliance (found on the rating plate)
- The purchase date
Customer Care Department
For general enquiries concerning your Tricity Bendix appliance or for further information on Tricity Bendix products, you are invited to contact our Customer Care Department by letter or telephone as follows:
Customer Care Department
Tricity Bendix
55-77 High Street
Slough
Berkshire
SL1 1DZ
Tel: 08705 950950 calls to this number may be recorded for training purposes.
Peace of Mind for Twelve Months
Tricity Bendix standard guarantee conditions
This guarantee is in addition to your statutory and other legal rights.
We Tricity Bendix undertake that if within 12 months of the date of the purchase this TRICITY BENDIX appliance or any part thereof is proved to be defective by reason only of faulty workmanship or materials, we will, at our option repair or replace the same FREE OF ANY CHARGE for labour, materials or carriage on condition that:
- The appliance has been installed correctly and used only on the electrical supply stated on the rating plate.
- The appliance has been used for normal domestic purposes only, and in accordance with the manufacturer's operating and maintenance instructions.
- The appliance has not been serviced, maintained, repaired, taken apart or tampered with by any person not authorised by us.
- All service work under this guarantee must be undertaken by a Tricity Bendix service Representative or authorised agent.
- Any appliance or defective part replaced shall become our property.
Home visits are made between 8.30am and 5.30pm Monday to Friday. Visits may be available outside these hours in which case a charge will be made.
EXCLUSIONS
This Guarantee does not cover:
- Damage or calls resulting from transportation, improper use or neglect, the replacement of any light bulbs or removable parts of glass or plastic.
-
Costs incurred for calls to put right an appliance which is improperly installed or calls to appliances outside the United Kingdom.
-
Appliances found to be in use within a commercial environment, plus those which are the subject of rental agreements.
- Products of Tricity Bendix manufacture which are NOT marketed by Tricity Bendix Ltd.
EUROPEAN GUARANTEE
If you should move to another country within Europe then your guarantee moves with you to your new home subject to the following qualifications:
- The guarantee starts from the date you first purchased your product.
- The guarantee is for the same period and to the same extent for labour and parts as exists in the new country of use for this brand or range of products.
- This guarantee relates to you and cannot be transferred to another user.
- Your new home is within the European Community (EC) or European Free Trade Area.
- The product is installed and used in accordance with our instructions and is only used domestically, i.e. a normal household.
Before you move please contact your nearest Customer Care Centre, list below, to give them details of your new home. They will then ensure that the local Service Organisation is aware of your move and able to look after you and your appliances.
France Senlis +33 (0) 3 44 62 28 28
Germany Nurnberg +49 (0) 911 323 2600
Italy Pordenone +39 (0) 1678 47053
Sweden Stockholm +46 (0) 20 78 77 50
UK Slough +44 (0) 1753 219898
To contact your local Tricity Bendix Service Centre telephone 08705 929 929
| CHANNEL ISLANDS | ORKNEY(M65) | Corsie Domestics7 King StreetKirkwallOrkney KW15 | NORTH EAST | ||
| GUERNSEY | Guernsey ElectricityPO Box 4Vale, GuernseyChannel Islands | GATESHEAD(M39) | Unit 356aDukesway CourtDukeswayTeam ValleyGateshead NE11 0BH | ||
| PERTH | Hydro ElectricalInveralmond HouseRuthervenfield RoadPerth PH1 3AQ | ||||
| JERSEY | Jersey Electricity CompanyPO Box 45Queens RoadSt HelierJerseyChannel Islands JE4 8NY | GRIMSBY(M42) | 15 Hainton AvenueGrimsbySouth HumbersideDN32 9AS | ||
| PERTH(OWN SALES) | Graham BeggUnit 4Airport Ind EstateWick KW1 4QS | ||||
| SCOTLAND | SHETLAND(OWN SALES) | Tait Electronic Systems LtdHolmsgarth RoadLerwickShetland ZE1 0PW | HULL(M41) | Unit 1Boulevard Industrial EstateHullHU3 4AY | |
| ABERDEEN(M05) | 54 Claremont StreetAberdeen AB10 6RA | LEEDS(M37) | 64-66 Cross Gates RoadLeedsLS15 7NN | ||
| AUCHTERMUCHY(M03) | 33a BurnsideAuchtermuchyFife KY14 7AJ | NEWTON AYCLIFFE(M45) | Unit 16Gurney WayAycliffe Industrial EstateNewton AycliffeDL5 6UJ | ||
| BLANTYRE(M07) | Unit 5Block 2Auchenraith Ind. EstateRosendale WayBlantyre G72 0NJ | SHEFFIELD(M38) | Pennine HouseRoman Ridge Ind.Roman Ridge RoadSheffield S9 1GB | ||
| DUMFRIES(M01) | 93 Irish StreetDumfriesScotland DG1 2 PQ | NORTHERN IRELAND | NORTH WEST | ||
| BELFAST(M27) | Owenmore HouseKilwee Business ParkUpper Dunmury LaneBelfastBT17 0HD | BIRKENHEAD(M11) | 1 Kelvin ParkDock RoadBirkenheadL41 1LT | ||
| DUNOON(M67) | Brair Hill7 Hill StreetDunoonArgyll PA23 7AL | CARLISLE(M10) | Unit 7James Street WorkshopsJames StreetCarlisleCumbria CA2 5AH | ||
| GLASGOW(M04) | 20 Cunningham RoadClyde EstateRutherglenGlasgow G73 1PP | WALES | |||
| CARDIFF(M28) | Guardian Industrial EstateClydesmuir RoadTremorfaCardiffCF2 2QS | ||||
| INVERNESS(M06) | Unit 3BSmithton Ind. EstateSmithtonInverness IV1 AJ | ISLE OF MAN(M64) | South Quay Ind. EstateDouglasIsle of ManIM1 5AT | ||
| ISLE OF ARRAN(OWN SALES) | Arran DomesticsUnit 4 The Douglas CentreBrodickIsle of Arran KA27 8AJ | LIVERPOOL(M15) | Unit 1Honeys Green PrecinctHoneys Green LaneLiverpoolL12 9JH | ||
| ISLE OF BARRA(OWN SALES) | J Zerfah244 BruernishIsle of BarraWestern Islands HS9 5QY | DYFED(M77) | Maes Y CoedHigh MeadLlanybydderCarmarthenshireSA40 9UL | ||
| ISLES OF BUTE | Walker EngineeringGlenmhorUpper Serpentine RoadRothesayIsle of Bute PA20 9EH | MANCHESTER(M09) | Unit BCentral Industrial EstateSt Marks StreetBoltonBL3 6NR | ||
| HAVERFORDWEST(M75) | Cromlech LodgeAmblestonHaverfordwestPembrokeshireSA62 5DS | ||||
| ISLE OF LEWIS | ND Macleod16 James StreetStornowayIsle of Lewis PA87 2QW | PRESTON(M13) | Unit 250Dawson PlaceWalton SummitBamber BridgePrestonLancashire PR5 8AL | ||
| KELSO(M08) | 2-8 Wood MarketKelsoBorders TD5 7AX | STOCKPORT(M16) | Unit 20 Haigh ParkHaigh AvenueStockportSK4 1QR | ||
To contact your local Tricity Bendix Service Centre telephone 08705 929 929
| MIDLANDS | LONDON & EAST ANGLIA | SUNBURY(M63) | Unit 1aThe SummitHanworth RoadHanworth Ind. EstateSunbury on ThamesTW16 5D | ||
| BIRMINGHAM(M18) | 66 Birch Road EastWyrley Road Ind. EstateWittonBirminghamB6 6DB | BECKENHAM(M79) | 11a Gardener Ind. EstateKent House LaneBeckenhamKent BR3 1QZ | ||
| BOURNE(M44) | Manning Road Ind. EstatePinfold RoadBournePE10 9HT | CHELMSFORD(M47) | Hanbury RoadWidford Ind. EstateChelmsfordEssexCM12 3AE | SOUTH EASTASHFORD(M58) | Unit 2Bridge Road Business Est.Bridge RoadAshfordKent TN2 1BB |
| BRIDGNORTH(M72) | 68 St. Mary's StreetBridgnorthShropshireWV16 4DR | COLINDALE(M53) | Unit 14Capitol ParkCapitol WayColindaleLondon NW9 0EQ | ||
| GLOUCESTER(M23) | 101 Rycroft StreetGloucesterGL1 4NB | ELTHAM(M78) | 194 Court RoadMottinghamElthamLondon SE9 4EW | FLEET(M59) | Unit 1Redsfield Ind. EstateChurch CrookhamFleetHampshire GU13 0RD |
| HEREFORD(M31) | Unit 3Bank BuildingsCattle marketHarefordHE4 9HX | ENFIELD(M49) | 284 Alma RoadEnfieldLondonEN3 7BB | HAYWARDSHEATH(M55) | 21-25 Bridge RoadHaywards HeathSussex RH16 1UA |
| HIGHAM FERRERS(M51) | 30 High StreetHigham FerrersNorthantsNN10 8BB | GRAVESEND(M57) | Unit B4Imperial Business EstateGravesendKentDA11 0DL | SOUTH WESTBARNSTAPLE(M30) | Main RoadFremingtonBarnstapleNorth Devon EX31 2NT |
| ILKESTON(M43) | Unit 2Furnace RoadIlkeston DE7 5EP | HARPENDEN(M46) | Unit 4Riverside EstateColdharbour LaneHarpendenAL5 4UN | BOURNEMOUTH(M26) | 63-65 Curzon RoadBournemouthDorsetBH1 4PW |
| LEICESTER(M22) | Unit 7Oaks Ind. EstateCoventry RoadNarboroughLeicestershireLE0 5GF | LETCHWORTH(M50) | 16-17 Woodside Ind. EstateWorks RoadLetchworthHertsSG6 1LA | BRIDGEWATER(M35) | 6 Hamp Ind. EstateBridgewaterSomerset TA6 3NT |
| LINCOLN(M40) | Unit 8Stonefield ParkClifton StreetLincolnLN5 8AA | LONDON(M76) | 2/4 Royal LaneYiewsleyWest DraytonMiddlesexUB7 8DL | BRISTOL(M25) | 11 Eldon WayEldonwall TradingBristolAvon BS4 3QQ |
| NEWCASTLEUNDER LYME(M12) | 18-21 Croft RoadBrampton Ind. EstateNewcastle under LymeStaffordshireST5 0TW | MAIDENHEAD(M60) | Reform RoadMaidenheadBerkshireSL6 8BY | EMSWORTH(M33) | 266 Main RoadSouthbourneEmsworthPO10 8JL |
| REDDITCH(M20) | 13 Thornhill RoadNorth Moons MoatRedditchWorcestershireB98 9ND | MOLESEY(M61) | 10 Island Farm AvenueWest MoleseySurreyKT8 2UZ | ISLE OF WIGHT(M34) | Unit 8Enterprise CourtRyde Business ParkRydeIsle of Wight PO33 1DB |
| TAMWORTH(M19) | Unit 3Sterling ParkClaymoreTamworthB77 5DO | NEWBURY(M24) | 9 Pipers CourtBerkshire DriveThatchamBerkshireRG19 4ER | NEWTON ABBOT(M29) | Unit 2Zealley Ind. EstateKingsteigntonNewton AbbotS. DevonTQ12 3TD |
| WORCESTER(M73) | Units 1 & 2Northbrook CloseGregorys Mill Ind. EstateWorcesterWR3 8BP | IPSWICH(M48) | Unit 6CELton Park Business CentreHadleigh RoadIpswichIP2 0DD | REDRUTH(M36) | Unit 7DPool Ind. EstateWilson WayRedruthCornwall TR15 3QW |
| NORWICH(M52) | 2b Trafalgar StreetNorwichNR1 3HN | ||||
Instructions for the Installer
Technical data
| Model | TB 89 L |
| Gross capacity (l) | Fresh food com.: 253 |
| Net capacity (l) | Fresh food com.: 236 |
| Width (mm) | 550 |
| Height (mm) | 1250 |
| Depth (mm) | 600 |
| Energy consumption (kWh/day)(kWh/year) | 0.65237 |
| Energy class, according to EU Standards | C |
| Rated power (W) | 90 |
| Weight (kg) | 45 |
Installing the appliance
Transportation, unpacking
The appliance and the interior fitting are protected for transport.
- Remove all packaging and any adhesive tape.
- Any remnants of adhesive can be removed using white spirit.
- After transportation the appliance must not be switched on for 2 hours. This is to allow the refrigerant to settle.
Cleaning
Clean the accessories and the inside of the appliance with warm water and bicarbonate of soda (5 ml to 0.5 litres of water). Rinse and dry thoroughly.
Do not use detergents, abrasive powders, highly perfumed cleaning products, wax polishes or cleaning products containing bleach or alcohol.
Location
The appliance should be positioned in a well ventilated, dry room.
Energy use is affected by the ambient temperature.
The appliance should therefore:
- not be installed next to radiators, cookers or other sources of heat
- only be installed at a location where the ambient temperature corresponds to the climate classification, for which the appliance is designed.
The climate classification can be found on the serial plate.
The following table shows which ambient temperature is correct for each climate classification:
| Climate Classification | Ambient Temperature |
| SN +10 to +32 °C | |
| N +16 to +32 °C | |
| ST +18 to +38 °C | |
Ventilation Requirements
The appliance must have adequate ventilation to ensure correct operation.
Diagram shows the ventilation requirements when installed:
A Under a worktop, or cupboard.
B When freestanding

Levelling
The appliance must be level. Level the appliance by adjusting the two adjustable feet (1) at the front of the appliance.
Door Reversal
If required the opening direction of the door can be changed as follows:
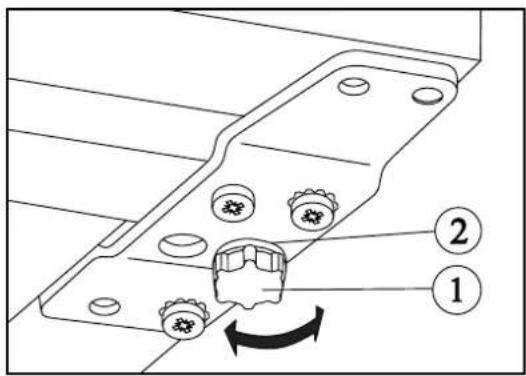
To reverse the bottom hinge assembly proceed as follows:
- Disconnect the appliance from the electricity supply.
- Tilt the appliance backwards, resting the top edge of the appliance on a stool or something similar.
- Unscrew the adjustable feet situated on both sides at the front (2 pieces). Remove the lower door hinge plate by unscrewing the 3 retaining screws.
- Remove the hinge pin from the bottom of the door.
- Slot the hinge pin into the hole in the hinge plate and relocate the hinge assembly to the opposite location and refit using the retaining screws.
- Put the cabinet in the upright position.

To reverse the top hinge assembly proceed as follows:
- Remove the 2 worktop retaining screws from the back of the appliance.
-
Slide the worktop towards the rear and lift clear of the appliance.
-
Remove the 2 upper hinge plate retaining screws.
- Remove the hinge plate from the top of the door.
- Unscrew the hinge pin from the hinge plate and re-insert on the opposite side of the pate.
- Rotate the hinge assembly 180° and insert the hinge assembly into the opposite location.
- Refit the 2 hinge plate retaining screws.
- Relocate the worktop and refit the worktop retaining screws.
To reverse the handle proceed as follows:
- Remove screw covers (if fitted) and handle retaining screws. Remove blanking plugs on the opposite side.
- Relocate the handle to the opposite side and refit retaining screws (covers if fitted), and replace the blanking plugs.

natural_image
Technical line drawing of a refrigerated unit with heat exchanger and cooling fins (no text or symbols)
natural_image
Technical line drawing of a mechanical assembly with mounting brackets and adjustment knobs (no text or symbols)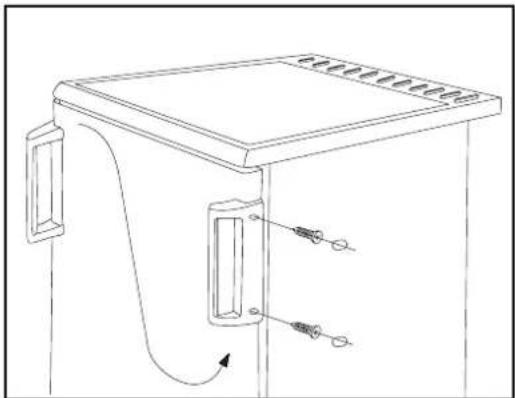
natural_image
Line drawing of a mechanical device with labeled parts and directional arrows (no text or symbols)Electrical Connection

Any electrical work required to install this appliance should be carried out by a qualified electrician or competent person.
This appliance must be earthed.
The manufacturer declines any liability should these safety measures not be observed.
Electrical Requirements
Before switching on, make sure the electricity supply voltage is the same as that indicated on the appliance rating plate.
The appliance is supplied with a 13 amp plug fitted. In the event of having to change the fuse in the plug supplied, a 13 amp ASTA approved (BS 1362) fuse must be used. Should the plug need to be replaced for any reason. The wires in the mains lead are coloured in accordance with the following code:
Green and Yellow: Earth
Blue: Neutral
Brown: Live
The wire coloured green and yellow must be connected to the terminal marked with the letter „E“ or by the earth symbol coloured green and yellow.
The wire coloured blue must be connected to the terminal „N“ or coloured black.
The wire coloured brown must be connected to the terminal marked „L“ or coloured red.
Upon completion there must be no cut, or stray strands of wire present and the cord clamp must be secure over the outer sheath.

CE This appliance complies with the following E.E.C. Directives:
- 73/23 EEC of 19.02.73 (Low Voltage Directive) and subsequent modifications,
- 89/336 EEC of 03.05.89 (Electromagnetic Compatibility Directive) and subsequent modifications.
Storage time chart
Time and method of storage of fresh foods in the refrigerator
| Foods Storage time in days Method of packaging | ||||||||
| 1 | 2 | 3 | 4 | 5 | 6 | 7 | ||
| Raw meat X X x x x cling film, airtight | ||||||||
| Cooked meat X X X | x x x dish covered | |||||||
| Roasted meat X X X | x x dish covered | |||||||
| Raw minced meat X dish covered | ||||||||
| Cooked minced meat X X x x dish covered | ||||||||
| Cold cuts X X x x cling film, cellophane, grease- | proof paper | |||||||
| Fresh fish | X | x | x | cling film, airtight | ||||
| Cooked fish | X | X | x x dish covered | |||||
| Tinned fish, open | X | x | x | dish covered | ||||
| Fresh chicken | X | X | X | x | x | x | cling film, airtight | |
| Fried chicken | X | X | X | x x x dish covered | ||||
| Fresh duck, goose | X | X | X | x | x | x | cling film, airtight | |
| Roasted duck, goose | X | X | X | X | x | x | x | dish covered |
| Butter unopened | X | X | X | X | X | X | X | original packaging |
| Butter opened | X | X | x | x | x | x | x | original packaging |
| Milk | X | X | X | x x original packaging | ||||
| Cream | X | X | x x plastic box | |||||
| Sour cream | X | X | X | X | x | x | x | plastic box |
| Cheese (hard) X X X | X | X | X | X | aluminium foil | |||
| Cheese (soft) X X X | X | x x x | cling film | |||||
| Egg | X | X | X | X | X | X | X | |
| Spinach, sorrel | X | X | x x cling film | |||||
| Green peas, green beans | X | X | X | X | x | x | x | cling film |
| Mushroom | X | X | x x x cling film | |||||
| Carrot | X | X | X | X | X | X | X | cling film |
| Tomato | X | X | X | X | X | X | X | cling film |
| Cabbage | X | X | X | X | X | x x | cling film | |
| Strawberry, raspberry, etc. | X | X | X | x | x | cling film | ||
| Tinned fruits opened | X | X | X | x | x | dish covered | ||
| Cakes filled with cream | X | X | x | x | dish covered | |||
Notation:
X recommended storage time
x maximum recommended storage time
The Electrolux Group is the world's largest producer of powered appliances for kitchen, cleaning and outdoor use. More than 55 million Electrolux Group products (such as refrigerators, cookers, vacuum cleaners, chain saws and lawn mowers) are sold each year to a value of approx. 14 billion USD in more than 150 countries around the world.

From the Electrolux Group. The world's No.1 choice.
- IMPORTANT SAFETY INSTRUCTIONS
- Prior to installation
- Installation
- Child Safety
- During Use
- Maintenance and Cleaning
- Servicing
- At the end of the Appliance Life
- The Appliance and the Environment
- CONTENTS
- Instructions for the User
- Important Safety Instructions 3
- Instructions for the User 5
- Using the Appliance 6
- Hints and Tips 7
- Maintenance and Cleaning 7
- Something not Working 9
- Instructions for the Installer
- Installing the Appliance 14
- Electrical Connection 17
- General information
- Description of the appliance, main parts
- Using the Appliance
- Before Use
- To Start the Appliance
- Thermostat Control
- Hints for storage
- Storage Shelves
- i Hints & Tips
- Food Storage
- Energy Saving Advice
- Maintenance & Cleaning
- Internal Cleaning
- External Cleaning
- Changing the Light Bulb
- Defrosting Your Appliance
- When the appliance is not in use
- Something Not Working
- Service and Spare Parts
- 5 929929
- Customer Care Department
- Peace of Mind for Twelve Months
- Tricity Bendix standard guarantee conditions
- EXCLUSIONS
- This Guarantee does not cover:
- EUROPEAN GUARANTEE
- Installing the appliance
- Transportation, unpacking
- Cleaning
- Location
- Ventilation Requirements
- Levelling
- Door Reversal
- Electrical Connection
- Electrical Requirements
- Storage time chart
- Notation:
- From the Electrolux Group. The world's No.1 choice.
Brand : Tricity Bendix
Model : TB89L
Category : Washing machine