
AWZ Classic CT - Coffee maker WHIRLPOOL - Free user manual and instructions
Find the device manual for free AWZ Classic CT WHIRLPOOL in PDF.


| Product Type | Condenser Tumble Dryer |
| Brand | Whirlpool |
| Model | AWZ Classic CT |
| Drum Capacity (Max Load) | Cottons: 5.0 kg, Synthetics: 2.5 kg |
| Dimensions (Height x Width x Depth) | Approx. 850 x 600 x 600 mm (min. housing dimensions) |
| Weight | Approx. 40 kg (estimated) |
| Electrical Connection | 220-240 V, 50-60 Hz, 13 A (BS 1363 plug) or 16 A circuit breaker |
| Power Consumption | Not specified (typical tumble dryer: 2000-2500 W) |
| Energy Efficiency Class | Not specified (likely B or C based on age) |
| Drying Programs | Electronic and time-steered: Cottons, Synthetics, Delicate, Rapid, Airing, Time (20-60 min) |
| Options | Delayed Start (1-8 h), Gentle, Rapid, Buzzer, Anti-crease |
| Control Type | Rotary selector knob and push buttons (Electronic) or selector knob only (Time-steered) |
| Display | Indicator lights for filter, water container, and machine on |
| Filter | Lint filter with clean indicator; clean after each cycle |
| Water Container | Removable, empty after each cycle; full indicator light; optional direct drain |
| Heat Exchanger | Clean every 3 months; removable for rinsing |
| Drum Material | Stainless steel (typical) |
| Door | Reversible hinge (left or right opening); child safety lock |
| Interior Light | Yes (15 W, E14 bulb, up to 300°C) |
| Stacking Capability | Can be stacked on washing machine using kit AMH 542 |
| Noise Level | Not specified (typical: 65-70 dB) |
| Safety Features | Door interlock, auto stop on door open, child safety lock, earthing required |
| Maintenance | Wipe cabinet with mild detergent; clean filter and heat exchanger regularly |
| Spare Parts Availability | Filter, heat exchanger, door seal, bulb, etc. via authorized service |
Frequently Asked Questions - AWZ Classic CT WHIRLPOOL
User questions about AWZ Classic CT WHIRLPOOL
0 question about this device. Answer the ones you know or ask your own.
Ask a new question about this device
Download the instructions for your Coffee maker in PDF format for free! Find your manual AWZ Classic CT - WHIRLPOOL and take your electronic device back in hand. On this page are published all the documents necessary for the use of your device. AWZ Classic CT by WHIRLPOOL.
USER MANUAL AWZ Classic CT WHIRLPOOL
GB TABLE OF CONTENTS
DESCRIPTION OF THE DRYER PAGE 13
FILTER PAGE 13
WATER CONTAINER PAGE 13
BEFORE USING THE DRYER PAGE 14
PRECAUTIONS PAGE 14
PREPARING THE LAUNDRY PAGE 15
SELECTING DRYING TIME OR PROGRAMME AND OPTIONS PAGE 16
STARTING AND COMPLETING THE PROGRAMME PAGE 17
INSTALLATION PAGE 18
ELECTRICAL CONNECTION PAGE 18
To get full satisfaction from your dryer, please read carefully your instruction manual.
DESCRIPTION OF THE DRYER
- Work-top
- Condensation water container
- Contact pin
- Door (Door opening can be reversed).
See "Door reversibility" section.
To open the door: pull the handle out.
To close the door: push the door gently until it closes.
- Lint filter
- Child safety-lock
Using a coin or a screwdriver turn the plastic screw clockwise by 90°.
Slot vertical: the door cannot be closed.
Slot horizontal: the door can be closed.
- Inside lamp (if available)
Only comes on when the door is open (the programme has to be selected).
Light off: the programme selector knob is set to "0".
- Push-button for heat exchanger flap opening
- Heat exchanger.

FILTER
Clean the lint filter at the end of each drying cycle.
- Pull the filter upwards.
- Open the filter.
- Brush lint using a soft brush or your fingertips.
- Close the filter and push it back well into place.
Filter Indicator light
It warns that the filter is dirty and needs to be cleaned.
If the laundry is insufficiently dry, check that the filter is not clogged.
WATER CONTAINER
Empty the water container at the end of each drying cycle
- Open the flap with the push-push lock by pressing gently on the right side of the flap and remove the water container.
- Empty the water container.
- When it is empty, push container back into housing until it clicks.
Water container indicator light
Indicates that the water container is full and needs to be emptied. The drying programme is automatically stopped.
Electronic dryer
Set programme selector knob to "0", empty the water container and restart the programme.
Time-steered dryer
Empty the water container. Turn the programme selector knob to the line on the left of the emptying symbol (Start button is pressed).
When the pump cycle has finished, turn the selector knob to the position where it was when the drying cycle was interrupted.
BEFORE USING THE DRYER
• After unpacking please make sure that the dryer is undamaged. In case of doubt do not use the dryer but call a qualified technician or your retailer.
- Packaging material (plastic, etc.) must be kept out of the reach of children as it constitutes a potential risk.
- This dryer was designed for domestic use and must be used exclusively for drying laundry.
Environmental hints
1. Packaging material
The packaging material can be 100% recycled, as confirmed by the recycling symbol (⚠️)
2. Dryer
The dryer is built from recyclable materials. If you decide to scrap the dryer act responsibly and observe local waste disposal by laws. Cut off the power cord so that the dryer cannot be connected to the mains.

PRECAUTIONS
Child safety
- After use, set the programme selector to position "0". This prevents children from switching on the dryer accidentally.
For domestic use only
This dryer conforms to EEC directive 93/68.
PREPARING THE LAUNDRY
Laundry preparation
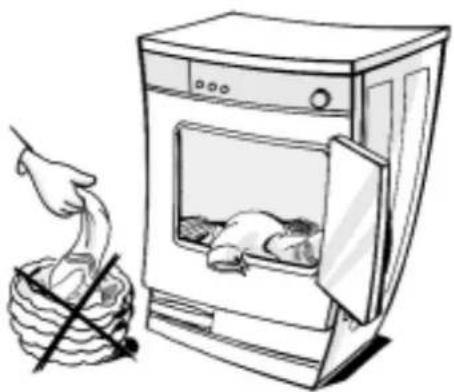
Check that all fastenings are closed and that pockets are empty. Turn the articles inside out. Place laundry loosely in the drum to make sure that they don't get tangled.
Max. drying weight
- Cottons 5,0 kg
• Cottons with Rapid option 3,5 kg (electronic dryer) - Synthetics 2,5 kg
The given weights correspond to a standard laundry load.
Sort laundry as follows
A) By care symbols
On the collar or inside seam:

Suitable for tumble drying

Tumble drying at low temperature only

Do not tumble dry
B) By amount and weight
Whenever the load is bigger than the dryer capacity, separate laundry according to weight (e.g. towels from thin underwear).
C) By type of fabrics
Cottons/linen: Towels, cotton jersey, bed and table linen made of cotton or linen.
Synthetics: Blouses, shirts, overalls, etc. made of polyester or polyamide, as well as for cotton/synthetic mixes.
D) By drying level
- Sort into: iron dry, cupboard dry, etc.
Do not tumble dry:
Woollens, silk, delicate fabrics, nylon stockings, delicate embroidery, fabrics with metallic decorations, bulky items such as sleeping bags, etc.
Attention: Do not dry articles which have been treated with a dry cleaning fluid or rubber articles (danger of fire or explosion). Do not dry laundry dirty with vegetable oils.

SELECTING DRYING TIME OR PROGRAMME AND OPTIONS
Electronic dryer
- Select the programme and the options as indicated in the table (see Programme Table).
- Options (If available)
To select an option, press the corresponding button before pressing the Start button. The indicator above the button lights up to confirm that a selection has been made. An alarm sounds to indicate that an incorrect selection has been made (incompatible options). Press the button again to cancel the option.
Delayed Start
Delays dryer starting. Every time the corresponding button is pressed the start time is delayed from 2 to 8 hours in 2 hourly steps. After the desired time is selected, press the Start button. When the light flashes the delayed start is running. The delay can be changed or cancelled by selecting "0" with the programme selector knob.
Opening the door stops the countdown. Close the door and press the Start button again to continue the countdown. You may hear the pump for a short time after pressing the Start button.
Gentle
Reduces the drying temperature for delicate articles. It is automatically included in the delicate programme, therefore selection is not possible.
Rapid (Cottons only) Max. 3,5 kg.
Shortens the drying time (e.g. cloths or other laundry of equal size). Do not use the option for large items (e.g. sheets or similar).

Buzzer
Pressing the button initiates a buzzer sound to signal at regular intervals, at the end of the drying cycle.
3. Additional Programmes
Airing
The laundry will be aired during 30 minutes without heating.
Time programme (20 to 60 minutes)
To gently finish dry or dry single items. Suitable for all fabrics.
SELECTING DRYING TIME OR PROGRAMME AND OPTIONS
Time-steered dryer
-
Select the drying time and the options according to the table (see Programme Table).
-
Options (if available)
To select an option, press the corresponding button. Press the button again to cancel the option.
Delayed Start
Delays dryer starting. The Start delay selector should be turned clockwise to the required time delay and the Start button pressed. It is possible to select a delay from 1 to 8 hours. The time delay can be changed at any time by simply turning the Start delay selector.
The remaining time to the programme start is shown on the selector. Opening the door stops the countdown. Close the door and press the Start button again to continue the count-down. To cancel the countdown turn delay selector to "0".
Gentle
Reduces the drying temperature for delicate articles.

Buzzer
Pressing the button initiates a buzzer sound to signal at regular intervals, at the end of the drying cycle.
- Additional Programme
Airing
The laundry will be aired during 20 minutes without heating.
STARTING AND COMPLETING THE PROGRAMME
- Having selected the desired drying time or programme and options, press the Start button.
- If selected a buzzer sounds to signal the end of the drying cycle. It will sound at regular intervals for some time.
- If you do not unload the laundry at the end of the drying cycle, an automatic anti-crease cycle will operate for maximum 20 min. (Time-steered dryer) or 70 min. (Electronic dryer): the drum rotates at regular intervals preventing the laundry from creasing.
- On completion of the programme, set the programme selector knob to position "0". The "Machine On" light goes off.
- Clean the lint filter and empty the water container at the end of each drying cycle.
- If you change the programme (electronic dryer) during the drying cycle the dryer stops. To operate the new programme press the Start button again.
Interruption of the drying cycle
To interrupt the dryer during the drying cycle, set the programme selector knob to position ( ) Airing and press the Start button again for the Electronic dryer.
Wait at least 5 minutes before opening the door to allow the dryer to cool down.
For your safety the programme stops automatically if you open the door. To restart close the door and press the Start button again.
INSTALLATION
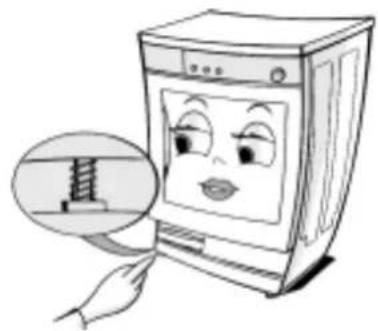
• Install your dryer in a room which is not subject to extreme conditions.
- Remove the protective foil from the control panel.
• Level the dryer adjusting the four feet.
- Should the room temperature rise above 35° C during the operation of the dryer, please ventilate the room.
- Before running the first cycle ensure water container and heat exchanger are correctly positioned.
- If possible use the pipe supplied to drain the water directly to a drainage system (see chapter drainage system).
• Take care not to trap the mains cable between the dryer and the wall.
Stacking kit
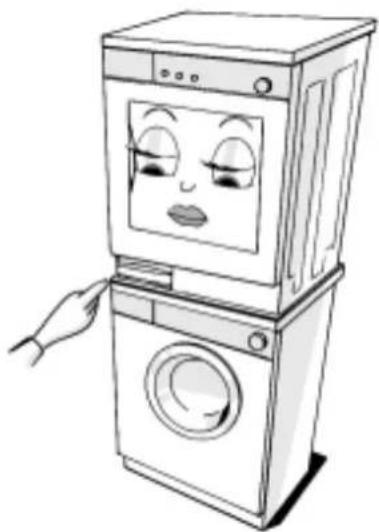
Your dryer can be stacked on top of your washing machine, using the stacking kit AMH 542, which is available from your dealer.
Minimum housing dimensions:
Width: 600mm
Height: 850mm
Depth: 600mm
ELECTRICAL CONNECTION
- The electrical connection has to be carried out in compliance with local regulations.
• Information on the permissible operating voltage, the power consumption and the required fuse protection is given on the rating plate on the back of the dryer.
• The earthing of this dryer is compulsory by law. - Do not use extension cords or multiple adapters.
- Before any maintenance on the dryer, disconnect it from the mains supply.
- Do not operate the dryer if it has been damaged during transport. Contact a qualified service technician.
- In case of replacement of mains cable contact a qualified service technician.

ELECTRICAL CONNECTION
1) ELECTRICAL CONNECTIONS
"Warning - this appliance must be earthed"
This appliance is normally supplied with a mains lead having a plug fitted in the factory which has been checked for correct earth continuity.
If the fitted plug is not suitable for your socket outlet, or if the machine's mains lead is not fitted with a plug, you should fit a suitable new, good quality plug by following the instructions in (2) below.
Any unsuitable plug should be cut off and disposed of in order to avoid a possible shock hazard should it be inserted into a socket.
2) CONNECTION TO A REWIRABLE PLUG - to be carried out only by a qualified electrician
The wires in the mains lead are coloured in accordance with the following code:
BLUE - "NEUTRAL" ("N")
BROWN - "LIVE" ("L")
GREEN AND YELLOW - "EARTH" ("E")
To fit a new plug, proceed as follows:
2.1 Polarized Plugs (e.g. 3 pin, 13 amp plug conforming to BS 1363A)
a. The GREEN AND YELLOW wire must be connected to the terminal in the plug which is marked with the letter "E" or by the Earth symbol or coloured yellow or green and yellow.
b. The BLUE wire must be connected to the terminal which is marked with the letter "N" or coloured black.
c. The BROWN wire must be connected to the terminal which is marked with the letter "L" or coloured red.

2.2 Non-polarized plugs (e.g. 2 pin with side earth contact)
The wire which is coloured GREEN AND YELLOW must be connected to the earth contact. The other two wires should be connected to the two pins, irrespective of colour.
3) FUSE REPLACEMENT
If the mains lead of this appliance is fitted with a BS 1363A 13 amp fused plug, replace the fuse only with an A.S.T.A. approved type conforming to BS 1362 and proceed as follows:

- Remove the fuse cover (A) and the fuse (B).
- Fit the replacement 13 A fuse into the fuse cover.
- Refit both into the plug.
For all other types of plug, the supply socket should be protected by a 16 A fuse or circuit breaker at the distribution board.
DRAINAGE SYSTEM
Direct drainage at the rear of the dryer
To avoid to empty the water container at the end of each drying cycle, connect the pipe supplied in the dryer directly to a fixed drain or put it into a sink.
- Remove the pipe in the lower part behind the dryer and mount it to the plastic connector (shown in driagram), put a rag underneath to collect water spillage.
- Connect the pipe supplied with the dryer to the connector. The maximum drain height is 1m.
- Make sure that the pipe is not bent or twisted (the end of the pipe must not be immersed in the drain water to avoid risk of siphoning).

The supplied hose length is 1,5m. The maximum permitted length is 2,5m.
DOOR REVERSIBILITY
To change the direction of opening of the door
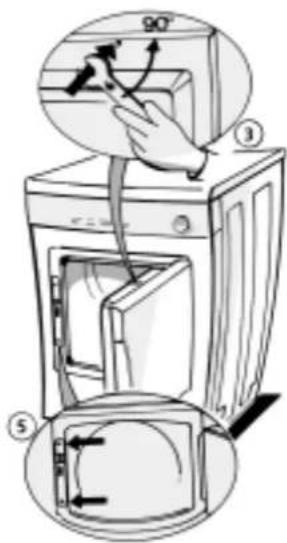
- Unplug the dryer.
- Open the door.
- Remove the contact pin at the upper part of the door with a spanner. Turn the contact pin 90° and take it out.
-
Unscrew the 2 screws at the door hinge and remove the door.
-
To remove the door lock:
- Unscrew the two screws above and below the door lock system and slide it upwards (1,5 cm) holding it from the bottom. Remove it.
-
To change the door opening:
-
Turn the door.
- Re-fit the door with the 2 screws at the preferred position.
-
Insert the door lock system at the opposite side of the door and move it (1,5 cm) down.
• Fix the 2 screws above and below the door lock system
• Take care not to reverse the sense of the door lock system. The child safety must be above the locking mechanism. -
Replace the contact pin in the top of the door.
MAINTENANCE
- Wipe the cabinet with a mild household detergent. Avoid using abrasive cleaners.
- Clean the lint filter at the end of each drying cycle.
-
If the lint filter mesh is clogged, clean it with water and a soft brush.
-
Clean the heat exchanger at least every three months proceeding as follows:
-
Open the door and press the button on the bottom of the door entrance.
• The heat exchanger flap opens. - Rotate the retaining springs and extract the heat exchanger.
MAINTENANCE
- Wipe away fluff from the seal and housing using a damp cloth.
- Flush the heat exchanger under running water.
- To replace the heat exchanger, insert it into its bay and lock it in place with the retaining springs.
N.B. The heat exchanger plates may discolour with use.
- Wipe away fluff from the door seal and the inside of the door using damp cloth.

TROUBLE SHOOTING GUIDE
Should your dryer operate incorrectly, check the following points before calling for a qualified service technician.
Drying is too long / laundry is not dry enough:
• Have you selected the correct drying time or programme?
- Was the inserted laundry too humid (Washing machine spin speed less than 800 rpm)?
• Is the lint filter dirty (filter indicator light on)?
• Is the heat exchanger dirty?
• Is the ambient temperature too high?
• After interruption of the mains supply, you must restart the dryer (Electronic dryer).
The dryer does not operate:
- Is the plug properly connected to the mains supply?
• Is there a power failure? - Has the fuse blown?
• Is the door well closed? - Has the drying time or programme been selected?
• Has the Start button been pressed?
Lint filter or water container light on:
• Is the lint filter clean?
• Is the water container empty?
• Is the water container correctly positioned?
• Is the heat exchanger clean?
- Has the pump position (Time-steered dryer) been selected (See "Water container" section)?
Waterdrops underneath the dryer:
• Is the heat exchanger correctly positioned?
- Has the fluff on the sealing of the heat exchanger been wiped away?
- Has the fluff on the door seal been wiped away?
Replacing inside light bulb (if available):
- If the inside lamp does not work, the bulb may perhaps be faulty.
- Unplug the dryer!
- Open the door and unscrew glass cover inside the drum.
- Replace faulty bulb with a new one and screw glass cover back on.
- Replacement bulb: 15W, 220/240 V, E14, suitable up to 300°C.
AFTER-SALES SERVICE
Before contacting After-Sales Service
- Try to solve the problem (see "Troubleshooting guide").
- Restart the programme to see if the fault is repeated.
If after the above checks your dryer does not work properly, get in touch with the nearest After-Sales Service Centre.
Please give:
• a short description of the fault.
• the exact type and model of the dryer.
• the service number visible on the right when door is open.
SERVICE
0000 000 00000

- Your correct address and telephone number.
- GB TABLE OF CONTENTS
- DESCRIPTION OF THE DRYER
- FILTER
- CLEAN THE LINT FILTER AT THE END OF EACH DRYING CYCLE
- FILTER INDICATOR LIGHT
- WATER CONTAINER
- EMPTY THE WATER CONTAINER AT THE END OF EACH DRYING CYCLE
- WATER CONTAINER INDICATOR LIGHT
- ELECTRONIC DRYER
- TIME-STEERED DRYER
- BEFORE USING THE DRYER
- ENVIRONMENTAL HINTS
- PACKAGING MATERIAL
- DRYER
- PRECAUTIONS
- CHILD SAFETY
- PREPARING THE LAUNDRY
- LAUNDRY PREPARATION
- MAX. DRYING WEIGHT
- SORT LAUNDRY AS FOLLOWS
- BY CARE SYMBOLS
- BY AMOUNT AND WEIGHT
- BY TYPE OF FABRICS
- BY DRYING LEVEL
- DO NOT TUMBLE DRY
- SELECTING DRYING TIME OR PROGRAMME AND OPTIONS
- ADDITIONAL PROGRAMMES
- STARTING AND COMPLETING THE PROGRAMME
- INSTALLATION
- STACKING KIT
- ELECTRICAL CONNECTION
- ELECTRICAL CONNECTIONS
- CONNECTION TO A REWIRABLE PLUG - TO BE CARRIED OUT ONLY BY A QUALIFIED ELECTRICIAN
- BLUE - "NEUTRAL" ("N")
- 2.2 NON-POLARIZED PLUGS (E.G. 2 PIN WITH SIDE EARTH CONTACT)
- FUSE REPLACEMENT
- DRAINAGE SYSTEM
- DIRECT DRAINAGE AT THE REAR OF THE DRYER
- DOOR REVERSIBILITY
- TO CHANGE THE DIRECTION OF OPENING OF THE DOOR
- MAINTENANCE
- TROUBLE SHOOTING GUIDE
- SHOULD YOUR DRYER OPERATE INCORRECTLY, CHECK THE FOLLOWING POINTS BEFORE CALLING FOR A QUALIFIED SERVICE TECHNICIAN
- DRYING IS TOO LONG / LAUNDRY IS NOT DRY ENOUGH
- THE DRYER DOES NOT OPERATE
- LINT FILTER OR WATER CONTAINER LIGHT ON
- WATERDROPS UNDERNEATH THE DRYER
- REPLACING INSIDE LIGHT BULB (IF AVAILABLE)
- AFTER-SALES SERVICE
- BEFORE CONTACTING AFTER-SALES SERVICE
- PLEASE GIVE
Brand : WHIRLPOOL
Model : AWZ Classic CT
Category : Coffee maker