CQ-HX1003W - Car Radio PANASONIC - Free user manual and instructions
Find the device manual for free CQ-HX1003W PANASONIC in PDF.

User questions about CQ-HX1003W PANASONIC
0 question about this device. Answer the ones you know or ask your own.
Ask a new question about this device
Download the instructions for your Car Radio in PDF format for free! Find your manual CQ-HX1003W - PANASONIC and take your electronic device back in hand. On this page are published all the documents necessary for the use of your device. CQ-HX1003W by PANASONIC.
USER MANUAL CQ-HX1003W PANASONIC
Removable Full Front MP3 WMA CD Player/Receiver with CD Changer Control
Removable Full Front CD Player/Receiver with CD Changer Control
natural_image
Black-and-white photo of a winding mountain road with snow-capped peaks in the background (no text or symbols visible)
WMA MP3
Matsushita Electric Industrial Co., Ltd.
Web Site: http://www.panasonic.co.jp/global/
YEFM283955 FD0203-0 Printed in China
- Please read these instructions carefully before using this product and save this manual for future use.
- 使用本產品前,請務必閱讀這些說明並將本說明書保管好以備將來之用。
Panasonic welcomes you to our ever growing family of electronic product owners. We know that this product will bring you many hours of enjoyment. Our reputation is built on precise electronic and mechanical engineering, manufactured with carefully selected components and assembled by people who take pride in their work. Once you discover the quality, reliability, and value we have built into this product, you too will be proud to be a member of our family.
Use this Product Safely
When Driving
Keep the volume level low enough to be aware of road and traffic conditions.
When Washing Your Car
Do not expose the product, including the speakers and CDs, to water or excessive moisture. This could cause electrical shorts, fire, or other damage.
When Parked
Parking in direct sunlight can produce very high temperatures inside your car. Give the interior a chance to cool down before switching the unit on.
Use the Proper Power Supply
This product is designed to operate with a 12 V DC, negative ground battery system.
Disc Mechanism
Do not insert coins or any small objects. Keep screwdrivers and other metallic objects away from the disc mechanism and disc.
Service
This product is made of precision parts. Do not attempt to disassemble or adjust any parts. For repair, please consult your nearest authorized Panasonic service station.
For Installation
This product should be installed in a horizontal position with the front end up at a convenient angle, but not more than 30°.
Note:
- The preset memory is cleared to return to the original factory setting when the power connector or battery is disconnected.
Before Reading these Instructions
- This operating instruction manual is for 2 models; CQ-HX1083W and CQ-HX1003W. All illustrations throughout this manual represent model CQ-HX1083W unless otherwise specified. The following table describes the differences between 2 models.
| Features\Models | CQ-HX1083W CQ-HX1003W | |
| MP3/WMA playback Yes None | ||
CQ-HX1083W
Indicates features applicable to CQ-HX1083W only.
CQ-HX1003W
Indicates features applicable to CQ-HX1003W only.

This can only be controlled through the main unit.

This can only be controlled through the remote control unit.
Operations with neither mark can be performed either by the main unit or the remote control unit.
CQ-HX1083/1003W
Features
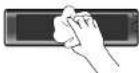
Touch Sensor Control
Instead of turning a knob or pushing a button to activate or change a setting, simply place your finger lightly on the corresponding area of the panel.
Display Color and Patterns
You are free to choose whatever color you like to light up the entire display. You can further customize your display with 5 spectrum analyzer patterns.
Double Security
Due to original Shutter LCD technology, the panel turns completely black when you turn off the unit. But for perfect security, you can actually remove the entire front panel and take it with you when you leave your car.
CD Player
- CD-R/RW playback
●MP3 and WMA playback CO-HX1083W
●Super One-Chip Digital Circuit
Accessories
- Remote control unit (1)

● Lithium battery (CR2025) (1)
- Removable face plate case (1)

- Operating instructions (1)

• Operation guide (1)

● Wiping cloth for the touch panel (1)
Note:
- Be careful not to lose the included operation guide, which you may need when operating the unit. Store it in a location such as one of the door pockets in your car.
CQ-HX1083/1003W
To Operate this Unit
Touch Panel
Power on Power off
Preparation:
Turn your car's ignition key to ACC or ON position.
On the main unit:
Press the center of the touch panel.
Power off (demonstration display ^4 )
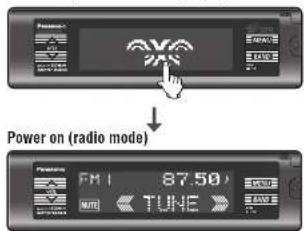
text_image
Power on (radio mode) FM1 87.50 TUNE*When you use this unit for the first time or you select "DEMO" of display setting (page 46), the demonstration display appears.
Note:
- The power can be turned on by pressing any part of the touch panel.
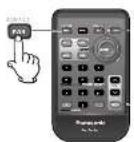
On the remote control unit: Press [PWR] (SOURCE).
On the main unit:
Press and hold SOURCEPOWER OFF
play) for more than 1 second.
Power on (example: radio mode)
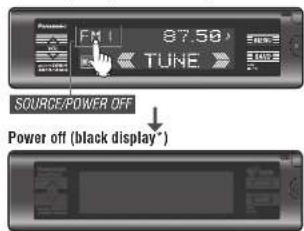
text_image
FM1 87.50 TUNE SOURCE/POWER OFF Power off (black display*)* security system based on LCD system (black display)
The display are no longer visible while the power is off.
Note:
- After turning the power on for the first time after purchasing this unit, the display when the power is off will always be a black display, unless the display setting (page 46) is changed.
- The clock display or the demonstration display can be shown on the screen when the power is off. (page 46)
On the remote control unit:
Press and hold [PWR] (SOURCE) again for more than 1 second.
CQ-HX1083/1003W
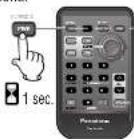
On the main unit:
Press SOURCE (source display) to change the source.
flowchart
graph TD
    A["FM1 SOURCE 87.50"] --> B["Radio mode (page 26)"]
    B --> C["CD/MP3/WMA mode (page 28)"]
    C --> D["CD changer mode (page 36) (When a CD changer is connected.)"]
    D --> E["AUX-IN mode"]
On the remote control unit:
Press [SOURCE] to change the source.
CQ-HX1083/1003W
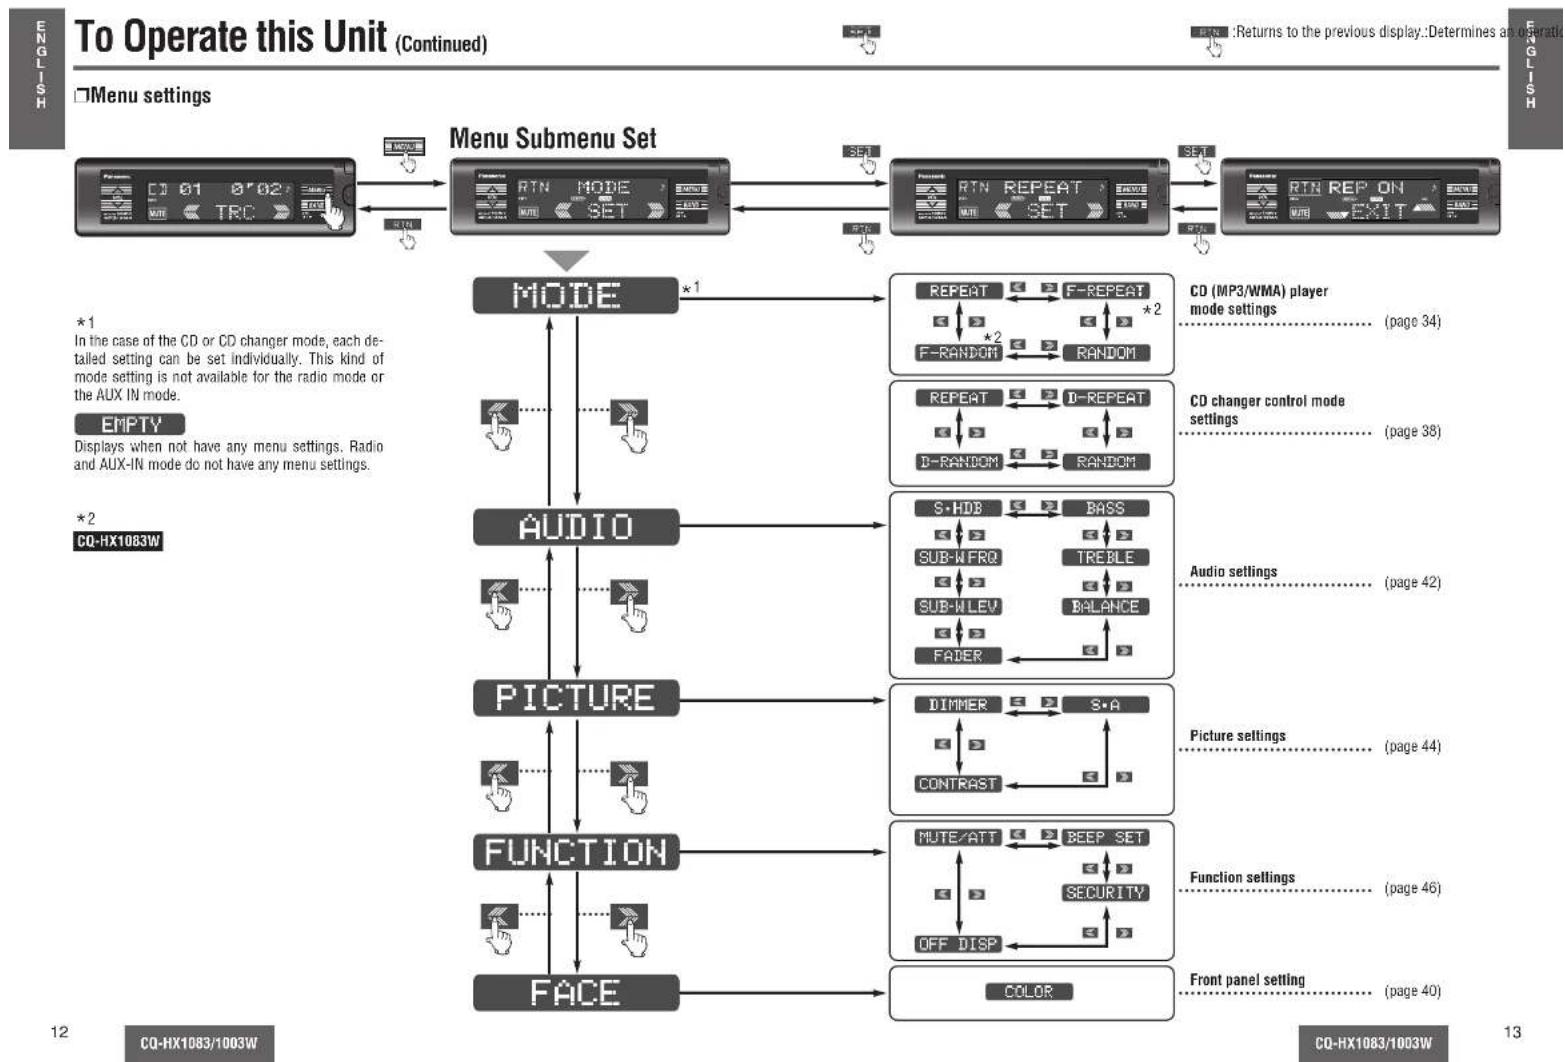
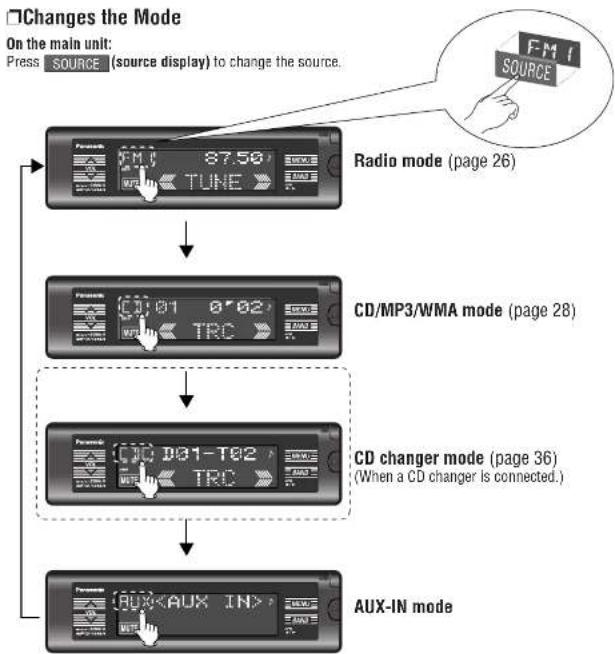
flowchart
graph TD
A["Menu Submenu Set"] --> B["Mode"]
B --> C["AUDIO"]
C --> D["PICTURE"]
D --> E["FUNCTION"]
E --> F["FACE"]
subgraph MODE
G["RESET"] --> H["RESET"]
I["RESET"] --> J["RESET"]
K["RESET"] --> L["RESET"]
end
subgraph AUDIO
M["REPEAT"] --> N["F-REPEAT"]
O["REPEAT"] --> P["D-REPEAT"]
Q["S-HDB"] --> R["BASS"]
S["S-BWRQ"] --> T["TREBLE"]
U["SUB-WLEV"] --> V["BALANCE"]
W["FADER"] --> X["BALANCE"]
end
subgraph PICTURE
Y["DIMMER"] --> Z["S-A"]
AA["CONTRAST"] --> AB["CONTRAST"]
AC["MUTE/ATT"] --> AD["BEEP SET"]
AE["OFF DISP"] --> AF["SECURITY"]
AG["COLOR"] --> AH["CONTROL"]
end
subgraph FUNCTION
AI["RESET"] --> AJ["RESET"]
AK["RESET"] --> AL["RESET"]
AM["RESET"] --> AN["RESET"]
end
subgraph FACE
AO["RESET"] --> AP["RESET"]
AQ["RESET"] --> AR["RESET"]
end
style MODE fill:#f9f,stroke:#333
style AUDIO fill:#ccf,stroke:#333
style PICTURE fill:#cfc,stroke:#333
style FUNCTION fill:#fcc,stroke:#333
style FACE fill:#cff,stroke:#333
note1["*1\nIn the case of the CD or CD changer mode, each detailed setting can be set individually. This kind of mode setting is not available for the radio mode or the AUX IN mode."<br>EMPTY\nDisplays when not have any menu settings. Radio and AUX-IN mode do not have any menu settings."<br>*2\nCQ-HX1083W"]
note2["CO (MP3/WMA) player mode settings....(page 34)"
note3["CO changer control mode settings....(page 38)"
note4["Audio settings....(page 42)"
note5["Picture settings....(page 44)"
note6["Function settings....(page 46)"
note7["Front panel setting....(page 40)"
%% Legend
Remote Control Unit Preparation
Battery Installation
1 Remove the battery holder.
Pull the battery holder by the position B while pushing position A in the direction indicated by the arrow.
② Install the battery on the battery holder.
Insert the battery holder back into its original position.
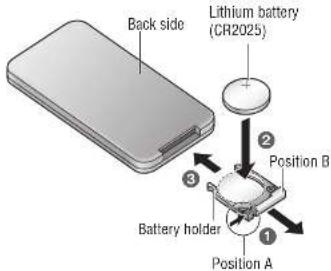
text_image
Back side Lithium battery (CR2025) Position B Battery holder Position ABattery Notes
● Battery type: Panasonic lithium battery (CR2025) (included)
● Battery life: Approximately 6 months with normal use (at room temperature)
Caution:
- Improper use of batteries may cause overheating, an explosion or ignition, resulting in injury or a fire. Battery leakage may damage the unit.
- Remove and dispose of an old battery immediately.
- Do not disassemble or short the battery. Do not throw a battery into a fire.
- Keep batteries away from children to avoid the risk of accidents.
- Be careful to observe proper local disposal rules when you dispose of batteries.
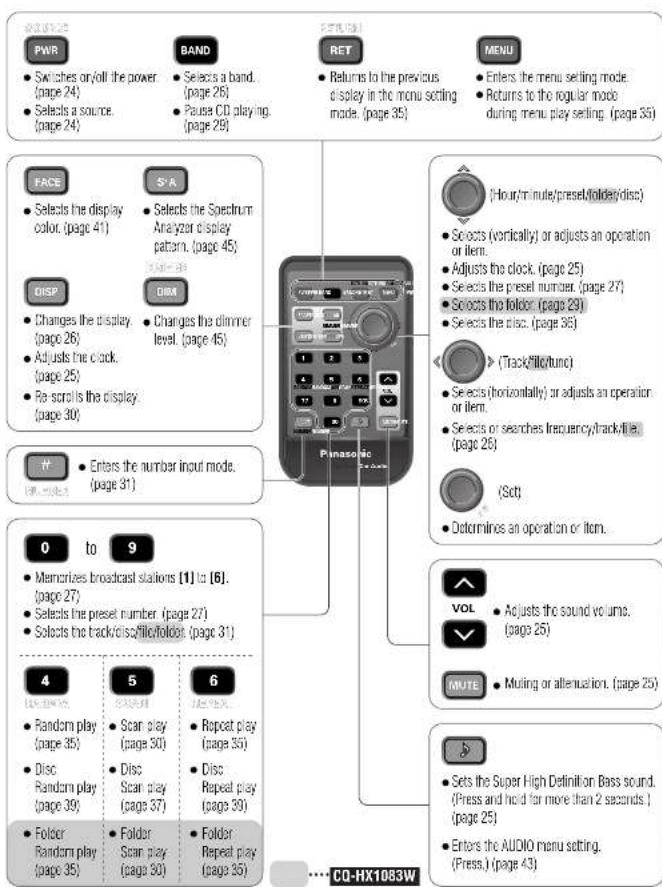
Name of Controls Functions (Remote Control Unit)
Point the remote control unit at the main unit's sensor. (page 22)
flowchart
graph TD
    A["PWR"] --> B["Switches or/off the power (page 24)"]
    A --> C["Selects a source (page 24)"]
    D["BAND"] --> E["Selects a band (page 26)"]
    D --> F["Pausa CD playing (page 29)"]
    G["RET"] --> H["Returns to the previous display in the menu setting mode. (page 35)"]
    I["MENU"] --> J["Enters the menu setting mode"]
    I --> K["Returns to the regular mode during menu play setting. (page 36)"]
    L["FACE"] --> M["Selects the display color. (page 41)"]
    N["S'R"] --> O["Selects the Spectrum Analyzer display pattern. (page 45)"]
    P["DISP"] --> Q["Changes the display (page 26)"]
    R["DIM"] --> S["Changes the dimmer level. (page 45)"]
    T["FF"] --> U["Enters the number input mode. (page 31)"]
    V["0 to 9"] --> W["Memorizes broadcast stations [1"] to["6"]. (page 27)]
    X["0 to 9"] --> Y["Selects the preset number (page 27)"]
    Z["0 to 9"] --> AA["Selects the track/disc/filo/fololet (page 31)"]
    AB["4"] --> AC["Random play (page 35)"]
    AD["5"] --> AE["Scan play (page 30)"]
    AF["6"] --> AG["Repeat play (page 35)"]
    AH["VOL"] --> AI["Adjusts the sound volume. (page 25)"]
    AJ["MUTE"] --> AK["Muting or attenuation. (page 25)"]
    AL["S"] --> AM["Sets the Super High Definition Bass sound. (Press and hold far more than 2 seconds.) (page 25)"]
    AN["ENC"] --> AO["Enters the AUDIO menu setting. (Press.) (page 43)"]
CQ-HX1083/1003W
CQ-HX1083/1003W
Name of Controls Functions (Front Panel)
●The power can be turned on by pressing any part of the touch panel.
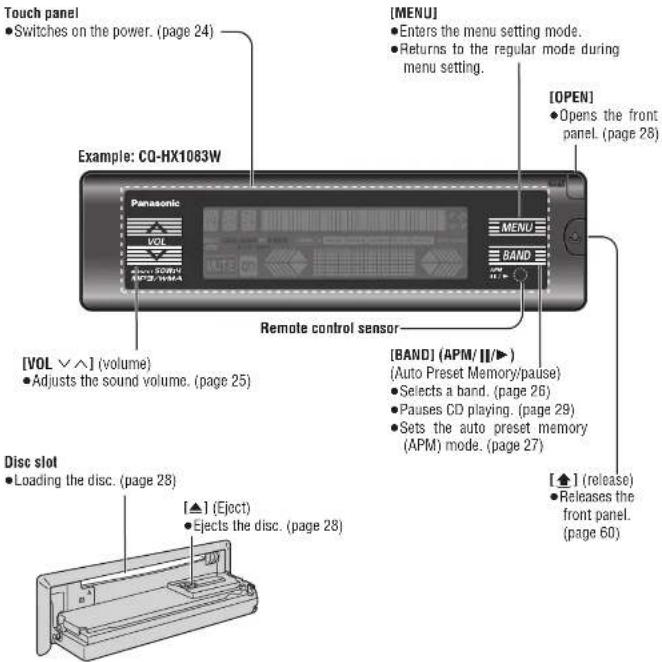
text_image
Touch panel • Switches on the power. (page 24) [MENU] • Enters the menu setting mode. • Returns to the regular mode during menu setting. Example: CQ-HX1083W [OPEN] • Opens the front panelL (page 28) Panasonic VOL BAND Remote control sensor [VOL ∨ ∧] (volume) • Adjusts the sound volume. (page 25) [BAND] (APM/ I/▶) (Auto Preset Memory/pause) • Selects a band. (page 26) • Pauses CD playing. (page 29) • Sets the auto preset memory (APM) mode. (page 27) Disc slot • Loading the disc. (page 28) [▲] (Eject) • Ejects the disc. (page 28) [▲] (release) • Releases the front panel. (page 60)(Display)

• • • • The display and the touch panel operation overlap in this region.
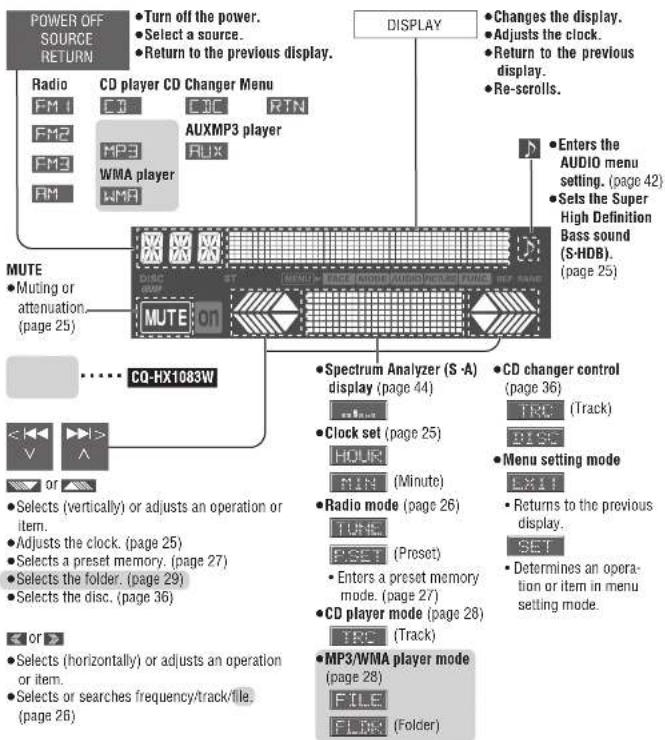
text_image
POWER OFF SOURCE RETURN Radio FM1 FM2 FM3 FM CD player CD Changer Menu CJ MP3 WMA player AUXMP3 player FLIX MUTE • Muting or attenuation. (page 25) CQ-HX1083W • Selects (vertically) or adjusts an operation or item. • Adjusts the clock. (page 25) • Selects a preset memory. (page 27) • Selects the folder. (page 29) • Selects the disc. (page 36) • Selects (horizontally) or adjusts an operation or item. • Selects or searches frequency/track/file. (page 26) DISPLAY • Turn off the power. • Select a source. • Return to the previous display. • Changes the display. • Adjusts the clock. • Return to the previous display. • Re-scrolls. • Enters the AUDIO menu setting. (page 42) • Sets the Super High Definition Bass sound (S-HDB). (page 25) • Spectrum Analyzer (S -A) display (page 44) • Clock set (page 25) HOUR MIN (Minute) • Radio mode (page 26) TUBE PSET (Preset) • Enters a preset memory mode. (page 27) • CD player mode (page 28) IFC (Track) • MP3/WMA player mode (page 28) FILE FLOW (Folder)Notes on the touch panel
Before operation
●Clean the surface of the touch
panel.
CQ-HX1083/1003W
At operation
- Use your fingers only to operate
touch the panel.
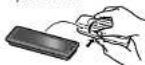
While leaving your car
- Detach the front panel, and
keep the panel with the face
plate ca
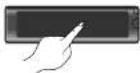
- Do not press the panel forcefully.
- Do not scratch the panel by fingernails or any hard objects.
- Do not use a pen or other sharp implement to operate the touch panel.
- Do not drop or bump the front panel.
If you do so, you may damage or break the glass on the top surface of the touch panel.
CQ-HX1083/1003W
General

Power
Turn your car's ignition key to ACC or ON position.
ON: Press the touch panel on the main unit. Press [PWR] on the remote control unit.
OFF: Press and hold SOURCE on the main unit again for more than 1 second. Press and hold [SOURCE] again for more than 1 second on the remote control unit.


Note:
- After turning off the ignition key, a security message is displayed, and the panel removable alarm that reminds you to take the panel is activated. (When security function is set to on) (page 46) - The power can be turned on by pressing any part of the touch panel.
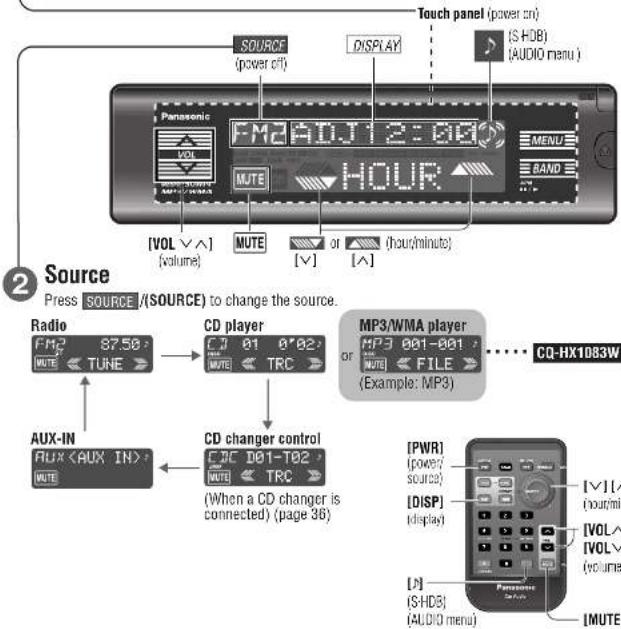
text_image
Touch panel (power on) SOURCE (power on) DISPLAY (S-HDB) (AUDIO menu) Panasonic FM2ADJ 2:00 MENU BAND [HOUR] [VOL V^] [volume] MUTE [√] or [^] (hour/minute) 2 Source Press SOURCE /(SOURCE) to change the source. Radio FM2 87.50 NOTE < TUNE >> CD player F 7 01 8'02 NOTE < TRC > MP3/WMA player MP3 001-001 or NOTE < FILE > (Example: MP3) CO-HX1083W AUX-IN AUXCQ-HX1083/1003W
Clock Set
Volume
Setting range: 0 to 40 (Default: 18)
Note:
- The sound level for each source is stored in memory. (For radio, one volume setting for AM, one volume setting for all FMs)
Mute/Attenuation
ON: Press [MUTE] MUTE]. ON lights. OFF:Press [MUTE] MUTE] again.
Decreasing volume range is adjustable by setting. (page 46)
MUTE No sound. ATT Decreases 10 steps.
S·HDB (Super High Definition Bass)
With music genres like rock music, the bass-sound will be more powerful.
Press and hold [√] for more than 2 seconds on the main unit.
SHDB OFF SHDB is non-active. (default)
TIGHT The bass sounds of the speakers are moderately emphasized.
BOOM The bass sounds of the speakers are strongly emphasized.
Note:
- These adjustments can also be performed using the AUDIO menu settings. (page 42)
The 12-hour system is used for the clock.
1 Press DISPLAY/[DISP] (display).
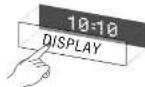
ADJUST
② Press and hold DISPLAY/[DISP] (display) for more than 2 seconds.

(Hours blink.)
3 Press / [√] or [^]. ADJ10:00 (Hours set.) HOUR
4 Press DISPLAY/[DISP] (display). ADJ10:QQ MIN (Minutes blink.)
5 Press or [√] or [^]. ADJ10:10 MIN (Minutes set.)
6 Press DISPLAY/[DISP] (display). 10=10 (End.)
Note:
- Press and hold or [√] or [^] to change numbers rapidly. - You can select the clock display even when the unit is off. (page 46) - ADJUST Displays before adjusting the clock.
Time Reset
① Press and hold DISPLAY/[DISP] (display) for more than 2 seconds. ② Repeat steps ③ to ⑥ above.
CQ-HX1083/1003W
Radio
1
Radio Mode
Press ,SOURCE] to change to the radio mode.
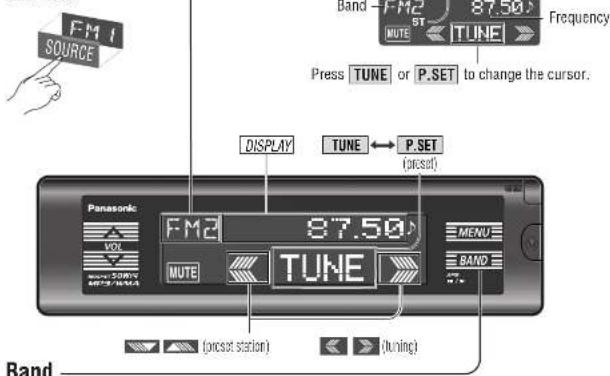
text_image
FM1 SOURCE band -FM2 87.50 ST MUTE ← TUNE → Frequency Press TUNE or P.SET to change the cursor. DISPLAY TUNE ← P.SET (preset) Panasonic FM2 87.50 VOUT MUTE ← TUNE → MENU BAND (preset station) ← (Tuning) Band2
Band
3

A<]: Down
Press and hold < or >/ [< ] or [>] for more than 0.5 seconds, then release.
Seeking will start.
Press [DISPLAY]/[DISP] (display).
Display Change
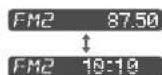
Radio mode display (Default)
Clock display

CQ-HX1083/1003W
Caution:
- To ensure safety, never attempt to preset stations while you are driving.
Preset Station Setting
- Up to 6 stations each can be saved in the FM1, FM2, FM3 and AM preset station memories.
Manual Preset Memory
Manually save a station in the preset memory.
1 Select a band and frequency. (previous page)
② Press and hold TUNE or P.SET for more than 2 seconds until the preset number blinks.
3 Press ▼ or ▲ /[∨] or [∧] to select a preset number (1-6).
4 Press and hold P.SET (preset) for more than 2 seconds to memorize.
- The display blinks once, and a receiving station is saved in the memory.
Preset number
Note:
- Frequency setting can be performed even after selecting a preset number.
- To suspend preset write, press DISPLAY/[DISP] (display).

1 Select a band and frequency. (previous page)
② Press and hold [1] to [6] for more than 2 seconds to memorize.
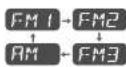
Auto Preset Memory (APM)
Automatically save stations with good reception in the preset memory.
1 Select a band. (previous page)
② Press and hold [APM] for more than 2 seconds.
- The 6 stations with good reception will be automatically saved in the memory under preset number 1 to 6.
- Once set, the preset stations are sequentially scanned for 5 seconds each. (scanning)

text_image
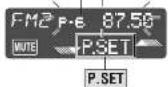
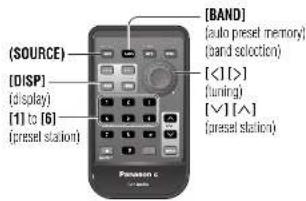
(SOURCE) [DISP] (display) [1] to [6] (preset station) [BAND] [auto preset memory] (bard selection) [] (funing) [V] [^] (preset station)Preset Station Calling
1 Select a band. (previous page)
② Press the Spectrum Analyzer display TUNE to show P.SET (preset).
③ Press □ or □/[▽] or [∧]. (Press [1] to [6] on the remote control unit.)
CQ-HX1083/1003W