
My Passport Go 5 - External hard drive WESTERN DIGITAL - Free user manual and instructions
Find the device manual for free My Passport Go 5 WESTERN DIGITAL in PDF.


| Product Type | Portable External Hard Drive |
| Interface | USB 3.0 (backward compatible with USB 2.0) |
| Power Source | USB-powered (no external power supply required) |
| Compatible Operating Systems | Windows Vista, 7, 8, 8.1; Mac OS X Snow Leopard, Lion, Mountain Lion, Mavericks, Yosemite (requires reformatting) |
| Backup Software | WD Backup – automatic, scheduled backup to local or cloud (Dropbox) |
| Security Software | WD Security – password protection with hardware encryption |
| Drive Management Software | WD Drive Utilities – diagnostics, sleep timer, drive erase, registration |
| Quick View | WD Quick View icon in Windows taskbar for status monitoring and safe removal |
| Data Transfer Speed | Up to 5 Gb/s (USB 3.0); up to 480 Mb/s (USB 2.0) |
| LED Indicator | Power/activity LED: steady (idle), fast flash (activity), slow flash (standby) |
| Kit Contents | My Passport Go 5 drive, USB 3.0 cable, Quick Install Guide |
| Warranty | 3 years limited (varies by region) |
| Form Factor | Ultra-sleek, portable design |
| Cloud Backup Support | Dropbox (account required) |
| Password Recovery | After 5 invalid password attempts, drive can be erased to regain access |
Frequently Asked Questions - My Passport Go 5 WESTERN DIGITAL
User questions about My Passport Go 5 WESTERN DIGITAL
0 question about this device. Answer the ones you know or ask your own.
Ask a new question about this device
Download the instructions for your External hard drive in PDF format for free! Find your manual My Passport Go 5 - WESTERN DIGITAL and take your electronic device back in hand. On this page are published all the documents necessary for the use of your device. My Passport Go 5 by WESTERN DIGITAL.
USER MANUAL My Passport Go 5 WESTERN DIGITAL
WD Service and Support
Should you encounter any problem, please give us an opportunity to address it before returning this product. Most technical support questions can be answered through our knowledge base or email support service at http://support.wd.com. If the answer is not available or if you prefer, please contact WD ^™ at the best telephone number shown below.
Your product includes 30 days of free telephone support during the warranty period. This 30-day period starts on the date of your first telephone contact with WD Technical Support. Email support is free for the entire warranty period and our extensive knowledge base is available 24/7. To help us keep you informed of new features and services, remember to register your product online at http://register.wd.com.
Accessing Online Support
Visit our product support website at http://support.wd.com and choose from these topics:
■ Downloads—Download drivers, software, and updates for your WD product.
■ Registration—Register your WD product to get the latest updates and special offers.
- Warranty & RMA Services—Get warranty, product replacement (RMA), RMA status, and data recovery information.
■ Knowledge Base—Search by keyword, phrase, or Answer ID.
■ Installation—Get online installation help for your WD product or software.
■ WD Community—Share your thoughts and connect with other WD users.
Contacting WD Technical Support
When contacting WD for support, have your WD product serial number, system hardware, and system software versions available.
North America Europe (toll free)* 00800 ASK4 WDEU
| English 800.ASK.4WDC (00800 27549338) | |||
| (800.275.4932) Europe +31 880062100 | |||
| Spanish | 800.832.4778 | Middle East Africa +31 880062100 | +31 880062100 |
| Mexico | 001 8002754932 | Russia | 8 10 8002 335 5011 |
| South America | Asia Pacific | ||
| Chile 1230 020 5871 | Australia | 1800 429 861 / 0011 800 2275 4932 | |
| Colombia | 009 800 83247788 | China | 800 820 6682 / 400 627 6682 |
| Venezuela | 0800 100 2855 | Hong Kong 3057 9031 | |
| Peru | 0800 54003 | India | 1800 200 5789 / 1800 419 5591 |
| Uruguay 000 413 598 3787 | Indonesia | 001 803 852 3993 | |
| Argentina | 0800 4440839 | Japan | 0800 805 7293 |
| Brazil | 0800 7704932 | Korea | 02 2120 3415 |
| 0021 800 83247788 | Malaysia | 1800 817 477 | |
| New Zealand | 0508 555 639 / 00800 2275 4932 | ||
| Philippines | 1800 1855 0277 | ||
| Singapore | 1800 608 6008 | ||
| Taiwan | 0800 225 593 | ||
| Thailand | 00 1800 852 5913 | ||
| Other countries | +86 21 2603 7560 | ||
* Toll free number available in the following countries: Austria, Belgium, Czech Republic, Denmark, France, Germany, Ireland, Italy, Netherlands, Norway, Poland, Slovakia, Spain, Sweden, Switzerland, United Kingdom.
Table of Contents
WD Service and Support .... ii
Accessing Online Support .... ii
Contacting WD Technical Support .... ii
1 About Your WD Drive .... 1
Features 1
Kit Contents 2
Optional Accessories 2
Operating System Compatibility....3
Disk Drive Format 3
Physical Description....3
USB 3.0 Interface 3
Power/Activity LED 4
Registering Your Drive 4
Handling Precautions 4
2 Connecting the Drive and Getting Started 5
Connecting the Drive 5
Getting Started with the WD Software 6
3 Backing Up Files 11
How the Backup Function Works.... 11
Backing Up Files.... 13
4 Restoring Files 18
How the Restore Function Works....18
Restoring Files 18
5 Locking and Unlocking the Drive 21
Password Protecting the Drive....21
Unlocking the Drive 22
With the WD Security or WD Drive Utilities Software 22
With the WD Drive Unlock Utility 23
Changing Your Password....24
Turning Off the Drive Lock Feature. 25
6 Managing and Customizing the Drive 27
Checking Drive Health 27
Erasing the Drive....28
Using the Drive Erase Function. 28
Using Five Invalid Passwords 29
Registering the Drive 31
Restoring the WD Software and Disk Image 31
Setting the Drive Sleep Timer 32
Using the WD Quick View Icon.... 32
Checking Drive Status 33
Monitoring Icon Alerts. 33
Safely Disconnecting the Drive 33
7 Managing and Customizing the Software 34
Checking for Software Updates 34
Configuring Your Cloud Service Account....35
Uninstalling the WD Software.... 37
8 Using the Drive with a Mac Computer 38
Reformatting the Drive 38
Restoring the WD Software and Disk Image 38
9 Troubleshooting 39
Installing, Partitioning, and Formatting the Drive 39
Frequently Asked Questions. 39
A Installing the SES Driver.... 41
Installing on Windows Vista Computers 41
Installing on Windows 7 and Windows 8 Computers....43
B Compliance and Warranty Information....46
Regulatory Compliance 46
FCC Class B Information 46
ICES-003/NMB-003 Statement 46
Safety Compliance 46
CE Compliance For Europe 47
KC Notice (Republic of Korea only) 47
Environmental Compliance (China)....47
Warranty Information 47
Obtaining Service 47
Limited Warranty....48
GNU General Public License ("GPL") 48
Index....49
1
About Your WD Drive
Welcome to your My Passport™ Ultra portable hard drive. This drive offers high capacity in a sleek portable device. It features ultra-fast USB 3.0 connectivity, local and cloud backup, and password protection with hardware encryption to help protect your files from unauthorized use.
This introductory chapter includes the following topics:
Features
Kit Contents
Operating System Compatibility
Disk Drive Format
Physical Description
Registering Your Drive
Handling Precautions
Features
With a compact design, high capacity, and your choice of local or cloud backup, My Passport Ultra fits perfectly into the busy life of anyone with an on-the-go digital life.
Ultra-fast transfer rates—When connected to a USB 3.0 port, your My Passport Ultra drive lets you access and save files with blazing speed. Reduce transfer time by up to three times when compared to USB 2.0 transfer time.*
*Performance may vary based on your hardware and system configuration.
Automatic, scheduled backup software—The WD Backup™ software works quietly in the background to help protect your data using minimal computer resources. Set the backup schedule to automatically back up your files at any time, on any day, week, or month.
Local and cloud backup—Choose where you back up your files. Back up files to your My Passport Ultra drive or back up files to the cloud using Dropbox ^TM .*
*A Dropbox account is required for cloud backup. Cloud services can be changed, terminated, or interrupted at any time and can vary by country.
Works great with Windows® 8—The WD app for Windows 8 makes it easy to discover the digital media stored on your My Passport Ultra drive with your Windows 8 computer. Your content is automatically displayed and organized so you can easily locate and enjoy your photos, videos, and music.
Ultra-sleek design with high capacity—This ultra-sleek drive is thin and fast with plenty of capacity for your important digital content.
USB 3.0 and USB 2.0 compatibility—With this single drive you get compatibility with the latest USB 3.0 devices and backward compatibility with USB 2.0 devices as well.
WD Drive Utilities™ software—Register your drive, set the drive sleep timer, run diagnostics, and more using the WD Drive Utilities software.
WD Security™ software—Set password protection and hardware encryption for your drive to help protect your files from unauthorized use or access.
Durable enclosure protects the drive inside—We know your data is important to you. So we build the drive inside to our demanding requirements for durability, shock tolerance, and long-term reliability. Then, we protect the drive with a durable enclosure designed for beauty.
USB-powered—Powered directly from the USB port on your computer. No separate power supply is needed.
Important: For the latest WD product information and news, visit our website at http://www.westerndigital.com. For the latest software, firmware, and product documentation and information, go to http://support.wd.com/downloads.
Kit Contents
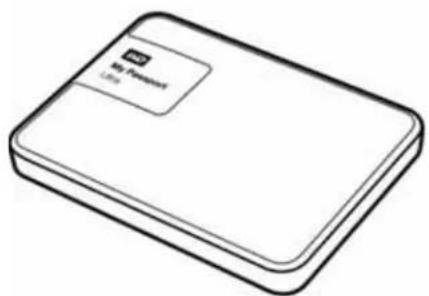
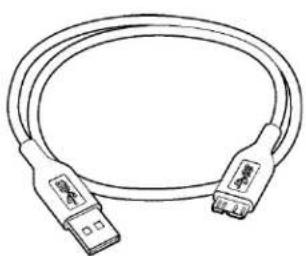
As shown in Figure 1, your My Passport Ultra drive kit includes the following:
■ My Passport Ultra portable hard drive, with the WD Backup, WD Security, WD Drive Utilities, and WD Quick View software
USB 3.0 cable
■ Quick Install Guide
Optional Accessories
For information about optional accessories for WD products, visit:
| US www.wdstore.com | |
| Canada www.wdstore.ca | |
| Europe www.wdstore.eu | |
| Australia www.wdstore.com.au | |
| Singapore www.wdstore.sg | |
| All others Contact WD Technical Support in your region. For a list of Technical Support contacts, visit http://support.wd.com and see Knowledge Base Answer ID 1048. | |
natural_image
Line drawing of a rectangular electronic device with a label on the top (no text or symbols on the body)My Passport Ultra Portable Hard Drive
natural_image
Line drawing of a USB cable with two connectors (no text or symbols)USB 3.0 Cable

natural_image
Simple line drawing of a closed book or notebook (no text or symbols visible)Quick Install Guide
Figure 1. My Passport Ultra Portable Hard Drive Kit Components
Operating System Compatibility
Your My Passport Ultra drive and the WD Drive Utilities and WD Security software are compatible with the following operating systems:
Windows Mac OS X
Windows Vista®
■ Snow Leopard
Windows 7
■ Lion
Windows 8
■ Mountain Lion
Windows 8.1
■ Mavericks
■ Yosemite
The WD Backup software is compatible with the following operating systems:
Windows Vista
Windows 7
Windows 8
Windows 8.1
Compatibility can vary, depending on hardware configuration and operating system.
For highest performance and reliability, always install the latest updates and service pack (SP). For Windows computers, go to the Start menu and select Windows Update. For Mac computers, go to the Apple menu and select Software Update.
Disk Drive Format
Your My Passport Ultra drive is formatted as a single NTFS partition for compatibility with all updated Windows operating systems. If you want to use the drive with a Mac computer, see “Reformatting the Drive” on page 38 and “Troubleshooting” on page 39.
Physical Description
As shown in Figure 2 on page 4, the My Passport Ultra drive has:
■ A USB 3.0 interface port
■ A power/activity LED indicator
USB 3.0 Interface
USB 3.0 supports data transfer rates up to 5 Gb/s.
USB 3.0 is backward compatible with USB 2.0. Connection to a USB 2.0 port transfers data at the port speed—up to 480 Mb/s.
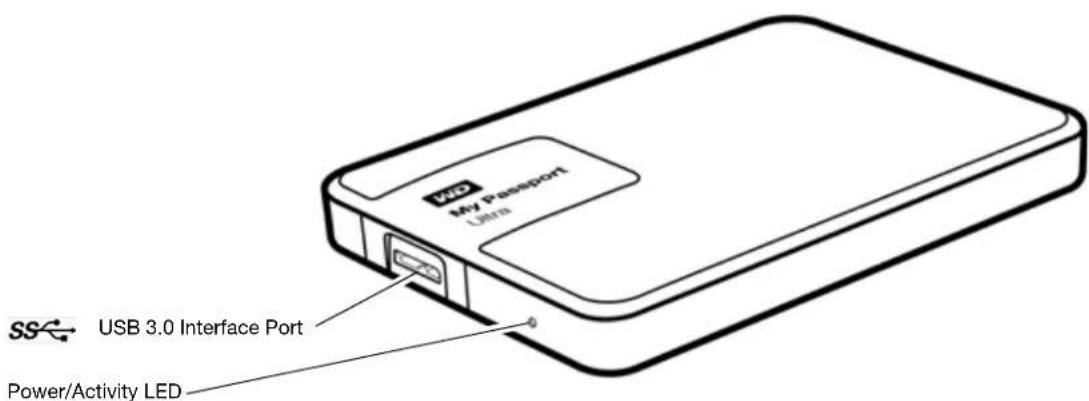
Figure 2. My Passport Ultra Drive
Power/Activity LED
The power/activity LED shows the drive's power state as follows:
| LED Appearance Power State/Activity | |
| On steady Idle | |
| Fast flashing, approximately 3 times per second Activity | |
| Slow flashing, approximately every 2.5 seconds System standby | |
Registering Your Drive
Always register your My Passport Ultra drive to get the latest updates and special offers. You can easily register your drive using the WD Drive Utilities software, as described in "Registering the Drive" on page 31. Another way is to register online at http://register.wd.com.
Handling Precautions
WD products are precision instruments and must be handled with care during unpacking and installation. Rough handling, shock, or vibration can damage drives. Always observe the following precautions when unpacking and installing your external storage product:
■ Do not drop or jolt the drive.
■ Do not move the drive during activity.
2
Connecting the Drive and Getting Started
This chapter provides instructions for connecting the drive and installing the WD software on your computer. It includes the following topics:
Connecting the Drive Getting Started with the WD Software
Connecting the Drive
- Turn on your computer.
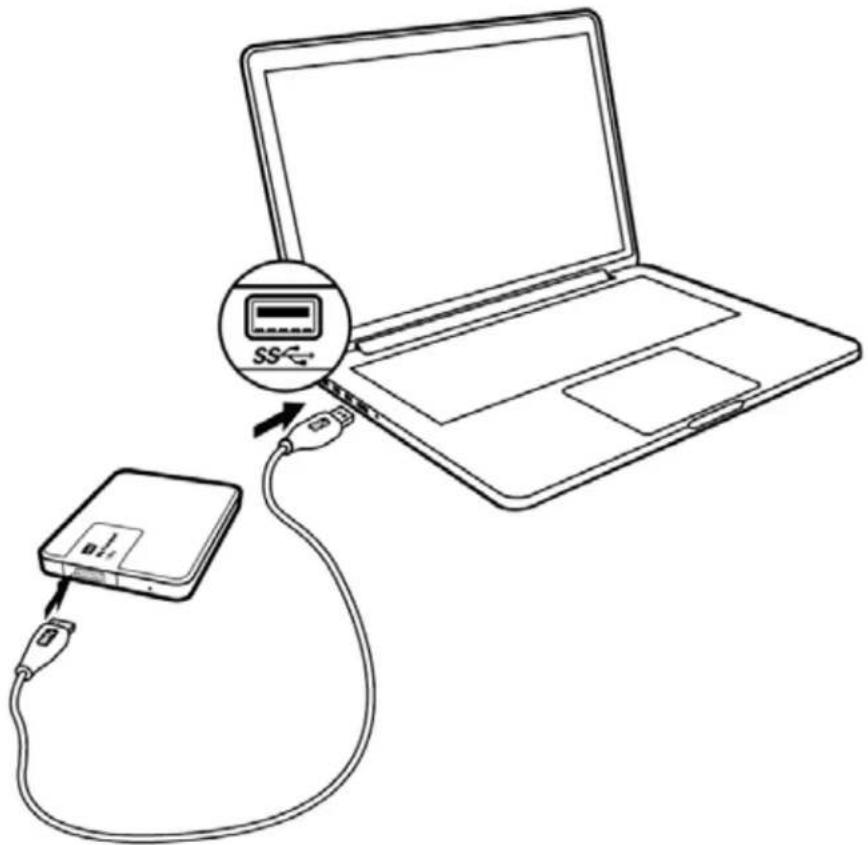
- Connect the drive to your computer as shown in Figure 3.
- Verify that the drive appears in your computer's file management utility listing.
- If a Found New Hardware screen appears, click Cancel to close it. The WD software installs the proper driver for your drive.
Your My Passport drive is now ready to use as an external storage device. You can enhance its capabilities by installing the WD software that is on the drive:
■ WD Backup
■ WD Security
■ WD Drive Utilities
■ WD Quick View
natural_image
Line drawing of a laptop connected to a USB drive via cable, with an inset showing the device's connection (no text or symbols present)Figure 3. Connecting the My Passport Drive
Getting Started with the WD Software
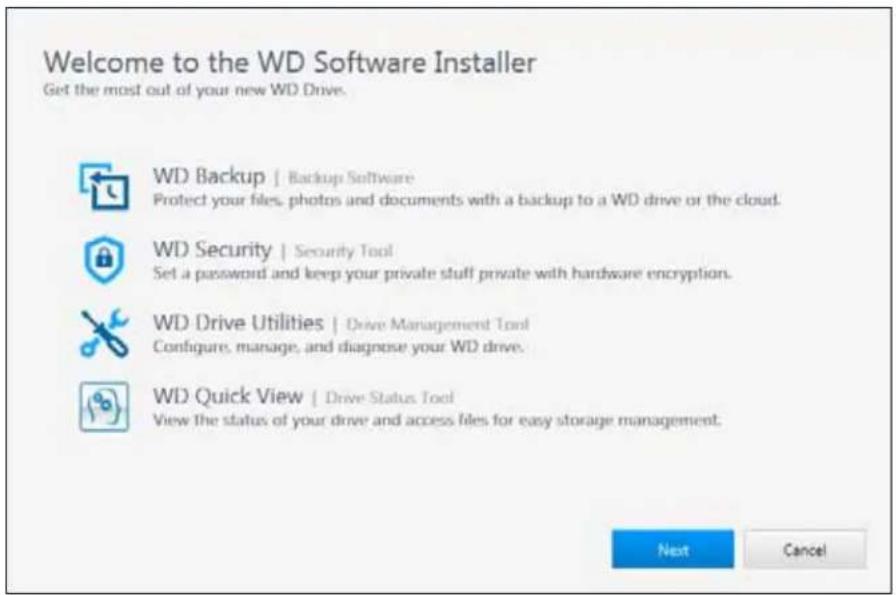
- Double-click the WD Apps Setup file that appears in the listing for the drive in your computer's file management utility to display the WD Apps Setup wizard, Software Installer dialog:
- Click Next to display the Installation Type dialog:
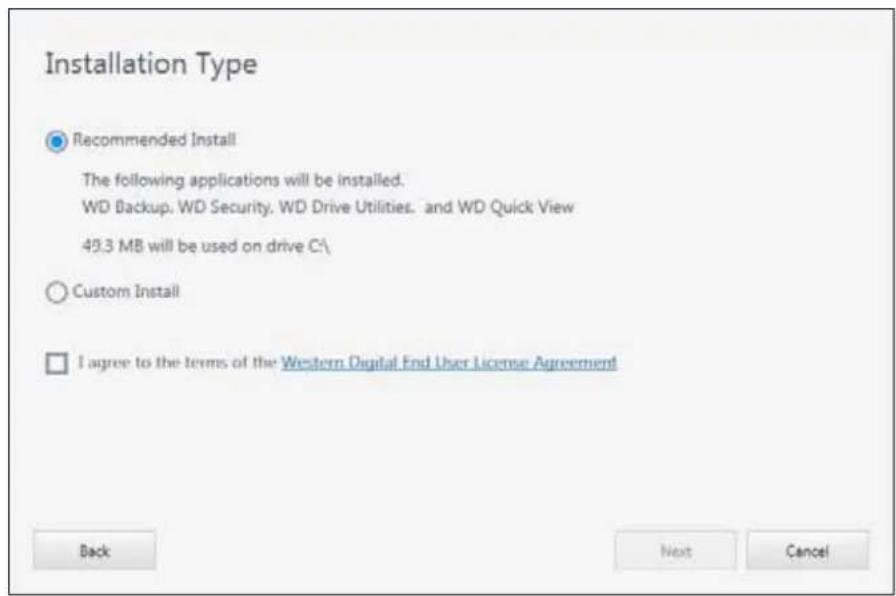
- On the Installation Type dialog:
a. Select the option that you want to use for the installation:
■ Recommended Install—Installs all of the WD software
■ Custom Install—Installs only the WD software that you select
b. Click the Western Digital End User License Agreement link and read the agreement.
c. Select the I agree... check box to accept the agreement and activate the Next button.
d. Click Next.
- The dialog that appears depends on the installation option you selected at Step 3:
IF you selected the ... option THEN ...
Recommended Install The Installing Applications dialog appears.
Custom Install The Custom Install dialog appears:
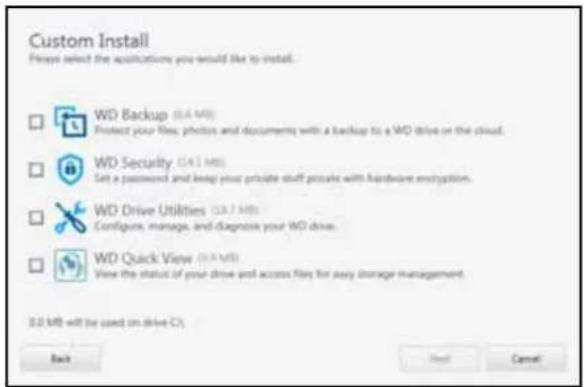
On the Custom Install dialog:
a. Select the check boxes for the applications that you want to install.
b. Click Next to display the Installing Applications dialog.
- The Installing Applications dialog:
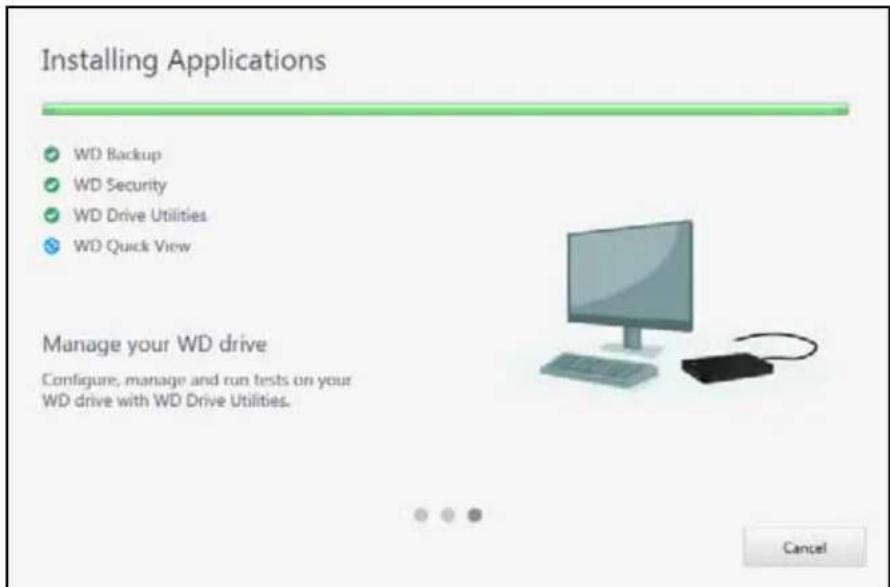
■ Shows the progress of the software installation
■ Displays a brief description of each application
■ Adds a desktop shortcut icon for each installed application:

WD Backup

WD Drive Utilities

WD Security
■ Adds the WD logo and WD Quick View icons to the Windows taskbar:


■ Replaces the Cancel button with a Next button when the installation is complete
6. Click Next to display the Installation Complete dialog:
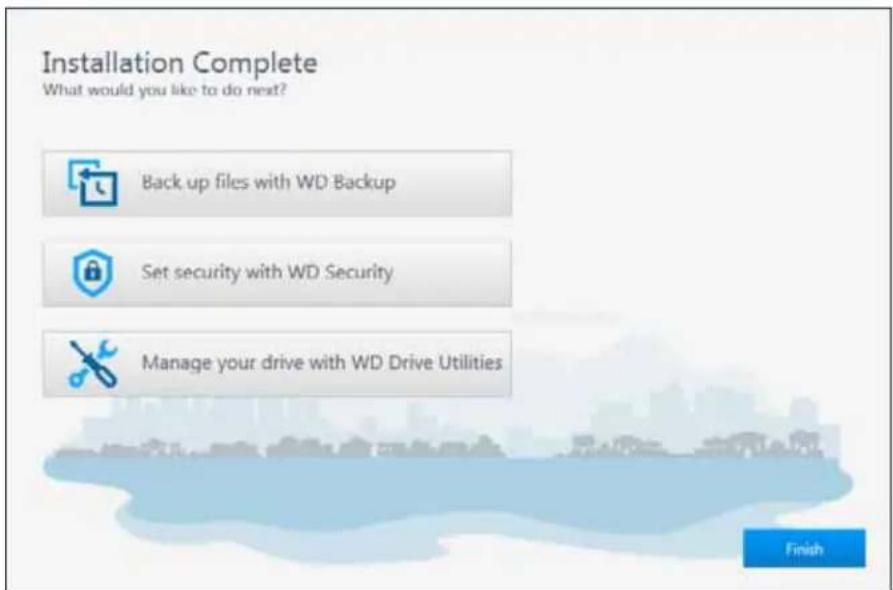
- On the Installation Complete dialog, click:
■ Back up files... to display the WD Backup screen, Select your WD storage device or cloud service dialog. See Figure 4 on page 9 and "Backing Up Files" on page 11.
- Set security... to display the WD Security screen, Set Security dialog. See Figure 5 on page 9 and "Locking and Unlocking the Drive" on page 21.
■ Manage your drive... to display the WD Drive Utilities screen, Diagnose dialog. See Figure 6 on page 10 and "Managing and Customizing the Drive" on page 27.
■ Finish to close the Installation Complete dialog.
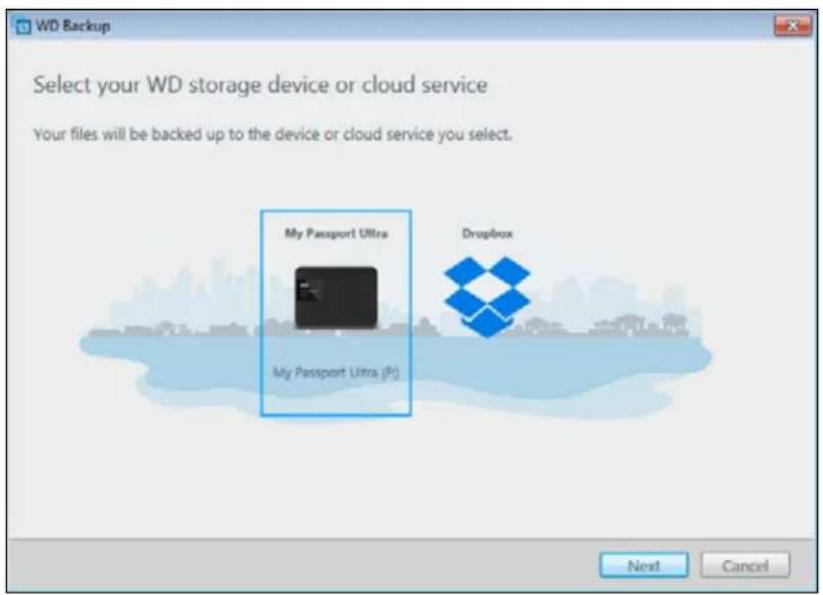
Figure 4. WD Backup Screen
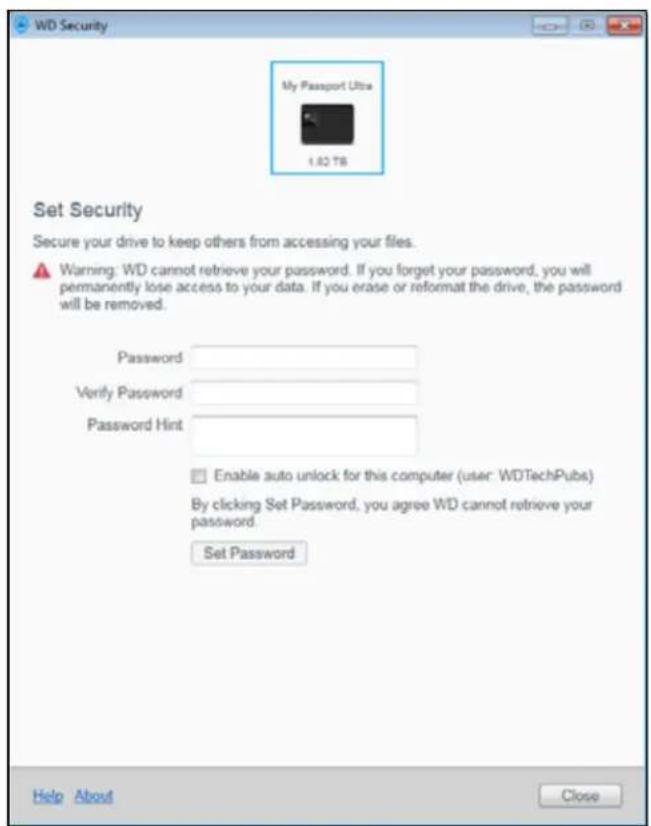
Figure 5. WD Security Screen
Note: The displayed capacity matches the capacity of the connected drive.
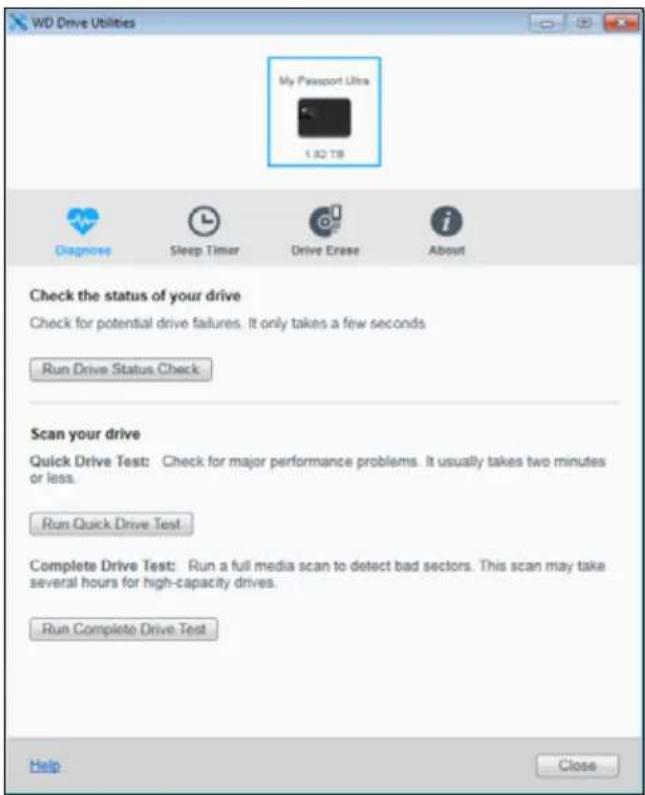
Note: The displayed capacity matches the capacity of the connected drive.
Figure 6. WD Drive Utilities Screen
Backing Up Files
This chapter includes the following topics:
How the Backup Function Works
Backing Up Files
How the Backup Function Works
The WD Backup software is a scheduled backup application that automatically backs up the files that you select on the schedule that you specify.
When you create a backup plan, you specify the backup:
■ Target—the external storage device where you will copy your files for backup protection. The backup target can be any supported:
■ External storage drive
■ Cloud service account
■ Source—the computer files and folders that you want to copy to the backup target for backup protection. The backup source can be any:
■ Internal hard drive or hard drive partition
■ External storage drive
■ Supported cloud service account
■ Schedule—the time of day, day of week, and month that you want to run the backup.
When you click Start Backup after creating a backup plan, the WD Backup software copies all of the specified backup source files and folders to the specified backup target. Then, on the schedule you specified, the WD Backup software automatically backs up any:
■ New file that was created in or copied to a backup-protected device or folder
■ Existing backup-protected file that was changed
This protection is automatic—the WD Backup software does it for you without any action on your part. Just leave the backup source and target devices connected to your computer.
Note: Whenever you disconnect and reconnect a backup target or source device, the WD Backup software rescans the backup source device for new or changed files and resumes automatic backup protection according to the schedule.
Excluded Files—The WD Backup software will not back up files that have specific:
■ Attributes
Names
■ Extensions
■ Start/end values
Table 1 on page 12 lists the excluded file types.
Table 1. Excluded Files.
| File Excluded Values | |
| Attributes reparsePoint | temporary |
| Name includes \AppData\Roaming\Microsoft\Windows[CommonApplicationData]\Western Digital\[CommonApplicationData]\Microsoft\Windows\Caches\config.msiMSOCache ntuser.datntuser.ini[RecycleBin]$recycle.binrecycler[Root]\Drivers\[Root]\Temp\System Volume InformationWD Backup.swstore.WD Hidden ItemsWD SmartWare.swstor[Windows] | |
| Extensions .ds_store | .temp.tmp.wdsync |
| Starts with ~ | |
| Ends with desktop.ini | .dropbox.dropbox.attrhiberfil.sys-journalpagefile.systhumbs.db |
Backing Up Files
- Open the Select your WD storage device or cloud service dialog by clicking either:

■ Configure backup on the WD Backup view menu from the Windows taskbar:
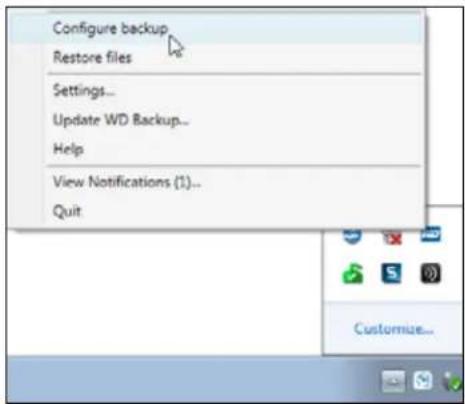
- The Select your WD storage device or cloud service dialog shows all of the hardware devices and cloud service accounts that you can use for a backup target device:
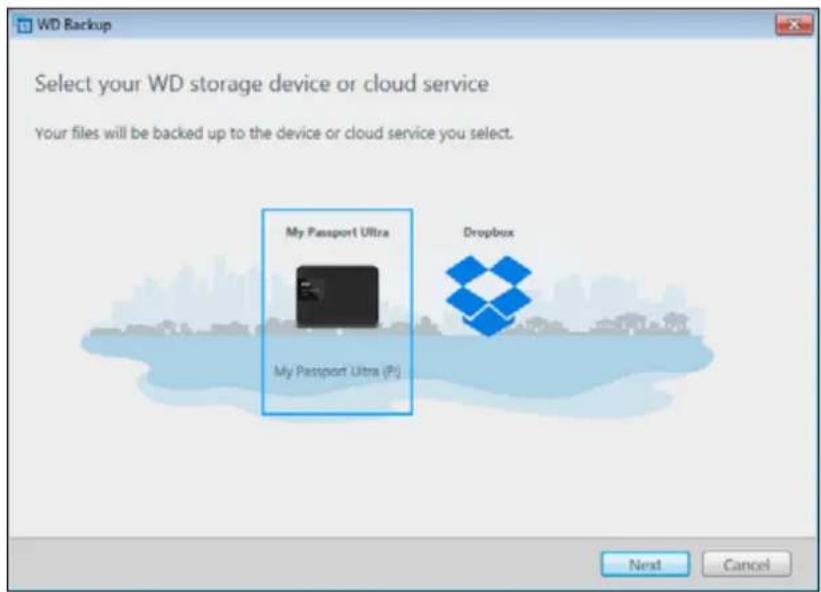
a. Select to highlight the device that you want to use.
b. If you have more than three available devices, use the left- and right-scroll buttons to see them all.
c. Click Next to display the Setup Complete dialog:
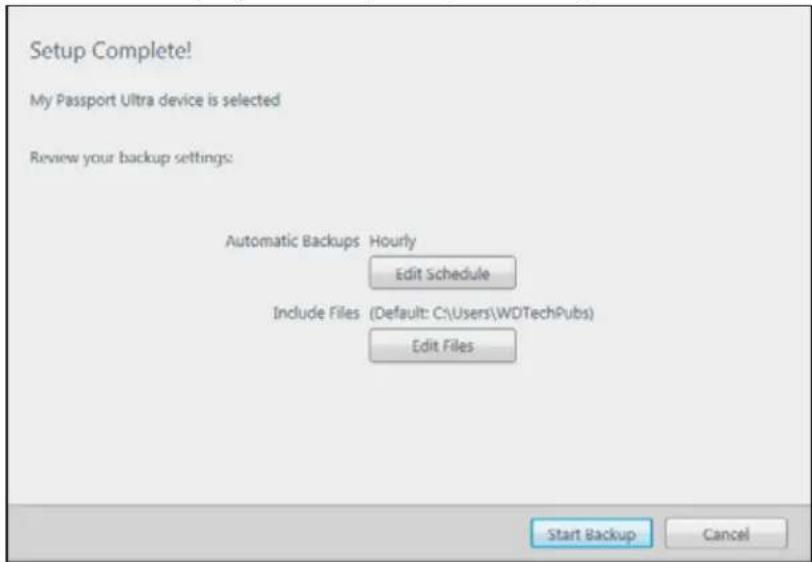
Note that:
| IF you selected a . . . | THEN the WD Backup software displays a . . . |
| Cloud service account Sign in dialog that you must complete to continue. (See “Configuring Your Cloud Service Account” on page 35.) | |
| Password-protected device that is locked | No writable partition message. In this case, first use either the WD Security or the WD Drive Utilities software to unlock the drive. Then reselect it. |
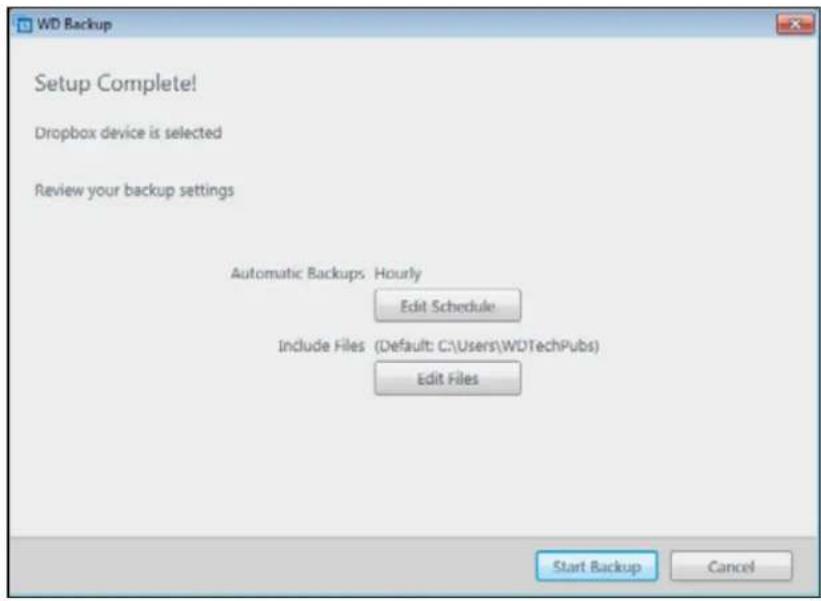
- The initial/default configuration of the backup settings on the Setup Complete dialog is for hourly backups of everything in the Windows Users folder for your computer user name.
On the Setup Complete dialog:
| IF you want to . . . THEN click . . . | |
| Accept the default settings | Start Backup to save and launch your backup plan and close the Setup Complete dialog.Skip to Step 10 on page 17. |
| Specify a different backup schedule | Edit Schedule to display the Automatic Backup Schedule screen and proceed to Step 4 on page 15. |
| Change the Include Files setting | Edit Files to display the Select Files to Back Up screen and skip to Step 7 on page 17. |
- On the Automatic Backup Schedule screen, select the option for the automatic backup schedule that you want:
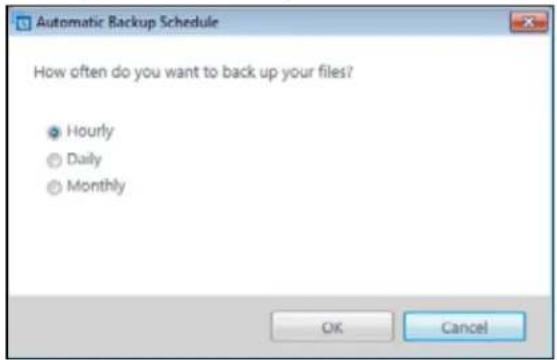
Selecting ... Configures automatic backups ...
Hourly Every hour, on the hour, 24 hours/day, 7 days/week.
Daily
Once a day, on the days of the week at the hour or half-hour you specify.
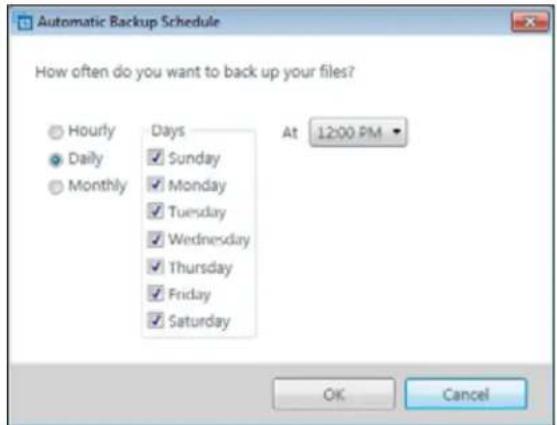
For a daily backup:
a. Select or clear the Days check boxes to specify the days of the week you want to run your backup.
b. Use the At drop-down list box to specify the time of day that you want to run your backup.
(Continued)
Selecting ... Configures automatic backups ...
Monthly
Once a month on the day you select, at the hour or half-hour you specify.
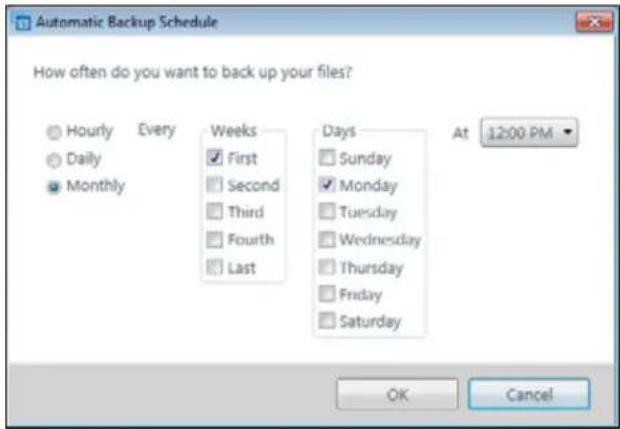
For a monthly backup:
a. Select or clear the Weeks check boxes to specify which occurrences of the day that you want to run your backup—First, Second, Third, Fourth, or Last.
b. Select or clear the Days check boxes to specify the days of the week that you want to run your backup.
c. Use the At drop-down list box to specify the time of day that you want to run your backup.
- Click OK to save and implement your change to the backup schedule and close the Automatic Backup Schedule screen.
- After changing the backup schedule:
| IF you want to . . . THEN click . . . | |
| Accept the default Include Files setting | Start Backup to save and launch your backup plan and close the Setup Complete dialog.Skip to Step 10 on page 17. |
| Change the Include Files setting | Edit Files to display the Select files to back up screen and proceed to Step 7 on page 17. |
7. On the Select Files to Back Up screen:
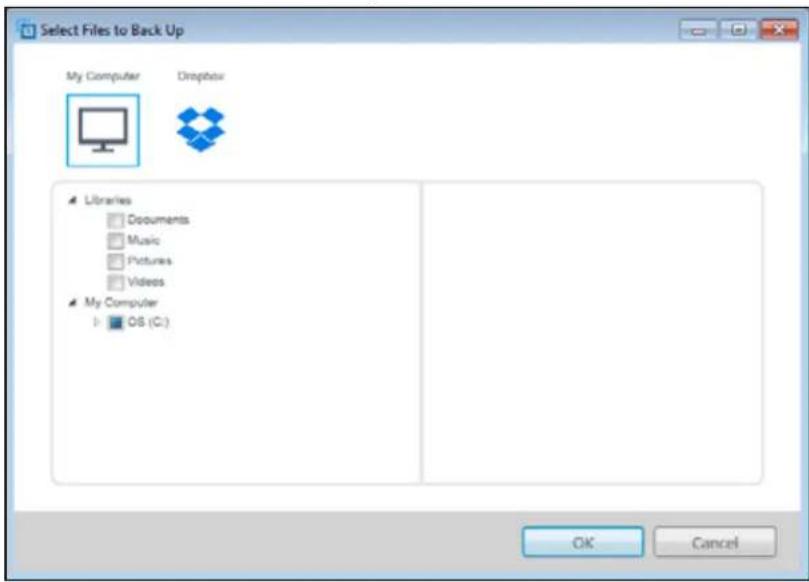
a. Click to select the device that has the files and folders you want to back up:
■ My Computer
- Dropbox
Note: If the files and folders you want to back up are in a Dropbox account and you have not configured the account for access by the WD Backup software see "Configuring Your Cloud Service Account" on page 35.
b. In the file structure view of the selected device, click the selectors to open the listings and select the check box for each file and folder that you want to back up. Note that selecting the check box for a folder automatically selects the check boxes for all of the files and subfolders in the folder.
c. Clear the check box for each file and folder that you do not want to include in the backup. Note also that clearing the check box for a folder automatically clears the check boxes for all of the files and subfolder in the folder.
Note: The default backup source is everything in the Windows Users folder for your computer user name. Be sure to clear that selection if you do not want to include those files and folders in your backup.
d. Click OK to save your selections and close the Select Files to Back Up screen.
- Verify that your Automatic Backups and Include Files specifications are correct.
- Click Start Backup to save and launch your backup plan and close the Setup Complete dialog.
- The WD Backup software runs the first backup immediately and shows the progress with a Backup in progress (x % complete) message on the Backup dialog. After the initial backup completes, the backup runs automatically according to the specified schedule.
4
Restoring Files
This chapter includes the following topics:
How the Restore Function Works
Restoring Files
How the Restore Function Works
The WD Backup software makes it easy for you to restore backed up files from your backup target device to either:
■ Their original locations on the backup source device
■ Any other location you select
Restore is generally a four-step process:
- Select the backup target device and the scheduled backup that has the files you want to restore.
- Select the location where you want to restore the files.
- Specify what you want to restore—either individual files and folders, or everything.
- Restore the files.
Restoring Files
- Open the Restore dialog by clicking either:
■ Restore on the WD Backup screen:

■ Restore files on the WD Backup view menu from the Windows taskbar:
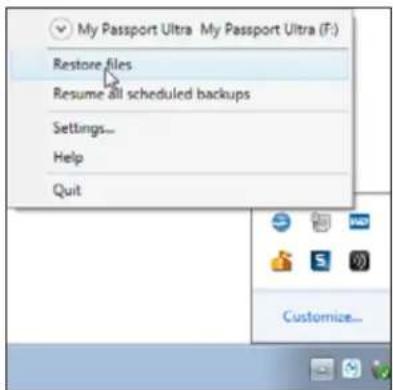
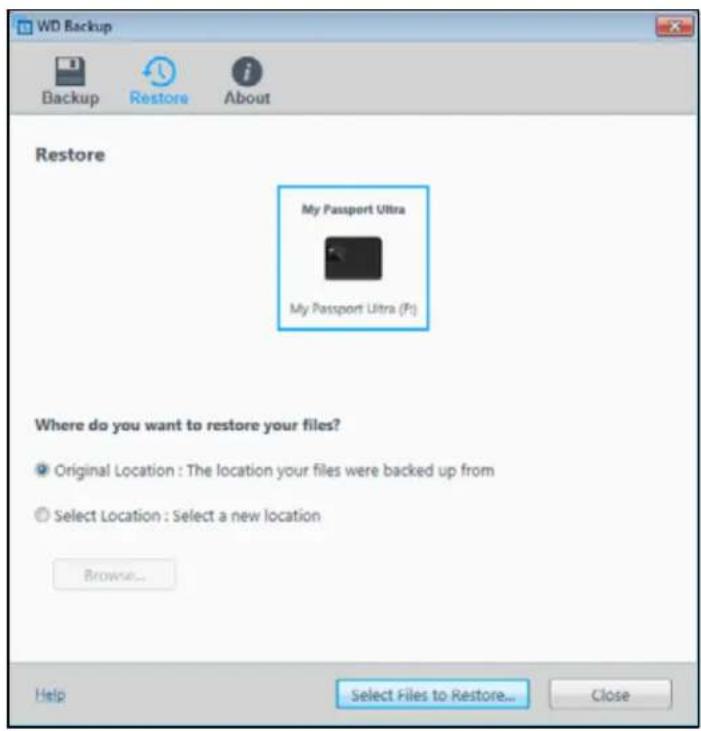
a. If you have more than one backup target device connected to your computer, click to select the one that has the backup files you want to restore.
b. Select the location option for where you want to restore the files:
■ Original Location and proceed to Step c on page 20
■ Select Location to activate the Browse button and:
(1) Click Browse to display the Select Location screen:
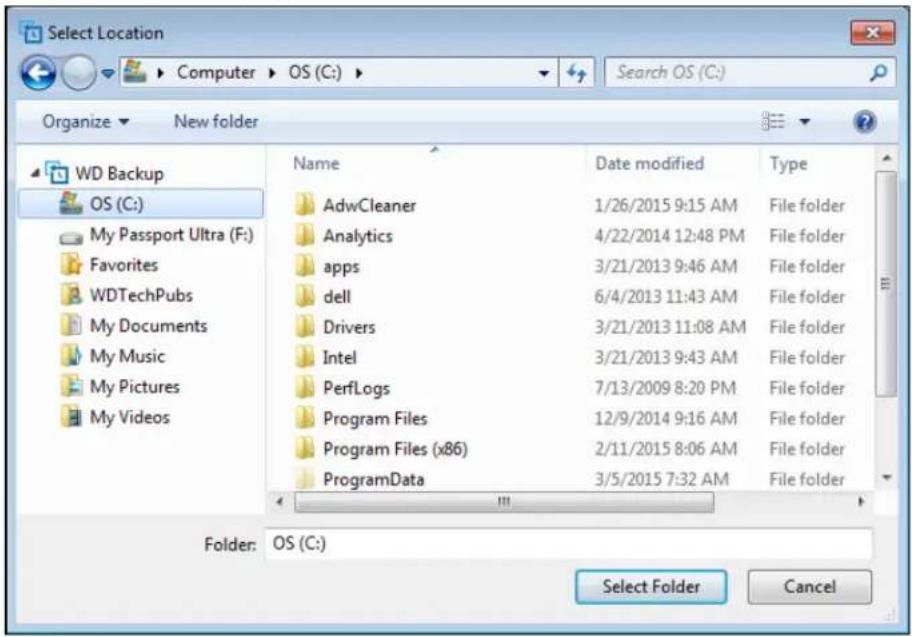
(2) Use the folder structure view of your computer to select the restore location.
(3) With the selected folder name in the Folder box, click Select Folder.
(4) The WD Backup software closes the Select Location screen and displays the path to the selected folder on the Restore dialog.
c. Click Select Files to Restore to display the Restore Files screen with the most-recent backup selected by default in the View files from list:
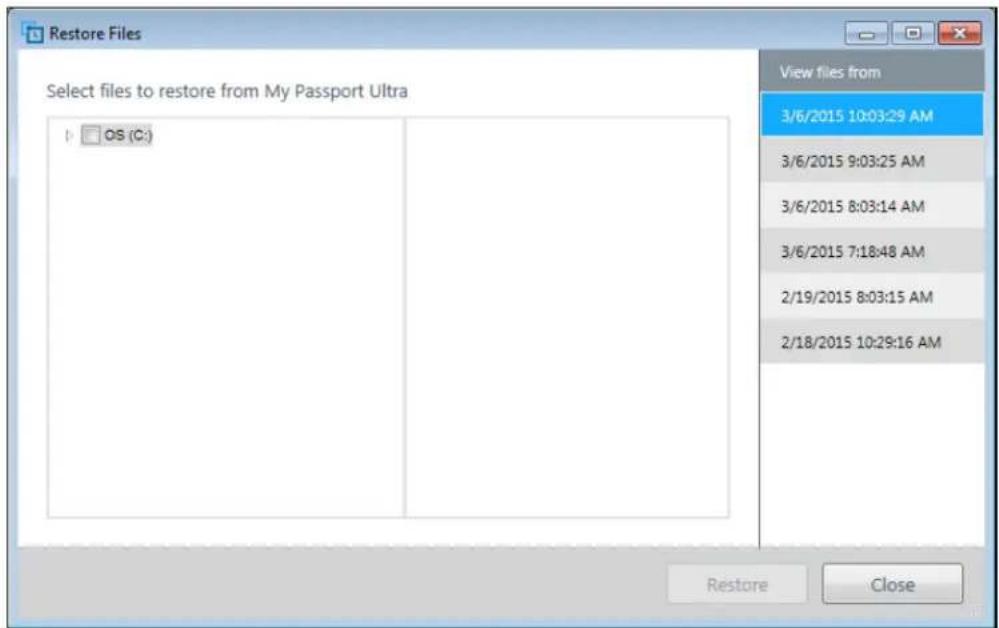
- On the Restore Files screen:
a. In the View files from list, select the backup that has the files you want to restore.
b. Use the folder structure view of the selected backup to specify the files that you want to restore:
IF you want to restore . . . THEN . . .
| All of the files in the selected backup | Select the top-level check box to specify the entire backup. |
| Selected files and folders | 1 Click the selectors in the folder structure view of the backup to open the folders and subfolders.2 Select the check boxes for the files or folders that you want to restore.Note that selecting the check box for a folder automatically selects all of the files and subfolders in the folder. |
c. Click Restore to restore the selected files or folders to the specified location.
Locking and Unlocking the Drive
This chapter includes the following topics:
Password Protecting the Drive
Unlocking the Drive
Changing Your Password
Turning Off the Drive Lock Feature
Password Protecting the Drive
You should password protect your drive if you are worried that someone else will gain access to your drive and you do not want them to see your files on the drive.
CAUTION! The WD Security software uses your password to electronically lock and unlock your drive. If you forget your password, you will not be able to access the data that is on your drive or write new data to it. You will have to erase the drive before you can use it again.
- Open the WD Security software by clicking either:
■ The WD Security desktop shortcut icon
■ Start > All Programs > Western Digital > WD Apps > WD Security
See Figure 5 on page 9.
- If you have more than one supported device connected to your computer, select the one that you want to create a password for.
- Read the warning about the possibility of data loss if you forget your password.
- Type your password in the Password box, using up to 25 characters.
- Retype your password in the Verify Password box.
- Type a hint to help remember your password in the Password Hint box.
- Select the Enable auto unlock for this computer... check box if you want the WD Security software to remember your password for the selected drive on this computer.
- Click Set Password to save your password and enable hardware encryption for your drive.
CAUTION! After creating a password, the drive remains unlocked for as long as you continue your current work session. Then the WD Security software:
- Locks the drive when you shut down your computer, disconnect your drive, or your computer goes into the sleep mode
- Requires you to type your password to unlock the drive when you restart your computer or reconnect your drive, UNLESS you selected the Enable auto unlock for this computer... check box when you created your password
Note: When you create a password, the WD Security software saves your password in firmware on the My Passport drive and displays the
WD Unlocker utility virtual CD (VCD) as a device in your computer's file management utility listing:
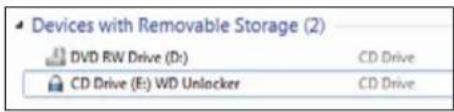
This listing appears:
■ The next time you shut down and restart your computer
■ When you remove and reconnect the My Passport drive
■ Your computer exits the sleep mode, depending on its configuration
The listing appears regardless of whether the drive is locked or not, or whether you selected the Enable auto unlock for this computer... check box when you created your password. It remains as long as you have password protection enabled for the drive.
Unlocking the Drive
After you have created a password to keep others from accessing the files on your drive, unless you selected the Enable auto unlock for this computer... check box, you will have to type your password to unlock the drive whenever:
■ You shut down and restart your computer
■ You disconnect and reconnect the drive to your computer
■ Your computer exits the sleep mode
You will have to do this even if you do not have the WD Security software installed on your computer.
Depending on the software configuration of your computer, there are two ways to unlock the drive, using either the:
■ WD Security or WD Drive Utilities software
■ WD Drive Unlock utility
With the WD Security or WD Drive Utilities Software
Whenever you shut down and restart your computer or disconnect and reconnect the drive to your computer, starting either the WD Security or WD Drive Utilities software displays the Unlock Drive dialog:
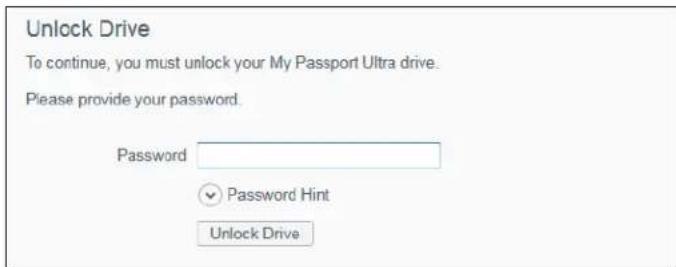
This happens either:
■ Automatically if you only have the one locked My Passport drive connected to your computer
■ When you select the locked drive on either the WD Security or WD Drive Utilities screen if you have more than one supported device connected to your computer
- If you do not see the Unlock Drive dialog, click either:
■ The WD Security or WD Drive Utilities desktop shortcut icon
■ Start > All Programs > Western Digital > WD Apps > WD Security
■ Start > All Programs > Western Digital > WD Apps > WD Drive Utilities
-
If you have more than one supported device connected to your computer, select the one that is locked to display the Unlock Drive dialog.
-
On the Unlock Drive dialog:
a. Type your password in the Password box.
b. Click Unlock Drive.
With the WD Drive Unlock Utility
Whenever you connect your password-protected drive to a computer that does not have the WD Security or WD Drive Utilities software installed, you can use the WD Drive Unlock utility to unlock the drive there. The WD Drive Unlock utility is on a virtual CD drive that appears in the computer's file management utility display.
-
Start the WD Drive Unlock utility by either:
-
Using the computer's file management utility to open the WD Unlocker virtual CD and double-clicking the WD Drive Unlock.exe file
- Clicking Start > Computer and double-clicking the WD Unlocker virtual CD icon under Devices with Removable Storage
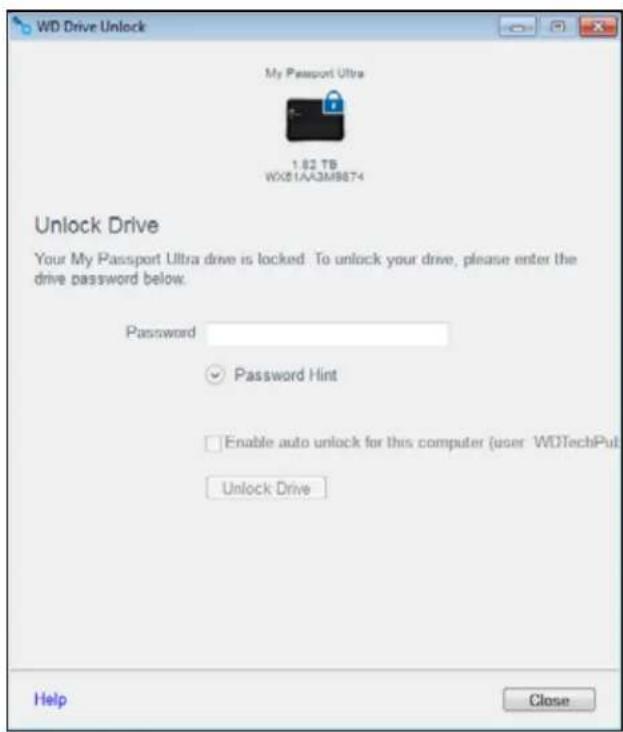
- On the WD Drive Unlock utility screen:
a. Type your password in the Password box.
b. Select the Enable auto unlock for this computer... check box if you want the WD Drive Unlock utility to remember your password on this computer.
c. Click Unlock Drive.
Changing Your Password
- Open the WD Security software by clicking either:
■ The WD Security desktop shortcut icon
■ Start > All Programs > Western Digital > WD Apps > WD Security
See Figure 5 on page 9.
- If you have more than one supported device connected to your computer, select the one with the password that you want to change to display the Edit security settings dialog:
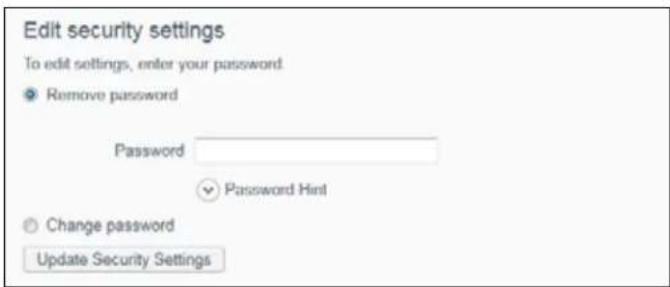
- On the Edit security settings dialog, select the Change password option to display the change password dialog:
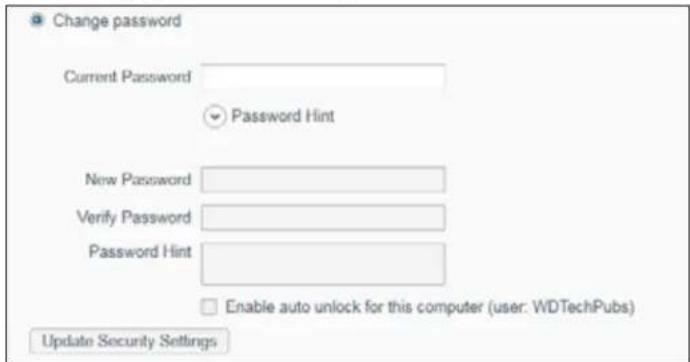
- On the change password dialog:
a. Type your current password in the Current Password box.
b. Type your new password in the New Password box, using up to 25 characters.
c. Retype your new password in the Verify Password box.
d. Type a hint to help remember your new password in the Password Hint box.
e. Select or clear the Enable auto unlock for this computer... check box to signify whether you want the WD Security software to remember your new password for the selected drive on this computer.
f. Click Update Security Settings.
CAUTION! After changing a password, the drive remains unlocked for as long as you continue your current work session. Then the WD Security software:
- Locks the drive when you shut down your computer, disconnect your drive, or your computer goes into the sleep mode
- Requires you to type your password to unlock the drive when you restart your computer or reconnect your drive, UNLESS you selected the Enable auto unlock for this computer... check box when you changed your password
Turning Off the Drive Lock Feature
- Open the WD Security software by clicking either:
■ The WD Security desktop shortcut icon
■ Start > All Programs > Western Digital > WD Apps > WD Security
See Figure 5 on page 9.
- If you have more than one supported device connected to your computer, select the one with the password that you want to remove to display the Edit security settings dialog:
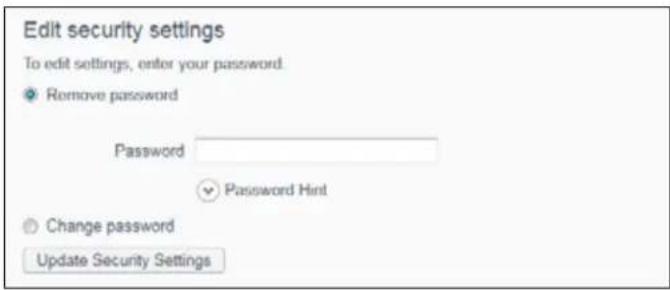
- On the Edit security settings dialog, the Remove password option is selected by default:
a. Type your password in the Password box.
b. Click Update Security Settings.
Managing and Customizing the Drive
This chapter includes the following topics:
Checking Drive Health
Erasing the Drive
Registering the Drive
Restoring the WD Software and Disk Image
Setting the Drive Sleep Timer
Using the WD Quick View Icon
Checking Drive Status
Monitoring Icon Alerts
Safely Disconnecting the Drive
The WD Drive Utilities software (see Figure 6 on page 10) makes it easy for you to manage and customize your drive for the best possible performance:
- Diagnose—Run diagnostics and status checks to make sure your drive is working properly.
- Sleep Timer—Turn your drive off during extended periods of inactivity to conserve power and extend the life of the drive.
- Drive Erase—Erase all of the data on the drive, including your password if you have one.
■ About—See the installed software version, check for software updates, and register your drive to receive free technical support during the warranty period and find out about product enhancements and price discount opportunities
Checking Drive Health
The WD Drive Utilities software provides three diagnostic tools to help make sure that your drive is performing well. Run the following tests if you are concerned that your drive is not operating properly:
■ Drive status check
The drive status check is a failure-prediction function that continuously monitors key internal performance attributes of the drive. A detected increase in drive temperature, noise, or read/write errors, for example, can provide an indication that the drive is approaching a serious failure condition. With advanced warning, you could take precautionary measures, like moving your data to another drive, before a failure occurs.
The result of a drive status check is a pass or fail evaluation of the drive's condition.
■ Quick drive test
Your drive has a built-in Data Lifeguard ^™ diagnostic utility that tests the drive for error conditions. The quick drive test checks the drive for major performance problems.
The result of a quick drive test is a pass or fail evaluation of the drive's condition.
■ Complete drive test
The most comprehensive drive diagnostic is the complete drive test. It tests every sector for error conditions and inserts bad sector markers as required.
The best time to run the drive diagnostics and status checks is on a regular basis, before you encounter any problems with your drive. And, because they are so fast, running the drive status check and the quick drive test provides a high level of assurance with minimal inconvenience. Then, run all three whenever you encounter disk error conditions when writing or accessing files.
- Open the WD Drive Utilities software by clicking either:
■ The WD Drive Utilities desktop shortcut icon
■ Start > All Programs > Western Digital > WD Apps > WD Drive Utilities
See Figure 6 on page 10.
- If you have more than one supported device connected to your computer, select the one that you want to check.
- On the Diagnose dialog, click the button for the test that you want to run:
■ Run Drive Status Check
■ Run Quick Drive Test
■ Run Complete Drive Test
Erasing the Drive
CAUTION! Erasing your drive permanently deletes all of the data on the drive. Always make sure that you no longer need any of the data on your drive before erasing it.
Note: Erasing your drive also deletes the WD software and all of the support files, utilities, and user manual files. You can download these to restore your to its original configuration after erasing the drive.
WD Drive Utilities provides two ways to erase your drive, depending on whether it is locked or not:
| IF your drive is . . . AND you . . . THEN see . . . | |
| Not locked | Want to erase the drive |
| Locked Have forgotten | or lost your password and must erase the drive |
Using the Drive Erase Function
To erase your drive when it is not locked:
- Open the WD Drive Utilities software by clicking either:
■ The WD Drive Utilities desktop shortcut icon
■ Start > All Programs > Western Digital > WD Apps > WD Drive Utilities
See Figure 6 on page 10.
-
If you have more than one supported device connected to your computer, select the one that you want to erase.
-
On the WD Drive Utilities screen, click Drive Erase to display the drive erase dialog:
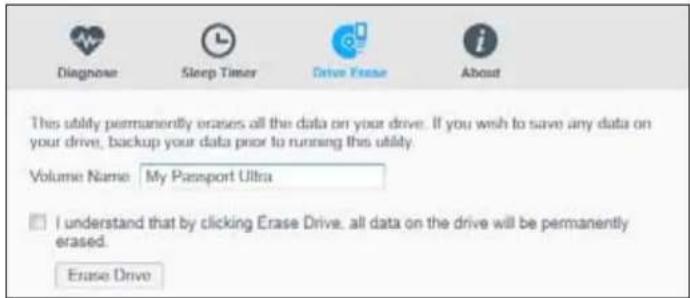
- On the drive erase dialog:
a. If you want to change the volume name, type over the name in the Volume Name box.
b. Read the explanation of the loss of data if you erase your drive. If you want to save any of the data that is on the drive, back it up to another device before continuing with the drive erase.
c. Click the I understand... check box to signify that you accept the risk and activate the Erase Drive button.
d. Click Erase Drive.
Go to http://support.wd.com and see Knowledge Base Answer ID 7 for information about downloading and restoring the WD software and disk image on your drive.
Note: Erasing your drive also removes your password. If you used a password to protect your drive, you will need to re-create it after restoring the WD software and disk image. (See "Password Protecting the Drive" on page 21.)
Erasing your drive does not erase the WD Drive Unlock utility software files that are on the drive's virtual CD. They remain, even after erasing or reformatting the drive.
Using Five Invalid Passwords
When you have forgotten or lost your password, you can erase the drive by entering five invalid passwords on the Unlock Drive dialog. See:
■ "With the WD Security or WD Drive Utilities Software" on page 22
■ "With the WD Drive Unlock Utility" on page 23
- On the Unlock Drive dialog, make five attempts to unlock the drive by:
a. Typing a password in the Password box.
b. Clicking Unlock Drive.
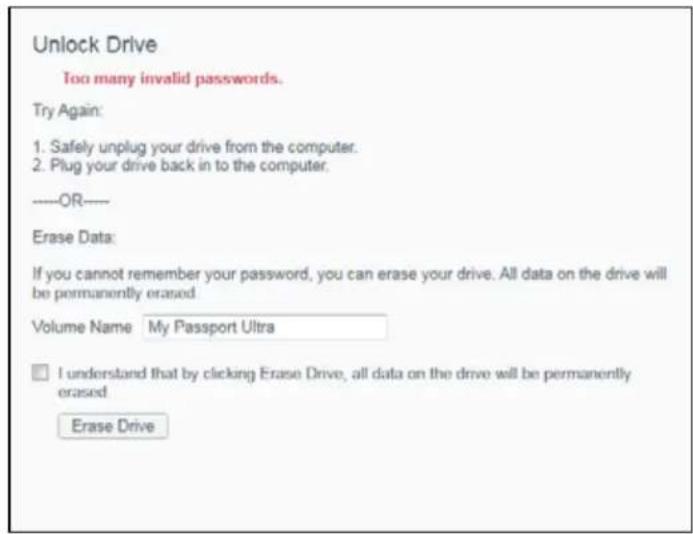
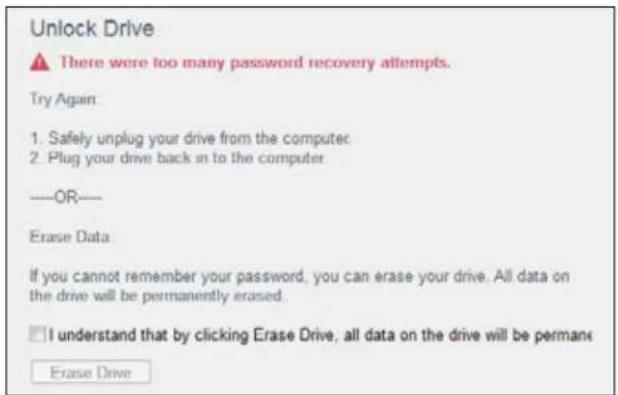
- Entering the fifth invalid password displays a too many password attempts dialog, depending on the application you used to open the Unlock Drive dialog:
■ Using the WD Security or WD Drive Utilities software:
■ Using the WD Drive Unlock utility:
- To erase your drive:
a. If you are using the WD Security or WD Drive Utilities software and you want to change the volume name, type over the name in the Volume Name box.
b. Read the explanation about erasing all of the data on the drive and select the I understand check box to indicate that you accept the risk and activate the Erase Drive button.
c. Click Erase Drive.
Go to http://support.wd.com and see Knowledge Base Answer ID 7 for information about downloading and restoring the WD software and disk image on your drive.
Note: Erasing your drive also removes your password. If you still want to use a password to protect your drive, you will need to re-create it after restoring the WD software and disk image. (See "Password Protecting the Drive" on page 21.)
Registering the Drive
The WD Drive Utilities software uses your computer's Internet connection to register your drive. Registering the drive provides free technical support during the warranty period and keeps you up-to-date on the latest WD products.
- Make sure that your computer is connected to the Internet.
- Open the WD Drive Utilities software by clicking either:
■ The WD Drive Utilities desktop shortcut icon
■ Start > All Programs > Western Digital > WD Apps > WD Drive Utilities
See Figure 6 on page 10.
- If you have more than one supported device connected to your computer, select the one that you want to register.
- Click About > Register to display the Register Your Device screen:
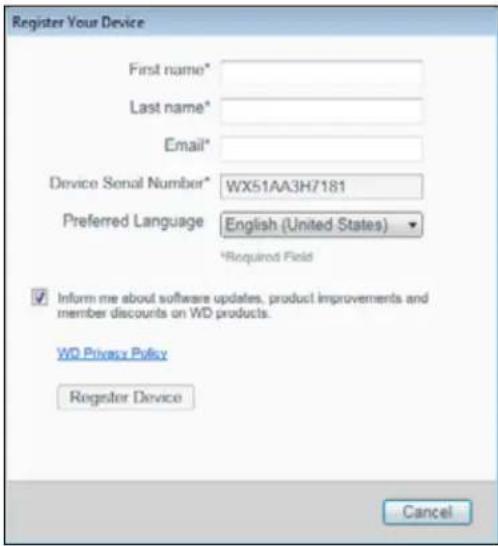
- On the Register Your Device screen:
a. Type your first name in the First name box.
b. Type your last name in the Last name box.
c. Type your email address in the Email box.
d. Select your language in the Preferred Language box.
e. Select or clear the Inform me about... check box to specify whether you want to receive notifications about software updates, product enhancements, and price discount opportunities.
f. Click Register Device.
Restoring the WD Software and Disk Image
In addition to deleting all of the data on your drive, erasing or reformatting the drive also removes the WD software and all of the support files, utilities, online help and user manual files.
If you ever need to remove and reinstall the WD software on your computer, or move the drive to another computer and install the software there, you will need to restore the WD software and disk image on your drive. To do this, after you have erased or reformatted the drive, go to http://support.wd.com and see Knowledge Base Answer ID 7.
Setting the Drive Sleep Timer
The drive sleep timer turns off the power to your drive after a certain period of inactivity to conserve power and minimize long-term wear on the drive.
- Open the WD Drive Utilities software by clicking either:
■ The WD Drive Utilities desktop shortcut icon
■ Start > All Programs > Western Digital > WD Apps > WD Drive Utilities
See Figure 6 on page 10.
- If you have more than one supported device connected to your computer, select the one that you want to set.
- Click Sleep Timer to display the Sleep Timer dialog:
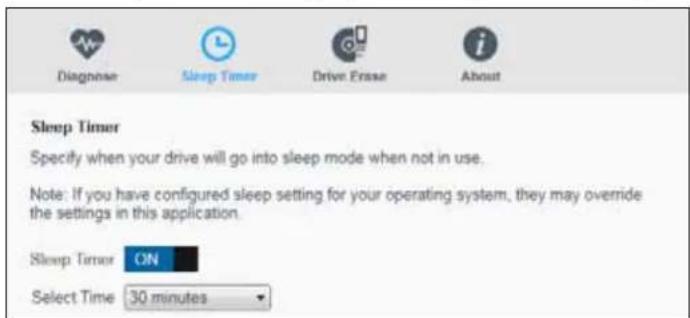
- On the Sleep Timer dialog:
a. Verify or click the Sleep Timer on/off toggle button to the ON position.
b. In the Select Time box, select the inactivity period for turning off the drive.
Using the WD Quick View Icon
After you have installed the WD software, the WD Quick View icon displays in the system tray portion of the Windows taskbar:
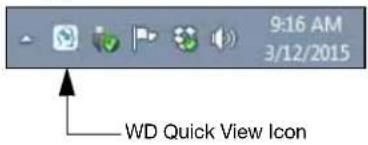
You can use the icon to:
■ Check the status of supported WD drives
■ Monitor icon alerts
■ Safely disconnect supported WD drives
The following sections describe how to use the icon and other ways to do these things.
Checking Drive Status
For supported WD drives, you can see the drive capacity used, find out if the drive is locked, and check the drive temperature condition by hovering the pointer over the WD Quick View icon in the Windows taskbar:
![WD Quick View Drive Name [Volumes] Used Locked Temperature My Passport Ultra USB HDD [F:] 1% No OK 9:28 AM 3/12/2015](/content/2026/06/1190607/images/42ae2a733a714ab8cb5ba045112705373cc389266deb5468844445ce4166a153.jpg)
Monitoring Icon Alerts
The WD Quick View icon in the Windows taskbar flashes to indicate the status of supported WD devices:
| IF the WD Quick View icon flashes . . . THEN the device might be . . . | |
| Green and white Locked or in a format that the | WD software does not understand (non-Windows format in a Windows environment). |
| Red and white Overheated. | Power down the device and let it cool for 60 minutes. Power it back up, and if the problem persists, contact WD Support. |
Safely Disconnecting the Drive
CAUTION! To prevent data loss, close all active windows and applications before shutting down or disconnecting the drive.
You can safely disconnect the drive by either:
- Clicking the WD Quick View icon in the Windows taskbar and selecting the Safely remove My Passport Ultra... option:
![About WD Quick View Safely remove My Passport Ultra USB HDD [F:\] Exit](/content/2026/06/1190607/images/be9c6e10d9faacce3245c453f312368f3d1d74ff56173e3716bcda44fc1d03ab.jpg)
■ Right-clicking the drive icon on the WD Security or WD Drive Utilities screen and selecting the Eject Disk option:
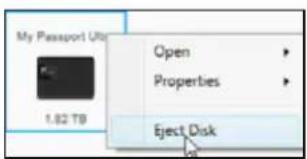
Wait for the power/activity LED to stop flashing before disconnecting the drive from the computer.
Managing and Customizing the Software
This chapter includes the following topics:
Checking for Software Updates
Configuring Your Cloud Service Account
Uninstalling the WD Software
Checking for Software Updates
If an update is available, follow the on-screen download and installation instructions:
| Software Procedure | |
| WD Drive Utilities | 1 Open the WD Drive Utilities software by clicking either:■ The WD Drive Utilities desktop shortcut icon■ Start > All Programs > Western Digital > WD Apps > WD Drive UtilitiesSee Figure 6 on page 10.2 Click the About icon and the Check for Updates button: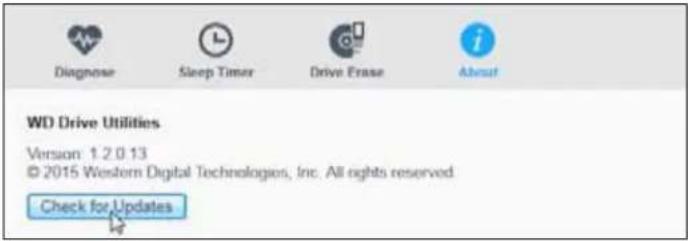 |
| WD Security 1 Open the | WD Security software by clicking either:■ The WD Security desktop shortcut icon■ Start > All Programs > Western Digital > WD Apps > WD SecuritySee Figure 5 on page 9.2 Click the About link and the Check for Updates button: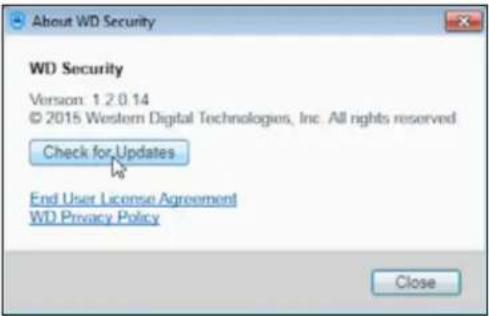 |
(Continued)
Software Procedure
WD Backup When the
WD Backup software determines that a software update is available, it:
■ Generates and displays a software update notification
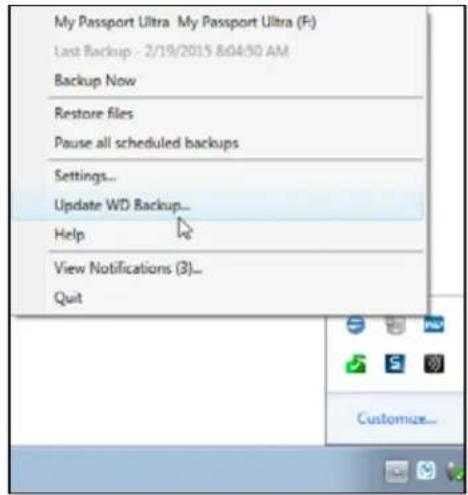
■ Adds the Update WD Backup selection to the WD Backup view menu
1 Click the WD logo icon in the Windows taskbar and select WD Backup to display the WD Backup view menu.
2 Select Update WD Backup:
Configuring Your Cloud Service Account
Before you can use a cloud service as a backup source or target device, you must configure your account for access by the WD Backup software.
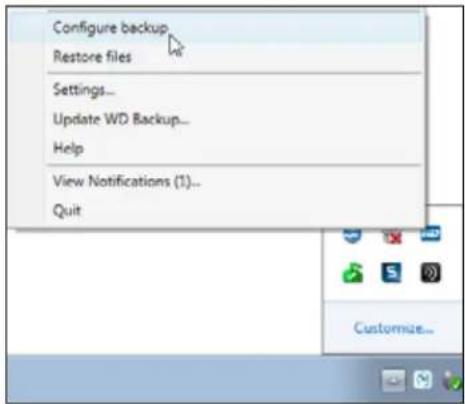
- Open the Select your WD storage device or cloud service dialog by clicking either:
■ Add Backup Plan on the WD Backup screen:

■ Configure backup on the WD Backup view menu from the Windows taskbar:
- On the Select your WD storage device or cloud service dialog, select to highlight the Dropbox icon:
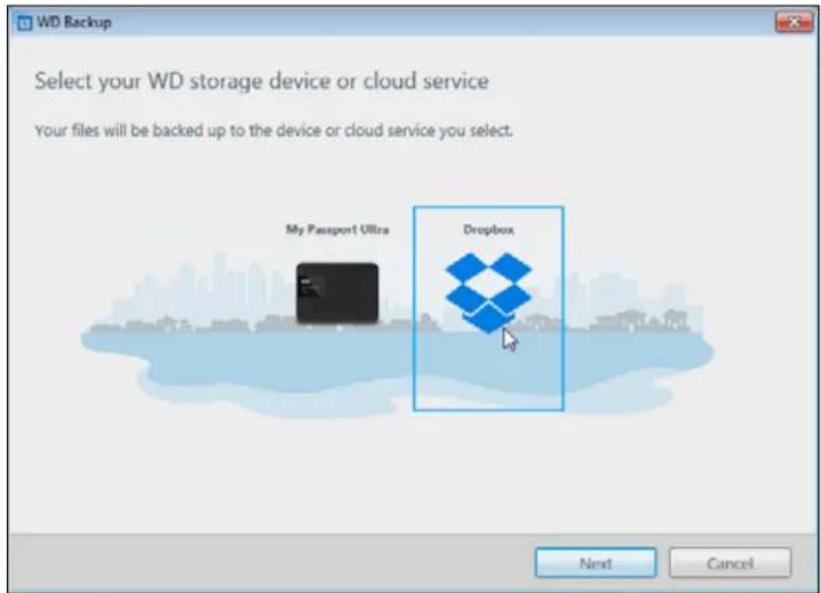
- Click Next to display the connection dialog for your Dropbox account:
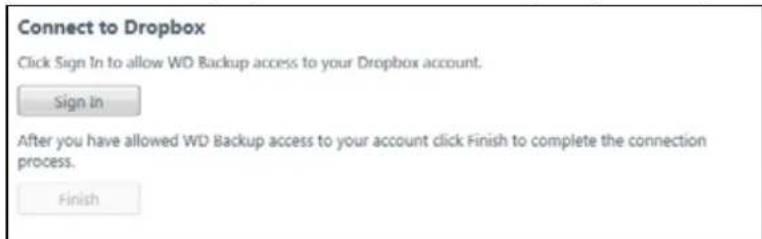
- On the connection dialog:
a. Click Sign In. The WD Backup software initiates a connection request on your behalf and uses your Web browser to access the Dropbox website.
b. On the Dropbox website, if you have not configured your account to remember your login credentials, type your email address and password and click Sign In to see the connection request from the WD Backup software.
c. Click Allow to accept the connection request.
d. The Success! indication signifies that the WD Backup software has been granted access to your Dropbox account.
e. Click Finish on the Dropbox connection dialog to finalize the configuration and display the Setup Complete dialog with Dropbox selected as your backup target device:
Uninstalling the WD Software
Use your operating system's Add or Remove Programs function to uninstall the WD software from your computer.
| Operating System Procedure | |
| Windows Vista or Windows 7 | 1 Click Start > Control Panel.2 Double-click Programs and Features.3 Click Uninstall a program and select the application or the icon for the WD software that you want to uninstall:■ WD Drive Utilities■ WD Security■ WD Backup4 Click Uninstall/Change and Yes at the Do you wish to proceed... prompt. |
| Windows 8 | 1 Right-click the tile for the WD Software that you want to uninstall on the Start screen:■ WD Drive Utilities■ WD Security■ WD Backup2 Select Uninstall in the Windows taskbar.3 Click Yes at the Are you sure... prompt. |
8
Using the Drive with a Mac Computer
The My Passport drive is formatted as a single NTFS partition for compatibility with updated Windows operating systems. To use the drive on Mac OS X operating systems, and to use Time Machine, if you want, you must reformat the drive to a single HFS+J partition.
This chapter includes the following topics:
Reformatting the Drive
Restoring the WD Software and Disk Image
Reformatting the Drive
CAUTION! Reformatting the drive erases all its contents. If you have already saved files on the drive, be sure to back them up before reformatting it.
Go to http://support.wd.com and refer to Knowledge Base Answer ID 3865 for information about reformatting the drive.
See "Troubleshooting" on page 39 for more information about reformatting a drive.
Restoring the WD Software and Disk Image
After you have reformatted your My Passport drive for use on Mac computers, go to http://support.wd.com and see Knowledge Base Answer ID 7 for information about downloading and restoring the Mac versions of the WD Drive Utilities and WD Security software and disk image on your My Passport drive.
The WD Backup software is not available for Mac computers.

Troubleshooting
This chapter includes the following topics:
Installing, Partitioning, and Formatting the Drive Frequently Asked Questions
If you have problems installing or using this product, refer to this troubleshooting section or visit our support website at http://support.wd.com and search our knowledge base for more help.
Installing, Partitioning, and Formatting the Drive
How to Answer ID
■ Partition, and format a WD drive on Windows (8, 7, Vista) and Mac OS X 3865
■ Convert a Mac OS X GPT partition to an NTFS partition in Windows 7 3647 or Vista
■ Download software, utilities, firmware updates, and drivers for WD 1425 products (from the Downloads Library)
■ Format a WD external hard drive in FAT32* (to use Windows or Mac OS X) 291
*The FAT32 file system has a maximum individual file size of 4 GB and cannot create partitions larger than 32 GB in Windows. To create partitions larger than 32 GB in FAT32 when reformatting the drive, download the External USB/FireWire FAT32 Formatting Utility from http://support.wd.com/product/download.
Windows users can avoid these size limitation by formatting the drive to NTFS using either the Windows Disk Management utility or similar third-party software.
For further details, see:
■ Answer ID 291 at http://support.wd.com
■ Article IDs 314463 and # 184006 at support.microsoft.com
The appropriate third-party software documentation or support organization
Frequently Asked Questions
Q: Why is the drive not recognized under My Computer or on the computer desktop?
A: If your system has a USB 3.0 or USB 2.0 PCI adapter card, be sure that its drivers are installed before connecting your WD USB 3.0 external storage product. The drive is not recognized correctly unless USB 3.0 or USB 2.0 root hub and host controller drivers are installed. Contact the adapter card manufacturer for installation procedures.
Q: Why won't my computer boot when I connect my USB drive to the computer before booting?
A: Depending on your system configuration, your computer might try to boot from your WD portable USB drive. Refer to your system's motherboard BIOS setting documentation to disable this feature or visit http://support.wd.com and see Knowledge Base answer ID 1201. For more information about booting from external drives, refer to your system documentation or contact your system manufacturer.
Q: Why is the data transfer rate slow?
A: Your system may be operating at USB 1.1 speeds due to an incorrect driver installation of the USB 3.0 or USB 2.0 adapter card or a system that does not support USB 3.0 or USB 2.0.
Q:How do I determine whether or not my system supports USB 3.0 or USB 2.0?
A: Refer to your USB card documentation or contact your USB card manufacturer.
Note: If your USB 3.0 or USB 2.0 controller is built in to the system motherboard, be sure to install the appropriate chipset support for your motherboard. Refer to your motherboard or system manual for more information.
Q: What happens when a USB 3.0 or USB 2.0 device is plugged into a USB 1.1 port or hub?
A: USB 3.0 and USB 2.0 are backward-compatible with USB 1.1. When connected to a USB 1.1 port or hub, a USB 3.0 or USB 2.0 device operates at the USB 1.1 full speed of up to 12 Mbps.
If your system includes a PCI Express slot, you can achieve USB transfer rates by installing a PCI Express adapter card. Contact the card manufacturer for installation procedures and more information.

Installing the SES Driver
If you do not install the WD software, you should install the SCSI Enclosure Services (SES) driver on Windows computers to keep the hardware pop-up wizard from displaying every time you connect your My Passport drive to your computer.
Note: The SES Driver is installed automatically when you install the WD software.
This appendix includes the following topics:
Installing on Windows Vista Computers Installing on Windows 7 and Windows 8 Computers
Installing on Windows Vista Computers
After connecting the drive as shown in Figure 3 on page 5, the Found New Hardware screen displays.
Note: If Autoplay is enabled, two additional screens might appear at the same time as the Found New Hardware screen. If they appear, close them.
- On the Found New Hardware screen, select the Locate and install driver software option:
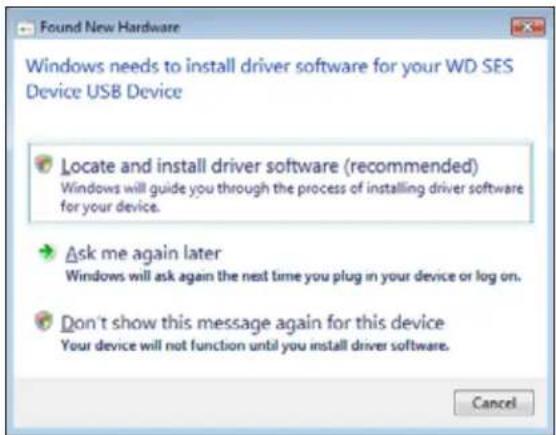
- On the Insert the disc... dialog, select the I don't have the disc... option and click Next:
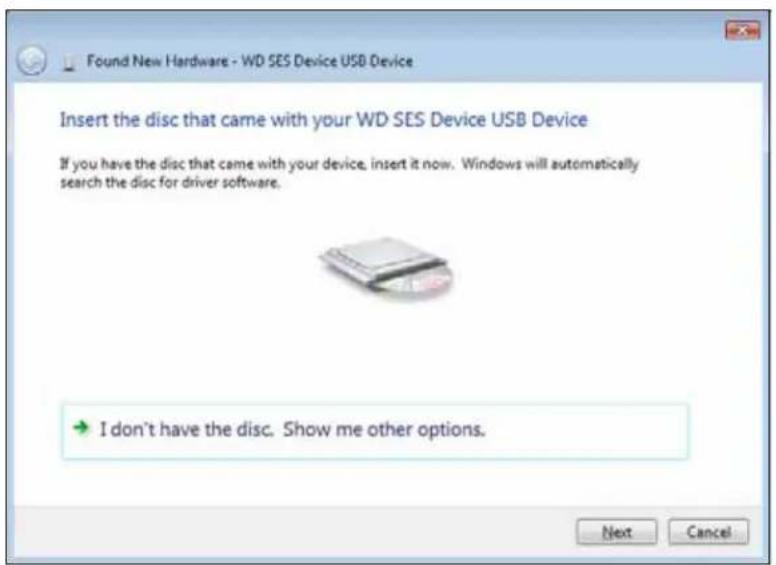
- Windows displays the Update Driver Software... screen:
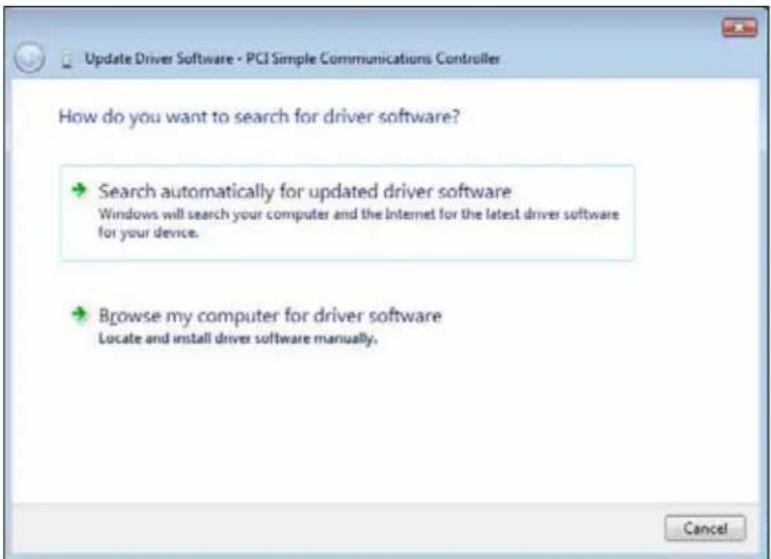
- On the Update Driver Software... screen:
IF your computer is ... THEN ...
| Connected to the Internet, | Select the Search automatically... option. Windows automatically:■ Connects to Windows Update■ Finds, downloads, and installs the SES driver |
(Continued)
IF your computer is ... THEN ...
Not connected to the Internet,
Select the Browse my computer... option, browse to Computer and:
a. Double-click the My Passport drive.
b. Double-click the Extras folder
c. Select WD SES Device Driver
d. Click Next:
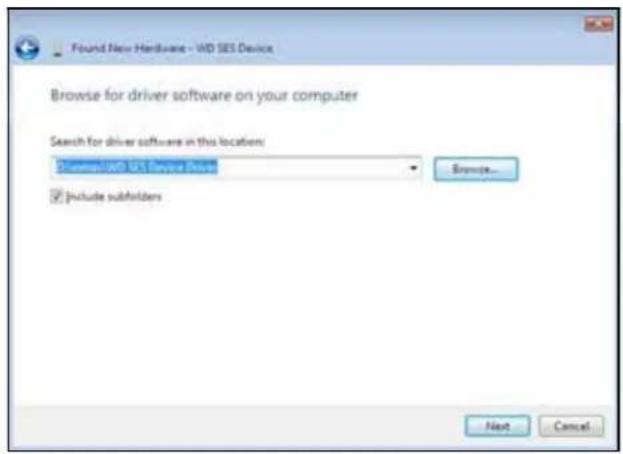
- When the installation completes, click Close.
Installing on Windows 7 and Windows 8 Computers
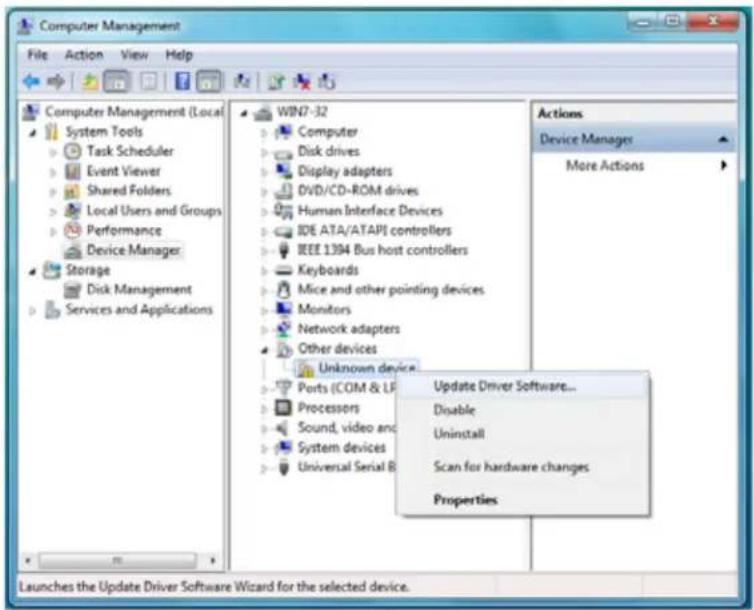
After connecting the drive as shown in Figure 3 on page 5, use the Windows Computer Management utility to install the SES driver:
- Click the Start icon, right-click Computer, and select Manage:
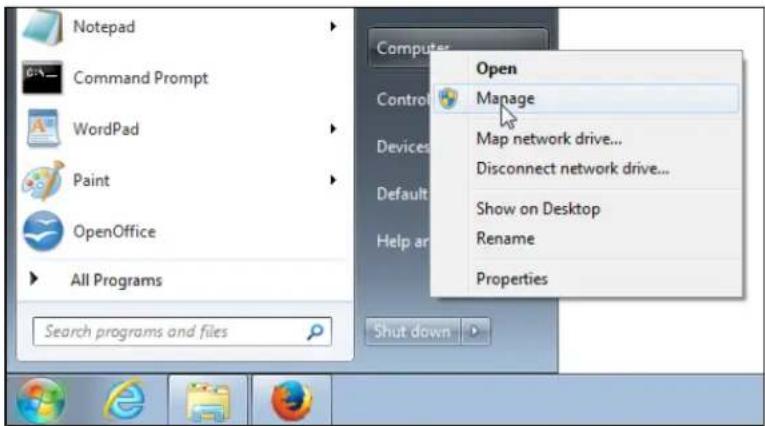
- On the Computer Management screen, under Computer Management (Local), click Device Manager > Unknown Device and right-click Update driver software:
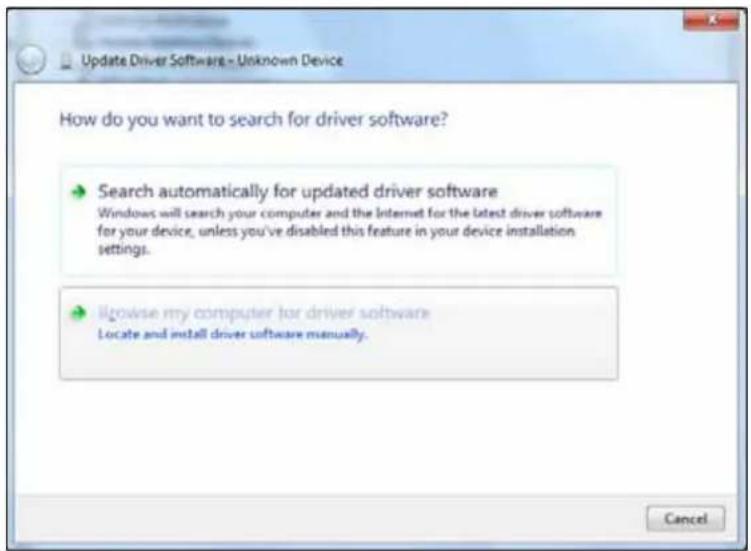
- On the Update Driver Software screen, click Browse my computer for driver software:
- Browse to Computer, double-click the My Passport drive, double-click the Extras folder, and select WD SES Device Driver:
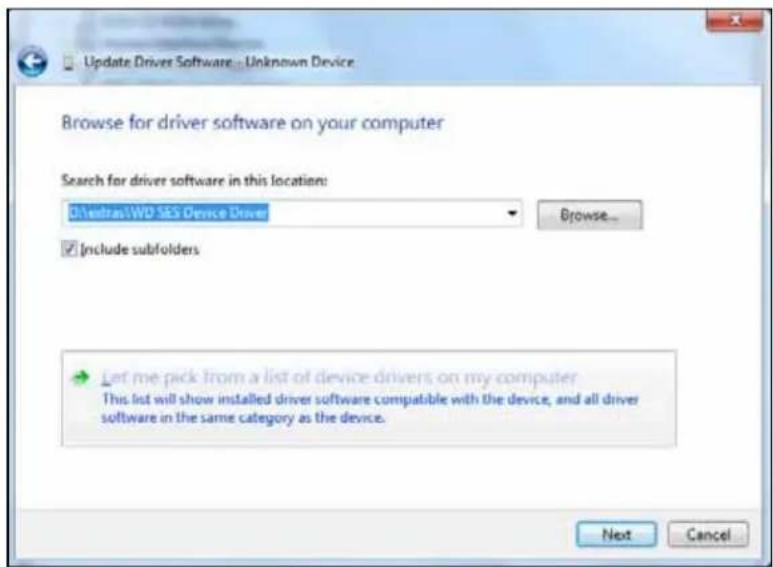
- Click Next.
- When the installation completes, click Close.

Compliance and Warranty Information
This appendix includes the following topics:
Regulatory Compliance
Environmental Compliance (China)
Warranty Information
Regulatory Compliance
FCC Class B Information
Operation of this device is subject to the following conditions:
■ This device may not cause harmful interference.
■ This device must accept any interference received, including interference that may cause undesired operation.
This device has been tested and found to comply with the limits for a Class B digital device, pursuant to Part 15 of the FCC Rules. These limits are designed to provide reasonable protection against harmful interference in a residential installation. This device generates, uses, and can radiate radio frequency energy and, if not installed and used in accordance with the instructions, may cause harmful interference to radio or television reception. However, there is no guarantee that interference will not occur in a particular installation. If this equipment does cause harmful interference to radio or television reception, which can be determined by turning the equipment off and on, you are encouraged to try to correct the interference by one or more of the following measures:
■ Reorient or relocate the receiving antenna.
■ Increase the separation between the equipment and the receiver.
■ Connect the equipment into an outlet on a circuit different from that to which the receiver is connected.
■ Consult the dealer or an experienced radio/television technician for help.
Any changes or modifications not expressly approved by WD could void your authority to operate this device.
ICES-003/NMB-003 Statement
This device complies with Canadian ICES-003 Class B.
Safety Compliance
Approved for US and Canada. CAN/CSA-C22.2 No. 60950-1, UL 60950-1: Safety of Information Technology Equipment.
CE Compliance For Europe
Marking by the CE symbol indicates compliance of this system to the applicable Council Directives of the European Union, including the EMC Directive (2004/108/EC) and the Low Voltage Directive (2006/95/EC). A “Declaration of Conformity” in accordance with the applicable directives has been made and is on file at Western Digital Europe.
KC Notice (Republic of Korea only)
Environmental Compliance (China)
Warranty Information
Obtaining Service
WD values your business and always attempts to provide you the very best of service. If this Product requires maintenance, either contact the dealer from whom you originally purchased the Product or visit our product support website at http://support.wd.com for information on how to obtain service or a Return Material Authorization (RMA). If it is determined that the Product may be defective, you will be given an RMA number and instructions for Product return. An unauthorized return (i.e., one for which an RMA number has not been issued) will be returned to you at your expense. Authorized returns must be shipped in an approved shipping container, prepaid and insured, to the address provided on your return paperwork. Your original box and packaging materials should be kept for storing or shipping your WD product. To conclusively establish the period of warranty, check the warranty expiration (serial number required) via http://support.wd.com. WD shall have no liability for lost data regardless of the cause, recovery of lost data, or data contained in any Product placed in its possession.
Limited Warranty
WD warrants that the Product, in the course of its normal use, will for the term defined below, be free from defects in material and workmanship and will conform to WD's specification therefor. The term of your limited warranty depends on the country in which your Product was purchased. The term of your limited warranty is for 3 years in the North, South and Central America region, 3 years in the Europe, the Middle East and Africa region, and 3 years in the Asia Pacific region, unless otherwise required by law. The term of your limited warranty period shall commence on the purchase date appearing on your purchase receipt. WD shall have no liability for any Product returned if WD determines that the Product was stolen from WD, is counterfeit or fake, or that the asserted defect a) is not present, b) cannot reasonably be rectified because of damage occurring before WD receives the Product, or c) is attributable to misuse, improper installation, alteration (including removing or obliterating labels and opening or removing external enclosures, unless the product is on the list of limited user-serviceable products and the specific alteration is within the scope of the applicable instructions, as found at http://support.wd.com), accident or mishandling while in the possession of someone other than WD. Subject to the limitations specified above, your sole and exclusive warranty shall be, during the period of warranty specified above and at WD's option, the repair or replacement of the Product.
The foregoing limited warranty is WD's sole warranty and is applicable only to products sold as new. The remedies provided herein are in lieu of a) any and all other remedies and warranties, whether expressed, implied or statutory, including but not limited to, any implied warranty of merchantability or fitness for a particular purpose, and b) any and all obligations and liabilities of WD for damages including, but not limited to accidental, consequential, or special damages, or any financial loss, lost profits or expenses, or lost data arising out of or in connection with the purchase, use, or performance of the Product, even if WD has been advised of the possibility of such damages. In the United States, some states do not allow exclusion or limitations of incidental or consequential damages, so the limitations above may not apply to you. This warranty gives you specific legal rights, and you may also have other rights which vary from state to state.
GNU General Public License ("GPL")
Firmware incorporated into this product may include third party copyrighted software licensed under the GPL or Lesser General Public License (“LGPL”) (collectively, “GPL Software”) and not Western Digital’s End User License Agreement. In accordance with the GPL, if applicable: 1) the source code for the GPL Software may be downloaded at no charge from http://support.wd.com/download/gpl or obtained on CD for a nominal charge from http://support.wd.com/download/gpl or by calling Customer Support within three years of the date of purchase; 2) you may re-use, re-distribute, and modify the GPL Software; 3) with respect solely to the GPL Software, no warranty is provided, to the extent permitted by applicable law; and 4) a copy of the GPL is included herewith, may be obtained at http://www.gnu.org, and may also be found at http://support.wd.com/download/gpl.
Modification of or tampering with the Software, including but not limited to any Open Source Software, is solely at your own risk. Western Digital is not responsible for any such modification or tampering. Western Digital will not support any product in which you have or have attempted to modify the Software supplied by Western Digital.
Index
A
Accessories, optional 2
Alerts, flashing icon 33
B
Backup
about backing up files 11
procedure 13
Box contents 2
C
CAUTION about
erasing the drive28
lost passwords 21
preventing data loss when disconnecting 33
your unlocked drive 21
China RoHS, environmental compliance 47
Cloud service, configuring 35
Compatibility with operating systems 3
Complete drive test 27
Compliance, regulatory 46
Converting drive format 39
Creating a password 21
D
Diagnose dialog 21, 24, 25, 28, 31, 32
Disconnecting the drive 33
Disk image, downloading and restoring 31, 38
Drive
diagnostics and status checks 27
disconnecting 33
disconnecting from a PC 33
formats, converting 3
handling precautions 4
sleep timer 32
status check 33
Drive Erase dialog 29
Drive status check 27
Drive Utilities
Diagnose dialog 21, 24, 25, 28, 31, 32
Drive Erase dialog 29
Register Your Device screen 31
Sleep Timer dialog 32
E
End User License Agreement, link 6
Environmental compliance, China RoHS 47
Erasing the drive 29
F
FCC Class B information 46
Flashing icon alerts 33
Full media scan 27
G
GNU general public license 48
GPL software 48
H
Handling precautions 4
Hardware 2
|
ICES-003/NMB-003 compliance 46
Indicator light 4
K
Kit contents 2
L
LED indicator 4
Limited warranty 48
0
Operating systems 3
Optional accessories 2
P
Password protecting your drive 21
CAUTION about lost passwords 21
Physical description 3
Precautions for handling 4
Product features 1
Q
Quick drive test 27
R
Reformatting the drive 38, 39
Register Your Device screen 31
Registering your drive 31
Regulatory compliance 46
Restore
about restoring files 18
procedure 18
Restoring the software disk image31, 38
s
Safety compliance 46
Service 47
Sleep Timer dialog 32
Software Installer screen 6
Software settings
cloud service account 35
software updates 34
Software, GPL 48
Space available 33
Status check 33
System compatibility 3
T
Temperature check 33
U
Uninstalling WD software 37
Unlocking the drive 22
from the virtual CD 23, 33
with the WD Security software22
without the WD Security software 23
USB interface 4
W
Warranty information 47
WD Backup software screen 9
WD Drive Utilities software
Diagnose dialog 21, 24, 25, 28, 31, 32
Drive Erase dialog 29
Register Your Device screen 31
screen 10
Sleep Timer dialog 32
WD Quick View icon 32
WD Security software
Edit security settings dialog 24, 26
screen 9
WD service, obtaining 47
Windows
uninstalling WD software 37
Information furnished by WD is believed to be accurate and reliable; however, no responsibility is assumed by WD for its use nor for any infringement of patents or other rights of third parties which may result from its use. No license is granted by implication or otherwise under any patent or patent rights of WD. WD reserves the right to change specifications at any time without notice.
Western Digital, WD, the WD logo, and My Passport are registered trademarks of Western Digital Technologies, Inc. in the U.S. and other countries; WD Backup, WD Security, WD Drive Utilities, Data Lifeguard, and My Passport Ultra are trademarks of Western Digital Technologies, Inc. in the U.S. and other countries. Apple, Mac, OS X, and Time Machine are trademarks of Apple, Inc., registered in the U.S. and other countries. Other marks may be mentioned herein that belong to other companies. Picture shown may vary from actual product.
© 2015 Western Digital Technologies, Inc. All rights reserved.
Western Digital
3355 Michelson Drive, Suite 100
Irvine, California 92612 U.S.A. 4779-705124-A00 Apr 2015
- WD Service and Support
- Accessing Online Support
- Contacting WD Technical Support
- Table of Contents
- About Your WD Drive .... 1
- Connecting the Drive and Getting Started 5
- Backing Up Files 11
- Restoring Files 18
- Locking and Unlocking the Drive 21
- Managing and Customizing the Drive 27
- Managing and Customizing the Software 34
- Using the Drive with a Mac Computer 38
- Troubleshooting 39
- A Installing the SES Driver.... 41
- B Compliance and Warranty Information....46
- Index....49
- 1
- About Your WD Drive
- Features
- Kit Contents
- Optional Accessories
- Operating System Compatibility
- Windows Mac OS X
- Disk Drive Format
- Physical Description
- USB 3.0 Interface
- Power/Activity LED
- Registering Your Drive
- Handling Precautions
- 2
- Connecting the Drive and Getting Started
- Connecting the Drive
- Getting Started with the WD Software
- IF you selected the ... option THEN ...
- Click Next to display the Installation Complete dialog:
- Backing Up Files
- How the Backup Function Works
- Selecting ... Configures automatic backups ...
- Daily
- Monthly
- On the Select Files to Back Up screen:
- 4
- Restoring Files
- How the Restore Function Works
- Locking and Unlocking the Drive
- Password Protecting the Drive
- Unlocking the Drive
- With the WD Security or WD Drive Utilities Software
- With the WD Drive Unlock Utility
- Changing Your Password
- Turning Off the Drive Lock Feature
- Managing and Customizing the Drive
- Checking Drive Health
- Erasing the Drive
- Using the Drive Erase Function
- Using Five Invalid Passwords
- Registering the Drive
- Restoring the WD Software and Disk Image
- Setting the Drive Sleep Timer
- Using the WD Quick View Icon
- Checking Drive Status
- Monitoring Icon Alerts
- Safely Disconnecting the Drive
- Managing and Customizing the Software
- Checking for Software Updates
- Software Procedure
- Configuring Your Cloud Service Account
- Uninstalling the WD Software
- 8
- Using the Drive with a Mac Computer
- Reformatting the Drive
- Troubleshooting
- Installing, Partitioning, and Formatting the Drive
- How to Answer ID
- Frequently Asked Questions
- Installing the SES Driver
- Installing on Windows Vista Computers
- IF your computer is ... THEN ...
- Installing on Windows 7 and Windows 8 Computers
- Compliance and Warranty Information
- Regulatory Compliance
- FCC Class B Information
- ICES-003/NMB-003 Statement
- Safety Compliance
- CE Compliance For Europe
- KC Notice (Republic of Korea only)
- Environmental Compliance (China)
- Warranty Information
- Obtaining Service
- Limited Warranty
- GNU General Public License ("GPL")
- Index
- A
- B
- C
- D
- E
- F
- G
- H
- |
- K
- L
- 0
- P
- Q
- R
- s
- T
- U
- W
Brand : WESTERN DIGITAL
Model : My Passport Go 5
Category : External hard drive