
DCT 4960-2 - Cordless phone UNIDEN - Free user manual and instructions
Find the device manual for free DCT 4960-2 UNIDEN in PDF.


| Product Type | Cordless Telephone System |
| Model | DCT 4960-2 |
| Brand | Uniden |
| Technology | 2.4 GHz FHSS (Frequency Hopping Spread Spectrum) |
| Number of Handsets | Up to 4 (comes with 2) |
| Display | 3-line backlit LCD |
| Memory Dialing | 20 name/number locations |
| Caller ID Memory | 50 numbers |
| Ringer Tones | 4 selectable tones |
| Intercom | Handset to handset, 3-way conference, call transfer |
| Dialing Mode | Tone/Pulse selectable |
| AC Adapter | AD-490, Input 120V AC 60Hz, Output 9V DC 300mA |
| Battery Pack | BP-490, 3.6V, 700mAh, Ni-MH |
| Battery Life (Talk) | 6 hours per charge |
| Battery Life (Standby) | 3 days |
| Charging Time | 12-15 hours initial charge |
| Operating Range | Up to several hundred feet (varies by environment) |
| Cleaning | Wipe with dry cloth; clean charging contacts with pencil eraser |
| Safety | Not waterproof; avoid moisture and heat sources |
| Warranty | 1 year limited warranty |
Frequently Asked Questions - DCT 4960-2 UNIDEN
User questions about DCT 4960-2 UNIDEN
0 question about this device. Answer the ones you know or ask your own.
Ask a new question about this device
Download the instructions for your Cordless phone in PDF format for free! Find your manual DCT 4960-2 - UNIDEN and take your electronic device back in hand. On this page are published all the documents necessary for the use of your device. DCT 4960-2 by UNIDEN.
USER MANUAL DCT 4960-2 UNIDEN
Step 1 Charging the Battery Step 2 Co
INSTALL THE HANDSET BATTERY

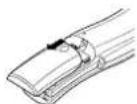
Remove the cover.

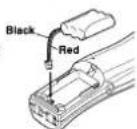
Connect the battery pack connector with the correct polarity.

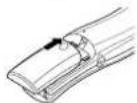
Replace the cover.
PLUG INTO AC POWER

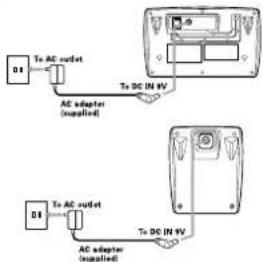
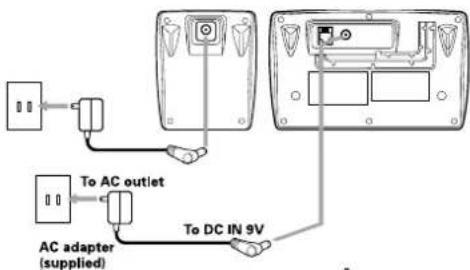
Plug the AC adapter cord into the base unit and charger to a standard 120V AC outlet.
flowchart
graph TD
    A["DC"] --> B["Ta AC outlet"]
    B --> C["AC adapter (supplied)"]
    C --> D["Ta DC IN VV"]
    D --> E["DC"]
    E --> F["Ta DC IN VV"]
    F --> G["AC adapter (supplied)"]

Place the handset on the base and the charger.
Note: You must charge the battery pack for 12-15 hours before using the phone.
ting/Adjusting Step 3 Using the Phone
CONNECT TO A PHONE LINE
When the handset battery pack is fully charged, plug the telephone cord into the base unit then into a telephone wall jack.
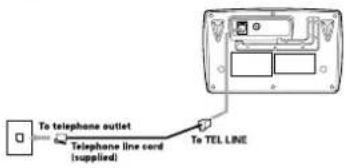
Your phone is set for tone dialing. If your local network requires pulse dialing, please see page 10 "Choose the dialing mode" in your owner's manual.
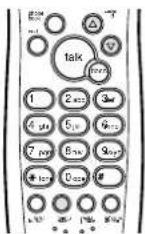
ADJUST HANDSET RINGER VOLUME AND RINGER TONE

Press menu/enter and press ▲ or ▼ to select "Line Ring", "Ringer Volume" or "Ringer Tone".

Press menu/enter.

Press ▲ or ▼ to change the setting.

Press menu/enter to confirm your selection.
TO MAKE A CALL
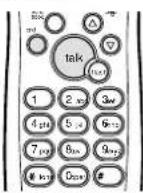

Press talk and listen for dial tone.

Dial the desired number.

Press end or return the handset to the base to hang up.
TO ANSWER A CALL
Press any number key on the handset or lift the handset (AutoTalk) from the base.
Adjust the handset volume louder or softer by pressing ▲ or ▼ during a call.
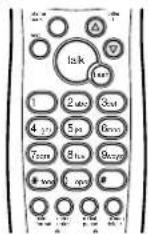
Step 4 Setting Up the Caller ID
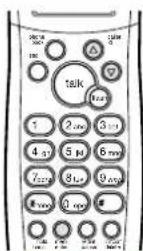
SETTING CALLER ID OPTIONS

Press menu/enter

Press ▲ or ▼ to move the cursor and select "Auto Talk".

Press menu/enter to display the current setting.

Press ▲ or ▼ to change the selection.

Press menu/enter again to confirm your selection.
ENTERING YOUR AREA CODE

Press menu/enter

Press ▲ or ▼ to select "Area Code".

Press menu/enter

Use the number keys to enter the local area code.

Press menu/enter to confirm your selection.
Step 5 Using Caller ID Additional Fea
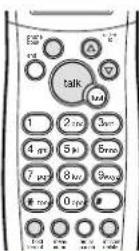
VIEWING CALLER ID MESSAGES

Press caller id. A screen displays a summary of incoming calls.

Press ▲ or ▼ to scan through numbers that have called.

Press end to return to standby.
CALLING A CALLER ID NUMBER

Press caller id. A screen displays a summary of incoming calls.

Press ▲ or ▼ to scan through names/numbers.

Press hold/format to select the mode to dial out.

Press talk to dial the number.
DELETING A CALLER ID MESSAGE

Press caller id. A screen displays a summary of incoming calls.

Press ▲ or ▼ to scan through names/numbers.

Press int'com/delete. A confirmation message appears. Then press int'com/delete again to confirm.
DELETING ALL CALLER ID MESSAGES

To delete all numbers, press caller id. A summary screen appears.

Press int'com/delete. "Delete Fill?" is displayed. Press int'com/delete to confirm the fetion.
STORING CALLER ID MESSAGE IN PHONE BOOK MEMORY

Locate the CID record you wish to store into the phone book.

Press hold/format to select the mode to dial out.

Press phone book to display the phone book index.

Press ▲ or ▼ to select your location.

Press menu/enter. "Replace Memory?" is displayed.

Press ▲ or ▼ to select "yes" or "no". Press menu/enter to confirm your selection.
See page 33 in your owner's manual for complete instructions about using Caller ID features.
Below is a list of functions available:
FOR MORE INFORMATION ON THESE FUNCTIONS, REFER TO THE OWNER'S MANUAL SUPPLIED WITH YOUR PHONE.

20 Enhanced Memory Locations

50 Number Caller ID Memory

Handset to Handset intercom

Call Transfer

4 Ringer Tones

3-way conference
Thank you for choosing Uniden, the world's largest manufacturer of cordless phones. If you experience problems after you have used this guide to set up your phone, please consult your owner's manual supplied in the package.
Uniden America Corporation
Welcome
Congratulations on your purchase of the Uniden DCT4960-2 Multi Handset System telephone. This unit is different from conventional cordless telephones. When the base unit is connected to AC power and a telephone line, it can support up to 4 handsets. You can now place a fully featured cordless handset anywhere in your home or office where AC power is available to connect the handset chargers.
Note: Some illustrations in this manual may differ from the actual unit for explanation purpose.
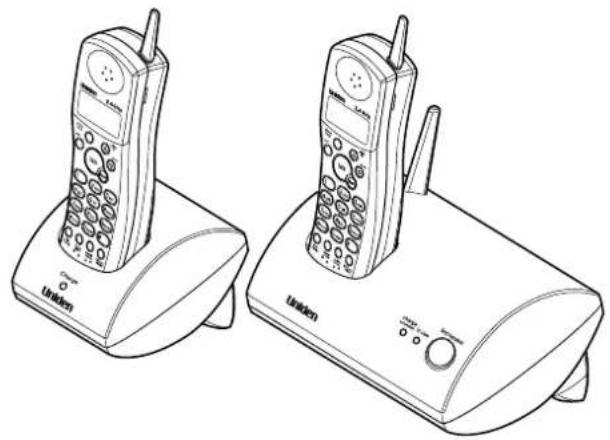
natural_image
Line drawing of two UNI-19 mobile phone models with keypad and antenna (no text or symbols)2.4 GHz MULTI-HANDSET
CORDLESS SYSTEM
Features
• 2.4 GHz FHSS (Frequency Hopping Spread Spectrum) Extended Range Technology
- Handset to Handset Intercom/3Way Conference/Call Transfer
• 3 Line Backlit Display
- Caller ID and Call Waiting Caller ID
- Tone/Pulse Dialing
• 20 Name and Number Memory Dialing
- Handset Earpiece and Ringer Volume Control
The DCT4960-2 features include AutoTalk™ and AutoStandby™. AutoTalk allows you to answer a call by just removing the handset from the base so you don't have to waste time pushing buttons or flipping switches. AutoStandby allows you to hang up by simply returning the handset to the base.
The UltraClear Plus™ true compander circuitry virtually eliminates background noise. To protect you against misbilled calls which might result from your phone being activated by other equipment, the DCT4960-2 has Random Code™ digital security which automatically selects one of 16,777,215 digital security codes for the handset and base.
Be sure to visit our web site: www.uniden.com
Uniden® is a registered trademark of Uniden America Corporation.
AutoTalk, AutoStandby, UltraClear Plus, Random Code, and AutoSecure are trademarks of Uniden America Corporation.
2.4 GHz MULTI-HANDSET
CORDLESS SYSTEM
Contents
Quick Reference Guide
Welcome/Features
Controls and Functions 2
Getting Started
Read this First 4
Checking the Package Contents 5
Setting up the Phone 6
Setting Caller ID Options 11
Entering Your Area Code 12
Registering Additional Handsets 13
Resetting the Handset 14
Basics
Making and Receiving Calls 16
Terminology 17
Adjusting the Handset Ringer and
Earpiece Volume 17
Redialing a Call 20
Tone Dialing Switch-over 21
Traveling Out-of-Range 21
Handset Locator 22
Message Waiting Indicator 22
Flash and Call Waiting 23
Intercom 24
Conference Call 26
Memory Dialing
Storing Phone Numbers and Names 27
Steps for Entering Names and Special
Characters 28
Making Calls with Memory Dialing 28
Chain Dialing 29
Editing a Stored Name and/or Phone Number 30
Erasing a Stored Name and Phone Number 32
Caller ID Features
Caller ID 33
When the Telephone Rings 33
Viewing the Caller ID Message List 34
Deleting Information from the Caller ID List 35
Using the Caller ID List 36
Additional Information
Changing the Digital Security Code 38
Installing the Beltclip 39
Headset Installation 39
Note on Power Sources 40
Maintenance 40
Troubleshooting 41
General Information 43
Precautions 44
Index 46
Controls and Functions
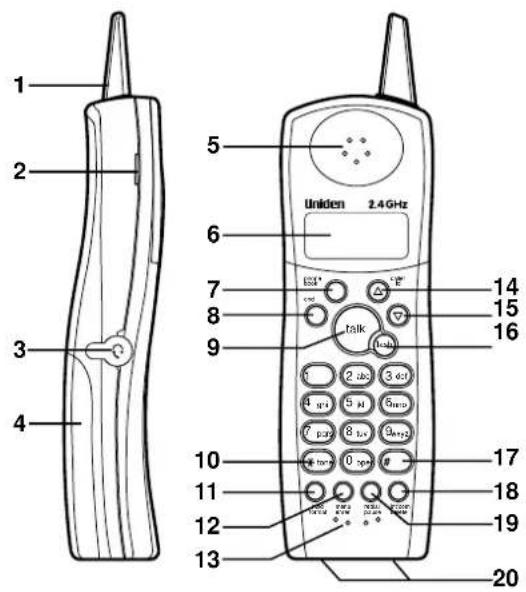
- Handset antenna
- Beltclip holes
- Optional headset jack
- Handset battery compartment
- Handset earpiece
- LCD display
- Phone book key
- End key
- Talk key
- */tone key
- Hold/format key
- Menu/enter key
- Handset microphone
- ▲ (up)/Caller ID key
- ▼ (down) key
- Flash key
-
key
- Int'com/delete key
- Redial/pause key
- Handset charging contacts
[2] CONTROLS AND FUNCTIONS[2]
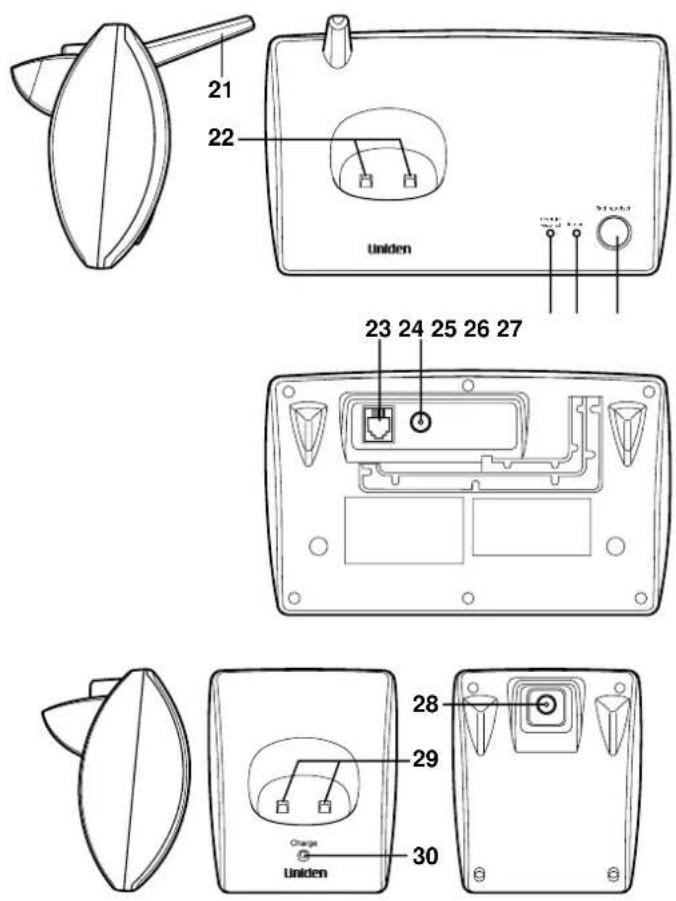
- Base antenna
- Base charging contacts
- Telephone line jack
- DC power input
- Charge/voicemail LED
- In use LED
- Find handset key
- DC power input
- Charging contacts
- Charge LED
Read this First
This cordless telephone must be set up before use. Follow these steps:
Step 1 (page 5)
Unpack the telephone and accessories.
Step 2 (page 6)
Next, choose the best location to set up the base unit.
Step 3 (page 7 to 10)
Then, insert the battery pack into the handset. Connect the base unit. You must charge the battery pack for 12-15 hours before plugging into the telephone line and using the phone.
Step 4 (page 11 to 12)
Finally, set the Caller ID options and store your area code in the memory to use the Caller ID service.
Note: Skip the area code setting if your calling area requires 10-digit dialing.
About the digital security code
This cordless telephone uses a digital security code to prevent unauthorized access to your base unit. This security code prevents other cordless handset from making calls through your base unit.
If you want to reset the security code, see page 38.
Checking the Package Contents
Make sure you have received the following items in the package. If any of these items are missing or damaged, contact the Uniden Parts Department.
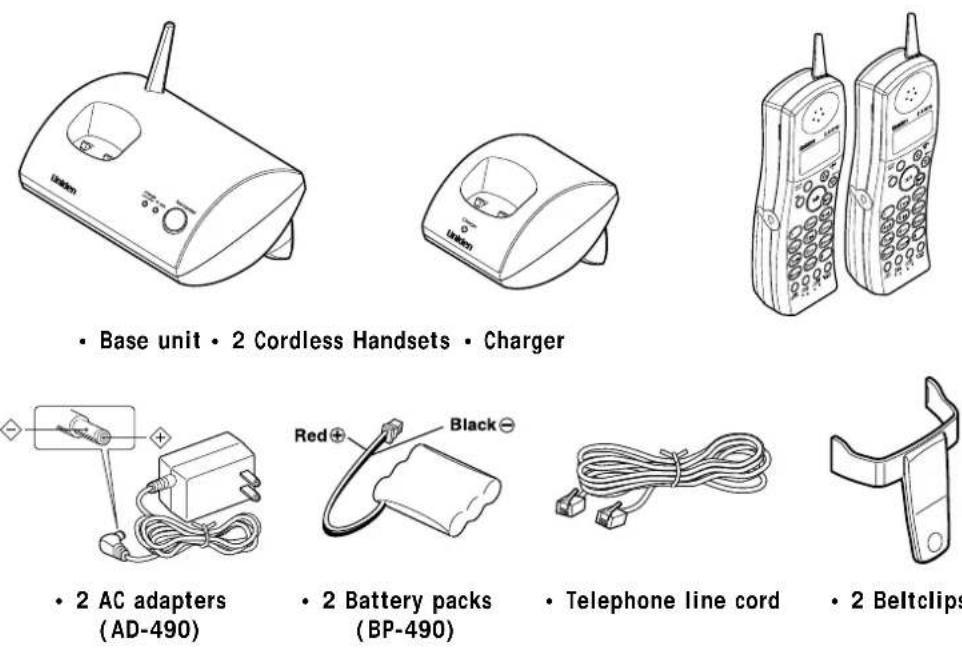
Also included:
- Owner's Manual
- Registration Card
• Other printed materials
Uniden Parts Department at (800) 554-3988
Hours: M-F 7:00 a.m. to 5:00 p.m. CST. We can
also be reached on the web at www.uniden.com
Setting up the Phone
Do the following steps:
A. Choose the best location C. Connect the base unit
B. Install the battery pack D. Choose the dialing mode
A. Choose the best location
Before choosing a location for your new phone, read the INSTALLATION CONSIDERATIONS included in the PRECAUTIONS AND IMPORTANT SAFETY INSTRUCTIONS. Here are some important guidelines you should consider:
Avoid heat sources, such as radiators, air ducts, and sunlight
Avoid television sets and other electronic equipment
Choose a central location
Avoid noise sources such as a window by a street with heavy traffic
Avoid microwave ovens
Avoid excessive moisture, extremely low temperatures, dust, mechanical vibration, or shock
Avoid personal computers
Avoid other cordless telephones
- The location should be close to both a phone jack and a continuous power outlet which is not switchable.
- Keep the base and handset away from sources of electrical noise such as motors, microwave ovens, and fluorescent lighting.
- The base can be placed on a desk or tabletop.
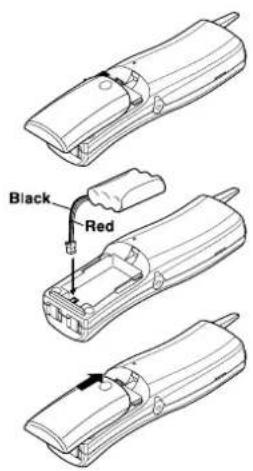
B. Install the battery pack
Charge the battery pack for at least 12-15 hours before plugging the phone line into your phone.
1) Press down on the battery cover release and slide the cover down until it comes off.
2) Connect the battery pack connector observing the correct polarity (black and red wires) to the jack inside the battery compartment.
Do not exert any force on this connection. It could cause damage to the battery or to the handset. The plastic connectors will fit together in only one way.
Once you are certain that you have made a good connection, then insert the battery pack into the battery compartment. Do not pinch the wires.
3) Securely close the battery compartment cover by sliding it up until it snaps into place.
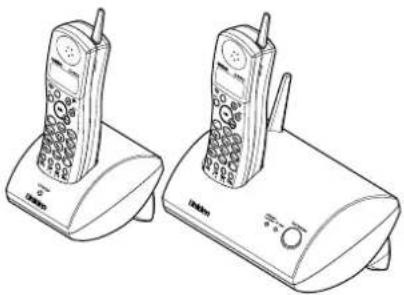
4) Place the handset in the charging cradle.
When the battery is charged, the LCD will display "Initializing..." for 5 to 10 seconds.
natural_image
Line drawing of two vintage mobile phone models on different bases (no text or symbols)
- Use only the Uniden battery (BP-490) supplied with your phone. Replacement batteries are also available through the Uniden Parts Department. (See page 5.)
• Additional handsets will include their own individual charging cradles. The battery will fully charge after approximately 12 to 15 hours.

Even when the battery pack is not being used, it will gradually discharge over a long period of time. For optimum performance, be sure to return the handset to the base unit after a telephone call.
Battery use time (per charge)
Fully charged
- 6 hours continuous use
• 3 days when the handset is in the standby mode
Low battery alert
When the battery pack is very low and needs to be charged, the phone is programmed to eliminate functions in order to save power. "BATT" appears on the display and you will hear a beep.
If the phone is in use, "BATT" appears on the display and the handset beeps twice. Complete your conversation as quickly as possible and return the handset to the base unit for charging.
Talk 10:10 BATT 18002971023

When the call is terminated due to a low battery, the call will be placed on hold and can be retrieved from any of the other handsets.
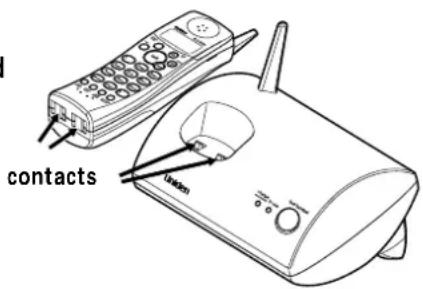
Cleaning the battery charging contacts
To maintain a good charge, it is important to clean the battery contacts on the handset and base unit with a dry cloth or a pencil eraser about once a month.
Do not use any liquids or solvents.
C. Connect the base unit
1) Connect the AC adapter to the DC IN 9V jack to a standard 120V AC wall outlet.
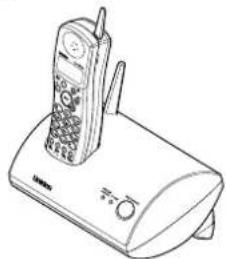
2) Set the base and charger on a desk or tabletop, and place the handset in the base unit as shown.
3) Make sure that the charge LED lights up. If the LED does not light up, check to see that the AC adapter is plugged in and that the handset makes good contact with the base charging contacts.

- Use only the supplied AD-490 AC adapter. Do not use any other AC adapter.
- Connect the AC adapter to a continuous power supply.
- Place the base unit close to the AC outlet so that you can unplug the AC adapter easily.
• After installing the battery pack in the handset, charge your handset at least 12-15 hours before plugging into the phone line. Once the handset battery pack is fully charged, connect the telephone line cord to the base and telephone wall outlet.
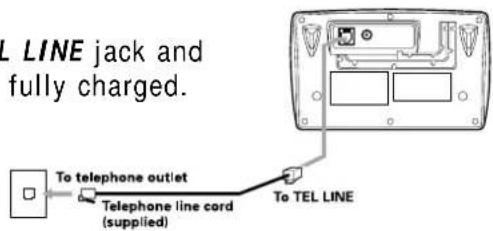
4) Connect the telephone line cord to the TEL LINE jack and to a telephone outlet once the handset is fully charged.

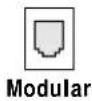
If your telephone outlet isn't modular type, contact your telephone company for assistance.
natural_image
Line drawing of a mobile phone with antenna and control panel (no text or symbols)
Place the power cord so that it does not create a trip hazard or where it could become chafed and create a fire or electrical hazard.

Make sure your battery pack is fully charged before choosing the dialing mode.
D. Choose the dialing mode
Most phone systems use tone dialing which sends DTMF tones through the phone lines. However some phone systems still use pulse dialing. Pulse dialing is often found in rural areas. The default setting is tone dialing. Depending on your dialing system, set the mode as follows:
1) Press menu/enter.
2) Press ▲ or ▼ and select "Tone/Pulse".
3) Press menu/enter, and the display will show the current setting. (The initial setting is Tone.)
4) Press ▲ or ▼ to change the selection.
5) Press menu/enter to confirm your selection.
6) The display will automatically change to the Menu Screen after 3 to 5 seconds.
Registration
Tone/Pulse Area Code
Tone/Pulse Tone [▲]/[▼]:Change
Tone/Pulse Pulse OK!
- If you are not sure of your dialing system, set the unit to tone dialing. Make a trial call. If the call connects, leave the setting as is, otherwise set the unit to pulse dialing.
- If your phone system requires pulse dialing and you need to send the DTMF tones for certain situations during a call, you may "switch-over" to tone dialing. (Refer to "Tone Dialing Switch-over" on page 21.)
Setting Caller ID Options
There are two Caller ID setup options available. They are AutoTalk and Area Code - see page 12 for Area Code setup instructions.
AutoTalk is a feature that allows you to pick up the call without pressing the talk key. When AutoTalk is ON, you can press any number key or simply pick up the handset from the base unit or charger to answer the call.
1) Press menu/enter.
2) Press ▲ or ▼ and select "Auto Talk".
3) Press menu/enter, and the display will show the current setting. (The initial setting is OFF.)
4) Press ▲ or ▼ to change the selection.
5) Press menu/enter to confirm your selection.
6) The display will automatically change to the Menu Screen after 3 to 5 seconds.
Privacy
>Auto Talk
Line Ring
Auto Talk
On
[=]/[=]:Change
Auto Talk
On
OK!

If your calling area requires 10-digit dialing, do not program this option.
Entering Your Area Code
Area Code programming
If you enter a 3-digit area code number in the Area Code option, your local area code does not appear in Caller ID messages. Do not program this option, if your calling area requires 10-digit dialing.
When reviewing Caller ID messages, you will see only the local seven digit number. For calls received from outside your local area code, you will see a full 10-digit number.
1) Press menu/enter.
2) Press ▲ or ▼ and select "Area Code".
3) Press menu/enter, and the display will show the current setting. (The initial setting is "Empty".)
4) Use the number keys to enter the local area code. (Use the int'com/delete to erase the numbers.)
5) Press menu/enter to confirm your selection.
6) The display will automatically change to the Menu Screen after 3 to 5 seconds.
Tone/Pulse
Area Code Privacy
Area Code (Empty) Digit:Edit
Area Code 817 OK!
Registering Additional Handsets
When you purchase additional handsets, those handsets need to be registered before use. Your DCT4960-2 is expandable up to 4 handsets. Follow the simple steps shown below:
1) Check that the phone is not in use (including the intercom), and make sure that the handset is not in the base unit.
2) Press and hold the find handset key on the base for 5 seconds.
- The charge/voice mail LED will start flashing to tell you that the system is in the registration mode.
3) Place the NEW (the 3rd) handset in the charging cradle of the base unit.
- The handset beeps to tell you that the registration has finished.
Setting the privacy mode
Your DCT4960-2 has a privacy feature which keeps others from listening in on your conversation. When you turn this feature On, the conference function will automatically be canceled.
1) When the phone is in standby mode, press menu/enter.
2) Press ▲ or ▼ and select "Privacy".
3) Press menu/enter, and the display will show the current setting. (The initial setting is "OFF".)
4) Press ▲ or ▼ to change the selection.
5) Press menu/enter to confirm your selection.
6) The display will automatically change to the Menu Screen after 3 to 5 seconds.
![Area Code >Privacy Auto Talk Privacy Off [▲]/[▼]:Change Privacy On OK!](/content/2026/06/1190157/images/7536b24d442c8d888a6fa4de6959bb42d3d8fb94a2b262855af1f57cf1b608db.jpg)

Charge the battery pack for 12-15 hours before registering the additional handset (see "Install the battery pack" on page 7).

When you reset the handset all stored information is erased.
Resetting the Handset
This feature allows you to clear (erase) all the selections and settings of the handset. After you have reset the handset, you must change the digital security code and re-register the handset before use (see page 38).
1) Press menu/enter.
2) Press ▲ or ▼ and select "Handset Reset".
3) Press menu/enter. "No?" appears on the display.
4) Press ▲ or ▼ to change the selection.
- "Yes" is to reset and "No" is to exit this mode.
5) Press menu/enter to confirm your selection.
6) Wait 5 to 10 seconds for the handset to complete the reset. ("Initializing..." appears on the display.)
7) When the reset is complete, the LCD will display "Handset is not registered".
Hold Reminder
Handset Reset Registration
Handset Reset Yes? [▲]/[▼]:Change
Handset Reset Resetting...
Initializing...
Selecting Hold Reminder Interval
This feature reminds you with the beep that someone is on hold. The LCD displays "Line On Hold" to remind you.
The options for the Hold Reminder include: Off/15/30/45/60 seconds.
1) Press menu/enter.
2) Press ▲ or ▼ and select "Hold Reminder".
3) Press menu/enter, and the display will show the current setting. (The default for Hold Reminder is set to off.)
4) Press ▲ or ▼ to change the selection.
5) Press menu/enter to confirm your selection.
The display will automatically change to the Menu Screen after 3 to 5 seconds.
Ringer Tone
Hold Reminder Handset Reset
Hold Reminder off [•]/[•]:Change
Hold Reminder 45 Seconds OK!

Refer to page 11
"Setting Caller ID
Options" to turn on the
AutoTalk feature
if desired.
Making and Receiving Calls
Placing a call by manual dialing
1) Pick up the handset and press talk.
2) Wait for a dial tone and then enter the telephone number, for example 18002971023. The number will appear in the display as you dial.
Talk 00:00 18002971023
Placing a call by pre-dialing
1) Enter the telephone number, for example 18002971023. The number will appear in the display as you dial.
2) Press talk to dial the number.
Ending a call
To hang up, press end or return the handset to the base/charger unit.
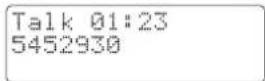
The call time will be displayed for 3 to 5 seconds after pressing end.
01:23
Receiving a call
When the phone rings, pick up the handset and press talk.
If you have set the "Auto Talk", then you can answer the call simply by picking up the handset from the base/charger unit or by pressing any of the number keys.
Terminology
Throughout this manual, terms such as Standby and Talk Mode are used. Below is the terminology explanation.
- Standby Mode - The handset is not in use, off the base, and talk has not been pressed. A dial tone is not present.
- Talk Mode - The handset is off the base and talk has been pressed enabling a dial tone.
Adjusting the Handset Ringer and Earpiece Volume
You can turn the ringer ON or OFF on each handset.
1) Press menu/enter.
2) Press ▲ or ▼ and select "Line Ring".
3) Press menu/enter, and the display will show the current setting. (The default ringer is set to ON.)
4) Press ▲ or ▼ to change the selection.
5) Press menu/enter to confirm your selection.
6) The display will automatically change to the Menu Screen after 3 to 5 seconds.
![Auto Talk >Line Ring Ringer Volume Line Ring On [△]/[▼]:Change Line Ring Off OK!](/content/2026/06/1190157/images/7871721b6b026836a50435b8159c6420f86795f931b159ad36814b3602df223d.jpg)
Ringer volume
You can select the Ringer Volume from High/Medium/Low/Off for all ring signals.
1) Press menu/enter.
2) Press ▲ or ▼ and select "Ringer Volume".
3) Press menu/enter, and the display will show the current setting. (The default ringer volume is set to Medium.)
4) Press ▲ or ▼ to change the selection.
5) Press menu/enter to confirm your selection.
6) The display will automatically change to the Menu Screen after 3 to 5 seconds.
Line Ring
Ringer Volume Ring Type
Ringer Volume Medium [▲]/[▼]:Change
Ringer Volume Off OK!
Line Ring
Ringer Volume Ringer Tone

• Each time you make a selection, you will hear the corresponding ring volume.
- The "key tone", "confirmation beep", "alert beep", and the ring during Intercom will remain as "Low" and the "find handset" ring will remain as "Hi" regardless of the selection.
- When "Off" is selected for the ringer volume, the following rings will be turned off:
(1) Incoming Call
(2) Intercom Call
(3) Hold Recall
(4) Hold Reminder
Ringer tone
There are 4 different ringer tones: 1/2/3/4
1) Press menu/enter.
2) Press ▲ or ▼ and select "Ringer Tone".
Ringer Volume
>Ringer Tone
Hold Reminder
3) Press menu/enter, and the display will show the current setting (The default ringer tone is set to 1).
Ringer Tone
1
[÷]/[÷]:Change
4) Press ▲ or ▼ to change the selection.
5) Press menu/enter to confirm your selection.
Ringer Tone
3
OK!
6) The display will automatically change to the Menu Screen after 3 to 5 seconds.
Earpiece volume
There are 5 levels to choose from for the earpiece volume.
1) Press ▲ or ▼ on the handset to change the volume level of the handset during a conversation.
2) When you reach the maximum or the minimum volume settings, you will hear a beep.
The volume control automatically stays at the last setting after each phone call.

• If the number exceeds 30 digits, only the first 30 digits are retained for redial.
- Press int'com/delete to return to Standby.
- Only the last number dialed can be accessed after talk has been pressed.
Redialing a Call
The last three phone numbers dialed can be quickly redialed.
Redialing from standby mode
1) Press redial/pause. The phone number that was last dialed appears on the display.
2) Press redial/pause again. Each press of redial/pause will display one of the last three numbers dialed.
3) Press talk. "Talk" appears on the display.
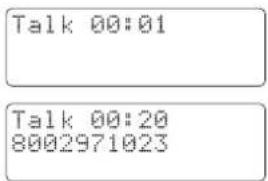
4) The selected number is dialed. The call-time display appears.
5) To hang up, press end or return the handset to the base. The call-time will be displayed for about 5 seconds.
Redial from talk mode
1) Press talk. "Talk" appears on the display.
2) Press redial/pause. The last number dialed will be displayed and redialed.
3) To hang up, press end or return the handset to the base. The call-time will be displayed for about 5 seconds.
Most Recent
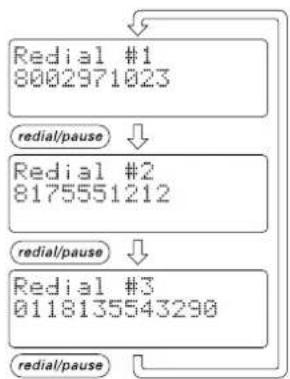
flowchart
graph TD
    A["Redial #1\n8002971023"] --> B["redial/pause"]
    C["Redial #2\n8175551212"] --> D["redial/pause"]
    E["Redial #3\n0118135543290"] --> F["redial/pause"]
Tone Dialing Switch-over
Some telephone companies use equipment that require pulse dialing (sometimes referred to as rotary dialing). If you need to enter tone dialing digits, you can switch-over to tone dialing during the call. An example of this could be entering your bank account number after you have called your bank. The digits of your bank account can be sent using DTMF tones.
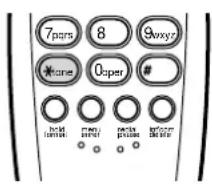
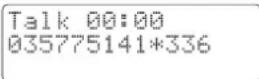
1) Dial the telephone number and wait for the line to connect.
2) Press the */tone key on the handset to temporarily change from PULSE dialing to TONE dialing.
3) Dial the tone numbers (such as automated menu choices).
4) Hang up and the unit will automatically return to PULSE mode.
Traveling Out-of-Range
The unit has an operating range of which can vary depending on conditions such as climate, altitude, and the type of obstacles between the handset and the base. If you move out of the operating range of the base unit, the display will show "Out Of Range" and will sound a warning beep every 5 seconds.
If you hear the warning beep, move closer to the base unit to deactivate the warning. If you remain out of range for approximately 15 seconds, the unit will place the call on hold.
The call can be retrieved when you are back in the operating range.
BASICS [21]

The message waiting indication is for the entire system. If you delete a message from one handset the message is deleted completely and none of the handsets can retrieve the message.
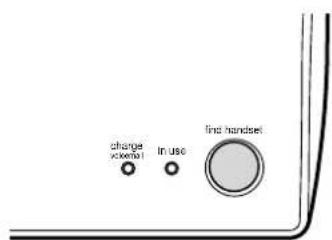
Handset Locator
To locate the handset, press find handset on the base unit.
All the handsets will ring for 60 seconds.
To stop the page ring, press find handset on the base again, or press end or any number key on the handset.
Message Waiting Indicator
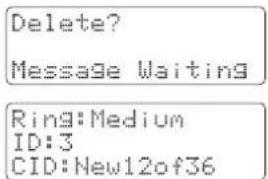
The charge/voicemail LED indicator on the base is designed to work with voice mail service provided by your local telephone company. The LED will flash to indicate when you have received new voice messages. Also the handset LCD indicates "Message Waiting". You must subscribe to voice mail service before this feature will work. Please contact your local telephone company representative for more details, or to subscribe.
You may need to occasionally reset the indicator if it remains on after you have retrieved your messages. To reset the indicator, press hold/format then press int'com/delete.
Dialing your voice message service
When you have messages, dial the number to access your message. Please contact your local telephone company representative for more details.
Flash and Call Waiting
If you subscribed to Call Waiting Caller ID (combined service), you will receive Caller ID information (if available) from Call Waiting calls. During a phone call, you will hear a beep to indicate the presence of a Call Waiting call. Shortly after, the Caller ID information will appear on the handset display. You can continue speaking to the first caller or by pressing flash key, you can toggle to speak to the second caller.
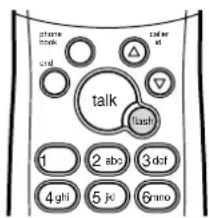
If you have Call Waiting service, you can receive the Call Waiting call by pressing the flash key.
Putting a call on hold
Press hold/format during a phone conversation to place a call on hold. The base LED will flash, and the handset LCD will state "Line On Hold".
Hold reminder
Hold Reminder is designed to prevent calls from accidentally being put on hold for a long duration of time. Hold Reminder automatically alerts the handset that placed a call on hold with a double beep in a selected interval (see "Selecting Hold Reminder") that the call has been unattended for longer than the time set for Hold Reminder. Also, "Line On Hold" is displayed on the handset to visually alert you that the call is on hold.
Hold recall ring
If the call on hold is not picked up for 3 minutes, all the handsets will ring (Hold Recall Ring) to remind all the handsets to a call on hold.
BASICS [23]

When the phone is in standby mode, press end to indicate the handset ID number.
Taking a call off hold
Press talk or pick up any handset and press talk to release the call from hold.
- If a call is put on hold for more than 5 minutes, the unit will automatically disconnect the call.
Multiple handset simultaneous conversation
The DCT4960-2 is a multiple handset system, but the unit allows only one handset at a time to talk with an outside call. When a handset is using the outside line, another handset cannot make another outside call. However, other handsets can join the outside call conversation (see Conference Call).
Intercom
Making an intercom call
You can make an intercom call to another handset.
1) Press int'com/delete.
2) The display will show "ICM To".
3) Press the Handset ID that you want to make an intercom call. For example, if you are using handset 1 and want to make an intercom call to handset 2, then you will press 2.
- The intercom will be canceled if the Handset ID for the receiving side is not entered within 10 seconds.

When you return the handset to the base or charger, the handset ID is indicated on the display.
Ring:Medium ID:1 CID:New12of36
Receiving an intercom call
When an intercom call is received, the handset will ring and displays "ICM By 1" to indicate that handset 1 is calling by intercom.
The intercom call can be answered by pressing int'com/delete, or any number key in the case the "AutoTalk" feature is ON.
The intercom call may be rejected by pressing end.
- If the intercom call is not answered within 60 seconds, the intercom call will be canceled.
- If talk is pressed during the intercom ring, then the intercom call will be canceled.
Transferring an outside call
You can transfer the outside call to another handset.
1) Press int'com/delete, the call will automatically on hold.
2) Press the receiving Handset ID. For example, if you are using handset 1 and want to transfer the outside call to handset 2, then you will press 2.
- The transfer will be canceled if the Handset ID is not entered within 10 seconds.
Answering a transferred call
Talk to the sender first
Press int'com/delete to talk to the sender before talking to the outside call. After talking to the sender, press talk to talk to the outside call.
Direct answer
Press talk to directly answer the transferred call. ("Transfer call" may be an intercom call. To receive an intercom call, press int'com/delete.)

Press end to cancel the call.
Conference Call
To have a conference call, be sure to have the "Privacy" mode turned OFF. During a call on an outside line, other handsets can conference-in by pressing talk.
- During the conference call, if someone presses hold/format, the system will be put on hold.
Storing Phone Numbers and Names
Storing the information into the phone book memory
The unit allows you to store up to 20 names (up to 12 characters) and numbers (up to 20 digits).
1) Press phone book to display the phone book.
2) Press ▲ or ▼ to select the empty location number.
3) Press menu/enter to enter the storing (or editing) mode.
4) Press */tone to start storing the information.
5) Press the appropriate keypad button to toggle through the letters and numbers associated with that key. The upper case letters will appear first, followed by the lower case letters, and the number. (For example - press the number "5" button to toggle among "J", "K", "L", "j", "k", "l", and the number "5").
6) When the desired letter appears, either wait 1-2 seconds for the cursor to automatically move to the next character, OR press ▲ or ▼ to manually move to the next character. Press int'com/delete to delete the incorrect characters.
7) Press menu/enter to complete the name and ready to enter the phone number.
8) Use the keypad to enter the desired phone number. Remember to include "1" for a long distance phone number and any prefixes necessary to access an outside line (such as "9").
9) Press menu/enter again to complete. - A confirmation beep will be heard and the display will return to phone book.
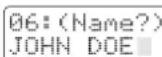
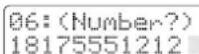
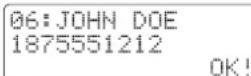
Steps for Entering Names and Special Characters
Press */tone to start storing the information.
The alphabet, characters, and the numbers are assigned to the number keys shown below in bold. Press the number key until you display the desired alphabet, characters, or numbers.
| 1 for | - ! & . ( ) 0 1 | 2 for | A B C a b c 2 |
| 3 for | D E F d e f 3 | 4 for | G H I s h i 4 |
| 5 for | J K L j k l 5 | 6 for | M N O m n o 6 |
| 7 for | P Q R S P q r s 7 | 8 for | T U V t u v 8 |
| 9 for W | X Y Z w x y z | 9* for | * |
| 0 for | O *SPACE^ | # for | # |
If you make a mistake while entering a name
Use ▲ or ▼ to move the cursor to the incorrect character. Press int'com/delete to erase the wrong character, then enter the correct character.
Making Calls with Memory Dialing
1) Press phone book to display the phone book.
2) Press ▲ or ▼ to select the location that you wish to dial.
3) Press the talk key to connect to the outside line, and the number will be dialed automatically.
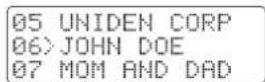
Chain Dialing
You may select to chain dial the following combinations:
(a) Manual Dialing + Phone Book.
(b) Phone Book + Manual Dialing
(c) Phone Book + Phone Book
(d) CID Number + Manual Dialing
(e) CID Number + Phone Book.
- In case of the combination with the CID number, the CID number must be dialed first. The “Manual Dialing + Caller Number” and the “Phone Book + Caller Number” order cannot be chain dialed.
1) Pick up the outside line and dial out manually from the phone book memory.
2) Press phone book and press the location number you wish to chain dial.
3) The phone will automatically chain dial the phone number stored in the location that you selected.
If you wish to insert a dialing delay between the digits, press redial/pause to insert a 2 second delay.
- For a longer delay, press redial/pause more than once. For example, pressing redial/pause 3 times will insert 6 seconds of delay between the digits.
Editing a Stored Name and/or Phone Number
1) Press phone book to display the phone book.
2) Press ▲ or ▼ to select the phone book location that you wish to edit.
3) Press menu/enter to enter the edit mode.
4) Press */tone to start editing the record.
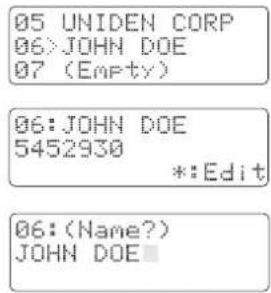
5) The display will show the name first. Edit the name and press menu/enter to move to edit the phone number. (If you do not need to edit the name, just press menu/enter to move to the phone number.)
6) After editing the phone number, press menu/enter to save the changes. - A confirmation beep will be heard and the display will return to the phone book.
Reviewing the information from phone book memory
1) Press phone book to display the phone book.
2) Press ▲ or ▼ to select the location that you wish to review.
3) Press hold/format to change the display to show the phone numbers (up to 13 digits).
4) Press hold/format again to toggle back to show the names.

Or, you can press menu/enter to enter the editing mode and then press ▲ or ▼ key to review the other records.
Dialing information from the phone book memory
1) Press talk to connect to the outside line.
2) Press phone book and press the location number in the phone book that you wish to dial (example: press 06 to dial the number stored in the location).
3) The phone will dial the phone number stored in that location.
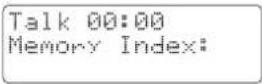
Erasing a Stored Name and Phone Number Deleting the information from the phone book memory
1) Press phone book to display the phone book.
2) Press ▲ or ▼ to select the phone book location that you wish to delete.
3) Press menu/enter to select the edit mode.
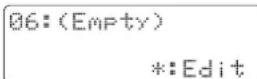
4) Press int'com/delete to delete the record.
5) Press int'com/delete again to confirm the deletion.
06:JAMES SMITH 13592251234 Delete?
06: (Empty) OK!
Caller ID
Caller ID is a subscription service available from your telephone service provider. For the Caller ID feature to work on the unit, you must subscribe to the service.
To receive Caller ID information for a Call Waiting call, you must subscribe to "Combined Call Waiting Caller ID service" from your telephone service provider. Even if you subscribe to both Caller ID and Call Waiting services separately, it is possible that you have not subscribed to the combined service.
When the Telephone Rings
If you subscribed to Call Waiting Caller ID (combined service), you will receive Caller ID information (if available) from Call Waiting calls. During a phone call, you will hear a beep to indicate the presence of a Call Waiting call. Shortly after, the Caller ID information will appear on the handset display. You can continue speaking to the first caller or by pressing flash, you can toggle to speak to the second caller.
Caller ID Display
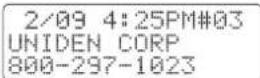
If you have subscribed to Caller ID service from your telephone company, each handset will show on the display, the telephone number and the name of the incoming call (if available), as well as the date and time the call is received. The information will show on the display after the second ring, and is then stored in the Caller ID database of the base unit.


The number shown after the “#” indicates the number of calls received from the same Caller ID.
Missing Caller ID data
If a caller chooses to partially or completely "block" Caller ID information, a message will appear on the display indicating that the name and/or phone has been blocked. The call will display as a Caller ID record, showing time and date information, and the message "PRIVATE". Other messages that might appear to indicate missing Caller ID data are "Out of Area", "No Number" or "No Name". These messages indicate that complete Caller ID information was not sent.
When the phone number and name data are received
When no name is received
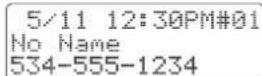
When invalid data is received
Incomplete Data
When no number is received
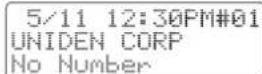
Enter the CID database retrieve mode
Press Caller ID to enter the CID Data. The LCD will display the number of CID records in the CID database.
Viewing the Caller ID Message List
You can scroll through the CID data.
1) Press caller id to enter Caller ID retrieve mode.
2) Press ▲ or ▼ to scroll through the CID database.
3) Press ▼ to see the newest caller.
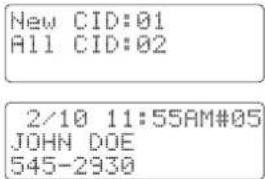
Deleting Information from the Caller ID List
Deleting a Caller ID message
You may delete caller information from the CID database.
1) Locate the caller information you wish to delete.
Delete? JOHN DOE 545-2930
2) Press int'com/delete to delete the caller data.
3) The display will show "Delete?" along with the name and the phone number.
4) Press int'com/delete to confirm the deletion.
Deleted!
Deleting all Caller ID names/numbers
You may delete all caller information easily from the caller database after you have returned the call or you have reviewed the caller list.
1) Press caller id, the display shows all caller information.
New CID:03 All CID:15 Delete All?
2) Press int'com/delete to delete all caller data.
3) This display will show "Delete All?".
4) Press int'com/delete again to confirm the deletion.
NEW CID:00 ALL CID:00
Using the Caller ID List
You may make a call to the telephone number shown in the display.
1) Locate the telephone number you wish to call from the CID database.
2) Press hold/format to select the mode that you wish to dial out.
2/09 4:25PM JOHN SMITH 555-1213
3) Each time you press hold/format to select other mode. (Local call mode or Long Distance call mode.)
2/09 4:25PM JOHN SMITH 1-555-1213
4) Press talk, and then the unit will dial the number automatically.
2/09 4:25PM JOHN SMITH 533-555-1213
2/09 4:25PM JOHN SMITH 15335551213
Caller ID (CID) data function
The DCT4960-2 stores up to 50 of the most recent Caller ID records. The records are stored in the base unit and can be accessed by any handset. Caller ID records are numbered sequentially, in the order in which they are received. When the 51st record is received, the oldest record will be deleted automatically each time a new record is received.
To store a Caller ID into the phone book memory
This feature allows you to store the Caller ID information into the phone book. To prevent the CID information from automatically being deleted, you may store it into your phone book.
1) Locate the CID record you wish to store into the phone book.
Note: The CID record without the phone number will not be stored into the phone book.
2) Press hold/format to select the mode you wish to dial out.
3) Press hold/format again to select the mode that you wish to use to dial out.
4) Press phone book to display the phone book location.
5) Press ▲ or ▼ to select your location.
6) Press menu/enter to confirm the selection.
7) The display will show "Replace Memory?"
8) Press ▲ or ▼ to select "Yes" or "No".
9) Press menu/enter to confirm that the CID record to be stored into the memory.
- You will hear a confirmation beep and the display will return to the CID retrieve mode.

Your DCT 4960-2 has the capability of expanding to 4 handsets. In any event that a handset is lost or damaged, the base unit security code will need to be changed, once a replacement handset is registered.
Changing the Digital Security Code
The digital security code is an identification code used to connect the handset and the base unit. Normally, setting the code is not necessary unless you are replacing an extra handset.
In the rare situation that you suspect another cordless telephone is using the same security code, you can change the code.
1) Unplug the AC Adapter.
2) Press and hold find handset on the base while you plug in the AC Adapter, and keep holding find handset for 10 seconds.
3) The security code has changed.
* After changing the security code, please be sure to re-register all the handsets before use.
Re-registering the handset
When you change the security code on the base, the handset needs to be re-registered.
Follow the simple steps shown below:
1) Check that the phone is not in use (including the intercom), and make sure that the handset is not in the base unit.
2) Press and hold find handset on the base for 5 seconds.
- The charge/voice mail LED will start flashing to tell you that the system is in the registration mode.
3) Press menu/enter on the handset.
4) Press ▲ or ▼ and select "Registration".
Handset Reset >Registration Tone/Pulse
5) Press menu/enter, and the display will show the current setting. (The initial setting is "No".)
6) Press ▲ or ▼ to change the selection.
7) Press menu/enter.
8) Place the handset in the charging cradle of the base unit.
- The handset beeps and displays that the registration has finished.
Registration No? [+]/*:Change
Registration Put on the base and wait
Registration ID=2 OK!
Installing the Beltclip
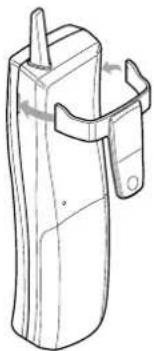
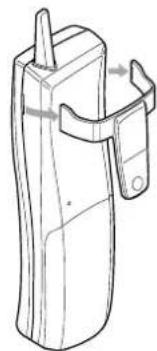
To attach the beltclip
Insert the beltclip into the holes on each side of the handset. Press down until it clicks.
natural_image
Line drawing of a cylindrical device with a handle and side clip, no text or symbols presentTo remove the beltclip
Pull both sides of the beltclip to release the tabs from the holes.
natural_image
Technical line drawing of a mechanical device with handle and mounting bracket (no text or symbols)Headset Installation
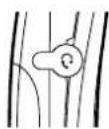
Each handset can be used with any standard 2.5mm headset for hands-free operation.
1) Plug the headset into the headset jack on the side of the phone (remove the rubber plug if it is covering the hole).
2) Calls can now be made using the headset.
To return to using the phone without a headset, simply unplug the headset.
Note on Power Sources
Battery replacement and handling
When the operating time becomes short, even after a battery is recharged, please replace the battery. With normal usage, your battery should last about one year. Please contact your place of purchase or the Uniden Parts Department for a replacement battery.
Power Failure
During the period that the power is off, you will not be able to make or receive calls with the telephone.
RECYCLING NICKEL METAL HYDRIDE BATTERIES

NICKEL METAL HYDRIDE BATTERIES MUST BE DISPOSED OF PROPERLY.
Nickel Metal Hydride cells are used in the battery pack. Please take your used nickel metal hydride battery packs to a store that recycles nickel metal hydride batteries.
Maintenance
When slightly dirty
Wipe with a soft, dry cloth.
When very dirty
Wipe with a soft cloth that has been dampened with diluted, neutral detergent. Dry with a dry cloth.
When the charging terminals become dirty
Wipe with a dry cloth or a pencil eraser, if necessary.
Caution
Do not use paint thinner, benzene, alcohol, or other chemical products. Doing so may discolor the surface of the telephone and damage the finish.
Troubleshooting
If your phone is not performing to your expectations, please try these simple steps first.
| Symptom | Suggestion |
| “No Svc” displays on the LCD | Make sure that the base unit is plugged in to the AC outlet.Make sure that the telephone cord is properly connected to the wall jack.The security code may not be properly registered to the base unit.The individual handset may not be programmed with the correct security code. |
| Handsets keep going “off hook” by themselves (won’t hang up) | Make sure that each handset has a DIFFERENT handset ID. |
| One or more handsets don’t communicate with the base or the other handsets | Make sure that each handset has the SAME security code. |
| Conference function (Intercom) canceled automatically | Make sure that privacy mode set to off. |
| Poor Sound Quality | The handset might be too far away from the base.Make sure that the battery is fully charged.Move the handset and/or base to a different location away from metal objects or appliances and try again.Another phone might be causing interference. |
ADDITIONAL INFORMATION [41]
| Symptom | Suggestion |
| “Out of Range” displays on the LCD | ·The handset is too far away from the base unit. Move closer to the base unit. |
| No Caller ID data is displayed | ·Confirm with your telephone company that you are subscribed to Caller ID service.·The handset was picked up before the second ring.·Charge the handset. |
| No Call Waiting Caller ID | ·Confirm with your local telephone company that you are subscribed to Call Waiting Caller ID. Even if you have subscribed to Call Waiting and Caller ID services separately, you may need to initiate the combined Call Waiting Caller ID service. |
| “Private”, “Unavailable”, or “No Name” message is displayed | ·All or part of the Caller ID information is not being sent. The information is either unavailable or is being blocked by the caller. |
| During a Call Waiting Call, the speaker mutes temporarily | ·This is normal operation. The speaker must be muted briefly to allow the phone to receive Call Waiting Caller ID information. |
| A second handset can’t join the conversation | ·Only one handset at a time can talk with an outside caller. To allow a different handset to talk to the caller, transfer the call to the other handset. |
| Voice Message Indication does not work | ·Contact your local telephone company to make sure that your telephone line receives FSK message signaling. |
| If you still have a problem | ·Call our customer hotline at 1-800-297-1023. |
ADDITIONAL INFORMATION[42]
General Information
The phone complies with FCC Parts 15 and 68.
Operating temperature: 0° to 55°C (+32°F to +131°F)
AC Adapter Information
AC Adapter part number: AD-490
Input Voltage: 120V AC 60Hz
Output Voltage: 9V DC 300 mA
Battery Information
Battery part number: BP-490
Capacity: 700 mAH, 3.6V
Battery use time (per charge)
From fully charged -
Talk mode duration: 6 hours
Standby mode duration: 3 days

If the handset is left off of the base, the actual Talk mode duration will be reduced respective to the amount of time the handset is off the base.
Recharge your phone on a regular basis by returning the handset to the base after each phone call. When the operating time becomes short, even after the battery is recharged, please replace the battery. With normal usage, the battery should last about one year.
Replacement batteries may be purchased at your local Uniden dealer or by contacting the Uniden Parts Department (800) 554-3988. Hours are from 7:00 a.m. to 5:00 p.m. Central Time, Monday through Friday. We can also be reached on the web at www.uniden.com
Specifications, features, and availability of optional accessories are all subject to change without prior notice.
ADDITIONAL INFORMATION [43]
Precautions!
Before you read anything else, please observe the following: Warning!
Uniden America Corporation DOES NOT represent this unit to be waterproof. To reduce the risk of fire, electrical shock, or damage to the unit, DO NOT expose this unit to rain or moisture.
Rechargeable Nickel Metal Hydride Battery Warning
- This equipment contains a rechargeable nickel metal hydride battery.
- The rechargeable Nickel Metal Hydride battery contained in this equipment may explode if disposed of in a fire.
• Do not short-circuit the battery. - Do not charge the rechargeable nickel metal hydride battery used in this equipment in any charger other than the one designed to charge this battery as specified in the owner's manual. Using another charger may damage the battery or cause the battery to explode.
Rechargeable Nickel Metal Hydride Batteries Must Be Recycled or Disposed of Properly


The exclamation point within an equilateral triangle is intended to alert the user to the presence of important operating and maintenance (servicing) instructions in the literature accompanying the appliance.
Important Safety Instructions
When using your telephone equipment, these basic safety precautions should always be followed to reduce the risk of fire, electrical shock, and injury to persons:
-
Read and understand all instructions.
-
Follow all warnings and instructions marked on the product.
-
Unplug this product from the wall outlet before cleaning. Use a dry cloth for cleaning without liquid or aerosol cleaners.
-
Do not use this product near water; for example, near a bath tub, wash bowl, kitchen sink or laundry tub, in a wet basement, or near a swimming pool.
-
Do not place this product on an unstable cart, stand, or table. The telephone may fall, causing serious damage to the unit.
-
Slots and openings in the cabinet and the back or bottom are provided for ventilation. To protect the product from overheating, these openings must not be blocked or covered. This product should never be placed near or over a radiator or heat register. This product should not be placed in a built-in installation unless proper ventilation is provided.
-
This product should be operated only from the type of power source indicated on the marking label. If you are not sure of the type of power supply to your home, consult your dealer or local power company.
-
Do not allow anything to rest on the power cord. Do not locate this product where the cord will be damaged by persons walking on it.
-
Do not overload wall outlets and extension cords, as this can result in the risk of fire or electrical shock.
-
Never push objects of any kind into this product through cabinet slots, as they may touch dangerous voltage points or short out parts that could result in a risk of fire or electric shock. Never spill liquid of any kind on the product.
-
To reduce the risk of electric shock, do not disassemble this product. Take it to qualified service personnel when service or repair work is required. Opening or removing covers may expose you to dangerous voltages or other risks. Incorrect reassembly can cause electric shock when the appliance is subsequently used.
-
Unplug this product from the wall outlet and refer servicing to qualified service personnel under the following conditions: A. When the power supply cord is damaged or frayed.
B. If liquid has been spilled into the product.
C. If the product has been exposed to rain or water.
D. If the product does not operate normally when following the operating instructions. (Adjust only those controls that are covered by the operating instructions. Improper adjustment of other controls may result in damage and will often require extensive repair work by a qualified technician.)
E. If the product has been dropped or the cabinet has been damaged.
F. If the product exhibits a distinct change in performance. 13. Do not use the telephone to report a gas leak in the vicinity of the leak.
Additional Battery Safety Precautions
Caution! To reduce the risk of fire or injury to persons by the battery, read and follow these instructions:
- Use only the appropriate type and size battery pack specified in the owner's manual.
- Do not dispose of the battery pack in a fire. The cell may explode. Check the Nickel Metal Hydride battery disposal package insert for disposal instructions.
- Do not open or mutilate the battery pack. Released electrolyte is corrosive and may cause damage to the eyes or skin. It may be toxic if swallowed.
- Exercise care in handling the battery in order not to short the battery with conducting materials such as rings, bracelets, and keys. The battery or conductor may overheat and cause burns.
- Charge the battery pack provided with or identified for use with this product only in accordance with the instructions and limitations specified in the owner's manual provided for this product.
- Observe proper polarity orientation between the battery pack and battery charger.
SAVE THESE INSTRUCTIONS!
Important Electrical Considerations
Unplug all electrical appliances when you know an electrical storm is approaching. Lightning can pass through your household wiring and damage any device connected to it. This phone is no exception.
Warning! Please do not attempt to unplug any appliance during an electrical storm.
The FCC Wants You To Know
Changes or modifications to this product not expressly approved by Uniden, or operation of this product in any way other than as detailed by the owner's manual, could void your authority to operate this product. The equipment cannot be used on public coin phone service provided by the telephone company. Connection to party line service is subject to state tariffs. (Contact the state public utility commission, public service commission or corporation commission for information.)
Range
Your new phone is designed to achieve the maximum possible range by transmitting and receiving according to the highest specifications set forth by the FCC. We have rated this phone to operate at a maximum distance with the qualification that the range depends upon the environment in which the telephone is used. Many factors limit range, and it would be impossible to include all the variables in our rating. The Maximum Range rating of this phone is meant to be used as a means of comparison against other range claims.
Telephone Line Problems
The FCC has granted the telephone company the right to disconnect service in the event that your phone causes problems on the telephone line. Also, the telephone company may make changes in facilities and services which may affect the operation of your unit. However, your telephone company must give adequate notice in writing prior to such actions to allow you time for making necessary arrangements to continue uninterrupted service. If you are having trouble with your telephone service, you must first disconnect your phone to determine if it is the cause of your problem. If you determine that it is the cause, you must leave it disconnected until the trouble has been corrected.
Radio Interference
Radio interference may occasionally cause buzzing and humming in your cordless handset, or clicking noises in the base. This interference is caused by external sources such as TV, refrigerator, vacuum cleaner, fluorescent lighting, or electrical storm. Your unit is NOT DEFECTIVE. If these noises continue and are too distracting, please check around your home to see what appliances may be causing the problem. In addition, we recommend that the base not be plugged into a circuit that also powers a major appliance because of the potential for interference. Be certain that the antenna on the unit is fully extended when needed. In the unlikely event that you consistently hear other voices or distracting transmissions on your phone, you may be receiving radio signals from another cordless telephone or other source of interference. If you cannot eliminate this type of interference, you need to change to a different channel. Finally, it should be noted that some cordless telephones operate at frequencies that may cause interference to nearby TVs and VCRs. To minimize or prevent such interference, the base of the cordless telephone should not be placed near or on top of a TV or VCR. If interference is experienced, moving the cordless telephone farther away from the TV or VCR will often reduce or eliminate the interference.
Cordless Telephone Privacy
Cordless telephones are radio devices. Communications between the handset and base of your cordless telephone are accomplished by means of radio waves which are broadcast over the open airways. Because of the inherent physical properties of radio waves, your communications can be received by radio receiving devices other than your own cordless telephone unit. Consequently, any communications using your cordless telephone may not be private.
Installation Considerations
Selecting a Location
Before choosing a location for your new phone, there are some important guidelines you should consider:
- The location should be close to both a phone jack and continuous power outlet. (A continuous power outlet is an AC outlet which does not have a switch to interrupt its power.)
- Keep the base and handset away from sources of electrical noise such as motors or fluorescent lighting.
- Be sure there is sufficient space to fully extend the base antenna.
- The base can be placed on a desk or tabletop or mounted on a standard telephone wall plate.
- You should charge your new phone for 10-12 hours before completing the installation or using the handset.
Telephone Line Outlets
There are two types of phone outlets:
Modular Jack
Most phone equipment available now uses modular jacks. Phone cords are fitted with a molded plastic connector which plugs into this type of jack. If you do not have modular phone jacks, contact your local telephone company for information about their installation.
Hardwired Jack
Some equipment is wired directly to a phone jack, and these types of installations require a modular jack converter. This type of installation is not difficult; however, you should contact your Uniden telephone dealer or a telephone supply store for advice about the proper adapter or converter for your particular situation.
Connecting the Telephone Cords
Consider these safety guidelines before connecting the telephone cords:
Caution!
- Never install telephone wiring during a lightning storm.
- Never touch uninsulated telephone wires or terminals unless the telephone line has been disconnected.
- Use caution when installing or modifying telephone lines.
Applying Power to the Base
This phone requires an AC outlet, without a switch to interrupt power, and the included AC adapter. To relieve strain on the DC plug when the phone is placed on a desk or table, wrap the power cord around the strain relief notch on the bottom of the base.
NOTE: Place the power cord so that it does not create a trip hazard, or where it could become chafed and create a fire or other electrical hazards.
Adapter Safety Features
If the AC adapter furnished with this phone has a polarized line plug (a plug having one blade wider than the other), this plug will fit into the power outlet only one way. If you are unable to insert the plug fully into the outlet, try reversing the plug.
Do not alter the shape of the blades of the polarized plug!
NOTE: If you cannot plug the AC adapter into the outlet,
contact someone about replacing the outlet.
Plug the AC Adapter into a standard 120 VAC wall outlet.
Do not use an outlet controlled by a wall switch.
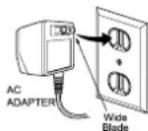

Use only the Uniden AC Adapter supplied with this phone.
One Year Limited Warranty
Important: Evidence of original purchase is required for warranty service.
WARRANTOR: UNIDEN AMERICA CORPORATION ("Uniden")
ELEMENTS OF WARRANTY: Uniden warrants, for one year, to the original retail owner, this Uniden Product to be free from defects in materials and craftsmanship with only the limitations or exclusions set out below.
WARRANTY DURATION: This warranty to the original user shall terminate and be of no further effect 12 months after the date of original retail sale. The warranty is invalid if the Product is (A) damaged or not maintained as reasonable or necessary, (B) modified, altered, or used as part of any conversion kits, subassemblies, or any configurations not sold by Uniden, (C) improperly installed. (D) serviced or repaired by someone other than an authorized Uniden service center for a defect or malfunction covered by this warranty. (E) used in any conjunction with equipment or parts or as part of any system not manufactured by Uniden, or (F) installed or programmed by anyone other than as detailed by the owner's manual for this product.
STATEMENT OF REMEDY: In the event that the product does not conform to this warranty at any time while this warranty is in effect, warrantor will either, at its option, repair or replace the defective unit and return it to you without charge for parts, service, or any other cost (except shipping and handling) incurred by warrantor or its representatives in connection with the performance of this warranty. Warrantor, at its option, may replace the unit with a new or refurbished unit. THE LIMITED WARRANTY SET FORTH ABOVE IS THE SOLE AND ENTIRE WARRANTY PERTAINING TO THE PRODUCT AND IS IN LIEU OF AND EXCLUDES ALL OTHER WARRANTIES OF ANY NATURE WHATSOEVER, WHETHER EXPRESS, IMPLIED OR ARISING BY OPERATION OF LAW, INCLUDING, BUT NOT LIMITED TO ANY IMPLIED WARRANTIES OF MERCHANTABILITY OR FITNESS FOR A PARTICULAR PURPOSE, THIS WARRANTY DOES NOT COVER OR PROVIDE FOR THE REIMBURSEMENT OR PAYMENT OF INCIDENTAL OR CONSEQUENTIAL DAMAGES. Some states do not allow this exclusion or limitation of incidental or consequential damages so the above limitation or exclusion may not apply to you.
LEGAL REMEDIES: This warranty gives you specific legal rights, and you may also have other rights which vary from state to state. This warranty is void outside the United States of America.
PROCEDURE FOR OBTAINING PERFORMANCE OF WARRANTY: If, after following the instructions in the owner's manual you are certain that the Product is defective, pack the Product carefully (preferably in its original packaging). The Product should include all parts and accessories originally packaged with the Product. Include evidence of original purchase and a note describing the defect that has caused you to return it. The Product should be shipped freight prepaid, by traceable means, to warrantor at:
Uniden America Corporation
Parts and Service Division
4700 Amon Carter Blvd.
Fort Worth, TX 76155
(800) 297-1023, 7 a.m. to 7 p.m. Central, Monday through Friday
ADDITIONAL INFORMATION [45]
Index
A
AC adapter information ....43
Adjusting ringer and earpiece volume......17
B
Battery pack
Information 43
Installing 7
Maintenance 8,40
Preparing and charging 9
Replacement and handling 40
Beltclip installation 39
C
Caller ID
Caller ID service 33
Call Waiting 23
Deleting 35
Setting Caller ID options 11
Using 36
Viewing 34
Connection 9
D
Dialing mode....10
Digital security code 4,38
E, F, G
Earpiece volume 19
H
Handset Locator....22
Headset installation 39
I, J, K, L
Interference 45
M, N, O
Maintenance 40
Making a call 16
Memory dialing
Editing a stored name
and phone number 30
Erasing a stored name
and phone number 32
Making calls with memory dialing ..... 28
Storing phone
numbers and names.... 27
P, Q
Package contents 5
R
Receiving a call 16
Redialing a call 20
Ringer tone and volume 17
S
Setting up the handset 7
Setting up the phone 6
T, U, V, W, X, Y, Z
Troubleshooting 41
At Uniden, we'll take care of you!
If you need any assistance with this product, please call our Customer Hotline at
1-800-297-1023
PLEASE DO NOT RETURN THIS PRODUCT TO THE PLACE OF PURCHASE.
Our Uniden representatives will be happy to help you with any matters regarding the operation of this unit, available accessories, or any other related matters.
Thank you for purchasing a Uniden product.
Hours: M-F 7:00 AM to 7:00 PM CST.
THANK YOU FOR PURCHASING A UNIDEN PRODUCT.
Uniden®
© 2001 Uniden America Corporation, Fort Worth, TX
Covered under one or more of the following U.S. patents:
4,511,761 4,523,058 4,595,795 4,797,916 5,381,460 5,426,690
5,434,905 5,491,745 5,533,010 5,574,727 5,650,790 5,660,269
5,661,780 5,663,981 5,671,248 5,717,312 5,754,407 5,768,345
5,787,356 5,838,721 5,864,619 5,893,034 5,912,968 5,915,227
5,929,598 5,930,720 5,960,358 5,987,330 6,044,281 6,070,082
6,125,277
Printed in China
381-251058
- Step 1 Charging the Battery Step 2 Co
- INSTALL THE HANDSET BATTERY
- PLUG INTO AC POWER
- ting/Adjusting Step 3 Using the Phone
- CONNECT TO A PHONE LINE
- ADJUST HANDSET RINGER VOLUME AND RINGER TONE
- TO MAKE A CALL
- TO ANSWER A CALL
- Step 4 Setting Up the Caller ID
- SETTING CALLER ID OPTIONS
- ENTERING YOUR AREA CODE
- Step 5 Using Caller ID Additional Fea
- VIEWING CALLER ID MESSAGES
- CALLING A CALLER ID NUMBER
- DELETING A CALLER ID MESSAGE
- DELETING ALL CALLER ID MESSAGES
- STORING CALLER ID MESSAGE IN PHONE BOOK MEMORY
- FOR MORE INFORMATION ON THESE FUNCTIONS, REFER TO THE OWNER'S MANUAL SUPPLIED WITH YOUR PHONE.
- Welcome
- Features
- Contents
- Quick Reference Guide
- Welcome/Features
- Controls and Functions 2
- Getting Started
- Basics
- Memory Dialing
- Caller ID Features
- Additional Information
- Controls and Functions
- key
- Read this First
- Step 1 (page 5)
- Step 2 (page 6)
- Step 3 (page 7 to 10)
- Step 4 (page 11 to 12)
- About the digital security code
- Checking the Package Contents
- Also included:
- Setting up the Phone
- Do the following steps:
- Choose the best location
- Install the battery pack
- Battery use time (per charge)
- Low battery alert
- Cleaning the battery charging contacts
- Connect the base unit
- Choose the dialing mode
- Area Code programming
- Registering Additional Handsets
- Setting the privacy mode
- Resetting the Handset
- Selecting Hold Reminder Interval
- Making and Receiving Calls
- Placing a call by manual dialing
- Placing a call by pre-dialing
- Ending a call
- Receiving a call
- Terminology
- Adjusting the Handset Ringer and Earpiece Volume
- Ringer volume
- Ringer tone
- Earpiece volume
- Redialing a Call
- Redialing from standby mode
- Redial from talk mode
- Tone Dialing Switch-over
- Traveling Out-of-Range
- Handset Locator
- Message Waiting Indicator
- Dialing your voice message service
- Flash and Call Waiting
- Putting a call on hold
- Hold reminder
- Hold recall ring
- Taking a call off hold
- Multiple handset simultaneous conversation
- Intercom
- Making an intercom call
- Receiving an intercom call
- Transferring an outside call
- Answering a transferred call
- Talk to the sender first
- Direct answer
- Conference Call
- Storing Phone Numbers and Names
- Storing the information into the phone book memory
- Steps for Entering Names and Special Characters
- Making Calls with Memory Dialing
- Chain Dialing
- Editing a Stored Name and/or Phone Number
- Reviewing the information from phone book memory
- Dialing information from the phone book memory
- Erasing a Stored Name and Phone Number Deleting the information from the phone book memory
- Caller ID
- When the Telephone Rings
- Caller ID Display
- Missing Caller ID data
- Enter the CID database retrieve mode
- Viewing the Caller ID Message List
- Deleting Information from the Caller ID List
- Deleting all Caller ID names/numbers
- Using the Caller ID List
- Caller ID (CID) data function
- To store a Caller ID into the phone book memory
- Changing the Digital Security Code
- Re-registering the handset
- Installing the Beltclip
- To attach the beltclip
- To remove the beltclip
- Headset Installation
- Note on Power Sources
- Battery replacement and handling
- Power Failure
- RECYCLING NICKEL METAL HYDRIDE BATTERIES
- Maintenance
- When slightly dirty
- When very dirty
- When the charging terminals become dirty
- Caution
- Troubleshooting
- General Information
- AC Adapter Information
- Battery Information
- Precautions!
- Rechargeable Nickel Metal Hydride Battery Warning
- Important Safety Instructions
- SAVE THESE INSTRUCTIONS!
- Important Electrical Considerations
- The FCC Wants You To Know
- Range
- Telephone Line Problems
- Radio Interference
- Cordless Telephone Privacy
- Installation Considerations
- Selecting a Location
- Telephone Line Outlets
- Modular Jack
- Hardwired Jack
- Connecting the Telephone Cords
- Caution!
- Applying Power to the Base
- Adapter Safety Features
- One Year Limited Warranty
- Index
- A
- B
- C
- D
- E, F, G
- H
- I, J, K, L
- M, N, O
- P, Q
- R
- S
- T, U, V, W, X, Y, Z
- At Uniden, we'll take care of you!
- 1-800-297-1023
- Uniden®
Brand : UNIDEN
Model : DCT 4960-2
Category : Cordless phone