
DCT 7085 - Cordless phone UNIDEN - Free user manual and instructions
Find the device manual for free DCT 7085 UNIDEN in PDF.


| Product Type | Cordless Phone |
| Brand | Uniden |
| Model | DCT 7085 |
| Technology | DECT 6.0 (1.9 GHz) |
| Handset Dimensions (approx) | 170 x 50 x 30 mm |
| Base Dimensions (approx) | 120 x 100 x 60 mm |
| Handset Weight (with battery) | Approx. 130 g |
| Base Power Supply | AC adapter (input: 100-240V, 50/60Hz, output: 9V DC) |
| Handset Battery Type | Rechargeable NiMH, 2.4V, 600 mAh (typical) |
| Main Functions | Caller ID, phonebook (up to 100 entries), speakerphone, intercom, call waiting, redial, mute |
| Display | Backlit LCD, 1.5-inch grayscale |
| Ringer Types | 10 polyphonic melodies |
| Range (indoors) | Up to 50 meters |
| Range (outdoors) | Up to 300 meters |
| Number of Handsets Supported | Up to 4 (with additional handsets) |
| Maintenance & Cleaning | Wipe with a soft, dry cloth; do not use liquids or abrasives |
| Security | Digital encryption, secure pairing |
| Spare Parts & Repairability | Replacement batteries, chargers, and handsets available from Uniden or authorized dealers |
| General Information | Wall-mountable base, belt clip included, hearing aid compatible |
Frequently Asked Questions - DCT 7085 UNIDEN
User questions about DCT 7085 UNIDEN
0 question about this device. Answer the ones you know or ask your own.
Ask a new question about this device
Download the instructions for your Cordless phone in PDF format for free! Find your manual DCT 7085 - UNIDEN and take your electronic device back in hand. On this page are published all the documents necessary for the use of your device. DCT 7085 by UNIDEN.
USER MANUAL DCT 7085 UNIDEN
Table of Contents...... 1
Welcome....4
Accessibility 4
Terminology Used in this Manual....5
Product Overview....6
Main Phone Features....6
Answering System Features 6
Parts of the Handset 7
Parts of the Answering System Base (DCT758) .. 8
Parts of the Answering System/Dual-keypad Base (DCT7585/DCT7085) 9
Using the Interface....10
Reading the Display.... 10
Using the Four-way Function Key...... 11
Using the Handset Menus.... 11
Entering Text from Your Handset.... 12
Installing the Phone 13
Choosing the Best Location 13
Wall Mounting the Base 13
Installing the Battery 14
Connecting the Base and Charging the Handset15
Connecting to the Phone Line.... 15
Testing the Connection 15
Changing the Dial Mode 16
Installing the Belt Clip 16
Basic Setup....17
Selecting a Language....17
Setting the Day and Time....17
Activating Caller ID on Call Waiting and Call Waiting Deluxe....18
Activating Personal Ring 18
Activating the Key Touch Tone....18
Adding Accessory Handsets 19
Compatible Handsets....19
Charging Accessory Handsets 20
Registering Accessory Handsets....20
Resetting Handsets 21
Setting Up the Phonebook....22
Creating Phonebook Entries 22
Finding a Phonebook Entry 24
Editing an Existing Phonebook Entry 24
Storing Caller ID or Redial Numbers in the Phonebook....24
Deleting Phonebook Entries 25
Copying Phonebook Entries to Another Handset25
Programming Base Speed Dial Numbers (Dual Keypad Model Only)....26
Deleting Base Speed Dial Numbers....27
Customizing Your Phone 27
Changing the Handset Banner 27
Selecting a Ring Tone (Handset Only) 28
Activating AutoTalk (Handset only) 28
Activating Any Key Answer (Handset only)...... 29
Using Your Phone 30
Making a Call from the Phonebook....31
Making a Call with Handset Speed Dial....31
Making a Call with Base Speed Dial (Dual-keypad Base Only).... 31
Switching to the Handset Speakerphone During a Call 31
Using Caller ID and Call Waiting 32
Using the Caller ID List 32
Making a Call from a Caller ID Record.... 32
Deleting Caller ID Numbers 33
Using Call Waiting.... 33
Using Call Waiting Deluxe 33
Redialing a Number....34
Deleting a Redial Record 34
Adjusting the Ringer, Earpiece and Speaker Volume 35
Adjusting the Ringer Volume 35
Adjusting the Earpiece Volume 35
Adjusting the Speaker Volume 35
Adjusting the Audio Tone 35
Using the Clarity Boost Feature 36
Finding a Lost Handset.... 36
Using Hold, Conference and Transfer 36
Placing a Call on Hold.... 36
Conferencing 37
Transferring a Call 37
Answering a Transferred Call 38
Using Special Features ....38
Do Not Disturb (All Calls) 38
Muting the Ringer (One Call Only) 38
Muting the Microphone....39
Privacy Mode....39
Seven-Digit Dialing....39
Using the DirectLink™ Communication Feature.40
Using the Intercom 41
Room/Baby Monitor....42
Tone Dialing Switch Over 43
Installing the Optional Headset 43
Setting Up the Answering System 44
Features 44
Using the Answering System Interface......45
Selecting the Language......45
Setting the Number of Rings 46
Setting the Day & Time 47
Recording a Personal Greeting 48
Selecting a Greeting....48
Deleting Your Personal Greeting....49
Setting the Record Time (or Announce Only).....49
Activating the Message Alert....50
Activating Call Screening 50
Setting a Security Code or Personal Identification Number (PIN)....51
Using the Answering System ....52
Turning Your Answering System On and Off .....52
Reviewing Messages 52
Screening Calls 53
Recording a Conversation....54
Recording a Voice Memo....55
Turning Off the Message Alert Tone 55
Operating the Answering System While You Are Away from Home.... 55
Maintenance....57
Specifications.... 57
Power Failures 57
Battery Life....57
Low Battery Alert....58
Battery Replacement and Handling 58
Change the Batteries Annually 58
Clean the Battery Contacts 59
Troubleshooting....59
Resetting the Handset 59
Resetting the Handset Without the Base ..... 60
Changing the Digital Security Code 60
Traveling Out of Range 61
Common Issues 61
Liquid Damage 63
Precautions!......65
Important Safety Instructions....65
The FCC Wants You To Know 66
Radio Interference....67
Cordless Telephone Privacy 67
I.C. Notice 67
One Year Limited Warranty....68
Index 69
Remote Operation Card....72
At Uniden, we'll take care of you!......73
Welcome
Thank you for purchasing a Uniden Multi-Handset phone.
Note: Illustrations in this manual are used for explanation purposes. Some illustrations in this manual may differ from the actual unit.
As an Energy Star® Partner, Uniden has determined that this product or product models meets the Energy Star® guidelines for energy efficiency. Energy Star® is a U.S. registered mark.
Uniden is a registered trademark of Uniden America Corporation. AutoStandby, DirectLink, IntegriSound and Random Code are trademarks of Uniden America.

Accessibility
Uniden provides a customer service hotline for accessibility questions. If you have a disability and need customer service assistance or if you have any questions about how Uniden's products can accommodate persons with disabilities, please call the accessibility voice/TTY line: 1-800-874-9314
A representative is available to talk to you M-F, 8:00 am to 5:00 pm, CST. After hours, you can leave us a message, and we will call you back. Information is also available on our website, www.uniden.com, under the "Accessibility" link.
Terminology Used in this Manual
| Accessory Handset | This phone system is expandable: one base supports a total of four handsets. The accessory handset is a handset that is compatible with this model. |
| Base | The main part of the phone that connects to your phone line and lets you make and receive calls. |
| CID | Caller ID is available from your telephone provider. With this service, you can see the name and number of incoming callers. |
| CW Deluxe or Call Waiting Deluxe | Call Waiting Deluxe is offered by your telephone provider. This service gives you different options when you have a waiting call. See Using Call Waiting Deluxe on page 33. |
| CID/CW or CIDCW | Caller ID on Call Waiting is available from your telephone provider. With this service, you can see incoming caller information while on another call. |
| Charger | A cradle that comes with an accessory handset and charges the handset battery. It connects to power but does not connect to a phone line. |
| DirectLinkTM | If you have accessory handsets on your system, you can use two handsets as 2-way radios. |
| Global settings | Apply to registered handsets and the base. If you change something under the global menu, you change it for all registered handsets and the base. Only one handset can change global settings at a time, and the phone must be in standby. |
| Standby | The handset is not in use. If it is off the cradle, no line has been activated. No dial tone is present. |
| Station | Any handset or the base. |
| Talk | A telephone line has been activated on the handset or the base, enabling a dial tone. |
Product Overview
Main Phone Features
- 2.4GHz Digital Expandable System expands up to 4 Handsets
- Integrated Digital Answering System
- Caller ID/Call Waiting Deluxe
- Base Keypad (DCT7585/DCT7085 only)
- 100 shared Phonebook Entries/Caller ID Numbers
- DirectLink™ Two-Way Communication
• Room/Baby Monitoring - Speakerphones on Base & Handset
Answering System Features
• Digital Tapeless Recording
- Up to 12 Minutes of Recording Time
- Personal or Pre-recorded Outgoing Messages
- English, Spanish, or French Voice Prompts for Menu Setup
• Day and Time Announcement
• 20 Ringer Options (10 Tones/10 Melodies)
- Personalized Ring by Party
• 10 Speed Dial Numbers
- Last 3 Number Redial
- Copy Phonebook Entries to Another Handset
- English, Spanish and French Menu Displays
- Call Transfer
- Conferencing
- Intercom
- Remote Message Retrieval
- Toll Saver
- Conversation Recording
- Voice Memo
- Message Alert
- Records Up to 59 messages
Parts of the Handset
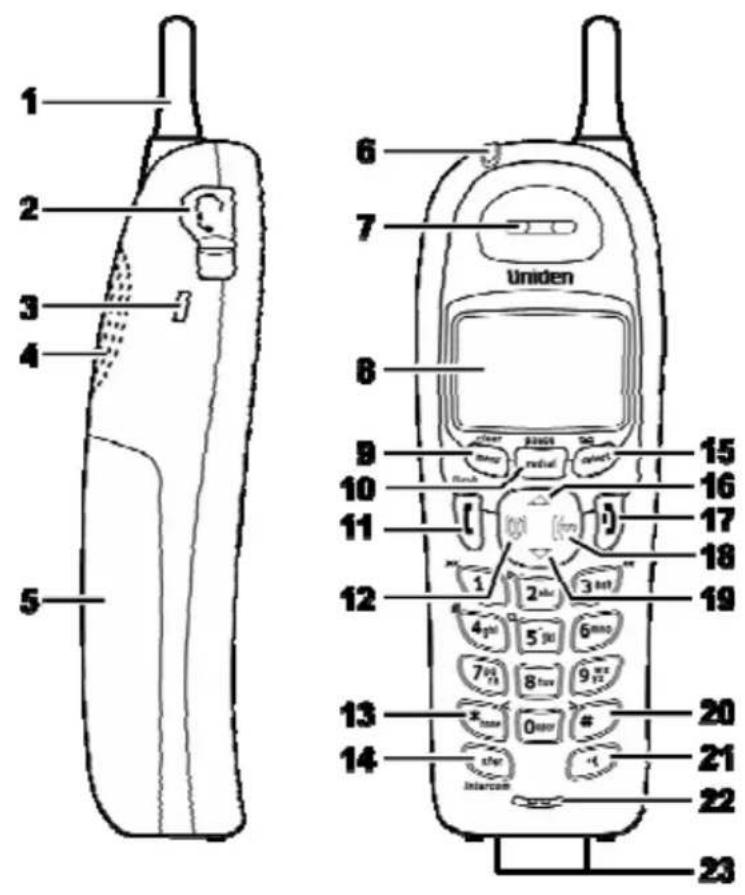
- Handset Antenna
- Headset Jack Cover
- Beltclip Hole
- Speakerphone Speaker and Ringer
- Handset Battery Compartment
- New Message LED
- Handset Earpiece
- LCD Display
- [menu/clear] key
- [redial/pause] key
- [/flash] key (talk/flash)
- [ ] key (phonebook)
- [*/tone/<] key
- [xfer/intercom] key
- [select/ ] key (select/messages)
- [ ]ey (up)
- [ ] key (end call)
- [they (caller ID)
- [ ]key (down)
- [#/>] key (pound)
- [■] key (speaker)
- Handset Microphone
- Handset Charging Contacts
Parts of the Answering System Base (DCT758)
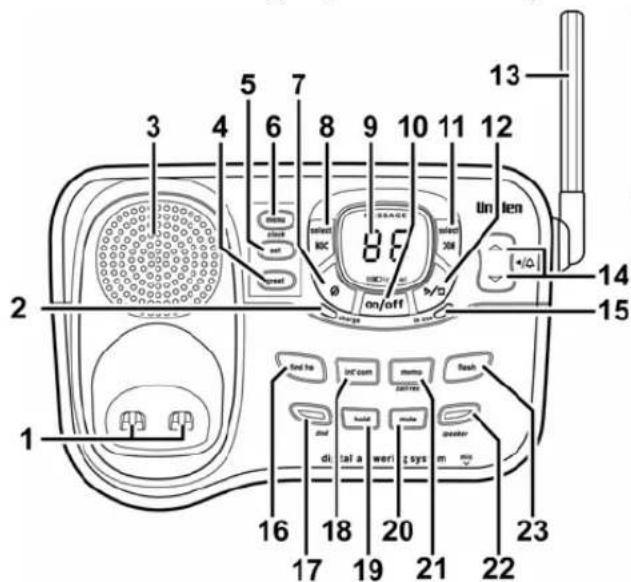
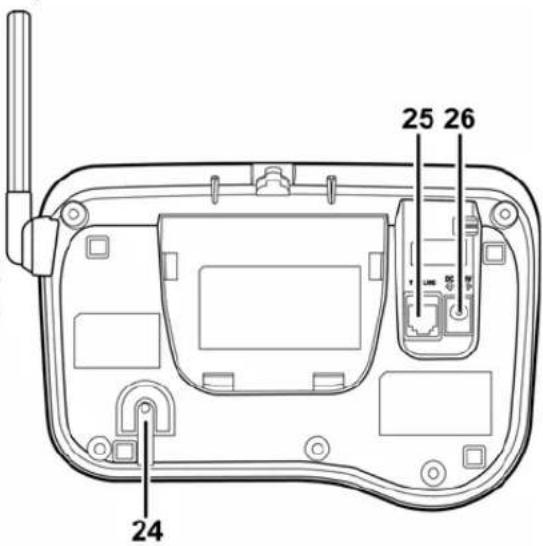
- Base charging contacts
- charge LED
- Base speaker
- [greet] key (record greeting)
- [set] key
- [menu/clock] key
-
[■] key (delete)
-
[OK/select] key (repeat/select)
- Message counter LED
- [on/off] key
(answering system on/off) - [×/select] key (skip/select)
- [▶] key (play/stop)
- Base antenna
14 [ /ke] (volume
up/down for speaker/ringer)
15. in use LED
16. [find hs] key (find handset)
17. [dnd] key (do not disturb)
18. [int'com] key (intercom)
- [hold] key
- [mute] key
- [memo/call rec] key
- [speaker] key
- [flash] key
- Base microphone
- TEL LINE phone jack
- DC IN 9V power jack
Parts of the Answering System/Dual-keypad Base (DCT7585/DCT7085)
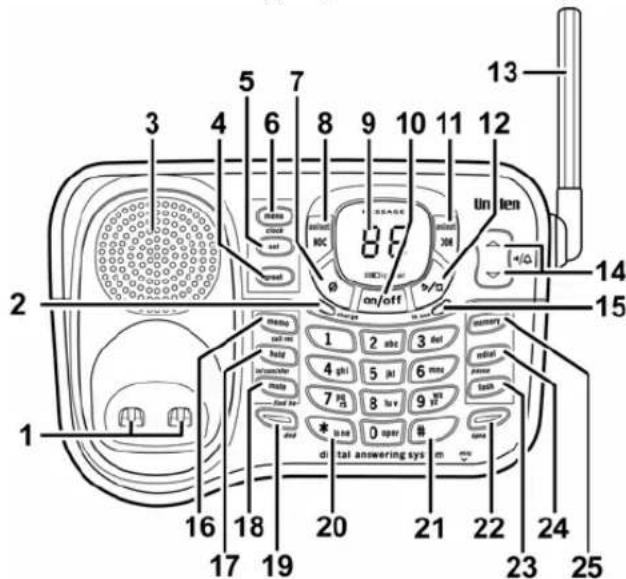
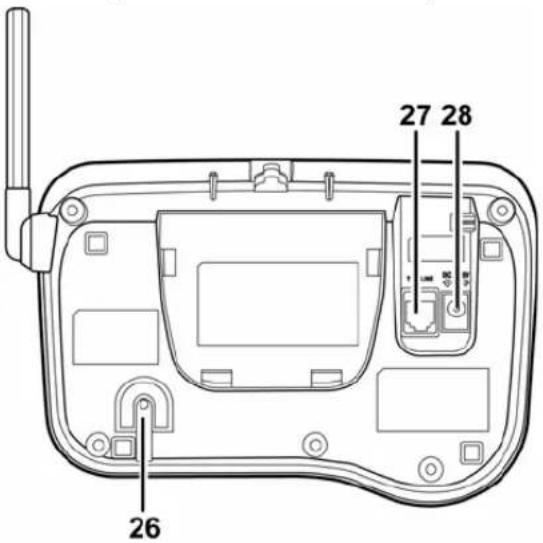
- Base charging contacts9. Message counter LED
- charge LED
- Base speaker
- [greet] key (record greeting)
- [set] key
- [menu/clock] key
- [■] key (delete)
- [/select] key (repeat/select)
- [on/off] key (answering system on/off)
- [elect] key (skip/select)
- [▶] key (play/stop)
-
Base antenna
14 [▲key (volume up/down for speaker/ringer) -
in use LED
-
[memo/call rec] key
-
[hold/int'com/xfer] key (hold/intercom/ transfer)
-
[mute/find hs] key (mute/ find handset)
-
[dnd] key (do not disturb)
-
[*/tone] key
-
[#] key (pound)
-
[speaker] key
-
[flash] key
24 [redial/pause] key
25 [memory] key
-
Base microphone
-
TEL LINE phone jack
-
DC IN 9V power jack
Using the Interface
Reading the Display
The handset display uses icons to tell you the status of your phone. The table below lists the icons and what they mean.
| Icon | Status | Description |
 | Standby/Talk | Thebatteryicon indicates the handset battery status: full, medium, low, and empty. |
 | Standby | Theringer officon indicates that the ringer is turned off. |
| [Control] | Talk | Themuteicon appears while the handset microphone is muted. |
| [Control] | Talk | Thecall recordicon appears while recording a conversation. |
| [Control] | Talk | Theboosticon appears when the Clarity Boost feature is activated. |
 | Talk | Thespeakericon appears when the handset speaker phone is in use. |
| [Control] | Talk | Theprivacyicon appears when the Privacy Mode is turned on. |
The Standby Screen
When the phone is in standby, the handset display shows the following items:
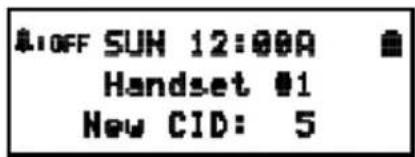
← Ringer status / Day and time / Battery status
← Handset banner
← Number of new Caller ID messages received
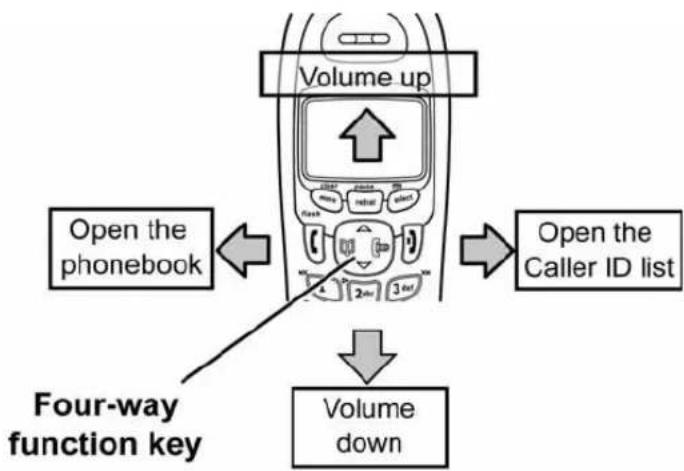
Using the Four-way Function Key
Your handset has a four-way function key that allows you to move the cursor or pointer on the display and access the most commonly used features at the touch of a button. By moving this key to the left, you open the phonebook. Move the key to the right to access Caller ID information. To use this four-way key, place your thumb over the key on the handset and move to the four positions to get the feel of how it moves and operates.
Using the Handset Menus
To open the menu, press [menu/clear]. Select the option you want by pressing the four-way function key. This will move the cursor; the option currently selected has a triangle beside it. Activate the selected option by pressing [select/To exit the menu and return to standby, press []].
flowchart
graph TD
    A["Open the phonebook"] --> B["Volume up"]
    B --> C["Open the Caller ID list"]
    D["Four-way function key"] --> E["Volume down"]
If you do not press a key within 30 seconds, the phone will time out and exit the menu. When setting the day and time, the time-out period is extended to two minutes.
Entering Text from Your Handset
You can use the number keypad on your phone to enter text by referring to the letters printed on each number key. When you press the number key in a text entry field, the phone displays the first letter printed on the number key. Press the number key twice to display the second letter and three times to display the third. Capital letters are displayed first, then lower case letters, then the number on the key.
If two letters in a row use the same number key, enter the first letter, then use [#/>] to move the cursor to the next position to enter the second letter. For example, to enter the word "Movies":
- Press [6] once to enter M.
- Use [#/>] to move the cursor to the right.
- Press [6] six times to enter o.
- Press [8] six times to enter v.
- Press [4] six times to enter i.
- Press [3] five times to enter e.
- Press [7] eight times to enter s.
- Press [select/120] end your text entry.
| Number of times key is pressed | |||||||||
| keys | 1 | 2 | 3 | 4 | 5 | 6 | 7 | 8 | 9 |
| 1 | 1 | ||||||||
| 2 abc | A | B | C | a | b | c | 2 | ||
| 3 def | D | E | F | d | e | f | 3 | ||
| 4 ghi | G | H | I | g | h | i | 4 | ||
| 5 jkl | J | K | L | j | k | l | 5 | ||
| 6 mno | M | N | O | m | n | o | 6 | ||
| 7 pqrs | P | Q | R | S | P | q | r | s | ? |
| 8 tuv | T | U | V | t | u | v | 8 | ||
| 9 wxyz | W | X | Y | Z | w | x | y | z | 9 |
| 0 oper | & | ( ) | < | > | / | (blank) | - | - | |
| , | , | : | ? | ! | @ | , | " | * | |
| # | ∅ | ||||||||
If you make a mistake while entering a name, use [*/tone/<] or [#/>] to move
the cursor to the incorrect character. Press [menu/clear] to erase the wrong character, and then enter the correct character. To delete all characters, press and hold [menu/clear].
Installing the Phone
Choosing the Best Location
When choosing a location for your new phone, here are some important guidelines you should consider:
• The location should be close to both a phone jack and a power outlet that is not controlled by a wall switch.
- The base and handset should be kept away from sources of electrical noise such as motors, microwave ovens, and fluorescent lighting.
- Don't place the base in direct sunlight or subject it to high temperatures. The battery may not charge properly.
- For better reception, place the base as high as possible.
• The base should be placed in an open area for optimum range and reception.
- If your home has specially wired alarm equipment connected to a phone line, be sure that installing the system does not disable your alarm equipment. If you have questions about what will disable alarm equipment, contact your telephone company or a qualified installer.
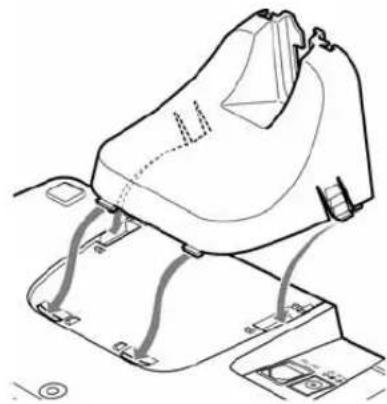
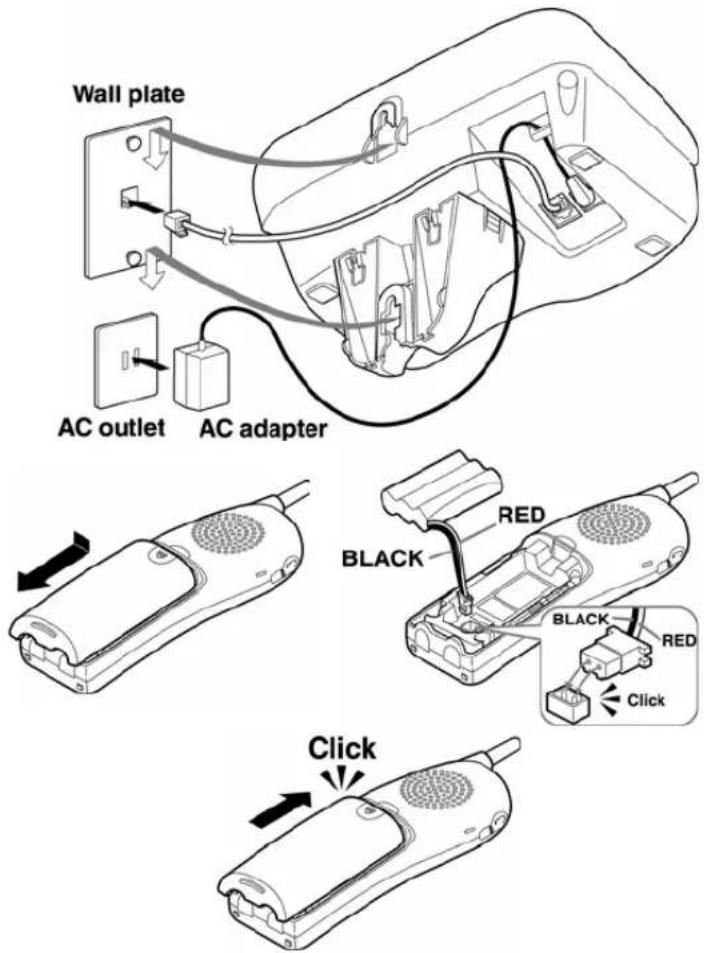
Wall Mounting the Base
This phone can be mounted on any standard wall plate.
- Snap the wall mount adapter into the notches on the base top.
- Plug the AC adapter into the DC IN 9V jack.
CAUTION: To avoid risk of fire and shock, only use the Uniden AD-800 AC adapter. - Wrap the AC adapter cord inside the molded wiring channel as shown.
- Plug the AC adapter into a standard 120V AC wall outlet. DO NOT use an AC outlet controlled by a wall switch.
natural_image
Line drawing of a mechanical device with attached components (no text or symbols)- Plug the telephone line cord into the TEL LINE jack.
- Plug the telephone cord into the telephone jack.
- Align the mounting slots on the base with the mounting posts on the wall. Then push in and down until the phone is firmly seated.
Installing the Battery
Follow the steps below to install the handset battery.
- Press in on the handset battery case cover (use the finger indentation for a better grip) and slide the cover downward to remove.
- Place the battery pack in the battery compartment with the connectors on the battery and on the compartment aligned.
- Place the battery case cover back on the handset and slide it upwards until it clicks into place.
Note: Use only the Uniden BT-909 rechargeable battery pack supplied with your cordless telephone.
Connecting the Base and Charging the Handset
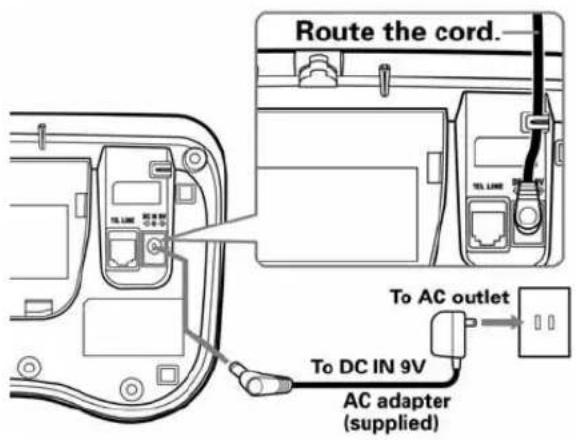
- Connect the AC adapter to the DC IN 9V jack.
CAUTION: To avoid risk of fire and shock, only use the Uniden AD-800 AC adapter.
- Connect the AC adapter to a standard 120V AC wall outlet. DO NOT use an AC outlet controlled by a wall switch.
- Place the handset in the base with the LCD screen facing forward.
- Make sure that the charge LED illuminates. If the LED does not illuminate, check to see that the AC adapter is plugged in and the handset makes good contact with the charging contacts.
- Charge your handset at least 15 to 20 hours before plugging into the phone line.
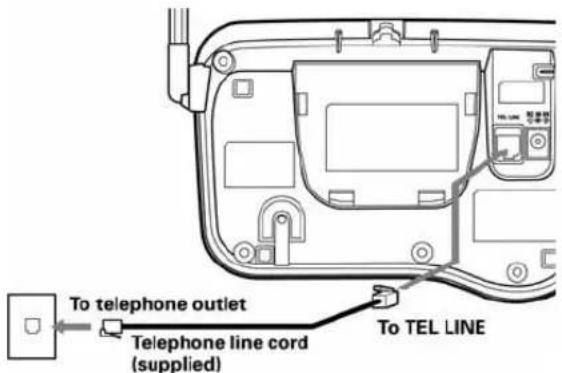
Connecting to the Phone Line
Once the battery pack is fully charged, connect the telephone cord to the TEL LINE jack and to a telephone jack.
Testing the Connection
Try making a call. If your call does not connect or you cannot get a dial tone, try the following steps:
- Make sure the AC adapter cord is securely connected to the DC IN 9V jack and a standard power outlet.
- Check to make sure the battery is fully charged. (If you don't see the "battery full" icon, check to make sure the battery is properly connected).
- Change the dial mode (instructions below).
Changing the Dial Mode
Your phone can communicate with the telephone network in two different ways: tone dialing or pulse dialing. These days, most phone networks use a method called tone dialing, so your phone comes programmed for tone dialing. If your phone company uses pulse dialing, you will need to change your phone's dial mode. If you don't get a dial tone or can't connect to the telephone network, please follow the steps below to modify your phone's settings:
-
Press [menu/clear]. Select the GLOBAL SETUP menu, and then the DIAL MODE submenu.
-
Scroll [♥] to select PULSE.
-
Press [select/You will hear a confirmation tone.
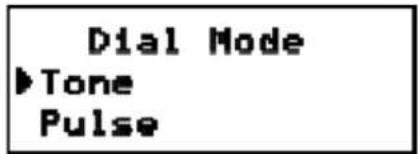
If you ever need to change the dial mode back to tone dialing, follow the same procedure, but select TONE in step 2.
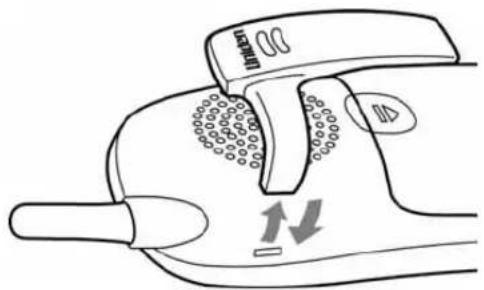
Installing the Belt Clip
Line up the holes on each side of the handset. To attach the belt clip, insert into the holes on each side of the handset. Press down until it clicks.
To remove the belt clip, pull either side of the belt clip to release the tabs from the holes.
Basic Setup
Selecting a Language
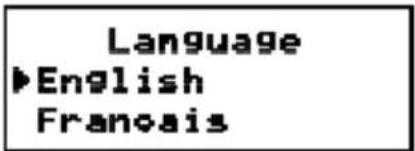
Your phone supports three languages: English, French and Spanish. Once you select a language, the menus on the handset will display in that language. The default language is English.
- Press [menu/clear]. Select the HANDSET SETUP menu, and then the LANGUAGE submenu.
- Move the cursor to choose ENGLISH, FRANÇAIS (French), or ESPAÑOL (Spanish).
- Press [select/☐]. You will hear a confirmation tone.
Setting the Day and Time
To change the day and time shown in the display, follow the steps listed below.
Note: If you don't press any keys for two minutes when setting the day and time, the phone will exit the menu.
- Press [menu/clear]. Select the GLOBAL SETUP menu, and then the DAY & TIME submenu option.
- Move the cursor to select the day of the week, and then press [select/□]
![Day & Time SUN 12:00 AM [↑/↓/SELECT]](/content/2026/06/1190155/images/096309b0fbb75bd5caf746cf02200222f02b6f534720547fde6d69b0bede85c5.jpg)
-
Move the cursor to set the hour, and then press [select/].
-
Move the cursor to set the minute, and then press [select/].
-
Move the cursor to choose AM or PM, and then press [select/☐]. You will hear a confirmation tone.
Activating Caller ID on Call Waiting and Call Waiting Deluxe
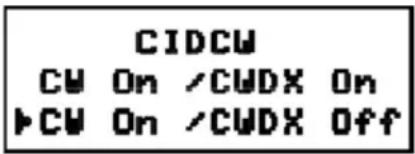
Your phone supports Caller ID on Call Waiting (CIDCW), so you can see the name and number of someone who calls when you're already on the line. Your phone also supports Call Waiting Deluxe (CWDX), which gives you a choice of how you want to handle a waiting call. You'll need to subscribe to these features with your phone company before you can use them. To let your phone support these features, follow the steps below:
- Press [menu/clear]. Select the GLOBAL SETUP menu, and then the CIDCW submenu.
- Move the cursor to select CW (Call Waiting) ON/CWDX (Call Waiting Deluxe) ON, CW ON/CWDX OFF, or CW OFF/CWDX OFF.
- Press [select/You will hear a confirmation tone.
See Using Call Waiting Deluxe on page 33 for instructions on using Call Waiting Deluxe.
Activating Personal Ring
You can assign special ringer tones to anyone in your phonebook. When your phone gets a call, it looks up the Caller ID information in your phonebook. If you've assigned a personal ringer to that number, the phone uses it so you know who is calling. To turn on personal ringing, follow these steps:
- Press [menu/clear]. Select the HANDSET SETUP menu, and then the PERSONAL RING submenu.
- Move the cursor to select ON or OFF.
- Press [select/☐]. You will hear a confirmation tone.
Activating the Key Touch Tone
Key Touch Tone is the tone your keypad makes when keys are pressed. You can turn this tone on or off.
-
Press [menu/clear]. Select the HANDSET SETUP menu, and then the KEY TOUCH TONE submenu.
-
Move the cursor to select ON or OFF.
- Press [select/You will hear a confirmation tone.
Adding Accessory Handsets
Your phone supports up to four handsets, including any handsets supplied with your phone. accessory handsets do not need to be connected to a phone jack. You can now place a fully-featured cordless handset anywhere AC power is available to connect the handset charger. All the handsets ring when a call is received.
Compatible Handsets
Your phone is compatible with the following Uniden 2.4 GHz Digital Accessory Handsets: DCX640, DCX700, and DCX750. (Please visit our website at www.uniden.com for the most up-to-date list of compatible handsets. If you purchase an accessory handset, you must register the handset to the base before use. Accessory handsets will not operate until they are registered.
natural_image
Exterior view of a silver and silver mobile phone with a small dome-shaped base (no visible text or symbols)DCX640

natural_image
Front view of a silver and white mobile phone with a digital display and antenna (no visible text or symbols)DCX700

natural_image
Front view of a silver and black mobile phone with a red antenna and control panel (no visible text or symbols)DCX750
Charging Accessory Handsets
The handset is powered by a rechargeable battery pack. The battery recharges automatically when the handset is placed in the charger.
-
Connect the AC adapter to the DC IN 9V jack and to a 120V AC outlet that is not controlled by a wall switch. Caution: Use only the Uniden AD-0005 adapter.
-
Set the charger on a desk or tabletop, and place the handset in the charger with the keypad facing forward.
-
Make sure that the charge LED illuminates. If the LED does not illuminate, check to see that the AC adapter is plugged in and the handset makes good contact with the base charging contacts.
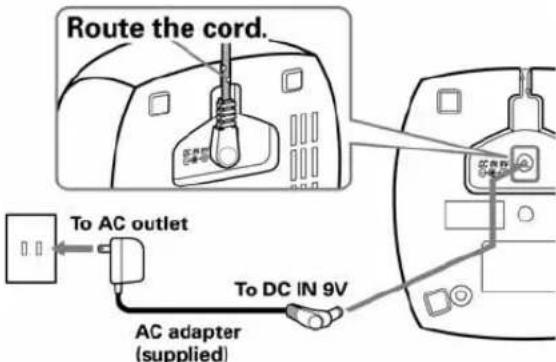
- Charge the handset battery pack for at least 15-20 hours before using your new cordless telephone for the first time.
Registering Accessory Handsets
If you purchase an accessory handset, you need to register the handset before use. Only one handset can be registered at a time. Handsets supplied with the phone are registered to the base by the factory. When charged, pre-registered handsets display a handset ID number. Handsets that have not been registered display MODELS VARY! CHARGE HANDSET ON THE BASE FOR REGISTRATION OR REFER TO OWNER'S MANUAL. (If an accessory handset has ever been registered to a base, you must reset the handset before you can register it to a new base. See Resetting Handsets on page 21.)
When you register an accessory handset to the base, the handset ID will be assigned.
Note: Before registering any accessory handsets, make sure the accessory handset's battery is fully charged.
Registering DCX750 Handsets
To register DCX750 handsets, simply place the accessory handset in the base. While the handset is registering, HANDSET REGISTERING will appear in the LCD. When REGISTRATION COMPLETE is displayed, the handset has been registered to the base. If REGISTRATION FAILED appears, remove the handset from the base and try again.
Registering DCX640 or DCX700 Handsets
- On the base, press and hold [flash] until the CHARGE LED starts to blink.
- On the handset, press and hold [#/] until you hear a beep.
- While the handset is registering, HANDSET REGISTERING appears in the display. When the display shows REGISTRATION COMPLETE, the handset has been registered to the base. If REGISTRATION FAILED appears, please try these steps again.
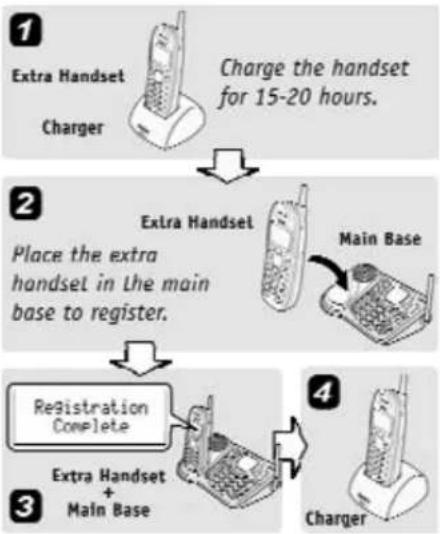
flowchart
graph TD
    A["Charge the handset for 15-20 hours."] --> B["Extra Handset Charger"]
    B --> C["Place the extra handset in the main base to register."]
    C --> D["Registration Complete"]
    D --> E["Extra Handset + Main Base"]
    E --> F["Charger"]
Resetting Handsets
If you want to register the handset to a different base or replace a handset with another one, you must first clear the registration information from the base and the handset.
- Press and hold [ ] and [#/>] for at least 5 seconds, until the SYSTEM RESET menu appears.
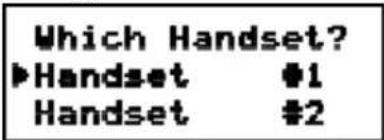
- Select the DEREGISTER HS submenu. WHICH HANDSET? appears in the display.
-
Use [▲] and [▼] to select the handset ID you want to de-register, and then press [select/■]. DEREGISTER HS appears.
-
When the phone asks you to confirm, move the cursor to select YES, and then press [select/ ☐]. You will hear a confirmation tone.
Note: The handset first clears it registration information from the base and then deletes the link to the base from its own memory. The handset will now display MODELS VARY! CHARGE HANDSET ON THE BASE FOR REGISTRATION OR REFER TO OWNER'S MANUAL. If the handset cannot contact the base, it will display UNAVAILABLE. If this happens, see Resetting the Handset Without the Base on page 60. For instructions on registering the handset, see page 20.
Setting Up the Phonebook
Your handset can store up to 100 names and numbers in your phonebook. Your phone shares memory between your phonebook and Caller ID entries. Once you store 100 phonebook entries, Caller ID information will not be stored and will only display at time of new incoming call. When all the phonebook entries are full, you will hear a beep and MEMORY FULL appears. You cannot store any additional names and numbers unless you delete some of the existing ones.
You can also use the phonebook entries or speed dial memory to store a group of numbers (up to 20 digits) that you may need to enter once your call connects. This is referred to as chain dialing.
Creating Phonebook Entries
To store names and numbers in your phonebook, please follow these steps:
- When the phone is in standby mode, press [ ]
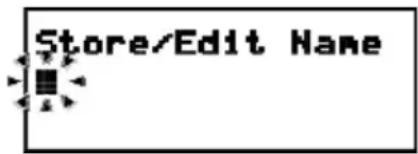
- To create a new phonebook entry, move the cursor to select STORE NEW, and press [select/√]. STORE/EDIT NAME appears.
- Enter the name for this entry (STORE/EDIT NAME).
Use the keypad to enter a name for this entry; the name can contain up to 16 characters. (See Entering Text from Your Handset on page 12 for
instructions on entering text.) If you do not want to enter a name for this entry, your phone will store this entry as
- Enter the number for this entry (STORE/EDIT NO.).
Once you have stored a name, STORE/EDIT NO. appears next. Use the number keypad to enter the phone number; the phone number can contain up to 20 digits. If you need the phone to pause between digits when it's dialing (for example, to enter an extension or an access code), press [redial/pause] to insert a two-second pause. You will see a P in the display. You can also use more than one pause together if two seconds counts as one digit.
Store/Edit No. 0007303456
- Assign a personal ring tone for this entry (PERSONAL RING).
You can attach a special ring tone to each phonebook entry; the phone will use this ring tone when this person calls. Use [▲] and [▼] to select one of the 20 different ring tone options (see Selecting a Ring Tone (Handset Only) on page 28 for a complete list of ring tones). As you scroll through the tones, you will hear a sample of each tone. When
Personal Ring ▶ No Selectn Flicker
you hear the ring tone you want to use, press [select/☑]. If you do not want to use a personal ring tone for this phonebook entry, choose NO SELECTN; the phone will use your standard ring tone setting.
- Assign this entry to a Speed Dial number (SPEED DIAL).
Your handset has 10 speed dial numbers, [0] to [9]. Use [▲] and [▼] to select the speed dial number you want to assign to this phonebook entry, and press [select/▼]. Choose NO SELECTN if you do not want to assign this entry to a speed dial number. If the speed dial number is already assigned to a phonebook entry, your phone will overwrite the assigned speed dial information.
Speed Dial
No Selectn
SPDI:
- You will hear a tone confirming that the new entry has been stored, and DONE! appears in the display.
Finding a Phonebook Entry
Press [ ] to open the phonebook, and then select DIAL/EDIT. Phonebook entries are stored in alphabetical order. To scroll through the phonebook from A to Z, press [ ] . To scroll trough the phonebook from Z to A press [ ]
You can also use the letters on the number keys to jump to a name that starts with that letter. Press a number key ([2] through [0]) once for the first letter, twice for the second letter, and so on. The phonebook jumps to the first entry that begins with the letter you entered; you can then use [▲] and [▼] to scroll to other entries. For example, to search for an entry beginning with the letter M, press 6 once.
To close the phonebook, press [1]. During a call, press [0] again instead of [1] to close the phonebook.
Editing an Existing Phonebook Entry
- With the phone in standby, press [m] to open the phonebook.
- Select DIAL/EDIT.
- Find the entry you want to edit and press [select/ 📋].
- Follow the steps for Creating Phonebook Entries on page 22. If you do not wish to change the information at any step, simply press [select/☐] to go to the next step.
Storing Caller ID or Redial Numbers in the Phonebook
You can store Caller ID records or redial numbers in the phonebook so you can use them later. Go to the Caller ID or redial list and select the number you want to store. (If the Caller ID information did not include the number, then you will not be able to store it.)
- When the phone is in standby, press [ ] to open the Caller ID list or [redial/pause] to open the redial list.
-
Use [▲] and [▼] to scroll through the Caller ID records or redial numbers. When you come to the information you want to store, press [select/▼]. STORE/EDIT NAME appears.
-
If the phone number is already stored in memory, you will hear a beep, and THIS DATA IS ALREADY STORED!! appears in the display. The number will not be stored.
Continue by following the steps for Creating Phonebook Entries on page 22.
Deleting Phonebook Entries
You can delete individual phonebook entries or delete all the phonebook entries at once.
- When the phone is in standby, press [ ]
- To delete a single phonebook entry, move the cursor to select DIAL/EDIT, and then press [select/☑].
- Find the phonebook entry you want to delete and press [menu/clear].
- DELETE MEMORY? appears in the display. Select YES, and then press [select/
- You will hear a confirmation tone, and DELETED! appears in the display.
Deleting all the phonebook entries at once
- When the phone is in standby, press [ ]
- Move the cursor to select DELETE ALL, and press [select/ ] .
- DELETE ALL appears in the display. Select YES and then press [select/ ]. You will hear a confirmation tone, and DELETED! appears in the display.
Copying Phonebook Entries to Another Handset
If you have more than one handset, you can transfer phonebook entries from one handset to another without having to re-enter names and numbers. You can transfer one phonebook entry at a time or all phonebook entries at once.
- When the phone is in standby, press [W].
Phonebook : 50 Copy ►Delete All
- Move the cursor to select COPY, and then press [select/].
- Move the cursor to select the handset which you want to transfer the entries to and then press [select/].
- Move the cursor to select ONE MEMORY or ALL MEMORY, and then press [select/
- If you select ALL MEMORY, ARE YOU SURE? appears on the display screen. Move the cursor to select YES, and then press [select/].
- If you select ONE MEMORY, find the phonebook entry you want to transfer and then press [select/☐].
- The phonebook entries will be transferred to the designated handset. During the copy process, the receiving handset shows RECEIVING and the banner of the sending handset.
- When the transfer is completed, DONE! appears on the handset.
Copy Phonebook One Memory All Memory :xxx
Note: If your phonebook contains 100 entries, you cannot store any new phonebook entries. You will hear a beep, and MEMORY FULL appears on the display. If the selected handset is out of range or data transfer is canceled, UNAVAILABLE appears in the display. Phonebook listings will not be transferred.
Programming Base Speed Dial Numbers (Dual Keypad Model Only)
The dual keypad base can store 10 speed dial numbers, [0] to [9]. Follow the steps below to store new speed dial numbers in the base. (Handset speed dial numbers are stored as part of a phonebook entry. See Creating Phonebook Entries on page 22 for information on programming handset speed dial numbers.)
- With the phone in standby, press [memory].
- Use the number keypad to enter the phone number; the phone number can contain up to 20 digits. If you need the phone to pause between digits when it's dialing (for example, to enter an extension or an access code),
press [redial/pause] to insert a two-second pause. You can also use more than one pause together if two seconds is not long enough. Each pause counts as one digit.
- Press [memory] again, and then press the number key ([0] to [9]) where you want to store this phone number. You will hear a confirmation tone.
Deleting Base Speed Dial Numbers
- With the phone in standby, press [memory] twice.
- Press the number key ([0] to [9]) that contains the phone number you want to delete. You will hear a confirmation tone.
Customizing Your Phone
Changing the Handset Banner
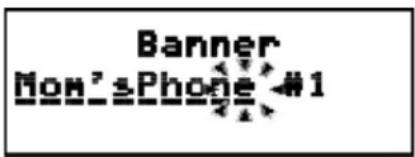
Each handset will display a banner name once it is registered to the base. The default banner is Handset #1, Handset #2, etc. You can change the name your phone displays by changing the banner display. If you have more than one handset, the banner name identifies your handset during handset-to-handset functions like intercom and DirectLink™ communication. The name will be displayed on the LCD screen during Standby, Intercom, Intercom Hold, Room/Baby Monitor, and Copy Phonebook operations. The banner name will be displayed on the receiving handset as well.
- Press [menu/clear].
- Select the HANDSET SETUP menu, and then the BANNER submenu.
- Use the keypad to enter or edit the banner name. (See Entering Text from Your Handset on page 12 for detailed instructions on entering text.)
- Press [select/☐]. You will hear a confirmation tone.
Selecting a Ring Tone (Handset Only)
You may choose from 10 melodies or 10 tones for your phone's primary ring tone. Each station can use a different ringer tone or melody. The available ring tones are listed below:
Melodies
| Beethoven's Symphony #9 (BEETHOVEN9) | When Irish Eyes Are Smiling (IRISH EYES) |
| For Elise (ELISE) | Aura Lee (AURA LEE) |
| We Wish You A Merry Christmas (MERRY- XMAS) | Let Me Call You Sweet Heart (SWEETHEART) |
| Home Sweet Home (HM SWT HM) | Star Spangled Banner (STAR SPNGL) |
| Lorri Song #6 (LORRI SONG) | Old MacDonald (OLD MACDLD) |
Ringers
| Flicker | Beep Boop |
| Clatter | Tone Board |
| Soft Alert | Chip Chop |
| Wake Up | Party Clap |
| Light Bug | Reminder |
- Press [menu/clear]. Select the HANDSET SETUP menu, and then the RINGER TONES submenu.
- Move the cursor to select a ring tone. As each ring tone is selected, you will hear a sample of the ring tone.
- When you hear the tone you want to use, press [select/☐]. You will hear a confirmation tone.
Ringer Tones ▶ Flicker Clatter
Activating AutoTalk (Handset only)
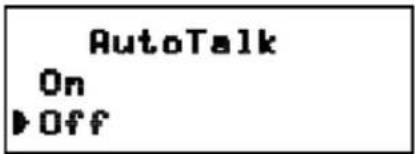
AutoTalk allows you to answer the phone simply by removing the handset from the cradle. You do not have to press any buttons to answer the call.
- Press [menu/clear].
- Select the HANDSET SETUP menu, and then the AUTOTALK submenu.
- Select ONor OFF, and press [select/☑]. You will hear a confirmation tone.
Activating Any Key Answer (Handset only)
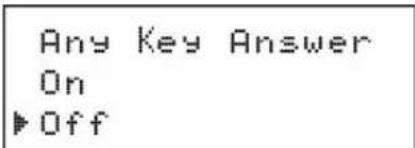
Any Key Answer allows you to answer the phone by pressing any key in the twelve-keypad.
- Press [menu/clear].
- Select the HANDSET SETUP menu, and then the ANY KEY ANSWER submenu.
- Select ONor OFF, and then press [select/☐]. You will hear a confirmation tone.
Using Your Phone
| From a cordless handset | From a handset speaker phone | From the base speaker phone | |
| Making a call | 1. Remove the handset from the charging cradle.2. Press [/flash].3. Listen for the dial tone.4. Dial the number.OR1. Remove the handset from the charging cradle.2. Dial the number.3. Press [/flash]. | 1. Remove the handset from the charging cradle.2. Press [■].3. Listen for the dial tone.4. Dial the number.OR1. Remove the handset from the charging cradle.2. Dial the number.3. Press [■]. | (Dual Keypad Model Only)1. Press [ speaker] .2. Listen for the dial tone.3. Dial the number. |
| Answering a call | 1. Pick up the handset. (If AutoTalk is on, the phone will answer when you remove the handset from the charging cradle.2. Press [/flash]. (If Any Key Answer is on, you can also press any key on the twelve-number keypad.) | 1. Pick up the handset. (If AutoTalk is on, the phone will answer when you remove the handset from the charging cradle.2. Press [■]. | Press [ speaker] . |
| Hanging up | Press [ ] or return the handset to the cradle. | Press [ ] or return the handset to the cradle. | Press [ speaker] . |
Making a Call from the Phonebook
- When the phone is in standby, press [10] to open the phonebook.
- Move the cursor to select DIAL/EDIT, and then press [select/☐].
- Find the phonebook entry you want to call (see Finding a Phonebook Entry on page 24).
- Press [/flash] or [■] to dial the number.
Note: You can also press [/flash] or [■] before you open the phonebook.
Making a Call with Handset Speed Dial
- When the phone is in standby, press and hold one of the number keys ([0] through [9]) until the assigned phonebook entry appears in the display.
- Press [/flash] or [■] to dial the number.
Making a Call with Base Speed Dial (Dual-keypad Base Only)
- When the phone is in standby, press [speaker].
- Press [memory].
- Press the number key ([0] through [9]) where the desired phone number is stored. The phone dials the programmed number.
Switching to the Handset Speakerphone During a Call
To switch a normal call to the speakerphone, press [1] on the handset. To switch from a speakerphone call to a normal call, press [1].
Using Caller ID and Call Waiting
If you subscribe to Caller ID from your phone company, your phone will show you the caller's phone number and name (if available) whenever a call comes in. If you subscribe to both Call Waiting and Caller ID, the phone also shows you the name and the number of any call that comes in while you're on the line.
If your telephone provider supports seven-digit dialing, you can save your local area code so it does not display in the Caller ID list. See Seven-Digit Dialing on page 39 for more information.
Using the Caller ID List
You can store up to 100 Caller ID numbers in each handset. Your phone shares memory between your Phonebook and Caller ID entries. Once you reach your maximum phonebook entries of 100, Caller ID information will not be stored (but it will still display when the call comes in).
To open the Caller ID list, press [ ] (on the right side of the four-way key). The phone will show the number of new Caller ID records and the total number of stored records. Use [ ] and [▼] to scroll through the list, or enter a letter on the keypad to jump to the first Caller ID name that starts with that letter.
Making a Call from a Caller ID Record
- When the phone is in standby, press [ ] to open the Caller ID list.
- Use [▲] and [▼] to find the Caller ID record you want to dial.
- To add (or delete) a "1" to the beginning of the displayed phone number, press [*/tone/<].
- Press [ / flash] or [ ▶ ] to dial the number.
Note: You can also press [ /flash] or [ ] before you open the Caller ID list.
Deleting Caller ID Numbers
To delete all the Caller ID numbers, press [ ] and then [menu/clear]. Select YES when asked if you want to DELETE ALL. You will hear a confirmation tone. When you delete a Caller ID number, you delete it permanently.
To permanently delete only one Caller ID number, go to the Caller ID list and select the number you want to delete. Press [menu/clear]. When the phone asks you to confirm, select YES. You will hear a confirmation tone.
Using Call Waiting
If you have Call Waiting service and a second call comes in when you are on the phone, a call waiting tone will sound. Press [/flash] on the handset or [flash] on the base to accept the waiting call. There is a short pause, and then you will hear the new caller. To return to the original caller, press [/flash] or [flash].
Note: You must subscribe through your telephone provider to receive Call Waiting services. Not all features are available in all areas.
Using Call Waiting Deluxe
Your handset gives you new options for Call Waiting Deluxe. At the touch of a button, you can place the caller on hold, send them to your voice mail service, or conference them into your current call. You must subscribe to both Call Waiting and Call Waiting Deluxe to use these features. Check with your telephone provider for details.
- When you receive a call waiting call, press [menu/clear].
- Move the cursor to select CW Deluxe, and then press [select/ □].
-
Move the cursor or use the number keypad ([1] through [7]) to select an option:
-
Ask to Hold – A prerecorded message states that user will be available shortly, and the call is place on hold.
- Tell Busy - A prerecorded message tells the caller you are busy, and the waiting call is disconnected.
- Forward Call - The caller is sent to your voice mail box, if available.
-
Answer/Drop 1 - Disconnects the first call, and connects to the new caller.
-
Conference - Starts a conference call with your first and second callers.
- Drop First/Drop Last - During a conference call, allows you to choose to drop the first or last caller.
- Press [select]. A confirmation screen will appear, and the phone returns to the call.
Redialing a Number
You can quickly redial the last 3 numbers dialed on each handset or the last number dialed on the dual-keypad base.
| From the dual-keypad base | From the handset |
| 1. Press [speaker].2. Then press[redial/pause]. | 1. With the phone in standby, press [redial/pause] to open the redial list.2. Use [redial/pause] or [◀] and [▼] to scroll through the redial list.3. When you find the number you want to dial, press [ /flash] or [ ▶]. |
Note: You can also redial the last number dialed on the handset by pressing [ / flash] or [ , and then [redial/pause].
Deleting a Redial Record
If you want to delete a phone number from the handset's redial list, follow the steps below:
- With the phone in standby, press [redial/pause].
- Use [▲] and [▼] to scroll through the redial list.
- When you find the redial number you want to delete, press [menu/clear].
- Select YES, and press [select/ or [menu/clear]. The redial number is deleted.
Adjusting the Ringer, Earpiece and Speaker Volume
Adjusting the Ringer Volume
You can choose from three ringer volume settings on the handset (off, low, and high) and four options (off, low, medium, and high) on the base. With the phone in standby, use [▲] or [▼] to adjust the ringer volume.
Adjusting the Earpiece Volume
You can choose from six volume levels for the earpiece. To adjust the earpiece volume while on a call, press [▲] (to make it louder) or [▼] (to make it softer).
Adjusting the Speaker Volume
Handset Speakerphone: You can choose from six volume levels for the handset speakerphone. To adjust the speaker volume while on a call, press [▲] (to make it louder) or [ ] to make it softer).
Base Speakerphone: You can choose from ten volume levels for the base speakerphone. To adjust the speaker volume while on a call, press [▲] (to make it louder) or [▼] (to make it softer).
Adjusting the Audio Tone
If you aren't satisfied with the audio quality of your phone, you can adjust the Audio Tone of the earpiece while on a call. Your phone gives you three audio tone options: low, natural and high; the default setting, Natural Tone, is recommended for hearing aid users. Audio tone adjustments only apply to the earpiece, not the speakerphone.
To adjust the audio tone:
- With the phone in talk mode, press [select/ 📋] to cycle through the three audio tone options.
- When the desired option appears on the display, stop.
- After two seconds, the displayed audio tone is set, and the display returns to normal.
Using the Clarity Boost Feature
If you encounter interference while using your phone, you can manually improve the sound by setting the clarity booster to on. This works only when the phone is in use, so while you are on a call:
- Press [menu/clear].
- Move the cursor to CLARITY BOOST, and then [select/]. BOOST ON and B appear in the display.
Use the same procedure to turn off clarity booster. BOOST OFF appears.
Finding a Lost Handset
To locate a misplaced handset, press [find hs] on the base (or [mute/find hs] on the dual-keypad base) when the phone is in standby. All registered handsets will beep for 60 seconds, and PAGING appears on the handset display. To cancel paging, press [find hs] ([mute/find hs]) again or any key on the found handset.
Using Hold, Conference and Transfer
Placing a Call on Hold
To place a caller on hold, press [xfer/intercom] on the handset, [hold] on the base, or [hold/int'com/xfer] on the dual-keypad base. If you leave a caller on hold for more than ten seconds, the display will read, LINE ON HOLD.
To return to the party on hold, press [ / flash] or [ ■ ] on a handset or [speaker] on the base.
Note: You can only place a caller on hold for 5 minutes. Once 5 minutes have passed, the caller will be disconnected and the phone will return to standby. While a call is on hold, Caller ID and Call Waiting can not be received.
Conferencing
If you have more than one handset, up to four people can participate in a conference call. A three-way conference call consists of an outside line and two stations. A four-way conference call consists of an outside line, the base speaker phone, and two handsets. You can easily join a call already in progress.
From the handset, press [/flash] or [■] to join the call. From the base, press [speaker]. You can hang up normally; the other station will still be connected to the call.
Transferring a Call
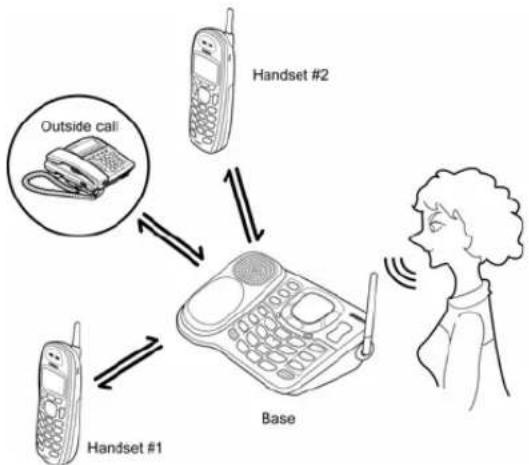
You can transfer a call from one station to another.
flowchart
graph TD
    A["Handset #1"] --> B["Base"]
    C["Handset #2"] --> B
    D["Outside call"] --> B
    B --> E["Signal transmission from Handset #1 to Base"]
| From the base From the handset | |
| 1. During a call, press [int'com]([hold/int'com/xfer] on the dual-keypad base).2. The call will automatically be placed on hold, and a paging tone sounds on all stations. (On the dual-keypad base, you can select the handset you want to talk with by pressing [1] through [4], or press [/tone] to page all registered handsets.) To cancel the transfer, press [speaker] or [int'com] ([hold/int'com/xfer]).3. When another station accepts the transferred call, you will be disconnected. If you want to rejoin the call, press [speaker] again. | 1. During a call, press [xfer/intercom].2. Use [▲] or [▼] to select the station you want to transfer the call to, then press [select/■].The call will automatically be placed on hold, and a paging tone sounds. To cancel the transfer, press [/flash] or [▼].3. When another station accepts the transferred call, you will be disconnected. If you want to rejoin the call, press [/flash] again or [▼]. |
Answering a Transferred Call
When a station receives a call transfer, it sounds a paging tone; handsets also show the ID of the station that is paging. To accept the call transfer:
- To answer the page and speak to the transferring station, press [flash] or [xfer/intercom] on the handset. On the base, press [speaker] or [int'com] ([hold/int'com/xfer] on the dual-keypad base)
- To accept the call and speak to the caller, press [ / flash] on the handset or [speaker] on the base.
- When you accept the transferred call, the transferring station will be disconnected.
Only the first station to answer the transfer page will be connected to the call. If the transfer page is not picked up within one minute, the operation will be canceled.
Using Special Features
Do Not Disturb (All Calls)
Do not disturb (DND) allows you to mute the ringer of all stations at once. With the phone in standby, press and hold [dnd] on the base. You will hear a confirmation tone and the dnd LED illuminates. To cancel, press [dnd] again. You can also mute the ringer tone while the phone is ringing by pressing [dnd] on the base.
Note: If the answering system is off, it will automatically turn on when you activate DND. If you turn the answering system off while DND is on, DND automatically turns off along with the answering system.
Muting the Ringer (One Call Only)
While the phone is ringing, press [ ] on the handset or [ ] on the base to mute the ringer for this call. The phone will ring again on the next call. (The handset must be off the cradle to mute the ringer.)
Muting the Microphone
Mute turns off the microphone so the caller can't hear you. This only works while you are on a call.
| From the base From the handset | |
| 1. Press [mute] ([mute/find hs] on the dual-keypad base). The speaker LED blinks while muting is on.2. To cancel muting, press [mute] or [mute/find hs] again. The speaker LED stops blinking. | 1. Press [menu/clear].2. Move the cursor to select MUTE and then press [select/ 📋]. MUTE ON and □ appear in the display; □ remains while muting is on.3. To cancel muting, repeat the procedure, MUTE OFF appears. |
Privacy Mode
If you don't want other stations to interrupt your call, turn on privacy mode. As long as your handset is in privacy mode, other stations can't join your call or make any calls of their own: their displays will show UNAVAILABLE.
- While on a call, press [menu/clear].
- Move the cursor to PRIVACY MODE, and then press [select/☑]. PRIVACY MODE ON and P appear in the display for 2 seconds; the icon remains in the display as long as privacy mode is on.
To turn privacy mode off, repeat the procedure listed above.
Seven-Digit Dialing
If you can make a local call by dialing only 7 digits (instead of 10), you can program your local area code in your phone. Calls that come from within your area code will show only the 7-digit phone number; calls from outside your area code will show all 10 digits. To enter an area code, follow the steps below:
- Press [menu/clear]. Select the GLOBAL SETUP menu, and then the AREA CODE submenu.
- Use the number keypad ([0] through [9]) to enter a 3-digit area code. If an area code has already been stored, it appears in the display. Press [menu/clear] to delete the stored code, and then enter a new one.
- Press [select]. You will hear a confirmation tone.
Using the DirectLink™ Communication Feature
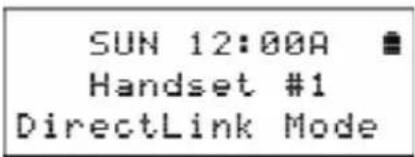
Using the DirectLink two-way communication feature, a pair of handsets can function as two-way radios. DirectLink communication does not interfere with the base's ability to make or receive telephone calls. You must set both handsets to use DirectLink communication before they can call each other. Other handsets can be used while two handsets are using DirectLink communication; however, the two handsets using DirectLink communication are not able to make or receive calls until the operation is canceled.
- Press [menu/clear] and move the cursor to the DIRECTLINK MODE menu.
- Press [select]. The display shows TO ENTER DIRECTLINK MODE PRESS [SELECT].
- Press [select]. You will hear a confirmation tone, and DIRECTLINK MODE COMPLETE appears in the display.
Making a DirectLink™ Call
- To call another handset with DirectLink communication, press [ / flash ]. The display shows TO DIRECTLINK A HANDSET PRESS [1-4].
- Press the number of the handset you want to call. If the handset is out of range or not set to DirectLink communication, the display shows UNAVAILABLE.
- To answer a DirectLink call, press [ /flash]. (If Any Key Answer is on you can also press any key on the twelve-key number pad.) To end the call, press [ ]
Exiting DirectLink™ Communication
While the handset is using DirectLink communication, the display shows DIRECTLINK MODE; this means the handset cannot make or receive normal phone calls. To exit DirectLink communication and return to normal standby, simply return the handset to the cradle, or press [menu/clear] followed by [select/]. DIRECTLINK MODE CANCEL appears in the display.
![To enter DirectLink mode press [SELECT]](/content/2026/06/1190155/images/a4aa5d90269f23a0d5e9bdf61fdb7339bcd485da501d28c1ac79d2dd553d985e.jpg)
![To DirectLink a handset press [1-4]](/content/2026/06/1190155/images/3c163c488b2ac46ea7974a44d047950c6cc0b6df35df07e8d1c2382545b3ad5d.jpg)
Using the Intercom
You can use the intercom to talk to another station without using the phone line.
Making an Intercom Page
| From the base From the handset | |
| 1. With the phone in standby, press [int'com] ([hold/int'com/xfer] on the dual-keypad base). All other stations will be paged. (On the dual-keypad base, press [1] through [4] to select the handset you want to talk with or press [*/tone] to page all other stations.)2. To cancel the intercom page, press [int'com] ([hold/int'com/xfer] on the dual-keypad base). | 1. With the phone in standby, press [xfer/intercom].2. Use [◀] or [ ] to select the station you want to talk with, then press [select/▼]. Select ALL to page all other stations.3. To cancel the intercom page, press [ ] . |
Note: Intercom paging will be canceled if any of the following things occur:
--You receive an outside call or an intercom page while selecting the other handset.
--You do not select a handset within 30 seconds.
--The party does not answer the page within one minute.
--The party is busy.
--The party is out of range (UNAVAILABLE appears in the display).
Answering an Intercom Page
When the intercom page tone sounds, the display will show the ID of the station that is paging.
- From the handset, press [/flash] or [xfer/intercom]. If AutoTalk is on, the handset will automatically answer the page when you remove the handset from the cradle.
- From the base, press [int'com] ([hold/int'com/xfer] on the dual-keypad base) or [speaker].
- To hang up an intercom page from the handset, press [1]. To hang up an intercom page from the base, press [int'com] ([hold/int'com/xfer] on the dual-keypad base).
Room/Baby Monitor
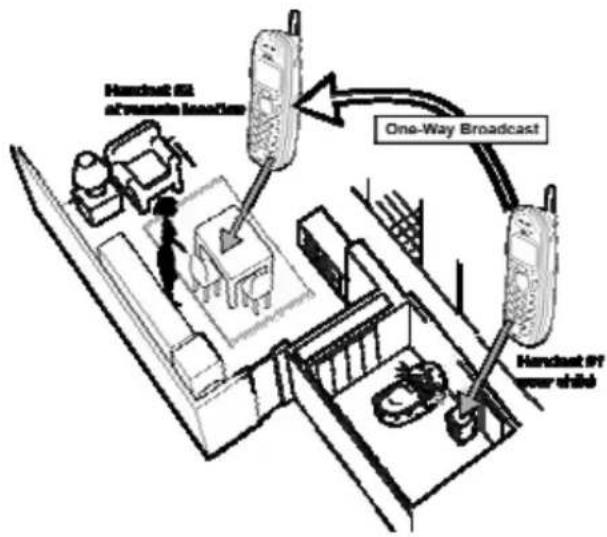
This feature allows you to monitor sounds in another room. Place a station in the room you wish to monitor; it will function as a microphone. Any handset can be set to function as a remote speaker, allowing you to monitor sounds in the room.
- Press [menu/clear] and enter the ROOM MONITOR menu. TO ROOM MONITOR appears in the display.
- Use [▲] or [▼] to select the station you want to monitor.
- Press [select/ ☐]. ROOM MONITOR appears, and you hear sounds in the room where the station is installed.
- To turn off the room monitor, press [☐] or return the handset to the cradle.
flowchart
graph TD
    A["Handcast 95 at remote antenna"] --> B["One-Way Broadcast"]
    C["Handcast 97 rear child"] --> B
    B --> D["Car with handcast"]
Note:
This feature only works when handsets are within the range of the base.
If the party is out of range, UNAVAILABLE appears in the display, and the operation will be canceled.
While a pair of handsets is in Room/Baby Monitoring, they cannot be used to make or receive calls. Other handsets can still make and receive calls.
You cannot listen from the base; the base can only function as a microphone
To Room Monitor ▶Handset #2
Tone Dialing Switch Over
If your phone is set to pulse dialing, you can switch to tone dialing after the call connects. This feature is useful when you need tone dialing to use automated menu systems, such as telephone bank tellers, telephone prescription refills, customer support menus, etc. Make your call normally. Once your call connects, press [*/tone/<] on the handset or [*/tone] on the dual-keypad base. Any digits you enter from then on will be sent with tone dialing. When this particular call ends, the phone automatically returns to pulse dialing.
See Changing the Dial Mode on page 16 for instructions on setting your phone for pulse or tone dialing.
Installing the Optional Headset
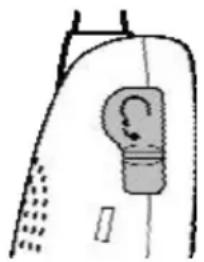
Your phone may be used with an optional headset. To use this feature, insert the headset plug into the headset jack. Your phone is ready for hands-free conversations. (Headsets may be purchased by calling the Uniden Parts Department. See back cover page for contact information.)
natural_image
Simple line drawing of a mechanical component or device with no visible text or symbolsSetting Up the Answering System
Your phone has a built-in answering system that answers and records incoming calls. You can also use your answering system to record a conversation or leave a voice memo.
Features
• Digital Tapeless Recording
- Up to 12 Minutes of Recording Time
- Call Screening
- Personal or Pre-recorded Outgoing Messages
- Voice Prompts for Menu Setup (English, Spanish, or French)
• Day and Time Announcement
- Remote Message Retrieval
- Toll Saver
- Conversation Recording
- Voice Memo
- Message Alert
- Hands Free Speaker Phone at Base
• Records Up to 59 messages
Digital Tapeless Recording allows you to quickly review, save, or delete the messages you choose. You will never have to worry about a tape wearing out, jamming, or resetting improperly.
Voice Prompts
You can set up your answering system's primary features from the base with voice prompt instructions. The following seven items may be set up using the voice prompts: Time, Security Code, Ring Time, Record Time, Message Alert, Language, and Call Screening
Using the Answering System Interface
Base operation
When the phone is in standby, press [menu/clock] to scroll through the answering system setup menu options. Each menu option has voice prompt instructions; you can press the next key at any time during the instructions. After the last option, call screening, the system returns to standby if you press [menu/clock]. You can exit the system at any time by pressing [▶/▶]. If you receive a call or a handset makes a call while you are in the setup menus, the operation is cancelled.

flowchart
graph LR
    A["Standby menu/clock"] --> B["Time menu/clock"]
    B --> C["Security code menu/clock"]
    C --> D["Hing time menu/clock"]
    D --> E["Record time menu/clock"]
    E --> F["Message alert menu/clock"]
    F --> G["Language menu/clock"]
    G --> H["Call screening menu/clock"]
    H --> I["Return to standby tone sounds"]
Handset operation
You can use your handset to operate your answering system from anywhere in your home. When the phone is in standby, press [select/ 📋] on the handset to access the answering system. REMOTE ANSWERING MACHINE OPERATION appears on the handset display, and the system announces the number of new and old messages. Keep the following things in mind when you use your handset to access your answering system:
- You can enter a command at any time during announcements.
- After the first announcement, you have 30 seconds to enter your first command before the system returns to standby.
- If you receive a call, the remote operation is cancelled.
- If another station makes a call, the remote operation is cancelled.
- During the remote operation “ - -” appears on the base.
Selecting the Language
You can select the language (English, French, and Spanish) of your answering system announcements. The default system language is English.
| From the base From the handset | |
| 1. Press [menu/clock] six times.2. The current setting ("E" English, "F" French, or "S" Spanish) appears on the base, and it is announced ("English" English, "Français" French, or "Español" Spanish).3. Press [OK/select] or [OK/select] to select the language.4. Press [set]. A confirmation tone sounds, and the system announces the new setting in the selected language. | 1. Press [menu/clear]. Select ANSW. SETUP, and then the LANGUAGE submenu.2. Move the cursor to choose ENGLISH, FRANÇAIS (French), or ESPAÑOL (Spanish).3. Press [select/ 📋]. You will hear a confirmation tone. |
Setting the Number of Rings
The ring time setting allows you to set the number of rings the caller hears before your answering system plays the outgoing message. You can set the ring time to answer after two, four, or six rings. If you enable the Toll Saver (TS) setting, the answering system picks up after two rings if you have new messages, and after four rings if there are none. This way, if you make a long distance call to check your messages, you can hang up after the second ring to avoid long distance billing charges.
| From the base From the handset | |
| 1. Press [menu/clock] three times. The base displays the current number of rings (2, 4, 6, or TS for toll saver) and announces the setting.2. Press [select] or [KK/select] until the desired ring time appears.3. Press [set]. A confirmation tone sounds, and the system announces the new ring time. | 1. Press [menu/clear]. Select the ANSW. SETUP menu, and then the RING TIME submenu.2. Move the cursor to select a ring time (TOLL SAVER, 2 TIMES, 4 TIMES, or 6 TIMES).3. Press [select/. You will hear a confirmation tone. |
Setting the Day & Time
If you do not set the clock on your answering system, your messages may not have the correct time and day stamp. You can set the day and time from the handset or the base.
| From the base From the handset | |
| 1. Press [menu/clock].2. Press [×/select] or [×/select] until the correct day is announced and the message counter shows the corresponding number (1 for Sunday, 2 for Monday, etc.).3. Press [set] to select the day.4. Press [×/select] or [×/select] until you hear the correct hour setting. The numbers 1 through 12 appear on the base as each hour is announced.5. Press [set] to select the hour.6. Press [×/select] or [×/select] until you hear the correct minute setting. The numbers 00 through 59 appears on the base as each minute is announced.7. Press [set] to select the minute.8. Press [×/select] or [×/select] until you hear the correct AM or PM setting. The message counter displays A or P.9. Press [set] to select the AM/PM setting. A confirmation tone sounds, and the day and time are announced for your review. | 1. Press [menu/clear].2. Move the cursor to GLOBAL SETUP and press [select/☑].3. Move the cursor to DAY & TIME and press [select/☑].4. Use [▲] and [▼] to select the correct day, and press [select/☑]5. Use [▲] and [▼] to select the correct hour, and press [select/☑]6. Use [▲] and [▼] to select the correct number of minutes, and press [select/☑]7. Use [▲] and [▼] to select AM or PM, and press [select/☑]ou hear a confirmation tone. |
Recording a Personal Greeting
Your answering system comes with a pre-recorded outgoing message or greeting that plays when you receive a call: "Hello, no one is available to take your call. Please leave a message after the tone." You can record your own personal outgoing greeting. Your recorded greeting must be between two seconds and thirty seconds long.
| From the base From the handset | |
| 1. Press and hold [greet].2. The system announces, "Record greeting." Begin recording after the announcement.3. The message counter displays "- -", then begins to count down 30 seconds.4. When you finish recording, press [greet], [set], or [▶/▶]. You will hear a confirmation tone, and your recorded greeting plays back for you. | 1. Press [select]. The system announces the number of new and old messages (or "Answering system is off.").2. Press [8] at any time during the announcement.3. The system announces, "Record greeting." Begin recording after the announcement.4. The message counter on the base displays "- -."5. When you finish recording, press [ □/5] or [8]. You will hear a confirmation tone, and your recorded greeting plays back for you. |
Selecting a Greeting
Once you have recorded a personal greeting, the phone automatically switches to your personal greeting. You can also switch back and forth between the pre-recorded greeting and your own greeting at any time from the base:
- With the phone in standby, press [greet]. The system plays the current greeting.
- To keep this greeting, do nothing.
- To switch to the other greeting, press [greet] while the system is playing the current greeting.
- Each time you press [greet], the system switches between the pre-recorded and the personal greeting. The last greeting you hear is used as the current greeting.
Deleting Your Personal Greeting
You can delete your personal greeting from the base. You cannot delete the pre-recorded greeting.
- With the phone in standby, press [greet].
- While the personal greeting is playing, press [■].
- The system announces "Greeting has been deleted," and switches back to the pre-recorded greeting.
Setting the Record Time (or Announce Only)
You can choose how long callers have to record a message. Set the record time to "1 minute" or "4 minutes" to limit the time for incoming messages. If you set the record time to "Announce only," the answering system answers the call but prevents callers from leaving a message.
| From the base From the handset | |
| 1. Press [menu/clock] four times. The base displays the current number of rings recording time (1 minute, 4 minutes, or A for announce only) and announces the setting.2. Press [OK/select] or [KK/select] until the desired message record time appears.3. Press [set] to select the new recording time. A confirmation tone sounds, and the system announces the new record time. | 1. Press [menu/clear]. Select the ANSW. SETUP menu, and then the RECORD TIME submenu.2. Move the cursor to select RECORD TIME (1 MINUTE, 4 MINUTES, or ANNOUNCE ONLY).3. Press [select]. You will hear a confirmation tone. |
While your answering system is set to Announce Only, the message counter LED on the base displays "A." If you are using the prerecorded greeting, the system automatically switches to the following message: "Hello, no one is available to take your call. Please call again." If you are using a personal greeting, the system continues to use that greeting.
Activating the Message Alert
The message alert feature sounds a short alert tone every 15 seconds whenever you have a new message. To turn on the message alert:
| From the base From the handset | |
| 1. Press [menu/clock] five times. The current setting (ON or OFF) appears on the base and it is announced.2. Press [OK/select] or [KK/select] to choose ON or OFF.3. Press [set]. A confirmation tone sounds, and the system announces the new setting. When the first new message is received, the alert tone will begin to sound. | 1. Press [menu/clear]. Select the ANSW. SETUP menu, and then the MESSAGE ALERT submenu.2. Move the cursor to select ON or OFF.3. Press [select]. You will hear a confirmation tone. |
Activating Call Screening
Your phone allows you to listen to callers leaving you a message. This call screen feature can be turned on or off.
| From the base From the handset | |
| 1. Press [menu/clock] seven times. The current call screen setting (ON or OFF) appears on the base.2. Press [OK/select] or [KK/select] to choose ON or OFF.3. Press [set]. A confirmation tone sounds, and the system announces the new setting. | 1. Press [menu/clear]. Select the ANSW. SETUP menu and then the CALL SCREEN submenu.2. Move the cursor to select ON or OFF.3. Press [select]. You will hear a confirmation tone. |
Setting a Security Code or Personal Identification Number (PIN)
To play your messages from a remote location, you will need to enter a two-digit security code or Personal Identification Number (PIN). The default security code is 80.
| From the base From the handset | |
| 1. Press [menu/cock] twice. The current security code appears on the base and it is announced.2. Press [select] or [KK/select] until the desired number appears. Press and hold [KK/select] or [KK/select] to quickly scroll through the numbers on the display.3. Press [set] to select the security code. A confirmation tone sounds; the system announces the new security code. | 1. Press [menu/clear]. Select the ANSW. SETUP menu, and then the SECURITY CODE submenu.2. Use the number keypad ([0] through [9]) to enter a two-digit security code (01-99).3. Press [select]. You will hear a confirmation tone. |
Using the Answering System
Turning Your Answering System On and Off
| From the base From the handset | ||
| Turning On | 1. With the phone in standby, press [on/off].2. The system announces "Answering System is on" and plays the current greeting.3. The message counter displays the number of messages stored in memory. If the counter flashes, then you have new messages waiting. | 1. With the phone in standby, press [select/ ].REMOTE ANSWERING MACHINE OPERATION appears on the display, and the answering system announces the number of new and old messages.2. Press [6] at any time during the announcement.3. The system announces "Answering System is on" and plays the current greeting message. |
| Turning Off | 1. With the phone in standby, press [on/off].2. The phone announces "Answering System is off."3. The message counter LED is no longer illuminated. | 1. With the phone in standby, press [select/ ].REMOTE ANSWERING MACHINE OPERATION appears on the display, and the answering system announces the number of new and old messages.2. Press [9] at any time during the announcement. The system announces "Answering System is off." |
Reviewing Messages
The base message counter displays the number of messages stored in memory. When you have new messages, the message counter and the new message LED on the handset flash. The answering system plays your new messages first. After you listen to all of your new messages, you can then play your old messages. You can review your messages from the base or from the handset:
| From the base | From the handset | |
| Playing messages | Press [ ] the system announces the number of new and old messages. It announces the message number, plays the message, then announces the time and day it was received. | Press [select/☑]. The system announces the number of new and old messages. Press [☐] to play your messages. After playing the message, the system announces the time and day that message was received. |
| Repeating a message | Press [ ☒/select] once to go to the beginning of the current message. Press [ ☒/select] repeatedly to go back to a previous message. Press and hold [ ☒/select] to rewind through the current message. | Press [☑/1] once to go to the beginning of the current message. Press [☑/1] repeatedly to go back to a previous message. |
| Skipping a message | Press [ ☒/select] to go to the beginning of the next message. Press and hold [ ☒/select] to fast forward through the current message. | Press [☑/3] to go to the beginning of the next message. |
| Deleting a message | While a message is playing, press [ ☐The message is permanently deleted. | While a message is playing, press [☑/4]. The message is permanently deleted. |
| Deleting all messages | While the phone is in standby, press [☐When the system asks you to confirm, press [☐] again. All messages are permanently deleted. | Not available |
| Ending the message review | Press [☑/☐] to stop the message playback and return to standby. | Press [☐/5] to stop the message playback. Press [☐] to exit the system and return to standby. |
Screening Calls
If you activate the call screening feature, you can listen to callers leaving a message without answering the phone (see Activating Call Screening on page 50). You can always hear callers from the base speaker. To screen an incoming call from the handset:
- Press [select/ 📋] when the system is answering. If another handset is screening a call, you will hear a beep and you will not be able to screen the call.
• To answer the call, press [ / flash].
• To stop screening the call, press [ ] .
Recording a Conversation
You can record a conversation between two seconds and ten minutes long from the handset or the base. These recorded conversations are treated just like regular messages. When the answering system is full, FL will appear on the base LCD and recording will be terminated. You can not record three-way calls or intercom conversations.
| From the base From the handset | ||
| Starting a recording | 1. During a conversation, press and hold [memo/call rec].2. The message counter LED flashes "- -". A confirmation tone that can be heard by both parties sounds during recording. | 1. During a conversation, press [menu/clear].2. Move the cursor to select CALL RECORD, and then press [select/☑].3. RECORDING A CALL appears on the display. A confirmation tone that can be heard by both parties sounds during recording. |
| Stopping a recording | 1. Press [memo/call rec], or [√/☐].2. You will hear a confirmation tone, and the message counter LED stops flashing. | 1. Press [menu/clear].2. Move the cursor to select CALL RECORD, and then press [select/☑].3. STOP RECORDING appears on the display, and you hear a confirmation tone. |
Note: Every state has different regulations governing the recording of conversations over the telephone. Make sure to check your local, state and federal laws before using this product to record any telephone conversation in order to determine that your use is in compliance with such laws or guidelines.
Recording a Voice Memo
The voice memo feature allows you to record messages that are between two seconds and four minutes long. You might want to use this feature to leave messages for other members of your household instead of written notes.
| From the base | From the handset | |
| Starting a memo | With the phone in standby, press and hold [memo/call rec] until you hear a beep.The system announces "Record memo message." Begin your message after this announcement.While you are recording, the message counter LED flashes "- -". | With the phone in standby, press [select/ ].REMOTE ANSWERING MACHINE OPERATION appears on the display, and the answering system announces the number of new and old messages.Press [7]. The system announces "Record memo message." Begin your message after this announcement. |
| Stopping a memo | Press [memo/call rec], [\/], or [set].You hear a confirmation tone, and the system returns to standby. | Press [\/5] or [7]. You hear a confirmation tone, and the system waits for your next command.Press [\/2] to hear the message you just recorded or [\/] to exit the system and return to standby. |
Turning Off the Message Alert Tone
When all new messages are played back, the message alert tone will automatically deactivate. The tone will not deactivate until all new messages are played back. To quickly turn off the tone, press any key on the base.
Operating the Answering System While You Are Away from Home
You can access your answering system while you are away from home to check, play, and delete messages, or even record a new greeting message or turn your answering system on and off.
To operate from a remote location, use any touch-tone telephone, and follow these steps:
- Call your telephone number and wait for the system to answer. If the answering system is off, it will answer after about 10 rings and sounds a series of beeps.
- During the greeting or the beeps (if answering system is off), press 0 and enter your security code/PIN within two seconds (see Setting a Security Code or Personal Identification Number (PIN) on page 51).
- The answering system announces the current time and the number of messages stored in memory. You hear "To play incoming messages, press zero-two. For help, press one-zero" followed by a beep.
- Enter a remote command from the chart below. You have 15 seconds to enter the first command; after the first command, you have two seconds to enter each command.
| Command | Function Command | Function | |
| [0] then [1] | Repeat a message* | [0] then [6] | Answering system on |
| [0] then [2] | Play incoming messages | [0] then [7] | Memo record start/stop |
| [0] then [3] | Skip a message | [0] then [8] | Greeting message record start/stop |
| [0] then [4] | Delete a message | [0] then [9] | Answering system off |
| [0] then [5] | Stop operation | [1] then [0] | Help |
* If you press [0] then [1] in the first four seconds of a message, the system skips to the previous message. If you press [0] then [1] after the first four seconds of a message, the system repeats the current message.
-
When you finish, you will hear intermittent beeps indicating that the system is in the command waiting mode. Enter another command from the chart within two seconds.
-
Hang up to exit the system. The answering system automatically returns to its normal standby setting.
Maintenance
Specifications
| Operating Temperature | 0°C to +50°C (+32°F to +122°F) | |
| AC Adapter | Part Number | Base: AD-800Charging cradle: AD-0005 |
| Input Voltage | Base: 120V AC, 60 HzCharging cradle: 120V AC, 60 Hz | |
| Output Voltage | Base: 9V D @ 350 mACharging cradle: 9V D @ 210 mA | |
| Battery | Part Number | BT-909 |
| Capacity | 3.6V DC @ 600 mA | |
Power Failures
During a power failure, you will not be able to make or receive calls with the phone. To avoid damage from an electrical spike when the power comes back on, we recommend you unplug your phone during power outages.
Battery Life
With average use, your battery talk time will be approximately 5 hours and standby time will be approximately 7 days. For optimum performance, be sure to return the handset to the cradle after each call. If the handset is left off of the base, the actual talk time duration will be reduced respective to the amount of time the handset is off the cradle.
Note:
Do not place the power cord where it creates a trip hazard or where it could become chafed and create a fire or electrical hazard.
Low Battery Alert
When the battery pack is very low, the phone is programmed to eliminate functions in order to save power. The battery pack needs to be charged when the display shows LOW BATTERY and the empty battery icon. If the phone is in standby, none of the keys will operate. If you are on a call, complete your conversation as quickly as possible, and return the handset to the charging cradle.
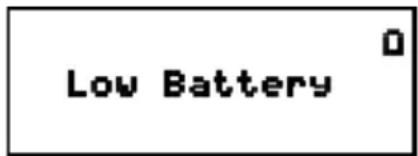
Battery Replacement and Handling
When the talk time becomes short, even after the battery is recharged, please replace the battery. With normal usage, your battery should last about one year. A replacement Uniden adapter or battery may be purchased by calling Uniden's Parts department (see back cover page).
Warning
To avoid the risk of personal injury or property damage from fire or electrical shock, use only BT-909 battery pack with your phone.
Caution:
Do not remove the batteries from the handset to charge them. Never throw the battery into a fire, disassemble them, or heat them. Do not remove or damage the battery casing.
Change the Batteries Annually
Even when the battery pack is not being used, it will gradually discharge over a long period of time. With average use, your phone's battery should last approximately one year. To order replacement batteries, please contact Uniden's Parts Department (see back cover page).
Clean the Battery Contacts
To maintain a good charge, clean the charging contacts on the handset once a month. Dampen a cloth with plain water. Gently rub the damp cloth over the charging contacts until all visible dirt is removed. Dry the contacts thoroughly before returning the handset to the charging cradle.
Caution: Do not use paint thinner, benzene, alcohol, or other chemical products. Doing so may discolor the surface of the telephone and damage the finish.
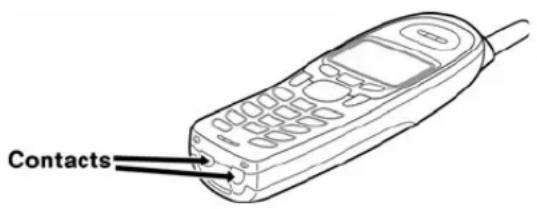
Troubleshooting
Resetting the Handset
You may need to reset your handset in the following instances:
- When you want to change the digital security code.
- You lose a handset and purchase a new one.
- You get the message Registration Failed when you try to register the handset.
- You are unable to register any handsets to the base.
- When you register new handsets to the base, the handset IDs do not match. (For example, the handset registers as "Handset #4" but you only have two handsets.)
-
When you are instructed to by one of Uniden's call center representatives.
-
Press and hold [1] and [#/>] for more than 5 seconds. Select DEREGISTER HS.
-
Select the handset you want to reset, then press [select/☐].
-
The phone will ask you to confirm the deregistration. Select YES. The selected handset will clear its registration information from the base, and then delete the link to the base from its own memory.
-
When the base information is deleted, the handset displays MODELS VARY! CHARGE HANDSET ON THE BASE FOR REGISTRATION OR REFER TO OWNER'S MANUAL.
- Re-register the handset to the base (see Registering Accessory Handsets on page 20).
If the handset cannot contact the base, it will display UNAVAILABLE. Make sure the handset is in range of the base and the base is connected to power.
Resetting the Handset Without the Base
If your original base is not available for some reason (for example, it is lost or somehow incapacitated), you can still reset the handset and use it with another base.
- Press and hold [0] and [#/>] for at least 5 seconds.
- Move the cursor to select REPLACING BASE and then press [select/ ]. REPLACE BASE appears.
- Move the cursor to select YES, and then press [select/ ☑]. You hear a confirmation tone, and the handset deletes its own base information without contacting the base. The handset displays MODELS VARY! CHARGE HANDSET ON THE BASE FOR REGISTRATION OR REFER TO OWNER'S MANUAL.
- Register the handset to the new base (see Registering Accessory Handsets on page 20).
Changing the Digital Security Code
The digital security code is an identification code used to connect the handset and the base. Your unit ships from the manufacturer with a preset security code. Resetting this code is not normally necessary. In the rare situation that you suspect another cordless telephone is using the same security code or if you are instructed to change this code by a manufacturer's Call Center Representative, you can change the code. To change the digital security code:
- Reset the handset (see Resetting the Handset on page 59)
- Re-register each handset (see Registering Accessory Handsets on page 20).
Traveling Out of Range
During a call, if you move your handset too far from your base, noise may increase. If you pass the range limit of the base, the handset will beep, display OUT OF RANGE, and then go to standby. The base will maintain the connection for 30 seconds after the handset goes out of range. If you move the handset back within range of the base within 30 seconds, press [ / flash] or [ ] to pick up the call again.
Common Issues
If your phone is not performing to your expectations, please try these simple steps first. If these steps do not solve your problem, please call our Customer Hotline (see back cover page).
| Symptom | Suggestion |
| The charge LED won't illuminate when the handset is placed in the cradle. | Make sure the AC adapter is plugged into the base or the charger (if you have more than one handset) and wall outlet.Make sure the handset is properly seated in the cradle.Make sure the charging contacts on the handset are clean. |
| The audio sounds weak. | Move the handset and/or base away from metal objects or appliances and try again.Make sure that you are not too far from the base. |
| Can't make or receive calls. | Make sure that you are not too far from the base.Make sure the line is not in use. If an outside call is already using a line, you cannot use that line to make another outside call.Check both ends of the base telephone line cord.Make sure the AC adapter is plugged into the base and wall outlet.Disconnect the AC adapter and reconnect.Change the Digital Security Code (see Changing the Digital Security Code on page 60). |
| Severe noise interference. | Keep the handset away from microwave ovens, computers, remote control toys, wireless microphones, alarm systems, intercoms, room monitors, fluorescent lights, and electrical appliances.Move to another location or turn off the source of interference. |
| The Caller ID does not display. | The call was placed through a switchboard.Call your telephone provider to verify your Caller ID service is current. There may be a problem with your Caller ID service. |
| The handset doesn't ring or receive a page. | Make sure that you are not too far from the base.Charge the battery in the handset for 15 to 20 hours by placing the handset on the base or charging cradle.Change the Digital Security Code (see Changing the Digital Security Code on page 60). |
| You cannot register the handset at the base. | Charge the battery pack in the handset for 15 to 20 hours.Change the Digital Security Code (see Changing the Digital Security Code on page 60). |
| The handset doesn't communicate with other handsets. | Change the Digital Security Code (see Changing the Digital Security Code on page 60).Make sure that you have registered all handsets (see Registering Accessory Handsets on page 20). |
| An extra handset can't join the conversation. | Make sure there are not two handsets already using the conference feature.Make sure that another handset is not in privacy mode. |
| Room Monitor does not work. | Make sure to place the handset(s) within the range of the base. |
| The answering system does not work. | Make sure the base is plugged in.Make sure that the answering system is turned on.Make sure that the message record time is not set to announce only. |
| Time stamp cannot be heard. | Make sure you have set the time (see Setting the Day and Time on page 17). |
| Messages are incomplete. | Incoming messages may be too long. Ask callers to leave a brief message.The memory may be full. Delete some or all of the saved messages. |
| There is no sound on the base or handset speaker during call monitoring or message review. | Adjust the speaker volume on the base or handset.Make sure the call screen feature is set to on. |
| Cannot access answering system from a remote phone. | Make sure you are using the correct PIN number.Make sure that the touch-tone phone you're using can transmit the tone for at least two seconds. If it cannot, try using a different touchtone phone. |
Liquid Damage
Moisture and liquid can damage your cordless phone.
- If the handset or base is exposed to moisture or liquid, but only the exterior plastic housing is affected, wipe off the liquid, and use as normal.
- If moisture or liquid has entered the plastic housing (i.e. liquid can be heard in the phone or liquid has entered the handset battery compartment or vent openings on the base), follow the steps below:
| Handset | Base |
| 1. Remove the battery cover and leave it off for ventilation.2. Disconnect the battery pack. Leave the battery cover off and the battery pack disconnected for at least 3 days.3. Once the handset is completely dry, reconnect the battery pack and the battery cover.4. Recharge the handset's battery pack for 15 to 20 hours before using. | 1. Disconnect the AC adapter from the base, cutting off electrical power.2. Disconnect the telephone cord from the base.3. Let dry for at least 3 days. |
IMPORTANT: You must unplug the telephone line while recharging the battery packs to avoid charge interruption. CAUTION: DO NOT use a microwave oven to speed up the drying process. This will cause permanent damage to the handset, base and the microwave oven. After following these steps, if your cordless telephone does not work, please call our Customer Service Hotline (see back cover page).
Precautions!
Before you read anything else, please note the following:
Warning!
Uniden America Corporation DOES NOT represent this unit to be waterproof. To reduce the risk of fire, electrical shock, or damage to the unit, DO NOT expose this unit to rain or moisture.
Rechargeable Nickel-Metal-Hydride Battery Warning
- This equipment contains a rechargeable Nickel-Metal-Hydride battery. The rechargeable batteries contained in this equipment may explode if disposed of in a fire.
- Nickel is a chemical known to state of California to cause cancer.
- Do not short-circuit the battery.
- Do not charge the rechargeable battery used in this equipment in any charger other than the one designed to charge this battery as specified in the owner's manual. Using another charger may damage the battery or cause the battery to explode.
Rechargeable Batteries Must Be Recycled or Disposed of Properly

Uniden works to reduce lead content in our PVC coated cords in our products and accessories.
Warning!
The cords on this product and/or accessories contain lead, a chemical known to the State of California to cause birth defects or other reproductive harm. Wash hands after handling.
Important Safety Instructions
When using your telephone equipment, basic safety precautions should always be followed to reduce the risk of fire, electric shock and injury to persons, including the following:
- Do not use this product near water, for example, near a bath tub, wash bowl, kitchen sink or laundry tub, in a wet basement or near a swimming pool.
- Avoid using a telephone (other than a cordless type) during an electrical storm. There may be a remote risk of electric shock from lightning.
- Do not use the telephone to report a gas leak in the vicinity of the leak.
-
Use only the power cord and batteries indicated in this manual. Do not dispose of batteries in a fire. They may explode. Check with local authorities for possible battery disposal instructions.
-
Do not disassemble any component of this product.
SAVE THESE INSTRUCTIONS
CAUTION!
Risk of explosion if battery is replaced by an incorrect type. Dispose of used batteries according to the instructions. Do not open or mutilate the battery, and disconnect the battery before shipping this product.
The FCC Wants You To Know
This equipment complies with Part 68 of the FCC rules and the requirements adopted by the ACTA. On the bottom of this equipment is a label that contains, among other information, a product identifier in the format US: AAAEQ##TXXXX. If requested, this number must be provided to the telephone company.
An applicable Universal Service Order Codes (USOC) certification for the jacks used in this equipment is provided (i.e., RJ11C) in the packaging with each piece of approved terminal equipment. A plug and jack used to connect this equipment to the premises wiring and telephone network must comply with the applicable FCC Part 68 rules and requirements adopted by the ACTA. A compliant telephone cord and modular plug is provided with this product. It is designed to be connected to a compatible modular jack that is also compliant. See installation instructions for details.
The REN is used to determine the number of devices that may be connected to a telephone line. Excessive RENs on a telephone line may result in the devices not ringing in response to an incoming call. In most but not all areas, the sum of RENs should not exceed five (5.0). To be certain of the number of devices that may be connected to a line, as determined by the total RENs, contact the telephone provider. For products approved after July 23, 2001, the REN for this product is part of the product identifier that has the format US:AAAEQ##TXXXX. The digits represented by ## are the REN without a decimal point (e.g., 03 is a REN of 0.3). For earlier products, the REN is separately shown on the label.
If this equipment causes harm to the telephone network, the telephone company will notify you in advance that temporary discontinuance of service may be required. But if advance notice isn't practical, the telephone company will notify the customer as soon as possible. Also, you will be advised of your right to file a complaint with the FCC if you believe it is necessary. The telephone company may make changes in its facilities, equipment, operations or procedures that could affect the operation of the equipment. If this happens the telephone company will provide advance notice in order for you to make necessary modifications to maintain uninterrupted service.
Please follow instructions for repairing, if any (e.g. battery replacement section); otherwise do not substitute or repair any parts of the device except as specified in this manual. Connection to party line service is subject to state tariffs. Contact the state public utility commission, public service commission or corporation commission for information. This equipment is hearing aid compatible.
Should you experience trouble with this equipment, please contact Uniden customer service at 800-297-1023. If the equipment is causing harm to the telephone network, the telephone company may request that you disconnect the equipment until the problem is resolved.
NOTICE: According to telephone company reports, AC electrical surges, typically resulting from lightning strikes, are very destructive to telephone equipment connected to AC power sources. To minimize damage from these types of surges, a surge arrestor is recommended.
Changes or modifications to this product not expressly approved by Uniden, or operation of this product in any way other than as detailed by the owner's manual, could void your authority to operate this product.
This device complies with part 15 of the FCC rules. Operation is subject to the following two conditions: (1) This device may not cause harmful interference, and (2) This device must accept any interference received, including interference that may cause undesired operation. Privacy of communications may not be ensured when using this phone.
To insure the safety of users, the FCC has established criteria for the amount of radio frequency energy various products may
produce depending on their intended usage. This product has been tested and found to comply with the FCC's exposure criteria. For body worn operation, the FCC RF exposure guidelines were also met when used with the Uniden accessories supplied or designed for this product. Use of other accessories may not ensure compliance with FCC RF exposure guidelines and should be avoided.
Radio Interference
Radio interference may occasionally cause buzzing and humming in your cordless handset, or clicking noises in the base. This interference is caused by external sources such as TV, refrigerator, vacuum cleaner, fluorescent lighting, or electrical storm. Your unit is NOT DEFECTIVE. If these noises continue and are too distracting, please check around your home to see what appliances may be causing the problem. In addition, we recommend that the base not be plugged into a circuit that also powers a major appliance because of the potential for interference. Be certain that the antenna on the unit is fully extended when needed. In the unlikely event that you consistently hear other voices or distracting transmissions on your phone, you may be receiving radio signals from another cordless telephone or other source of interference. If you cannot eliminate this type of interference, you need to change to a different channel.
Finally, it should be noted that some cordless telephones operate at frequencies that may cause interference to nearby TVs and VCRs. To minimize or prevent such interference, the base of the cordless telephone should not be placed near or on top of a TV or VCR. If interference is experienced, moving the cordless telephone farther away from the TV or VCR will often reduce or eliminate the interference.
Cordless Telephone Privacy
Cordless telephones are radio devices. Communications between the handset and base of your cordless telephone are accomplished by means of radio waves which are broadcast over the open airways. Because of the inherent physical properties of radio waves, your communications can be received by radio receiving devices other than your own cordless telephone unit. Consequently, any communications using your cordless telephone may not be private.
I.C. Notice
Terminal Equipment
NOTICE: This equipment meets the applicable Industry Canada Terminal Equipment Technical Specifications. This is confirmed by the registration number. The abbreviation, IC, before the registration number signifies that registration was performed based on a Declaration of Conformity indicating that Industry Canada technical specifications were met. It does not imply that Industry Canada approved the equipment.
NOTICE: The Ringer Equivalence Number (REN) for this terminal equipment is marked on the equipment itself. The REN assigned to each terminal equipment provides an indication of the maximum number of terminals allowed to be connected to a telephone interface. The termination on an interface may consist of any combination of devices subject only to the requirement that the sum of the Ringer Equivalence Numbers of all the devices does not exceed five.
Radio Equipment
The term "IC:" before the radio certification number only signifies that Industry Canada technical specifications were met. Operation is subject to the following two conditions: (1) this device may not cause interference, and (2) this device must accept any interference, including interference that may cause undesired operation of the device. "Privacy of communications may not be ensured when using this telephone".
One Year Limited Warranty
Important: Evidence of original purchase is required for warranty service. WARRANTOR: UNIDEN AMERICA CORPORATION (“Uniden”) ELEMENTS OF WARRANTY: Uniden warrants, for one year, to the original retail owner, this Uniden Product to be free from defects in materials and craftsmanship with only the limitations or exclusions set out below.
WARRANTY DURATION: This warranty to the original user shall terminate and be of no further effect 12 months after the date of original retail sale. The warranty is invalid if the Product is (A) damaged or not maintained as reasonable or necessary, (B) modified, altered, or used as part of any conversion kits, subassemblies, or any configurations not sold by Uniden, (C) improperly installed, (D) serviced or repaired by someone other than an authorized Uniden service center for a defect or malfunction covered by this warranty, (E) used in any conjunction with equipment or parts or as part of any system not manufactured by Uniden, or (F) installed or programmed by anyone other than as detailed by the owner's manual for this product.
STATEMENT OF REMEDY: In the event that the product does not conform to this warranty at any time while this warranty is in effect, warrantor will either, at its option, repair or replace the defective unit and return it to you without charge for parts, service, or any other cost (except shipping and handling) incurred by warrantor or its representatives in connection with the performance of this warranty. Warrantor, at its option, may replace the unit with a new or refurbished unit. THE LIMITED WARRANTY SET FORTH ABOVE IS THE SOLE AND
ENTIRE WARRANTY PERTAINING TO THE PRODUCT AND IS IN LIEU OF AND EXCLUDES ALL OTHER WARRANTIES OF ANY NATURE WHATSOEVER, WHETHER EXPRESS, IMPLIED OR ARISING BY OPERATION OF LAW, INCLUDING, BUT NOT LIMITED TO ANY IMPLIED WARRANTIES OF MERCHANTABILITY OR FITNESS FOR A PARTICULAR PURPOSE. THIS WARRANTY DOES NOT COVER OR PROVIDE FOR THE REIMBURSEMENT OR PAYMENT OF INCIDENTAL OR CONSEQUENTIAL DAMAGES. Some states do not allow this exclusion or limitation of incidental or consequential damages so the above limitation or exclusion may not apply to you.
LEGAL REMEDIES: This warranty gives you specific legal rights, and you may also have other rights which vary from state to state. This warranty is void outside the United States of America and Canada. PROCEDURE FOR OBTAINING PERFORMANCE OF WARRANTY: If, after following the instructions in the owner's manual you are certain that the Product is defective, pack the Product carefully (preferably in its original packaging). Disconnect the battery from the Product and separately secure the battery in its own separate packaging within the shipping carton. The Product should include all parts and accessories originally packaged with the Product. Include evidence of original purchase and a note describing the defect that has caused you to return it. The Product should be shipped freight prepaid, by traceable means, to warrantor at:
Uniden America Service 4700 Amon Carter Blvd. Fort Worth, TX 76155
Index
Accessibility...... 4
Answering calls 30
Answering system...... 44
Using the handset...... 45
When away from home.. 55
Any key answer...... 29
AutoTalk 29
Baby monitor.... 42
Banner...... 27
Base Installing.... 13
Parts of the base...... 8
Parts of the dual keypad base....9
Wall mounting 13
Battery Installing.... 14
Low battery alert 58
Replacement and handling 58
Talk and standby time.... 57
Belt clip.... 16
Call recording.... 54
Call screening.... 50, 53
Call waiting.... 33
Call waiting deluxe ..... 18, 33
Caller ID 32
Caller ID on call waiting..18
Deleting Caller ID records 33
Making calls from......32
Clarity booster....10, 36
Conferencing......37
Day and time......17, 47
Dial mode....16, 43
DirectLink 40
Making a call....40
Do not disturb....38
FCC statements......66
Finding a handset 36
Greetings
Deleting......49
Recording 48
Selecting......48
Handset
Accessing the answering system ....45
Accessory handsets......19
Banner 27
Choosing a ringer .....28
Copying phonebook entries 25
Displays and icons......10
Entering text......12
Finding......36
Parts of the handset .....7
Registering .....20
Resetting .....21, 59
Standby screen......11
Hanging up 30
Headset......43
Hold....36
Installation....13
Intercom....41
Key touch tone......18
Maintenance 57
Making calls 30
Using Caller ID ....32
Using redial....34
Using speed dial......31
Using the phonebook.....31
Message alert ....50, 55
Mute Microphone....39
Ringer....38
Out of range......61
Personal identification number (PIN)......51
Personal ring......18
Phonebook....22
Copying entries......25
Creating new entries..... 22
Deleting entries...... 25
Editing entries 24
Finding entries 24
Making calls from...... 31
Storing Caller ID or redial numbers.... 24
Power failure operation ..... 57
Privacy mode...... 10, 39
Pulse dialing.... 16, 43
Recording a call 54
Recording a voice memo .. 55
Redial
Deleting a record .....34
Making calls with.....34
Ringer
Choosing a handset ringer 28
Muting....38
Personal ring......18
Room monitor......42
Safety notices 65
Screening calls....50, 53
Security code 60
Answering system......51
Seven-digit dialing......39
Speed dial
Making calls from......31
Programming......23
Programming on the dual-keypad base....26
Text, entering......12
Tone dialing .....16, 43
Transferring a call......37
Volume, adjusting ....35
Wall mounting the base .....13
Warranty 68
MEMO
Remote Operation Card
| REMOTE OPERATION CARDUniden® | REMOTE OPERATION CARDUniden® | ||
| Remote accessaway from home1. Call your phone numberfrom a touch-tone phone.2. During the outgoingmessage, press 0 and enteryour PIN code. The answering system announces thenumber of messages stored inmemory and begins the voice prompts.3. To quit, hang up the phone. | Turn on the answeringsystem remotely1. Call your phone and let itring 10 times until you hear abeep.2. Press 0 and then enteryour PIN code.3. Press 0 then 5 to stopthe announcement.4. Press 0 then 6 to turn theanswering system on. | Remote accessaway from home1. Call your phone numberfrom a touch-tone phone.2. During the outgoingmessage, press 0 and enteryour PIN code. The answering system announces thenumber of messages stored inmemory and begins the voice prompts.3. To quit, hang up the phone. | Turn on the answeringsystem remotely1. Call your phone and let itring 10 times until you hear abeep.2. Press 0 and then enteryour PIN code3. Press 0 then 5 to stopthe announcement.4. Press 0 then 6 to turn theanswering system on. |
| REMOTE OPERATION CARDUniden® | REMOTE OPERATION CARDUniden® | ||
| Remote accessaway from home1. Call your phone numberfrom a touch-tone phone.2. During the outgoingmessage, press 0 and enteryour PIN code. The answering system announces thenumber of messages stored inmemory and begins the voice prompts.3. To quit, hang up the phone. | Turn on the answeringsystem remotely1. Call your phone and let itring 10 timesuntil you hear abeep.2. Press 0 and then enteryour PIN code.3. Press 0 then 5 to stopthe announcement.4. Press 0 then 6 to turn theanswering system on. | Remote accessaway from home1. Call your phone numberfrom a touch-tone phone.2. During the outgoingmessage, press 0 and enteryour PIN code. The answering system announces thenumber of messages stored inmemory and begins the voice prompts. | Turn on the answeringsystem remotely1. Call your phone and let itring 10 times until you hear abeep.2. Press 0 and then enteryour PIN code.3. Press 0 then 5 to stopthe announcement.4. Press 0 then 6 to turn theanswering system on. |
At Uniden, we'll take care of you!
| Task | Key |
| Repeat a Message | 0 1 |
| Play Incoming Messages | 0 2abc |
| Skip a Message | 0 3def |
| Delete a Message | 0 4ghi |
| Stop Operation | 0 5ji |
| Answering System On | 0 6mmo |
| Memo Record/Stop | 0 7pars |
| Greeting Message Record/Stop | 0 8iwi |
| Answering System Off | 0 9ways |
| Help | 1 0oper |
| Task | Key |
| Repeat a Message | 0 1 |
| Play Incoming Messages | 0 2abc |
| Skip a Message | 0 3daf |
| Delete a Message | 0 4ghi |
| Stop Operation | 0 5 jxl |
| Answering System On | 0 6mno |
| Memo Record/Stop | 0 7pqrs |
| Greeting Message Record/Stop | 0 8tuv |
| Answering System Off | 0 9wnyz |
| Help | 1 0oper |
| Task | Key |
| Repeat a Message | 0 1 |
| Play Incoming Messages | 0 2abc |
| Skip a Message | 0 3daf |
| Delete a Message | 0 4ghi |
| Stop Operation | 0 5jud |
| Answering System On | 0 6nmo |
| Memo Record/Stop | 0 7pars |
| Greeting Message Record/Stop | 0 8huv |
| Answering System Off | 0 9wxyz |
| Help | 1 0oper |
| Task | Key |
| Repeat a Message | 0 1 |
| Play Incoming Messages | 0 2abc |
| Skip a Message | 0 3daf |
| Delete a Message | 0 4shi |
| Stop Operation | 0 5xtl |
| Answering System On | 0 6mno |
| Memo Record/Stop | 0 7pqrs |
| Greeting Message Record/Stop | 0 8tuv |
| Answering System Off | 0 9wnyz |
| Help | 1 0oper |
Thank you for purchasing a Uniden product. if you have any questions or problems, please do not return this product to the place of purchase.
| Having trouble? | Our customer care specialists are here to help you! Visit our website at www.uniden.com or call our Customer Service Hotline at 1-800-297-1023, Monday through Friday, 7 am to 7 pm or Saturday/Sunday, 9 am to 5 pm, CST. (The Customer Service Hotline is closed on holidays.) |
| Need a part? | To order headsets, accessory handsets, replacement batteries, or other accessories, visit our website at www.uniden.com or call 1-800-554-3988, Monday through Friday, 8 am to 5 pm, CST. |
| Help for our customers with special needs | If you need special assistance due to a disability or have questions on the accessibility features of this product, please call 1-800-874-9314 (voice or TTY). |
May be covered under one or more of the following U.S. patents:
| 4,797,916 | 5,381,460 | 5,426,690 | 5,434,905 | 5,491,745 | 5,493,605 | 5,533,010 | 5,574,727 |
| 5,581,598 | 5,650,790 | 5,660,269 | 5,661,780 | 5,663,981 | 5,671,248 | 5,696,471 | 5,717,312 |
| 5,732,355 | 5,754,407 | 5,758,289 | 5,768,345 | 5,787,356 | 5,794,152 | 5,801,466 | 5,825,161 |
| 5,864,619 | 5,893,034 | 5,912,968 | 5,915,227 | 5,929,598 | 5,930,720 | 5,960,358 | 5,987,330 |
| 6,044,281 | 6,070,082 | 6,125,277 | 6,253,088 | 6,314,278 | 6,418,209 | 6,618,015 | 6,671,315 |
| 6,714,630 | 6,782,098 | 6,788,920 | 6,788,953 | 6,839,550 | 6,889,184 | 6,901,271 | 6,907,094 |
6,914,940
Other patents pending.
Uniden®
A World Without Wires®
VISIT
WWW.UNIDEN.COM
TO REGISTER YOUR
PRODUCT
© 2006 Uniden America Corporation, Fort Worth, Texas. Contains additional foreign articles. Printed in China.
- Operating the Answering System While You Are Away from Home.... 55
- Welcome
- Accessibility
- Product Overview
- Main Phone Features
- Answering System Features
- Using the Interface
- Reading the Display
- The Standby Screen
- Using the Four-way Function Key
- Using the Handset Menus
- Entering Text from Your Handset
- Installing the Phone
- Choosing the Best Location
- Wall Mounting the Base
- Installing the Battery
- Connecting the Base and Charging the Handset
- Connecting to the Phone Line
- Testing the Connection
- Changing the Dial Mode
- Installing the Belt Clip
- Basic Setup
- Selecting a Language
- Setting the Day and Time
- Activating Caller ID on Call Waiting and Call Waiting Deluxe
- Activating Personal Ring
- Activating the Key Touch Tone
- Adding Accessory Handsets
- Compatible Handsets
- Charging Accessory Handsets
- Registering Accessory Handsets
- Registering DCX750 Handsets
- Registering DCX640 or DCX700 Handsets
- Resetting Handsets
- Setting Up the Phonebook
- Creating Phonebook Entries
- Finding a Phonebook Entry
- Editing an Existing Phonebook Entry
- Storing Caller ID or Redial Numbers in the Phonebook
- Deleting Phonebook Entries
- Deleting all the phonebook entries at once
- Copying Phonebook Entries to Another Handset
- Programming Base Speed Dial Numbers (Dual Keypad Model Only)
- Deleting Base Speed Dial Numbers
- Customizing Your Phone
- Changing the Handset Banner
- Selecting a Ring Tone (Handset Only)
- Activating AutoTalk (Handset only)
- Activating Any Key Answer (Handset only)
- Making a Call from the Phonebook
- Making a Call with Handset Speed Dial
- Making a Call with Base Speed Dial (Dual-keypad Base Only)
- Switching to the Handset Speakerphone During a Call
- Using Caller ID and Call Waiting
- Using the Caller ID List
- Making a Call from a Caller ID Record
- Deleting Caller ID Numbers
- Using Call Waiting
- Using Call Waiting Deluxe
- Redialing a Number
- Deleting a Redial Record
- Adjusting the Ringer, Earpiece and Speaker Volume
- Adjusting the Ringer Volume
- Adjusting the Earpiece Volume
- Adjusting the Speaker Volume
- Adjusting the Audio Tone
- Using the Clarity Boost Feature
- Finding a Lost Handset
- Using Hold, Conference and Transfer
- Placing a Call on Hold
- Conferencing
- Transferring a Call
- Answering a Transferred Call
- Using Special Features
- Do Not Disturb (All Calls)
- Muting the Ringer (One Call Only)
- Muting the Microphone
- Privacy Mode
- Seven-Digit Dialing
- Using the DirectLink™ Communication Feature
- Making a DirectLink™ Call
- Exiting DirectLink™ Communication
- Using the Intercom
- Answering an Intercom Page
- Room/Baby Monitor
- Tone Dialing Switch Over
- Installing the Optional Headset
- Setting Up the Answering System
- Features
- Voice Prompts
- Using the Answering System Interface
- Base operation
- Handset operation
- Selecting the Language
- Setting the Number of Rings
- Setting the Day & Time
- Recording a Personal Greeting
- Selecting a Greeting
- Deleting Your Personal Greeting
- Setting the Record Time (or Announce Only)
- Activating the Message Alert
- Activating Call Screening
- Setting a Security Code or Personal Identification Number (PIN)
- Using the Answering System
- Reviewing Messages
- Screening Calls
- Recording a Conversation
- Recording a Voice Memo
- Turning Off the Message Alert Tone
- Operating the Answering System While You Are Away from Home
- Maintenance
- Power Failures
- Battery Life
- Note:
- Low Battery Alert
- Battery Replacement and Handling
- Warning
- Caution:
- Change the Batteries Annually
- Clean the Battery Contacts
- Troubleshooting
- Resetting the Handset
- Resetting the Handset Without the Base
- Changing the Digital Security Code
- Traveling Out of Range
- Common Issues
- Liquid Damage
- Precautions!
- Warning!
- Rechargeable Nickel-Metal-Hydride Battery Warning
- Important Safety Instructions
- SAVE THESE INSTRUCTIONS
- CAUTION!
- The FCC Wants You To Know
- Radio Interference
- Cordless Telephone Privacy
- I.C. Notice
- Terminal Equipment
- Radio Equipment
- One Year Limited Warranty
- Index
- MEMO
- Remote Operation Card
Brand : UNIDEN
Model : DCT 7085
Category : Cordless phone