
DECT 1725+2 - Cordless phone UNIDEN - Free user manual and instructions
Find the device manual for free DECT 1725+2 UNIDEN in PDF.


| Product Type | Cordless Phone |
| Brand | Uniden |
| Model | DECT 1725+2 |
| Handsets Included | 3 (base handset + 2 additional) |
| Maximum Handsets | 5 |
| Display | LCD with icons (standby: time, date, handset name) |
| Caller ID | Yes (requires service) – 40 number calls log |
| Phonebook | 50 entries, alphanumeric, up to 12 characters name, 20 digits number |
| Redial Memory | Last 10 numbers |
| Ringer Melodies | 10 for handset, 5 for base |
| Handsfree (Speakerphone) | Yes |
| Internal Calls | Yes – between registered handsets |
| Call Transfer | Yes – to another handset |
| Conference Call | Yes – 3-way (two handsets + external caller) |
| Range | Outdoors: up to 300m; Indoors: up to 50m (in ideal conditions) |
| Battery Type | 2 x AAA NiMH rechargeable (1.2V 550mAh) per handset |
| Talk Time | Up to 10 hours |
| Standby Time | Up to 7 days |
| Charging Time | 15-20 hours for initial charge |
| Keypad Lock | Yes – prevents accidental dialling |
| Alarm | Yes – with snooze option |
| Dial Mode | Tone / Pulse (adjustable) |
| Languages | 16 menu languages |
| Base Ringer Volume | 5 levels + off |
| GAP Compatible | Yes – can register other DECT GAP handsets |
| Warranty | 1 year limited |
| Maintenance | Clean with damp cloth; do not use non-rechargeable batteries |
Frequently Asked Questions - DECT 1725+2 UNIDEN
User questions about DECT 1725+2 UNIDEN
0 question about this device. Answer the ones you know or ask your own.
Ask a new question about this device
Download the instructions for your Cordless phone in PDF format for free! Find your manual DECT 1725+2 - UNIDEN and take your electronic device back in hand. On this page are published all the documents necessary for the use of your device. DECT 1725+2 by UNIDEN.
USER MANUAL DECT 1725+2 UNIDEN
Series Owners Manual
OWNER'S MANUAL


Welcome...
Introducing your Digital Cordless Telephone
- Caller ID* to see who's calling before you pick
• 40 Number Calls log
• 50 Names and numbers phonebook
- 10 Last number redial
• 10 Handset finger melodies to choose from.
* Feature requires Caller ID service from network
supplier. There is usually a fee for this service.
In this guide you will find all the information you need, explained simply to help you get the most
from your phone.
What's in the box:
- Handset
- Base
• 2 x NiMH rechargeable batteries AAA size
(1.2V 550 mAh)
• Power supply
• Telephone line cord - Charger (multi-packs only)
For each additional handset, you will have
the following:
• Additional handset
• Charger with power supply attached
• 2 x NiMH rechargeable batteries AAA size
(1.2V 550 mAh)
IMPORTANT
This equipment is not designed for making emergency calls when the power fails. Alternative arrangements should be made for access to
emergency services.





Contents
Setting up ....4
Finding a location 4
Connecting your phone 4
Preparing the handsets ....5
Installing and charging the handset batteries 5
Battery Low Warning 5
Battery Performance....5
Setting the data and time....6
Setting the date and time....6
Connecting the telephone line cord....6
Your handset 7
Your DECT1725 base and charger (+1, +2 models only) 8
Your handset display....9
Standby Display 10 Quick Guide 44
Using your phone 12
Make a call 12 Adjust the earpiece!
receiver volume during a call 12
Preparatory dialling (pre-dial) 12
Handset range 12 Call timer 12
Handsfree mode 13
End a call....13 Resell to call....17
Receive a call 13 Call Waiting 13
Receiving internal calls 13
Redial 14
[2]
Redial the last number called....14
Redial any of the last 10 numbers called....14 Class a radial number in the apparent....14
Delete numbers from the redial list ....15
Mute (privacy)....15 Finding missing handsets....15
Finding paging handsets....15 Keypad lock....16
Using the phonebook 17
Store a phonebook name/number 17 View and dial a phonebook entry 18
Edit a phonebook name/number 18
Delete a phonebook name/number 19
Phonebook status....19
Handset and base menu settings 20
Handset earpiece 20 Handset ringer volume 20
Handset speaker 20
Handset ringer type 21
Auto answer 21 Alarm 22
Handset name 22
Language 23 Base ringer volume 23
Base ringer type 24
Call baming 25

●
+
⊕


●
Settings menu....26
Tones 25
Flash 26 Dial Mode 27
Tone Dialling Switch-Over (Australia only) 27
Registering a new handset....27
De-register a handset....28
Base PIN code 29 Selecting a base 79
Selecting a dose 25 Resetling your phone 30
Default settings....31
Network services 32
Caller ID 32 Caller ID 32
Calls log 32 View the Calls log 33
Dial calls log number 33
Copy Calls log number to the phonebook 33
Delete Calls log entry(ies) 34
Using extra handsets 35
Register your handset
to another base....35 Call another handset (internal cell)....25
Call another handset (Internal call) ....35 Answer on external call while on
Answer an external call while on an internal call 35
Transferring a call 38
Conference call 36
Simple solutions 37
[3]
Handset/Base 37
Caller ID 38
General Information 39
Safety 59
Maintenance 45 Cleaning your product 40
Replacing the handset batteries 40
How many telephones can I have? 41
Warranty 42
![UNIDEN DECT 1725+2 - [3] - 1](/content/2026/06/1190147/images/9f4fca039422495ffb856b88653dd7d010b5c280e50a11d8fe06a35d322e8703.jpg)
●
+

[Non-Text]
![UNIDEN DECT 1725+2 - [Non-Text] - 1](/content/2026/06/1190147/images/7be2b79f182c6c53d68a3afab986925be9891a36669967264dcea8bef1406320.jpg)
![UNIDEN DECT 1725+2 - [Non-Text] - 2](/content/2026/06/1190147/images/c1c5dbf340442bd6a3bd1f478601999a73ecf81c3b0017bedcd5f68ddd4f10a9.jpg)
Setting up
Follow these simple steps to prepare your phone(s) ready for use.
Finding a location
Make sure your phone is:
- Within 1.8 metres of a power and phone socket so that the cords will reach.
- At least 1 metre away from other electrical appliances, to avoid interference.
- Not located in humid or damp conditions, e.g. in a bathroom.
Connecting your phone
1 Connect the base power supply into the socket on the back of the base. Plug the other end into the mains power socket.
WARNING
Use only the power supply that came with your phone.
Using another power supply could seriously damage your phone and invalidate your warranty.
Do not connect the telephone line cord until your handset is fully charged. This will prevent the risk of the phone being answered before the batteries are charged. Answering the phone before the batteries are fully charged may prevent them from reaching their optimum capacity.
2 On each charger (multi-packs only):
Connect the power supply attached to each charger into the mains and switch on.


Preparing the handsets
Installing and charging the handset batteries.
1 On each handset: Remove the battery compartment cover. Press down on the semi-circle indent and slide the cover off. Connect the supplied batteries with the correct polarity. Slide the battery cover back until it clicks securely into place.
2 To charge the batteries, place the handset(s) on the base or on a charger. The charging light in the base illuminates. The symbol scrolls until the handset is fully charged. If the charging light does not come on, reposition the handset in the base or charger, ensuring that the charging points contact. You must charge each handset for 15-20 hours before use.
WARNING
Under no circumstances should non-rechargeable batteries be used. Only use the supplied battery pack or you will invalidate your guarantee and may damage the telephone.
BATTERY LOW WARNING
If the □ symbol is displayed on the handset or if you hear the low battery tone, you will need to recharge your handset. Note: If you set the "Battery Low" tone to off, the low battery tone will not sound. We recommend that you place the handset back on the base/charger between use to ensure that it is always fully charged.
Battery Performance
The handset may become warm during charging, this is normal. On a single charge your handset will give 10 hours talk time and 7 days standby time.
New NiMH batteries do not reach their full capacity until they have been in use for several days.
Over time, as the batteries wear out, the charge capacity will reduce, so reducing the talk/standby time of the handset.
Eventually the batteries will need to be replaced.
[5]

●
Setting the date and time
The phone uses the 12 or 24 hour clock.
In standby mode:
1 Press
2 Press on to select and press
3 Press or to select and press.
4 Press or to select and press
5 Press on to select MH1 and press
6 Press or until is ▼ TIME FORMAT displayed and press
7 Press on to selector 24 - HOUR 12 - HOUR and press :
8 Press or until is displayed SET TIME and press
9 Enter Hour and Minute using the keypad, and press.
[6]
Connecting the telephone line cord
High Speed Internet
If your phone line also has High Speed Internet please ensure you are using an approved line filter before connecting the telephone cord.
1 Connect the telephone line cord into the TEL LINE socket on the back of the base. Plug the other end into the telephone wall socket or approved line filter.
Only use the telephone line cord supplied or your phone may not work correctly. Setting up is now complete. You can make and receive calls on your phone.

●
●
[NO TEXT]
广力云智慧零售收银系统
![Your Handset Earpiece/Receiver Display Clear • Use to delete incorrect digits or letters • Press to go back to the previous menu • Press and hold to exit menu and return to standby • Press and hold to off the analyze temporarily • Press to mute the conversation Down • Press during a call to decrease the centerpiece volume • Use to scroll through the phonebook, menu, radial list, or CALLER ID log. • Press to decrease the handset finger volume when the phone rings. Phonebook • Use to access the phonebook list Redial/Flash • Press to access the redial list. • Press during a call for flash function Temporary Tone • Use to set up the conference call Microphone Up • Press during a call to increase the centerpiece volume • Use to scroll through the phonebook, menu, radial list, or CALLER ID log. • Press to increase the handset finger volume when the phone rings. Menu/OK • Press to access the menus. • Press to control a setting. • Press and hold to power on/off the handset. • Use with # key to switch the handset keypad lock On/Off. Hook • Press to make and receive calls. • Press to end calls. Intercom • Use when making internal cells, conference calls or for transferring calls (if you have more than one handset registered to your base); Speaker/Pause • Used for hands free mode. • Press and hold to enter a pause. #Lock • Use after pressing manualok key to switch the handset keypad lock On or Off. [7]](/content/2026/06/1190147/images/29b7e8bd2b926d002380899b6b2d93b9aac84fafbcd0f7eab79832b6f1e98326.jpg)
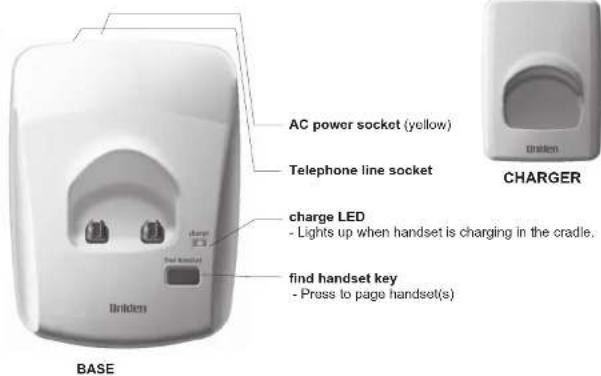
Your DECT1725 base and charger (+1, +2 models only)
[8]

●


●


●
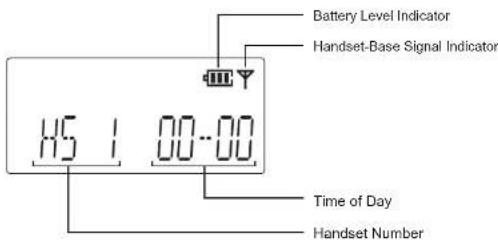
Your handset display
The following figure shows the layout of icons on your handset display.
Symbol Explanation
→
Menu
◀
Indicates more characters to display to the left
▶
Indicates more characters to display to the right
CLI
Indicates new CID
[NO TEXT]
Displayed when viewing the phonebook list or in the phonebook menu. Flashes when the phonebook is full.
C
Always displayed when your handset is on, shows the battery status.
[No text]
Displayed when you have subscribed to a message waiting service and you have a new message waiting.
[9]
Symbol Explanation
![UNIDEN DECT 1725+2 - [9] - 1](/content/2026/06/1190147/images/3219da79fc1bf329d042816335b033af259138bffe3069c05ad82fa57c58c3fd.jpg)
Remains steady when the line is in use.
EXT
External call in progress
INT
Internal call in progress
![UNIDEN DECT 1725+2 - [9] - 2](/content/2026/06/1190147/images/9f5ba6f938a24b0d16185ca77e34c9632e30a65a8415b798ab4eb2434bdb811d.jpg)
Indicates the alarm has been set.
Y
Always displayed when your handset is on. Flashes and you hear a warning tone during a call if the handset moves out of range, you will need to move closer to the base for clearer reception.
π
Displayed when the keypad has been locked.
[Symbol]
Talk by speaker phone
Standby Display
Once charged, your handset display will be as below, displaying the handset name and number, and time and date. This is referred to as 'standby mode'.
For example:
[10]


Quick Guide
Function Button press
Make a call 📞 or press 📞 . enter number.
Preparatory call Enter number, on press
Adjust earpiece volume During a call, or
End a call ☐ or place handset on base.
Receive a call Phone rings.
Redial Press, then or to display number
or press.
Mute During a call, clear. To resume a call press clear again.
Store phonebook number select PHONEBOOK, select ADD ENTRY, enter name,
enter number, Select., MELODY
Dial phonebook number thereor, or press.
Handset ninger melody ☐, select HS SETTINGS, ☐, Select RING SETUP, ☐, Select INT
RING or EXT RING, Select MELODY, and select a melody.
Make internal call 📄, enter internal handset number;
[11]


Using your phone
Make a call
- Press. The symbols is displayed. When you hear the dial tone, dial the number you want. The number is shown in the display. After a short delay the call timer will start timing the call.
Adjust the earpiece/receiver volume during a call
1 Press or to adjust the volume. There are five levels.
Preparatory dialling (pre-dial)
1 In standby mode, enter the number to be dialed. The number is displayed. You can enter numbers up to 32 digits long. Press ☐ to delete any incorrect digits. Press and hold ☐ to delete all digits. 2 Press ☐ to dial the displayed number.
[12]
Handset range
Up to 300 metres outdoors and up to 50 metres indoors (in ideal conditions). If the handset is too far away from the base, during standby, Approves and the symbol will flash. During a call you will hear a warning tone. You will need to mover closer to the base for clearer reception and to avoid being disconnected.
Call timer
When you make or receive a call, a short while after the line is connected the call timer will show the duration of the call in the display in hours, minutes and seconds.

●
Handsfree mode
You can use handsfree mode to talk to your caller without holding the handset to your ear. You can speak into the handset microphone and listen over the loudspeaker.
Handsfree also enables other people in the room to listen in to the conversation.
During a call:
1 Press 🎨. The 🔊 symbol is displayed while in handsfree mode.
2 Press 📋 again to go back to the normal talk mode.
End a call


Place the handset back on the base/charger.
Receive a call
When you receive a call the handset(s) will ring (as long as handset ring volume is not set to OFF - see page 20).
[13]
The symbol EXT will flash in the handset display. If you have subscribed to a Caller ID service through your network supplier, the caller's number will be displayed (if available). See page 32 for further information on Caller ID.
1 Press to answer the call.
Or simply lift the handset from the base (providing Auto Answer is set to On, see page 21). After a short delay the call timer will start timing the call.
Call Waiting
If you subscribe to Call Waiting and the call waiting tone sounds during a call:
Australia: Press 📄 then 2 to switch between callers.
New Zealand: Press to switch between callers.
Receiving internal calls
If you receive a call from another handset, the INT symbol and the internal caller's handset number will be displayed.

●
●

[Non-Text]
![UNIDEN DECT 1725+2 - [Non-Text] - 1](/content/2026/06/1190147/images/e63ef91489f402acf7855105cce60624f7b354f6ace533c2d528a7696ed3d1d6.jpg)
Redial
Redial the last number called
Your handset saves the last 10 numbers called into a redial list. You can select and redial any number from the list at a later time. Each handset has its own redial list. Numbers stored in the redial list can be up to 32 digits long.
Redial any of the last 10 numbers called
Your handset saves the last 10 numbers called into a redial list. You can select and redial any number from the list at a later time. Each handset has its own redial list.
Numbers stored in the redial list can be up to 32 digits long.
1 In standby mode, press 📄 to display the last number called.
2 Press 📄 or ⬇ to display any of the last 10 numbers called.
If the name/number is stored in the phonebook, the name will be shown as well.
3 Press ☑ to dial the displayed number.
Store a redial number to the phonebook
1 In standby mode, press 📂 to display the last number called.
2 Press or to display the redial number you want.
3 Press, then use or to select ADD TO PB, press.
4 is###Payed.
Enter a name using the keypad and press □. For information on entering names, see page 17. You can enter a name of up to 12 letters. Press □ to delete an incorrect letter.
5 The number is displayed again, press
6 Select distinctive ring. Press ▲ or ▼ to select a ringer press
[14]





●
Deleting numbers from the redial list
1 In standby mode, press 📄 to display the last number called.
2 Press ▲ or ▼ to display any of the last 10 numbers called.
3 With the number you want displayed, press
4 Press or to select the DELETE number selected or members in the list.
5 app05181 ? Press
Mute (privacy)
When on a call you can mute the handset microphone and speak privately to someone in the same room, without your caller hearing you.
1 During a call, press . □ CALL MUTED is displayed while mute is on and your caller cannot hear you.
2 Press □ again to resume your call.
Finding/paging handsets
You can use the Find Handset button on the base to locate a missing handset or page the user (paging calls cannot be answered by a handset).
1 Press on the base. Any handsets registered to your base will ring.
To stop the paging ring:
1 Press any key on the handset or press □ on the base again. If you do not stop the paging ring, it will stop automatically after 60 seconds.
[15]
![UNIDEN DECT 1725+2 - [15] - 1](/content/2026/06/1190147/images/cbed34d5ac86d2499f0ff6ed244b044d26d3f116e10cce9b5516d0f603374287.jpg)
![UNIDEN DECT 1725+2 - [15] - 2](/content/2026/06/1190147/images/63fcf4d5cd99615ea192018375e94df444b46d7f2e2236ff29f3d5e68cd26760.jpg)
●
●

[Non-Text]
![UNIDEN DECT 1725+2 - [Non-Text] - 1](/content/2026/06/1190147/images/1d3e8f7ce15e57a251eba162b1a6d6345bbef4ce7ceb12ab1f8c17d704a4cdf8.jpg)
![UNIDEN DECT 1725+2 - [Non-Text] - 2](/content/2026/06/1190147/images/a56e040c3e84e7af9f9cff5b91f7817192c2e2420e5c1125526cecc82bd7cb0e.jpg)
Keypad lock
The keypad lock helps prevent accidental dialling when you are carrying the handset around and can also be used to stop younger children dialling out accidentally.
Switch the keypad lock ON
1 Press and then. symbol appears.
Switch the keypad lock OFF
1 to Pnalschinen keypad and return to standby mode.
[16]


Using the phonebook
You can store your 50 frequently used names and numbers in the phonebook for easy dialling.
Store a phonebook name/number
Phonebook entries are stored alphabetically.
1 Press.
2 Press order select Press
PHONEBOOK
- Select .REES ENTRY

4 NAME ? appears. Enter name using the keypad, then press. Stored names can be up to 12 letters long. Press to delete an incorrect letter. To enter a space, press.
Entering names
For example, to enter the name JOHN:
For ,pre5+once.
For pions three times.
For ,ipre4sntwice.
For pre-6 outwise.
Press
5 NUMBER ? is displayed. Enter the number. Press . Stored numbers can be up to 20 digits long.
Press ☐ to delete an incorrect digit.
Press
- is displayed. Press or to
select a tone type and press . The phonebook entry is now stored.
Press ☐ to exit the phonebook menu and return to standby at any time.
[17]


Entering a 'pause' in a stored number
You may need to enter a pause in some international or charge card numbers or if you are connected to a switchboard.
When storing a number, at the point where you want a pause, press and hold 📂. A P will be shown in the display.
View and dial a phonebook entry
1 Press ☐ and the first alphabetical entry is displayed.
2 Press or to scroll through the
entries and display the entry you want. Or Search alphabetically for the entry.
To search alphabetically
Enter the first letter of the name you want using the keypad.
E.g. for HELEN, press 4th twice, then use or ▲ to display the exact entry you want.
3 Press to dial the number.
Or Press char to exit and return to standby.
Edit a phonebook name/number 1 Press.
- Press on to select. Press
PHONEBOOK
- Press do to select. Press
CHANGE ENTRY
-
Press ▲ or ▼ to display the name for the entry you want (or search alphabetically).
-
Press ☐ to access the phonebook menu.
-
Press repeatedly to delete any incorrect letters, then enter the correct letters using the keypad and press.
-
The number is displayed. Press repeatedly to delete any incorrect digits, and enter the correct number using the keypad and press.
-
Select a melody type and press
[18]

+

[Non-Text]

●
Delete a phonebook name/number
1 Press
- Press on to select. Press :
PHONEBOOK
- Press or to select or DELETE ALL. Press.

DELETE ENTRY
4 Press 🙏 or ⬇ to display the name for the entry you want (or search alphabetically). Press 📄
- is displayed: Press

Phonebook status
This allows you to show how many entries are stored in the phonebook.
-
Press
-
Press of to select Press
PHONEBOOK
3 Press or to select Press
PB STATUS
Phonebook status is displayed.
[19]


●


Handset and base menu settings
Handset earpiece
There are 5 earpiece volumes to choose from.
- Press to access the main menu.
16
- Press of to select and
press
- SETTING
prada
▲
Press of tols
press
AUDIO SETUP

-
Select aRFPESSE U.
-
Page ▲ on 1/4 to select the website you
-
Press|and or ▼ to selec
want, then press to confirm.
Handset ringer volume
There are 5 ringer volumes to choose from. You
can also select volume Off if you do not want to
be disturbed.
You can set a different ringer volume for each handset registered to your base.
virad
- Press ☐ to access the main menu.
(1) 2017年1月1日
Press 0.10 select and
HS SETTINGS
[20]
press
- Press or to select and
dress
press
- Press or to select for
Floss of 39% select of p
RING and press.
- Process: 10 units
Press of the selected and VOLUME
press □. Select the volume you want (you
will hear a sample of each as you
scroll through). Press.

Handset speaker
There are 5 speaker volumes to choose from.
-
Press ☐ to access the main menu.
-
Box plot gold and 15 observations
Press qiaq selectand
press
- Drop drive color band
Press qnd seleq band
press □
- Press or select and
Press qndq select by an
press
-
证明: = + 12
-
Press | cd | or ⬤ to select the volume you
want, then press to confirm


●
Handset ringer type Auto answer
There are 10 handset ringer melodies. You can select different ring tones for external calls and internal calls.
- Press 📄 to access the main menu.
- Press or b select and press. HS SETTINGS
- Press or to select and RING SETUP press
- Press drop selector or RING and press .INT RING EXT
- Press order select and press H8.00 Select the melody you want (you will hear a sample of each as you scroll through), then press to confirm.
Auto answer, lets you answer the phone just by picking it up from the cradle.
If you switch auto answer off, you have to press to answer a call, even if a handset is on the base.
The default setting is 'On'.
-
Press ☐ to access the main menu.
-
Press order select and press HS SETTINGS
- Press or a select Press AUTO ANSWER
- Press order selector. Press ON OFF
[21]
![UNIDEN DECT 1725+2 - [21] - 1](/content/2026/06/1190147/images/6f3678b6ca60bbb4c8f385b43bfa976d602e038a5dd6def381fad7076eacb61a.jpg)
●
+

[Non-Text]
[Non-Text]
[Non-Text]
[Non-Text]
[Non-Text]
[Non-Text]
[Non-Text]
[Non-Text]
[Non-Text]
[Non-Text]
[Non-Text]
[Non-Text]
[Non-Text]
[Non-Text]
[Non-Text]
[Non-Text]
[Non-Text]
[Non-Text]
[Non-Text]
[Non-Text]
[Non-Text]
[Non-Text]
[Non-Text]
[Non-Text]
[Non-Text]
[Non-Text]
[Non-Text]
[Non-Text]
[Non-Text]
[Non-Text]
[Non-Text]
[Non-Text]
[Non-Text]
[Non-Text]
[Non-Text]
[Non-Text]
[Non-Text]
[Non-Text]
中
-
•
[Non-Text]
[Non-Text]
[Non-Text]
[Non-Text]
[Non-Text]
[Non-Text]
[Non-Text]
[Non-Text]
[Non-Text]
[Non-Text]
[Non-Text]
+
+
[Non-Text]
[Non-Text]
[Non-Text]
[Non-Text]
[Non-Text]
[Non-Text]
[Non-Text]
[Non-Text]
[Non-Text]
[Non-Text]
[Non-Text]
[Non-Text]
[Non-Text]
[Non-Text]
[Non-Text]
[Non-Text]
[Non-Text]
[Non-Text]
[Non-Text]
[Non-Text]
[Non-Text]
[Non-Text]
[Non-Text]
[Non-Text]
[Non-Text]
[Non-Text]
[Non-Text]
[Non-Text]
[Non-Text]
[Non-Text]
[Non-Text]
[Non-Text]
[Non-Text]
[Non-Text]
[Non-Text]
[NO TEXT]
一
[Non-Text]
[Non-Text]
[Non-Text]
[Non-Text]
[Non-Text]
[Non-Text]
[Non-Text]
[Non-Text]
+
[Non-Text]
[Non-Text]
[Non-Text]
[Non-Text]
[Non-Text]
[Non-Text]
[Non-Text]
[Non-Text]
[Non-Text]
[Non-Text]
[Non-Text]
[Non-Text]
[Non-Text]
[Non-Text]
[Non-Text]
[Non-Text]
[Non-Text]
[Non-Text]
[Non-Text]
[Non-Text]
[Non-Text]
[Non-Text]
[Non-Text]
[Non-Text]
[Non-Text]
[Non-Text]
•
[Non-Text]
[Non-Text]
[Non-Text]
[Non-Text]
[Non-Text]
[Non-Text]
+
[Non-Text]
[Non-Text]
[Non-Text]
[Non-Text]
[Non-Text]
[Non-Text]
[Non-Text]
[Non-Text]
[Non-Text]
[Non-Text]
[Non-Text]
[Non-Text]
[Non-Text]
[Non-Text]
[Non-Text]
[Non-Text]
[Non-Text]
[Non-Text]
[Non-Text]
[Non-Text]
[Non-Text]
[Non-Text]
[Non-Text]
[Non-Text]
[Non-Text]
[Non-Text]
[Non-Text]
[Non-Text]
[Non-Text]
[Non-Text]
[Non-Text]
[Non-Text]
[Non-Text]
[Non-Text]
[Non-Text]
[Non-Text]
[Non-Text]
[Non-Text]
[Non-Text]
[Non-Text]
[Non-Text]
[Non-Text]
[Non-Text]
[Non-Text]
[Non-Text]
[Non-Text]
[Non-Text]
[Non-Text]
[Non-Text]
•
-
•
[Non-Text]
[Non-Text]
[Non-Text]
[Non-Text]
[Non-Text]
[Non-Text]
[Non-Text]
[Non-Text]
[Non-Text]
[Non-Text]
[Non-Text]
•
[NO TEXT]
[Non-Text]
[Non-Text]
[Non-Text]
[Non-Text]
[Non-Text]
[Non-Text]
[Non-Text]
[Non-Text]
[Non-Text]
[Non-Text]
[Non-Text]
[Non-Text]
[Non-Text]
[Non-Text]
[Non-Text]
[Non-Text]
[Non-Text]
[Non-Text]
[Non-Text]
[Non-Text]
[Non-Text]
[Non-Text]
[Non-Text]
[Non-Text]
[Non-Text]
[Non-Text]
[Non-Text]
[Non-Text]
[Non-Text]
[Non-Text]
[Non-Text]
[Non-Text]
[Non-Text]
[Non-Text]
[Non-Text]
[Non-Text]
[Non-Text]
[Non-Text]
[Non-Text]
[Non-Text]
[Non-Text]
[Non-Text]
[Non-Text]
[Non-Text]
©
-
•
[Non-Text]
[Non-Text]
[Non-Text]
[Non-Text]
[Non-Text]
[Non-Text]
[Non-Text]
[Non-Text]
[Non-Text]
•
[NO TEXT]
[Non-Text]
[Non-Text]
[Non-Text]
[Non-Text]
[Non-Text]
[Non-Text]
[Non-Text]
[Non-Text]
[Non-Text]
[Non-Text]
[Non-Text]
[Non-Text]
[Non-Text]
[Non-Text]
[Non-Text]
[Non-Text]
[Non-Text]
[Non-Text]
[Non-Text]
[Non-Text]
[Non-Text]
[Non-Text]
[Non-Text]
[Non-Text]
[Non-Text]
[Non-Text]
[Non-Text]
[Non-Text]
![UNIDEN DECT 1725+2 - [Non-Text] - 1](/content/2026/06/1190147/images/df16fbc7cd31238a5a8c38542e5762797f3146845e1caaa505e64b7bddd2e504.jpg)
●
Alarm Handset name
Your phone allows you to set an alarm.
1 Press 📄 to access the main menu.
2 Press or to select Press. HS SETTINGS.
3 Press or to select Press
ALARM.
4 Press or to select or Press
ON OFF
5 If you select ON, enter time for the alarm using the number keypad.
6 Press.
7 Press or to selector SNOOZE OFF, Press.
SNOOZE ON
The 🔒 appears, showing that the alarm is set to on.
When the reminder occurs, your phone will ring. To stop alarm tone, press any key on the handset. To off the snooze temporally, press and hold door
[22]
You can change the name your phone displays on the screen. If you have more than one handset, you can use the name to identify your handset.
1 Press ☐ to access the main menu.
2 Press or to select HS SETTINGS.
Press.
3 Press or to select Press :
HS LABEL
4 Enter the name using the number keypad. Press
![UNIDEN DECT 1725+2 - [22] - 1](/content/2026/06/1190147/images/2a13781a62f72e25fbcd7d1f4855a1b1237603a246013f32cc7f9cf8cd4e2c5d.jpg)
●
+

[Non-Text]
[Non-Text]
[Non-Text]
[Non-Text]
[Non-Text]
[Non-Text]
[Non-Text]
[Non-Text]
[Non-Text]
[Non-Text]
[Non-Text]
[Non-Text]
[Non-Text]
[Non-Text]
[Non-Text]
[Non-Text]
[Non-Text]
[Non-Text]
[Non-Text]
[Non-Text]
[Non-Text]
[Non-Text]
[Non-Text]
[Non-Text]
[Non-Text]
[Non-Text]
[Non-Text]
[Non-Text]
[Non-Text]
[Non-Text]
[Non-Text]
[Non-Text]
[Non-Text]
[Non-Text]
[Non-Text]
[Non-Text]
[Non-Text]
[Non-Text]
[Non-Text]
[Non-Text]
©
一
•
[Non-Text]
[Non-Text]
[Non-Text]
[Non-Text]
[Non-Text]
[Non-Text]
[Non-Text]
[Non-Text]
[Non-Text]
[Non-Text]
[Non-Text]
[Non-Text]
[NO TEXT]
©
广力云智慧零售收银系统
[Non-Text]
[Non-Text]
[Non-Text]
[Non-Text]
[Non-Text]
[Non-Text]
[Non-Text]
[Non-Text]
[Non-Text]
[Non-Text]
[Non-Text]
[Non-Text]
[Non-Text]
[Non-Text]
[Non-Text]
[Non-Text]
[Non-Text]
[Non-Text]
[Non-Text]
[Non-Text]
[Non-Text]
[Non-Text]
[Non-Text]
[Non-Text]
[Non-Text]
[Non-Text]
[Non-Text]
[Non-Text]
[Non-Text]
[Non-Text]
[Non-Text]
[Non-Text]
[Non-Text]
[Non-Text]
[Non-Text]
[Non-Text]
[Non-Text]
[Non-Text]
[Non-Text]
[NO TEXT]
●
[Non-Text]
[Non-Text]
[Non-Text]
[Non-Text]
[Non-Text]
[Non-Text]
[Non-Text]
[Non-Text]
[Non-Text]
[Non-Text]
[Non-Text]
(1) AD = BD = 1
•
⊕
[Non-Text]
[Non-Text]
[Non-Text]
[Non-Text]
[Non-Text]
[Non-Text]
[Non-Text]
[Non-Text]
[Non-Text]
[Non-Text]
[Non-Text]
[Non-Text]
[Non-Text]
[Non-Text]
[Non-Text]
[Non-Text]
[Non-Text]
[Non-Text]
[Non-Text]
[Non-Text]
[Non-Text]
[Non-Text]
[Non-Text]
[Non-Text]
[Non-Text]
[Non-Text]
[Non-Text]
[Non-Text]
[Non-Text]
[Non-Text]
[Non-Text]
[Non-Text]
[Non-Text]
HS SETTINGS.
HS LOPE
AS LABEL
umber keypad.
(1)
[Non-Text]
[Non-Text]
[Non-Text]
[Non-Text]
[Non-Text]
[Non-Text]
[Non-Text]
[Non-Text]
[Non-Text]
[Non-Text]
[Non-Text]
[Non-Text]
[Non-Text]
[Non-Text]
[Non-Text]
[Non-Text]
[Non-Text]
[Non-Text]
[Non-Text]
[Non-Text]
[Non-Text]
[Non-Text]
[Non-Text]
[Non-Text]
[Non-Text]
[Non-Text]
[Non-Text]
[Non-Text]
[Non-Text]
[Non-Text]
[Non-Text]
[Non-Text]
[Non-Text]
[Non-Text]
[Non-Text]
[Non-Text]
[Non-Text]
[Non-Text]
[Non-Text]
[Non-Text]
[Non-Text]
[Non-Text]
[Non-Text]
[Non-Text]
[Non-Text]
[Non-Text]
[Non-Text]
[Non-Text]
(五)
(1)
(No text)
r phone displays on
our handset.
main menu.
A. 2011-04-26
HS LABEL
umber keypad
[Non-Text]
[Non-Text]
[Non-Text]
[Non-Text]
[Non-Text]
[Non-Text]
(二)
The Ground Truth image displays a single, solid horizontal line. According to Rule 2 (UNDERSCORE & LINE RULES), if the GT contains lines used for stylistic emphasis or as background (like ruled paper), the OCR result must ignore them. The line in the GT is clearly a stylistic/background line, not a placeholder for text. Therefore, the OCR should not have output any underscores. Outputting \`\_\_\_\_\` constitutes an error under Rule 2, as it hallucinates placeholder symbols where none are semantically intended. Hence, the OCR result is inconsistent with the Ground Truth.
1
(1)
[Non-Text]
[Non-Text]
[Non-Text]
[Non-Text]
[Non-Text]
[Non-Text]
[Non-Text]
[Non-Text]
[Non-Text]
[Non-Text]
[Non-Text]
[Non-Text]
[Non-Text]
[Non-Text]
[Non-Text]
[Non-Text]
[Non-Text]
[Non-Text]
[Non-Text]
[Non-Text]
[Non-Text]
[Non-Text]
[Non-Text]
[Non-Text]
[Non-Text]
[Non-Text]
[Non-Text]
[Non-Text]
[Non-Text]
[Non-Text]
[Non-Text]
[Non-Text]
[Non-Text]
[Non-Text]
[Non-Text]
[Non-Text]
1
1
•
phone displays on man one handset, you
1
HS SETTINGS.
US LOPE
(1)基因通过控制 通过控制
(1) 本说明仅供参考。
[Non-Text]
[Non-Text]
[Non-Text]
[Non-Text]
[Non-Text]
(二)
•
| ⊕
1
[Non-Text]
[Non-Text]
[Non-Text]
[Non-Text]
[Non-Text]
[Non-Text]
[Non-Text]
![UNIDEN DECT 1725+2 - [Non-Text] - 1](/content/2026/06/1190147/images/74d4fe161ccfa1e2c3107364cb108a2f38b260050d583cb65a3f77d721eec227.jpg)
Language Base ringer volume
You can change the language the menu display will use
There are 16 languages to choose from.
1 Press to access the main menu.
2 Press or to select and HS SETTINGS press
3 Press or select LANGUAGE
4 Press of to select language.
Press to confirm.
There are 5 volume levels to choose from or you can select volume Off.
1 Press ☐ to access the main menu.
2 Press or to select and BS SETTINGS press
3 Press or to select and press RING SETUP
4 Press of until is √ BS VOLUME
displayed and press
5 Press ▲ or √ to select the volume you want (you will hear a sample of each as you scroll through), and press 📄 to confirm.
[23]


⊕
—
⊕
⊕
—
⊕
⊕
—
⊕
⊕
—
⊕
⊕
—
⊕


Base ringer type
There are 5 base ringer melodies to choose from.
1 Press to access the main menu.
2 Press or to select and press.
BS SETTINGS
3 Press or to select and press.
RING SETUP
4 Press or to select and press.
RS HELDY
5 Press ▲ or ▼ to select the melody you want. You will hear a sample of each as you scroll through the melodies.
6 With the ringer melody you want displayed, press to confirm your selection.
[24]


●
Call Barring
When switched on, Call Barring prevents calls being made.
1 Press ☐ to access the main menu.
2 Press onto select
Press .
3 Press or to select ▼ BARRING . Press
4 PIN ? is displayed. Enter the PIN code using the number keypad. Press
5 Press onto select or. Press to confirm. ON OFF
[25]

●


Settings menu
Tones
You can switch on or off the tones for key touch, battery low, and out-of-range alarm.
For example, when the key tone is set to ON, you will hear a tone each time you press a keypad button.
1 Press ☐ to access the main menu.

HS SETTINGS
Press

TUNE SELF
4 Press 📁 or ⬇ to select the option you want.
KEY TONE
BATTERY LOW
RANGE ALARM
Press
5 Press or display/either or. ON OFF Press to confirm.
[26]
Flash
Flash is used when connected to certain switchboards, for transferring calls to another extension number, and for some network services. Contact your network or switchboard provider for advice on how to use the button.
Changing the Flash time
You can select the flash time from short or long according to your switchboard requirements. Consult your switchboard provider for advice if unsure which setting you need.
1 Press ☐ to access the main menu,
2 Press or until is displayed and press
3 Press or to select and press. FLASH TIME
4 Press or to select oEADT LONG press.


●
Dial mode
You can set your phone to use either Tone or Pulse dialling. The pre-set setting is TONE dialling, where you will hear a tone beep each time you dial a number.
Most modern exchanges and switchboards use Tone dialling, so you should not need to change this setting. Only change it if your switchboard uses Pulse dialling or if you cannot make a call using Tone dialling.
1 Press to access the main menu.
2 Press of until is √ displayed and press □ ES SETTINGS
3 Press of to select and DIAL MODE
press
4 Press or to display either or PULSE and press
TONE
Tone Dialling Switch-Over (Australia only)
If you have set your phone to use Pulse dialing, you can switch temporarily to Tone dialing for the duration of a call:
- Press
2 Press and hold Stone. Any digits entered after this long press of Stone will be dialed using tone dialing.
[27]
Registering a new handset
Registering a new handset
When you register a new handset to your base, you will be asked to enter the base PIN code.
The pre-set PIN code is 0000. If you wish you can change this code, see page 29.
Each handset can only be registered to one base at a time. Before registering, make sure the new handset is fully charged and that you have the base and handset in front of you.
On the handset you want to register:
1 Press to access the main menu.
2 Press or to select and press
REGISTRATION
3 Press rat or √
to select your base number.
On your base:
4 Press and hold ____ until you hear the registration tone. You are now in 'subscription mode'.
If the base already has the maximum number of handsets (5) registered to it you will hear the reject tone and you will need to de-register one of the existing handsets before you can register the new handset.
See section below for de-registering handsets.

●
⊕


On the handset you want to register: 5 Press.
6 Enter the base PIN code. Pre-set base PIN code is 0000.
7 Press.
You will hear a confirmation tone when registration is complete.
When in standby mode, the new handset number will be displayed.
The handset will automatically be allocated with the next available handset number. If the registration is failed, the handset display returns to the display before enter the registration step.
De-register a handset
If you have more than one handset registered to your base you can de-register a handset registered to use.
Before registering, make sure all handsets and the base are in standby mode.
1 On a handset not to be de-registered, press to access the main menu.
2 Press or until is √ BS SETTINGS displayed and press
3 Press or 40 display and press TERMINATE HS
4 PIN ? is displayed. Enter your PIN code and press
5 Press ▲ or ▼ to display the handset you want to de-register and press □.
If the handset has been registered to the base successfully, you will hear a confirmation tone.
[28]


●
Base PIN code
You need to enter the base PIN code when you are registering handsets. For security reasons you may wish to change the PIN code. You can choose a PIN code up to 4 digits long. If you reset the base from the handset, base PIN code will be 0000.
Always keep a record of your base PIN code. Note your PIN code and keep it in a safe place. If you change the PIN code you will need to use the new code for any handset registered to your base.
1 Press □ to access the main menu.
2 Press or to select and press
3 Press or to select and press
HOUIFY PIN
4 Enter the current PIN code using the number keypad. Press
5 NEW PIN appears. Enter a new PIN code and press.
6 CONFIRM ? appears, Enter a New PIN code again and press
[29]
Selecting a base
You can register a handset to up to 4 bases, e.g. one at work and one at home, and switch between them. Once your handset is registered with other bases, you can either specify the base you want to use.
1 Press to access the main menu.
2 Press or to select.
Press
3 Press or to select.
Press
HS SETTINGS .
SELECT BASE
4 Press ▲ or ▼ to select the base number. Press

●
+

[Non-Text]
![UNIDEN DECT 1725+2 - [Non-Text] - 1](/content/2026/06/1190147/images/88d69c98c029b78788a22a0b488eeaa94f9907ef148dd39d20ba9502f730c36a.jpg)
![UNIDEN DECT 1725+2 - [Non-Text] - 2](/content/2026/06/1190147/images/bd55e2ea220c89e1498a6ada05a3210b156a986fa5a5c9e54674f008f1b40da9.jpg)
Resetting your phone
If you reset your phone, both the base and handset will return to their pre-set (default) settings. If you have more than one handset registered to your base and you complete the following procedure, only the handset you reset and the base will go back to the default settings.
For the base:
1 Press to access the main menu.
- Press or to color and
BS SETTINGS
Press of top
press.
3 Press order select and press
BS DEFAULT
PIN ? appears. Enter your PIN code.
Press
The base will reset and the handset will return to standby mode.
[30]
For the handset:
1 Press □ to access the main menu.
A
2 Press of to|select and
HS SETTINGS
press
10
3 Press or to select and
HS DEFAULT
press
□
4 PIN? appears. Enter your PIN code.
Press
□
The handset will reset and the handset will beep.


Default settings
Handset and base
Ringer Volume Base Level 4
Handset Level 5
Ringer Type External Melody 1
Internal Melody 1
Tone Key On
Battery Low On
Range Alarm On
Alarm Off
Auto Talk On
Language English
Select Base
Flash Time
Base PIN
Call Barring
Base1
Short(Australia)
Long (New Zealand)
0000
Off
[31]


Network services
TO USE CALLER ID OR ANY OTHER SERVICES DETAILED IN THIS SECTION, YOU MUST FIRST CONTACT YOUR NETWORK PROVIDER AND SUBSCRIBE TO THE RELEVANT SERVICE.
Caller ID
With CALLER ID the caller's number is shown in the handset display as you receive an incoming call so you can see who is calling before you pick up the phone.
Only the last 12 digits of the number are displayed. If the number has more than 12 digits you will see the symbol ▶ below the first digit.
If your caller's number is stored in the phonebook and an exact number match is found, the caller's name will be displayed instead of the number.
Only the first 12 letters of the caller's name are displayed.
Calls log
To view the Calls log, press | | when the phone is in standby mode, and use or to scroll.
The calls log stores details of the last 40 incoming calls.
It can store numbers up to 20 digits long and names up to 12 characters long. When you have new calls the number of message appears in the display.
If the caller has withheld their number, WITHHELD NUM will be displayed or, if the number is unavailable the display will show UNAVAILABLE.
You will not be able to dial back an entry with one of these messages.
When the calls log is full, a new call will replace the oldest call.
[32]


●
View the Calls log
1 Press. The latest calls log entry is displayed (or BPTV if there are no entries).
2 Press 📁 or ⬇ to scroll through the calls log
3 Press or to continue viewing other calls log entries.
Or Press ☐ to exit and return to standby.
Dial calls log number
1 Press[▲]. The latest calls log entry is displayed.
2 Press 📂 or ⬇ to scroll to the number you want.
3 Press _g to dial the entry displayed.
Copy Calls log number to the phonebook
1 Press → to access the main menu.
2 Press or to select CIO BOOK and press . The latest calls log entry is displayed.
3 Press ▲ or ▼ to scroll and display the entry you want.
4 Press ☐ to dial the entry displayed.
[33]
5 is displayed: Press
[Unreadable]
Enter a name using the keypad and press
to confirm.
If you enter a name that is already stored in the phonebook, you will be prompted to enter another name.
6 The number is displayed.
If necessary you can edit the number, using to delete any incorrect digits and entering new ones using the keypad. The cursor appears at the first digit. For Telecom customers you can enter a 0 at the start to complete the STD prefix.
To confirm and save the entry to the phonebook, press .
7 Press ▲ or ▼ to select a distinctive ring.
Press.
8 Press clear to exit and return to standby.

●
●

[Non-Text]
[Non-Text]
[Non-Text]
[Non-Text]
[Non-Text]
[Non-Text]
[Non-Text]
[Non-Text]
[Non-Text]
[Non-Text]
[Non-Text]
[Non-Text]
[Non-Text]
[Non-Text]
[Non-Text]
[Non-Text]
[Non-Text]
[Non-Text]
[Non-Text]
[Non-Text]
[Non-Text]
[Non-Text]
[Non-Text]
[Non-Text]
[Non-Text]
[Non-Text]
[Non-Text]
[Non-Text]
[Non-Text]
[Non-Text]
[Non-Text]
[Non-Text]
[Non-Text]
[Non-Text]
[Non-Text]
[Non-Text]
[Non-Text]
[Non-Text]
⊕
•
[Non-Text]
[Non-Text]
[Non-Text]
[Non-Text]
[Non-Text]
[Non-Text]
[Non-Text]
[Non-Text]
[Non-Text]
[Non-Text]
[Non-Text]
[Non-Text]
•
⊕
[Non-Text]
[Non-Text]
[Non-Text]
[Non-Text]
[Non-Text]
[Non-Text]
[Non-Text]
[Non-Text]
[Non-Text]
[Non-Text]
[Non-Text]
[Non-Text]
[Non-Text]
[Non-Text]
[Non-Text]
[Non-Text]
[Non-Text]
[Non-Text]
[Non-Text]
[Non-Text]
[Non-Text]
[Non-Text]
[Non-Text]
[Non-Text]
[Non-Text]
[Non-Text]
[Non-Text]
[Non-Text]
[Non-Text]
[Non-Text]
[Non-Text]
[Non-Text]
[Non-Text]
[Non-Text]
[Non-Text]
[Non-Text]
[Non-Text]
[Non-Text]
[Non-Text]
[Non-Text]
[Non-Text]
[Non-Text]
[Non-Text]
[Non-Text]
[Non-Text]
[Non-Text]
[Non-Text]
[Non-Text]
[Non-Text]
[Non-Text]
[Non-Text]
[Non-Text]
[NO TEXT]
●
[Non-Text]
[Non-Text]
[Non-Text]
[Non-Text]
[Non-Text]
[Non-Text]
[Non-Text]
[Non-Text]
[Non-Text]
[Non-Text]
[Non-Text]
(No text)
•
⊕
[Non-Text]
[Non-Text]
[Non-Text]
[Non-Text]
[Non-Text]
[Non-Text]
[Non-Text]
[Non-Text]
[Non-Text]
[Non-Text]
[Non-Text]
[Non-Text]
[Non-Text]
[Non-Text]
[Non-Text]
[Non-Text]
[Non-Text]
[Non-Text]
[Non-Text]
[Non-Text]
[Non-Text]
[Non-Text]
[Non-Text]
[Non-Text]
[Non-Text]
[Non-Text]
[Non-Text]
[Non-Text]
[Non-Text]
[Non-Text]
[Non-Text]
[Non-Text]
[Non-Text]
[NO TEXT]
•
[Non-Text]
[Non-Text]
[Non-Text]
[Non-Text]
[Non-Text]
[Non-Text]
[Non-Text]
[Non-Text]
[Non-Text]
[Non-Text]
[Non-Text]
(1)
一
[Non-Text]
[Non-Text]
[Non-Text]
[Non-Text]
[Non-Text]
[Non-Text]
[Non-Text]
[Non-Text]
[Non-Text]
[Non-Text]
[Non-Text]
[Non-Text]
[Non-Text]
[Non-Text]
[Non-Text]
[Non-Text]
[Non-Text]
[Non-Text]
[Non-Text]
[Non-Text]
[Non-Text]
[Non-Text]
[Non-Text]
[Non-Text]
[Non-Text]
[Non-Text]
[Non-Text]
[Non-Text]
[Non-Text]
[Non-Text]
[Non-Text]
The image contains no discernible text or characters.
-
[Non-Text]
[Non-Text]
[Non-Text]
[Non-Text]
[33]
⊕
[Non-Text]
[Non-Text]
[Non-Text]
[Non-Text]
[Non-Text]
[Non-Text]
[Non-Text]
[Non-Text]
[Non-Text]
[Non-Text]
[Non-Text]
[Non-Text]
[Non-Text]
[Non-Text]
[Non-Text]
[Non-Text]
[Non-Text]
[Non-Text]
[Non-Text]
[Non-Text]
[Non-Text]
[Non-Text]
[Non-Text]
[Non-Text]
[Non-Text]
[Non-Text]
[Non-Text]
[Non-Text]
[Non-Text]
[Non-Text]
[Non-Text]
[Non-Text]
[NO TEXT]
•
[Non-Text]
[Non-Text]
[Non-Text]
[Non-Text]
[Non-Text]
[Non-Text]
[Non-Text]
[Non-Text]
[Non-Text]
(No text)
-
[NO TEXT]
[Non-Text]
[Non-Text]
[Non-Text]
[Non-Text]
[Non-Text]
[Non-Text]
[Non-Text]
[Non-Text]
[Non-Text]
[Non-Text]
[Non-Text]
[Non-Text]
[Non-Text]
[Non-Text]
[Non-Text]
[Non-Text]
[Non-Text]
[Non-Text]
[Non-Text]
![UNIDEN DECT 1725+2 - [Non-Text] - 1](/content/2026/06/1190147/images/8d0874e349ff84b9d0b8bb938dd20abcb8e4eb1aeee9488b2bc7319a20d9c9bd.jpg)
●
Delete Calls log entry(ies)
1 Press ☐ to access the main menu.
2 Press order to select and CTD BOOK press. The latest calls log entry is displayed.
3 Press 🔍 or ⬇ to scroll to the entry you want. If you delete all calls log, skip this step.
4 Press.
Select DELETE DELETE ALL
Press applications?
to confirm.
5 Press ☐ to exit and return to standby.
[34]
![UNIDEN DECT 1725+2 - [Non-Text] - 2](/content/2026/06/1190147/images/242a9b165ba92508f9cb46972fdb60fa32bdc2f30810eb1d27a6d91afc7f42d6.jpg)
+
●
©
[Non-Text]
![UNIDEN DECT 1725+2 - [Non-Text] - 3](/content/2026/06/1190147/images/14164b3ca69f76b9d7cc3b0a9e9721615122e5be6bc09818ab96c302eea794e0.jpg)
![UNIDEN DECT 1725+2 - [Non-Text] - 4](/content/2026/06/1190147/images/3c163d0b0219bcc4fbfcaefe8039e4e5a1971c70bb73d19e526d1cb808213f8d.jpg)
Using extra handsets
If you purchased a multi-pack all your handsets come pre-registered to the base.
Your phone is GAP compatible, which means you can register other DECT (Digitally enhanced cordless telephone) GAP compatible handsets to your base and register your handset to other GAP compatible bases.
You can use a total of 5 handsets with your base. Your handset can only be used with one base at an time.
To register a handset to your base, see page 27.
To de-register a handset from your base, see page 28.
If you already have 5 handsets registered to your base and you want to register a new handset, you will first need to de-register one of your existing handsets, see 'De-registering a handset', page 28.
With more than one handset you can make internal calls, transfer calls and hold conference calls.
Register your handset to another base Follow the procedure for registering shown in the other manufacturer's user guide.
Call another handset (internal call)
1 Press. The symbol and are displayed and you will hear the internal call dialing tone.
2 Enter the number of the handset you want to call using the number keypad.
Answer an external call while on an internal call During an internal call, if an external caller is trying to get through, you will hear a series of short beeps to alert you to the call.
If you have Caller ID, the caller's information will also be displayed.
1 To end the internal call, press 📋 to take the external call.
[35]


●
Transferring a call Conference call
You can transfer an external caller from your
handset to another internal handset.
During an external call:
1 Press ☑. The external caller is put 'on-hold'.
2 Enter the number of the handset you want to
call using the number keypad.
3 When the called handset answers, press or place the handset backs on the base to transfer the call.
If the called handset does not answer, press
to return to the external caller.
[36]
You can hold a 3-way conversation (conference call) between your handset, an external caller and another internal handset user.
During an external call:
- Press The external caller is put 'on-hold'.
2 Enter the number of the handset you want to
have a conference call with.
The called handset will ring.
3 When the called handset answers, press where on
the initiating handset to start your
conference call.
- Any handset can press 📄 at any time to
leave the conference call

●
●

[Non-Text]
[Non-Text]
[Non-Text]
[Non-Text]
[Non-Text]
[Non-Text]
[Non-Text]
[Non-Text]
[Non-Text]
[Non-Text]
[Non-Text]
[Non-Text]
[Non-Text]
[Non-Text]
[Non-Text]
[Non-Text]
[Non-Text]
[Non-Text]
[Non-Text]
[Non-Text]
[Non-Text]
[Non-Text]
[Non-Text]
[Non-Text]
[Non-Text]
[Non-Text]
[Non-Text]
[Non-Text]
[Non-Text]
[Non-Text]
[Non-Text]
[Non-Text]
[Non-Text]
[Non-Text]
[Non-Text]
[Non-Text]
[Non-Text]
[Non-Text]
[Non-Text]
[Non-Text]
©
一
•
[Non-Text]
[Non-Text]
[Non-Text]
[Non-Text]
[Non-Text]
[Non-Text]
[Non-Text]
[Non-Text]
[Non-Text]
[Non-Text]
[Non-Text]
[Non-Text]
[Non-Text]
[Non-Text]
●
©
(1) AD = BD = 1
[Non-Text]
[Non-Text]
[Non-Text]
[Non-Text]
[Non-Text]
[Non-Text]
[Non-Text]
[Non-Text]
[Non-Text]
[Non-Text]
[Non-Text]
[Non-Text]
[Non-Text]
[Non-Text]
[Non-Text]
[Non-Text]
[Non-Text]
[Non-Text]
[Non-Text]
[Non-Text]
[Non-Text]
[Non-Text]
[Non-Text]
[Non-Text]
[Non-Text]
[Non-Text]
[Non-Text]
[Non-Text]
[Non-Text]
[Non-Text]
[Non-Text]
[Non-Text]
[Non-Text]
[Non-Text]
[Non-Text]
[Non-Text]
[Non-Text]
[Non-Text]
中
●
[Non-Text]
[Non-Text]
[Non-Text]
[Non-Text]
[Non-Text]
[Non-Text]
[Non-Text]
[Non-Text]
[Non-Text]
[Non-Text]
[Non-Text]
[Non-Text]
+
The image contains no discernible text or characters.
[Non-Text]
[Non-Text]
[Non-Text]
[Non-Text]
[Non-Text]
[Non-Text]
[Non-Text]
[Non-Text]
[Non-Text]
[Non-Text]
[Non-Text]
[Non-Text]
[Non-Text]
[Non-Text]
[Non-Text]
[Non-Text]
[Non-Text]
[Non-Text]
[Non-Text]
[Non-Text]
[Non-Text]
[Non-Text]
[Non-Text]
[Non-Text]
[Non-Text]
[Non-Text]
[Non-Text]
[Non-Text]
[Non-Text]
[Non-Text]
[Non-Text]
[Non-Text]
[Non-Text]
[Non-Text]
[Non-Text]
[Non-Text]
[Non-Text]
[Non-Text]
[Non-Text]
©
-
•
[Non-Text]
[Non-Text]
[Non-Text]
[Non-Text]
[Non-Text]
[Non-Text]
[Non-Text]
[Non-Text]
[Non-Text]
[Non-Text]
[Non-Text]
[Non-Text]
•
•
[Non-Text]
[Non-Text]
[Non-Text]
[Non-Text]
[Non-Text]
[Non-Text]
[Non-Text]
[Non-Text]
[Non-Text]
[Non-Text]
[Non-Text]
[Non-Text]
[Non-Text]
[Non-Text]
[Non-Text]
[Non-Text]
[Non-Text]
[Non-Text]
[Non-Text]
[Non-Text]
[Non-Text]
[Non-Text]
[Non-Text]
[Non-Text]
[Non-Text]
[Non-Text]
[Non-Text]
[Non-Text]
[Non-Text]
[Non-Text]
[Non-Text]
[Non-Text]
[Non-Text]
[Non-Text]
[Non-Text]
[Non-Text]
[Non-Text]
[Non-Text]
[Non-Text]
⊕
。
(No text)
[Non-Text]
[Non-Text]
[Non-Text]
[Non-Text]
[Non-Text]
[Non-Text]
[Non-Text]
[Non-Text]
[Non-Text]
[Non-Text]
[Non-Text]
[Non-Text]
[Non-Text]
[Non-Text]
中
[Non-Text]
[Non-Text]
[Non-Text]
[Non-Text]
[Non-Text]
[Non-Text]
[Non-Text]
[Non-Text]
[Non-Text]
[Non-Text]
[Non-Text]
[Non-Text]
[Non-Text]
[Non-Text]
[Non-Text]
[Non-Text]
[Non-Text]
[Non-Text]
[Non-Text]
[Non-Text]
[Non-Text]
[Non-Text]
[Non-Text]
[Non-Text]
[Non-Text]
[Non-Text]
[Non-Text]
[Non-Text]
[Non-Text]
[Non-Text]
[Non-Text]
[Non-Text]
[Non-Text]
[Non-Text]
[Non-Text]
•
[Non-Text]
[Non-Text]
[Non-Text]
[Non-Text]
[Non-Text]
[Non-Text]
[Non-Text]
[Non-Text]
[Non-Text]
[Non-Text]
[Non-Text]
•
•
[Non-Text]
[Non-Text]
[Non-Text]
[Non-Text]
![UNIDEN DECT 1725+2 - [Non-Text] - 1](/content/2026/06/1190147/images/ea489cb08090c39d9abd285fbe435984470fb71a846562aa72f84185b26384b8.jpg)
●
Simple solutions
The most common problems often have the simplest solutions.
We hope that you will not experience any problems with your product, but in the event that you do, this section hopes to overcome any problems quickly and with minimum effort.
Firstly, check that:
• the telephone line cord is correctly connected.
• the mains power cord is correctly connected and switched on.
• the battery pack is charged and not in need of replacing.
If you have more than one handset registered to your base remember to check the connections on this too.
If you are still experiencing a problem, you are likely to find a solution opposite.
• If your phone line also has High Speed Internet please ensure you are using an approved line filter (check with your High Speed Internet provider if unsure about the filters).
[37]
Handset/Base
No dial tone
- Is the handset registered to the base?, see page 27.
- Is the symbol flashing and can you hear a beep during a call? – if so, move closer to the base as you are out of range.
Cannot dial out
- Is ⚡ symbol displayed, if so the keypad lock is on, see page 16.
Handset does not ring
• The ringer volume may be set to off, see page
20.
- Is the symbol flashing? – if so, move closer to the base as you are out of range.

●


●
Handset is not charging properly
- Check that the charge light is on and that the handset is sitting correctly in the base or charger. Clean the charging contacts with a dry cloth.
• Are you using the power adaptor supplied with your phone?
Handset will not link up with the base
- Is the symbol flashing? – if so, move closer to the base as you are out of range.
- Is the handset registered to the base, see page 27.
- Buzzing noise on my radio, TV, computer or hearing aid Sometimes your phone may interfere with other electrical equipment if it is placed too close. We recommend you leave a distance of at least one metre to avoid this.
Cannot make a call
• Is the Call Barring set, see page 25.
CALLER ID
Caller's details are not displayed
- Have you subscribed to a CALLER ID service? If not, contact your network provider.
• The caller may have withheld their details.
- Let the phone ring a couple of times as there may be a delay in receiving the CALLER ID information.
Caller's name is not displayed even though it is
- stored in the phonebook - The name will only be displayed if an exact number match is found. Make sure that the number in the phonebook is a match with the received number in the Caller ID log.
[38]
![UNIDEN DECT 1725+2 - [38] - 1](/content/2026/06/1190147/images/301aec55da7a3e3044d02b39a42ae18839efffb2260b2c5818cc0894bc183c4e.jpg)
●
●


General information
This equipment is not designed for making emergency telephone calls when the power fails. Alternative arrangements should be made for access to emergency services.
Safety
- Only use the power supply that came with the product. Using an unauthorised power supply will invalidate your guarantee and may damage the telephone.
- Do not open or tamper with the handset or base (other than to change the batteries). You could expose yourself to high voltages or other risks.
Please see warranty page for contact information regarding repair. Or visit our website at www.uniden.com.au, www.uniden.co.nz.
- Radio signals transmitted between the handset and base may cause interference to hearing aids.
- DO NOT use your phone: - near emergency/intensive care medical equipment. - if you have a pacemaker fitted. - during an electrical storm.
[39]


• DO NOT position your product:
- less than one metre away from other electrical appliances, e.g. TV and radio sets, clock/alarms and computers, or you risk interference.
- on antique/veneered wood (as the product may become warm during charging).
- on carpets or other surfaces which generate fibres.
Always ensure free flow of air over the products surfaces.
• DO NOT expose your product:
- to water (or use it in damp conditions, such as in bathrooms).
- to fire, explosive or other hazardous
- to direct sunlight.
• DO NOT dispose batteries with ordinary domestic refuse. There is a risk of the release of highly toxic chemicals.
[40]
Maintenance
Cleaning your product:
Wipe the handset, base and charger with a damp (not wet) cloth, or an anti-static wipe. Never use a dry cloth as this may cause a static shock. Never use household polish as this will damage the product.
Replacing the handset batteries:
Over time, as the handset batteries wear out, the talk and standby times after charging will reduce. The batteries will eventually need replacing.
Inserting new batteries:
1 Remove the battery compartment cover and the old batteries.
2 Insert rechargeable batteries. Connect the batteries with the correct polarity. Replace the battery compartment cover.


How many telephones can I have?
All items of telephone equipment have a Ringer Equivalence Number (REN), which is used to calculate the number of items which may be connected to any one telephone line.
The total recommended REN on one line is 3. If you exceed a REN of 3, your phones may not ring. With different telephone types there is no guarantee of ringing, even when the REN is less than 3. Your phone has a REN of < 0.01 (even with additional handsets and chargers registered to your base).
[41]


One Year Limited Warranty
Important: Evidence of original purchase is required for warranty service.
Warrantor: Uniden Australia Pty Limited A.B.N. 59 001 865 499 Uniden New Zealand Limited
ELEMENT OF WARRANTY: Uniden warrants to the original retail owner for the duration of this warranty, its
DECT1725/DECT1725+1/DECT1725+2 (herein after referred to as the Product), to be free from defects in materials and craftsmanship with only the limitations or exclusions set out below. Warranty is only valid in the original country of purchase.
WARRANTY DURATION: This warranty to the original retail owner only shall terminate and be at no further effect 17 months.
after the date of original retail sale. This warranty will be deemed invalid if the product is
(A) Damaged or not maintained as reasonable and necessary,
(B) Modified, altered or used as part of any conversion kits, subassemblies, or any configurations not sold by Uniden,
(c) In (property) installed,
(B) Repaired by someone other than all authorized Officer Repair Agent for a defect of Hamiltonian covered by this warranty. (E) Used in conjunction with any equipment or parts as an part of a custom not manufactured by Union
(2) 2008 in the following that any equipment of parts of the parts of a growth tool is manufactured by others.
PARTS COVERED: This warranty covers for one (1) year, the Base unit, charger and handsets. All accessories (AC adaptor etc) are covered for 80 days only.
STATEMENT OF REMEDY: In the event that the product does not conform to this warranty at any time while this warranty is in
Effect, the Warrantor is for disclosure. All report the defect or replace the product and return it to you without charge for persons or service. THIS WARRANTY DOES NOT COVER OR PROVIDE FOR THE REIMBURSEMENT OR PAYMENT OF INCIDENTAL OR
CONSEQUENTIAL DAMAGES. THIS GUARANTEE IS IN ADDITION TO AND DOES NOT IN ANY WAY AFFECT YOUR RIGHTS
UNDER THE CONSUMER GUARANTEE ACT.
PROCEDURE FOR OBTAINING PERFORMANCE OR WARRANTY: In the event that the product does not conform to this warranty.
the Product should be shipped or delivered, freight pre-paid, with evidence of original purchase (eg): a copy of the sales docket), to the warrantor at.
UNIDEN AUSTRALIA PTY LIMITED
SERVICE DIVISION
345 Princes Highway,
Rockdale,
NSW 2216
AUSTRALIA Fax: (02) 9599-3278
www.yrjnd.com.cn

UNIDEN NEW ZEALAND LIMITED
SERVICE DIVISION
150 Harris Road,
East Tama
Auckland,
NEW ZEALAND Fax: (08) 274 425
in our vision of the
[42]


THANK YOU FOR BUYING A UNIDEN PRODUCT.
Uniden®
(c) 2006 Uniden Australia Pty Limited. Uniden New Zealand Ltd. Printed in China UCZZ01882WZ(0)
- Welcome...
- What's in the box:
- IMPORTANT
- Contents
- ●
- [3]
- +
- [Non-Text]
- Setting up
- Finding a location
- Connecting your phone
- WARNING
- Preparing the handsets
- BATTERY LOW WARNING
- Battery Performance
- Your handset display
- [9]
- Standby Display
- Quick Guide
- Using your phone
- Make a call
- Adjust the earpiece/receiver volume during a call
- Preparatory dialling (pre-dial)
- Handset range
- Call timer
- Handsfree mode
- During a call:
- End a call
- Receive a call
- [13]
- Call Waiting
- Receiving internal calls
- Redial
- Redial the last number called
- Redial any of the last 10 numbers called
- Deleting numbers from the redial list
- Mute (privacy)
- Finding/paging handsets
- To stop the paging ring:
- [15]
- Keypad lock
- Switch the keypad lock ON
- Switch the keypad lock OFF
- Using the phonebook
- Entering a 'pause' in a stored number
- View and dial a phonebook entry
- To search alphabetically
- Handset and base menu settings
- Handset earpiece
- Handset ringer volume
- Handset speaker
- Handset ringer type Auto answer
- [21]
- 中
- -
- •
- [NO TEXT]
- 一
- ©
- Alarm Handset name
- [22]
- 广力云智慧零售收银系统
- AD = BD = 1
- ⊕
- (五)
- (1)
- (No text)
- r phone displays on
- our handset.
- main menu.
- 2011-04-26
- HS LABEL
- umber keypad
- (二)
- The Ground Truth image displays a single, solid horizontal line. According to Rule 2 (UNDERSCORE & LINE RULES), if the GT contains lines used for stylistic emphasis or as background (like ruled paper), the OCR result must ignore them. The line in the GT is clearly a stylistic/background line, not a placeholder for text. Therefore, the OCR should not have output any underscores. Outputting \`\_\_\_\_\` constitutes an error under Rule 2, as it hallucinates placeholder symbols where none are semantically intended. Hence, the OCR result is inconsistent with the Ground Truth.
- 1
- phone displays on man one handset, you
- HS SETTINGS.
- US LOPE
- (1)基因通过控制 通过控制
- 本说明仅供参考。
- | ⊕
- Language Base ringer volume
- Base ringer type
- Call Barring
- Settings menu
- Tones
- Flash
- Changing the Flash time
- Dial mode
- [27]
- Registering a new handset
- On the handset you want to register:
- Base PIN code
- [29]
- Selecting a base
- Resetting your phone
- For the base:
- For the handset:
- Default settings
- Network services
- Caller ID
- Calls log
- View the Calls log
- Dial calls log number
- [33]
- is displayed: Press
- [Unreadable]
- The number is displayed.
- The image contains no discernible text or characters.
- Using extra handsets
- Call another handset (internal call)
- Transferring a call Conference call
- During an external call:
- [36]
- 。
- Simple solutions
- Firstly, check that:
- Handset/Base
- No dial tone
- Cannot dial out
- Handset does not ring
- Handset is not charging properly
- Handset will not link up with the base
- Cannot make a call
- Caller's details are not displayed
- Caller's name is not displayed even though it is
- [38]
- General information
- Safety
- Maintenance
- Replacing the handset batteries:
- Inserting new batteries:
- One Year Limited Warranty
Brand : UNIDEN
Model : DECT 1725+2
Category : Cordless phone