
DSS 3415+1 - Cordless phone UNIDEN - Free user manual and instructions
Find the device manual for free DSS 3415+1 UNIDEN in PDF.


| Product Type | Cordless Phone |
| Brand | Uniden |
| Model | DSS 3415+1 |
| Technology | 2.4 GHz Digital Expandable System |
| Number of Handsets Supported | Up to 4 (including supplied) |
| Caller ID | Yes (requires subscription) |
| Call Waiting | Yes with Caller ID (CIDCW) |
| Distinctive Ring | Yes (per phonebook entry) |
| Phonebook Capacity | 100 shared entries (names & numbers) |
| Speed Dial | 10 locations (0-9) |
| Redial Memory | Last 3 numbers per handset |
| Ringer Options | 20 (10 tones, 10 melodies) |
| DirectLink (Two-Way Radio) | Yes (requires 2 handsets) |
| Room/Baby Monitor | Yes (requires 2 handsets) |
| Intercom | Yes (handset-to-handset) |
| Conference Calling | Up to 3 parties (2 handsets + outside line) |
| Call Transfer | Yes |
| Battery Pack | Uniden BT-909, 3.6V DC, 600 mAh |
| Talk Time | Approximately 8 hours |
| Standby Time | Approximately 7 days |
| Base AC Adapter | Uniden AAD-041S (Input: 240V AC, Output: 9V DC 350mA) |
| Charger AC Adapter | Uniden AAD-600S (Input: 240V AC, Output: 9V DC 210mA) |
| Operating Temperature | 0°C to +50°C |
| Belt Clip | Included |
| Headset Jack | Yes (optional headset) |
| Warranty | 1 year limited |
| Maintenance | Clean charging contacts monthly with damp cloth |
Frequently Asked Questions - DSS 3415+1 UNIDEN
User questions about DSS 3415+1 UNIDEN
0 question about this device. Answer the ones you know or ask your own.
Ask a new question about this device
Download the instructions for your Cordless phone in PDF format for free! Find your manual DSS 3415+1 - UNIDEN and take your electronic device back in hand. On this page are published all the documents necessary for the use of your device. DSS 3415+1 by UNIDEN.
USER MANUAL DSS 3415+1 UNIDEN
Terminology used in this Manual 5
Product Overview 6
Parts of the Handset 7
Parts of the Base 8
Handset Icons 9
The Standby Screen 10
Using the Interface 11
Using the Four-way Function Key 11
Using the Handset Menus 11
Entering Text from Your Handset 12
Installing the Phone 13
Choosing the Best Location 13
Installing the Rechargeable Battery 14
Connecting the Base
and Charging the Handset 15
Installing the Belt Clip 16
Connecting to the Phone Line 17
Testing the Connection 18
Changing the Dial Mode
(Australian Model Only) 19
Basic Setup 19
Setting the Day and Time 19
Activating Caller ID on Call Waiting 20
[2]
Activating Distinctive Ring 20
Activating Key Touch Tone 20
Setting up Voice Mail 20
Programming One-Touch Voice
Mail Access 21
Resetting the Voice Message
Waiting Indicator 21
Activating Name Tag (POP ID) 22
Activating the Insert 0 22
Adding Extra Handsets 23
Compatible Handsets 23
Charging the Accessory Handset 23
Registering Accessory Handsets 24
Registering DSS3405 Handsets 24
Resetting Handsets 25
Setting Up the Phonebook 25
Creating Phonebook Entries 25
Finding a Phonebook Entry 27
Editing an Existing Phonebook Entry 28
Storing Caller ID or Redial Numbers
in the Phonebook 28
Deleting Phonebook Entries 28
Deleting All the Phonebook
Entries at Once 29


Copying Phonebook Entries
to Another Handset 29
Customizing Your Phone 30
Changing the Handset Banner 30
Selecting Ring Tones 31
Activating AutoTalk 32
Activating Any Key Answer 32
Using Your Phone 33
Keypad Lock 34
Making a Call from the Phonebook 34
Making a Call with Speed Dial 34
Switching to the Speakerphone During a Call 34
Using Caller ID and Call Waiting 34
Using the Caller ID List 35
Making a Call from a Caller ID Record 35
Deleting Caller ID Numbers 35
Using Call Waiting 36
Redialing a Number 37
Deleting a Redial record 37
Adjusting the Ringer, Earpiece, and Speaker
Volume 37
Adjusting the Ringer Volume 37
Adjusting the Earpiece and Speaker Volume 38
Adjusting the Audio Tone and Clarity Boost 38
Finding a Lost Handset 38
Using Hold, Conference, and Transfer 39
Placing a Call on Hold 39
Conferencing 39
Transferring a Call 40
Answering a Transferred Call 40
Using Special Features 41
Muting the Ringer (One Call Only) 41
Muting the Microphone 41
Privacy Mode 41
Using the DirectLink Communication Feature 42
Making a DirectLink Call 43
Exiting DirectLink Operation 43
Making an Intercom Page 43
Answering an Intercom Page 44
Room/Baby Monitor 44
Tone Dialing Switch Over
(Australian Model Only) 45
Installing the Optional Headset 45
Maintenance 46
Battery Replacement and Handling 46
Battery Contact Maintenance 46
Low Battery Alert 47
Talk Time, Standby Time, and
[3]

●
⊕
⊕

Storing the Handset on the Base 47
Troubleshooting 47
Resetting the Handset 47
Resetting the Handset without the Base 48
Changing the Digital Security Code 49
Traveling Out of Range 49
Common Issues 49
Liquid Damage 52
Specifications 53
Index 54
Warranty 55
[4]


Welcome
Thank you for purchasing a Uniden Multi-Handset phone. This unit is different from conventional cordless telephones. When the base unit is connected to AC power and a telephone line, it can support up to 4 handsets. Using extra handsets, you can establish a 3-way conference call (2 handsets and an outside line), while two other handsets are making an intercom call. You can now place a fully featured cordless handset anywhere in your home or office where AC power is available to connect the handset chargers.
Note: Illustrations in this manual are used for explanation purposes. Some illustrations in this
manual may differ from the actual unit.
Caution: The earcap of this telephone may attract and retain small metallic objects.
Terminology used in this Manual
| Base | The main part of the phone that connects to your phone line and lets you make and receive calls. |
| CID | Caller ID is available from your telephone provider. With this service, you can see the name and number of incoming callers. |
| CID/CW or CIDCW | Caller ID on Call Waiting is available from your telephone provider. With this service, you can see incoming caller information while on another call. Note: The Caller ID on Call Waiting service is currently unavailable in NZ. |
| Charger | A cradle that comes with an accessory handset and charges the handset battery. It connects to power but does not connect to a phone line. |
| DirectLink | If you have accessory handsets on your system, you can use two handsets as 2-way radios. |
| Extra or Accessory Handset | This phone system is expandable and will support a total of four handsets to one base. The extra, or accessory handset, is a handset that is compatible with this model. |
| Global Settings | Apply to registered handsets. If you change something under the global menu, you change it for all handsets. Only one handset can change global settings at a time, and the phone must be in standby. |
[5]


| Standby | The handset is not in use. If it is off the cradle, no line has been activated. No dial tone is present. |
| Station | Any handset. |
| Talk | A telephone line has been activated on the handset enabling a dial tone. |
Product Overview
Main Features:
• 2.4GHz Digital Expandable System
• Expands up to 4 Handsets
- Caller ID
- Caller ID on Call Waiting*
- Distinctive Ring** by Party
- Name Tag** (POP ID) Caller Name Identification
• 100 shared Phonebook Entries/Caller ID
Numbers
- DirectLink***
• Room/Baby Monitoring***
• 20 Ringer Options (10 Tones/10 Melodies)
* Requires subscription to Caller ID and Caller ID on Call Waiting service provided by Network supplier. There is usually a fee for this service. The Caller ID on Call Waiting service is currently unavailable in NZ.
** These features rely on the Caller ID service to function.
*** Requires the use of multiple handsets.
# Range may vary depending on environmental and/or topographical conditions.
[6]

●
⊕
⊕

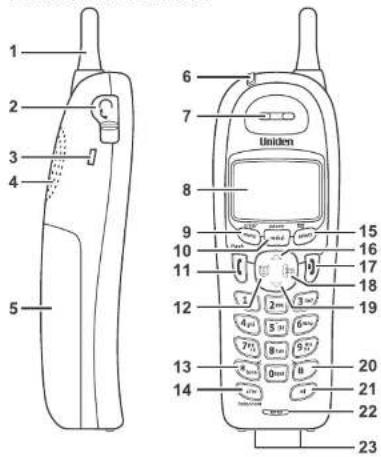
Parts of the Handset
[7]
- Handset Antenna
- Headset Jack Cover
- Beltclip Hole
- Speakerphone Speaker and Ringer
- Handset Battery Compartment
- New Message LED
- Handset Earpiece
- LCD Display
- kɛ[menu/clear]
- [redial/pause]
- [dylptalk]flash)
- ey
- [ə/one/<]
- [æfer/intercom]
- [style/ret/messages]
- [ey]up)
- [e] (end call)
- [ey] caller ID)
- [ey]down)
- [#]pound)
- ay
- Handset Microphone
- Handset Charging Contacts

⊕


Parts of the Base
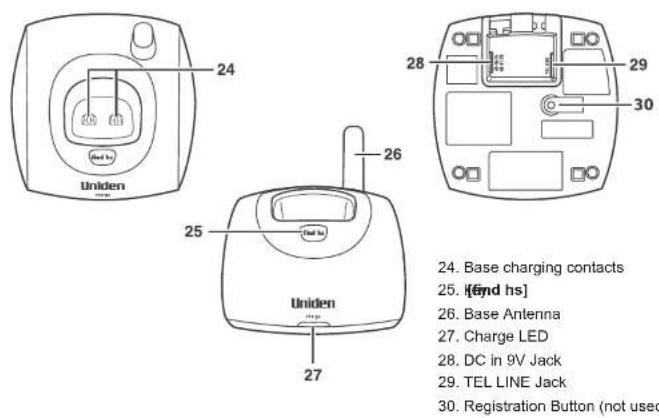
24. Base charging contacts
25. [end hs]
26. Base Antenna
27. Charge LED
28. DC in 9V Jack
29. TEL LINE Jack
30. Registration Button (not used)
[8]



Handset Icons
| ICON STATUS DESCRIPTION | ||
| Standby/Talk | Thebatteryicon indicates the handset battery status: full, medium, low, and empty. | |
| 1:OFF | Standby | The ringer off icon indicates that the ringer is turned off. |
| Talk | Themuteicon appears when you mute the handset. | |
| Talk | Theboosticon appears when the Clarity Boost feature is activated. | |
| Talk | Thespeakericon appears when the handset speaker phone is in use. | |
| P | Talk | Theprivacyicon appears when Privacy Mode is turned on. |
[9]



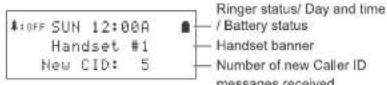
The Standby Screen
When the phone is in standby, the handset display shows the following items:
[10]



Using the Interface
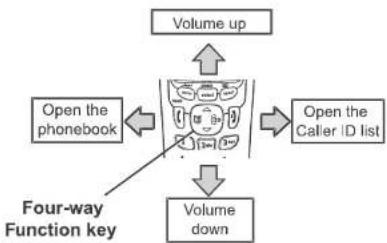
Using the Four-way Function Key
Your handset has a four-way function key that allows you to move the cursor on the display and access the most commonly used features at the touch of a button. By moving this key to the left, you open the Phonebook. Move the key to the right to access Caller ID information. To use this four-way key, place your thumb over the key on the handset and move to the four positions to get the feel of how it moves and operates.
flowchart
graph TD
    A["Open the phonebook"] --> B["Central Device"]
    C["Volume up"] --> B
    D["Open the Caller ID list"] --> B
    E["Volume down"] --> B
    F["Four-way Function key"] --> B
Using the Handset Menus
To open the menu, press [menu/clear]. Select the option you want by pressing the four-way function key up or down. This moves the cursor; the option currently selected has a triangle beside it. Select the option by pressing [select/[I]). To exit the menu and return to standby, press 0 on the handset. If you do not press a key within 30 seconds, the phone times out and exits the menu. When setting Day and Time, the time-out period is extended to two minutes.

[11]


Entering Text from Your Handset
You can use the number keypad on your phone to enter text by referring to the letters printed on each number key. When you press the number key in a text entry field, the phone displays the first letter printed on the number key. Press the number key twice to display the second letter and three times to display the third. Capital letters are displayed first, then lower case letters, then the number on the key.
If two letters in a row use the same number key, enter the first letter, then use [#/>] to move the cursor to the next position to enter the second letter. For example, to enter the word "Movies":
- Press o(6)e to enter M.
- Use to[#]ve the cursor to the right.
- Press [6] six times to enter o.
- Press [8] six times to enter v.
- Press [4] six times to enter i.
- Press [3] five times to enter e.
- Press [7] eight times to enter s.
- Press tc[selectu] text entry.
If you make a mistake while entering a name, use [t/tonelx]e[#/>]
the cursor to the incorrect character. Press [menu/clear] to erase the wrong character, and then enter the correct character. To delete all characters, press and hold [menu/clear].
| Number of times key is pressed | |||||||||
| keys | 1 | 2 | 3 | 4 | 5 | 6 | 7 | 8 | 9 |
| 1 | 1 | ||||||||
| 2 abc | A | B | C | a | b | c | 2 | ||
| 3 def | D | E | F | d | e | f | 3 | ||
| 4 ghi | G | H | I | g | h | i | 4 | ||
| 5 jhi | J | K | L | J | k | l | 5 | ||
| 6 mno | M | N | O | n | n | o | 6 | ||
| 7 pqs | P | Q | R | S | P | q | r | s | ? |
| 8 tuv | T | U | V | t | u | v | 8 | ||
| 9 wxyz | W | X | Y | Z | w | x | y | z | 9 |
| 0 oper | & | < | ) | < | > | / | {blank} | - | - |
| . | r | : | ? | ! | @ | " | " | * | |
| # | ∅ | ||||||||
[12]



Installing the Phone Choosing the Best Location
When choosing a location for your new phone, here are some important guidelines you should consider:
• The location should be close to both a phone jack and a power outlet that is not controlled by a wall switch.
- The base and handset should be kept away from sources of electrical noise such as motors, microwave ovens, and fluorescent lighting.
- Don't place the base in direct sunlight or subject it to high temperatures. The battery may not charge properly.
• For better reception, place the base as high as possible.
• The base should be placed in an open area for optimum range and reception.
- If your home has specially wired alarm equipment connected to a phone line, be sure that installing the system does not disable your alarm equipment. If you have questions about what will disable alarm equipment, contact your telephone company or a qualified installer.
[13]
⊕


Installing the Rechargeable Battery
Use only the Uniden BT-909 rechargeable battery pack supplied with your cordless telephone. Follow the steps below to install a battery.
- Press in on the handset battery case cover (use the finger indentation for a better grip) and slide the cover downward to remove.
- Place the battery pack in the battery compartment with the connectors on the battery and on the compartment aligned.
- Place the battery case cover back on the handset and slide it upwards until it clicks into place.
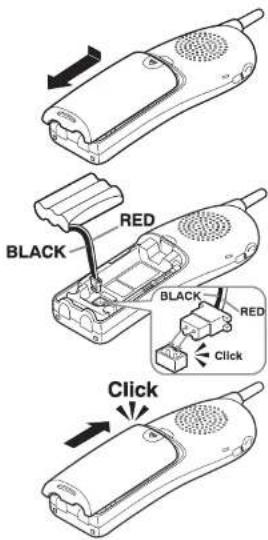
[14]



Connecting the Base and Charging the Handset
- Connect the AC adapter to the DC IN 9V jack.
- Connect the AC adapter to a wall outlet that is not controlled by a switch.
- Place the handset in the base with the LCD screen facing forward.
- Make sure that the charge LED illuminates. If the LED does not illuminate, check to see that the AC adapter is plugged in and the handset makes good content with the base charging contacts.
- Charge your handset at least 15-20 hours before plugging into the phone line.
Note: Use only the supplied AAD-041S adapter with your phone. Do not use any other AC adapter.
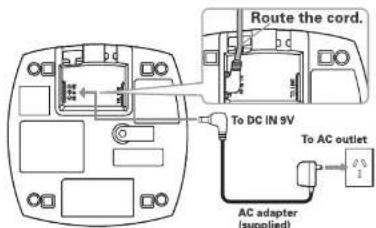
[15]

●



Installing the Belt Clip
-
Line up the holes on each side of the handset. To attach the belt clip, insert into the holes on each side of the handset. Brace down until it clicks
-
To remove the belt clip, pull either side of the belt clip to release the tabs from the holes.
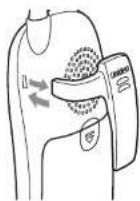

[16]



Connecting to the Phone Line
Once the handset battery pack is fully charged, connect the telephone line cord to the TEL LINE jack and to a standard telephone wall outlet.
High Speed Internet
If your phone line also has High Speed Internet please ensure you are using an approved line filter before connecting the telephone cord.
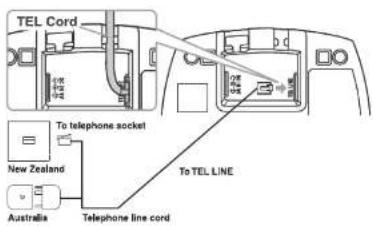

[17]




Testing the Connection
To test your connection try making a call. If your call connects, the settings are fine. If your call does not connect check the following:
-
Check the AC adapter cord. Make sure it is securely connected to the DC IN 9V connector and to a standard AC power outlet.
-
Check to make sure the battery is fully charged. (If you don't see the "battery full" icon, check to make sure the battery is properly connected).
- Change "dial mode" (instructions follow).

[18]

Changing the Dial Mode (Australian Model Only)
Your phone can communicate with the telephone network in two different ways: tone dialing or pulse dialing. These days, most phone networks use a method called tone dialing, so your phone comes programmed for tone dialing. If your phone company uses pulse dialing, you will need to change your phone's dial mode. If you don't get a dial tone or can't connect to the telephone network, please follow the steps below to modify your phone's settings:
- Press [menu/clear]. Select the GLOBAL SETUP menu, and then the DIAL MODE submenu.
- Scroll to select PULSE.
- Press [select/ ☑ . You will hear a confirmation tone. If you ever need to change the dial mode back to tone dialing, follow the same procedure, but select TONE in step 2.
Basic Setup
Setting the Day and Time
To change the day and time shown in the display, follow the steps below.
Note: If you don't press any keys for two minutes when setting the day and time, the phone exits the menu.
Dial Mode ▶ Tone Pulse
Day & Time SUN 12:00 AM [↑/↓/SELECT]
- Press [menu/clear]. Select the GLOBAL SETUP menu, and then the DAY & TIME submenu option.
- Move the cursor to select the day of the week, and then press [select/ ☑ .
- Move the cursor to set the hour, and then press [select/ ]
- Move the cursor to set the minute, and then press [select/ ]
- Move the cursor to choose AM or PM, and then press [select/ ☑ . You will hear a confirmation tone.
[19]
⊕
⊕
Activating Caller ID on Call Waiting
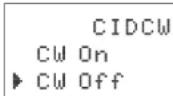
Your phone supports Caller ID on Call Waiting (CIDCW), so you see the name and number of someone who calls when you're already on the line. You need to subscribe to these features with your phone company before you can use them. The Caller ID on Call Waiting service is currently unavailable in NZ. To let your phone support these features, follow the steps below:
- Press [Fenol/chea] GLOBAL SETUP
menu, then the CIDCW submenu. - Move the cursor to select CW (Call Waiting) ON.
- Press [select/ ] . You hear a confirmation tone.
Activating Distinctive Ring
You can assign special ringer tones to anyone in your phonebook. When your phone gets a call, it looks up the Caller ID information in your phonebook. If you've assigned a distinctive ringer to that number, the phone uses it so you know who is calling. To turn on distinctive ring, follow these steps:
- Press [menu/clear]. Select the HANDSET SETUP menu, and then the DISTINCT. RING submenu.
- Move the cursor to select ON.
- Press [select/ ☑ . You will hear a confirmation tone.
Activating Key Touch Tone
Key Touch Tone is the tone your keypad makes when keys are pressed. You can turn this tone on or off.
- Press [menu/clear]. Select the HANDSET SETUP menu, and then the KEY TOUCH TONE submenu.
- Move the cursor to select ON or OFF.
- Press [select/ ] . You hear a confirmation tone.
Setting up Voice Mail
If you subscribe to a voice mail service, you can use your phone to access your voice mailbox. The new message LED flashes whenever you have messages waiting in your voice mailbox. If you have programmed your access
[20]


number into your phone, you can simply press [select/ ☑ to access your voice mail. When you subscribe to the service, your voice mail provider provides you with the access number and the required voice mail signaling tone.
Notes:
• Voice Mail Access Numbers :
Australia - Message Bank : 125101, Home Messages : 101
New Zealand - Call Minder : 083210
- For New Zealand model, the Voice Mail Access Number is stored in the One-Touch Voice Mail key [Select/☑] and in speed dial location 4.
Programming One-Touch Voice Mail Access
You can program your voice mail access number to the voice mail key ([select/ ☑]) on each handset so you can get your messages at the touch of a button. Your voice mail service provider will supply you with the access number.
To edit the voice mail number, follow the steps below:
- Press [menu/clear]
- Move the cursor to HANDSET SETUP menu and then press [select/ ]
- Move the cursor to EDIT VOICE MAIL and then press [select/]
- Enter your personal access number (up to 20 digits).
- If you need to have the phone wait before sending the next digits, press [redial/pause] to insert a two-second pause in the dialing sequence. For a longer pause, press [redial/pause] multiple times. A P appears in the display each time you press [redial/pause] and each pause counts as one digit.
- Press vlsdeqto are finished.
Resetting the Voice Message Waiting Indicator
When you receive a new voice mail message, the LED on the top of the handset flashes. In the event your message alert tone gets out of sync with your phone company's voice messaging system, you can reset back to its original "no messages waiting" state. To reset, press and hold [find hs] on the base for 5 seconds. A beep sounds and the message alert tone is reset.
[21]
●


Activating Name Tag (POP ID)
The Name Tag feature works with the Caller Display number from Caller ID. A subscription to the Caller ID service is required from your network provider. There is usually a fee for this service. When the phone rings the received Caller Display number is compared to numbers stored in the phonebook. If there is a match then any name stored with the phonebook number will be displayed.
To turn Name Tag on or off, follow the steps below:
- Press [menu/clear]. Select the GLOBAL SETUP menu, and then the NAME TAG submenu.
- Move the cursor to select On or Off.
- Press [select/ ] . You will hear a confirmation tone.
Activating the Insert 0
This feature adds '0' or '00' to the number, when you receive Caller ID messages. The default setting for New
Zealand is On. The default setting for Australia is Off. To turn Insert 0 on or off, follow the steps below:
- Press [menu/clear]. Select the GLOBAL SETUP menu, and then the INSERT 0 submenu.
- Move the cursor to select On or Off.
- Press [select/ ] . You will hear a confirmation tone.

[22]



Adding Extra Handsets
Your phone supports up to four handsets, including any handsets supplied with your phone. Accessory handsets do not need to be connected to a phone jack. You can now place a fully-featured cordless handset anywhere AC power is available to connect the handset charger. The accessory handsets connect to the base to make and receive calls just like the handset that came with the main base. All the handsets ring when you receive a call.
Compatible Handsets
Your phone is compatible with the DSS3405 additional handset. If you purchase an accessory handset, you must register the handset to the main base before use. Accessory handsets will not operate until they are registered.
Charging the Accessory Handset
The handset is powered by a rechargeable battery pack. The battery recharges automatically when the handset is placed in the charger.
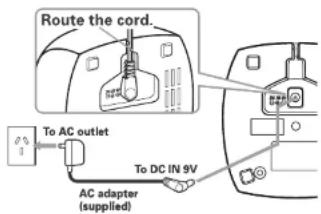
- Connect the AC adapter to the DC IN 9V jack and to a standard 240V AC wall outlet. Use only AC adapter Model Number AAD-600S
- Set the charger on a desk or tabletop, then place the handset in the charger with the keypad facing forward.
- Make sure that the charge LED illuminates. If the LED does not illuminate, check that the AC adapter is plugged in and the handset makes good contact with the base charging contacts.
- Charge the handset battery pack for at least 15-20 hours before using your new cordless telephone for the first time.
[23]
⊕


Registering Accessory Handsets
If you purchase an accessory handset, you need to register the handset before use. Only one handset can be registered at a time. Handsets supplied with the phone are registered to the base by the factory. When charged, pre-registered handsets display a handset ID number. Handsets that have not been registered display MODELS VARY! CHARGE HANDSET ON THE BASE FOR REGISTRATION OR REFER TO OWNER'S MANUAL. (If an accessory handset has ever been registered to a base, you must reset the handset before you can register it to a new base. See Repart 2 Handsets
When you register an extra handset to the base, the handset ID will be assigned.
Registering DSS3405 Handsets
- Before registering the DSS3405 accessory or extra handset, the battery pack MUST be charged for 15-20 hours.
- Place the extra handset in the main base unit to begin registration.
- While the handset is registering, HANDSET REGISTERING appears on the LCD display. When REGISTRATION COMPLETE appears, the handset has been registered to the base. If REGISTRATION FAILED appears, please try these steps again.

[24]

Resetting Handsets
If you want to register the handset to a different base or replace a handset with another one, you must first clear the registration information from the base and the handset.
-
Press and hold [][##]d for at least 5 seconds, until the SYSTEM RESET menu appears.
-
Move the cursor to select the handset ID to be de-registered from the list, and then press [select/ ☑ . DEREGISTER HS appears.
-
The phone asks you to confirm the deregistration. Move the cursor to select YES, then press [select/]. A confirmation tone sounds. The handset clears the registration information from the base and then deletes its own link to the base. The handset now displays MODELS VARY! CHARGE HANDSET ON THE BASE FOR REGISTRATION OR REFER TO OWNER'S MANUAL. To register the handset to a base see page 24.
Setting up the Phonebook
Your phone lets you store up to 100 names and numbers in your phonebook in the handset. Your phone shares memory between your phonebook and CID entries. Once you store 100 phonebook entries, CID information is not stored and only appears during a new incoming call. When phonebook and CID entries are full, a beep sounds and MEMORY FULL appears. You cannot store any additional names and numbers unless you delete some of the existing ones. You can also use the phonebook to store a group of numbers (up to 20 digits) that you may need to enter once your call connects. This is referred to as chain dialing.
Creating Phonebook Entries
To store names and numbers in your phonebook, follow these steps:
- When the phone is in standby mode, press [☐]
- To create a new phonebook entry, move the cursor to select STORE NEW.
- Press [SCORE] EDIT NAME appears.
- Enter the name for this entry(STORE/EDIT NAME).
Deregister HS Yes No
Store/Edit Name
Store/Edit No. 8007303456■
[25]


Use the keypad to enter a name for this entry; the name can contain up to 16 characters. (See page 12 for entering text instructions.) If you do not want to enter a name for this entry, your phone stores this entry as
- Enter the number for this entry (STORE/EDIT NO.). Once you have stored a name, STORE/EDIT NO. appears. Use the number keypad to enter the phone number; the phone number can contain up to 20 digits. If you need the phone to pause between digits when it's dialing (for example, to enter an extension or an access code), press [redial/pause] R Insert a two-second pause. A appears on the display. You can also use more than one pause together if two seconds is not long enough. Each pause counts as one digit.
- Assign a distinctive ring tone for this entry (DISTINCTIVE RING). You can attach a distinctive ring tone to each phonebook entry; the phone uses this ring tone when this person calls. See page 31 for a selection list.
Move the cursor to select one of the 20 different ring tone options. As you select each ring tone, a sample of that tone sounds. When you hear the ring tone you want to use, press [select/□].
If you do not want to use a distinctive ring tone for this phonebook entry, select the NO SELECTN option, and the phone uses your standard ring tone setting.
Distinctive Ring ▶ No Selectn Flicker
- Your phone has 10 speed dial numbers, [0] to [9]. Move the cursor to select the speed dial number you want to assign to this phonebook entry, and press [select/ ] . Select NO SELECTN if you do not want to assign this entry to a speed dial number.
A tone sounds confirming that the new phonebook entry has been stored, and DONE! appears in the display.
Speed Dial
▶No Selectn
SPD1:
[26]




Finding a Phonebook Entry
Press [☐] to open the phonebook. Then, select DIAL/EDIT. Phonebook entries are stored in alphabetical order. To scroll through the phonebook from A to Z, press [♥]. To scroll through the phonebook from Z to A press △.
You can also use the letters on the number keys to jump to a name that starts with that letter. Press a number key
([2] [8] [0] and ) once for the first letter, twice for the second letter, and so on. The phonebook jumps to the first entry that begins with the letter you entered; you can then use [▽] or [△] to scroll to other entries. For example, to search for an entry beginning with the letter M, press [6] once. To close the phonebook, press [.) If you are looking up a phonebook entry during a call, press [□] again instead of .) to close the phonebook.

[27]


Editing an Existing Phonebook Entry
-
With the phone in standby, press [☐] to open the phonebook.
-
Select DIAL/EDIT
-
Use [▽] or [△] to scroll through the phonebook entries. When you come to the entry you want to edit, press [select/ □].
Follow the steps for Creating Phonebook Entries on page 25. If you do not wish to change the information at any step, simply press [select/ ☑] to go to the next step.
Storing Caller ID or Redial Numbers in the Phonebook
You can store Caller ID records or redial numbers in the phonebook so you can use them later. Note: If the Caller ID information did not include the number, then you will not be able to store it
- When the phone is in standby, press [I][redia]pause]Caller ID list or
to open the redial list. - Use [▽] or [△] to scroll through the Caller ID records or redial numbers. When you come to the information you want to store, press [select/✉]. STORE/EDIT NAME appears.
- If the phone number is already stored in memory, a beep sounds, and THIS DATA IS ALREADY STORED! appears in the display. The number will not be stored. Follow the steps for Creating Phonebook Entries on page 25.
Deleting Phonebook Entries
To erase individual phonebook entries or erase all the phonebook entries at once follow the steps below.
1. When the phone is in standby, press [☐].
2. To delete a single phonebook entry, move the cursor to select DIAL/EDIT, then press [select/☑].
3. Use []▼ [p] △ to select the desired phonebook entry, then p[menu/clear]
4. DELETE MEMORY? appears in the display. Select YES, then press [select/☑]. A confirmation tone sounds, and DELETED! appears in the display.
[28]


Deleting All the Phonebook Entries at Once
- When the phone is in standby, press [☐].
- Move the cursor to select DELETE ALL, and press [select/ ]
DELETE ALL? appears in the display. - Select YES, then press [select/ ] . A confirmation tone sounds.
and DELETED! appears in the display.
Phonebook : 50
Copy
▶ Delete All
Copying Phonebook Entries to Another Handset
If you have more than one handset, you can transfer stored phonebook entries from one handset to another without having to re-enter names and numbers. You can transfer one phonebook entry at a time or all phonebook entries at once.
-
When the phone is in standby, press [☐].
-
Move the cursor to select COPY, and then press [select/]
-
Move the cursor to select the handset to which you want to transfer the phonebook entries, then press .[select/ ]
Move the cursor to select ONE MEMORY or ALL MEMORY, then
press [select/
- If you select ALL MEMORY, ARE YOU SURE? appears. Move the cursor to select YES, then press [select/
If you select ONE MEMORY, select the phonebook entry you want to transfer and then press [select/ ]
- The phonebook entries will be transferred to the designated handset. During the copy process, the receiving handset shows RECEIVING and the Banner name of the sending handset.
When the transfer is completed, DONE! appears on the handset.
Notes:
- If your phonebook contains 100 entries, you cannot store any new phonebook entries. A beep sounds, and MEMORY FULL appears on the display.
- If the selected handset is out of range or data transfer is canceled, UNAVAILABLE appears in the display. Phonebook listings are not transferred.
[29]


Customizing Your Phone
Changing the Handset Banner
Each handset will display a banner name once it is registered to the base. The default banner is Handset #1, Handset #2, etc. You can change the name your phone displays by changing the banner display. If you have more than one handset, the banner name identifies your handset during handset-to-handset functions like Intercom and DirectLink communication. The name will be displayed on the LCD screen during Standby, Intercom, Intercom Hold, Room/Baby Monitor, and Copy Phonebook operations. The banner name will be displayed on the receiving handset as well.
Banner Mom's Phone #1
- Press [menu/clear]
- Select the HANDSET SETUP menu, and then the BANNER submenu.
- Use the keypad to enter or edit the banner name. (See Entering Text from Your Handset on page 12 for detailed instructions on entering text.)
- Press [select/ ] . You will hear a confirmation tone.

[30]


Selecting Ring Tones
You may choose from 10 melodies or 10 tones for your phone's primary ring tone. Each station can use a different ring tone or melody. The available ring tones are listed below:
| Melodies Ringers | |
| Beethoven's Symphony #9 [Beethoven9] | Flicker |
| For Elise [Elise] | Clatter |
| We Wish You A Merry Christmas [Merry- Xmas] | Soft Alert |
| Home Sweet Home [Hm Swt Hm] | Wake Up |
| Lorri Song #6 [Lorri Song] | Light Bug |
| When Irish Eyes Are Smilling [Irish Eyes] | Beep Boop |
| Aura Lee [Aura Lee] | Tone Board |
| Let Me Call You Sweet Heart [Sweetheart] | Chip Chop |
| Waltzing Matilda [W Matilda] | Party Clap |
| Old MacDonald [Old MacDld] | Reminder |
- Press .[menu/clear]
- Select the HANDSET SETUP menu, and then
the RINGER TONES submenu. - Move the cursor to a ring tone. As each ring tone is selected.
you will hear a sample of the ring - When you hear the tone you want to use press, [select/1]
You will hear a confirmation tone.
[31]
Ringer Tones ▶ Flicker Clatter
Activating AutoTalk
AutoTalk allows you to answer the phone simply by removing the handset from the cradle. You do not have to press any keys to answer the call.
- Press [menu/clear]
- Select the HANDSET SETUP menu, and then the AUTOTALK submenu.
- Select ON or OFF, and press [select/ ☑ . You will hear a confirmation tone.
AutoTalk
On
Off
Activating Any Key Answer
Any Key Answer allows you to answer the phone by pressing any key in the twelve-key pad.
- Press [menu/clear]
- Select the HANDSET SETUP menu, and then the ANY KEY ANSWER submenu.
- Select ON or OFF, and then press [select/ ☑ . You will hear a confirmation tone.
Any Key Answer
On
Off
[32]


Using Your Phone
| From a cordless handset | From a handset speaker phone | |
| Making a call | 1. Remove the handset from the charging cradle.2. Press [ flash ]3. Listen for the dial tone.4. Dial the number.OR1. Remove the handset from the charging cradle.2. Dial the number.3. Press [ flash ] | 1. Remove the handset from the charging cradle.2. Press [■■ ]3. Listen for the dial tone.4. Dial the number.OR1. Remove the handset from the charging cradle.2. Dial the number.3. Press [■■ ] |
| Answering a call | 1. Pick up the handset. (If AutoTalk is on, the phone will answer when you remove the handset from the charging cradle.)2. Press [ [flaap ]Key Answer is on, you can also press any key on the twelve-number keypad.) | 1. Pick up the handset. (If AutoTalk is on, the phone will answer when you remove the handset from the charging cradle.)2. Press [■■ ] |
| Hanging up | Press [●] jetum the handset to the cradle. | Press [●] jetum the handset to the cradle. |
[33]

●
⊕
⊕


Keypad Lock
Use Keypad Lock to disable key response. You can still answer calls, receive page and receive copy phonebook locations - keylock will reactivate after these operations.
To lock the keypad
Press and hold [*/tone/<] until you hear a confirmation tone. KEYPAD LOCKED appears. If any key is pressed when keypad is locked, TO UNLOCK KEYPAD PRESS & HOLD *KEY appears.
To unlock the keypad
Press and hold [*/tone/<] again. KEYPAD UNLOCKED appears.
Making a Call from the Phonebook
-
When the phone is in standby, press [☐] to open the phonebook.
-
Move the cursor to select DIAL/EDIT, and then press [select/]
-
Find the phonebook entry you want to call (see Finding a Phonebook Entry on page 27).
-
Press (fitasib) [he number
Note: You can also press [ /flash] or [ ] before you open the phonebook. When you come to the
phone number you want to dial, press [select/✉].
Making a Call with Speed Dial
- When the phone is in standby, press and hold one of the number keys ([0] through [9]) until the assigned
phonebook entry appears in the display.
- Press p(fitasib) [he number.
Switching to the Speakerphone During a Call
To switch a normal call to the speakerphone, press [ ] on the handset. To switch from a speakerphone call to a normal call, press [ ]
Using Caller ID and Call Waiting
If you subscribe to Caller ID from your phone company, your phone will show you the caller's phone number and name (if available) whenever a call comes in. If you subscribe to both Call Waiting and Caller ID, the phone also shows you the name and the number of any call that comes in while you're on the line.
[34]


Using the Caller ID List
You can store up to 100 Caller ID numbers in each handset. Your phone shares memory between your Phonebook and Caller ID entries. Once you reach your maximum phonebook entries of 100, Caller ID information will not be stored (but it will still display when the call comes in).
To open the Caller ID list, press [10] (on the right side of the four-way key). The phone will show the total number of stored Caller ID records. Use [] and 4 to scroll through the list, or enter a letter on the keypad to jump to the first Caller ID name that starts with that letter.
Making a Call from a Caller ID Record
- When the phone is in standby, press [ID] to open the Caller ID list.
- Use [▽] and 4 to find the Caller ID record you want to dial.
- Press (fklabib) the number.
Note: You can also press [[/flash] before you open the Caller ID list. When you come to the phone number you want to dial, press [select/☑].
Deleting Caller ID Numbers
To delete only one Caller ID number, go to the Caller ID list and select the number you want to delete. Press [menu/clear]. When the phone asks you to confirm, select YES. To delete all the Caller ID numbers, press [] and the [menu/clear] . Select YES when asked if you want to Delete all.
Warning : When you delete a Caller ID number, you delete it permanently.
[35]



Using Call Waiting
If you have Call Waiting service and a second call comes in when you are on the phone, a call waiting tone will sound.
For Australian Model: [P/tiash] 2 and then to switch between callers. There is a short pause during the switch.
Talk John Smith 8178583300
For New Zealand Model: P/Flash switch between callers. There is a short pause during the switch.
Note: You must subscribe through your telephone provider to receive Call Waiting services. Not all features are available in all areas.

[36]


Redialing a Number
You can quickly redial the last 3 numbers dialed on each handset.
- With the phone in standby, press [redial/pause] to open the redial list.
- Use [redial/pause] [p] [V] and △ to scroll through the redial list.
- When you find the number you want to dial, press [[ / flash] or [ ]
OR - Press [ /flash] [ ]
- Press [redial/pause]. The last number dialed will be displayed.
Deleting a Redial Record
If you want to delete a phone number from the handset's redial list, follow the steps below:
1. With the phone in standby, press [redial/pause]
2. Use [redial/pause] or [ ] and △ to scroll through the redial list.
3. When you find the redial number you want to delete, press [menu/clear].
4. Select YES, and then press [select/1 menu/clear] . The redial number is deleted.
Adjusting the Ringer, Earpiece, and Speaker Volume
Adjusting the Ringer Volume
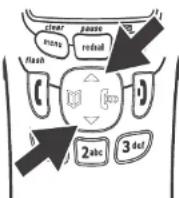
You can choose from three ringer volume settings on the handset (off, low, and high).
With the phone in standby, use [▽] or △[ on the handset to adjust the ringer
volume.
[37]
●
⊕


Adjusting the Earpiece and Speaker Volume
You can choose from six volume levels for the earpiece and speaker. To adjust the volume while on a call, press [△] to make it louder or ▼ to make it softer.
Adjusting the Audio Tone and Clarity Boost
If you aren't satisfied with the audio quality of your phone, you can adjust the Audio Tone of the earpiece while on a call. Your phone gives you three audio tone options: low, natural, and high; the default setting. Natural Tone, is recommended for hearing aid users. Audio tone adjustments only apply to the earpiece, not the speakerphone. To adjust the audio tone:
- With the phone in talk mode, press [select/ ] to cycle through the three audio tone options.
- When the desired option appears on the display, stop
- After two seconds, the displayed audio tone is set, and the display returns to normal.
If you encounter interference while using your phone, you can manually improve the sound by setting the Clarity Boost to on. This works only when the phone is in use, so while you are on a call: - Press .[menu/clear]
- Move the cursor to CLARITY BOOST, and then press [select/]. BOOST ON and B appear on the display. Use the same procedure to turn off Clarity Boost. BOOST OFF appears.
Finding a Lost Handset
With the phone in standby, press [find hs] on the base. All registered handsets will beep for 60 seconds, and PAGING appears on the handset display. To cancel paging, press any key on the found handset or press [find hs].

[38]


Using Hold, Conference, and Transfer
Placing a Call on Hold
During a call, press [xfer/intercom] on the handset to place the caller on hold. If you leave a caller on hold for more
than ten seconds, the display screen will read LINE ON HOLD.
To return to the party on hold, press [Vflash] [∅r ] on a handset. The phone returns to the holding party.
Notes:
- You can only place a caller on hold for 5 minutes. Once 5 minutes has passed, that party's line is
disconnected and the phone returns to standby. - While a call is on hold, Caller ID and Call Waiting can not be used.
Conferencing
If you have more than one handset, up to three people can participate in a conference call. A three-way conference
call consists of an outside line and two handsets. You can easily join a call already in progress.
- Press [flash] [c] on the handset to join the call.
- To hang up, return the handset to the cradle or press [1] on the handset. The other station will still be connected to the call.

[39]


Transferring a Call
You can transfer a call from one station to another.
- During a call, press .[xfer/intercom]
- Use [A][b]select to select the station you want to transfer the call to, then press ☑. The call will automatically be placed on hold, and a paging tone sounds. To cancel the transfer, press [ flash ] [pr ]
- When another station accepts the transferred call, you will be disconnected. If you want to rejoin the call, press [flash] again or .
Answering a Transferred Call
When a station receives a call transfer, it sounds a paging tone and shows the ID of the station that is paging.
To accept the call transfer
- Press df[/flash] [xfer/intelcom]he handset.
- To speak to the caller, press [ (flash) on the receiving handset.
- Only the first station to answer the transfer page will be connected to the call. If the transfer page is not picked up within one minute, the operation will be canceled.
[40]


Using Special Features
Muting the Ringer (One Call Only)
While a handset is ringing, press [ ] on the handset to mute the ringer for this call. The phone rings again on the next call.
Note: The handset must be off the cradle to mute the ringer.
Muting the Microphone
Mute turns off the microphone so the caller can't hear you. The display shows ☑ while the microphone is muted.
-
While you are on a call, press [menu/clear].
-
Move the cursor to MUTE and then press [select/ ☑ . 📄 appears in the display and remains while MUTE ON disappears in several seconds. To cancel muting, repeat the procedure.
Privacy Mode
If you don't want other station to interrupt you while on a call, you can turn on privacy mode. As long as your station
Is in privacy mode, other stations won't be able to join your call or make any calls of their own.
-
While on a call, press .[menu/clear]
-
Move the cursor to PRIVACY MODE, and press [select/]. PRIVACY MODE ON appears in the display for 2 seconds, but P appears and remains in the display until the feature is turned off. Other handsets will not be able to make a call and their display will list UNAVAILABLE when they try to join the call.
To turn privacy mode off, repeat the procedures listed above.
[41]
●


Using the DirectLink Communication Feature
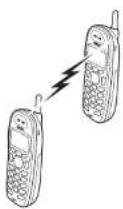
Using the DirectLink feature, a pair of handsets can function as two-way radios. You can have up to two pairs of handsets using DirectLink at a time. DirectLink communication does not interfere with the main base's ability to make or receive telephone calls. You must set both handsets to use DirectLink communication to activate this feature. Other handsets can be used while two handsets are in DirectLink communication; however, the two handsets in DirectLink operation are not able to make or receive calls until DirectLink communication is canceled.
- Press [menu/clear] and move the cursor to the DIRECTLINK MODE menu.
- Press [select/ ] . The display shows TO ENTER DIRECTLINK MODE PRESS [SELECT]
- Press [select/ ] . You will hear a confirmation tone, and DIRECTLINK MODE COMPLETE appears in the display.
To enter DirectLink mode press [SELECT]

[42]




Making a DirectLink Call
-
To call another handset with DirectLink communication, press [ (flash) ]
-
The display shows TO DIRECTLINK A HANDSET PRESS [1-4].
-
Press the number of the handset you want to call. If the handset is out of range or not using DirectLink communication, the display shows UNAVAILABLE. To answer a DirectLink call, press [flash] or if Any Key Answer is on, press any key of the twelve-key pad.
-
To exit the DirectLink call, press []].
Exiting DirectLink Operation
To exit DirectLink communication and return to normal standby, press [menu/clear] [saldebh] press return the handset to the cradle. DIRECT LINK MODE CANCEL appears in the display.
or
Making an Intercom Page
You can use the intercom to talk to another station without using the phone line.
- With the phone in standby, press [xfer/intercom].
- Use [A qr] ▼ to select the station you want to talk with, then prselect/ ]
Select ALL to page all other stations paged. - To cancel the intercom page, press [ ]
Note:
Intercom paging will be cancelled if any of the following things occur:
You receive an outside call or an intercom page while selecting the other handset.
You do not select a handset within 30 seconds.
The party does not answer the page within one minute.
The party is busy.
The party is out of range (UNAVAILABLE appears on the display).
[43]
⊕

Answering an Intercom Page
When the intercom page tone sounds, the display shows the ID of the station that is paging.
From the handset, press [[flash] [xfer/intercom] . If AutoTalk is on, the handset automatically answers the page when you remove the handset from the cradle. If Any Key Answer is on, press any key of the twelve-key pad.
To intercom
▶Handset #2
Handset #3


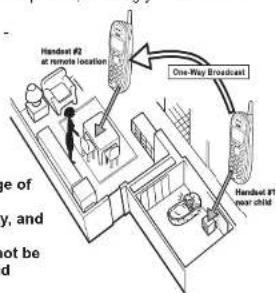
Room/Baby Monitor
This feature allows you to monitor sounds in another room. Place a handset in the room you wish to monitor; it will function as a microphone. Another station can be set to function as a remote speaker, allowing you to monitor sounds in the room.
- Press [menu/clear] and enter the ROOM MONITOR menu. TO ROOM MONITOR appears.
- Select the station you want to monitor by using [△] or ▽[ . ]
- Press [select/ ] . ROOM MONITOR appears, and you hear sounds in the room where the station is installed.
- To turn off the Room Monitor, press [1] or return the handset to the cradle.
Notes:
- This feature only works when both handsets are within the range of the base.
- If the party is out of range, UNAVAILABLE appears in the display, and the operation is canceled.
- While a pair of handsets is in Room/Baby Monitoring, they cannot be used to make or receive calls. Other handsets can still make and receive calls.
[44]


Tone Dialing Switch Over (Australian Model Only)
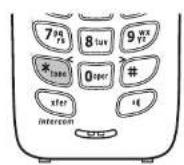
If your telephone company requires pulse dialing, you can switch to tone dialing after the call connects. This feature is useful when you need tone dialing to use automated menu systems, such as telephone bank tellers, telephone prescription refills, customer support menus, etc. If your phone is set to pulse dialing, make your call normally. Once your call connects, press ["/tone/>] on the handset. Any digits you enter from then on will be sent as tone dialing. When this particular call ends, the phone automatically returns to pulse dialing.

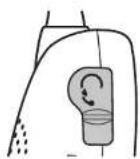
Installing the Optional Headset
Your phone may be used with an optional headset. To use this feature, insert the headset plug into the headset jack. Your phone is ready for hands-free conversations. Headsets may be purchased by visiting www.uniden.com.au (Australian Model) or www.uniden.co.nz (New Zealand Model).

[45]


Maintenance
Battery Replacement and Handling
With average use, your phone's battery should last approximately one year. To order replacement batteries, please visit www.uniden.com.au (Australian Model) or www.uniden.co.nz (New Zealand Model).
Battery Contact Maintenance
To maintain a good charge, clean the charging contacts on the handset once each month. Dampen a cloth with plain water. Genly rub the damp cloth over the charging contacts until all visible dirt is removed. Dry the contacts thoroughly before returning the handset to the charging cradle.
Caution: Do not use paint thinner, benzene, alcohol, or any other chemical products. Doing so may discolor the surface of the telephone and damage the finish.
Warning
To avoid the risk of personal injury or property damage from fire or electrical shock, use only Uniden AAD-041S (base) or AAD-600S (charger) AC adapters and Uniden BT-909 battery pack with your phone.
Caution:
Do not remove the batteries from the handset to charge them.
Never throw the battery into a fire, disassemble, or heat them.
Do not remove or damage the battery casing.
A replacement Uniden adapter or battery may be purchased by visiting www.uniden.com.au (Australian Model) or www.uniden.co.nz (New Zealand Model).
[46]
●


Low Battery Alert
When the battery pack is very low, the phone is programmed to eliminate functions in order to save power.
The battery pack needs to be charged when the empty battery icon appears. When LOW BATTERY appears in the display and the phone is in standby, none of the keys will operate. If you are on a call, complete your conversation as quickly as possible, and return the handset to the charging cradle.
Low Battery
0
Talk Time, Standby Time, and Storing the Handset on the Base
With average use, your battery provides approximately 8 hours of talk time and approximately 7 days of standby time. However, even when the battery pack is not being used, it gradually discharges over a long period of time. Therefore, you can achieve optimum performance if you return the handset to the cradle after each call. If the handset is left off of the base, the actual talk time duration will be reduced respective to the amount of time the handset is off the cradle.
Troubleshooting
Resetting the Handset
You may need to reset your handset in the following instances:
- You lose a handset and purchase a new one.
- When you try and register to your existing base, you see REGISTRATION FAILED on the menu display.
- You are unable to register any handsets to the base.
- You had a base which needed to be exchanged by the manufacturer.
- When you register your existing handsets to the base, and the handset IDs do not match. (For example, the handset registers as Handset #4, but you only have two handsets.)
- When you are instructed to by the one of the manufacturer's call center representatives.
[47]
●

[Non-Text]

To reset the handset, do the following:
- Press and hold [ ] ##d for at least 5 seconds until the SYSTEM RESET menu appears.
Select DEREGISTER HS submenu. WHICH HANDSET? appears.
-
Move the cursor to select the handset ID to be deregistered from the list, and then press [select/ ☑ . DEREGISTER HS appears.
-
The phone will ask you to confirm the deregistration. Move the cursor to YES, and then press [select/ ☑ . You will hear a confirmation tone.
When the base information is deleted, the handset displays MODELS VARY! CHARGE HANDSET ON THE BASE FOR REGISTRATION OR REFER TO OWNER'S MANUAL. To register the handset to the new base, see page 24.
If the handset cannot contact the base, it displays UNAVAILABLE. Make sure the handset is in range of the base and the base is connected to power.
Note: It is also possible to reset the handset back to its original factory settings. All changes including phonebook entries and Caller ID information will be erased. For more information on resetting the handset back to factory settings and when you need to do this, visit the customer support page at www.uniden.au (Australian Model) or www.uniden.co.nz (New Zealand Model).
Resetting the Handset without the Base
If your original base is not available for some reason (for example, it is lost or somehow incapacitated), you can still reset the handset and use it with another base.
-
Press and hold [ ] [#&]d for at least 5 seconds until the SYSTEM RESET menu appears.
-
Move the cursor to select the REPLACING BASE submenu, and then press [REPLACE] BASE appears.
-
Move the cursor to select YES, and then press [select/ ☑ . A confirmation tone sounds. The handset deletes its own base information without trying to contact the base. When the base information is deleted, the handset displays MODELS VARY! CHARGE HANDSET ON THE BASE REGISTRATION OR REFER TO OWNER'S MANUAL. To register the handset to the new base, see page 24.
[48]
Replace Base Yes
No

●
●
⊕
Changing the Digital Security Code
The digital security code is an identification code used to connect the handset and the base. Your unit ships from the manufacturer with a preset security code. Resetting this code is not normally necessary. In the rare situation that you suspect another cordless telephone is using the same security code or if you are instructed to change this code by a manufacturer's Call Center Representative, you can change the code. To change the digital security code:
- Reset the handset (see page 25).
- Re-register each handset on page 24.
Traveling Out of Range
During a call, if you move your handset too far from your base, noise may increase. If you pass the range limit of the base, the handset will beep, display OUT OF RANGE, and then go to standby. The base will maintain the connection for 30 seconds after the handset goes out of range. If you move the handset back within range of the base within 30 seconds, press [ {flash} ] or # to pick up the call again.
Common Issues
If your phone is not performing to your expectations, please try these simple steps first. If these steps do not solve your problem, please visit the customer support page at www.uniden.au (Australian Model) or www.uniden.co.nz (New Zealand Model).
| Symptom | Suggestion |
| The charge LED won't illuminate when the handset is placed in the cradle. | Make sure the AC adapter is plugged into the base or the charger (if you have more than one handset) and wall outlet.Make sure the handset is properly seated in the cradle.Make sure the charging contacts on the handset are clean. |
| The audio sounds weak. | Move the handset and/or base away from metal objects or appliances and try again.Make sure that you are not too far from the base. |
[49]


| Symptom | Suggestion |
| Can't make or receive calls. | Make sure that you are not too far from the base.Make sure the line is not in use. If an outside call is already using a line, you cannot use that line to make another outside call.Check both ends of the base telephone line cord.Make sure the AC adapter is plugged into the base and wall outlet.Disconnect the AC adapter and reconnect.Change the Digital Security Code (see page 49). |
| Severe noise interference. | Keep the handset away from microwave ovens, computers, remote control toys, wireless microphones, alarm systems, intercoms, room monitors, fluorescent lights, and electrical appliances.Move to another location or turn off the source of interference. |
| The Caller ID does not display. | The call was placed through a switchboard.Call your telephone provider to verify your Caller ID service is current. There may be a problem with your Caller ID service. |
| The handset doesn't ring or receive a page. | Make sure that you are not too far from the base.Charge the battery in the handset for 15 to 20 hours by placing the handset on the base or charging cradle.Change the Digital Security Code (see page 49). |
| You cannot register the handset at the base. | Charge the battery pack in the handset for 15 to 20 hours.Change the Digital Security Code (see page 49). |
[50]
| Symptom Suggestion | |
| The handset doesn't communicate with other handsets. | Change the Digital Security Code (see page 49).Make sure that you have registered all handsets. |
| An extra handset can't join the conversation. | Make sure there are not two handsets already using the conference feature.Make sure that another handset is not in privacy mode. |
| Room Monitor does not work. | Make sure to place the handset(s) within the range of the base. |
| The Voice Message Waiting LED flashes, but there are no new messages | Reset the Voice Message Waiting Indicator (see page 21). |
[51]
Liquid Damage
Moisture and liquid can damage your cordless phone. Follow the suggestions below if your phone gets wet:
Exterior
If the handset or base is exposed to moisture or liquid, but only the exterior plastic housing is affected, wipe off the liquid, and use as normal.
Interior
If moisture or liquid has entered the plastic housing (i.e. liquid can be heard in the phone or liquid has entered the handset battery compartment or vent openings on the base):
| Handset | Base |
| 1. Remove the battery cover and leave it off for ventilation.2. Disconnect the battery pack. Leave the battery cover off and the battery pack disconnected for at least 3 days.3. Once the handset is completely dry, reconnect the battery pack and the battery cover.4. Recharge the handset's battery pack for 15 to 20 hours before using. | 1. Disconnect the AC adapter from the base, cutting off electrical power.2. Disconnect the telephone cord from the base.3. Let dry for at least 3 days. |
IMPORTANT: You must unplug the telephone line while recharging the battery packs to avoid charge interruption. CAUTION: DO NOT use a microwave oven to speed up the drying process. This will cause permanent damage to the handset, base and the microwave oven. After following these steps, if your cordless telephone does not work, please visit the customer support page at www.uniden.com.au (Australian Model) or www.uniden.co.nz (New Zealand model).
[52]
Specifications
| Operating Temperature | 0°C to +50°C (+32°F to +122°F) | |
| AC Adapter | Part Number Base: AAD-041SCharging cradle: AAD-600S | |
| Input Voltage | Base: 240V AC, 50 HzCharging cradle: 240V AC, 50 Hz | |
| Output Voltage | Base: 9V DC @ 350 mACharging cradle: 9V DC @ 210 mA | |
| Battery Part Number BT-909 | Capacity 3.6V DC @ 600 mAh | |
Notes:
- Use only the supplied AAD-041S and AAD-600S adapters.
- Do not use any other AC adapter.
- Do not place the power cord where it creates a trip hazard or where it could become chafed and create a fire or electrical hazard.
- Do not place the base in direct sunlight or subject it to high temperatures.
[53]


Index
| A | |
| Adjusting Audio Tone 38Answering a Call 33Any Key Answer 32AutoTalk 32 | |
| B | |
| Battery ContactMaintenance 46Battery Replacementand Handling 46 | |
| C | |
| Caller ID on Call Waiting 20Clarity Boost 38Controls Part of the Handset 7 | |
| D | |
| Day and Time 19Deleting a Redial Record 37Deleting Caller ID Numbers 35Dial Mode 19Digital Security Code 49DirectLink 42Distinctive Ring 20 | |
| E | |
| Earpiece Volume 38Entering Text from theHandset 12 | |
| F | |
| Four Way Function Key 11 | |
| H | |
| Handset Banner 30 | |
| Hanging Up 33 | |
| I | |
| Insert 0 22 | |
| Installing the Belt Clip 16 | |
| Installing the Phone 13 | |
| Installing the Rechargeable Battery 14 | |
| K | |
| Key Touch Tone 20 | |
| Keypad Lock 34 | |
| L | |
| Low Battery Alert 47 | |
| M | |
| Maintenance 46 | |
| Making a Call 33 | |
| Making a call from a Caller ID Record 35 | |
| Making a call with Speed Dial 34 | |
| Muting the Microphone 41 | |
| Muting the Ringer 41 | |
| N | |
| Name tag 22 | |
| O | |
| Optional Headset 45 | |
| Out of Range 49 | |
| P | |
| Phonebook 25 | |
| Placing a Call on Hold 39 | |
| Privacy Mode 41 | |
| Product Overview 6 | |
| R | |
| Redialing a Number 37 | |
| Resetting Handsets 25 | |
| Ringer Tones 31 | |
| Ringer Volume 37 | |
| Room/Baby Monitor 44 | |
| S | |
| Speaker Volume 38 | |
| Speed Dial 26 | |
| T | |
| Talk and Standby Time 47 | |
| V | |
| Voice Mail | 20 |
| Voice Mail Programming | 21 |
| Voice Message Waiting Indicator | 21 |
[54]

●
⊕
⊕
One Year Limited Warranty
Important: Evidence of original purchase is required for warranty service.
Warrantor: Uniden Australia Pty Limited A.B.N. 58 001 865 498 Uniden New Zealand Limited
Warranty is only valid in the original country of purchase.
ELEMENT OF WARRANTY: Uniden warrants to the original retail owner for the duration of this warranty, its DSS3415 (herein after referred to as the Product), to be free from defects in materials and craftsmanship with only the limitations or exclusions set out below.
WARRANTY DURATION: This warranty to the original retail owner only, shall terminate and be of no further effect 12 months after the date of
original retail sale. This warranty will be deemed invalid if the product is:
(A) Damaged or not maintained as reasonable and necessary,
(B) Modified, altered or used as part of any conversion kits, subassemblies, or any configurations not sold by Uniden,
(C) Improperly installed
(D) Repaired by someone other than an authorized Uniden Repair Agent for a defect or malfunction covered by this warranty.
(E) Used in conjunction with any equipment or parts or as part of a system not manufactured by Uniden.
PARTS COVERED: This warranty covers for one (1) year, the Base unit and handset (DSS3415) or base, charger and handset (DSS3415+1). Accessories: AC Adaptor, Batleries, Belt Clips etc are covered for 90 days only.
STATEMENT OF REMEDY: In the event that the product does not conform to this warranty at any time while this warranty is in effect, the warrantor at its discretion, will repair the defect or replace the product and return it to you without charge for parts or service.
THIS WARRANTY DOES NOT COVER OR PROVIDE FOR THE REIMBURSEMENT OR PAYMENT OF INCIDENTAL OR CONSEQUENTIAL DAMAGES. THIS GUARANTEE IS IN ADDITION TO AND DOES NOT IN ANY WAY AFFECT YOUR RIGHTS UNDER THE CONSUMER GUARANTEE ACT.
PROCEDURE FOR OBTAINING PERFORMANCE OR WARRANTY: In the event that the product does not conform to this warranty, the Product should be shipped or delivered, freight pre-paid, with evidence of original purchase (eg. a copy of the sales docket), to the warrantor at:
UNIDEN AUSTRALIA PTY LIMITED
SERVICE DIVISION
345 Princes Highway,
Rockdale,
NSW 221
AUSTRALIA
Fax: (02) 9599 3278
www.uniden.com.au
- 2017年1月1日星期六
UNIDEN NEW ZEALAND LIMITED
SERVICE DIVISION
150 Harris Road
East Tamaki,
Auckland,
NEW ZEALAND
Fax: (09) 274 4253
www.uniden.co.nz
[55]


THANK YOU FOR BUYING A UNIDEN PRODUCT.
Uniden®
© 2008 Uniden Australia Pty Limited. Uniden New Zealand Ltd. Printed in China UPZZ01411BZ(0)
- Troubleshooting 47
- Common Issues 49
- Specifications 53
- Welcome
- Product Overview
- Main Features:
- The Standby Screen
- Using the Interface
- Using the Four-way Function Key
- Using the Handset Menus
- Entering Text from Your Handset
- Installing the Phone Choosing the Best Location
- Installing the Rechargeable Battery
- Connecting the Base and Charging the Handset
- Installing the Belt Clip
- Connecting to the Phone Line
- High Speed Internet
- Testing the Connection
- Changing the Dial Mode (Australian Model Only)
- Basic Setup
- Setting the Day and Time
- Activating Caller ID on Call Waiting
- Activating Distinctive Ring
- Activating Key Touch Tone
- Setting up Voice Mail
- Notes:
- Programming One-Touch Voice Mail Access
- Resetting the Voice Message Waiting Indicator
- Activating Name Tag (POP ID)
- Activating the Insert 0
- Adding Extra Handsets
- Compatible Handsets
- Charging the Accessory Handset
- Registering Accessory Handsets
- Registering DSS3405 Handsets
- Resetting Handsets
- Setting up the Phonebook
- Creating Phonebook Entries
- Finding a Phonebook Entry
- Editing an Existing Phonebook Entry
- Storing Caller ID or Redial Numbers in the Phonebook
- Deleting Phonebook Entries
- Deleting All the Phonebook Entries at Once
- Copying Phonebook Entries to Another Handset
- Customizing Your Phone
- Changing the Handset Banner
- Selecting Ring Tones
- Activating AutoTalk
- Activating Any Key Answer
- Keypad Lock
- Making a Call from the Phonebook
- Making a Call with Speed Dial
- Switching to the Speakerphone During a Call
- Using Caller ID and Call Waiting
- Using the Caller ID List
- Making a Call from a Caller ID Record
- Deleting Caller ID Numbers
- Using Call Waiting
- Redialing a Number
- Deleting a Redial Record
- Adjusting the Ringer, Earpiece, and Speaker Volume
- Adjusting the Ringer Volume
- Adjusting the Earpiece and Speaker Volume
- Adjusting the Audio Tone and Clarity Boost
- Finding a Lost Handset
- Using Hold, Conference, and Transfer
- Placing a Call on Hold
- Conferencing
- Transferring a Call
- Answering a Transferred Call
- Using Special Features
- Muting the Ringer (One Call Only)
- Muting the Microphone
- Privacy Mode
- Using the DirectLink Communication Feature
- Making a DirectLink Call
- Exiting DirectLink Operation
- Making an Intercom Page
- Answering an Intercom Page
- Room/Baby Monitor
- Tone Dialing Switch Over (Australian Model Only)
- Installing the Optional Headset
- Maintenance
- Battery Contact Maintenance
- Warning
- Low Battery Alert
- Talk Time, Standby Time, and Storing the Handset on the Base
- Troubleshooting
- Resetting the Handset
- Resetting the Handset without the Base
- Changing the Digital Security Code
- Traveling Out of Range
- Common Issues
- Liquid Damage
- Exterior
- Interior
- Index
- One Year Limited Warranty
- UNIDEN AUSTRALIA PTY LIMITED
- UNIDEN NEW ZEALAND LIMITED
Brand : UNIDEN
Model : DSS 3415+1
Category : Cordless phone