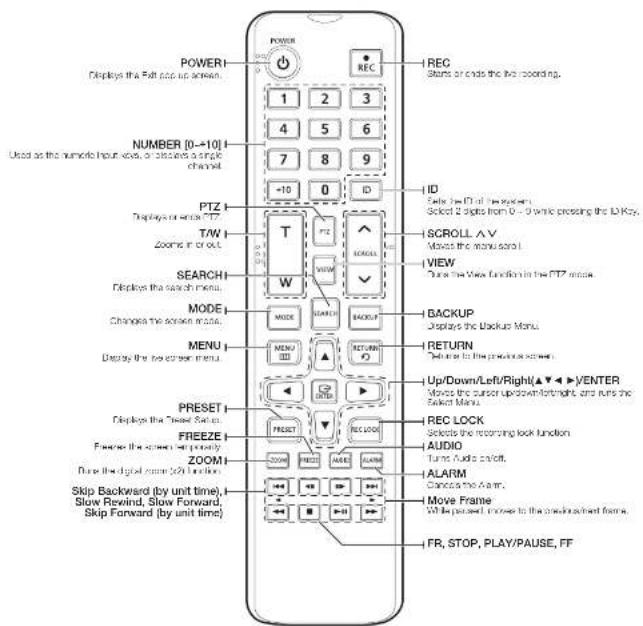
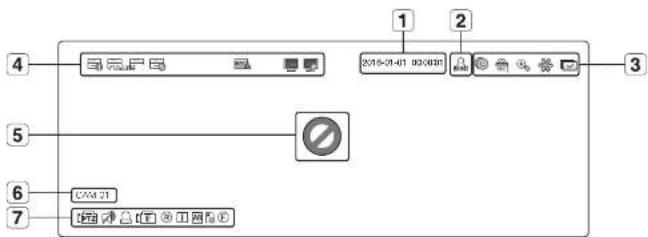
[ENTER] ▲ ▼ ▶ ▶ [ENTER]
text_image
Add Pop
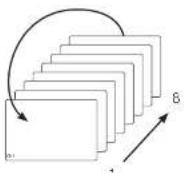
1. Install iPhone enable an out-of-use and turn it
2. Select Full Version 1 or less and can add content.
Add Image
Add Image to the image.
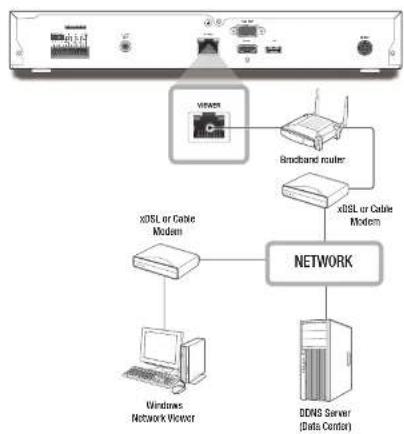
Enable P2P: Select check box if you want to use P2P service.
To run the P2P service
When is checked, the connection test runs to check if it can be remotely connected from the current NVR.
When the connection is successful, search for WiseNet Mobile from the smart phone, and then install and run it.
- When Add a device > QR code is selected, the NVR QR code can be scanned.
When the QR code is scanned, the device ID that can be seen in NVR is automatically converted to mobile viewer ID, and the mobile viewer can be used right away when the ID/password of NVR is entered.
After this, it automatically connects to NVR and can be monitored easily with a smart phone when running WiseNot mobile app saved in the smart phone.
The expiration date for the P2P service is three years after the purchase of the product, and the remaining period can be checked in mobile FAQ.
search & play
SEARCH
You can perform the search for recorded data by the time or by the search criteria such as an event. You can access the menu directly in Live mode.
text_image
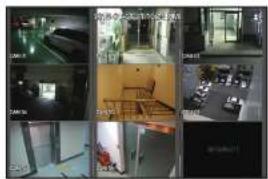
Screenshot of a surveillance camera interface with multiple surveillance camera images and a 'Control Panel' dialog box.
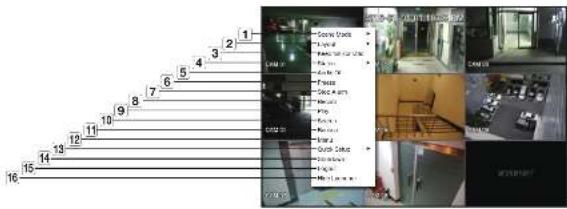
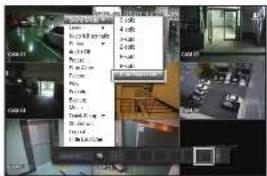
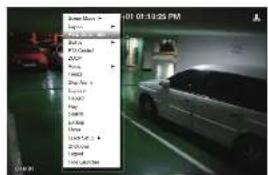
In live mode, right click with the mouse button or press the [MENU] button on your remote control. The Live menu appears.
Select .
The Search menu should appear.
The search can be restricted by the Auto Delete function.
Refer to "Setting the Recording > Record Option". (Page 40)
Overlapped data - it only appears if there exists overlapped data on a certain time, produced due to the change of NVR's time setup. The latest data comes first, from . It does not appear in .
- The search time is based on the time specified by MFR.
Time Search
You can search for recorded data of a desired time.
The displayed time is based on the local time zone and the daylight saving time (DST). Therefore, data recorded at the same time from different areas may differ based on the time zone and the DST.
text_image
Scene Settings
Scene Select Time
00:00:00
01:00:00
02:00:00
03:00:00
04:00:00
05:00:00
06:00:00
07:00:00
08:00:00
09:00:00
10:00:00
11:00:00
12:00:00
13:00:00
14:00:00
15:00:00
16:00:00
17:00:00
18:00:00
19:00:00
20:00:00
21:00:00
22:00:00
23:00:00
24:00:00
25:00:00
26:00:00
27:00:00
28:00:00
29:00:00
30:00:00
31:00:00
32:00:00
33:00:00
34:00:00
35:00:00
36:00:00
37:00:00
38:00:00
39:00:00
40:00:00
41:00:00
42:00:00
43:00:00
44:00:00
45:00:00
46:00:00
47:00:00
48:00:00
49:00:00
50:00:00
51:00:00
52:00:00
53:00:00
54: 55 56 57 58 59 6 61 62 63 64 65 66 67 68 69 7 71 72 73 74 75 76 77 78 79 8 81 82 83 84 85 86 87 88 89 9 91 92 93 94 95 96 97 98 99 |
Scene Select Time
1.1.1.1.1.1.1.1.1.1.1.1.1.1.1.1.1.1.1.1.1.1.1.1.1.1.1.1.1.1.1.1.1.1.1.1.1.1.1.1.1.1.1.1.1.1.1.1.1.1.1 |
Scene Select Time
2.1.2.2.2.2.2.2.2.2.2.2.2.2.2.2.2.2.2.2.2.2.2.2.2.2.2.2.2.2.2.2.2.2.2.2.2.2.2.2.2.2.2.2.2.2.2.2.2.2.2.2.
Scene Select Time
3.1.3.3.3.3.3.3.3.3.3.3.3.3.3.3.3.3.3.3.3.3.3.3.3.3.3.3.3.3.3.3.3.3.3.3.
Scene Select Time
4.1.4 . . . . . . . . . . . . . . . . . . . . . . . . . . . . . . . . . . . . . . . . . . . . . . . . . . . . . . . . . . . . . .
Scene Select Time
5.1.5 . . . . . . . . . . . . . . . . . . . . . . . . . . . . . . . . . . . . . . . . . . . . . . . . . . . . . . .
Scene Select Time
6.1.6 . . . . . . . . . . . . . . . . . . . . . . . . . . . . . . . . . . . . . . . . . . . . . .
Scene Select Time
7.1.7 : - - - - - - - - - - - - - - - - - - - - - - - - - - - - - - - - - - - - - - - - - - - - - - - - - - - - - - - - - - - - - - - - - - - - - - - - - - - - - - - - - - - - - - - - - - - - - - - - - - -
Scene Select Time
8.1.8 : - - - - - - - - - - - - - - - - - - - - - - - - - - - - - - - - - - - - - - - - - - - - - - - - - - - - - - - -
Scene Select Time
9.1.9 : + + + + + + + + + + + + + + + + + + + + + + + + + + + + + + + + + + + + + + + + + + + + + + + + + + + + + + + + + + + + + + + + + + + + + + + + + + + + + + + + + + + + + + + + + + + + + + + + + + + + +
Scene Select Time
14 : ( ) : ( ) : ( ) : ( ) : ( ) : ( ) : ( ) : ( ) : ( ) : ( ) : ( ) : ( ) : ( ) : ( ) : ( ) : ( ) : ( ) : ( ) : ( ) : ( ) : ( ) : ( ) : ( ) : ( ) : ( ) : ( ) : ( ) : ( ) : ( ) : ( ) : ( ) : ( ) : ( ) : ( ) :
Scene Select Time
15 : ( ) : ( ) : ( ) : ( ) : ( ) : ( ) : ( ) : ( ) : ( ) : ( ) : ( ) : ( ) : ( ) : ( ) : ( ) : ( ) : ( ) : ( ) : ( ) : ( ) : ( ) : ( ) : ( ) : ( ) : ( )
Scene Select Time
16 : ( ) : ( ) : ( ) : ( ) : ( ) : ( ) : ( ) : ( ) : ( ) : ( ) : ( ) : ( ) : ( ) : ( ) : ( ) : ( ) : ( ) : ( ) : ( ) : ( )
Scene Select Time
17 : ( ) : ( ) : ( ) : ( ) : ( ) : ( ) : ( ) : ( ) : ( ) : ( ) : ( ) : ( ) : ( ) : ( ) : ( ) : ( )
Scene Select Time
18 : ( ) : ( ) : ( ) : ( ) : ( ) : ( ) : ( ) : ( ) : ( ) : ( ) : ( ) : ( ) : ( )
Scene Select Time
19 :( )( )( )( )( )( )( )( )( )( )( )( )( )( )( )( )( )( )( )( )( )( )( )( )( )( )( )( )( )( )( )( )( )( )( )( )( )( )( )( )( )( )( )( )( )( )( )( )( )( )( )
Scene Select Time
24 :( )( )( )( )( )( )( )( )( )( )( )( )( )( )( )( )( )( )( )( )( )( )( )( )( )( )( )( )( )( )( )( )( )( )( )( )( )( )( )( )( )( )( )( )( )( )( )( )
Scene Select Time
Select in the menu.
In the date selection window, click on the < ♦ > button to select a search date.
For using the calendar, refer to "To use the calendar". (Page 24)
The record data on the specific date will be listed.
The display bar is different according to the data type. So check the data type for the color in the left pane.
- If DST (Daylight Saving Time) is configured, overlapping multiple recordings may be produced for a certain moment of time. Such a time section is distinguished with red color to mark DST section.
Go to First: Move to the earliest recording date.
Go to Last : Move to the latest recording date.
Time : Enter a time to perform the search or use the up/down button <♦> to select one.
Zoom In: The map enlarges in detail.
Zoom Out: The map will switch in the reverse order of the detailed mode above. It will switch in the sequence of 1 hour - 2 hours - 6 hours - 12 hours - 24 hours.
Preview : Click and select (click, drag) a time in to display a still image for the portion.
- If the selected channel does not contain any recorded data, it will be marked black.
Select a data item and click .
The screen switches to the data playback mode.
Color indications depending on current recording status
The recorded data types are represented through the use of different colors. Each color corresponds to a certain recording type.
Event Search
You can search for events by the channel and play them.
text_image
Event Search
Outlook Date
Outlook Time
Event
0:00:00
0:00:00
10:00:00
10:00:00
10:00:00
10:00:00
10:00:00
10:00:00
10:00:00
10:00:00
10:00:00
10:00:00
10:00:00
12:00:00
12:00:00
12:00:00
12:00:00
12:00:00
12:00:00
12:00:00
12:00:00
12:00:00
12:00:00
12:00:00
12.56.56.56.56.56.56.56.56.56.56.56.56.56.56.56.56.56.56.56.56.56.56.56.56.56.56.56.56.56.56.56.56.56.56.
12:56.56.56.56.56.56.56.56.56.56.56.56.56.56.56.56.56.56.56.56.56.56.56.56.56.56.56.56.56.56.
12:56.56.88.88.88.88.88.88.88.88.88.88.88.88.88.88.88.88.88.88.88.88.
12:56.57.94.94.94.94.94.94.94.94.94.94.94.94.94.94.94.94.94.
12:56.57.94.94.94.94.94.94.94.94.94.94.94.94.
12:56.57.94.94.94.94.94.94.94.94.94.
12:56.57.94.94.94.94.94.94.94.
12:56.57 12:56 12:56 12:56 12:56 12:56 12:56 12:56 12:56 12:56 12:56 12:56 12:56 12:56 12:56 12:56 12:56 12:56 12 : 12 : 12 : 12 : 12 : 12 : 12 : 12 : 12 : 12 : 12 : 12 : 12 : 12 : 12 : 12 : 12 : 12 : 12 : 12 : 12 : 12 : 12 : 12 : 12 : 12 .
Select in the menu.
Configure the channel, search date and event type settings.
- Depending on the menu selected, it will search for all/motion detection/video analysis/audio detection/sensors/reservation/general recording events.
Date/Time Preview: If you select a data item in the list, the still image of the selected data will be displayed in the left preview pane.
Select a data item and click .
The screen switches to the event data playback mode.
search & play
Smart Search
You can select a specific area of the image as an area of interest or exclusion using a virtual line to perform a search of events that have occurred in a specific time period.
- To perform smart search, the option in should be turned and the camera motion event option must be set to the entire area (page 41).
text_image
Video & Image
Timeline
100%
100%
100%
100%
100%
100%
100%
100%
100%
100%
100%
100%
100%
100%
100%
100%
100%
100%
100%
100%
100%
100%
100%
100%
100%
100%
In the menu, select .
Configure the channel, search date and time settings.
Go to First: Moves to the oldest smart search result.
Go to Last: Moves to the most recent smart search result.
Region of Interest: The entire screen is set as a non-detection area and a specific area designated as a detection area. Click and drag on the image or select 4 vertexes to designate a desired detection area.
Exclusive Region: The entire screen is set as a detection area and a specific area designated as a non-detection area. Click and drag on the image or select 4 vertexes to designate a desired non-detection area.
Virtual Line: Detects a motion towards a marked direction based on the virtual line. At a desired position on the screen, click or drag the start point and end point of the line.
- Up to 3 areas of interest, areas of exclusion and virtual lines can be set, respectively.
Click the button.
■ Search results displayed include a list, timeline and thumbnail.
- When you double-click a list or thumnal displayed as search results, the applicable data can be played back.
Select data to play and click .
Moves to the playback screen for the data searched.
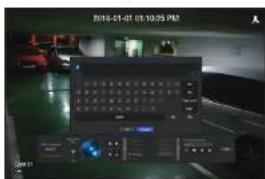
Text Search
You can search data that was entered into POS systems connected to NVR.
text_image
Text Book
Source: Caien
Text Book
Background
Background Data
Data
Text
Text
Background Data
Data
Text
Text
Background Data
Select from the menu.
Please specify the search criteria and click the button.
- A deeper and more detailed search can be performed by using specific characters.
• Search characters : Enter characters using a virtual keyboard. button.
: If this option is checked, the search terms are case-sensitive.
- : If checked, only results that exactly match the input words will be displayed.
Time overlap: This is displayed if there is data duplicated during a preset time interval.
Preview screen: If data is selected from a list, a preview image is displayed. All information is displayed in the text display below.
Export: Stores all text search information recored in NVR to storage media.
Select data and .
Moves to a replay screen for searched text data.
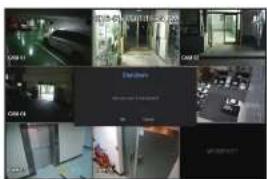
Backup Search
Searches for backup data in the connected backup device. Only data in the format of NVF is included in the search.
text_image
Back Select
File Name:
Document
Record Event
Play Start Time
Select in the menu.
When storage media with data is connected, the list of recordings stored is displayed on the equipment.
File Name : Displays the name of a file recorded.
Play Start Time: Select a time that you start playing.
Select data to play and click . The screen switches to the backup data playback mode.
ARB Search
text_image
ABS Select
File Name
Duration
Record Time
View Start Time
ABS Select Options
OK
Cancel
Select from the menu.
The type and model name of the ARB storage device are displayed.
When storage media with data is connected, the list of recordings stored and ARB data volume are displayed on the equipment.
File Name: Displays the name of a file recorded.
Channel: Displays the channel recorded.
Record Period: Displays the duration of recording.
Play Start Time: Select the time at which the video is to be played.
ARB Export Device: Selects an ARB storage device and exports a file.
Press the < □> button and you can check the free space remaining in the storage device.
Select data to play and click
The screen moves to the ARB backup data play screen.
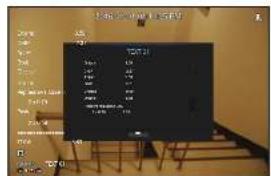
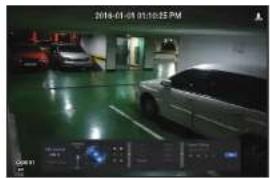
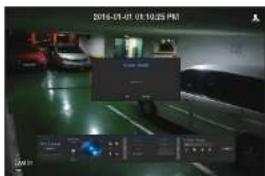
PLAYBACK
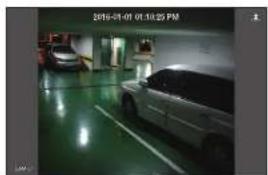
Play
You can play data stored in the HDD and backup a desired portion of the data.
text_image
2019-01-01 01:10:25 PM
Add to Image
Add to Image
Add to Image
Add to Image
Add to Image
Add to Image
text_image
2014-07-01 01:30 PM
Balance Range
Balance Range: 50%
Balance Range: 50%
Balance Range: 50%
Balance Range: 50%
Balance Range: 50%
Balance Range: 50%
Balance Range: 50%
Balance Range: 50%
Balance Range: 50%
Balance Range: 50%
Balance Range: 50%
Balance Range: 50%
Balance Range: 50%
Balance Range: 50%
Balance Range: 50%
Balance Region
OK
Cancel
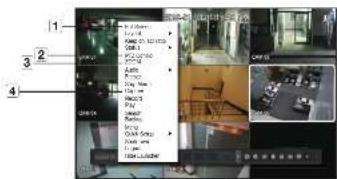
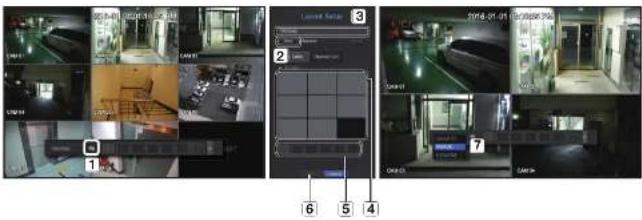
In the live menu screen, select menu or click on <▶> in the launcher menu or press the [▶] button on your remote control.
Using the up/down(▲▼) button, select the search menu.
Select a data item and click in the Search menu. will start immediately without performing the search
Playback Information: Displays the date and time of the current data in the top corner.
Backup: Click < 🔒 > to set the current time to the start time of backup; you can specify a backup area using the mouse yellow triangle.
Click < ● > again to set the current time to the end time of the backup and the 'Backup Range' window appears.
- Type: Supports formats of NVR and SEC.
- When you select the SEC format, you can select or deselect 'Text data Included'
Device : Select a backup device.
Check Capacity: Enables you to check the capacity of the selected storage device.
If you want to return to the live screen while playing, click < ■ > on the launcher menu or press the [■] button on your remote control.
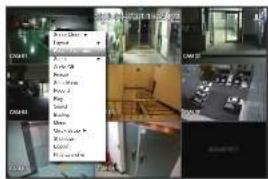
Right-click on the play screen.
Select a menu to run.
For more information about each menu, please refer to the 'Split Mode Menu', (Page 16)
- Rotate mode only appears in single screen mode. You can rotate the play screen by 90 degrees.
text_image
1
2 3 4 5 6 7 8 9 10 11
17 REC 12 13 14 15 16
Name Description 1 Play Timeline indicates the current playback point, and can be used to move. 2 Skip Backward Moves backward by unit time. 3 Backward Fast Play Used for quick backward search while in Play. 4 Backward Slow Play Used for backward frame-by-frame search while in PAUSE. 5 Step Backward Moves backward by one frame at a time. 6 Pause Stops playing the current video temporarily. 7 Stop Stops playback and moves to the live screen. 8 Step Forward Moves forward by one frame at a time. 9 Forward Slow Play In a split mode, the real time playback may not be supported, depending on the record quality, resolution and number of channels. And some frame rates may be supported. 10 Forward Fast Play Used for quick forward playback. 11 Skip Forward Moves forward by unit time. 12 Return Return to the search setup screen. 13 Audio Sets Audio ON/OFF. 14 REC Records all channels in Live mode. 15 ZOOM This is available in Single mode, which will enlarge the video from a selected channel. To cancel the zooming, simply double click the enlarged image or select=Close Zoom>In the Live screen menu. 16 Partial Backup Begins backup of the selected section of the video being played, with the specified starting/ending point. 17 Mode Switch Click on a desirable play mode to change the screen segmentation mode.
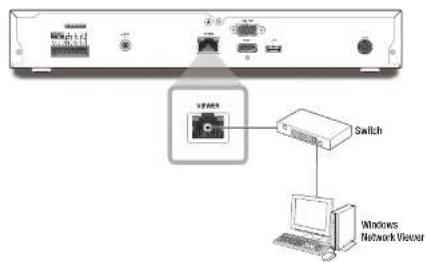
starting web viewer
WHAT IS WEB VIEWER?
WebViewer is a software program with which the operator can access a remote NVR (Network Video Recorder) for real-time monitoring, PTZ control (if configured) or search.
flowchart
graph TD
    A["Network Camera"] --> B["NETWORK"]
    B --> C["100 MHz"]
    C --> D["NETWORK"]
    D --> E["Remote PC"]
Product Features
Remote connection using the browser
Saving function in JPEG/BMP/PNG image format for printing and storage.
Record video in AVI format-compatible with popular media players. (The integrated codec is needed)
To play the video in Windows Media Player, you must download and install the relevant codec from www.windows7codecs.com. (version 4.0.3 or higher)
System Requirements
The following lists the minimum suggested hardware and operating system requirements needed to run the Web Viewer.
Item Minimum Recommended CPU Intel Core 2 Quad 2.5Gb or higher Intel I7 (0.5Gb) or more RAM 3GB or more 4GB or more HDD 200GB or more 600GB or more VGA Memory 512MB or more 76B or more Display Resolution 1280 x 1024 or higher OS - Supported OS : Windows 7, 8.1, 10, Mac OS X 10.9, 10.10, 10.11Plug In free web viewerSupported web browsers : Google Chrome 47, MS Coge 20- Plug-in Web viewerSupported web browsers : MS Explorer 11, Mozilla Firefox 43, Apple Safari 9 ※ Mac OS X only Network 10'100'1000 Ethernet NIC
CONNECTING WEB VIEWER
Open your web browser and type the IP address or URL of NVR into the URL address box.
Accesses the web viewer by connecting to network.
You must have specified the IP address in "Network > Interface".
The URL connection will be enabled only when the DONS connection settings have been completed.
A user with the admin permissions should provide the admin ID and password. A registered user should provide the user ID and password.
text_image
QSV-810
NVR WebViewer
AU 1
Password
Logis
Send ID
Live Next Password
The initial ID and password for webviewer is "admin" and "4321". When an initial password is entered, while partially resetting to access a new viewer, a pop up window will appear that will guide the user to change the password and when doing a whole reset to access a new viewer, a pop up window will appear that will guide the user to complete the settings for the Install Wizard. Set a new password when a pop up window appears.
Please change your password every three months to safely protect personal information and to prevent the damage of the information theft.
When a program installation wizard window appears, press the [Install] button to install the program.
The version of the program installed may vary depending on the update version.
When program installation is complete, click on the [Finish] button.
After completing installation and successfully logging in, the main live viewer screen appears.
text_image
NEWEDU/VIEWI Viewer X.X.X.XXX Setup Wizard
Welcome to the NYEDU/VIEWI Viewer
X.X.X.XXX Setup Wizard
This will be able to use through the installation of
XWEDU/VIEWI Viewer X.X.X.XXX.
It is recommended that this will not change the setup wizard. This will also be available to existing software or other services. The setup wizard must be used for your application.
Edit Setup to switch the setup wizard.
OK Cancel
starting web viewer
If you want to access the web viewer with multiple browsers
Set auto execution of plugin (noNVRViewer) in the browser menu that you first access and refresh the screen after activating the plugin or selecting plugin reliability.
- Each time the browser is upgraded in the future, the plugin activation method can be changed. Plug in setting menu can be referred to in the browser manual.
- For chrome browsers, 'Plug In Is not activated. Please select 'Always run on this site' and refresh', then select the 'always execute on this site' button in the top of the browser.
On a browser in the latest version that does not support plug-ins, please refer to the descriptions about the plug-in free web server stated below.
Accessing the Plug-in Free Webviewer from a web browser
To log in
Open a web browser and enter the IP address of the NVR or a URL in the address bar.
A user with administrator authority should enter an administrator ID and password.
A regular user should enter a user ID and password.
check box is selected by default on a browser that does not support plug-ins.
This option is only supported by an Internet browser that does not use plug-ins (e.g. Chrome, Edge Browser)
- As the plug-in free web viewer has lower performance than the plug-in web viewer, it has a limit on the monitoring of high quality profiles.
To monitor high quality profiles, use either a plug-in web viewer or network Viewer.
text_image
NVR WebViewer
GET-810
NVR WebViewer
GET-810
Password:
Light
I Save It
if you have a Weiscreen
Copyright and your website will be used to create a new website.
text_image
NVR WebViewer
ONV 8.0
NVR WebViewer
OK
Cancel
Request
Logh
I use the WebViewer
AChry and Dachay are again! Be the following of NVR Web-
eans: Closed access and 'Find you' to support the service of https://www.nvr.net.
< Internet Explorer >
Live viewer screen layout
text_image
Channel 1
2
3
4
5
6
7
8
9
Menu Description 1 System Status Display Displays icons that indicate the screen state of system status.▪ For more information about each icon, please refer to "System Status". (Page 56) 2 View Menu Enables or disables View Menu. 3 Select Menu Displays the user login ID and moves to the setup page.▪ The way that you configure settings is identical to the existing web viewer settings. Please rator to.(Page 64) 4 Changes the camera profile. 5 Captures the current video and saves it in a designated path. 6 Supports the PTZ Digital Zoom function. 7 Turns the sound ON/OFF. 8 Changes the aspect ratio. 9 Logout Logs out your account. Shutdown Turns off the power of the MVR system.
Up-in Free Webviewer only supports a single split line screen. However, output of only up to 720p resolution is available. Resolution exceeding 720p will not be displayed. (Exception - H.265 codec is not output if the resolution and frame rate exceed 720P 26fps.)
- You can change the live screen by selecting .
live viewer
LIVE VIEWER
You can check the video from camera registered in the NVR connected from a remote PC. Also, you can adjust the camera and check the network transfer status.
Live Viewer Screen
text_image
Screenshot of a surveillance camera interface with numbered panels and labeled camera views
Menu Description 1 System Stauts Indicator Displays icons to display the screen or system status. 2 Menu Selection Switches into corresponding menu screen by clicking each menu. 3 Date/channel Shows the access data/time and the selected channel. Sound Sets the sound connected to each channel to either ON/OFF. Capture Saves current video for the selected channel in the path designated by the user. Print Prints current video image for the selected channel through designated printer. Image Rotation Rotates the screen of a selected channel by 90 degrees. Keep ch. scr ratio Changes screen ratio of the selected channel. Keep full scr ratio Changes screen ratio for all channels. 4 Channel change Switches to the previous next channel group. Full screen Switch from the full screen to the split screen.Press the [ESC] key on the keyboard to exit full screen mode.Satari for Mac does not support full screen mode.
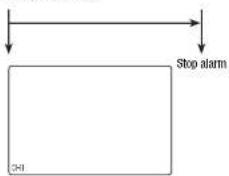
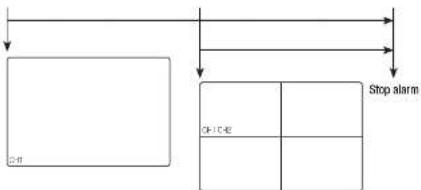
Menu Description 5 Channel information Shows the channel information selected.▪ If the user's PC monitor does not support 60Hz at a specific high resolution, or the HDMI cable does not support HDMI 2.0, 60fps or higher will not be output from the channel information. Freeze Temporarily stops the videos in all the channels or desactivates the Pause function in suspending status. Stop Alarm Desactivates an alarm when it occurs. OSD Check the OSD item to display the OSD screen information in the web viewer window. PC recording Saves the real-time video. In AVI format, from the selected channel, in a designated folder on the PC. NVR recording Start and stop NVR recording. 6 Layout setting Set the layout 7 Sequence Set the sequence. 8 PTZ Controls correct PTZ camera(s). 9 Fisheye Runs the fisheye settings for the selected channel.(Configured the mounting mode and the view mode to correct the screen distortion.) 10 Display Pane Displays the video of camera connected to NVR. 11 Text Turns text devices and data output located in the right side of Search ON/OFF. ID Display the ID of user connected. Quick setup Simple camera registration and recording settings. Manual backup Manually backup the video of the camera connected. Status Shows the camera live and recording status. Help Move to the help window. 12 Logout Performs logout process. Shutdown Turn off the NVR system.
LIVE SCREEN CONFIGURATION
System Status
You can check the status or operation of the NVR with the icons on the live screen.
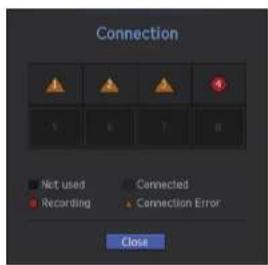
Item Description System Operation It is displayed when there is an issue with the recording conditions. Displayed if the HDD is full and the NVR has an insufficient space to record. Displayed if no HDD is installed or the existing HDD should be replaced. Displayed if the HDD needs a technical examination. It is displayed when the max permitted amount of data for each channel is exceeded. [X47S] It is displayed when the network is overloaded. It is displayed when the network is overloaded.* it occurs when the max receiving performance is exceeded, causing an overload to the CPU. It will disappear if you modify the camera selling or delete a camera to reduce the level of performance overload. It is displayed when there is firmware to update the server. It is displayed when there is firmware to update the server. [602D] Displayed when the battery that enables time information to be saved in the NVR equipment is empty. If you press the screen stop button, it is displayed. [ZZYW] It is displayed when all the channels are switched at the set time interval.
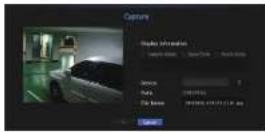
To capture a screen
Click < > button.
Select the path and name the file. And then click the button.
Save current camera's video image as .bmp, .jpg or .png file.
- If the viewer is running without the administrator's permission in Windows 7, you may not save the captured image as .bmp.jpg or .png file.
text_image
Display 100% Mode
File Edit View Insert
Add View Insert
View
Name: 9.01.23, 486.1.21
To print a screen
Click < > button.
Print current camera's video image with the printer connected to the PC operating the Web Viewer.
natural_image
Interior view of a car garage with two cars parked in the background (no visible text or signage)
Setting the layout
If you don't add or save it in the layout after registering a camera, the live screen will not be displayed. Click on the <button to launch the layout setting screen.
If you want to add a layout
Click on .
Sell the layout name to add and click on the button to add it.
If you want to change the layout name
Select the layout name to change and click on <.>. After changing the name, click on the outside of the layout window to change the name.
text_image
Layout 01
Ch. Table Channel List
Select All
1 2 3 4
5 6 7 8
If you want to save the layout
Click on <■>.
The changed layout will be saved.
e layout for each user is saved separately.
If you want to delete the layout
After selecting the layout to delete, click on .
The selected layout will be deleted.
less you press the Save or Delete button, changes will not be
ved.
Changing Split Mode
When closing the Split Mode selection button, the screen is changed into the selected split mode.
live viewer
Setting screen switching
If you don't register the layout, the screen switching function will not operate.
You can view the layouts one by one.
Click on the button to launch the switching setting window.
Select the layouts to be shown in turn by pressing < ▼>
Enter the screen switching time.
text_image
Sequence
Order Name
1 OFF Layout 01
2 OFF
3 OFF
4 OFF
5 OFF
6 OFF
7 OFF
8 OFF
9 OFF
10 OFF
Dwell Time : 10 10 ~ 60 sec
Click on the button to save the designated sequence.
Click on the button to activate the switching mode and run a sequence.
Auto Sequence
In a split mode, if you have set in 'Device > Monitor', Auto Sequence will be conducted at the sat interval. (Page 37)
When switching to another channel, the video may be slightly delayed depending on network status.
If you perform automatic switching of a single screen, the layout setting menu will be deactivated during operation.
How to query text devices and data
Checks the text data transmitted from POS systems that are connected to NVR.
If the button is selected, you can turn off the function to query text devices and data located in a separate area.
- A queried device should be set in terms of its usage, channel, etc. by selecting "Device > Text > Device". (Page 36)
text_image
All Items
Camera : 16
TEXT 01
Camera : 16
TEXT 02
Camera : 0
TEXT 03
Camera : 0
TEXT 04
Camera : 0
TEXT 05
Camera : 0
TEXT 06
Camera : 0
Data
TEXT 01
17:54:58
Lierick, Oberdevin
IE95136741
******
Lidl 10 Years in Ireland
EUR
Boat Cheese
2.69
Onions
0.79
White Grape Punnet
1.99
Onions Red 750g
0.69
Large Pet Herbs
1.49
Peppers red, loose
1.58
Passets
1.18
TOTAL
10.41
CONTROLLING A CONNECTED NETWORK CAMERA
Controlling PTZ
If PTZ camera is connected, the < a > icon appears on screen. When selecting corresponding camera channel, the PTZ tab is provided to allow you to control the PTZ.
text_image
16
15
14
2
C1x
+
-
Sensitivity
13
3
12
4
11
5
100
6 7 8 9 10
Item Description 1 Camera menu Displays the camera settings menu. 2 Direction Adjustment Use this to adjust the direction of the camera or click the crosshair in the center to use it as an OK button. 3 Digital zoom Adjust digital zooming to make an image larger or smaller. 4 Sound You can set the camera audio torque and mute. 5 Volume control Change the PC volume between 0 and 100. 6 Preset Sets the preset position for camera framing and moves to designated preset position when selecting a desired preset.
live viewer
Item Description 7 Swing Moves between the preset start point and end point. 8 Group Moves in the path specified by combining the preset. 9 Trace Moves camera's framing in the predefined path. 10 Tour Moves in the path specified by combining multiple groups. 11 Focus Adjusts the focus of the camera. 12 Zoom Zooms in/out the image by controlling camera's zoom. 13 Sensitivity Adjust the sensitivity of your camera operation. 14 Digital Zoom Off Returns to the original site from the zoomed state. 15 Fisheye D-PTZ Provides the digital PTZ function for the distortion corrected screen. 16 Simple focus Automatically adjusts the camera focus.
To activate digital zoom
Press the < > button and the screen will be zoomed in by 50% per click.
Press the < > button and the screen will be zoomed out by 50% per click.
You can zoom in or out by 10% with the mouse wheel.
Click the < _0 > button and the screen returns to 100% size.
digital zoom function is only available in the single model.
To use the digital PTZ function on a distortion corrected screen
Click the icon on the distortion corrected screen.
Mouse over the screen and drag to control.
To set a preset
Click < >Button to display 'Preset' window.
Click on < ▼> to select the presal order.
Enter the name of preset.
Use direction keys to adjust the direction which camera aims at.
Click the < > button.
To activate the preset
Click < > button to display 'Preset' window.
Select a desired preset to activate from the list. The camera's framing moves to the preset position.
text_image
Order
1
Name
11
To activate Swing(Auto-pan), Group(Scan), Trace(Pattern) and Tour
You can activate listed functions in the same manner as using a preset. For more information, refer to corresponding user manual of applicable camera.
Only selective functions of the camera can be supported, depending on camera.
To use the Digital PTZ (D-PTZ) function
Register a camera that supports the D-PTZ profile.
In cameras that support the D-PTZ profile, you can use the D-PTZ function.
Both cameras that support general PTZ and cameras that support D-PTZ can control the live image using some of the function menus.
For more information about the supported functions, please refer to the camera manual.
search viewer
SEARCH VIEWER
You can search and play the video record saved in NVR by accessing NVR remotely.
Search Viewer Screen
text_image
Screenshot of a surveillance camera interface with multiple video frames showing car detection and timestamped data, labeled 1 to 11.
Item Description 1 Menu Selection Switches to the corresponding menu screen by clicking each menu. 2 Calendar Displays the video recorded data in bus and today In red. Click the data in blue color to display the recorded video information in timeline. 3 Channel selection Displays the search channels. 4 Search Search for the user designated channel for the selected date. 5 Text Search Searches data that was entered into POS systems connected to NVR. 6 Channel displays Display the selected channel number.
Item Description 7 Sound Sets this sound connected to each channel to other ON/OFF. Capture Saves current video for selected channel in the desgrated path. Print Prints current video image for selected channel through the assigned printer. Section backup Backup the video for the selected section. Rotate Video Rotates the screen of a selected channel by 90 degrees. Keep ch. scr ratio Changes screen ratio of the selected channel. Keep full scr ratio Changes screen ratio for all channels. Magnify/Shrink Magnify or shrink the current video for the selected channel. OSD Displays the channel information. Full screen Show the four way split screen in the full screen. 8 Sound control Adjust the audio for the video searched. 9 Fisheye Plurs the fisheye settings for the selected channel.(Configures the mounting mode and the view mode to correct the screen distortion.) 10 Recording Color Displays the corresponding color depending on recorded data type if you place your mouse cursor on that area. 11 Display Pane Plays corresponding data on the screen if you select a search result.
Time Search
You can search recorded data by setting date and time.
To search by date
You can select the search date by using calendar.
Click on < □ ▶ to select the year/month for your search.
If a date has data associated with it, it is displayed in blue. The current date is displayed as a blue box.
Click the date to search in calendar.
The first image of searched video data on the date is displayed on screen and the data is displayed in the timeline.
To search video data on today, click . Today's date is selected.
search viewer
Color indications depending on current recording status
Displays the corresponding color according to the recorded data type.
2 or more kinds of recording type are mixed for the same timeline, only the recording type with higher priority is displayed. Priority: Standard > Motion > Schedule > Sensor > Camera Event > Audio Detection > DST
To adjust timeline
If searched data are overlapping, you can select a desired data. move its playback time point, and zoom in/out the timeline.
text_image
Time run
Background Time
10:00
24:00
30:00
36:00
42:00
48:00
54:00
60:00
66:00
72:00
78:00
84:00
90:00
96:00
102:00
108:00
114:00
120:00
126:00
132:00
138:00
144:00
150:00
156:00
162:00
168:00
174:00
180:00
186:00
192:00
198:00
204:00
210:00
216:00
222:00
228:00
234:00
240:00
246:00
252:00
258:00
264:00
270:00
276:00
282:00
288:00
294:00
300:00
306:00
312:00
318:00
324:00
330:00
336:00
342:00
348:00
354:00
360:00
366:00
372:00
378:00
384:00
390:00
396:00
402:00
408:00
414:00
420:00
426:00
432:00
438:00
444:00
450:00
456:00
462:00
468:00
474:00
480:00
486:00
492:00
498:00
504:00
510:00
516:00
522:00
528:00
534:00
540:00
546:00
552:00
558:00
564:00
570:00
576:00
582:00
588:00
594: 1 1 1 1 1 1 1 1 1 1 1 1 1 1 1 1 1 1 1 1 1 1 1 1 1 1 1 1 1 1 1 1 1 1
Select the number of data to search if data is overlapping.
It appears only when data are overlapped and assigns <0> to the most recent data.
Click your desired time point to play on the timeline. The playback start point is moved.
Click <+> / <-> to zoom in/out the zoom factor to display time.
When magnified, if you want to view the pre/post timeline, click on the timeline and drag it in the direction you want to move it.
If you want to check the recording list
The results for each recording section will be displayed.
text_image
Developer 2015
File Edit View Date End Date Amount Type Help List
A B C D E F G H I J K L M N O P Q R S T U V W X Y Z
1.0 1.0 1.0 1.0 1.0 1.0 1.0 1.0 1.0 1.0 1.0
1.0 1.0 1.0 1.0 1.0 1.0 1.0 1.0 1.0 1.0
1.0 1.0 1.0 1.0 1.0 1.0 1.0 1.0 1.0
1.0 1.0 1.0 1.0 1.0 1.0 1.0 1.0 1.0
1.0 1.0 1.0 1.0 1.0 1.0 1.0
1.0 1.0 1.0 1.0 1.0 1.0 1.0 1.0
1.0 1.0 1.0 1.0 1.0 1.0 1.0
1.0 1.0 1.0 1.0 1.0 1.0 1.0
1.0 1.0 1.0 1.0 1.0 1.0
1.0 1.0 1.0 1.0 1.0 1.0
1.0 1.0 1.0 1.0 1.0
1.0 1.0 1.0 1.0
1.0 1.0 1.0
1.0 1.0
1.0
1.0
1.0
1.0
1.0
1.0
1.0
1.0
1.0
1.0
1.0
1.0
1.0
1.0
1.0
1.0
1.0
1.0
1.0
1.0
1.0
1.0
1.0
1.0
1.0
To back up the search results
You can back up the search results in the list.
Click the [ ] button.
From the search results, select the check box of the item you wish to back up.
Format: Select the format of the file to back up.
AVI: Codec information provided from the NVR is saved together and can be played in a separate viewer (Windows Media Player, etc.) on the PC.
SEC : Proprietary file format, which can be played on the PC immediately as it is saved with a dedicated viewer.
When you select the SEC format, you can select or deselect 'Password' and 'Text data Included'.
text_image
File Edit View
Format: 12
Name: C#N-100
Format: 12
Name: C#N-100
Format: 12
Name: C#N-100
Format: 12
Name: C#N-100
Format: 12
Name: C#N-100
Format: 12
Name: C#N-100
Format: 12
Name: C#N-100
Format: C#N-100
Format: C#N-100
Format: C#N-100
Format: C#N-100
Format: C#N-100
Format: C#N-100
Format: C#N-100
Format: C#N-100
Format: C#N-100
Format: C#N-100
Float:
C:\Users\C#N-100\C#N-100\C#N-100\C#N-100\C#N-100
C:\Users\C#N-100\C#N-100\C#N-100\C#N-100\C#N-100
C:\Users\C#N-100\C#N-100\C#N-100\C#N-100\C#N-100
C:\Users\C#N-100
C:\Users\C#N-100
C:\Users\C#N-100
C:\Users\C#N-100
C:\Users\C#N-100
C:\Users\C#N-100
C:\Users\C#N-100
C:\Users\C#N-100
C:\Users\C#O
C:\Users\C#O
C:\Users\C#O
C:\Users\C#O
C:\Users\C#O
C:\Users\C#O
C:\Users\C#O
C:\Users\C#O
C:\Users\C#O
C:\Users\C#O
C:\Users\C#O
C:\Users\C#O
C:\Users\C#O
C:\Inputs
C:\Inputs
C:\Inputs
C:\Inputs
C:\Inputs
C:\Inputs
C:\Inputs
C:\Inputs
C:\Inputs
C:\Inputs
C:\Inputs
C:\Inputs
C:\Inputs
C:\Inputs
C:\Inputs
C:\Inputs
C:\Inputs
C:\Inputs
C:\Inputs
C:\Inputs
C:\Inputs
C:\Inputs
C:\Inputs
C:\Inputs
C:\Inputs
C:\Input
Path : displays the location of the folder in which the section backup file is to be saved.
After completing the backup settings, click the button.
If you press the button during the backup process, the backup will be suspended.
To run the section backup function
You can select and back up a desired section in the timeline or list of video(s) being played.
Click the [ ] button
On the timeline of a video being played, select the start point and the end point of the section to back up.
Section backup settings screen will open.
Channel: Displays the channel for the section backup.
Backup section : Displays the and the of a section to back up.
Format: Selects the format of a section to back up.
AVI : Codec information provided from the NVR is saved together and can be played on a separate viewer (Windows Media Player, etc.) on the PC.
SEC : Proprietary file format, which can be played on the PC immediately as it is saved with a dedicated viewer.
- When you select the SEC format, you can select or deselect "Password" and "Text data Included"
File name : Sets the name of a section backup file.
Path : displays the location of the folder in which the section backup file is to be saved.
Alter completing the section backup settings, click the button.
If you press the button during the section backup process, the backup will be suspended.
Text Search
You can search data that was entered into POS systems connected to NVR.
If you want to search by a text
Select a date and time to search.
Set event keywords and search conditions.
Search Condition : Enter a text to search.
Event Keyword : Searches based on the condition set in "Device > Text > Event settings". (Page 36)
: If checked, search terms are case-sensitive.
: If checked, only results that exactly match the input search terms are returned.
Click the button
=Refer to for the detailed text search method. (Page 50)
text_image
Text Search
2015 01 1
08 46 13 ~
2015 01 2
08 46 13
Event Keyword
Search Condition
Case Sensitive
Whole Word
Search
If you want to restore text search
When you enter search conditions and replay the search result with ON/OFF button in the upper right hand, it is possible to query text data.
text_image
DATA
TEXT 01
RT : 2015-01-13 : 00:39:37 AM
PB : 2015-01-13 : 00:39:38 AM
10-01-07 2-CIP
SANDY 0004 24536
RED 0.01492 1.78
PUM RED .68
BANKING .44
DRG .58
AULB #
SUBTOTAL 5.25
TAX .80
TOTAL 6.36
CASH 10.00
CHANGE 5.20
text_image
(1)
2
4
3
(5)
6
Item Description 1 Back Returns to the previous event. 2 Rewind Used to rewind a video.(Supports x1, x2, x4, x8, x16, x32, x54, x1, x2 and x4 speed) 3 Slow Rewind Used to rewind the video at a slow speed.(Supports x1/2, x1/4, x1/8, x1/2 and x1/4 speed) 4 Previous frame Move to the frame in reverse direction. 5 Play/Pause Video is played and paused. 6 Stop Terminates the video play. 7 Next frame Move to the frame in the forward direction. 8 Slow Play Used to play the video forward at a slow speed.(Supports x1/2, x1/4, x1/8, x1/2 and x1/4 speed) 9 Slow Forward Used to play a video forwards.(Supports x1, x2, x4, x8, x16, x32, x54, x1, x2 speed) 10 Move forward Proceeds to the next event.
setup viewer
SETUP VIEWER
You can configure the NVR settings remotely on the network.
To configure the NVR settings, click .
Settings Screen
text_image
Data Transfer Language
Text Time
Size
Width
Size
Time Spds
DST
Language
Holding
1
2
3
4
5
Item Description 1 Menu Selection Click each menu to switch into corresponding menu screen. 2 Parent Menu Configure the settings or select a parent item to change the existing settings. 3 Sub-Menu Among the sub-menus of selected parent menu, select a desired item to set. 4 Detailed Menu Click desired item's input field to change and enter a desired value. 5 OK Apply the modified settings.
System
You can configure the various settings of the NVR system.
Date/Time/Language
For more information, refer to 'Date/Time/Language' in the 'System' menu. (Page 24)
Date/Time
Set the date and time.
Time Synchronization Setup
Set the time synchronization.
DST (Daylight Saving Time)
During the summer, Daylight Saving Time (DST) advances clocks one hour forwards from the standard local time zone.
Language
Select a preferred language for the NVR.
Holiday
A user can select specific dates as holidays according to their own preferences.
text_image
Screenshot of a software interface showing a data table with columns, rows, and columns, likely from an older software development or configuration tool.
User
For more information, refer to 'User' in the 'System Setup' menu. (Page 25)
Administrator
You can change the admin ID or the password.
- ID allows alphanumeric characters only.
If the admin ID is not used for access, you cannot change the ID.
text_image
Screenshot of a software interface showing a form with fields for name, gender, and age, likely from an older software development tool.
User
You can add, change or remove a user or users.
text_image
Screenshot of a software interface showing a dropdown menu with options like 'New', 'Delete', and 'Add' in Chinese.
Permission Setup
You can set the user permission.
text_image
Screenshot of a software interface showing a data entry panel with fields for 'Category', 'Value', and 'Date'.
System Management
For more information, refer to "System Management" in the "System" menu. (Page 27)
You can see information of the current system.
Check the model name, software version, MAC address.
You can search for a file from the storage device connected to the PC to perform an upgrade.
text_image
File Edit View Insert Options
Name:
Size: 25 px (10^4)
Resolution: 100%
Altitude: 100%
Noise Level: 0%
Noise Ratio: 100%
Noise Mode: Normal
Noise Value: 100%
Noise Range: 0%
Noise Width: 0%
Noise Mode: Normal
Noise Value: 100%
Settings
Using a storage device, you can apply the current configuration of NVR to another NVR.
Press the Initialize button to return the network settings to their factory default state. Items in the category are excluded from the initialization.
text_image
Screenshot of a software interface showing a list of items with names and corresponding values, likely from an older software development or configuration tool.
System log
Data recorded in the system log displays various system-related logs/date/time such as system starts, system ending and menu selling changes.
text_image
Screenshot of a software interface showing a data table with columns and values, likely from an older file or system.
setup viewer
Event log
The event log lists recorded events, such as sensor events, camera events, or video losses.
text_image
Screenshot of a software interface showing a data table with columns and values, likely from an older file or system.
Backup log
You can inquire about a user who performed a backup, execution time, details (backup time, channel, backup device, backup file type).
text_image
Screenshot of a software interface showing a data table with columns and values, likely from an older system or configuration tool.
Device
You can check a list of devices that are connected to the NVR and configure the necessary settings.
Click in the menu screen.
For more information, refer to "Setting the Device". (Page 29)
Camera
Cam Registration
You can add a network camera(s).
text_image
Screenshot of a software interface showing a data table with columns and values, likely from an older system or application.
Camera Setup
You can change the settings of a connected network camera.
- When you click the [Camera website] button, a new camera web browser window is opened.
It supports the version specified below or later for each Q/P/X series camera.
(OND-7010R series: 1.04, OND-708CR series: 1.02, OND-6010R series: 1.02, OND-6070R series: 1.01, P series: 1.01)
It supports only when the camera is connected to IPv4 and is not set to HTTPS.
When you are connecting to the camera web page on a closed network, a camera that does not support the universal web will not be able to output an image.
When trying to connect. If the plugin does not get installed, try again after setting the compatibility view from the web page of the M/R web viewer.
Camera Password
You can change the passwords of all registered cameras at once.
text_image
Screenshot of a software interface showing a data table with columns and values, likely from an older data entry or configuration tool.
text_image
File Wizard
File Path:
1.000000000000000000000000000000000000000000000000000000000000000000000000000000000000000000000000
Name: 123456789
Description:
Category:
Date: 2/1/22/22
Time: 9:31:32:33
Address:
Email:
Email Address:
Email Address:
Email Address:
Email Address:
Email Address:
Email Address:
Email Address:
Email Address:
Email Address:
Email Address:
Email Address:
Email Address:
Email Address:
Email Address:
Email Address:
Email Address:
Email Address:
Email Address:
Email Address:
Email Address:
Email Address:
Email Address:
Email Address:
Email Address:
Email Address:
Email address:
Email address:
Email address:
Email address:
Email address:
Email address:
Email address:
Email address:
Email address:
Email address:
Email address:
Email address:
Email address:
Email address:
Email address:
Email address:
Email address:
Email address:
Email address:
Email address:
Email address:
Email address:
Email address:
Email address:
Email address:
Email addresses :
Email addresses :
Email addresses :
Email addresses :
Email addresses :
Email addresses :
Email addresses :
Email addresses :
Email addresses :
Email addresses :
Email addresses :
Email addresses :
Email addresses :
Email addresses :
Email addresses :
Email addresses :
Email addresses :
Email addresses :
Email addresses :
Email addresses :
Email addresses :
Email addresses :
Email addresses :
Email addresses :
Email addresses :
Email addresses :
email addresses :
email addresses :
email addresses :
email addresses :
email addresses :
email addresses :
email addresses :
email addresses :
email addresses :
email addresses :
email addresses :
email addresses :
email addresses :
email addresses :
email addresses :
email addresses :
email addresses :
email addresses :
email addresses :
email addresses :
email addresses :
email addresses :
email addresses :
email addresses :
email addresses :
email addresses :
email addresses :
email addresses :
email addresses :
email addresses :
email addresses :
email addresses :
email addresses :
email address :
email address :
email address :
email address :
email address :
email address :
email address :
email address :
email address :
email address :
email address :
email address :
email address :
email address :
email address :
email address :
email address :
email address :
email address :
email address :
email address :
email address :
email address :
email address :
email address :
email address :
email address :
email address :
email address :
email address :
email address :
email address :
email address :
email address :
email address :
Note:
1. The following table is a table format for the year 2016, but the data is not available for this table.
2. The table contains all four rows of data (e.g., “data”, “page”, “index”, “size” or similar) and contains four columns of data (e.g., “value”, “size”, “index”, “size” or similar). All values are in the table format.
Live Setup
You can change the life transfer settings of the network camera.
text_image
Screenshot of a software interface showing a data table with columns and checkboxes, likely from an older file or form.
Channel Setup
You can configure the video settings for each channel.
text_image
Data
File Edit View Help
Share Data
Name: 12345678
Size: 12345678
Date: 2023-09-21
Time: 0:00:00
Balance: 0.00:00
Balance: 0.00:00
Balance: 0.00:00
Balance: 0.00:00
Balance: 0.00:00
Balance: 0.00:00
Balance: 0.00:00
Balance: 0.00:00
Balance: 0.00:00
Balance: 0.12345678
Balance: 12345678
Balance: 12345678
Balance: 12345678
Balance: 12345678
Balance: 12345678
Balance: 12345678
Balance: 12345678
Balance: 12345678
Balance: 123345678
Balance: 123345678
Balance: 123345678
Balance: 123345678
Balance: 123345678
Balance: 123345678
Balance: 123345678
Balance: 123345678
Balance : 123345678
Balance : 123345678
Balance : 123345678
Balance : 123345678
Balance : 123345678
Balance : 123345678
Balance : 123345678
Balance : 1233456
Storage Device
You can check and change the settings related to the data storage device.
You can check a storage device, amount of use, type of use and status of storage device.
- ARB: Video that was not recorded due to disconnection from the camera can be backed up after the connection with the camera is re-established.
Press the button and an window is opened.
For more information about settings, please refer to "Device/Format". (Page 35)
text_image
File
Name: 100
File Type: All
Name:
100
File Name:
100
File Type:
100
File List:
100
File Date:
100
File Date:
100
File Date:
100
File Date:
100
File Date:
100
File Date:
100
File Date:
100
File Date:
100
File Date:
100
File Date:
100
File Date:
100
File Date:
100
File Date:
100
File Date:
100
File Date:
52347688888888888888888888888888888888888888888888888888888888888888888888888888888888888888888888
100
100
100
100
100
100
100
100
100
100
100
100
100
100
100
100
100
100
100
100
100
100
100
100
100
102347688888888888888888888888888888888888888888888
HDD Alarm
You can set the alarm output port and the duration in case an error occurs.
text_image
Screenshot of a software interface showing a settings panel with parameters for image size, resolution, and color mode.
Monitor
Monitor
You can configure the monitoring screen settings and set the output system.
The video is not prayed properly, refer to the troubleshooting section later in this manual. (Page 79)
- The Monitor Setup settings control the monitor connected to the M/F.
Text
Device
Relevant values of a device connected to NVR can be set.
text_image
Screenshot of a software interface showing file properties and settings panel with Chinese labels
text_image
Screenshot of a software interface showing a data table with columns and rows, likely from an older file or spreadsheet application.
Event
It is possible to set total amount conditions and keywords to display events of a text device.
text_image
Screenshot of a software interface with menu options and a dropdown bar showing 'OK' and 'Cancel' buttons.
setup viewer
Record
For more information, refer to "Setting the Recording". (Page 3B)
Recording Schedule
If you set a recording schedule for a specific date and time, the recording will start at that specific time.
text_image
Screenshot of a software interface showing a data table with rows and columns, likely from an older application or configuration tool.
Record Setup
NVR
Select a type of the normal/event recording frame rate for each channel.
text_image
Screenshot of a software interface showing a data table with columns and values, likely from an older document or form.
Camera
You can set the recording profile for a network camera.
text_image
Screenshot of a software interface showing a data table with columns and values, likely from an older database or form.
Record Option
You can set the Disk End Mode.
- You can set the recording duration separately for each channel.
text_image
Screenshot of a software interface showing a data table with columns and values, likely from an older file or spreadsheet application.
Event
For more information, refer to "Setting the Event". (Page 40)
Sensor Detection
NVR / Camera
You can set the sensor operation mode and the synchronized camera as well as the alarm output type and the duration.
- If the connected network camera that has configured the alarm input settings triggers an alarm, NVR will perform the alarm out.
text_image
Screenshot of a software interface showing a data table with columns and values, likely from an older file or spreadsheet.
Camera Event
You can set NVR and camera event mode, alarm output type and alarm time.
text_image
Screenshot of a software interface showing a data table with columns and values, likely from an older file or spreadsheet application.
Video Loss Detection
You can set to trigger the alarm if a video loss occurs.
text_image
Screenshot of a software interface showing a data table with columns and values, likely from an older file or spreadsheet.
Alarm Out Schedule
You can schedule the alarm output according to the day of the work and the time.
The default setting is Event Sync, which activates the alarm only if an event occurs.
text_image
Screenshot of a software interface showing a grid workspace with color selection and a highlighted cell
Network
For more information, refer to "Network Configuration". (Page 42)
Interface
A remote user can access the NVR via the network to check the current mode and the IP address.
Network
Specify the network connection path.
text_image
Screenshot of a software interface showing a dropdown menu with options like 'File', 'Paste', and 'Save As' in Chinese.
Port
You can configure the protocol related settings.
text_image
Screenshot of a software interface showing file properties and settings panel with Chinese labels
setup viewer
DDNS
Network
You can check the DDNS settings.
text_image
Screenshot of a software interface showing a dropdown menu with file paths and a list of items, likely from an older software application.
802.1x
When connecting to a network, you can select whether to use the 802.1x protocol and install corresponding certificate.
text_image
Screenshot of a software interface showing a dropdown menu with options like 'Open', 'Close', and 'Help', alongside a toolbar with icons and text.
IP Filtering
You can prepare the list of IP address to allow or block accesses to a specific IP address.
text_image
Screenshot of a software interface showing a data entry panel with columns and checkboxes, likely from an older software development environment.
Live Streaming
You can set the video profile transmitted to the network.
text_image
Screenshot of a software interface showing a data table with columns and a toolbar with Chinese text.
SSL
You can select a security connection system or install public certificates.
While using HTTPS, if you want to switch to HTTP, then abnormal operation can take place as the browser contains the setting values. You need to change the URL to HTTP and reconnect or initialize the cookie setting of the browser.
text_image
OK
Cancel
Help
OK
Cancel
Help
OK
Cancel
Help
OK
Cancel
Help
E-mail
You can specify the SMTP server that sends a mail if an event occurs and set the recipient group and users.
SMTP
You can set the server that sends mails and specify if you use the authentication process.
text_image
Name
Name ID
Name Type
Name Name
Name Name
Name Name
Name Name
Name Name
Name Name
Name Name
Name Name
Name Name
Name Name
Name Name
Name Name
Name Name
Name Name
Name Name
Name Name
Name Name
Name Name
Name Name
Name Name
Name Name
Name Name
Name Name
Name Name
Name Name
Name Name
Name Name
Name Name
Name Name
Name Name
Name Name
Name Name
Name Name
Name Name
Event
You can set the event interval and specify which events the server sends mails for.
text_image
Screenshot of a software interface showing a dropdown menu with file paths and a list of file types, likely from an older software application.
Recipient
You can set groups and recipients to receive emails.
text_image
Screenshot of a software interface showing a dropdown menu with options like 'OK', 'Cancel', and 'Help', alongside a grid of text entries.
SNMP
Using the SNMP protocol, the system or network administrator can remotely monitoring the network devices and sets the environment.
text_image
Screenshot of a software interface showing a dropdown menu with file paths and a list box containing Chinese text.
DHCP Server
Network
You can set the internal DHCP server and assign an IP address to the network camera.
text_image
Screenshot of a software interface showing a dropdown menu with options like 'Open', 'Close', and 'Help', alongside a toolbar with icons and text.
Check IP
You can check the IP and MAC currently used through the DHCP server, and the connected network port.
text_image
Screenshot of a software interface showing a dropdown menu with options like 'Open', 'Close', and 'Help', alongside a blank preview area.
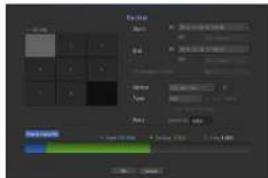
P2P
You can check the Enable P2P check box if you want to use P2P service.
For using P2P service, you have to scan QR Code on screen.
text_image
Screenshot of a web-based document interface with a QR code preview and navigation menu open.
setup viewer
Using the setting icons
ABText admin Quick Setup Manual Backup Status Help
If the button is selected, you can turn on/off the function to query text devices and data that are located in a separate area.
• You can register a network camera for each channel and easily set the resolution and the number of shots in case of event occurrence or manual recording.
- For more on how to register a camera, refer to "To register a camera" (Page 29)
- if the fallover mode is in a standby state, Item is hidden.
• You can manually enter the desired backup channel and time/date to backup the recorded video.
- You can select whether or not to "Text data Included" for SEC format.
Text All Items Camera : 16 TEXT 01 Camera : 16 TEXT 02 Camera : 0 TEXT 03 Camera : 0 TEXT 04 Camera : 0 TEXT 05 Camera : 0 TEXT 06 Camera : 0
text_image
File Edit View Help
Add Edit View Insert Tools Help
Name: 10.0000
Edit: 10.0000
Edit Type: All
Edit Date: 2023-07-24
Edit Time: 0:00:00:00
Edit Status: All
Edit Amount: $500.00
Edit Price: $5.00
Edit Amount: $5.00
Edit Price: $5.00
Edit Amount: $5.00
Edit Price: $5.00
Edit Amount: $5.00
Edit Price: $5.00
Edit Amount: $5.00
Edit Price: $5.00
Edit Amount: $5.00
Edit Price: $5.00
Edit Amount: $5.00
Edit Price: $5,000.00
Edit Amount: $5,000.00
Edit Price: $5,000.00
Edit Amount: $5,000.00
Edit Price: $5,000.00
Edit Amount: $5,000.00
Edit Price: $5,000.00
Edit Amount: $5,000.00
Edit Price: $5,000.00
Edit Amount: $1,500.00
Edit Amount: $1,500.00
Edit Amount: $1,500.00
Edit Amount: $1,500.00
Edit Amount: $1,500.00
Edit Amount: $1,500.00
Edit Amount: $1,500.00
Edit Amount: $1,500.00
Edit Amount : $1,500.00
Edit Amount : $1,500.00
Edit Amount : $1,500.00
Edit Amount : $1,500.00
Edit Amount : $1,500.00
Edit Amount : $1,500.00
Edit Amount : $1,500.00
Edit Amount : $1,500.0
text_image
Data
Name: 10.0000
Size: 25.0000
Resolution: 100
Output: 100
Available Data (Capacity): 10.0000
Data Size: 10.0000
Output: 10.0000
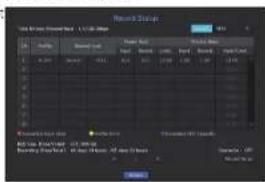
You can check the recording status and the status of camera connected.
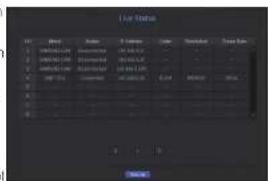
Live : Select to check the status of camera connected to each channel and the transmission information. to check the following for each channel : profile, recording type, inputs / recording transmission rate, settings / inputs / amount of recorded data.
text_image
Data
Name Date Time Help Comments Help/Help
1 12:00:00 January January January January January
2 04:00:00 January January January January January
3 - - - - - - - - - - - - - - - - - - - - - - - - - - - - - - - - - - - - - - - - - - - - - - - - - - -
1 1 1 1 1 1 1 1 1 1 1 1 1 1 1 1 1 1 1 1 1 1 1 1 1 1 1 1 1 1 1 1 1 1 1 1 1 1 1 1 1 1 1 1 1 1 1
2 S-A S-B S-C S-D S-E S-F S-G S-H S-I S-J S-K S-L S-M S-N S-O S-P S-U S-V S-W S-X S-Y S= S= S= S= S= S= S= S= S= S= S= S= S= S= S= S= S= S= S= S= S= S= S= S= S= S= S= S= S= S= S= S= S= S= S= S= S= S= S= S= S= S= S= S= S= S= S= S= S= S= S= S= S= S= S= S= S= S= S= S= S= S= S= S= S= S= S= E
backup viewer
SEC BACKUP VIEWER
You can play a file that is backed up in the format of SEC.
Backup in SEC format produces backup data file, library file and self-executable viewer file.
If you run the backup file viewer, the backup data file will be played.
Recommended System Requirements
PCs with a lower specification than the recommended below may not fully support forward/backward and high-speed playback.
PC specifications
- Minimum requirements
- CPU : Intel Core 2 Quad 2.5GHz
-RAM:2GB or Higher
- HDD:200GB or Higher
- VGA memory : 512MB or Higher
Display resolution : 1280*1024
- Recommended
- CPU : Intel i7(3.5GHz) or Higher
- RAM : 4GB or Higher
- HDD: 500GB or Higher
- GPU : GTX940 or Higher
- VGA memory: 2GB or Higher
- Display resolution : 1920x1080 or Higher
-OS
- Windows 7, 8.1, 10, Mac OS X(10.9 or Higher)
- Browser
1) Non-Plugin Webviewer
- Google Chrome 47, MS Edge 20
2) Plugin Webviewer
- MS IE 11, Mozilla Firefox 43, Apple Safari 9 (Mac OS X Only)
text_image
1
2
4
5
6
7
8
9
3
Camera List
C:\CAM 11
NVR_CAM01
VIDEO:H264C204E:A1596\AUDIO:NONE
2016-01-01 16:17:49
10 11 12
Item Description 1 Split screen Selects screen ratio to display. The screen is changed to a split screen. 2 Fish eye view mode If < 10 is pushed, it is possible to change to a fish eye installation type. It is possible to select WALL/GROUND/CEILING mode according to the Installation piece. The fish eye view mode on the current screen can be changed independently on each split. 3 Digital Zoom Enlarge the image by up to 100 times as big as the current one.Press the Zoom In (1) button the enlarge the image; press the Zoom Out (1) button to shrink the image.You can also use the slide bar (1) in the pop-up window to zoom layout.Press (1) on a size-changed video to restore the default zoom factor (100%).If you enlarge the image by more than 200%, the enlarged area will be marked on the digital zooming screen. Click on the marked area and move it to a desired position.The digital zooming is applied to all backup viewer. When the digital zooming is canceled, the video size will restore the default rate of 100%.
backup viewer
Item Description 4 Screen Printout mcm Saves the current video's image as in an image file. Supports JPEG file format. mm Prints out the current screen. You should have installed the appropriate printer driver before you can print out the screen. 5 Audio A toggle button. Each time you press this button, the audio output will toggle between activated and deactivated. You can adjust the volume level from 0 to 100. 6 Watermark Press the button to enable file tampering detection. to detect data file forging. 7 Deinterlace You can enable the Do interlace function. 8 Show OSD Check the OSD checkbox to display the OSD information on the backup playback screen.Information such as backup data, day of the week, time, mode name, and channel number will be displayed on the screen. 9 Maintain aspect ratio/Full screen Maintains the aspect ratio of the playback screen. Plays the video on a full screen. 10 Enlarge / Reduce Timeline Collapses the time range that is displayed on the range bar of the storage time.You can collapse the range bar until the overall range is shortened to 24 hours. Enlarges the time range that is displayed on the range bar of the storage time.You can enlarge the range bar until the overall range is extended to 1 minute. 11 Restore Timeline Restoros the timeline to the default. 12 Display of storage time range Displays the time range of a stored video file.You can move the gridline of the range bar to select a time point to play. 13 Playback Control You can adjust the video playback of the timeline.
appendix
PRODUCT SPECIFICATION
Item Details QRN-410 QRN-810 Display Network Camera Inputs Max. 4CH Max. 8CH Resolution CF - 8MP Protocols Samsung. ONVF Live Local Display 1x HDMI/ HDMI 1.4) / 1x VGA Multi-Channel Display [Local Monitor] 1 / 2V / 3V / 4 / Auto Sequence [Wsb] 1 / 4 / Auto Sequence [Local Monitor] 1 / 2V / 3V / 4 / 6 / 8 / Auto Sequence [Wsb] 1 / 4 / 6 / Auto Sequence Performance [Local Monitor] 8MP(60fps) 5MP(90fps), 3MP(120fps), 2MP(240fps), 720p(240fps), D1 (240fps) But for Mbps, up to 2MP is allowed Performance Operating System Embedded Linux Record Compression H.265, H.264, 1MJPEG (It can decode up to 2M) Recording Bandwidth Max. 50Mbps Max. 100Mbps Resolution CF - 8MP Type Manual, Schedule(Continuous/Event), Event (Pre/Post) Event Trigger - Alarm Input()- Video Loss- Camera event (Sensor, MD, Video analytics, Defocus) Event Action e-Mail, PTZ Preset, Alarm Out, Buzzer, Monitor Out Search & Play Playback Bandwidth 32Mbps (4CH simultaneously) 32Mbps (6CH simultaneously) Performance Max. 3 Users (local 1, Remote 3)
Item Details QRN-410 QRN-810 Search & Play Mode Date & Time(Calendar/Event Log list/Text Search/POS, AMPR), ARB Search, Smart search (Virtual Line w/ direction, Enter/Ex) Simultaneous playback Max. 4CH (Local, Network) Max. 6CH (Local, Network) Resolution CIF -- BMP Playback Control Fast/Slow Forward/Backward, Move one step up/down Storage Built-In 0TB ~ 6TB (dependent on region) - Seagate : ~ 4TB Internal HDD 1 (Max. 6TB) Backup File backup BLI/Feat(USR), JPG/AVI(Web, CMS) Function Multi channel(Upto 4CH) Play, Date-Time/Title display Multi channel(Upto 6CH) Play, Date-Time/Title display Sensor I/O 4/2 (NO 1EA, NO/NC 1EA) 4/3 (NO 2EA, NO/NC 1EA) Audio Input 4CH (network) 8CH (network) Compression G.711, G.726, AAC(16/48KHz) Audio Communication 2-Way Network Protocol TCP/IP, LOP/IP, RTP (UDP), RTP (TCP), RTSP, NTP, HTTP, DHCP (Server, Client, PPPoC, SMTP, ICMP, ICMP, ARP, DNS, DDNS, uPnP, HTTPS, SNMP, OMWIP (Profile-S), SUVMPi(Server, Client) DDNS Harwala Security DDNS Transmission Bandwidth 64Mbps 123Mbps Max Remote Users Search(3i / Live unicast(10i / Multicast(20i) IP Version IPvA/V6 Security User access Log, IP Filtering, 802.1x, Encryption
appendix
Item Details QRN-410 QRN-810 Language English, French, German, Italian, Spanish, Russian, Turkish, Polish, Dutch, Swedish, Czech, Portuguese, Danish, Romanian, Serbian, Croatian, Hungarian, Greek, Norwegian, Finnish, Korean, Chinese, Japanese, Thai OS Windows 7. 8. 10. Mac OS X 10.9. 10.10. 10.11 Web Browser Non plugin Webviewer Supported Browser: Google Chrome 47, MS Edge 20 Plug-in Webviewer Supported MS Explore 11, Morilla Firefox 13, Apple Safari 9 * Mac OS X only Viewer Software Type SSM, Webviewer, SmartViewer, Wisenet Mobile CMS Support SDK/CGI (SUMAP) Functions Camera Setup Register 1) Auto mode 2) Manual mode Setup Items IP address, Add profile edit, Bitrate, Compression, SOP, Quality, Camera MD setup Camera video setup (Simple focus, Brightness/Contrast, Flip/Mirror, IRIS, WDR, D&N, SSNR, Snutter, SSDR, DIS, Fisheye Dewarpingweb), Hallway View Setup, Camera Web Easy Configuration Setup Wizard/Date/Time, Network, Auto Camera Configurazioni P2P (OR node) Redundancy ARB Yes PTZ Control Via GUI, Webviewer, 265 preset Smart phone Support Model Android, IOS Protocol Support FTP, RTSP, HTTP, CGI (SUNAPI) Control Live/Schj : Multi Profile Support Playback(1cn) Event push Live/Schj : Multi Profile Support Playback(1cn) Event push System Control Mouse, Web, IR Rempcan
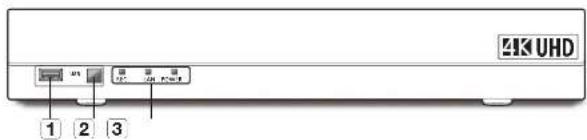
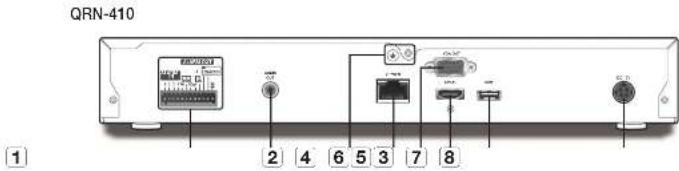
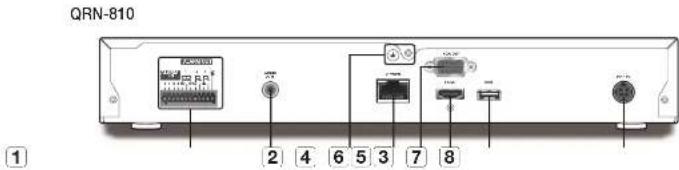
Item Details QRN-410 QRN-810 Indicator/Interface Front Indicator Power Status LED 1EA Lan Status LED 1EA Record Status LED 1EA Connectors VGA 1EA HDMI 1EA Support upto 4K (3840 x 2160), 30Hz Connectors Audio Out(1EA, RCA, Line) Ethernet 1EA (WAN, 1Gbps) - WAN: Uplink to CMS Alarm In(IEA, Terminal Block) Out(2EA, Terminal Block) In(IEA, Terminal Block) Out(3EA, Terminal Block) USB Front 1EA(USB2.0j, Rear) (USB3.0) Storage - Serial - Reset Switch (1EA) Power Cord Included System Log Log List Max. 20000 (System Log, Event Log each) Environmental Operating Temperature / Humidity + 0°C to + 40°C (+32°F to +104°F) Humidity 20% ~ 85% RH Electrical Power Input 12W/4A Power Consumption MAX. 9W(31BTU, 2TB HDD x 1ea)
Item Details QRN-410 QRN-810 Mechanical Color / Material Black / Metal Dimension (WxHxD) W300 x H47 x 0208.7mm (11.81"x1.85"x6.22") (FU) Weight 1.055kg (2T HDD)
PRODUCT OVERVIEW
unit : mm (inches)
text_image
3D (1.87)
206.7 (1.22)
206.7 (1.87)
appendix
DEFAULT SETTING
To reset the system, move to 'System Management > Settings > Load Factory Default' and press the
button.
This returns the factory default settings.
When you initiative with the included, you are required to reboot the camera and reset the passwords.
■ The default settings are based on QFN-810.
The initial administrator D is "admin" and the password should be set when logging in for the first time.
- Please change your password every three months to safely protect personal information and to prevent the damage of the information theft. Please, take note that it's a user's responsibility for the security and any other problems caused by mismanaging a password.
Category Details Factory Default System Date/Time/Language Date/Time/Language Date YYYY-MM-DD Time 24 hours Time Zone GMT Time Sync. OFF DST OFF Language English User Admin ID admin Permission Setup Restricted Access Backup/Record/RecordStop/Search/PTZ/RemoteAlarm Out/Shutdown Restriction on Network Access None Auto Log out 3 Min Manual Input of ID OFF System Management System Information Device Name NVR Log Information System Log Type View all Event Log Type View all Backup Log OFF Device Camers Camera Register OFF Sat Camera OFF Camera Password OFF Live Setup OFF Channel Setup Video ON Audio OFF Camera Name CAM 01 -- CAM 06 Storage Device Device/Format Device HDD Usage Status Temperature - Time -
Category Details Factory Default Device Storage Device I-DD Alarm Check Alarm Output Port BEEP Duration Continuous Replace Alarm Output Port BEEP Duration Continuous Remote Device Female Control ON ID ON Monitor Monitor Event Display OFF Display All Sequence switching time 5 sec Video Output VGA(1280x1024) Display Position Setup 3D Text Device Device TEXT 01~08 Use Not Used Port 7001 ~7008 Encoding type US-ASCII Event Total amount D Record Recording Schedule CHF~CHB Both(Cont&Dmt) Record Setup Standard Full Event Full Pre Event OFF POST Event 1 min Audio OFF Record Option Disk End Mode Overwrite Disk End Boop OFF Auto Delete OFF Event Sensor Detection NVR Sensor Operation OFF Cam Camera No. Alarm Out None Duration 10 sec Camera Sensor Operation OFF Cam Camera No. Alarm Out None Duration 10 sec Camera Event Camera Camera Event OFF MD OFF Smart Search OFF Cam Camera No. Alarm None Alarm Duration 10 sec Video loss detection Video loss status OFF Alarm Out None Alarm Duration 10 sec Alarm Out Schedule Alarm Out Event Sync Network Interface Network IP Type Static IP Network 192.168.1.200 Subnet Mask 255.255 255.0 Gateway 192.168.1.1 DNS 168.126.63.1 Port Protocol Type TCP Device Type 554 UDP Port 8000~8159 Multicast IP Address 224.126.63.1 Multicast TTL 5 HTTP Port 80 Send SSL OTT Backup Bandwidth Low DDNS Network DDNS Site OTT IP Filtering Filtering Type Deny SSL Secured Connection System HTTP (Non-secured connection) 802.1x Network Enable IEEE 802.1x OFF Live Streaming OFF E-Mail SMTP Port 25 Use Authentication OFF Secure Transfer Newer Event Event Interval 5 min Use Event Transfer OTT Recipient Group Name OTT Permission OFF SNMP Enable SNMP v1 OFF Enable SNMP v2 OTT Enable SNMP v3 OFF Enable SNMP Traps OFF DHCP Server Network IP Address 192.168.1.200 Subnet Mask 255.255 255.0 IP Range 192.168.1.1 - 192.168.1.254 IP Lease Time 86400 P2P Enable P2P OFF
TROUBLESHOOTING
Problem Action Live video will be slow or cut off. • The frame number set for multiple data transmission set in camera or network environment could differ from the actual rate of transmission. Right click with the mouse button and select <Channel Information> to check the number of incoming frames for each channel and the actual number of framed played. Basically, when you register a camera, the Live4MR profile is created and the rate is set to H.264-800*600/cs. If necessary, go to <Menu> → <Device> → <Camera> → <Camera Setting> and change the number of frames. If you keep sealing video slow down or cut off, then check the network environment or camera condition. The system does not turn on and the indicator on the front panel does not work at all. Check if the power supply system is properly connected. Check the system for the input voltage from the power source. • If the problem persists even after you have taken the above actions, check the power supplier and replace it with a new one if necessary. • Check Inside if the cables are properly connected. (SMPS, FRONT) Some channels display just a black screen even if they receive video sources. • Check if the camera is properly supplied with power. • Check the video output connecting the camera's webviewer. • Check if the network port is properly connected and the network setting is set correctly. • Change the hub supporting Gigabit, it may solve. The screen displays the logo image repeatedly. • This may occur from a problem with the main board, or the related software is compt. Contact the nearest service center for more information. The Channel button does not work on the Live screen. • No Channel button does not work if the current screen is in the event monitoring mode. The cursor will not move to the Start button when I start the calendar search. Check if the channel and the date that you want to play are marked with the V symbol. Both channel and date should be checked before you can start playing with the Start button. No video is played on the connected monitor. • Check if the necessary cables are connected to the monitor properly. Some monitors do not support the NVR output (HDMI or VGA). (NVR output resolution: VGA: 1024*765, 1283*720, 1280*1024, 1920*1080, HDMI: 720P, 1030P, 1440P, 2160P) Check the monitor resolution If you operate at 60Hz with 4K resolution, the screen may not be able to display. Please check whether your TV supports 30Hz.
appendix
Problem Action No response controlling PTZ In the live viewer. • Check the registered Camera if it support PTZ function. The camera is not connected or the PC falls to connect to the product. Check if the network cable is connected properly.Ensure that you have sat Network - Connection Mode.Check the IP selling of the PC or camera.Try the Ping Test.Check if there is a different device near the product uses the same IP. I registered a camera, but the web viewer does not show live video. After registering a camera, a user need to edit/save the desired layout, before the screen split mode and live screen fit for the setting appears. In the web viewer, the screen does not switch automatically. You need to select the desired layout for sequence operation, in the automatic switching menu. The Live screen is too bright or too dark. • Check the Video settings of the registered camera. A message of "Need to reset date/time." Is displayed on the screen. This message is displayed if there occurs a problem with the time setting of the internal clock or an error in the clock itself.Contact the retailer or the service center for more information. The time bar is not displayed in Search mode. • The timeline can switch between normal and extension mode.In extension mode, the time car may not be displayed in the current timeline.Switch to normal mode or use the left or right action to navigate through the time bar. The "NO HDD" Icon and an error message are displayed. Check the HDD for connection, if the problem persists in a normal condition, contact the nearest service center to have the HDD checked by the service personnel. I have installed an additional HDD on the NVR but it does not recognize the HDD. See the compatibility list to check if this additional HDD is supported by the NVR. For the compatibility list, contact the retailer where you purchased the NVR. I have connected an external storage device (USB Memory, USB HDD) to the NVR but the NVR seems not to recognize it. See the compatibility list of external storage devices to check if the connected device is supported by the NVR. For the compatibility list, contact the retailer where you purchased the NVR. If I press the ESC key in full screen mode of the WebViewer, the system does not switch to a normal split mode. Press the ALT+TAD keys to select "ACTIVE MOVE" and press the ESC key again. The system will switch to a normal split mode. I found it difficult to configure the network settings if using the default search, backup and router settings. For more information, refer to the user manual.If you want to check the basics of the product for a quick start, refer to the quick start guide (pickup, search).• If you use the router for network connection, refer to the "Connecting and Setting the Network" section in this manual.
Problem Action I forget the password. • Contact the MVR administrator for help. Backup data is just not played by the PC or NVR. • When you are backing up data, you have choices about the player other PC or NVR. Make your selection before proceeding.If you are using the PC to pay the data, the format of the backup file should be either SEC.If you are using the NVR for this purpose, formatting backup files should be done by the NVR. Recording does not work. • If your player does not display a live image at all, that indicates recording does not work so first check if you see an image on the screen.Recording does not work if the recording settings are not properly configuredScheduled Record: Specify is desired time in Menu – Record – Recording Schedule. Recording will start at the specified time.- <Continuous> Record: Recording will proceed in any conditions at the specified time.- <Event> Record: When an event occurs, recording will perform only if the event is of alarm, motion detection and video loss. If there is no event found, recording will not perform.- <Continuous / Event> Record: If there is no event found, Continuous recording will perform, Whereas, it is an event occurs, Event recording will perform. The image quality of the recording data is not good. • Increase the resolution and quality level in Menu – Record – Quality / Resolution.1) Resolution: Select a bigger size when specifying the recording size The recording image in the CP format shows a deteriorated quality as it is enlarged from a small-shock image.2) Record Quality: Specify a bigger level for the recording quality.If you increase the resolution and the recording quality, the data site increases accordingly. So the HDD will be filled faster. Overwriting will overwrite the existing data so recording will proceed at a shorter interval. Frame rate of the actual recording does not match that of configured to the camera. if multiple profiles were applied to one camera for video transmission, the actual video stream can be serviced by the camera at a lower frame rate than specified.Configurc your camera to use one profile for data streaming as possible. For example, if you set the same profile for recording and network profiles, the actual recording is made at the specified frame rate.Sell, live video display using split screen mode may apply yet another profile to camera in accordance with the used screen mode.Note that allowed limit distance for recording / recording settings should be set to be bigger values than that of camera's feet. In the recording setting screen, the permitted level for a specific channel is displayed in orange. the input data is greater than the permitted level for each channel. It is displayed in orange. Set the permitted data limit to higher than the amount of input data.the sum of input data for each channel exceeds the limit, the alarm icon will be displayed. In this case, the channel exceeding the input limit does not record the entire frame, but it records the main frame onlyions or two per soc). In the live screen, the [ ] icon is displayed and the message window saying " recording data load exceeds the limit. Check it in the record setting," pops up. the sum of input data for each channel exceeds the limit, the alarm icon and the pop up window will be displayed. In this case, the channel exceeding the input limit does not record the entire frame, but it records the main frame onlyions or two per sec).Set the permitted data limit to higher than the amount of input data entered in the record setting menu (page 39). Recording is not performed in accordance with the settings. the recording status displays 'Proceeds the maximum hard disc performance', set the recording size according to the recording performance specifications.(Refer to "Record Settings" in the menu settings. (Page 39). The recording screen will slow down. Check whether the recording performance specifications match the actual recording settings.Rator to "Record Settings" in the menu settings. (Page 39).the data volume of a video exceeds the playing performance, only the main frame is played.(Refer to "Product Specifications" in the appendix. (Page 75). If recording loss persists continuously Reset the camera recording profile to let the entire recording bps size fit the recording performance. Refer to "Record Settings" in the menu settings. (Page 39).Check the I DD status and determine whether inspection or replacement is necessary.(Refer to "Storage Device" in the menu settings. (Page 35). When plugin does not get installed when trying to connect to the camera web page from camera settings in the web viewer Try again after setting the compatibility view from the web page of the NVR was viewer.
OPEN SOURCE LICENSE REPORT ON THE PRODUCT
The authors included in the particular contents copyrighted software that is licensed under the GPL, IGP, MP 1, SSD 2; License, license, SSD 3-License License, MT License, IBM2 License, Apache 2.0 License, developing License, Boost Software License, Curl License, Microsoft Public License, Code Filed Open 1.02 License, JPSB License, RSA MC4 or MCS Wireless Digest Algorithm License, PHP License 3.01, OpenSSL Combined License, HTML & License, NIP License, Codegarle License, GUU for Win2 License, ISO License, Unit Gradman Alternate License. You may obtain the complex Corresponding Source code from us for a period of three years after our last shipment of this product by sending email to https://www.mware.com
I you want to obtain the complete Corresponding Source code in the physical medium such as CD-ROM, the cost of physically poisoning source distribution might be charged.
For more details about Open Source, refer to the CD or Hanwhs. Welcome.
- GPL Software:ad-2.252, aprson-1.93, basin-4.0, boe-5.62, borne-1.10a, cuybox-1.24, consults-0.23, curlps-0.32, dober-1.01, oostools-3.028, orostools-1.1, espegs-1.42.13, ehtbo-3.11, use-2.97, pdo-7.21, gre-2.25, hcp-1.02, hcp-0.17, poteb-1.421, openics-2.075, brintine-1.01, iusz-4.20, scox-2.28, DME-2.0295, boe-2.09, mcdn-3/4, maritester-4.30, mil-1.517, ramip-1.47, mid-1.51, mil-1.60, lebe-1.80, relphi-3.85, ramn, nu 2.74, partel-3.2c, secos-3.28, radine 6.7, eqnc-3.12, smarttools-0.5, spess-1.00, termac-2.05, throttle-1.2, tree-1.73, ucev-157, uxtole-0.72, util-rhuc-2.28-rc2, wgt-1.18, raesf_tools_29, upe suplcsnt-0.73, xspags-4.70
- LGPL Software: avah-0.6.32, fmpeg-2.4.3, glb-2.46.2, Ibclasmon-0.14, icnl-3.2.25, Ibusb-0.1.12, Ibusb-0.1.5, qencode-3.4.4, wcla-1.61, weshame-4.6.1, Live555, qspa4.7.2
- MPL 1.1: rpači ssk
• BSD 2-Clause License: FreeBSD
- BSD 3-Clause License: miniaturp: 1.5 pcs; net sremp: 5.6/2.1; spec: 0.4.5; jqueryasha:258; jekn; flipog: turbo, lightpad, minitypes, requires, spherical-, sparrt: 0.7; System Verks: Packet Library, Text OpaxGlc Extension Wrangler Library 1.7.0
- MIT License: splachmsv2, avpropendus, oscn, cJSON-Dewe Gamble, dynstree, strascript-pix6, pGrid, jQuery UI, query-form, query-hashchange, query-fson, query-numero, query-throttle-debounce 1.1, JS-Browser-Driver, moon9, roty, Rapnset JavaScript Library, wildflower 1.3.Beta
- libxm2 License: libxm2 2.7.7
• Apache 2.0 License: BLI in
- zlibvlibong License: cpimana. HM NIS Edt. Nutsoft Scriptable Install Server 2.46. PNG reference library. Inxwd 2.6.2, zfp
- Boost Software License: boerst 1570
- Curl License: cur 7.49.1
• Microsoft Public License: Miring, Text Designer Outline Text Library
• Code Project Open 1.02 License: CFPPSQLJe C + Wrappers for SQLite, Areusable, high performance, socket server class Part3
• JPEG License. bpeq-Bh
- RSA MD4 or MD5 Message-Digest Algorithm License. JavaScript: MD5 1.1, sptxsp
• PHP License 3.01: -PHP 2.1.0, PHP 5.8.14
- OpenSSL Combined License: OpenSSL 1.0.21
• PCRE 5 License: pore 8.39
• NTP License: ntp 4.2.5p8
• Codelaniter License: Codolaniter
- CLUT for Win32 License, CLUT for Win32
• ISC License: dbn43-9m2
- Brian Gladman Alternate License: AES with the MA ACE
- Acknowledgement: This product includes modified version of fipag. Live555, qapa4.7.2 and npapi-sik.
GNU General Public License (GPL)
Version 2, June 1991
Copyright (C) 1985. 1991 Free Software Foundation, Inc. 59 Temple Plaza, Suite 332, Boston, MA 02-11-1007 USA Everyone is permitted to copy and distribute schalm into copies of this license document, but changing it is not allowed.
Preamble
The license for most software is designed to take away your freedom to share and change it. By contrast, the GNU General Public License is restricted to guarantee your freedom to share and change free software to make sure the software: it is free for all users. The General Public License applies to most of the Free Software Foundation's software and to any other program whose authors commit to using it. If some other free Software Foundation software is covered by the GNU Library General Public License (IaaS)? You can apply it to your programs, fees.
When we speak of free software, we are referring to farmers, not prices. Our General Public Licenses are designed to make sure that you have the freedom to distribute copies of free software (and change for this service if you want, that you receive source code or can get it if you want it, that you can change the software or use phones of it in more free programs; and that you know you can do these things).
To protect your rights, we need to make restrictions that took anyone to deny you these rights or to ask you to surrender the rights. These restrictions translate to certain reasonable fee for you if you distribute copies of the software, or if you modify it.
For example, if you distribute codes of such a program, whether grates or for a fee you must give the essentials at the rights that you have. You must make sure that they, too, receive or can get the source code. And you must show them these terms so they know their rights.
We predict your rights with two slopes (1) copyright the solvents, and (2) offer you the license which gives you legal permission to copy, distribute and/or modify the solvents.
Also, for each author's protection and ours, we want to make certain that everyone understands that there is no warranty for the free softwares. If the software is modified by someone else and passed on, we want its recipients to know that who they have is not the original, so that any problems introduced by others will not reflect on the original authors' regulations.
Finally, any free program is threatened constantly by software patents. We wish to avoid the danger that redistributions of a free program will individually obtain patent licenses, in effect making the program proprietary. To prevent this, we have made it clear that any patent must be licensed for everyone's free use or not licensed at all.
The precise terms and conditions for copying, distribution and modification follow.
TERMS AND CONDITIONS FOR COPYING, DISTRIBUTION AND MODIFICATION
This License applies to any program or other work which contains a native place by the copyright holder saying it may be distributed under the terms of the General Public License. The Program, however, refers to any such program or work, and a "work based on the Program" means either the Program or any distinct work under copy gift law; that is to say, a work containing the Program or a portion of it, either verbain or own modifications, and/or Entities and/or other language. (Herstellung, transitions is included without irritation in the term "modification"), each licensee is addressed as "you".
Activities other than copying, distribution and modification are not covered by the License; they are outside its scope. The act of running the Program is not restricted, and the output from the Program is covered only if its contents constitute a work based on the Program independent or having been made by running the Program. Whether that is true dependence on what the Program does.
You may copy and distribute verbal copies of the Program's source code as you receive it, in any medium, provided that you carefully end appropriately publish or each copy an appropriate copyright notice and disclaimer of warranty; keep exact all the notices that refer to this License and to the absence of any warranty; and give any other:
You may charge a fee for his physical act of transferring a copy, and you may at your option after warranty cancellation in exchange for a fee.
You may modify your copy or copies of the Program on any portion of it, thus limiting a work based on the Program, and copy and distribute such modifications or work under the terms of Section 1 above, provided that you also meet all of these conditions.
a) You must cause the modified files to carry prominent notices stating that you changed the files and the date of any change.
by You must cause any work that you distribute or publish, that in whole or in part can are or is derived from the Program or any part thereof, to be licensed as a whole at no charge to all third parties under the terms of this License.
cl If the modified program normally reads commones interactivity when run, you must cause it, when started running for such instead uses in the most ordinary way, to print or display a
announcement including an appropriate copyright notice and a notice that there is no warranty for use, saying that you provide a warranty and that users may redistribute the program under these conditions, and telling the user how to view a copy of this License. (Exception: If the Program itself is introduced but does not normally print such an announcement, your work based on the Program is not required to print an announcement.)
These requirements apply to the modified work as a whole. It is important sections of trial work are not required from the Program, and can be reasonably considered independent and separate works in themselves, then this License, and its terms, do not apply to those sections when you distribute them as separate works. But when you distribute the
same sectors as part of a whole which is a work based on the Program, the distribution of the whole must be on the terms of this License, whose permissions for other licensees extend to the entire whole, and thus to each and every part, regardless of who wrote it.
Thus, it is not the intent of this direction to claim rights or contest your rights to work written entirely by your, rather, the intent is to exercise the right to control the distributor or derivative or collective works based on the Program.
In addition, more aggregation of another work not based on the Program with the Program (or with a work based on the Program) on a volume of a storage or distribution medium could not bring the other work under the scope of this License.
You may copy and distribute the Program for a work based on t under Section 2 in object code or executable form under the terms of Sections 1 and 2 above provided that you also do one of the following:
s) Accompany it with the complete corresponding machine-readable source code, which must be distributed under the terms of Sections 1 and 2 above on a medium customarily used for software interchange; or.
b) Accompany with a written offer, said for at least three years, to give any third party, for a charge no more than your cost of physically performing source distribution, a complete machine-readable copy of the corresponding source code, to be distributed under the terms of Sections 1 and 2 above on a medium customarily used for software interchange or.
of Accompany it with the information you received as to the offer to distribute corresponding source code. (This alternative is allowed only for nonexperimental distribution and only if you receive the program in object code or executable form with such an offer, in accord with Subsection b above.)
The source code for a work means the preferred form of the work for making modifications to it. For an executable work, complete source code means all the source code for all modules it contains, plus any associated interface definition files, plus the script used to control compilation and installation or the executable. However, as a social exception, the source code distributed needs not include anything that is normally distributed in other source or binary terms with the major components (bomper, kernel, and so on) of the operating system on which the executable runs unless that component item accompanies the executable.
If distribution of executable or object code is made by offering access to copy from a designated place, then offering equivalent access to copy the source code from the same place counts as distribution of the source code, even though third series are not cancelled to copy the source along with the object code.
You may not copy, modify, sublicense, or distribute the Program except as expressly provided under this License. Any attempt otherwise to copy, modify, sublicense or distribute the Program is solid, and will automatically terminate your rights under this License. However, parties who have received copies, or rights, from you under this License will not have their licenses terminated as long as such parties remain in full compliance.
You are not required to accept this License, since you have not signed it. However, nothing also means you permission to modify or distribute the Program or its derivative works. These actions are prompted by law if you do not accept the License. Therefore, by modifying or distributing the Program for any work based on the Program, you indicate your acquaintance of this License to please, and all its names and conditions for copying, distributing or modifying the Program or works based on it.
Each time you redistribute the Program for any work based on the Program, the recipient automatically receives a license from the original licensor to copy, distribute or modify the Program subject to these terms and conditions. You may not impose any further restrictions on the recipients' excess of the rights granted herein. You are not responsible for enforcing compliance by third parties to this License.
/ . It, as a consequence of a court judgment or allegation or patent infringement or for any other reason (not implied to patent issues) conditions are imposed on you (whether by court order, agreement or otherwise) that contradict the conditions of the Licensee, they do not excuse you from the conditions of this license. If you cannot distribute so as satisfy simultaneously as your obligations under the Licensee and any other permanent obligations, then as a consequence you may not distribute the Program at all. For example, its patent license would not permit royalty free redistribution of the Program by all those who receive copies directly or indirectly through you, then the only way you could satisfy both it and this License would be to refrain entirely from distribution of the Program.
If any portion of the section is not allowed or unrecognizable under any particular circumstance, the balance of the section is intended to apply and the section as a whole is masked to apply in other circumstances. It is not the purpose of this section to induce your own influence of any patents or other property right claims or to contest validity of any such claims. This section has been the same purpose of protecting the integrity of the first software distribution system which is implemented by public license practices. Many people have made generous contributions to the wide ranges of software distributed through that system of reliance on constant allocation of that system; it is up to the author/donor to disclose if the or she is willing to distribute software through any other system and a licensee cannot impose their choice.
This section is intended to make thoroughly clear what is believed to be a consequence of the rest of this Licence.
If the distribution and/or use of the Program is restricted in certain countries either by paternals or by copyrighted interfaces, the original copyright holder who places the Program under this License may acid an exotic geographical division on limitation excluding these countries, so that distribution is permitted only in or among countries not thus excluded. In such case, this License incorporates the limitation as if written in the body of the License.
The Free Software Foundation may publish released and/or new versions of the General Public License from time to time. Such new versions will be similar in spirit to the present version, but may dilite in detail to address new problems or concerns.
Each version is given a distinguishing version number. If the Program specifies a version number of this License which applies to it and "any later version", you have the option of following the terms and conditions either of that version or of any later version published by the Free Software Foundation. If the Program does not specify a version number of this License, you may choose any version ever published by the Free Software Foundation.
If you wish to incorporate parts of the Program into other free programs whose distribution conditions are different, write to the author to ask for permission. For software which is copyrighted by the Free Software Foundation, while to the Free Software Foundation, we sometimes make exceptions for this. Our decision will be guided by the two goals of preserving the free status of all derivatives of our free software and of promoting the sharing and reuse of software generally.
NO WARRANTY
BECAUSE THE PROGRAM IS LICENSED FREE OF CHARGE, THERE IS NO WARRANTY FOR THE PROGRAM TO THE EXTENT PERMITTED BY APPLICABLE LAW, EXCEPT WHEN OTHERWISE STATED IN WRITING THE COPYRIGHT HOLDERS AND/OR OTHER PARTIES PROVIDE THE PROGRAM AS IS WITHOUT WARRANTY OF ANY KIND, EITHER EXPRESSED OR IMPLIED, INCLUDING, BUT NOT LIMITED TO, THE IMPIED WARRANTIES OF MERCHANTABILITY AND ITINLESS OR THAT PARTICULAR TO IPRESS. IT SHALL ONLY REJECT AS TO THE QUALITY AND PERFORMANCE OF THE PROGRAM IS WITH YOU SHOULD THE PROGRAM HAVE DEFECTIVE, YOU ASSUME, THE COST OF ALL NECESSARY SERVIEMING, REPAIR OR CORRECTION.
IN NO EVENT UNLESS REQUIRED BY APPLICABLE LAW OR AGREED TO IN WRITING WILL ANY COPYRIGHT HOLDER, OR ANY CHILD PARTY MAY TO WAY Uganda AND/OR REDISTRIBUTE THE PROGRAM AS PERMITTED ABOVE, BE LIABLE TO YOU FOR DAMAGES, INCLUDING ANY GENERAL, SPECIAL, INCIDENTAL OR CONSEQUENTIAL DAMAGES ARISING OUT OF THE USE OR ANY OTHER INFORMATION CONTAINED IN QUINTLY BUT NOT LIMITED TO LOSS OF DATA OR DATA BEING RENDED INCORPORATE OR LOSSES SUSTAINED BY YOU OR THIRD PARTIES OR A FAILURE OF THE PROGRAM TO OPERATE WITH ANY OTHER PROGRAMS, EVEN IF SUCH HOLDER OR OTHER PARTY HAS BEEN AWSED OF THE POSSIBILITY OR SUCH IDAMIGALS.
END OF TERMS AND CONDITIONS
How to Apply These Terms to Your New Programs
If you develop a new program, and you want it to be of the greatest possible use to the public, the best way to achieve this is to make it free software which everyone can redistribute and charge under these terms. To do so, at each the following notices to the program, it is taken to attach them to the start of each source file to most effectively convey the exclusion of warranty; and each file should have at least the "copyright" line and a pointer to where the full notice is found.
one line to give the program's name and an idea of what it does. Copyright © yyy name of author
This program is free software: you can redistribute it and/or modify it under the terms of the GNU General Public License as published by the Free Software Foundation; either version 2 of the Licenses, or by your option any lower version.
This program is distributed in the hope that it will be useful, but WITHOUT ANY WARRANTY; without even the implied warranty of MERCHANTABILITY or FITNESS FOR A PARTICULAR PURPOSE. See the
GNU General Public License for more details.
You should have received a copy of the GNU General Public License
along with this program; if not, write to the Free Software
Foundation, Inc., 51 Franklin Street, Fifth Floor, Boston, MA 021 IC-1301,
USA.
Also add information on how to contact you by electronic and paper mail. If the program is interactive, make it outout a short notice like this when it starts in an interactive mode:
Gromovision version 60, Copyright (C) year name of author
Gromovision comes with ABSOLUTELY NO WARRANTY; for details
type 'show v'. This is free software, and you are welcome
to redistribute it under certain conditions: type 'show c'
for details.
The hypothetical commands 'show w' and 'show c' should show the appropriate parts of the General Public License. Of course, the commands you use may be called something other than 'show w' and 'show c' they could even be mouse-clocks or menu items—whatever suits your program.
You should also get your employer (if you work as a programme) or your school, if any. to sign a "copyright disclaimer" for the program, if necessary. Here is a sample; after the names:
Yoyodyne, Inc., hereby disclaims all copyright
interest in the program 'Gnomovision'
(which makes passes at compilers) written
by James Hacker.
signature of Ty Decu, 1 April 1989
Ty Coen, President of Vice
This General Public License does not permit, incorporating your program into proprietary programs. If your program is a subroutine library, you may consider it more useful to permit linking proprietary applications with the library. If this is what you want to do, use the GNU Lesser General Public License instead of this License.
GNU General Public License
Version 3, 29 June 2007
Copyright (C) 2007 Free Software Foundation, Inc. http://fst.org/
Everyone is permitted to copy and distribute verbatim copies of this license document, but changing it is not allowed.
Preamble
The GNU General Public License is a free, copyright license for software and other kinds of works.
The licenses for most software and other practical works are designed to take away your freedom to share and change the works. By contrast, the GNU General Public License is intended to guarantee your freedom to share and change; all versions of a program to make sure it remains free software for all its users. We, the Free Software Foundation, use the GNU General Public License for most of our software, it applies also to any other work released this way by its authors. You can apply it to your programs, i.e.
What we speak of free software, we are referring to freedom, not prices. Our General Public Licensees are designed to make sure that you have the freedom to distribute copies of free software (and charge for them if you want), that you receive source code or can get it if you want it, that you can change the software or use pieces of it in new free programs, and that you know you can do these things.
To protect your rights, we need to prevent others from denying you these rights or asking you to surrender the rights. Therefore, you have certain responsibilities if you distribute copies of the software, or if you modify it: responsibilities to respect the freedom of others.
For example, if you distribute copies of such a program, whether gratis or for a fee, you must pass on to the recipients the same freedoms that you received. You must make sure that they, too, receive or can get the source code. And you must show them these terms so they know their rights.
Developers that use the GNU GPL protect your rights with two steps: (1) assert copyright on the software, and (2) offer you this License giving you legal permission to copy, distribute and/or modify it.
For the developers' end authors' protection, the GPL clearly explains that there is no warranty for this free software. For both users' and authors' sake, the CPL requires that modified versions be marked as changed, so that their problems will not be introduced erroneously to authors of previous versions.
Some devices are designed to deny users access to install or run modified versions of the software inside them, although the manufacturer can do as. This is fundamentally incompatible with the aim of packaging users' freedom to change the software. The systematic pattern of such abuse occurs in the area of products for individuals to use, which is precisely where it is most unacceptable. The errors, we have designed this version of the GPL to prohibit the practice for those products. If such problems are substantially in other domains, we stand ready to extend this provision of these domains in future versions of the GPL as needed to protect the freedom of users.
Finally, every program is threatened constantly by software patents. States should not allow patents to restrict development and use of software on general purpose computers, but in most that do, we wish to avoid the special danger that patents applied to a free program could make it effectively proprietary. To prevent this, the GPL assures that patents cannot be used to render the program non-free.
The precise terms and conditions for copying, distribution and modification follow.
TERMS AND CONDITIONS
0. Definitions.
"This License" refers to version 3 of the GNU General Public License. "Copyright" also means copyright-like laws that apply to other kinds of works, such as semiconductor risks.
"The Program" takes to any copyrightable work licensed under this License. Each licensee is addressed as "your". "Licensees" and "recipients" may be individuals or organizations.
To 'modify' a work means to copy from or accept el or part of the work in a fashion requiring copyright permission, other than the making of an exact copy. The resulting work is called a "modified version" of the earlier work or a work "based on" the earlier work.
A "covered work" means either the unmodified Program or a work based on the Program.
To "propagate" a work means to do anything with it that, without permission, would make you directly or secondly liable for infringement. Under applicable copyright law, except executing it on a computer or modifying a private copy. Propagation includes copying, distribution (with or without modification), making available to the public, and in some countries other activities as well.
To "convey" a work means any kind of propagation that enables other parties to make or receive copies. More interaction with a user through a computer network, with no transfer of a copy, is not conveying.
An interactive user interfaces displays "Appropriate Legal Notices" to the extent that it includes a convenient and prominently visible feature that (1) displays an appropriate copyright notice, and (2) tells the user that there is no warranty for the work (except to the extent that warranties are provided, that licenses may convey the work under this License, and how to view a copy of this License. If the interface presents a list of user commands or options, such as a menu, a prominent item in the list makes its inclusion.
Source Code.
The "source code" for a work means the preferred form of the work for making modifications to it. "Object code" means any non-source form of a work.
A "Standard interface" means an interface that either is an official standard defined by a recognized standards body, or, in the case of interfaces specified for a particular programming language, one that is widely used among developers working in that language.
The "Eys an Librations" of an executable work includes anything, other than the work as a whole, that (p) is included in the normal zone of packaging a Major Component, but which is not part of first Major Component, and (p) serves only to enable use of the work with that Major Component, or to implement a Standard Interface for which an indemnation is available to the public in source code form. A "Major Component". In the context, means a major or essential component (kernel, window system, and so on) of the specific operating system (if any) on which the executable work runs, or is simpler used to produce the works, or an object code engineer used to run it.
The "Corresponding Source" for a work in object code form means all the source code needed to generate, install, and (for an executable work) run the object code and to modify the work, including scripts to control these activities. However, it does not include the work's System
Libraries, or general-purpose tools or generally available free programs which are used unmodified in performing those activities but which are not part of the work. For example, Corresponding Source includes interface definition files associated with source files for the work, and the source code for shared library and dynamically linked subprograms that the work is specifically designed to require, such as by intimate date, communication or control flow between these subprograms and other parts of the work.
The Corresponding Source need not include anything that users can regenerate automatically from other parts of the Corresponding Source. The Corresponding Source for a work in source code form is that same work.
2. Basic Permissions.
All rights granted under this License are granted for the term of copyright on the Program, and are irrevocable provided the stated conditions are met. The License explicitly affirms your unlimited permission to run the unmodified Program. The output from running a covered work is covered by this License only if the output, given its consent, constitutes a covered work. This License acknowledges your rights of fair use or other equivalent, as provided by copyright law.
You may make run and prolegate covered works that you do not convey, without conditions so long as your license otherwise remains in force. You may convey covered works to others for the sole purpose of having them make modifications exclusively for you, or provide you with retices for running those works, provided that you comply with the terms of this License in conveying all materials for which you do not control copyright. Those thus making on running the covered works for you must do so exclusively on your behalf under your direction and control on terms that prohibit them from making any copies of your copyrighted material outs do their relationship with you.
Conveying under any other circumstances is permitted solely under the conditions stated below. Subicensing is not allowed; section 10 makes it unnecessary.
Protecting Users' Legal Rights From Anti-Circumvention Law. No covered work shall be deemed part of an effective technological measure under any applicable law fulfilling obligations under article 11 of the WPO copyright treaty adopted on 20 December 1996, or similar laws prohibiting or restricting circumvention of such measures.
When you convey a covered work, you waive any legal power to forbod circumvention of technological measures to the extent such circumvention is effected by exercising rights under this License with respect to the covered work, and you disclaim any mention to limit operation or modification of the work as a means of enforcing against the work's users, your or third parties' legal rights to forbod circumvention of technological measures.
4. Conveying Verbatim Copies.
You may convey verbalim copies of the Program's source code as you receive it, in any medium, provided that you explicitly and appropriately publish on each copy an appropriate copyright notice; keep intact all notices stating that this License and any non-permissive terms added in accord with section 7 apply to the code; keep intact all notices of the absence of any warranty and give all recipients a copy of this License along with the Program.
You may charge any price or no price for each copy that you convey, and you may offer support or warranty protection for a fee.
Conveying Modified Source Versions.
You may convey a work based on the Program, or the modifications to produce it from the Program, in the form of source code under the terms of section 4, provided that you also meet all of these conditions:
a) The work must carry prominent notices stating that you modified it, and giving a relevant date.
b) The work must carry prominent notices stating that it is released under this License and any conditions added under section 7. This requirement modifies the requirement in section 4 to "keep intact all no cats".
c) You must license the entire work, as a whole, under this License to anyone who comes into possession of a copy. This License will therefore apply, along with any applicable section 7 additional terms, to the whole of the work, and all its parts, regardless of how they are packaged. This License gives no permission to license the work in any other way, but it does not irworkate such permission if you have separately received it.
d) If the work has interactive user interfaces, each must display Appropriate Legal Notices; however, if the Program has interactive interfaces that do not display Appropriate Legal Notices, your work need not make them do so.
A compilation of a covered work with other separate and independent works, which are not by their nature extensions of the covered work, and which are not combined with it such as to form a larger program, in or on a volume of a storspe or distribution medium, is called an "aggregate" if the compilation and its resulting copyright are not used to limit the access or legal rights of the compilation's users beyond what the individual works permit inclusion of a covered work in an aggregate does not cause this License to apply to the other parts of the aggregate.
You may convey a several work in object code form under the terms of sections 4 and 5, provided that: you also convey the machine-readable Corresponding Sources under the terms of this License, in one of these ways:
a) Convey the object code in, or embodied in, a physical product (including a physical distribution medium), accompanied by the Corresponding Source Index on a durable physical medium customarily used for software interchange.
By Convey the object code in a embodied in, a physical product (including a physical distribution medium, accompanied by a written offer, valid for at least three years and valid for as long as you offer spare parts or customer support for this product model), to give anyone who perceives that object code either ("a copy of this Corresponding Source for all the software in the product that is covered by this License, on a durable physical medium customarily used for software interchange, for a price no more than your reasonable cost of physically performing this conveying or source, or (2) access to copy the Corresponding Source from a network server at no charge.
c) Convey individual copies of the object code with a copy of the written offer to provide the Consalescing Source. This alternative is allowed only occasionally and noncommercially, and only if you received the object code with such an offer, in accord with subsection 60.
di Convey the object code by offering access from s. designated piece ignals or for a charge, and offer equivalent access to the
Corresponding Source in the same way through the same piece at no further chance. You need not require recipients to copy this
Corresponding Source along with the object code, if the place to copy the object code is a network server, the Corresponding Source may be on a different server (operated by you or a third party) that supports equivalent copying facilities, provided you maintain clear directions next to the object code saying where to find the Corresponding Source. Regardless of what server hosts the Corresponding Source, you remain obligated to ensure that it is available for as long as needed to satisfy these requirements.
ej Convey the object code using peer to peer transmission, provided you inform other peers where the object code and Corresponding Source of the work are being offered to the general public at no charge under subsection 6d.
A separable portion of the object code, whose source code is excluded from the Corresponding Source as a System Library, read no. be included in conveying the object code work.
A "Less Product" is defined (1) to "consumer product", which means any tangible personal property which is normally used for personal, family, or household purposes, or 25 anything designed or used for incorporation into a dwelling. In determining whether a product is a consumer product, class of cases shall be reached in favor of coverage. For a particular product received by a particular user, "normally used" refers to a typical or common use of that class of product, regardless of the status of the particular user or of the way in which the particular user actually uses, or aspects or is expected to use, the product. A product is a consumer product regardless of whether the product has substantial commercial, industrial or non-consumer uses, unless such use represents the only significant mode of use of the product.
"Installation information" for a User Product means any methods, procedures, authorization keys, or other information required to install and execute modified versions of a covered work in that User Product from a modified version of its Corresponding Sources. The information must suffice to ensure that the continued functioning of the modified object cycle is in no case prevented or interfered with solely because modification has been made.
If you convey an object code work under this section in, or will, or specifically for use in, a User Product, and the conveying occurs as part of a transaction in which the right of possession and use of the User Product is transferred to the recipient. In perpetuity or for a fixed term (regardless of how the transaction is characterized), the Corresponding Source conveyed under this section must be accompanied by the Installation Information. But this requirement does not apply if neither you nor any third party retains the ability to install modified object code on the User Product (for example, the work has been installed in ROW).
The requirement to provide installation information does not include a requirement to continue to provide support service, warranty, or updates for a work that has been modified or installed by the recipient, or for the User Product in which it has been modified or installed. Access to a
network may be denied when the modification itself materially and adversely affects the operation of the network or violates the rules and protocols for communication across the network.
Corresponding Source conveyed, and Installation Information provided. In accord with the section must be in a format that is publicly documented (and with an unknown action handshake to the public in source code form), and must require no special password or key for unpacking, reaching or copying.
7. Additional Terms.
"Additional permissions" are terms that supplement the terms of this License by making exceptions from one or more of its conditions. Additional permissions that are applicable to the entire Program shall be treated as though they were included in the License, to the extent that they are said under applicable law. If additional permissions apply only to part of the Program, that part may be used separately under those permissions, but the entire Program remains governed by this License without regard to the additional permission."
When you convey a copy of a covered work, you may at your option remove any additional permissions from that copy, or from any part of it. (Additional permissions may be written to require their own removal in certain cases when you modify the work.) You may place additional permissions on material added by you to a covered work, for which you have or can give approximately copyright permission.
Notwithstanding any other provision of this License, for material you add to a covered work, you may if authorized by the copyright holders of that material; supplement the terms of this License with terms:
s) Disclaiming warranty or limiting liability differently from the terms of sections 15 and 16 of this License; or
b) Recurring preservation of specified reasonable legal notices or author attributions in that material or in the Appropriate Legal Notices displayed by works containing it; or
c) Prohibiting misrepresentation of the origin of that material, or requiring that modified versions of such material be marked in reasonable ways as different from the original version; or
d) Limiting the use for publicly purposes of names of licensors or authors of the material; or
s) Declining to grant rights under trademark law for use of some trade names, trademarks, or service marks; or
(i) Requiring indemnification of licensors and authors of that material by anyone who conveys the material (or modified versions of it) with contractual assumptions of liability to the recipient, for any liability that these contractual assumptions directly impose on those licensors and authors.
All other non-permissive additional terms are considered "further restrictions" within the meaning of section 10. If the Program as you received it, or any part of it, contains a notice stating that it is governed by this License along with a term that is a further restriction, you may remove that term, if a license document contains a further restriction but permits releasing or conveying under this License, you may add to a covered work material governed by the terms of that license document, provided that the further restriction does not survive such relicencing or conveying.
If you add terms to a covered work in accord with this section, you must place in the relevant source files, a statement of the additional terms that apply to those files, or a notice indicating where to find the applicable terms.
Additional terms, permissive or non-permissive, may be stated in the form of a separately written license, or stated as exceptions; the above requirements apply either way.
8. Termination.
You may not propagate or modify a covered work exact as expressly provided under this License. Any attempt otherwise to propagate or modify it is void, and will automatically terminate your rights under the License (including any patent licenses granted under the third paragraph of section 1-1).
However, if you cease all violation of this License, then your license from a particular copyright holder is reinstated (a) provisionally, unless and until the copyright holder explicitly and finally terminates your license, and (b) permanently. If the copyright holder fails to notify you of the violation by some reasonable means prior to 60 days after the cessation.
Moreover, your license from a particular copyright holder is reinstated permanently if the copyright holder notifies you of the violation by some reasonable means, this is the first time you have received notice of violation of this License (for any work) from that copyright holder, and you cure the violation prior to 30 days after your receipt of this notice.
Termination of your rights under this section does not terminate the licenses of paras who have received copies or rights from you under this license. If your rights have been terminated and not permanently restated, you do not qualify to receive new licenses for the same material under section 10.
9. Acceptance Not Required for Having Copies.
You are not required to accept this License in order to receive or run a copy of the Program. Ancillary propagation of a covered work occurring solely as a consequence of using peer-to-peer transmission to receive a copy likewise does not require acceptance. However, nothing other than the License grants your permission to propagate or modify any covered work. These actions infringe copyright if you do not accept this License. Therefore, by modifying or propagating a covered work, you indicate your acceptance of this License to do so.
10. Automatic Licensing of Downstream Recipients.
Each time you convey a covered work, the recipient automatically receives a license from the original licensors, to run, modify and propagate that work subject to this License. You are not responsible for enforcing compliance by third parties with this License.
An entity transaction is a transaction on transferring control of an organization, or substantially all assets of one, or succiving an organization, or merging organizations. If propagation of a covered work results from an entity transaction, each party to that transaction who receives a copy of the work also receives whatever licenses to the work the party's predecessor in interest and could give under the predominant paragraph, plus a right to possession of the Corresponding Source of the work from the predecessor in interest, if the predecessor has it or can get it with reasonable efforts.
You may not impose any further restrictions on the exercise of the rights granted or affirmed under this License. For example, you may not impose a license line, royalty, or other charge for exercise of rights granted under this License, and you may not initiate litigation (including a cross claim or countless claim in a lawfully alleging that any patent claim is infringed by making, using, selling, offering for sale, or importing the Program or any person of it).
11. Patents.
A "contributor" is a copyright holder who authorizes use under this License of the Program or a work on which the Program is based. The work thus licensed is called the contributor's "contributor version".
A contributor's "essential patent claim" are all patent claims owned or controlled by the contributor, whether directly acquired or hereafter acquired that would be infringed by some manner, permitted by the License, of making, using, or selling to contributor version, but do not include claims that would be infringed only as a consequence of further modification of the contributor version. For purposes of this definition, "control" includes the right to grant patent subsidiaries in a manner consistent with the requirements of the License.
Each contributor grants you a non-exclusive, worldwide, royalty-free patent license under the contributor's essential patent claims, to make use, sol, offer for sale, import and otherwise run, modify and propagate the consents of its contributor version.
In the following three paragraphs, a "entient license" is any express agreement or commitment, however denominated, not to enforce a patent (such as an express permission to practice a patent or covenant not to suit for patent infringement). To "grant" such a patent license to a party means to make such an agreement or commitment not to enforce a patent against the party.
If you convey a covered work, knowingly relying on a patent license, and the Corresponding Source of the work is not available for anyone to copy, tree of charge and under the terms of this License, through a publicly available network server or other usually successful means, then you must either (1) cause the Corresponding Source to be so available, or (2) attempts to derive yourself of the benefit of the patent license for the particular work, or (3) arrange, in a manner consistent with the requirements of the License, to extend the patent license to consume them in a country. The Company is doing so that this License is not being used, but for the patent license, your conveying the covered work in a country, or your electronic use of the covered work in a country, would interfere one or more reliable patents in that country; that you have reason to believe are said.
If, pursuant to or in connection with a single transaction or arrangement, you convey or propagate by procuring conveyance of, a covered work, and grant a patent license to some of the parties receiving the covered work authorizing them to use, propagates, modify or convey a specific copy of the covered work, then the patent license you grant is
automatically extended to all recipients of the covered work and works based on it.
A patent licensee is "discriminatory." It does not include within the scope of its coverage, prohibits the exercises of, or is conditioned on the non-exercises of one or more of the rights that are specifically granted under the license. You may not convey a covered work if you are a party to an arrangement with a third party shall be in the business of distributing and otherwise. If you do not have a copy of this paper, you can only use the extent of your active or conveying the work, and under which the third party grants, to any of the parties who would receive the covered work from you a discriminatory patent license (a) in connection with copies of the covered work conveyed by you (or copies made from these copies), or (or primarily for and in connection with specific products or complete that certain the covered work, unless you interact into that permission or that patent licensee was granted, prior to 26 March 2007).
Nothing in this License shall be construed as excluding or limiting any implied license or other defenses to infringement that may otherwise be available to you under applicable patent law.
12. No Surrender of Others' Freedom.
It conditions are imposed on you whether by court order, agreement or otherwise that contradict the conditions of this License, they do not excuse you from the conditions of this License. If you cannot convey a covered work so as to satisfy simultaneously your obligations under this License and any other portionful obligations, then as a consequence you may not convey it at all. For example, if you agree to terms that obligate you to collect a royalty for further conveying from these to whom you convey the Program, the only way you could satisfy both those terms and this License would be to refrain entirely from conveying the Program.
13. Use with the GNU Affero General Public License.
Notwithstanding any other provisions of this License, you have permission to link or combine any covered work with a work licensed under version 3 of the GNU Aftero General Public License into a single combined work and to convey the resulting work. The terms of this License will continue to apply to the part which is the covered work, but the special requirements of the GNU Aftero General Public License, section 10, concerning interaction through a network will apply to the combination as such.
14. Revised Versions of this License.
The Free Software Foundation may publish revised and/or new versions of the GNU General Public License from time to time. Such new versions will be similar in spirit to the present version, but may differ in detail to address new problems or concerns.
Each version is given a distinguishing version number. If the Program specifies that a certain numbered version of the GNU General Public License or any later version' applies to it, you have the option of following the items and conditions ruler of that numbered version or of any later version published by the Free Software Foundation. If the Program does not specify a version number of the GNU General Public License, you may choose any version ever published by the Free Software Foundation.
If the Program specifies that a proxy can decide which future versions of the GNU General Public License can be used, that proxy's public statement of acceptance of a version permanently authorizes you to choose that version for the Program.
Later license versions may give you additional or different permissions. However, no additional obligations are imposed on any author or copyright holder as a result of your choosing to follow a later version.
15. Disclaimer of Warranty.
THERE IS NO WARRANTY FOR THE PROGRAM, TO THE EXTENT PERMITTED BY APPLICABLE LAW, EXCEPT WHEN OTHERWISE STATED IN WRITING THE COPYRIGHT HOLDERS AND/OR OTHER PARTIES PROMISE THE PROGRAM "AS IS" WITH CUT WARRANTY OF ANY KIND, EITHER EXPRESSED OR IMPLIED, INCLUDING, BUT NOT LIMITED TO THE IMPLED WARRANTIES OF MERCHANTABILITY AND JUSTICE FOR A PARTICULAR PURPOSE. THE ENTIRE RISK AS TO THE QUALITY AND PERFORMANCE OF THE PROGRAM IS WITH YOU SHOULD THE PROGRAM PROVEE DEFECTIVE. YOU ASSUME THE COST OF ALL NECESSARY SERVICING, REPAIR OR CORRECTION.
16. Limitation of Liability.
IN NO EVENT UNLESS REQUIRED BY APPLICABLE LAW OR AGREED TO IN WRITING WILL ANY COPYRIGHT HOLDER, OR ANY OTHER PARTY WHO COMES AND/OR CONVEYS THE PROGRAM AS PERMITTED ABOVE, BE LIABLE TO YOU FOR DAMAGES, INCLUDING ANY GENERAL, SPECIAL INCIDENTAL OR CONGREGENTAL DAMAGES ARISING OUT OF THE USE OR INABILITY TO USE THE PROGRAM (INCLUDING BUT NOT LIMITED TO LOSS OF DATA OR DATA BEING RENDERED INACCURATE OR LOSSES SUSTAINED BY
YOU OR THIRD PARTIES OR A FAILURE OF THE PROGRAM TO OPERATE WITH ANY OTHER PROGRAMS, EVEN IF SUCH HOLDER OR OTHER PARTY HAS BEEN ADVISED OF THE POSSIBILITY OF SUCH DAMAGES.
17. Interpretation of Sections 15 and 16.
If the disclaimer of warranty and limitation of liability provided above cannot be given local legal effect, according to their terms, reviewing courts shall apply local law that most clearly approximates an absolute waiver of all civil facility in connection with the Program, unless a warranty or assumption of liability accompanies a copy of the Program in return for a fee.
END OF TERMS AND CONDITIONS
How to Apply These Terms to Your New Programs
If you develop a new program, and you want it to be of the greatest possible use to the public, the best way to achieve this is to make it free software which everyone can realitise and change under these terms. To do so, attach the following notices to the program: it is sales to attach them to the start of each source file to most effectively state the exclusion of warranty; and each file should have at least the "copyright" line and a pointer to where the full notice is found.
Copyright (C)
This program is free software: you can redistribute it and/or modify it under the terms of the GNU General Public License as published by the Free Software Foundation, either version 3 of the License, or (at your option) any later version.
This program is distributed in the hope that it will be useful but WITH CUT ANY WARRANTY; without even the implied warranty of MERCHANTABILITY or FITNESS FOR A PARTICULAR PURPOSE. See: the GNU General Public License for more details.
You should have received a copy of the GNU General Public License along with this program. If not, see http://www.gnu.org/licenses/ .
Also acid information on how to contact you by electronic and paper mail.
If the program does terminal interaction, make it output a short notice like this when it starts in an interactive mode:
Copyright (C)
This program comes with ABSOLUTELY NO WARRANTY; for deals type 'show'
This is free software, and you are welcome to redistribute it under certain conditions; type 'show c' for details.
The hypothetical commands 'show w' and 'show o' should show the appropriate parts of the General Public License. Of course, your program's commands might be different; for a CU Interface, you would use an "about box".
You should also get your employer (if you work as a programmer) or school, if any, to sign a "copyright disclaimer" for the program. It necessary. For more information on this, and how to apply and follow the GNU GIF, see http://www.gnu license .
The GNU General Public License does not permit incorporating your program into proprietary programs. If your program is a subroutine library, you may consider it more useful to permit linking proprietary applications with the library. If this is what you want to do, use the GNU Lesser General Public License instead of this License. But first, please read http://www.gnu.org/philosophy/why-not-lgpt.html .
GNU Lesser General Public License
Version 2.1, February 1999
Copyright (C) 1991, 1999 Free Software Foundation, Inc.
59 Temple Place, Suite 330, Boston, MA 02111-1307 USA
Everyone is permitted to copy and distribute verbatim copies
of this license document, but changing it is not allowed.
This is the first released version of the Lesser GPL. It also counts
as the successor of the GNU Library Public License, version 2, hence the version number 2.1.]
Preamble
The licenses for most software are designed to take away your freedom to share and change it. By contrast, the GNU General Public Licenses are intended to guarantee your freedom to share and change free software--to make sure the software is free for all its users.
This license, the Lesser General Public Licensee, applies to some specially designated software packages—typically librates—of the Free Software Foundation and other authors who decide to use it. You can use it too, but we suggest you first think carefully about whether this license or the ordinary General Public License is the better strategy to use in any particular case, based on the explorations below.
When we speak of free software, we are referring to freedom of use, not price. Our General Public Licensee are designed to make sure that you have the freedom to distribute copies of free software (and charge for this service if you wish); that you receive source code or can get it if you want it; that you can charge the software and use pieces of it in new free programs; and that you are informed that you can do these things.
To protect your rights, we need to make restrictions that forbld distributors to deny you these rights or to ask you to surrender these rights. These restrictions translate to certain responsibilities for you if you distribute copies of the library or if you modify it.
For example, if you distribute copies of the library, whether gratis or for a fee, you must give the recipients all the rights that we gave you. You must make sure that they, too, receives or can get the source code. If you link other code with the library, you must provide complete object files to the recipients, so that they can link them with the library after making changes to the library and rescompiling it. And you must show them these terms so they know their rights.
We protect your rights with a two-step method: (1) we copyright the library, and (2) we offer you this license, which gives you legal permission to copy, distrioure and/or modify the library.
To protect each distributor, we want to make it very clear that there is no warranty for the free library. Also, if the library is moored by someone else and passed on, the recipients should know that what they have is not the original version, so that the original author's reputation will not be affected by problems that might be introduced by others.
Finally, software parents pose a constant threat to the existence of any free program. We wish to make sure that a company cannot effectively restrict the users of a free program by obtaining a riskitive license from a parent holder. Therefore, we insist that any patent license obtained for a version of the library must be consistent with the full freedom of use specified in this license.
Most GNU software, including some libraries, is covered by the ordinary GNU General Public License. This license, the GNU Lesser General Public Licensee, applies to certain designated libraries, and is quite different from the ordinary General Public Licensee. We use this license for certain libraries in order to permit linking those libraries into non-free programs.
When a program is linked with a library, whether statistically or using a shared library, the combination of the two is legally speaking a combined work, a derivative of the original library. The ordinary General Public License therefore permits such linking only if the entire combination its orders of freedom. The Lesser General Public License permits more tax bilanza for linking other works with the library.
We call this license the "Lesser" General Public License because it does Less to protect the user's freedom than the ordinary General Public License. It also provides what free software developers. Loss of us
advantage over competing non-free programs. These disadvantages are the reason we use the ordinary General Public License for many libraries. However, the Lesser license provides advantages in certain special circumstances.
For example, on rare occasions, there may be a special need to encourage the widest possible use of a certain library, so that it becomes a de-factors standard. To achieve this, non-free programs must be allowed to use its library. A more frequent case is that a free library does the same job as wisely used non-free libraries. In this case, there is little to gain by limiting the free library to free software only, so we use the Lesser General Public License.
in other cases, permission to use a particular library in non-free programs enables a greater number of people to use a large body of free software. For example, permission to use the GNU C Library in non-free programs enables many more people to use the whole GNU operating system, as well as its variant, the GNU/Linux operating system.
Although the Lesser General Public License is Less protective of the users' freedom, it does ensure that the user of a program that is linked with the Library has the freedom and the controversial to run that program using a modified version of the Library.
The precise terms and conditions for copying, distribution and modification follow. Pay close attention to the difference between a 'work based on the library' and a 'work that uses the library'. The former contains codes derived from the library, whereas the letter must be combined with the library in order to run.
TERMS AND CONDITIONS FOR COPYING, DISTRIBUTION AND MODIFICATION
This License Agreement applies to any software library or other program which contains a notice placed by the copyright holder or other authorized party saying it may be distributed under the terms of this Lesser General Public License (also called "the License"). Each licensee is addressed as "you".
A 'library' means a collection of software functions and/or data prepared so as to be conveniently linked with application programs (which uses some of those functions and details to form executables.
The "Library", below, refers to any such software library or work which has been distributed under these terms. A work based on the Library means either the Library or any derivative work under copyright law; that is to say, a work containing the Library or a portion of it, either variation or with modifications and/or translated straightforwardly into another language. Hereinafter, translation is included without imitation in the term "modification".
"Source code" for a work means the preferred form of the work for making modifications to it. For a library, complete source code means all the source code for all modules it contains, plus any associated interfaces definition ties, plus the scripts used to control compilation and installation of the library.
Activities other than copying, distribution and modification are not covered by this License, they are outside its scope. The act of running a program using the Library is not restricted, and output from such a program is covered only if its contents constitute a work based on the Library independent of the use of the Library in a tool for writing it. Whether that is true dependence on what the Library does and what the program that uses the Library does.
You may copy and distribute verbalim codes of the Library's complete source code as you receive it, in any medium, provided that you conspicuously and appropriately publish on each copy an appropriate copyright notice and disclaimer of warranty; keep intact all the notices that refer to the License and to the absence of any warranty; and distribute a copy of this License along with the Library.
You may charge a fee for the physical act of transferring a copy, and you may at your option offer warranty protection in exchange for a fee.
You may modify your copy or copies of the Library or any portion of it, thus forming a work based on the Library, and copy and distribute such modifications or work under the terms of Section I above, provided that you also read all of these conditions:
a) The modified work must itself be a software library.
b) You must cause the files modified to carry prominent notices stating that you changed the files and the data of any change.
c) You must cause the whole of the work to be licensed at no charge to all third parties under the terms of this License.
of it a facility in the modified Library refers to a function or a table of data to be supplied by an application program that uses the facility, other than as an argument passed when the facility is invoked, then you must make a good faith effort to ensure that, in this event an application does not supply such function or table, the facility still operates, and performs whatever part of its purpose remains meaningful.
For example, a function in a library to compute square roots has a purpose that is entirely well-defined independent of the application. Therefore, Subsection 2d requires that any application-supplied function or table used by this function must be optional if the application does not supply it, the square root function must still compute square root(s).
These requirements apply to the modified work as a whole. If identifiable sections of that work are not derived from the Library, and can be reasonably considered independent; and separate works in themselves, then this License, and its terms, do not apply to those sections when you distribute them as separate works. But when you
distribute the same sections as part of a whole which is a work based on the Library, the distribution of the whole must be on the terms of this License, where permissions for other licenses extend to the
entire whole, and thus to each and every part regardless of who wrote it.
Thus, it is not the intent of this section to claim rights or contest your rights to work written entirely by you; rather, the intent is to exercise the right to control the distribution of derivative or collective works based on the Library.
In addition, more aggregation of another work not based on the Library with the Library (or with a work based on the Library) on a volume of a storage or distribution on medium does not bring the other work under the scope of this License.
You may opt to apply the terms of the ordinary GNU General Public License instead of this License to a given copy of the Library. To do this, you must alter all the notices that refer to this License, so that they refer to the ordinary GNU General Public License, version 2. Instead of this License, if a never version then version 2 of the ordinary GNU General Public License has appeared, then you can specify that version instead if you wish.) Do not make any other change in these notices.
Once this change is made in a given copy, it is irreversible for that copy, so the ordinary GNU General Public License applies to all subsequent copies and derivative works made from that copy.
This option is useful when you wish to copy part of the codes of the Library in a program that is not a library.
You may copy and distribute the Library for a portion or derivative of it, under Section 2; In object code or executable form under the terms of Sections 1 and 2 above provided that you accompany it with the complete corresponding machine readable source code, which must be distributed under the terms of Sections 1 and 2 above on a medium customarily used for software interchanges.
If distribution of object, code is made by offering access to copy from a designated place, then offering equivalent access to copy the source code from the same place satisfies the requirement to distribute the source code, even though third parties are not compelled to copy the source along with the object code.
A program that contains no derivative of any portion of the Library, but is designed to work with the Library by being compiled or linked with it, is called a "work that uses the Library". Such a work, in relation, is not a derivative work of the Library, and therefore falls outside: the scope of this License.
However, linking a "work that uses the Library" with the Library creates an executable that is a derivative of the Library (because it contains portions of the Library), rather than a "work that uses the library". The executable is therefore covered by this License. Section 6 states terms for distribution of such executables.
When a "work that uses the Library" uses material from a header file that is part of the Library, the object code for the work may be a derivative work of the Library even though the source code is not. Whether this is true is especially significant if the work can be incorrect without the Library, or if the work is itself a library. The threshold for this to be true is not precisely defined by law.
If such an object file uses only numerical parameters, data structure layouts and accessors, and small macros and small inline functions (ten lines or less in length, then the use of the object file is unrealized regardless of whether it is legally a derivative work. Executables containing this object code plus portions of the Library will still fall under Section 6.1)
Otherwise, if the work is a derivative of the Library, you may distribute the object code for the work under the terms of Section 6. Any executables containing that work also fall under Section 6, whether or not they are linked directly with the Library itself.
As an exception to the Section above, you may also combine or link a "work that uses the Library" with the Library to produce a work containing portions of the Library, and distribute that work under terms of your choice, provided that the terms permit modification or the work for the customer's own use and reverse engineering for debugging such modifications.
You must give prominent notice with each copy of the work that the Library is used in it and that the Library and its use are covered by this License. You must supply a copy of this License. If the work during execution displays copyright notices, you must include the copyright notice for the Library among them, as well as a reference directing the user to the copy of this License. Also, you must do one of these things:
a) Accompany the work with the complete corresponding machine readable source code for the Library inducing whatever changes were used in the work (which must be distributed under Sections 1 and 2 above); and, if the work is an executable linked with the Library, with the complete machine readable "work that uses the Library", as object code and/or source code, so that the user can modify the Library and then link to produce a modified executable containing the modified Library. It is understood that the user who changes the contents of definitions files in the Library will not necessarily be able to recompile the application to use the modified definitions.)
b) Use a suitable shared library mechanism for linking with the library. A suitable mechanism is one that (1) uses at run time a copy of the library already present on the user's computer system, rather than copying library functions into the executable, and (2) will operate properly with a modified version of the library, if the user installs one, as long as the modified version is interface compatible with the version that the work was made with.
c) Accompany the work with a written offer, valid for at least three years, to give the same wear the materials specified in Subsection 6a, above, for a charge no more than the cost of performing this distribution.
d) If distribution of the work is made by offering access to copy from a designated place, offer equivalent access to copy the above specified materials from the same place.
e) Verify that the user has already received a copy of these materials or that you have already sent this user a copy.
For an executable, the required form of the "work that uses the Library" must include any data and utility programs needed for reproducing the executable from it. However, as a special exception, the materials to be distributed need not include anything that is normally distributed in either source or binary form with the major components (compiler, kernel, and so on) of the operating system on which the executable runs, unless that component itself accompanies the executable.
It may happen that this requirement contracts the license restrictions of other proprietary libraries that do not normally accompany the operating system. Such a contradiction means you cannot use both them and the Library together in an executable that you distribute.
You may pace library facilities that are a work based on the Library side by side in a single library together with other library facilities covered by this License, and distribute such a combined library, provided that the separate distribution of the work based on the Library and of the other library facilities is otherwise permitted, and provided that you do these two things:
a) Accompany the combined library with a copy of the same work based on the Library, uncombined with any other library facilities. This must be distributed under the terms of the Sections above.
by Give prominent notice with the combined library of the fact that part of it is a work based on the Library, and explaining where to find the accompanying uncombined form of the same work.
You may not copy, modify, sublicense, link with, or distribute the Library except as expressly provided under the License. Any attempt otherwise to copy, modify, sublicense, link with, or distribute the Library is void, and will automatically terminate your rights under the License. However, parties who have received copies, or rights, Pure you under this License will not have their licenses terminated so long as such parties remain in full compliance.
You are not required to accept this License, since you have not signed it. However, nothing else grants you permission to modify or distribute the Library or its derivative works. These actions are prohibited by law if you do not accept this License. Therefore, by modifying or distributing the Library for any work based on the Library, you indicate your accordance of this License to do so, and all its arms and conditions for copying, distributing or modifying the Library or works based on it.
Each time you redistribute the Library for any work based on the Library, the recipient automatically receives a license from the original licensee to copy, distribute, links with or modify the Library subject to these terms and conditions. You may not impose any further restrictions on the recipients' exercise of the rights granted herein. You are no
responsible for enforcing compliance by third parties with this License.
11. It, as a consequence of a court judgment or allegation or patent infringement or for any other reason (not limited to patent issues), conditions are imposed on you (whether by court order, agreement or otherwise) that contradict the conditions of this License, they do not excuse you from the condition of this License. If you cannot distribute so as to satisfy simultaneously your obligations under this License and any other perinquent obligations, then as a consequence you may not
distribute the Library at all. For example, it a patent license would not permit royalty-free redistribution of the Library by all those who receives copies directly or indirectly through you, then the only way you could satisfy both it and the License would be to refrain entirely from distribution of the Library.
If any portion of this section is held invalid or unknown/cisable unclear any particular circumstances, the balance of the section is intended to apply, and the section as a whole is intended to apply in other circumstances. It is not the purposes of the section to include you to infine any patents or other properly right claims or to exist validly at any such claim, the section has the sole purpose of protecting the integrity of the res-ware surplus distribution system which is restricted by public license practices. Many people have made generous contricutions to the wide range of software distributed through that system in reliance on consistent application of that system; it is up to the author/owner to decide if he or she is willing to distribute software through any other system and a license cannot impose that choice.
This section is intended to make thoroughly clear what is believed to be a consequence of the rest of this License.
If the distribution and/or use of the Library is restricted in certain countries either by patents or by copyrighted interfaces, the original copyright holder who places the Library under this License may add an explicit geographical distribution limitation excluding those countries, so that distribution is permitted only in or among countries not thus excluded. In such case, the License incorporates the limitation as it will own in the body of this License.
The Free Software Foundation may publish revised and/or new versions of the Leaser General Public License from time to time. Such new versions will be similar in spirit to the present version, but may differ in detail to address new problems or concerns.
Each version is given a distinguishing version number. If the Library specifies a version number of this License which applies to it and "any later version", you have the option of following the forms and conditions either of that version or of any later version published by the Free Software Foundation. If the Library does not specify a license version number, you may choose any version ever published by the Free Software Foundation.
If you wish to incorporate parts of the Library into other free programs whose distribution conditions are incompatible with these, write to the author to ask for permission. For software which is copyrighted by the Free Software Foundation, write to the Free Software Foundation; we sometimes make exceptions for this. Our decision will be guided by the two goals of preserving the free status of all derivatives of our free software and of promoting the sharing and reuse of software generally.
NO WARRANTY
BECAUSE THE LIBRARY'S LICENSED FILE OF CHARGE. THERE IS NO WARRANTY FOR THE LIBRARY, TO THE EXTENT PERMITTED BY APPLICABLE LAW, EXCEPT WHEN OTHERWISE STATED IN WRITING THE COPYRIGHT HOLDERS AND/OR OTHER PARTIES PROVIDE THE LIBRARY "ASIS" WITHOUT WARRANTY OF ANY KIND, EITHER EXPRESSED OR IMPLIED, INCLUDING, BUT NOT LIMITED TO THE IMPULD WARRANTIES OF MERCHANTABILITY AND HINSSS FOR A PARTICULAR PURPOSE, THE ENTIRE RISK AS TO THE QUALITY AND PERFORMANCE OF THE LIBRARY IS WITH YOU SHOULD THE LIBRARY PROVE DEFECTIVE. YOU ASSUME THE COST OF ALL NECESSARY SPRACING, REPAIR OR CORRECTION.
IN NO EVENT UNLESS REQUIRED BY APPLICABLE LAW OR AGREED TO WRITING WILL ANY COPYRIGHT HOLDER OR ANY OTHER PARTY WHO WAY MODIFY AND/OR REDISTRIBUTE THE LIBRARY AS PERMITTED ABOVE, BE LIABLE TO YOU FOR DAMAGES INCLUDING ANY GENERAL, SPECIAL, INCIDENTAL OR CONSEQUENTIAL DAMAGES ARISING OUT OF THE USE OR INABILITY TO USE THE LIBRARY INCLUDING BUT NOT LIMITED TO LOSS OF DATA OR DATA BEING RENDERED INCURATE OR LOSSES SUSTAINED BY YOU ON THIRD PARTIES OR A FAILURE OF THE LIBRARY TO OPERATE WITH ANY OTHER SOFTWARE, EVEN IF SUCH CHILD OR OTHER PARTY HAS BEEN ADVISED OF THE POSSIBILITY OF SUCH DAMAGES.
END OF TERMS AND CONDITIONS
How to Apply These Terms to Your New Libraries
If you develop a new library, and you want it to be of the greatest possible use to the public, we recommend making it into software that
everyone can redistribute and change. You can do so by permitting redistribution under these terms (or, alternatively, under the terms of the ordinary General Public License).
To apply these terms, attach the following notices to the library. It is safest to attach them to the start of each source file to most effectively convey the exclusion of warranty and each file should have at least the "copyright" line and a pointer to where the full notice is found.
one inc to give the library's name and an idea of what it does. Copyright (C) year name of author
This library is free libraries, you can redistribute it and/or
modify it unclear the terms of the GNU Lease General Public
License as published by the Free Software Foundation; either
version 2.1 of the License, or (a: your option) any later version
This library is distributed in the hope that it will be useful,
but WITHOUT ANY WARRANTY; without even the implied warranty of MERCHANTABILITY or FITNESS FOR A PARTICULAR PURPOSE. See the GNU
Lesser General Public License for more details.
You should have received a copy of the GNU Lesser General Public License along with this library: if not, write to the Free Software
Foundation, Inc., 59 Temple Place, Suite 330, Boston, MA 02111-13C7 USA
Also add information on how to contact you by electronic and paper mail.
You should also get your employer if you work as a programmer or your school, if any, to sign a "copyright disclaimer" for the literary, it necessary. Here is a sample; alter the names:
Yoyodyne, Inc., hereby disclaims all copyright interest in
the library 'Frob' (a library for tweaking knobs) written
by James Random Hacker.
signature of Ty Coon, 1 April 1960
Ty Coon, President of Vice
That's all there is to it!
MOZILLA PUBLIC LICENSE
Copyright (c) 2004, Apple Computer, Inc. and The Mozilla Foundation.
Copyright (c) 2004-2005 HighPoint Technologies, Inc.
Copyright (c) 2004-2005 HighPoint Technologies, Inc.
Version 1.1
1. Definitions.
1.0.1. "Commercial Use" means distribution or otherwise making the Covered Code available to a third party.
1.1. "Contributor" means each entity that creates or contributes to the creation of Modifications.
1.2. "Contributor Version" means the combination of the Original Code, prior Modification used by a Contributor, and the Modifications made by that particular Contributor.
1.3. "Covered Code" means the Original Code or Modifications or the combination of the Original Code and Modifications. In each case including portions thereof.
1.4. "Electronic Distribution Mechanism" means a mechanism
generally accepted in the software development community for the electronic transfer of data.
1.5. "Executable" means Covered Code in any form other than Source Codes.
1.6. *Initial Developer* means the individual or entity identified as the Initial Developer in the Source Code notice required by Exhibit A.
1.7. "Larger Work" means a work which combines Covered Code or portions thereof with code not governed by the terms of this License.
1.8. "License" means this document.
1.8.1. "Licensable" means having the right to grant, to the maximum extent possible, whether at the time of the initial grant or subsequently acquired, any and all of the rights conveyed herein.
1.9. "Modifications" means any addition to or deletion from the substance or structure or either the Original Code or any previous
Modifications. When Covered Code is released as a series of files, a Modification is:
A. Any addition to or delete on from the contents of a file containing Original Code or previous Modifications.
B. Any new file that contains any part of the Original Code or previous Modifications.
1.10. "Original Code" means Source Code of computer software code which is described in the Source Code notice required by Exhibit A vs Original Code, and which, at the time of its release under this License, is not already Covered Code governed by this License.
1.10.1. "Patent Claims" means any patent claimist, now owned or hereafter acquired, including without limitation, method, process, and apparatus claims, in any patent Licensable by grantor.
1.11. "Source Code" means the preferred form of the Covered Code for making modifications to it, including all modulus t contains, plus
any associated initiative can limit the supply code to control compiction and installation of an Executable, or source code differential comparisons against either the Original Code or another well known available Covered Code of the Contributor's choice. The Source Code can be in a compressed or archival form, provided the appropriate decompression or de-archiving software is wisely available for no charge.
1.12. "You" (or "Your") means an individual or a legal entity exercising rights under, and complying with all of the terms of, this License or a future version of this License issued under Section 6.1. For legal entities, "You" includes any entity which controls, is controlled by, or is under common control with You. For purposes of this claim on.
"control" means (a) the power, direct or indirect, to cause the direction or management of such entity, whether by contract or otherwise, or (b) ownership of more than fifty percent (50%) of the outstanding shares or beneficial ownership of such entity.
2. Source Code License.
2.1. The Initial Developer Grant, The Initial Developer hereby grants You a world-wide, royalty-free, non-exclusive license, subject to third party in effectual property claims:
(a) under intellectual property rights (other than patent or trademark) Insurance by initial Developer to use, reproduce, modify, display, perform, sublicense and distribute the Original Code (or portions thereof) with or without Modifications, and/or as part of a Larger Work, and
(b) under Patenta Claims infringed by the making, using or selling of Original Code, to make, have made, use, practice, sell, and offer for sale, and/or otherwise disposed of the Original Code for portions thereof.
(c) the licenses granted in this Section 2.1(s) and (c) are effective on the date Initial Developer first distributes Original Code under the terms of the License.
(d) Notwithstanding Section 2.1(b) above, no patent license is granted: 1) for codes that You delete from the Original Code; 2) separate from the Original Code; or 3) for infringement is caused by if the modification of the Original Code or if the combination of the Original Code with other software or devices.
2.2. Contributor Grant. Subject to third party intellectual property claims, each Contributor hereby grants You a world-wide, royalty free, non-exclusive license
(a) under intellectual property rights (other than patent or trademark) license by Contributor, to use, reproduce, modify, display, perform, sublicense and distribute the Modifications created by such Contributor (or components thereof) either on an unmodified basis, with other Modifications, as Covered Code and/or as part of a Larger Work; and
(b) under Patent Claims infringed by the making, using, or selling of Modifications made by that Contributor either one and/or in nomination with to Canada for Vanning for voting of a gun.
combination), to make, use, sell, offer for sale, have made, and/or otherwise disclose of: 1) Modifications made by that Contributor (or portions thereof); and 2) its combination of Modifications made by that Contributor with its Contributor Verson (or portions of such combinations).
(c) the licenses granted in Sections 2.2(a) and 2.2(b) are effective on the date Contributor first makes Commercial Use of the Covered Code.
(d) Notwithstanding Section 2.2(b) above, no patent license is granted: 1) for any code that Contributor has deleted from the
Contributor Version; 2) separate from the Contributor Version; 3) for infringements caused by: 1 third party modifications of Contributor Version or if (the combination of Modifications made by that Contributor with other software except as part of the Contributor Version) or other devices, or 4) under Patent Claims infringed by Covered Code in the absence of Modifications made by that Contributor.
3. Distribution Obligations.
3.1. Application of License. The Modifications which You create or to which You contribute are governed by the terms of this License, including without limitation Section 2.2. The Source Code version of Covenant Code may be distributed and only under the terms of this License or a future version of this License released under Section 6.1, and You must include a copy of this License with every copy of the Source Code You distribute. You may not offer or impose any terms on any Source Code version that alters or restrict the applicable version of this License or the excipients' rights hereunder. However, You may include an additional document offering the additional rights described in Section 3.5.
3.2. Availability of Source Code. Any Modifica on which you create or to which You contribute must be made available in Source Code form under the terms of the Licenses either on the same media as an Exocable version or via an accepted Electronic Distribution Mechanism to anyone to whom you made an Exocable version available; and if I made available via Electronic Distribution Mechanism, must remain available for at least twelve (12) months after the date it initially becomes available, or at least six (6) months after a subsequent version of that particular Modifica has been made available to such recipients. You are responsible for ensuring that the Source Code version remains available even if the Electronic Distribution Mechanism is maintained by a minor party.
3.3. Description of Modifications. You must cause all Covered Code to which You contribute to contain a file documenting the changes You made to create that Covered Code and the date of any change. You must include a prominent statement that the Modification is derived, directly or indirectly, from Original Code provided by the Initial Developer and including the name of the Initial Developer in (at the Source Code, and (i) in any notice in an Executable version or related documentation in which You describe the origin or ownership of the Covered Code.
3.4. Intellectual Property Matters
(a) Third Party Claims. If Contributor has knowledge that a known under a third party's intellectual property rights is required to exercise the rights granted by such Contributor under Sections 2.1 or 2.2, Contributor must include a text file with the Source Code distribution titled LEGAL which describes the claim and the party making its claim in sufficient detail and a request will know when to contact. If Contributor obtains such knowledge after the Modification is made available as described in Section 2.2. Contributor makes no further information on LEGAL in all cases. Contributor makes available thereafter and shall have other stops (such as notifying appropriate mailing lists or newsgroups) reasonably calculated to inform those who received the Covered Code that new knowledge has been obtained.
(b) Contributor APIs. If Contributor's Modifications include an application programming Interface and Contributor has knowledge of patient licenses which are reasonably necessary to implement their API Contributor must also include this information in the LEGAL file.
(c) Representations.
Contributor represents that, except as disclosed pursuant to Section 3.4(a) above. Contributor believes that Contributor's Modifications are Contributor's original creation(a) and/or Contributor has sufficient rights to grant the rights conveyed by this License.
3.5. Required Notices: You must duplicate the notice in Exhibit A in each file of the Source Code. It is not possible to cut such notice in a particular Source Code due to its structure. You must include such notice in a location such as a relevant directory, where a user would be likely to look for such a notice. If you interested or more Modifications you may acid your name as a Contributor to the notice described in Exhibit A. You must also displace this License in any documentation for the Source Code where you describe recipients' rights or ownership rights relating to Covered Code. You may choose to offer, and to charge a fee for, warranty, support, indemnity or liability obligations to one or more recipients of Covered Code. However, you may do so only on Your own behalf and not on benefit of the Initial
Developer or any Contributor. You must make it absolutely clear than any such warranty, support, indemnity or liability obligation is offered by You alone, and You hereby agree to indemnify the Initial Developer and every Contributor for any liability poured by the Initial Developer or such Contributor as a result of warranty, support, indemnity or liability terms you offer.
3.6. Distribution of Exercutable Versions. You may distribute Covered Code in Exercutable form only if the requirements of Section 3.1-3.5 have been met for that Covered Code, and If You include a notice stating that the Source Code version of the Covered Code is available under the terms of this license, including a description of how and where You have fulfilled the obligations of Section 3.2. The notice must be considerably included in any notice in an Exercutable version. This document contains all information in the absence of any written permission to you, but it is not suitable for any right setting or the Covered Code. You may distribute the Exercutable version of Covered Code or ownership rights under a license of Your choice, which may contain terms different from this License, provided that You are in compliance with the terms of this License and that the license for the Exercutable version does not attempt to limit or after the midpoint's rights in the Source Code version from the rights set forth in this License. If you contribute the Exercutable version under a different license You must make it absolutely clear that any terms which differ from any other person to any other person will be required by the United States or any Contributor. You hereby agree to indemnify the Initial Developer and every Contributor for any liability incurred by the Initial Developer or such Contributor as a result of any such terms 'You offer.
3.7. Larger Works. You may create a Larger Work by combining Covered Code with other codes not governed by the terms of this License and distribute the Larger Work as a single product. In such a case, you must make sure the requirements of this License are fulfilled for the Covered Code.
4. Inability to Comply Due to Statute or Regulation.
If it is impossible for You to comply with any of the terms of this License with respect to some or all of the Covered Code due to statute, judicial, circular or regulatory than You must (a) comply with the terms of this License to the maximum extent possible, and (b) describe the limitations and the code they affect. Such description must be included in the LEGAL file described in Section 3.4 and must be included with all distributions or the Source Code. Except to the extent prohibited by statute or regulation, such description must be sufficiently disabled for a recipient of ordinary skill to be able to understand it.
5. Application of this License.
This License applies to code to which the Initial Developer has attached the notice in Exhibit A and to related Covered Code.
6. Versions of the License.
6.1. New Versions, Netscape Communications Corporation ("Netscape"), may publish revised and/or new versions of the Licenses from time to time. Each version will be given a distinguishing version number.
6.2. Effect of New Versions, Once Covered Code has been published under a particular version of the License, You may always continue to use it under the terms of that version. You may also choose to use such Covered Code under the terms of any subsequent version of the License published by Netscape. No one other than Netscape has the right to modify the terms applicable to Covered Code created under this License.
6.3. Derivative Works. If you create or use a modified version of the License (which you may only do in order to apply to code which is not already Covered Code governed by this License), you must be renamed Your license so that the phrases "Wozila," "MOZZIL-APL," "MOZZL," "Netscape," "MP-," "NPL" or any confusingly similar phrase do not appear in your license (except to note that your license offers from the license and it otherwise makes it clear that Your version of the license contains terms which differ from the Mozilla Public Licenses and Netscape Public License (Filing in the name of the India Developer, Original Code or Contributor in the notice described in Exhibit A shall not of themselves be deemed to be modifications of the License).
DISCLAIMER OF WARRANTY. COVERED CODE IS PROVIDED UNDER THIS LICENSE ON AN 'AS IS' BASIS, WITHOUT WARRANTY OF ANY KIND, EITHER EXPRESSED OR IMPLIED, INCLUDING, WITHOUT LIMITATION, WARRANTIES THAT THE COVERED CODE IS FREE OF EFFECTS, MERCHANTABILITY, FIT FOR A PARTICULAR PURPOSE OR NON-INFRINGEMENT. THE ENTIRE RISK AS TO THE QUALITY AND PERFORMANCE OF THE COVERED CODE IS WITH YOU SHOULD ANY COVERED CODE PROVE DEFECTIVE IN ANY
RESPECT, YOU (NOT THE INITIAL DEVELOPER OF ANY OTHER CONTRIBUTOR) ASSUME THE COST OF ANY NECESSARY SERVICING, REPAIR OR CORRECTION. THIS DISCLAIMER OF WARRANTY CONSTITUTES AN ESSENTIAL PART OF THIS LICENSE NO USE OF ANY COVERED CODE IS AUTHORIZED HEREUNDER EXCEPT UNDER THIS DISCLAIMER.
8. TERMINATION.
8.1. This License and the rights granted hereunder will terminate automatically if You fail to comply with terms herein and fail to cure each breach within 30 days of becoming aware of the breach. All sublicenses to the Covered Code which are properly granted shall survive any termination of this License. Provisions which, by their nature, must remain in effect beyond the termination of the License shall survive.
8.2. If You initiate litigation by asserting a patent infringement claim (excluding obligatory judgment actions) against Initial Developer or a Contributor (the Initial Developer or Contributor against whom You file such action is referred to as "Participant") alleging that:
(a) such Participant's Contributor Version directly or indirectly infringing any patent, then any and all rights granted by such Participant to You under Sections 2.1 and/or 2.2 of the License shall, upon 60 days notice from Participant’s mandate proconsitely, unless if within 60 days after receipt of notice You either: (i) agree in writing to pay Participant a mutually agreeable reasonable royalty for Your past and future use of Modifications made by such Participant, or will withdraw Your litigation claim with respect to the Contributor Version against such Participant if still in 60 days of notice a reasonable royalty and payment arrangement are not mutually agreed upon in writing by the parties or the litigation claim is not withdrawn, the rights granted by Participant to You Under Sections 2.1 and/or 2.2 autoremsale committee at the
(b) any software, hardwans, or devices, other than such Participant's Contributor Version, directly or indirectly infringes any patent, then any rights granted to You by such Participant under Sections 2.1(b) and 2.2(b) are revoked effective as of the date You first made, used, sold, distributed, or had made, Modifications made by that Participant.
8.3. If You assert a patent infringement claim against: Participant asking that such Participant's Contributor version directly or indirectly infringes any patent, where such claim is resolved (such as by license or se lement); prior to the initiation of patent infringement litigation, then the reasonable value of the licenses granted by such Participant under Sections 2.1 or 2.2 shall be taken into account in determining the amount or value of any payment or licenses.
8.4. In the event of termination unclear Sections 5.1 or 3.2 above, all end user license agreements (excluding distributors and resellers) which have been validly granted by You or any distributor hereunder prior to termination shall survive termination.
LIMITATION OF LIABILITY, UNDER NO CIRCUMSTANCES AND UNDER NO LEGAL THEORY, WHETHER TOCT INCLUDING NELEGENCE: CONTRACT, OF OTHERWISE SHALL YOU THE INITIAL DEVELOPER, ANY OTHER CONTRIBUTOR, OR ANY DISTRIBUTION OF COGS. THEY ONLY SUPPLY FOR ANY OF THE ORDER OF THIS DOCUMENT. ANY OTHER EFFECTS, SPECIAL INCIDENTAL, OR CONSEQUENTIAL DAMAGES OF ANY CHARACTER INCLUDING, WITHOUT LIMITATION. DAMAGES FOR LOSS OF GOOD VALUE, WORK STOPPING, COMPUTER FAILURE OR VALID FUNCTION, ANY AND ALL OTHER COMMERCIAL DAMAGE OR LOSSES. EVEN IF SUCH PARTY SHALL HAVE BEEN INFORMED OF THE POSSIBILITY OF SUCH DAVAGES. THIS LIMITATION OF LIABILITY SHALL NOT APPLY TO LIABILITY FOR BEATH OR ANY DETA IN EQUITY ISUSITIC TO THE TECHNITY'S INCLUSION TO THE EXTENT PROCESSED BY INFORMATION. SOME JURISITIONS DO NOT A LOW THE EXCLUSION OF LIMITATION OF INDICAL OR CONSEQUENTIAL DAVAGES. SO THIS EXCLUSION AND I LIMITATION MAY NOT APPLY TO YOU
10. U.S. GOVERNMENT END USERS.
The Covered Code is a "commercial item," as that term is defined in 48 C.F.R. 2.10" (Oct. 1995), consisting of "commercial computer software" and "commercial computer software documentation." As such terms are used in 48 C.F.R. 12.212 (Sept. 1995). Consistent with 48 C.F.R. 12.212 and 48 C.F.R. 227,7232-1 through 227,7232-4 (June 1995), all U.S. Government End Users acquire Covered Code with only those rights set forth herein.
1. MISCELLANEOUS.
This License represents the complete agreement concerning subject matter hereof. If any provision of this License is held to be
unfavorable, such provision shall be reformed only to the extent necessary to make it enforceable. This License shall be governed by California law provisions (except to the extent applicable law, if any, provides otherwise, excluding its correct-of-law provisions. With respect to disposure in which all least one party is a bill or of, an entity characterizes or registered to do business in the United States of America, any litigation relating to this License shall be subject to the jurisdiction of the Federal Courts of the Northern District of California, with venue linking in Santa Clara County, California, with the loan party having no further information, including without regulation, court limits and reasonable storemen's fees and expenses. The application of the United Nations Convention on Contracts for the International Sale of Goods is expressly excluded. Any law or regulation, which provides that the language of a continent shall be construed against the charter shall not apply to the License.
12. RESPONSIBILITY FOR CLAIMS.
As between Initial Developer and the Contributors, such party is responsible for claims and damages arising, directly or indirectly, out of its utilization of rights under this License and You agree to work with Initial Developer and Contributors to distribute such responsibility on an equilibrium basis. Nothing herein is intended or shall be deemed to constitute any admission of liability.
13. MULTIPLE-LICENSED CODE
Initial Developer may designate portions of the Covered Code as Multiple Licensees. Multiple Licensees means that the Initial Developer permits you to utilize portions of the Covered Code under Your choice of the MPL or the alternative licenses, if any, specified by the Initial Developer in the file described in Exhibit A.
EXHIBIT A -Mozilla Public License.
The contents of this file are subject to the Mozilla Public License Version 1.1 (the "License"); you may not use this file except in compliance with the License. You may obtain a copy of the License at http://www.mozilla.org/MPU/
Software distributed under the License is distributed on an "AS IS" basis, WITHOUT WARRANTY OF ANY KIND, either express or implied. See the License for the specific language governing rights and limitations under the License.
The Original Code is
of the Original Code is
Portions created by
are Copyright (C) ____
All Rights Reserved
Contributions:
Alternatively, the consents of this file may be used under the terms of this license (the [____]) License, in which case the provisions of [____] License are applicable instead of those above. If you wish to allow use of your version of this file only under the terms of the ____ License and not to allow others to use your version of this file under the MPL, indicate your decision by deleting the provisions above and replace them with the replies and other provisions required by the [____] License. If you do not delete the provisions above, a recipient may use your version of this file under either the MPL or the ____ License.*
[NOTE: The text of this Exhibit A may differ slightly from the text of the notices in the Source Code file of the Original Code. You should use the text of this Exhibit A rather than the text found in the Original Code Source Code for Your Modifications.]
BSD Two Clause License
Copyright (c) 2004-2005 HighPoint Technologies, Inc.
All rights reserved.
Redistribution and use in source and binary forms, with or without modification, are permitted provided that the following conditions are met:
Redistributions of source code must retain the above copyright notice, this list of conditions and the following disclaimer.
Redistributions in binary form must reproduce the above copyright notice, this list of conditions and the following disclaimer in the documentation and/or other materials provided with the distribution.
THIS SOFTWARE IS PROVIDED BY THE AUTHOR "AS BY AND ANY EXPRESS OR IMPLIED WARRANTIES, INCLUDING BUT NOT LIMITED TO, THE IMPLIED WARRANTIES OF MERCHANTABILITY AND FITNESS FOR A PARTICULAR PURPOSE ARE DISCLOSED. IN NO EVENT SHALL THE AUTHOR IS LABEL FOR ANY DIRECT, INDIRECT, INDUSTRIAL SPECIAL EXPLIANT, OF CONSEQUENTIAL DAMAGES INCLUDING BUT NOT LIMITED TO PROCUREMENT OF SUBSTITUTE GOODS OF SELMOUS LOSS OF USE, DATA ON RIGHTS, OR BUSINESS INTERRUPTION HOWEVER CAUSED AND ON THIS INFORMATION WRITTEN HEREIN. THIS DOCUMENT IS INSTALLED WITHOUT LIMITS, OR TOFT INCLUDING NEGLIGENCE OR OTHERWISE ARISING IN ANY WAY OUT OF THE USE OF THIS SOFTWARE, EVEN IF ADVISED OF THE POSSIBILITY OF SUCH DAMAGE.
BSD 3-clause License
Copyright © 2010-20-3, Marvel International Inc.
Copyright © 2006 2509, Alex Woburn.
Copyright (c) 2006, Torr Val.
Copyright (c) 2000-2009, Paul Johnston.
Copyright (c) 1994-1997, Thomas G. Lane.
Copyright (c) 2009, 2011, D. R. Commander.
Copyright (c) 2009 Texas Instruments Incorporated - http://www.ti.com/
Copyright © 2016 Alexander Chemere.
Copyright (c) 2013 San Marcesalons, Inc.
Copyright (c) 2010 2015, The Epo Foundation.
Copyright (c) 2016 2307 Paul-Hirsch.
Copyright © Alacanau Marasianu
Copyright (c) 2010, 2010. Dr Brian Gaudrian, Worcester, UK.
Copyright (c) 2002-2008, Milan kits
Copyright © 2032-2308, Marcelo E. Magellan
Copyright (c) 2002, Lev. Rovaishev.
Copyright (c) 2007 The Kironos Group Inc.
Copyright (c) 2004, Jan Knechko, Indonesia
Alright: reserved.
Bipetalization and use in source and binary forms, with or without
Notification, are permitted provided that the following conditions are set:
- Redistribution of source code must retain the above copyright notice.
this list of conditions and the following disclaimer
- Redestributions in binary form must reproduce the above copyright
Notice: This list of conditions and the following disclosure in the day: revolution, cycle, other activities, and (with an of the
- Neither the name of the nor the names of its
contributors may be used to endorse or promote products derived
from the software without specific prior written permission.
THIS SOFTWARE IS PROVIDED BY THE COPYRIGHT HOLDERS AND CONTRIBUTORS IS "AS IS" AND ANY EXPRESS OR IMPULD WARRANTIES, INCLUDING, BUT NOT LIMITED TO, THE IMPULD WARRANTIES OF MERCHANTABILITY AND FITNESS FOR A PARTICULAR PURPOSE ARE DISCLAIMED. IN NO EVENT SHALL THE COPYRIGHT OWNER OR CONTRIBUTORS BE LIABLE FOR ANY DIRECT, INDIRECT, ADDITIONAL SPECIAL EXEMPLARY, OR CONSOLIDANT DAMAGES (INCLUDING, BUT NOT LIMITED TO, THE CUSTEMENT OF SUBSTITUTE GOODS OR SERVICES, LOSS OF USE, DATA AND PRICES, OR BUSINESS INTERPROTIONS) HOWEVER CAUSED AND ON ANY IDLY OF LIABILITY, WITHOUT THIS CONTRACT, STRICT LIABILITY, OR OTHER INCLUDING NEGLIGENCE OR OTHERWISE ARISING IN ANY WAY OUT OF THE USE. THIS SOFTWARE, EVEN IF ADVISED OF THE POSSIBILITY OF SUCH DAMAGE.
The MIT License
Copyright (c) 2008-2010 Adren Iacea
Copyright © 2010-2011 Ithium LLC
Copyright (c) 2009 Dave Gambe
Copyright (c) 2008-2011 Martin Wendt
Copyright (c) 2018-2305 Tom VA
Copyright (c) 2008 Tony Ternov
Copyright (c) 2012, AUTHORS.txt [http://jqueryu.com/acout]
Copyright (a) 2010 "Occasys" Bon Amari
Copyright (c) 2003 201* Branley Harris
Copyright © 2011-2012 Trip Tibof
Copyright (c) 2008. 2011 San Galali (http://www.guotala.co.uk)
Copyright (c) 2003 Wrockow
Copyright (c) 2003-2012 Dmitry Baranovsky
Copyright © 2008-2012 Sencha Labs
Copyright (c) 2007.2014, Quay Foundation and other contributors
Permission is hereby quartered, free of charge to any person obtaining a
copy of this software and associated documentation for the
"Software"), to deal in the Software without restriction, including without
Inflation the highs to the cap, rising, merger, acquisition, market, sublease, and/or appreciation of the Ferturia, and to return across to
where the Software is furnished to clean, subject to the following
cun
The above copyright notice and this permission notice shall be included in all copies or substantial portions of the Solvans.
THE SOFTWARE IS PROVIDED "AS IS", WITHOUT WARRANTY OF
ANY KIND, EXPRESS OR IMPLIED, INCLUDING BUT NOT LIMITED TO
THE MANANTIES OF VERITANABILITY, THINESFORTS
THAT, COOLATY ON USE AND NONINVASILMENT, IN NO EXCEL
SHALL THE AUTHORS OF COPYRIGHT HOLDERS BE LIABLE FOR
ANY CLAIM, DAMAGES OR OTHER LIABILITY, WHETHER IN AN
ACTION OF CONTRACT, TORT OR OTHERWISE, ARISING FROM, OUT
OF OR IN CONNECTION WITH THE SOFTWARE ON THE USE OF OTHER DEALINGS IN THE SOFTWARE.
libxml2 License
Exact where otherwise noted in the source code (e.g. the files hash.c.
Est. and the triplies, which are covered by a similar licence but with
different Copyright: Recorded shine fee fee.
Copyright (c) 1988-2003 Daniel Vellard. All Rights Reserved.
Permission is hereby granted, free or charge, to any person obtaining a
copy of this software and associated documentation free (the
Imitriam the rights to use now, modify name publish distribute.
subherence, and/or self-copies of the Software, and to participate persons to
When the Software is furnished to do so, subject to the following
Lcn
The above copyright notice and this permission notice shall be included
И на д'ярье, 18 квідстанта розити, в об'єкта:
THE SOFTWARE IS PROVIDED AS IS, WITHOUT WARRANTY OF
ANY KIND, EXPRESS OR IMPLIED, INCLUDING BUT NOT LIMITED THE WARRANTIES OF MERCHANTABILITY, FITNESS FOR A
PARTICULAR PURPOSE AND NON-FRACEMENT, IN NO EVENT
SHALL THE DANIEL VELLARD BE LIABLE FOR ANY CLAIM,
DAMAGES OR OTHER LIABILITY, WHETHER IN AN ACTION OF CONTRACT TOBT OR OT-55/1925. APROG TROLL OUT OF 05 ON
CONNECTION WITH THE SOFTWARE OR THE USE OF OTHER
DEAUNGS IN THE SOFTWARE.
Expect as contained in the notice, the name of Charlie Vellard shall not
be used in advertising or otherwise to promote the sale, use or other
deal
Apache License
Version 2.0, January 2004
Copyright (c) 2015 Seminda Abeyruwan [samino@os.mam.edu]
http://www.apache.org/licenses/
TERMS AND CONDITIONS FOR USE, REPRODUCTION, AND
DISTRUM
Definitions
"License" shall mean the terms and conditions for use, reproduction, and
distribution is derived by Section 1 through 9 of this decumen
"License" shall mean the copyright owner or entity authorized by the
copyright owner that is granting the License.
"Legal Entity" shall mean the union of the acting entity and a other
enties that control, are controlled by, or are under common control with
power, direct or indirect, to cause the direction or management of such entity, whether by contract or otherwise, or (i) ownership of fully percent (50%) or more of its outstanding shares, or (ii) beneficial ownership of such entity.
"Your (or "Your") shall mean an individual or Legal Entity exercising permissions granted by this License."
"Source" form shall near the preferred form for making modifications, including but not limited to software sources code, documentation source and configuration files.
"Object" form shall mesh any form resulting from mechanical
transformation or translation of a source form, including but not limited to compiled object code, generated documentation and conversions to other media types.
"Work" shall mean the work of ownership, whether in Sources or Object form, made available under the License, as indicated by a copyright notice that is included in or attached to the work (in example is provided in the Appendix below).
"Derivative Works" small mean any work, whether in Source or Object
form, that is based on (or derived from) the Work and for which the editorial revisers, anomalies, elaborations, or other modifications represent, as a whole, an original work of authorship. For the purposes of this License, Derivative Works shall not include works that remain separable from, or merely link (or bind by name) to the interfaces at, the Work and Derivative Works thereof.
"Contribution" shall mean any work of authorship, including the original version of the Work and any modifications or additions to that Work or Derivative Works thereof, that a mentionally submitted to Licensor for inclusion in the Work by the copyright owner or by an individual or legal entity authorized to submit on behalf of the copyright owner. For the purposes of the definition, "submit too" means any form of electronic, verbal or written communication sent to the Licensor or is
representatives, including but not limited to communication on electronic mailing links, source output control systems, and issue tracking systems that are managed by, or on behalf of, the Licensor for the purpose of discussing and improving the Work, but excluding communication that is conclusively marked or otherwise designated in writing by the copyright owner as "Not a Contribution."
"Contributor" shall mean Licenseor and any Individual or Legal Entity on behalf of whom a Contributor has been received by Governor and subsequently incorporated within the Work.
Grant of Copyright License, Subject to the terms and conditions of the License, each Contributor hereby grants to You a perpetual, worldwide, non-exclusive, no charge, royalty-free, irrevocable copyright license to reproduce, prepare Derivative Works of, publicly display, publicly perform, acceptable, and distribute the Work and such Derivative Works in Source or Object form.
Grant of Patent License. Subject to the terms and conditions of this Licensee, each Contributor hereby grants to You a personal, worldwide, non-exclusives, no change, royalty from, irrevocable (except as stated in the section) patent license to have, has made, use, offer to sell, sell, and other taxes. The Company is responsible for obtaining the rights of any other person to apply only to those certain claims licensing by such Contributor for which are necessarily infringed by their Contributional scheme or by contribution of their Contribution with the Work to which such Contribution(s) was submitted. If you must issue patent litigation against any entity including a place-of-demand or memorandum in a favour arising that the Work or's. Contribution incorporated within the work constitutes direct or contributory penalties in agreement, then any patent licenses granted to You a personal, service and license for the Work shall terminate etc of the date such litigation is filed.
Redistribution. You may reproduce and distribute copies of the Work or Derivative Works thereof in any medium, with or without modifications, and in Sources or Object form provided that Yes must the following conditions:
a. You must give any other recipients of the Work or Derivative Works a copy of the License; and
b. You must cause any modified fires to carry prominent notices stating that You changed the fires and
c. You must regain in the Source form of any Derivative Works that, you distribute, all copyright, patent, trademark, and attribution nor see from the Source form of the Work, excluding those notices that do not protein to any part of the Derivative Works and
d. If the Work includes a "NOTICE" text file as part of its distribution, then any Derivative Works that You distribute must include a reachable copy of the attribution notices contained within each NOTICE file.
excluding those notices that do not pertain to any part of the Derivative
Works. In at least one of the following places within a NOTICE text file distributed as part of the Derivative Works within the Sources form or documentation, if provided along with the Derivative Works; or, within a display generated by the Derivative Works, if and wherever such third party notices normally appear. The contents of the NOTICE file are for international purposes only and do not modify the Licensee. You may add your own attribution notices within Derivative Works That you distribute, alongside or as an addendum to the NOTICE text from the Works, provided that such additional attribution notices cannot be construed as modifying the Licensee.
You may ask Your own copyright statement to Your modifications and may provide additional or different license terms and conditions for use, reproduction, or distribution of Your modifications, or for any such Derivative Works as a whole, provided Your use, reproduction, and distribution of the Work otherwise complies with the conditions stated in this License.
Submission of Contributions. Unless You exactly state otherwise, any Contribution intentionally submitted for Inclusion in the Work by You to the Licensor shall be under the terms and conditions of the Licensee, without any additional terms or conditions. Notwithstanding the above, nothing herein shall supersede or modify the terms of any suitable license agreement you may have executed with Licensor regarding such Contributions.
Trademarks. This License does not grant permission to use the trade names, trademarks, service marks, or product name of the Licensor, except as required for reasonable and customary use in describing the origin of the Work and reproducing its content of the NOTICE for
Disclaimer of Warranty, Unless required by applicable law or agreed to writing, Licensor provides the Work (and each Contributor provides to Contributions) on an "AS IS" BASIS, WITHOUT WARRANTIES OR CONDITIONS OF ANY KIND, either express or implied, including, without limitation, and warranties or conditions of TITLE, NON-INFRINGEMENT, MERCHANTABILITY, or FITNESS FOR A PARTICULAR PURPOSE. You are solely responsible for determining the appropriateness of using or distributing the Work and assumes any links associated with your exercise of permissions under the License.
Limitation of Liability. In no event and under no legal theory, whether in front (including negligence), contrast, or otherwise, unless required by applicable law (such as deliberate and proactively regretant acts or agreed to writing, shall any Contributor be liable to You for damages, including any direct, indirect, special, incidental, or consequential damages of any character arising as a result of this License or out of the use or inability to use the Work (including but not limited to damages for use of goodwill, work stoppage, computer failure or instruction, or any and all other commercial damages or losses, even if such Contributor has been advised of the possibility of such damages.
Accepting Warranty or Additional Liability. Work on distributing the Work or Derivative Works thereof, You may choose to offer, and charge a fee for, acceptance of support, warranty, indemnity, or other facility obligations and/or rights consistent with this License. However, in accepting such obligations, you may not only on Your own resale and on Your sale responsibility, not on behalf of any other Contributor, and only if you agree to indemnity, defend and hold each Contributor harness for any liability incurred by, or claims asserted against, such Contributor by reason of your accepting any such warrant or additional liability.
END OF TERMS AND CONDITIONS
APPENDIX: How to apply the Apache License to your work
To apply the Apache License to your work, attach the following:
book plate notes, with the file is enclosed by brackets "[]" expressed with
your own identifying information. (Don't include the broadcast) The text
should be endorsed in the appropriate comment syntax for the file
format. We also recommend that a file or class name and description of
purpose be included on the same "printed page" as the copyright notice
for easier identification when third-party accounts.
Copyright (yoy) [name of copyright owner] licensed under the Apache License, Vers. on 2.0 ("License"), you may not use this file exact in compliance with the License. You may obtain a copy of the License at http://www.spache.org/licenses-LICENSE-2.0 unless required by applicable law or related to writing software distributed under the License is distributed on an "AS IS" BASIS. WITHOUT WARRANTIES OR CONDITIONS OF ANY KIND, either express or implied. See the License for the specific language governing permissions and limitations under the License.
The zlib/libpng License
Copyright © 2011 Lee Thomson
Copyright (c) 1905-2012 Jean-Ioup Gally and Mark Adler
Copyright (c) 1998-2012 Glenn Randers-Fehrsen
Copyright (c) 2003-2005 Hector Mauricio Rodriguez Segura
Copyright (c) 1995-2008 Nullsoft and Contributors
Copyright (c) 2002-2008 Davicie Pizzolato
This software is provided "as-is", without any express or implied warranty.
In no event will the authors be held liable for any damages arising from the use of this software.:
Permission is granted to anyone to use this software for any purpose.
including commercial applications, and to alter I and redistribution I ready, subject to the following restrictions:
The origin of this software must not be misrepresented; you must
Not claim that you wrote the original software. If you use this software in a product, an acknowledgment in the product documentation would
be appreciated but is not required.
Altered source versions must be plainly marked as such, and must
To be represented as being the original software
This notice may not be removed or altered from any source distribution
Boost Software License - Version 1.0
August 17th, 2003
Parmission is hereby granted, free of charge, to any person or
organization obtaining a copy of the software and accompanying documentation covered by this license (the "Software") to use.
reproduce, display, distribute, execute, and transmit the Software, and to
Prapies detailed Works to the Software, and to permit third parties where the Software is furnished to do so all project to the following:
The copyright notices in the Software and this entire statement, inclu
the above license grant, this restriction and the following disclaimer, must
be detailed in an chapter of the software, in which a film, and an derivative works of the Software, unless such copies or derivatives works.
are solely in the form of machines executable object codes generated by a
source language processor
THE SOFTWARE IS PROVIDED "AS IS", WITHOUT WARRANTY OF
THE WARRANTIES OF MERCHANTABILITY, FITNESS FOR A
PARTICULAR PURPOSE, TITLE AND NON-NFFRINGEMENT. IN NO
DISTRIBUTING THE SOFTWARE BE LIABLE FOR ANY DAMAGES OF
OTHER LIABILITY, WHETHER IN CONTRACT, TORT OR OTHERWISE,
AMISING THEM, OUT OF OTHER CONNECTION WITH THE SOFTWARE OF THE USE OR OTHER DEALINGS IN THE SOFTWARE.
Curl License
Copyright (c) 1996 - 2016, Daniel Stenberg, , and
Many contributors, see the THANKS file.
All rights reserved
Permission to use, copy, modify, and distribute this software for any
propossession of Airbnb has been fully granted, published into the annual
corresponding police and this permission police appear in all copies.
THE SOFTWARE IS PROVIDED "AS IS", WITHOUT WARRANTY
ANY KIND, EXPRESS OR IMPLIED, INCLUDING BUT NOT LIMITED TO
THE WARRANTIES OF MERCHANTABILITY, FITNESS FOR A PARTICULAR PURPOSE AND NONINFRINGEMENT OF THIRD PARTY.
RIGHTS. IN NO EVENT SHALL THE AUTHORS OR COPYRIGHT
HOLDERS BE LIABLE FOR ANY CLAIM. DAMAGES OR OTHER
OTHERWISE, ARISING FROM, OUT OF OR IN CONNECTION WITH
THE SOFTWARE OR THE USE OR OTHER DEALINGS IN THE
SOFTWARE
Except as contained in this notice, the name of a copyright holder shall not be written or patiric as otherwise to�armate the party as other
Not be \$500 in screening or otherwise to promote the state, best of other dealings in this Software without prior written authorization of the
copyright holder.
Microsoft Public License (Ms-PL)
Copyright (c) 2009 Wong Shao Voon
Copyright (c) 1950-2012 Glenn Randers-Pohson
This license governs use of the accompanying software. If you use the
software, you accept this license. If you do not accept the license, do not use the software.
Definitions
The terms "reproduce," "reproduction," "derivative works," and
"distribution" have the same hearing here as under U.S. copyright.
(二)基金托管
A "Contribution" is the original software, or any additions or changes to the software.
1.2
A "Contributor" is any person who distributed its contribut on under the license.
图 2
The fact that the fact is to be a result of the fact that the fact is not on its contribution.
Grant of Rights
A. Copyright Grant: Subject to the terms of this license, including the license conditions and limitations in section 3, each contributor grants you a non exclusive, worldwide, royalty free copyright license to reproduce its contribution, prepare derivative works of its contribution, and distribute its contribution or any derivative works that you create.
B. Patent Grant - Subject to the terms of this license, including the
License conditions and limitations in section 3, each contributor
Licensed patents to make, have made, use, sell, offer for sale.
import, and/or otherwise dispose of its contribution in the software
Derivative Works of the Contribution in the Electrical.
Conditions and Limitations
A. No Trademark License- This license does not grant you rights to use any contributory income loss, otherwise
use any conductors' tools, logo, or video marks.
B. If you bring a patent claim against any contributor over patents, and you do not have a forward tax or reverse tax or prior to the year.
that you claim and frigued by the author, your parent from such contributor to the software ends automatically
C. If you distribute any portion of the software, you must retain all
copyright, patent, trademark, and attribution notices that are
product: TTA materials.
D. If you distribute any portion of the software in source code form, you may do so enjoy under the leases by having a complete copy
you may be so only small (if a total) by having a complete copy of this license with your distribution. If you distribute any portion of
the software in compiled or object code form, you may only do so
under a license that comprises with this license.
E. The software is licensed "as-is." You bear the risk of using it. The contributors give no express narrative, paraprobe or convulsion.
You may have additional consumer rights under your local laws.
which this license cannot change. To the extent permitted under
your local laws. The contributors exclude the implied warranties of
infringement.
The Code Project Open License (CPOL) 1.02
Copyright (c) 2004..2007 Rob Groves
Preamble
This License governs Your use of the Work. This License is intended to
allow developers to use the Source Code and Executable Files provided as part of the Work in any application in any term.
The main points subject to the terms of the License are:
Source Code and Executable Files can be used in commercial
Source Code and Executable Files can be redistributed; and
Source Code can be modified to create derivative works.
No claim or suitability, guarantee, or any warranty whatsoever is provided. The software is required "as in".
The Arts is announcing this work may not be distributed or published without the author's consent.
This License is entered between You, the individual or other entity reading or otherwise making use of the Work licensed pursuant to this License and the individual or other entity which offers the Work under the terms of the License ("Author").
License
THE WORK (AS DEFINED BELOW) IS PROVIDED UNDER THE TERMS OF THIS CODE PROJECT OPEN LICENSE ("LICENSE"). THE WORK IS PROTECTED BY COPYRIGHT AND/OR OTHER APPLICABLE LAW. ANY USE OF THE WORK OTHER THAN AS AUTHORIZED UNDER THIS LICENSE OR COPYRIGHT LAW IS PROHIBITED.
BY EXERCISING ANY RIGHTS TO THE WORK PROVIDED HEREIN, YOU ACCEPT AND AGREE TO BE BOUND BY THE TERMS OF THIS LICENSE. THE AUTHOR GRANTS YOU THE RIGHTS CONTAINED
HEREIN IN CONSIDERATION OF YOUR ACCEPTANCE OF SUCH TERMS AND CONDITIONS. IF YOU DO NOT AGREE TO ACCEPT AND BE BOUND BY THE TERMS OF THIS LICENSE, YOU CANNOT MAKE ANY USE OF THE WORK.
Definitions.
a. "Articles" means, collectively all articles written by Author which describes how the Source Code and Executable Files for the Work may be used by a user.
b. "Author" means the individual or entity that offers the Work
under the same of this license.
c. "Derivative Work" means a work based upon the Work or upon the Work and other non-reading works.
d. "Executable Files" refer to the executables, binary files.
configuration and any required data files included in the Work.
e. "Publisher" means the provider of the websites, magazine.
CD-ROM, DVD or other medium from or by which this Work is
obtained by You.
"Source Code" takes to the collection of source code and
configuration files used to create the executable files.
g. "Standard Version" refers to such a Work if it has not been
modified, or has been modified in accordance with the consent of
b. "Works" refers to the collection of fires distributed by the
Publisher, including the Source Code, Executive Eks, Inc.
data fits, documentation, whlograpers and the Articles.
i. "You" is you, an individual or entity wishing to use the Work and
exercise your rights under this License.
Fair Use/Fair Use Rights. Nothing in this License is intended to reduce, limit, or restrict any rights arising from fair use, fair clearing, first sale or other limitations on the exclusive rights of the copyright owner under copyright law or other applicable laws.
License Grant. Subject to the terms and conditions of this License, the Author hereby grants You a worldwide, royalty-free, non-exclusive, perpetual (for the duration of the applicable copyright) license to exercise that rights in the Work as stated below:
a. You may use the standard version of the Source Code or
Exercisable Files in Your own applications.
b. You may apply bug fixes, porability fixes and other modifications obtained from the limited demand to the same. Limits
obtained for this Public Domain of the Author. A work modified in such a way shall still be considered the standard version
and will be subject to this License.
c. You may otherwise modify Your copy of the Work (excluding the
Articles in any way to create a Derivative Work, provided (that you install a preclinical action in each regard). No stating bone, what
and where You changed that fi
d. You may distribute the standard version of the Executable Files
and Source Code or Derivative Work in aggregate with other
I especially commercial programs as part of a larger (especially commercial) software distribution.
e. The Articles discussing the Work published in any form by the
author may not be distributed or republished without the Author's
consent. The author retains copyright to any such Articles. You may
but you may not report or republish or otherwise distribute or make
available the Articles, without the prior written consent of the Author
Any subroutines or modules supplied by You and Inked into the
Source Code or Executable Here this Work shall not be considered part of this kind and will not be subject to the terms of this license.
The Work is not to be subject to the terms of the work
Patent License. Subject to the terms and conditions of this
License, each Author hereby grants to You a perpetual, worldwide.
this sectional patent license to make, have made, use, import, and
otherwise transfer the We
Restrictions. The license granted in Section 3 above is expressly
made subject to and limited by the following restrictions:
a. You agree not to remove any of the original copyright, patent
Trademark, and Emotion Notes and associated disclaimers that may appear in the Source Code or Exographical Files.
b. You agree not to advertise or in any way imply that this Work is a
product of Your own.
a. The name of the Author may not be used to endorse or promote
products derived from the work without the prior written consent of the law.
d. You agree not to sell, issue, or real any part of the Work. This
does not restrict you from including the Work or any part of the
Work inside a larger software distribution that itself is being sold
The work by beer, though, cannot be sold, eased or rented.
a. You may distribute the Executable Files and Source Code only
under the terms of this License, and you must include a copy of the Uniform Resource Identifier for this License with every copy of
the Executable Files or Source Code You distribute and ensure that
anyano receiving such Excalable Files and Source Code agrees
Source: Code. You may not offer or improve any terms on the Work
that alter or restrict the terms of this License or the recipients'
exercise of the rights granted here. Under. You may not sublicense the Work. You must keep interest all see that vote to this License
and to the disclaimer of warranties. You may not distribute the
Executable Files or Sources Code with any technological measures
that control access or use of the work in a manner inconsistent with
H24: 10.5 CA
You agree that to use the Work for illegal, informal or improper
purposes, cf an paşitet containing magat, fih bateri implojata persaria. Tan Block is subject to croplabin export liven. You do
to comply with all such laws and regulations that may apply to the
Work after Your receipt of the Work.
Representations, Warranties and Disclaimer. THIS WORK IS
PROXED AS IS, WHERE IS AND AS AVAILABLE, WITHOUT ANY EXPRESS OR IMBULD WARRANTIES OR CONDITIONS OR
GUARANTEES, YOU, THE USER, ASSUME ALL FISK IN ITS USE.
INCLUDING COPYRIGHT INFRINGEMENT, PATENT INFRINGEMENT,
SUITABILITY, ETC. AUTHOR EXPRESSLY DISCLAIMS ALL EXPRESS.
IMPLIED OR STATUTORY WARRANTIES OR CONDITIONS
INCLUDING WITHOUT LIMITATION, WARRANTIES OR CONDITIONS
OF MERCHANTABILITY, MERCHANTABLE QUALITY OR FITNESS
FOR A PARTICULAR ORDER, OR ANY WARRANTY OF TITLE, NON INFRINGEMENT, OR THAT THE WORK OR ANY PERTON
THEREOF IS CORRECT, USEFUL, BUG-FREE OR FREE OF
VIRUSES. YOU MUST PASS THIS DISCLAIMER ON WHENEVER YOU
DISTRIBUTE THE WORK ORDERATIVE
Indemnity. You agree to deal and indemnity and hold harmless the
Adults and their decision criteria against any claims, taxes, licenses, dangers, liabilities, costs, and expenses (including reasonable level or
attorneys' fees resulting from or relating to any use of the Work by
You.
Limitation on Liability. EXCEPT TO THE EXTENT REQUIRED BY
APPLICABLE LAW, IN NO EVENT WILL THE AUTHOR OF THE PUBLISHER BE LIABLE TO YOU ON ANKLEAL THEORY FOR ANY
SPECIAL, INCIDENTIAL, CONSEQUENTIAL, ELINITIVE OR
EXemplary damages arising out of this license or the
USE OF THE WORK OR OTHERWISE, EVEN IF THE AUTHOR OR
THE PUBLISHER HAS BEEN ADVISED OF THE POSSIBILITY OF SUCH DAMAGES.
Termination
a. This License and the rights granted hereunder will terminate
auternally upon any breach by You of any term of this License.
Individuals of entries who have received Derivative Works from You
in line - for example, PDA/AR, but the related term that that has a full available such individual or entities remain in full compliance with
those licenses. Sections 1, 2, 6, 7, 6, 9, 10 and 11 will survive any
termination
b. If You bring a copyright, trademark, patent or any other
Infringement claim against any contributor over infringements You
earnings are particularly this work, your loaned from such contributions to the Work ends automatically.
c. Subject to the above terms and conditions, this License is perpetual for the duration of the applicable copyright in the Work. Norwithstanding the above, his Author reserves the right to release the Work under different license terms or to stop distituing the Work at any time; provided, however that any such quotation will not serve to withdraw this License for any other license that has been, or is required to be granted under the terms of the Licensey, and this License will continue in full force and effect unless terminated as stated above.
Publisher. The series hereby confirm that the Publisher shall not under any circumstances, but responsible for and shall not have any liability in respect of the subject matter of this License. The Publisher makes no warranty whatsoever in connection with the Work and shall not be liable to You or any party on any legal theory for any damages whatsoever, including without limitation any general, special, incidental or consequential damages arising in connection to this license. The Publisher reserves the right to cease making the Work available to You at any time without notice
11. Miscellaneous
a. This License shall be governed by the laws of the location of the head office of the Author or if the Author is an individual, the laws of location of the principal place of residence of the Author.
b. If any provision of the License is invalid or unfeasible under applicable law, it shall not affect the validity or enforceability of the remainder of the terms of this License, and without further action by the parties to the License, such provision shall be reformed to the minimum extent necessary to make such provision valid and enforceable.
c. No term or provision of this Licensa shall be deemed waived and no breach consented to unless such waiver or consent shall be in writing and signed by the party to be charged with such waiver or consent.
d. The Licensee constitutes the entire agreement between the partee with respect to the Work licensed herein. There are no understandings, agreements or representations with respect to the Work not specified herein. The Author shall not be bound by any additional provisions that may appear in any communication from You. This Licensee may not be modified without the mutual written agreement of the Author and You.
The Independent JPEG Group's JPEG software
Copyright (C) 1991-1997. Thomas G. Lane.
README for release 8th of 27-Mar-1909
[EMPTY]
This distribution contains the sixth public release of the inexpenden JPEG Group's free JPEG software. You are welcome to redistribute this software and to use it for any purpose, subject to the conditions under LEGAL ISSUES, below.
Serious uses of this software (particularly those incorporating it into regular programs) should contact U6 at jpeg-info@unet.eu.net to be added to our electronic making list. Making list members are modified of updates and have a chance to participate in technical discussions, etc. This software is the work of Tom Lane, Philip Gladstone, Jim Boucher, Law Crocker, Julian Minglian, Luis Orlé, George Philips, Davie Roes, Guido Vaolbading, Ga' Majors, and other members of the Independent JPEG Group.
UG is not affiliated with the official ISO JPEG standards committee. LEGAL ISSUES
In plain English:
We don't promise that this software weaks. (But if you find any bugs, please let us know!)
You can use this software for whatever you want. You don't have to pay us.
You may not pretend that you wrote this software. If you use it in a program, you must acknowledge somewhere in your documentation that you've used the UG code.
In legalese:
The authors make NO WARRANTY or representation, either express or mapped, with respect to the software, its quality, accuracy.
merchandise, or fitness for a particular purpose. This software is provided "AS IS", and you, its user, assume the entire risk as to its quality and accuracy.
This software is copyright (C) 1991-1995. Thomas G. Lane. All Rights Reserved except as specified below.
Permission is hereby granted to use, copy, modify, and distribute the software (or portions thereof) for any purpose, without less, subject to these conditions:
(1) If any part of the source code for this software is distributed, then the README file must be included, with this copyright and no warranty notice or created; and any additional, debitions, or changes to the original files must be clearly indicated in accompanying documentation.
(2) If only executable code is distributed, then the accompanying documentation must state that "this software is based in part on the work of the Independent JPEG Group".
(3) Permission for use of this software is granted only if the user accepts full responsibility for any undesirable consequences; the authors accept NO LIABILITY for damages of any kind.
These conditions apply to any software derived from or based on the UG code, not just to the unmodified library. If you use our work, you ought to acknowledge us.
Permission is NOT granted for the use of any UG author's name or company name in advertising or publicity relating to this software or products derived from it. This software may be referred to only as "the Independent JPEG Group's software".
We specifically permit and encourage the use of this software as the basis of commercial products, provided that all warranty or liability claims are assumed by the product vendor.
ans2km.c is included in this distribution by permission of L. Peter Deutsch, side proprietor of its copyright holder, Aladin Enterprises of Manlo Park, CA, ans2km.c is NOT covered by the above copyright and conditions, but instead by the usual distribution terms of the Free Software Foundation; principally, that you must include source code in your redistribution it. (See the ans2km.c for full details.) However, since ans2km.c is not needed as part of any program generated from the UG code, the does not limit you more than the foregoing paragraphs do.
The Unix configuration script 'configure' was produced with GNU Auconc. It is copyright by the Free Software Foundation but is freely distributable. The same holds for its supporting scripts (config guess, config.suit, licnig, lnnm.sh). Another support script, install-sh, is copyright by M.L.T., but is also freely distributable.
It appears that the arithmetic coding option of the JPEG spec is covered by patents owned by IBM, AT&T, and Mitsubishi. Hence arithmetic coding cannot legally be used without obtaining one or more licenses. For the reason, support for arithmetic coding has been removed from the free JPEG software. Since arithmetic coding provides only a marginal gain over the unpatented Huffman mode, it is unlikely that very many mechanisms will support it. So far as we are aware, there are no patent restrictions on the remaining code.
The UC distribution formerly included code to read and write GIF files. To avoid entanglement, with the Unsys LZW patent, GIF reading support has been removed altogether, and the GIF writer has been applied to produce "uncompressed GIFs". This technique does not use the LZW algorithm; the resulting GIF files are larger than usual, but are readable by all standard GIF decoders.
We are required to state that
"The Graphics Interchange Formal(s) is the Copyright property of ComcuServe Incorporated. GIFISM is a Service Mark property of ComcuServe Incorporated."
RSA MD4 or MD5 Message-Digest Algorithm License
License to copy and use this software is granted provided that it is identified as the RSA Data Security, Inc. MD4 or MD5 Messages-Digest Algorithm* In all material mentioning or referencing this software or this function.
License is also granted to make and use derivative works provided that such works are identified as "derived from the RSA Data Security, Inc., MD4 or MD5 Message-Digest Algorithm" in all material mentioning or referencing the derived work.
RSA Data Security, Inc. makes no representations concerning either the merchantability of this software or the suitability of this software for any particular purpose. It is provided "as is" without express or implied warranty of any kind.
These notices must be retained in any copies of any part of this documentation and/or software.
The PHP License, version 3.01
Copyright (c) 1999 - 2006 The PHP Group. All rights reserved.
Redistribution and use in source and binary forms, with or without modification, is permitted provided that the following conditions are met:
1. Redistributions of source code must retain the above copyright notice, this list of conditions and the following disclaimer.
Redestributions in binary form must reproduce the above copyright
nelixa, this list of conclusions and his following disclaimer in the documentation and other materials provided with the distribution
The name "EHI" must not be used to endorse or promote products
derived from this software without prior written permission. For written permission, please contact group@prop.net.
Products derived from this software may not be called "PHP", nor may "PHP" appear in their name, without prior written permission from group@php.net. You may indicate that your software works in conjunction with PHP by saying "Foo for PHP" instead of calling it "PHP Foo" or "physics".
The PHP Group may publish revised and/or new versions of the license from time to time. Each version will be given a distinguishing version number. Once covered code has been published under a particular version of the license, you may always continue to use it under the terms of that version. You may also choose to use such
covered oxide under the terms of any subsequent version of the license published by the PIP Group. No one other than the PIP Group has his right, to modify the terms applicable to covered oxide created under the License.
Red distributions of any form whatsoever must retain the following acknowledgment:
*This product includes PHP software, freely available from (http://www.php.net/software/).
THIS SOFTWARE IS PROVIDED BY THE PHP DEVELOPMENT TEAM "AS IS" AND ANY EXPRESSED OR IMPLIED WARRANTIES.
INCLUDING, BUT NOT LIMITED TO, THE IMPLIED WARRANTIES OF MERCHANTABILITY AND FITNESS FOR A PARTICULAR PURPOSE ARE DISCLAIMED. IN NO EVENT SHALL THE PHP DEVELOPMENT TEAM OR ITS CONTRIBUTORS BE LIABLE FOR ANY DIRECT.
INDIRECT, INCIDENTAL, SPECIAL, EXEMPLARY, OR CONSEQUENTIAL DAMAGES (INCLUDING, BUT NOT LIMITED TO, PROCUREMENT OF SUBSTITUTE GOODS OR SERVICES; LOSS OF USE, DATA, OR FROORS, OR BUSINESS INTERRUPTION; HOWEVER CAUSED AND ON ANY THEORY OF LIABILITY, WHETHER IN CONTRACT, STRICT LIABILITY, OR TORT INCLUDING NEGLIGENCE OR OTHERWISE ARISING IN ANY WAY OUT OF THE USE OF THIS SOFTWARE, EVEN IF ADVISED OF THE POSSIBILITY OF SUCH DAMAGE.
This software consists of voluntary contributions made by many individuals on behalf of the PHP Group.
The PHP Group can be contacted via Email at group@php.net
For more information on the PHP Group and the PHP project, please see (http://www.php.net).
PHP includes the Zend Engine, freely available at: {http://www.zend.com}.
LICENSE ISSUES
[EMPTY]
The OpenSSL toolkit stays under a dual license, i.e. both the conditions of the OpenSSL License and the original SSL may license apply to the toolkit. See below for the actual license texts. Actually both licenses are BSO-style Open Source licenses. In case of any license issues related to OpenSSL please contact openssl-core5openssl.org.
OpenSSL License
Copyright (c) 1999-2006 The OpenSSL Project. All rights reserved.
Redistribution end use in source and binary forms, with or without modification, are permitted provided that the following conditions are met:
Red attributions of source code must retain the above copyright notice, this list of conditions and the following disclaimer.
Red distributions in binary form must reproduce the above copyright notice, this list of conditions and the following disclaimer in the documentation and/or other materials provided with the distribution.
All advertising materials mentioning features or use of this software must display the following acknowledgment:
This product includes software developed by the OpenSSL Project for use in the OpenSSL Toolkit. (http://www.openssl.org/)
The names "OpenSSL Toolkit" and "OpenSSL Project" must not be used to endorse or promote products derived from this software without prior written permission. For written permission, please contact opensal.cere@openasl.org.
Products derived from this software may not be called "OpenSSL" nor may "OpenSSL" appear in their names without prior written permission of the OpenSSL Project.
Redistribution of any form whatsoever must retain the following acknowledgment:
*This product includes software developed by the OpenSSL Project for use in the OpenSSL Toolkit. [http://wwwTitcansl.org]
THIS SOFTWARE IS PROVIDED BY THE OPESSIL PROJECT "AS IS" AND ANY EXPRESSSED OR IMPLIED WARRANTIES, INCLUDING, BUT NOT LIMITED. TO THE IMPLIED WARRANTIES OF MERCHANTABILITY AND FITNESS FOR A PARTICULAR PURPOSE ARE DISCLAIMED. IN NO EVENT SHALL THE OPESSIL PROJECT OR ITS CONTRIBUTORS BE LIABLE FOR ANY DIRECT INDIRECT, INCIDENTAL, SPECIAL EXPIRATORY, OR CONSOLIDANT DAMAGES (INCLUDING, BUT NOT LIMITED, PROCUREMENT OF SUBSTITUTE GOODS OR SERVICES, LOSS OF USE, DATA, OR PROFITS, OR BUSINESS INTERRUPTION) HOWEVER CAUSED AND ON ANY THORY OF LIABILITY, WHETHER IN CONTRACT, STRICT LIABILITY, OR TORT (INCLUDING NEGLIGENCE OR OTHERWISE ARISING IN ANY WAY OUT OF THE USE OF THIS SOFTWARE, EVEN IF ADVISED OF THE POSSIBILITY OF SUCH DAMAGE.
This product includes cryptographic software written by Eric Young (eay@cyptsoft.com). This product includes software written by Tim Hudson (bh@cyptsoft.com).
PCRE 5 LICENCE
FORE is a library of functions to support regular expressions whose syntax and semantics are as close as possible to these of the Part 5 language.
Release 5 of PCRE is distributed under the terms of the "BSI7" license, as specified below. The documentation for PCRE, supplied in the "doc" directory, is distributed under the same terms as the software itself.
Written by: Philip Hazel (ph10@car.ac.uk)
University of Cambridge Computing Services,
Cambridge, English. Phone: +14 1223 334714.
Copyright (c) 1997-2001 University of Cambridge
All rights reserved.
Redistribution and use in source and binary forms, with or without modification, are permitted provided that the following conditions are met:
- Redistrictutions of source code must retain the above copyright notice, this list of conditions and the following disclaimer.
• Realistications in binary form must reproduce the above copyright notices, this list of conditizens and the following disclaimer in the documentation and/or other materials provided with the distribution
- Neither the name of the University of Cambridge nor the names of its contributors may be used to endorse or promote products
derived from this software without specific prior written permission. THIS SOFTWARE IS PROVIDED BY THE COPYRIGHT HOLDERS AND CONTRIBUTORS "AS IS AND ANY EXPRESS OR IMPLIED WARRANTIES, INJ. IDING, BUT NOT LIMITED, TO THE IMPLIED WARRANTIES OF MENO-ABILITY AND INSENSS FOR A PARTICULAR PURPOSE AND INFORMATION. IN NO PRESENTIAL, THE COPYRIGHT CAVES, OTHER CONTINUATORS, WILL LABOR FOR ANY DIRECT, INDIRECT, INCIDENTAL, SPECIAL, EXEMPLARY OR CONSEGUNAL DAMAGES INCLUDING, BUT NOT INVOLVED TO, PROCUREMENT OF SUBSTITUTE GOODS OR SERVICES LOSS OF USE, DATA, OP PROFITS, OR BUSINESS INTERRUPTION) HOWEVER CAUSED AND ON ANY THEORY OF LIABILITY, WHETHER IN CONTRACT, STRICT LIABILITY, OR TORT (INCLUDING NEGLIGENCE OF OTHERS) ABHIBING IN ANY WAY ON OF THE USE OF THIS SOFTWARE, IFN IT AT ASSET OF THE POSSIBILITY OF SUCH DAMAGE.
NTP License
This file is automatically generated from hier/copyright.htm
Copyright Notice
[sheepb.jpg] "Clone me," says Doly sheepishly
The following copyright notices applies to all fees collectively called the Network Time Protocol Version 4 Distribution. Unless specifically declared otherwise in an individual fee, this notice applies as if the fee was explicitly included in the fee.
Copyright (c) David L. Mills 1992-2001
Permission to use, copy, modify, and distribute this software and its documentation for any purpose and without fee is hereby granted, provided that the above copyright notice appears in all copies and that both the copyright notice and this permission on notice scope in
supporting documentation, and that this name University of Delaware is to be used in advertising or publicity pertaining to distribution of the software without specific, written prior permission. The University of Delaware makes no representations about the suitability this software for any purpose. It is provided "as is" without express or implied warranty.
The following individuals contributed in part to the Network Time Protocol Distribution Version 4 and are acknowledged as authors of this work.
1. [1]Vark Andreas mark@sysci.dirs.csiro.au Letch atomic clock controller
[2]Rame Almeia- calmenia/ka soil class hopf Elektronik serial line and PCI-bus devices
[3]Vrsj Bals vbsis@mallman1.Inteloom and [4]Clayton Kirlewood part to Windows NT 3.5
[5] Michael Barone enichael.barone@hrco.com GPSVVE files
[6] Karl Berry -dear@owl.HQ.ieef.com> syslog to file option
[7]Sreg Brockley greg.brockley@bigfoot.com Major rework of WINNT port. Clean up next but and isignal code into separate modules.
[d]Varo Brett Marc.Brett@westgeo.com Magnavox GPS clock driver
[9]Piete Brooks Piete.Brooks@ol.cam.ac.uk MSF clock driver, Trimble PARISE support
[10]Ray Cleones crog@the.com, Oncoo driar (Current maintains)
[11] Steve Clift OMEGA clock driver
[12] Casey Crelin casey@oso.co.za vWorks (Tornado) port and help with target configuration
[13]Even Dietrich seven�95�cletrich@trimble.com Palisade reference clock driver, NT adj. residuals, integrated Greg's Winnt port.
[14] John A. Dundas III dundas@saltjol.nasa.gov Apple A/UX port
[15]Torsten Duwe duwe@imnd4.inkrmalik.uni-erlangen.de Linux port
[16]Dennis Ferguson clennis@mrbillcanet.ca foundation code for NTP Version 2 as specified in RFC-1119
[17]Gkrem Helinger gkrem@keraki.usask.com GOFS clock drive
[18]Mike Iplesias plesias@uci.scup DEG Aprra port
[19].im Jagielski AUX port
[20] Jeff Johnson - job@chsthem.usdesign.com> massive prototyping overhaul
[21]Hars Lambertont HansLambemont@rlorigin-it.com or [22]H.Lambemont@chello.nl ntpaveep
[23]Poul Henning Kamp Onshore driver (Original author)
[24] Frank Kardel [25] Frank.Karde@informat.kuni-erlangen.de
PARSE driver [14 reference clocks], STREAMS module for PARSE, support scripts, syslog cleanup
[26] William L. Jones jones@hennes.chpc.utexas.edu RS/\$000 AIX modifications, HPUX modifications
[27]Dave Katz RS/6030 AX port
[28]Craig Leres deres@ee.lbi.gov 4.ABSD port, postcode, Magnavox GPS clock driver
[29]George Lindholm indholm@ucs.usc.cs SunOS 5.1 per:
35|Louis A. Marakos ouie@niumd.edu MC5-based authentication
31] Lars H. Mathiesen adaptation of foundation code for Version 3 as specified in RPC-1005
'32|David L. Mills mils@uciel.edu Version 4 foundation: clock discipline, authentication, predicts on kernel; clock drivers: Spectracom Austron, Arbter, Health, ATOW, ACTS, KSI/Oldatics; audio clock drivers: CHU, WWW.H, FIG
33|Wolfgang Moskør moskør@gedge1.dual-gexig.das VMS port
34|Jaffrey Mocul moguk@pa.dac.com riptraco utility
35[Torn Moora 365 ser4 port
Dopaima A, Matalie, kaiman@wnenb.com 800 OpenServer
port
[37]Dansk Multichy <clare<@topbox.clemson.co.uk> and [38]Damon Hart-Davis c@ho.org ABCRON MSF clock driver
35|Fisher Pruy Rainer.Pruy@Infomatik.url-erlanger.de
24|Dirce Richards dirce@zk3.dsc.com Digital UNIX V4.0 port
41[Milfredo Sanchez wsanchez@apple.com added support to Nalina
[47] Mick Sayer - crrappro@quack.kfu.comro - SunOS streamre modules
[43]Jack Sasportss jack@innovstiveinternet.com Seven a Lot of space on the stuff in the htmlpic/ subdirectory
[4]Rsy Schnitzler schnitz@uricress.com Unixware1 port
45]Michael Shield shield@temcel.org USNO clock driver
25:Jeff Stenman (quawpeeblee, p.r.198a.gov) Datum PTS clock driver
'47|Harlan Stern harlan@tpfcs.com GNU automake/
a. a. a. a. a. a. a. a. a. a. a. a. a. a. a. a. a. a. a. a. a. a. a. a. a. a. a. a. a. a. a. a. a. a. a. a. a. a. a. a. a. a. a. a. a. a. a. a. a. a. a.
Sepakamal Sion: Extingu:10.0000000000000000000000000000000000000
29(Aji Thagirajan caji@asa.udz.edu.P multicast/arycast support
50|Tomoak TSUHUCKA teurucka@inc.tuucks-u.ac|p TRAK clock driver
51|Paul A vble vble@vx.com TrueTime GPS driver, generic TrueTime clock drive
[57] Uich Windl corrected and validated HTML documents according to the HTML DTD
[53]gi
[54]David L. Mills «miles@uciol.edu»
Atefonexas
maltomarka@syd.cirs.cairo.au
maltozaltmsier@atksoft.de
maltovbeis@mailman1.intel.co
maltockirkwood@striderfm.intel.com
maltxmichael.barone@imcc
mail:kar@zw.HQiloxf.com
mailxyrag.brae/day@bigfoot.com
rallexMarc Post/Investigco.com
matrix:Plate.Brooks@cl.com.ac.uk
mailoreg@divf.com
mailoxi@ml.csiro.eu
mellocase,@csc.co.za
mslto:Sven_DietrichStrimble.COM
maltoclundae@salt.pl.ness.gov
maltoclusive@immdf.informatik.uni-erlangen.de
mailoxdennis@rrbil.camt.ca
email@kerr@horaid.usesk.ca
realtoglesias@uci.edu
mellojagucoxgsc.nasa.gov
msoito(bj@chathsm.usdesign.com
mslto:Hans.Lambermont@nl.origin-It.comv
melto:H.Lambemont@chello.nl
mail@hk@FreeBSD.OFG
http://www.jinkemalik.uni-orangen.dk/kar/Jol
realto: Frank Karuki Winfasserlik.uni-orlangas.da
treilojones@hamas.chpc.ulexas.edu
meltockatz@disco.com
traito/aresðs.bi.gov
melto:Inchaim@uce.ubc.ca
3D. maltofouie@nl.umcl.edu
mail@horinn@dfk.dk
mailzrik@racis.edu
raltozrosiko@yaskv1.dval.qpecin.da
mailzroqal@x.dsc.com
raltoclincoze@feval.daylonoh.net.com
mito@amal2whorce.com
mslto:clersk@toybox.demon.co.uk
mslto:cl@hd.org
m/sito:Rsiner.Pruy@informatik.uni-erlangen.de
mailfoxice@zk3.dec.com
mailozsancha@aspie.com
mailozragpis@quack.kfu.com
rreitojack@irroyalixinternal.com
maito:schnitz@unipress.com
maito:shields@tembel.org
meltosebiles@pl.nssa.gov
meltodarlan@pfcs.com
meltoken@edd.hp.com
melto:alt:see.udele.edu
raltotsuoka@rc.ukucka-.ac.jp
meltonbis@vix.com
maito:Ulrich.Windérz.uni-regensburg.de
file://localhost/backroom/http-stable/html/index.html
maitomile@ucel.edu
Codelgniter License Agreement
Copyright (c) 2008 - 2009, ElleLab, Inc.
All rights reserved.
This license is a legal agreement between you and FliSLb Inc. for the use of Code gnter Software (the "Software"). By obtaining the Software you agree to comply with the terms and conditions of this license.
Permitted Use
You are permitted to use, copy, modify, and distribute the Software and its documentation, with or without modification, for any purpose, provided that the following conditions are met:
A copy of this license agreement must be included with the
(See Appendix)
Redistribution of source code must retain the above copyright
house in all service orders has
Re-distributions in binary form must reproduce the above copyright notice in the documentation and/or other materials provided with the distribution.
Any files that have been modified must carry no issues stating the nature of the change and the names of those who charged them.
Products derived from the Software must include an
acknowledgment that they are derived from Codeughter in their
Institute of the 2016-2017 period, the 2016-2017 period was a result of the 2016-2017 period.
Results reflect from the conduct of may not be stated "CodeIgniter nor may 'CodeIgniter' appear in their name, without prior written permission from EllisLab, Inc.
Indemnity
You agree to indemnify and hold harmless the authors of the Software and any contributors for any direct, indirect, incidental, or consequential third-party claims, actions or suits, as well as any related expenses, liabilities, damages, settlements or rees arising from your use or misuse of the Software, or a violation of any terms of this license.
Disclaimer of Warranty
THE SOFTWARE IS PROVIDED "AS IS", WITHOUT WARRANTY OF ANY KIND, EXPRESSION OR IMPLIED, INCLUDING, BUT NOT LIMITED TO WARRANTIES OF QUALITY, PERFORMANCE, NON-INFRINGEMENT, MERCHANTABILITY, OR FITNESS FOR A PARTICULAR PURPOSE.
Limitations of Liability
YOU ASSUME ALL RISK ASSOCIATED WITH THE INSTALLATION AND USE OF THE SOFTWARE. IN NO EVENT SHALL THE AUTHORS OR COPYRIGHT HOLDERS OF THE SOFTWARE BE LIABLE FOR CLAIMS, DAMAGES OR OTHER LIABILITY ARISING FROM, OUT OF, ORIN CONNECTION WITH THE SOFTWARE, LICENSELL HOLDERS ARE SOLELY RESPONSIBLE FOR DETERMINING THE APPROPRIATENESS OF USE AND ASSUME ALL RISKS ASSOCIATED WITH ITS USE, INCLUDING BUT NOT LIMITED TO THE RISKS OF PROGRAM ERRORS, DAMAGE TO EQUIPMENT, LOSS OF DATA OR SOFTWARE PROGRAMS, OR UNAVAILABILITY OR INTERRUPTION OF OPERATIONS.
GLUT for Win32 License
The OpenGL Utility Toolkit distribution for Win32 (Windows NT & Windows 95) contains source code modified from the original source code for GLUT version 3.3 which was developed by Mark J. K ligand. The original source code for GLUT is Copyright 1997 by Mark J. K ligand.
GUT with Win32 is Copyright 1997 by Nate Rhins and is not in the public domain, but its treely distributive without licensing fees. It is provided without guarantee or guarantee expressed or improved. It was prone with the permission of Mark J. K ligand by Nate Rhins.
THIS SOURCE CODE IS PROMoted: "AS IS WITHOUT WARRANTY OF ANY KIND, EITHER EXPRESSION OR IMPLIED, INCLUDING, BUT NOT LIMITED TO, THE IMPLIED WARRANTIES OR MERCHANTABILITY OR FITNESS FOR A PARTICULAR PURPOSE."
OpenGL (H) is a registered trademark of Silicon Graphics, Inc.
ISC License
Copyright: (c) 2004-2013 by Inmet Systems Consortium, Inc. ("ISC")
Permission to use, copy, modify, and distribute this software for any purposes with or without loss is hereby granted, provided that the above copyright notice and this permission notice appear in all copies.
THE SOFTWARE IS PROVIDED AS ST AND IS DISCLAIMS ALL WARRANTIES WITH REGARD TO THIS SOFTWARE INCLUDING ALL IMPLIED WARRANTIES OF MERCHANTABILITY AND FITNESS. IN NO EVENT SHALL BE LIABLE FOR ANY SPECIAL DIRECT, INDIRECT OR CONSEQUENTIAL DAMAGES OR ANY DAMAGES WHATSOEVER RESULTING FROM LOSS OF USE, DATA OR PRODUCTS, WHETHER IN AN ACTION OF CONTRACT, NEGLIGENCE OR OTHER TORTIOUS ACTION, ARISING OUT OF OR IN CONNECTION WITH THE USE OR PERFORMANCE OF THIS SOFTWARE.
Internet Systems Consortium, Inc.
350 Charter Street
Redwood City, CA 94063
info@is.org
https://www.isc.org/
Brian Gladman Alternate License
Copyright (c) 2020, 2010 Brian Gladman, Worcester, UK. All rights reserved.
LICENSE TERMS
The free distribution and use of this software in both source and binary kmt is allowed (with or without changes) provided that:
distributions of the source code include the above copyright notice, this list of conditions and the following disclaimer;
distributions in binary form include the above copyright notice, this list of conditions and the following disclaimer in the documentation and/or other associated materials;
the copyright holder's name is not used to endorse products but using this software without a specific written permission.
ALTERNATMELY, provided that the notice is retained in full, this product may be distributed under the terms of the GNU Genera Public License (GPL) in which case the provisions of the GPL apply INSTEAD OF this given above.
DISCLAIMER
This software is provided "as is" with no explicit or implied warranty in respect of its properties, including, but not intended to, correctness and/or fitness for purpose.
Hanwha Techwin cares for the environment at all product manufacturing stages, and is taking measures to provide customers with more environmentally friendly products.
The Eco mark represents Hanwha Techwin's devotion to creating environmentally friendly products, and indicates that the product satisfies the EU RoHS Directive.
Correct Disposal of This Product (Waste Electrical & Electronic Equipment)
Applicates in the European Union and other European countries with separate countries or systems:
This marking on the product accessories or literature indicates that the product and its electronic accessories (e.g. changer, reachel, USR cable) should not be disposed of with other household waste at the end of their working life. To prevent possible harm to the environment or human health from uncontrolled waste disposal, please separate these items from other types of waste and recycle them responsibly to promote the social cable reuse of material resources.
Household uses should contact either the retailer where they purchase this product, or their local government office, for details of where and how they can take these items for environmentally safe recycling.
Business users should contact their supplier and check the terms and conditions of the purchase contract. This product and its electronic accessories should not be moved with other commercial varies for disposal.
Correct disposal of batteries in this product
Applicable in the European Union and other European countries with separate battery return systems.
This marking on the battery manual or packaging indicates that the batteries in this product should not be dispersed with other household waste at the end of their working time. Where marked, the chemical symbols Fig. Cal or Pb indicate that the battery contains mercury cadmium or lead above the reference levels in FC Directive 2005/95, if batteries are not properly disposed or these substances can cause harm to human health or the environment.
to protect natural resources and to promote seasonal reuse, please separate batteries from other types of waste and recycle them through your local tree battery return system.
Head Office
6, Pangyo-ro 319 beon-gil, Bundang-gu, Seongnam-si,
Gyeonggi-do, 463-400 Rep. of KOREA
Tel: +82.70.7147.8753 Fax: +82.31.8018.3740
www.hanwha-security.com
Hanwha Techwin America
500 Frank W. Burr Blvd. Suite 43 Teaneck, NJ 07666
Toll Free +1.877.213.1222 Direct +1.201.325.6920
Fax +1.201.373.0124
www.hanwha-security.com
Hanwha Techwin Europe
Heriot House, Heriot Road, Chertsey, Surrey, KT16 9DT, United Kingdom
Tel +44.1932.57.8100 Fax +44.1932.57.8101
www.hanwha-security.eu
Hanwha
Techwin