
PAC730B - Bag Chief - Free user manual and instructions
Find the device manual for free PAC730B Chief in PDF.

| Product Type | Carrying Bag |
| Brand | Chief |
| Model | PAC730B |
| Dimensions (Approx.) | 40 x 30 x 15 cm (15.7 x 11.8 x 5.9 in) |
| Weight (Approx.) | 1.0 kg (2.2 lbs) |
| Material | Nylon with reinforced stitching |
| Color | Black (standard) |
| Closure Type | Zipper with dual sliders |
| Main Compartment | Padded laptop sleeve (fits up to 15.6") |
| Additional Pockets | 2 front zippered pockets, 1 hidden back pocket, 2 side mesh pockets |
| Carrying Options | Top handle and adjustable, detachable shoulder strap |
| Lining | Soft polyurethane to protect contents |
| Water Resistance | Water-repellent exterior fabric |
| Care Instructions | Hand wash with mild soap, air dry; do not machine wash or bleach |
| Safety Features | Reflective stripes on front for visibility; anti-theft back pocket |
| Spare Parts Availability | Contact Chief customer service for replacement straps or zippers |
| Warranty | 2-year limited warranty against manufacturing defects |
Frequently Asked Questions - PAC730B Chief
User questions about PAC730B Chief
0 question about this device. Answer the ones you know or ask your own.
Ask a new question about this device
Download the instructions for your Bag in PDF format for free! Find your manual PAC730B - Chief and take your electronic device back in hand. On this page are published all the documents necessary for the use of your device. PAC730B by Chief.
USER MANUAL PAC730B Chief
INSTALLATION INSTRUCTIONS

natural_image
Technical line drawing of a mechanical assembly with two platforms and mounting base (no text or symbols)Small Secure Storage Shelf for Carts and Stands
DISCLAIMER
Milestone AV Technologies and its affiliated corporations and subsidiaries (collectively "Milestone"), intend to make this manual accurate and complete. However, Milestone makes no claim that the information contained herein covers all details, conditions or variations, nor does it provide for every possible contingency in connection with the installation or use of this product. The information contained in this document is subject to change without notice or obligation of any kind. Milestone makes no representation of warranty, expressed or implied, regarding the information contained herein. Milestone assumes no responsibility for accuracy, completeness or sufficiency of the information contained in this document.
Chief® is a registered trademark of Milestone AV Technologies. All rights reserved.

IMPORTANT WARNINGS AND
CAUTIONS!

WARNING: A WARNING alerts you to the possibility of serious injury or death if you do not follow the instructions.

CAUTION: A CAUTION alerts you to the possibility of damage or destruction of equipment if you do not follow the corresponding instructions.

WARNING: Failure to read, thoroughly understand, and follow all instructions can result in serious personal injury, damage to equipment, or voiding of factory warranty! It is the installer's responsibility to make sure all components are properly assembled and installed using the instructions provided.

WARNING: Exceeding the weight capacity can result in serious personal injury or damage to equipment! It is the installer's responsibility to make sure the combined weight of all components stored within or on the PAC730 does not exceed 25 lbs (11.3 kg).
DIMENSIONS
![[508] 20,00 [200] 7.87 [366] 14.41 [200] 7.87 [8.6] Ø0.34 [122.2] 4.81 Ø [96,9] 3.82 MAX EQUIPMENT HEIGHT [450,9] 17,75 MAX EQUIPMENT WIDTH [63,5] 2.50 [139,7] 5.50 [50,9] Ø2.00 DOOR HIDDEN [317,5] 12.50 MAX EQUIPMENT DEPTH MEASUREMENTS: [MILLIMETERS] INCHES](/content/2026/06/1188722/images/bb646d0af2d41fa7dd13df91779d539d7fa0ad007c8b37675f3f16c9640d8cf3.jpg)
LEGEND
| Tighten Fastener | Loosen Fastener | ||
| Apretar elemento de fijación | Aflojar elemento de fijación | ||
| Befestigungsteil festziehen | Befestigungsteil lösen | ||
| Apertar fixador | Desapertar fixador | ||
| Serrare il fissaggio | Allentare il fissaggio | ||
| Bevestiging vastdraaien | Bevestiging losdraaien | ||
| Serrez les fixations | Desserrez les fixations | ||
| By Hand | Hex-Head Wrench | ||
| A mano | Llave de cabeza hexagonal | ||
| Von Hand | Sechskantschlüssel | ||
| Com a mão | Chave de cabeça sextavada | ||
| A mano | Chiave esagonale | ||
| Met de hand | Zeskantsleutel | ||
| À la main | Clé à tête hexagonale |
TOOLS FOR INSTALLATION / PARTS
![19/31 5/32" (Included) A (1) [Storage Shelf] B (1) [Pole Attachment Plate] C (1) [Upper Bracket] D (1) [Hole Plug] G (8) [Bumper] E (1) 5/32" F (4) 1/4-20 x 3/8" H (4) 1/4-20 x 3/4" J (1) [Key]](/content/2026/06/1188722/images/a8255ecdef55aebb668c4d8773f97944f39d21c7fe7fefeb2cd9374732e77c54.jpg)
INSTALLATION
NOTE: The PAC730 may be mounted on the Chief cart or stand either by being attached mid-column on the cart or stand column, or to the top of the cart or stand column.
Mid-Column Attachment
- Attach pole attachment plate (B) around the cart or stand column to the storage shelf (A) using four 1/4-20 x 3/8" button head cap screws (F). (See Figure 1)
- Proceed to Adding Bumpers section.
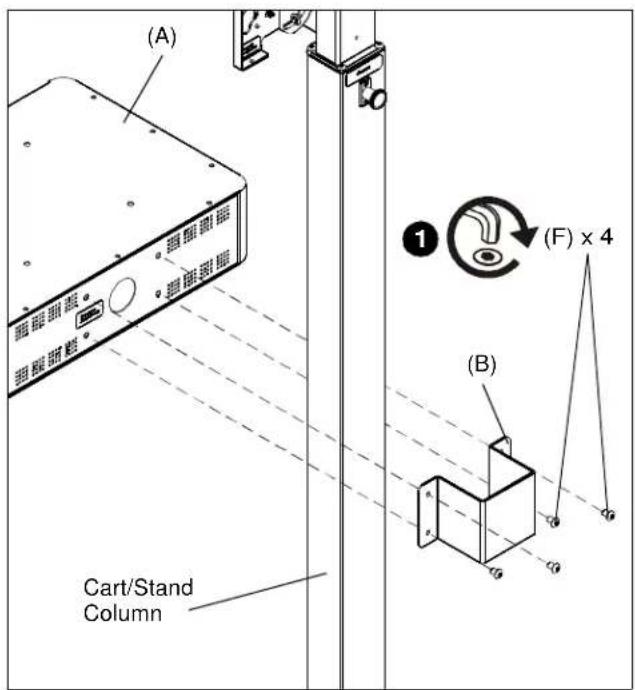
Figure 1
Top of Column Attachment
- Attach upper bracket (C) to storage shelf (A) using four 1/4-20 x 3/4" button head cap screws (H). (See Figure 2)
NOTE: The upper bracket (C) may be attached in two different ways using the two hole patterns on the storage shelf bottom. (See Figure 2)

Figure 2
-
Remove display from faceplate following instructions in the cart or stand installation instructions.
-
Remove and save four button head cap screws from top of cart or stand column. (See Figure 3)
- Place upper bracket with PAC730 onto top of cart or stand column. (See Figure 3)
- Fasten PAC730 to cart or stand using four button head cap screws removed in Step 3. (See Figure 3)
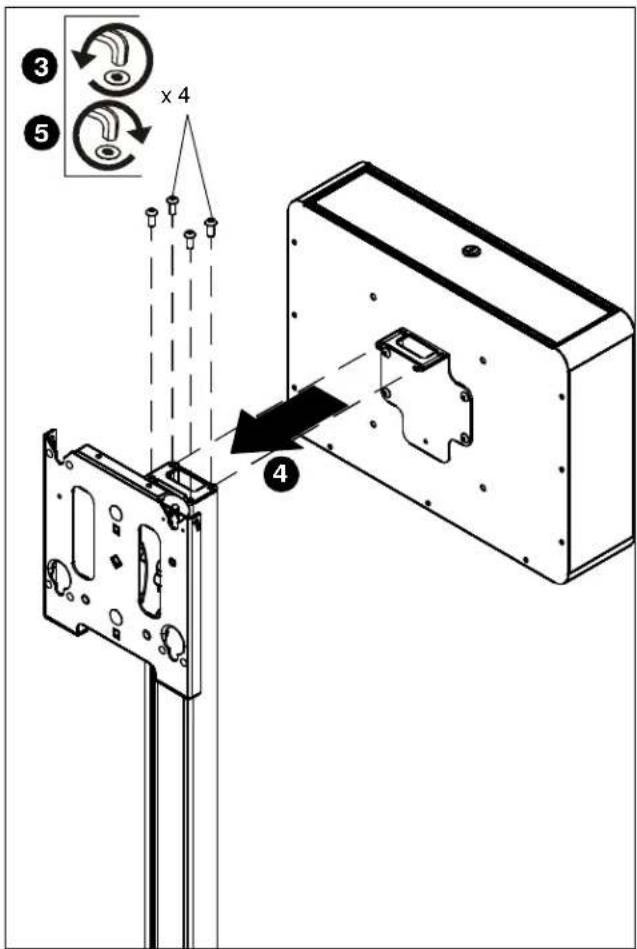
Figure 3
- Re-attach display to faceplate following installation instructions included with cart or stand.
Adding Bumpers
Add eight bumpers (G) to fill the unused PEM nuts (inside the PAC730) to protect the stored equipment. They can be added to the unused PEM nuts in the circled areas. (See Figure 4)
Cable Management
- Place hole plug (D) into 2" cable management opening. (See Figure 4)
- Run cables from components in storage shelf through the plug in the cable management opening at the back of the storage shelf. (See Figure 4)
![(G) x 8 Cable Management Opening [Bottom View]](/content/2026/06/1188722/images/88d41afdc6e251819d750aab034f1c1fe2de4d7aa72fb72a5b2a794381a144ef.jpg)
Figure 4
Brand : Chief
Model : PAC730B
Category : Bag