
SN50MC1 - Smartphone HANNSPREE - Free user manual and instructions
Find the device manual for free SN50MC1 HANNSPREE in PDF.


| Product Type | Smartphone |
| Brand | Hannspree |
| Model | SN50MC1 |
| Dimensions | 145 mm x 72.8 mm x 8.5 mm |
| Weight | 150 g (with battery) |
| Battery Capacity | 2000 mAh |
| Network Bands | GSM 850/900/1800/1900 MHz, WCDMA 900/2100 MHz |
| SIM Card Type | Dual SIM (Full size) |
| Display | Touch screen (size not specified) |
| Rear Camera | Yes, with flash |
| Front Camera | Yes |
| Memory Card Support | microSD up to 32 GB |
| Operating System | Android |
| Wi-Fi | Yes, 802.11 b/g/n |
| Bluetooth | Yes |
| Charging Port | micro USB |
| Headphone Jack | 3.5 mm |
| Proximity Sensor | Yes |
| FM Radio | Yes |
| Sound Recorder | Yes |
| Voice Search | Yes |
| Google Services | Yes (Gmail, Maps, Play Store, etc.) |
| Special Feature | Hannspree One-Click Install app |
Frequently Asked Questions - SN50MC1 HANNSPREE
User questions about SN50MC1 HANNSPREE
0 question about this device. Answer the ones you know or ask your own.
Ask a new question about this device
Download the instructions for your Smartphone in PDF format for free! Find your manual SN50MC1 - HANNSPREE and take your electronic device back in hand. On this page are published all the documents necessary for the use of your device. SN50MC1 by HANNSPREE.
USER MANUAL SN50MC1 HANNSPREE
- Precautions....4
- Declaration......5
- Your Phone ....7
Product Overview 7
Button and Softkey Descriptions ....8
- Start to Use 9
Install Memory Card, SIM Card, and Battery 9
Remove Memory Card, SIM Card, and Battery 10
Charge the Battery 10
Use Touch Screen 10
Connecting to a Wi-Fi network 11
Make a Call 13
Answer a Call 13
Emergency Service 13
Input Method 13
- Connecting PC & Data Transmission ....14
Use Micro SD Card ....14
- The Android Interface .... 15
Home Screen 15
Extending home screen. 16
Customizing the home screen panels 16
Managing applications 16
Creating application folders ....17
- Applications....18
Music 18
Video 18
Browser 18
Calculator 18
Calendar 18
Camera 18
Clock 18
Email 18
File Manager 19
FM Radio 19
Gallery 19
Goggle service 19
Messaging 19
People 20
Phone 20
Settings.... 20
SIM Toolkit 22
Sound recorder....2 2
Voice search 22
Wireless input device....2 2
Widgets 22
8. Basic and Maintenance....23
Battery Care 23
Smart Phone Maintenance ....23
9. System Firmware Update....24
10. Technical Information ....24
11. Appendix ......25
Warranty and Service 25
FAQ 25
Resetting Your Device to Factory Defaults 25
Control information
This device is in accordance with the requirements in Radio & Telecommunications Terminal Equipment Directive 1995/5/EC.
This device complies with the requirements in EMC Electromagnetic Compatibility Directive 2004/108/EC and Low Voltage Directive 2006/95/EC.
Recycling information
Hannspree attaches great importance to our environmental policy, and firmly believe that we can better protect the "health" of the earth by properly disposing and recycling the industrial technological equipment that has reached service life.
These devices contain recyclable materials, which can be re-added to new material after decomposition. In contract, other materials are classified as dangerous and toxic substances. We sincerely hope that you contact the relevant institutions based on the information we provide to recycle this product.
For more information, please visit:
http://www.hannspree.com/
Preventing Hearing Loss

Caution: Permanent hearing loss may occur if earphones or headphones are used at high volume for prolonged periods of time.
This device have been tested to comply with the Sound Pressure Level requirement laid down in the applicable EN 50332-1 and/or EN 50332-2 standards.
For the correct use and good performance of the device, the user must fully understand the manual as well as strictly follow the instructions provided.
- Please avoid high temperature (over 35^ ) or low temperature (below 0^ ).
- Never knock the main machine violently.
- Never let the device come in contact with chemicals such as benzene, thinner etc.
- Do not let the device get close to strong magnetic field, electric field etc.
- Keep away from direct sunlight or heating appliances.
- Never privately dissemble, repair or modify the device.
- Using the device and the earpiece during bicycling, car and motorcycle driving is likely to cause danger.
- Never use higher volume, which may damage your hearing ability.
- Please charge under the following circumstances:
A. The battery icon shows no power (☐) on the upper-right corner of the screen.
B. The system automatically shuts down, and immediately shuts down after a re-start.
C. The operating button does not respond.
D. The product displays the red icon ( ) on the upper-right corner of the screen.
natural_image
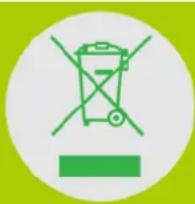
Green circular icon with crossed-out trash bin and horizontal bar (no text or symbols)DO NOT throw the battery in municipal waste.
The symbol of crossed out wheeled bin indicates that the battery should be NOT placed in municipal waste.
HANNspree Europe Holdings B.V.: Greyenstraat 65, 5928 PM Venlo, The Netherlands HANNspree UK Lt.d: Ground Floor, Suite F, Breakspear Park, Breakspear Way, Hemel Hempstead, Hertfordshire, HP2 4TZ
Do not attempt to replace the battery of your HANNspree SN50MC1B yourself, you may damage the battery and this could cause overheating and injury. The lithium-ion battery in your HANNspree SN50MC1B should be replaced only by HANNspree or a HANNspree Authorized Service Provider, and must be recycled or disposed of separately from household waste. Do not incinerate the battery. For more information about battery recycling and replacement, go to http://www.hannspree.eu/en/support/battery-replacement.
The Li-ion battery package in the product is not serviced and replaced.
Declaration
- The information in this manual may not, except under written license by The Company, be copied, transmitted, distributed, or stored.
- Although efforts have been made for the correctness and completeness during the preparation of the manual, there is no guarantee that this manual is free from any error or omission. The Company assumes no reliability regarding the errors or omissions that might exist in the manual.
- For sustainable development, The Company reserves the right to modify and improve any product described in this manual without prior notice.
- Under no circumstance shall the Company assume any liability, direct or indirect, related to data or income loss, or any special, accidental, incidental or indirect losses.
First Time Using Your Phone Hannspree \*One-Click Install Application
Please be noted that to activate Hannspre One-Click Install by tapping on the shortcut icon ( ) on the All App Page at your first time using if the device you purchased has built-in. Hannspre One-Click Install application can search the latest drivers, utility and be downloaded automatically. Please be noted that the Hannspre One-Click install interface, icons, utilities and software versions may vary based on the model at the point of your purchase, please operate Hannspre One-Click Install according to the default built-in version.
*(Extra Apps)
Please find within your app drawer an application named "Hannspree One-Click Install". This app will contain Hannspree recommended drivers, apps and utilities to help get the best out of your phone. Please note that the Hannspree One-Click Install icon, user interface and software versions may vary depending on purchase date of the device.
Warnings
Not following these guidelines may be dangerous or illegal. Please read the complete user guide for further information.
TURN ON SAFELY
Do not turn on the phone when wireless phone is prohibited or when it may cause interference or danger.
ROAD SAFETY
Obey all road safety laws. Always use both of your hands to operate the vehicle while driving.
INTERFERENCE
All wireless phones may be sensitive to interference, which may affect performance.
TURN OFF IN HOSPITALS
Follow all restrictions. Turn off the phone near medical equipment.
TURN OFF ON AIRCRAFTS
Follow all restrictions. Wireless devices can cause interference on aircrafts.
TURN OFF WHEN REFUELING
Do not use the phone at/near refuelling stations. Do not use near fuel or chemicals.
DO NOT MODIFY
Only qualified personnel may install or repair this product.
BATTERIES
Use only Hannspree provided/approved batteries and cables. Do not connect incompatible products.
WATER-RESISTANCE
Your phone is not water-resistant. Keep it dry.
BACKUP COPIES
Remember to back-up copies of important files and pictures to your PC or a cloud service.
CONNECTING TO OTHER DEVICES
When connecting to any external device, read its user guide for detailed safety instructions. Do not connect with incompatible products.
1. Your Phone
The phone appearance is shown as below. The picture is for reference only; your phone may be different. Please take your actual phone as the standard.
1.1 Product Overview
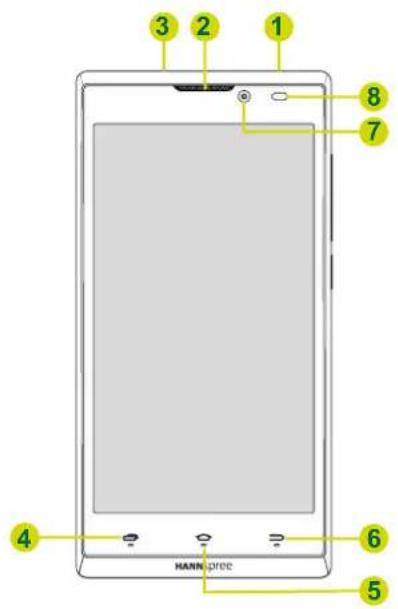
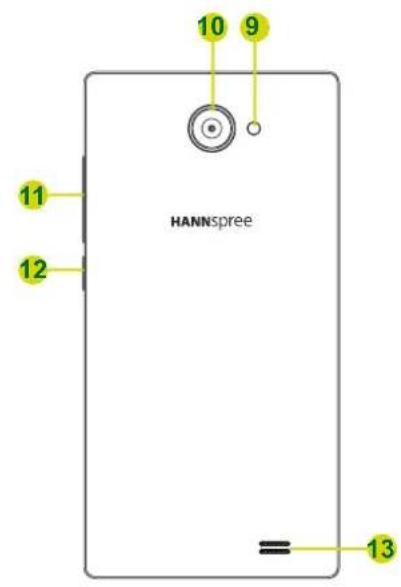
No. Item No. Item
1 Headset jack 8 Proximity sensor
2 Receiver 9 Flash
3 Charging jack / micro USB port 10 Back camera
4 Option key 11 Volume keys
5 Home key 12 Power key
6 Back key
7 Front camera
13 Speaker
1.2 Button and Softkey Descriptions
| Key Description | |
| Power Button | Long press the button to turn on the phone.In the power on status, press the button to lock keypad and screen; long press the button to show phone options. |
| Options Key | Press the key to enter option menu.Long press the key to enter Google search interface. |
| Home Key | Press the key to return to Home Screen.Long press the key to enter Google search interface. |
| Back Key | In the menu mode, press the key to go back to upper menu. |
| Volume Keys | To adjust incoming call ringtone volume.During a call, playing music, video, or listening to radio, press the keys to adjust volume. |
2. Start to Use
2.1 Install Memory Card, SIM Card, and Battery
SIM Card
When you subscribe to a mobile network they will provide you with a SIM card. SIM (Subscriber Identity Module) card that contains phone number, service projects and can be used to store phone numbers and personal information.
Your "HANNspree SN50MC1B" can accept two Full size SIM Cards.
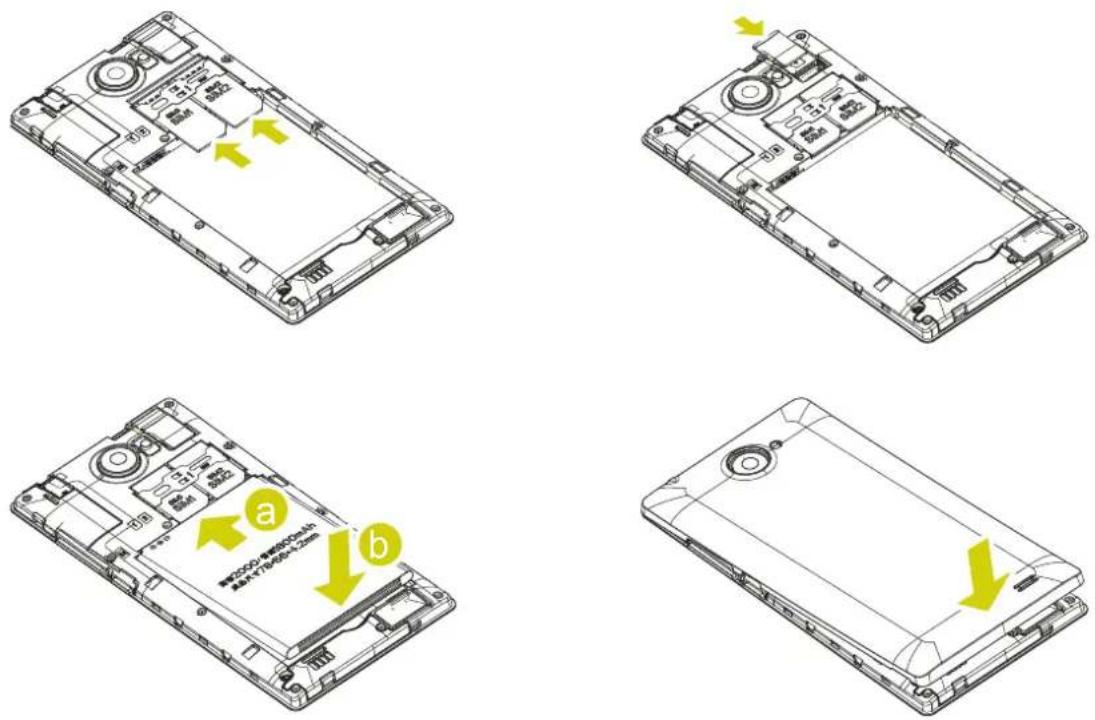
Attention: Do not bend or scratch SIM card, avoid contact with static electricity, dust or water.
- Remove the back cover - Be careful not to damage your fingernails when you remove the back cover.
- Insert the SIM with the gold coloured contacts facing downwards.
- Insert the battery with the gold contacts facing the corresponding pins on the back of the phone.
- Replace the back cover.
Keep all SIM cards where children cannot reach or touch.
NOTE:
- Keep the SIM card chip contacts face downward. Make the SIM card fits card slot.
IMPORTANT NOTE:
- The card slot marked with "SIM1" supports 3G WCDMA / 2G GSM network band.
- The card slot marked with "SIM2" supports 2G GSM network band.
2.2 Remove Memory Card, SIM Card, and Battery
Turn the device off. Then, remove the battery, SIM card, and memory card. Do not insert or remove memory card in whilst device is turned on, otherwise it can cause damage to the file system.
NOTE:
- If the phone is turned on, long press the Power key about 3 seconds until the Phone Options menu appears and select Power Off > OK to turn off the phone.
Do not plug or remove memory card in boot state, otherwise it will cause damage to the file system.
2.3 Charge the Battery
- Before charging, check the battery slot to ensure the battery has been installed correctly.
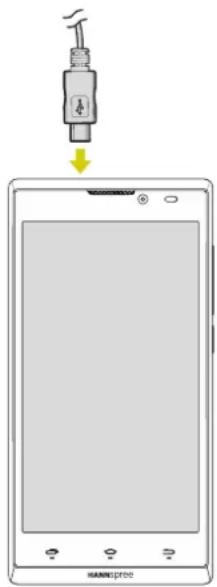
- Plug the provided micro USB part of the charger into phone.
- Connect the opposite end to the charger and plug into the socket.
-
Start charging. The device can be charged whether powered on or off.
-
In power on state, when the battery icon on top right of the screen starts rolling means it is being charged. When the icon is full and stops rolling the battery is fully charged.
-
In power off state, when the battery icon on the screen starts rolling means it is being charged. When the icon is full and stops rolling the battery is fully charged.
-
Unplug the charger from the socket.
- Disconnect the charger and phone.
2.4 Use Touch Screen
- Press: Use finger to press the desired option to confirm selection or start an application.
- Long press: Long press the screen in current operation interface, icon, or input area; you can open the option menu in current interface.
- Slide: Slide the finger on screen horizontally or vertically. For example, slide the screen in standby mode or main menu horizontally to change menu page.
- Drag: Use finger to long press desired item, drag it to anywhere on screen. For example, you can drag the icon in main menu to standby screen.
2.5 Connecting to a Wi-Fi network
A Wi-Fi connection makes it easy to connect to the Internet. Once you have successfully connected to a Wi-Fi network, the device will automatically connect to the network when you are within range.
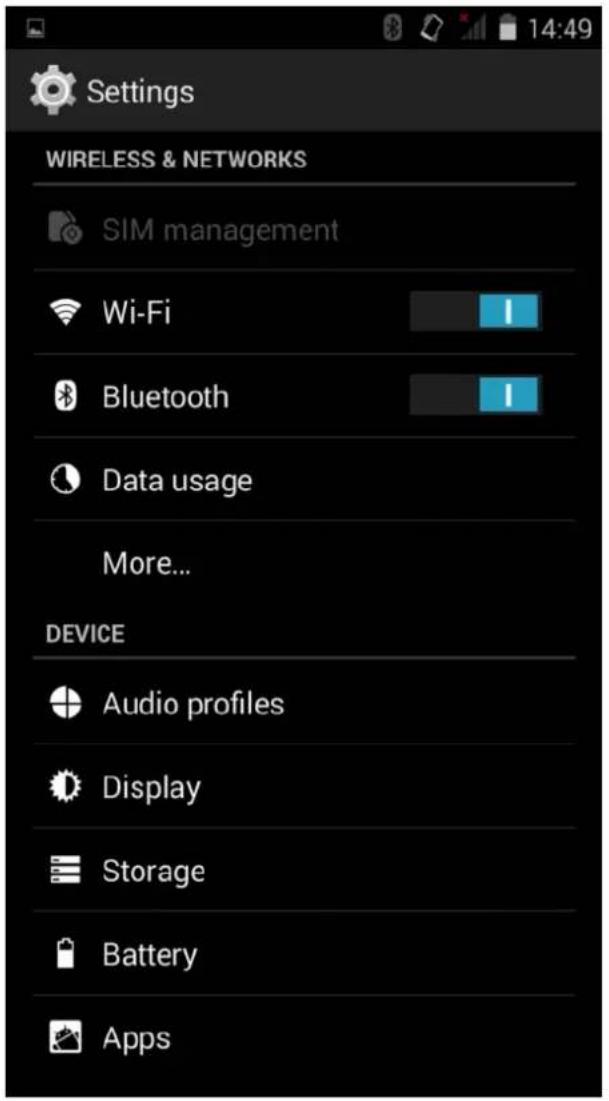
To configure the Wi-Fi connection, do the following:
- Tap and drag the status bar downward to open the notification panel.
-
On the Quick Settings screen, tap SETTINGS.
-
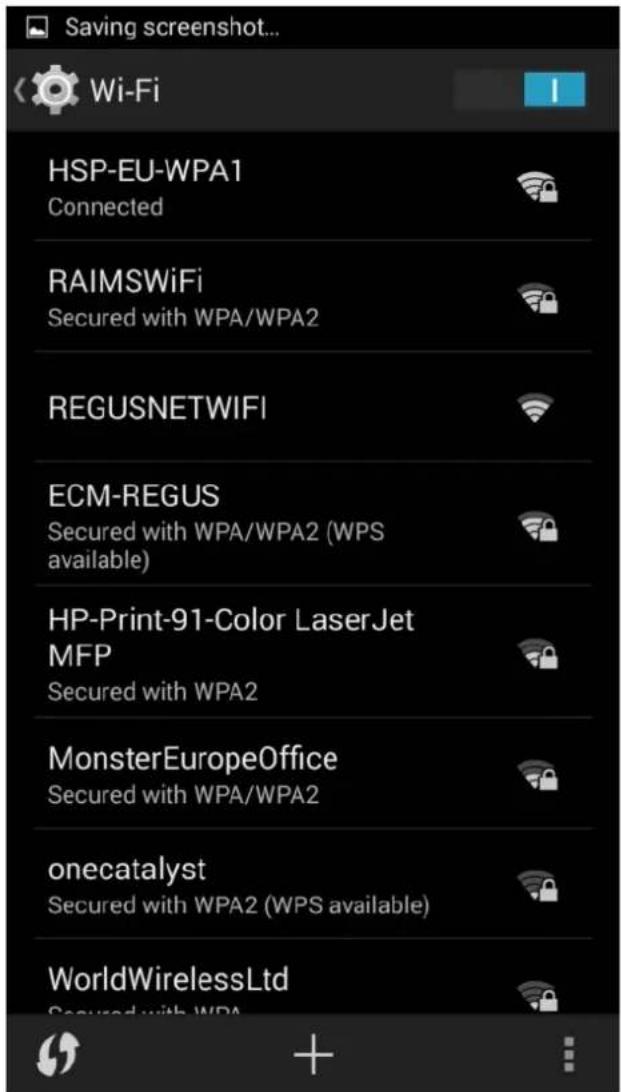
Turn on Wi-Fi. The device should now search for available networks within range and displays the searched Access Point (AP) names on the right panel.
NOTE:
Tap the Wi-Fi switch button to turn Wi-Fi on or off.
- The Wi-Fi icon showing indicates Wi-Fi is turned off.
-
The Wi-Fi icon showing indicates Wi-Fi is turned on.
-
Tap an access point name that you want to connect to. If the selected access point is protected by a password, the device will prompt for the password.
- If prompted, enter the password to connect to the AP.
NOTE:
- The password entry is required only when connecting to the AP for the first time.
- To make the Wi-Fi password is visible while typing it, select the "Show password" checkbox.
6. Tap Connect.
NOTE:
- Some public places offer free wireless internet access. This means no password is required to establish the connection.
- For secured networks, you may need to enter several parameters to complete the settings. If you are not sure about the parameters, please contact your local Internet Service Provider (ISP).
- This tablet PC keeps track and recognizes Wi-Fi networks that have been connected before. Once Wi-Fi is turned on and a known connection is detected, the device automatically connects to that network.
2.6 Make a Call
- In standby mode or in main menu, press the dial icon to enter dial panel, press numbers on screen to enter phone number.
- Press dial icon at bottom and select SIM card to dial the number.
- Press end icon to cancel the call.
NOTE:
- You need to unlock the phone if the keypad and screen are locked.
- You can make calls through call log, contacts, and messages.
- During a call, press the Volume keys to adjust the volume.
- Your phone supports intelligent dial. When input numbers, the phone will search the corresponding contact in phonebook or call log.
2.7 Answer a Call
When there is an incoming call, you can:
- Drag the icon towards the right to answer the call.
- Drag the icon towards the left to decline the call.
- Drag the icon upwards to reject the call with SMS.
2.8 Emergency Service
You can call emergency service number without a SIM card. Different countries use different emergency numbers, please query your network operator.
2.9 Input Method
Your phone has the built-in input method. In edit mode, long press to show Input options and set input languages and Google keyboard settings.
Input English
Press the on-screen keypad to enter corresponding letters.
Input Number
Press “?123”, you can input numbers directly by press the number icons. Long press the letter icons with number, or after long press, slide finger to the numbers to input.
Input Symbol
Press “?123” to enter symbol list. Press the desired symbol to input.
Long press “....” to show symbol list, slide finger to the desired symbol to input.
3. Connecting PC and Data Transmission
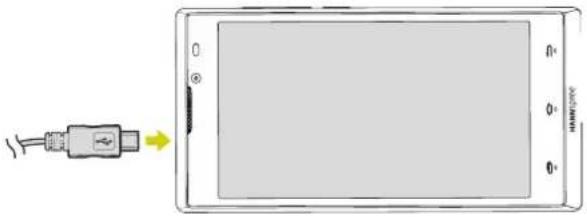
Use the supplied USB cable, connect the device to the PC to transfer data or power up the device.
natural_image
Diagram showing a cable connector pointing to a screen, with no visible text or symbolsNOTE: USB charging only supports 500mA. If the battery power is lower than 4%, the device cannot be turned on.
To enter the USB disk mode to copy and delete files to and from the PC, do the following:
- When the operation menu appears, tap "USB connected": Tap "Turn on USB storage" on the prompting window, then enter the data transmission state.
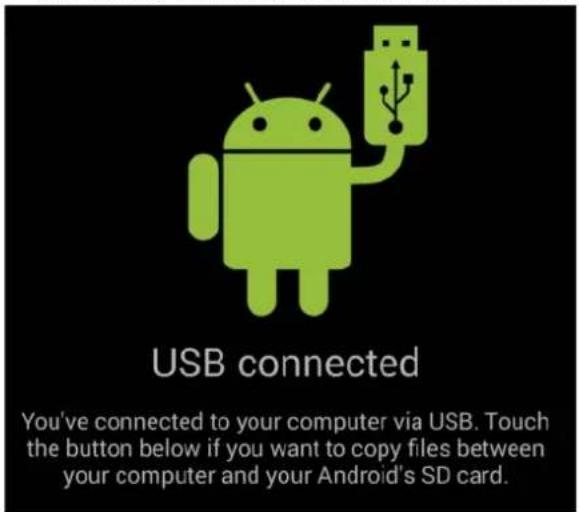
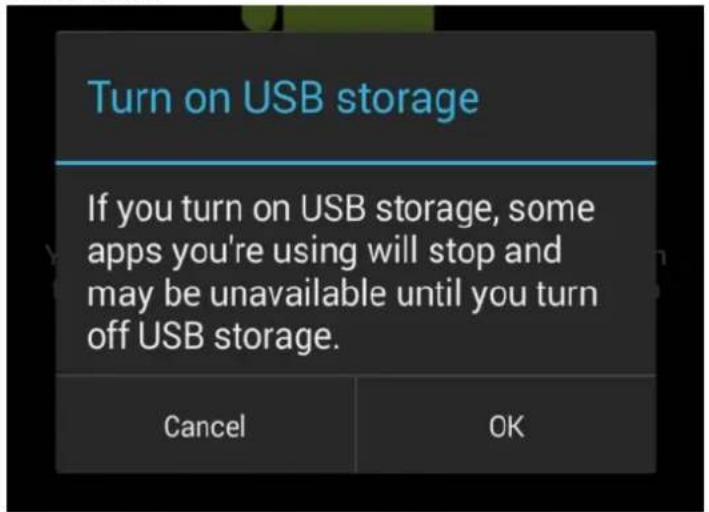
- Locate the Phone storage card and SD card (if the card has been plugged in) in My Computer list.
- After data transmission, tap "Turn off USB storage", and then it will quit the data transmission state.
NOTE: Before quitting the state of data transmission, if the system of U disk or card is NTFS, please safety remove them from the PC, then click "close USB storage device", otherwise the file may be missing.

3.1 Use Micro SD card
After connecting the device to a PC, you will find two removable disks, the front one is the built-in-memory disk, the other one is the Micro SD card disk. If there is no card plugged in, the second disk cannot be opened. The device supports up to 32GB Micro SD card expansion.
Plug-in: insert the memory card with the side with prints facing to the front of the device. Push the memory card into the card slot until it is firmly seated. Now the device can access the data and play the files stored on the card.
Plug-out: push Micro SD card slightly inward to release it from the slot. Then gently pull it out of the card slot.
4. The Android Interface
4.1 Home Screen
After powering on the device, the locked Home screen is displayed. After you unlock the screen, the main Home screen appears.
The following describes the main touch screen area and some tips on how to use the touch screen.
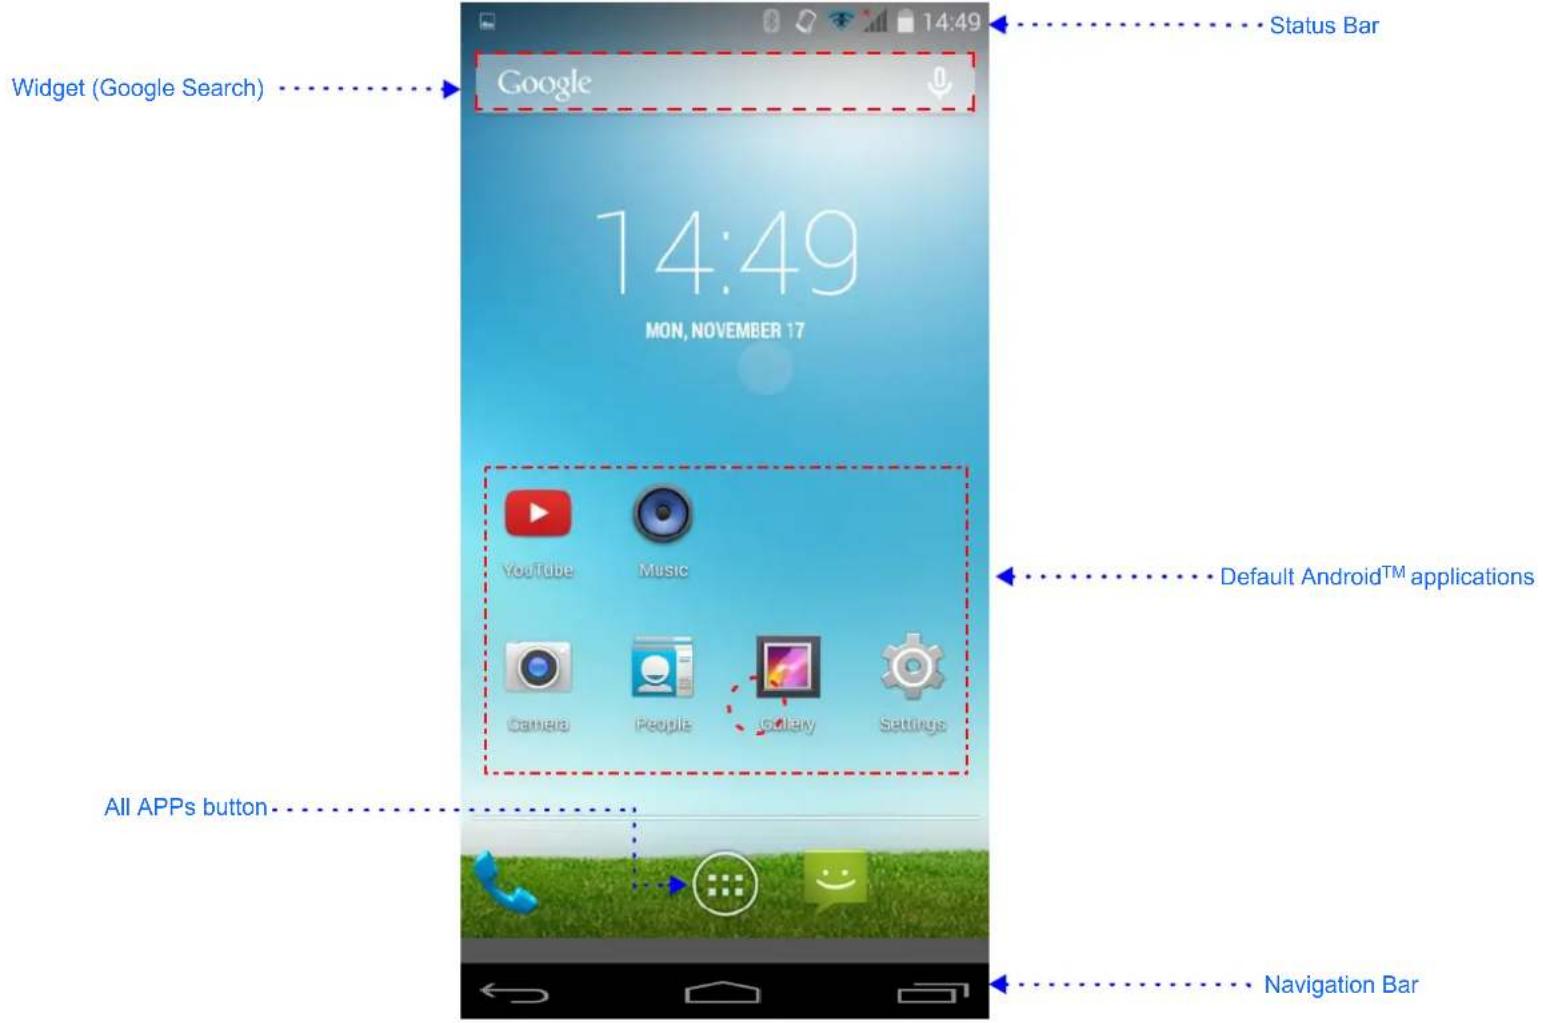
Item Description
Status Bar Display notifications and system icons such as Wi-Fi connection status, battery power/ battery charging status, current time, and USB connection status.
Widget (Google Search) Enter the text you want to search in the search box.
Default Android ^TM applications
Tap an icon to open the corresponding application.
All APPs button (

Tap to reveal all Android ^TM applications and widgets installed on your Tablet PC.
- To create shortcuts on the Home screen, refer to "Managing Applications" on page 13.
• To install other application, search and download it from Play Store.
| Item Description | ||
| Navigation Bar | Back key (←) | Tap to return to the previous screen. |
| Home key (☐) | Tap to return to the Home screen. | |
| Shortcut key (☐) | Tap to view the most-recently accessed applications. • To access the specific application, tap directly on the icon. • To remove a thumbnail from the list, swipe the icon upward or downward. | |
| Screenshot key ([☐]) | Tap to capture the snapshot of the current screen. | |
4.2 Extended Home Screen
You can navigate between different Home screen panels by swiping your finger to the left or right. Tap to return to the main Home screen.

natural_image
Abstract dark blue gradient background with scattered purple circular spots (no text or symbols)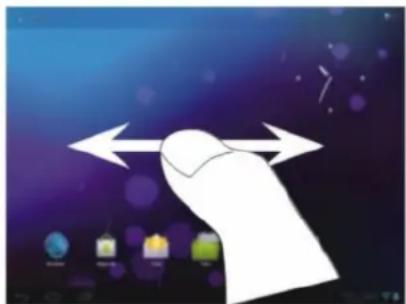
natural_image
White hand icon pointing left with double arrows against a dark blue background (no text or symbols)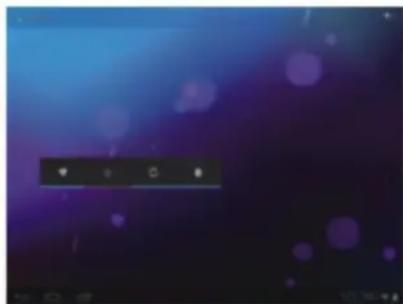
natural_image
Abstract digital interface with purple gradient background and floating purple dots (no text or symbols)4.3 Customizing the Home Screen Panels
You can customize the wallpaper of your Home screen with the default wallpaper or with the photos stored in the device. Long press the touch-screen, the Wallpaper option menu will appear on the screen. Then choose the desired option from the list.
4.4 Managing Applications
- Add application shortcuts: Long press an application icon from the application menu and then drag the icon to the Home screen to add as shortcut.
- Moving application shortcuts: Long press an application icon in the Home screen until the positioning gridlines appear. Then drag the icon to the desired location and release your finger.
- Remove application shortcuts: Long press an application icon in the Home screen, the top of the screen displays. Drag the application icon towards until it turns red, and then release your finger to remove the application shortcut.
4.5 Creating Application Folders
You can combined several similar applications in a folder. Simply, drag one application icon over another application icon and release it. A folder is automatically created.
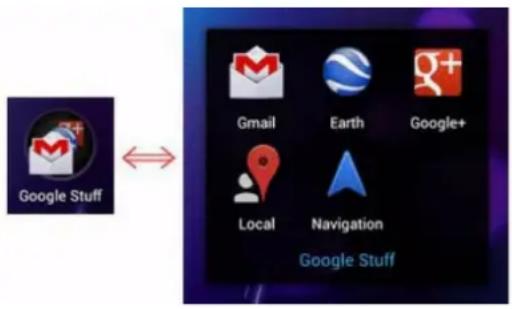
flowchart
graph LR
    A["Google Stuff"] <--> B["Gmail"]
    A <--> C["Earth"]
    A <--> D["Google+"]
    A <--> E["Local"]
    A <--> F["Navigation"]
    A <--> G["Google Stuff"]
5. Applications
5.1 Music
Select Music in App Drawer to play imported music files.
5.2 Video
Select Video in App Drawer to play your videos.
5.3 Browser
You can use your phone to access websites. To browse the internet, you must subscribe to the data service from your service provider and configure your phone's relevant settings. Or have a valid WIFI connection.
5.4 Calculator
The calculator can execute simple calculations. Slide the screen toward left or right, you can change the calculator to a Basic panel or Advanced panel.
5.5 Calendar
In the calendar, you can check schedules for current month. You can edit or delete the entries.
5.6 Camera
You can take photos or record video any time. Press the Camera icon in App Drawer to enter. Press the shoot icon or record icon to take photos or record video.
Press the icons on screen or Option Key to set parameters of the camera or recorder.
5.7 Clock
In the clock interface, you can check time and date. Press the alarm icon, you can add new alarm clock or turn on/off existed alarm clocks.
In the clock interface, you can also press the icons to enter count down function, stopwatch, cities settings, night mode, and settings.
5.8 Email
You can use Email to send and receive emails.
Setup Email Account
According to the tips on screen to input email address and password, and press Next. You can press Manual setup to setup server information manually.
Check Emails
In the Inbox, select the email you want to check to enter. Press the icons at bottom to delete, reply, add to favorite.
Compose and Send Email
In the Inbox, press new mail icon to create new email. Input receiver email address, subject, and content, and then press send icon to send the email.
Delete Accounts
In the Inbox, press Option Key to select Settings. Select the account you want to delete and then
5.9 File Manager
In this App, you can check folders and files stored on phone or memory card.
5.10 FM Radio
Select FM Radio in the main menu and plug earphone to enter. Press Power icon to turn on/off the radio. Press setting icon and select Search, the phone will search available channels and save in the list. Press the icons on screen to operate the FM radio.
5.11 Gallery
You can use Gallery to view or manage images and videos.
5.12 Google Service
Availability of Google applications, services, and features may vary according to your country or carrier. Please follow local laws and regulations to use them.
When you turn on your mobile phone for the first time, touch a Google services such as Gmail, Google, Google Settings, Google+, Hangouts, Local, Maps, Navigation, Photos, Play Books, Play Games, Play Movies & TV, Play Music, Play Newsstand, Play Store, or YouTube, and you may be prompted to sign in to your Google account.
Ensure that your mobile phone has an active data connection (3G/GPRS) before you sign in to your Google account.
5.13 Messaging
Select Messaging in the main menu or standby mode to enter. Select new message icon at left down corner to create new SMS or MMS and send.
- Enter receiver's number or add number from contacts.
- Press "Type text message" to input message content.
- If you want to send picture or video file, press + to add pictures, videos and audio. The message will shift to multimedia message automatically.
- Press send icon and select SIM card to send the message.
5.14 People
In the People, press search icon to search contact, press add new icon to add new contact. Press Option Key to enter:
Delete Contact
Select one or more contacts, then press OK to delete all selected contacts.
Contacts to Display
Select All contacts, contacts on SIM card, Phone, or Customize the contacts to display.
Import/Export
Copy the contacts from SIM cards, phone, phone storage or SD card, and then select location to copy.
Accounts
Select whether to Auto-sync app data.
Settings
To set display options in this menu.
Share Visible Contacts
Select one or more contacts, press OK and then share the selected contacts via Bluetooth, Email, etc.
Memory Query
To check the memory of phone and SIM cards.
Join Contacts
To joint the same contact.
5.15 Phone
Press the icons on screen to input numbers in sequence. After inputting numbers, press dial icon and select SIM card to dial. Press the icons at the top screen, you can enter call log or contact.
5.16 Settings
In this menu, you can select and set SIM management, WLAN, Bluetooth, Data usage, under More... - Airplane mode, VPN, Tethering & portable hotspot, Mobile networks, and USB Internet.
- Choose Wi-Fi or Wireless & Networks.
You see a list of Wi-Fi networks.
-
Choose a wireless network from the list.
-
If prompted, type the network password.
Putting a check mark in the box by the Show Password option makes it easier to type a long, complex network password.
- Touch the Connect button.
You should be immediately connected to the network. If not, try the password again.
Bluetooth
The phone supports Bluetooth. It can exchange information between devices including mobile phones wirelessly. Through Bluetooth, you can sync phone and computer, exchange data with other Bluetooth devices, and can connect to Bluetooth earphone.
In Menu/Settings/WIRELESS & NETWORKS, slide the icon beside Bluetooth toward right to turn on Bluetooth and set. Before transmit data, you may need to match with other Bluetooth devices.
Device
In this menu, you can set audio profiles and display, check storage and battery, and manage apps.
Personal
- Location Access
Select whether to allow Apps access to your phone location, switch ON/OFF GPS, or find location using WLAN & mobile network location.
- Security
You can select SCREEN SECURITY, ENCRYPTION, SIM CARD LOCK, PASSWORDS, DEVICE ADMINISTRATION, and CREDENTIAL STORAGE in this menu.
- Language & Input
Select and set Language, keyboard & input methods, speech, and mouse/trackpad.
- Backup & Reset
In this menu, select Factory data reset and then select Reset phone to clear all data in the phone memory. Select DRM reset to delete all DRM licenses. Select Back up my data to back up app data, WLAN passwords, and other settings to Google servers.
Accounts
- Add Account
To add new account of Corporate, Email, or Google.
System
- Date & Time
Set time and date for the phone.
- Accessibility
To set accessibility functions for the phone.
- About Phone
To check status, legal information, etc.
5.17 SIM Toolkit
If your SIM card supports STK (SIM Tool Kit) function, the phone can display different first level menu according to different STK card. This function needs the network provider support. If user finds STK function can't operate normally, please contact the network provider. If the network provider does not support this function, we do not claim any responsibility whatsoever.
5.18 Sound Recorder
The phone supports sound record function, recorded files will be saved with different quality.
5.19 Voice Search
You can use the voice search function to search via Google search. Before using this function, you need to check the network settings.
5.20 Wireless Input Device
Your phone supports wireless input device. You need to turn on Bluetooth and select to add new device.
5.21 Widget
In the widgets list, you can select desired widget to add to idle screen.
6. Basic and Maintenance
6.1 Battery Care
- Your device is powered by a rechargeable battery. When the power is weak, please charge the battery. In order to extend the lifespan of the battery, use all the battery's power before recharging.
- Unplug the charger from the electrical plug and the device when not in use. Do not leave the battery connected to a charger more than a week. Overcharging may shorten its lifespan.
- Extreme temperatures can affect the ability of your battery to charge. Battery needs the fit temperature. If the surrounding temperature is over 40^ , the battery cannot be charged.
- Use the battery only for its intended purpose. Never use any charger or battery that is damaged.
- Do not short-circuit the battery. Accidental short-circuiting can occur when a metallic object such as a coin, clip, or pen causes direct connection of the positive (+) and negative (-) terminals of the battery. (These look like metal strips on the battery.) Short-circuiting the terminals may damage the battery or the connecting object.
- Leaving the battery in hot or cold places, such as in a closed car in summer or a freezer in winter conditions, will reduce the capacity and lifetime of the battery. Always try to keep the battery between 59°F and 77°F (15°C and 25°C). A hot or cold battery may not function temporarily, even when the battery is fully charged.
- Battery performance is particularly limited in temperatures below freezing.
- Do not dispose of batteries in a fire! Dispose of batteries according to local regulations. Please recycle when possible. Cellphones are not considered household waste.
6.2 Smart Phone Maintenance
- Keep the device dry. Precipitation, humidity, and all types of liquids or moisture can contain minerals that will corrode electronic circuits. If your device does get wet, remove the battery and allow the device to dry completely before replacing it.
- Do not use or store the device in dusty, dirty areas. Its moving parts and electronic components can be damaged.
- Do not store the device in hot areas. High temperatures can shorten the life of electronic devices, damage batteries, and warp or melt certain plastics.
- Do not store the device in cold areas. When the device returns to its normal temperature, moisture can form inside the device and damage electronic circuit boards.
- Do not attempt to open the device other than as instructed in this guide.
- Do not drop, knock, or shake the device. Rough handling can break internal circuit boards and fine mechanics.
- Do not use harsh chemicals, cleaning solvents, or strong detergents to clean the device.
- Do not paint the device Paint can clog the moving parts and prevent proper operation.
- Use only the supplied or an approved replacement antenna. Unauthorized antennas, modifications, or attachments could damage the device and may violate regulations governing radio devices.
All of the above suggestions apply to your device, battery, charger, or any enhancement. If any device is not working properly, take it to the nearest authorized service facility for service.
Caution: The manufacturer assumes no responsibility for the consequences of the users does not comply with the above suggestions or misuse of the phone.
7. System Firmware Update
Android devices automatically receive over-the-air (OTA) updates whenever the manufacturer of the phone rolls out official updates. To manually check for a firmware update, select Settings > About phone > System Update.
8. Technical Information
Weight: 150g (with battery)
Size: 145mm*72.8mm*8.5mm
Battery capacity: 2000mAh
Networks: GSM 850/900/1800/1900MHz
WCDMA 900/2100MHz
The actual situation of the phone using is related to local environment, SIM card and way of use.
NOTE:
- If the version of user manual upgrades, we will do not notice. The company has the final interpretation of the user manual.
The pictures in user manual only for reference, please take your actual phone as the standard.
9. Appendix
9.1 Warranty and Service
Warranty and service and related information, please refer to, the warranty card or Hannspree support site below for further help and support with your device including how to install software updates if available and much more:
http://www.hannspree.com/
9.2 FAQ
FAQ (Frequent Asked Questions) please refer to the below link:
http://www.hannspree.com/
9.3 Resetting Your Device to Factory Defaults
If you need to reset your device to the factory default settings for any reason please follow the process below:
WARNING!!!
Please be aware any information currently on the device will be permanently erased by following this procedure.
- From the Home screen, tap Settings.
- Tap Backup & Reset.
- Select Factory data reset.
- Leave the erase SD card option unchecked and tap Reset tablet.
- Tap erase everything.
The unit will now reset itself back to factory reset and any previous information/data will have been permanently erased.
Some of the applications downloaded from Play Store or produced by other third party are not fully supported on this device.
- Basic and Maintenance....23
- System Firmware Update....24
- Technical Information ....24
- Appendix ......25
- Control information
- Recycling information
- Preventing Hearing Loss
- DO NOT throw the battery in municipal waste.
- Declaration
- First Time Using Your Phone Hannspree \*One-Click Install Application
- Warnings
- TURN ON SAFELY
- ROAD SAFETY
- INTERFERENCE
- TURN OFF IN HOSPITALS
- TURN OFF ON AIRCRAFTS
- TURN OFF WHEN REFUELING
- DO NOT MODIFY
- BATTERIES
- WATER-RESISTANCE
- BACKUP COPIES
- CONNECTING TO OTHER DEVICES
- Your Phone
- Product Overview
- No. Item No. Item
- Button and Softkey Descriptions
- Start to Use
- Install Memory Card, SIM Card, and Battery
- SIM Card
- NOTE:
- IMPORTANT NOTE:
- Remove Memory Card, SIM Card, and Battery
- Charge the Battery
- Use Touch Screen
- Connecting to a Wi-Fi network
- Tap Connect.
- Make a Call
- Answer a Call
- Emergency Service
- Input Method
- Input English
- Input Number
- Input Symbol
- Connecting PC and Data Transmission
- Use Micro SD card
- The Android Interface
- Home Screen
- Item Description
- Extended Home Screen
- Customizing the Home Screen Panels
- Managing Applications
- Creating Application Folders
- Applications
- Music
- Video
- Browser
- Calculator
- Calendar
- Camera
- Clock
- Setup Email Account
- Check Emails
- Compose and Send Email
- Delete Accounts
- File Manager
- FM Radio
- Gallery
- Google Service
- Messaging
- People
- Delete Contact
- Contacts to Display
- Import/Export
- Accounts
- Settings
- Share Visible Contacts
- Memory Query
- Join Contacts
- Phone
- Settings
- Bluetooth
- Device
- Personal
- - Location Access
- - Security
- - Language & Input
- - Backup & Reset
- - Add Account
- System
- - Date & Time
- - Accessibility
- - About Phone
- SIM Toolkit
- Sound Recorder
- Voice Search
- Wireless Input Device
- Widget
- Basic and Maintenance
- Battery Care
- Smart Phone Maintenance
- System Firmware Update
- Technical Information
- Appendix
- Warranty and Service
- FAQ
- Resetting Your Device to Factory Defaults
- WARNING!!!
Brand : HANNSPREE
Model : SN50MC1
Category : Smartphone